canTurnaroundAimCancel (Very Hard)
Canceling an aim angle while crouching and turning around, to wiggle to the right.
Strats ()
|
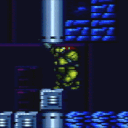
Shinespark from the end of the entry runway, just past the down slope. Samus will crash into the last set of blocks preventing access to the opposite door. Entrance condition: {
"comeInShinecharged": {
"framesRequired": 37
}
}
Requires: "canShinechargeMovement"
"canHorizontalShinespark"
{
"shinespark": {
"frames": 70
}
}
{
"or": [
"Morph",
"canTunnelCrawl",
"canTurnaroundAimCancel",
{
"and": [
"canTwoTileSqueeze",
"canXRayTurnaround"
]
}
]
}
|
|
From: 3
Bottom Left Door
To: 6
Junction (Right of Tunnel)
Notable: true 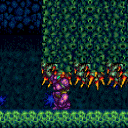
Wiggle through the thorns. It is a long wiggle with a lot of thorn hits. Requires: "canTurnaroundAimCancel"
"canBeVeryPatient"
{
"thornHits": 180
}
|
|
From: 5
Junction The Left End of Morph Tube
To: 4
Item (Through the Pipe)
It takes Morph or a Tunnel Crawl to get back out. Requires: "canTurnaroundAimCancel" |
|
This strat makes it possible to squeeze through Morphless with just 2 supers. Requires: {
"ammo": {
"type": "Super",
"count": 2
}
}
{
"or": [
"canXRayTurnaround",
"canTurnaroundAimCancel"
]
}
|
|
From: 1
Left Door
To: 1
Left Door
Notable: true Use SpeedBooster to construct a structure for Moondancing that has 1 chest height block and 1 head height block to the right of it and no other Speed blocks. Crystal Flash below the lower block, exactly pixel aligned with its right side, to standup and then begin Moondancing. After Samus sinks through the floor tiles, use Grapple to return to a standing position and count an additional 145 moonfalls. Then use Grapple to return to a crouch and wiggle right and Turn-Around Aim Cancel to escape to the right. Finally, use SpeedBooster if needed to break the remaining Speed blocks and reach the door. Requires: "h_canCrystalFlash" "canTrickyJump" "canTurnaroundAimCancel" "canTemporaryBlue" "canExtendedMoondance" "canSpeedball" Exit condition: {
"leaveWithStoredFallSpeed": {
"fallSpeedInTiles": 2
}
}
|
|
From: 1
Left Door
To: 1
Left Door
Notable: true Use SpeedBooster to construct a structure for Moondancing that has 1 chest height block and 1 head height block to the right of it and no other Speed blocks. Crystal Flash below the lower block, exactly pixel aligned with its right side, to standup and then begin Moondancing. After Samus sinks through the bottom tile, it is possible to use Grapple to return to a crouch and wiggle right and then Turn-Around Aim Cancel to escape to the right. Without Grapple, count to 174 Moonfalls and delicately Moonfall so as to remain crouched and then wiggle to the right. Finally, use SpeedBooster if needed to break the remaining Speed blocks and reach the door. Requires: "h_canCrystalFlash" "canTrickyJump" "canTurnaroundAimCancel" "canTemporaryBlue" "canMoondance" "canSpeedball" Exit condition: {
"leaveWithStoredFallSpeed": {
"fallSpeedInTiles": 1
}
}
|
|
From: 1
Left Door
To: 2
Right Door
Notable: true Use SpeedBooster to construct a structure for Moondancing that has 1 chest height block and 1 head height block to the right of it and no other Speed blocks. Crystal Flash below the lower block, exactly pixel aligned with its right side, to standup and then begin Moondancing. After Samus sinks through the floor tiles, use Grapple to return to a standing position and count an additional 145 moonfalls. Then use Grapple to return to a crouch and wiggle right and Turn-Around Aim Cancel to escape to the right. Finally, use SpeedBooster if needed to break the remaining Speed blocks and reach the door. Requires: "h_canCrystalFlash" "canTrickyJump" "canTurnaroundAimCancel" "canTemporaryBlue" "canExtendedMoondance" "canSpeedball" Exit condition: {
"leaveWithStoredFallSpeed": {
"fallSpeedInTiles": 2
}
}
|
|
From: 1
Left Door
To: 2
Right Door
Notable: true Use SpeedBooster to construct a structure for Moondancing that has 1 chest height block and 1 head height block to the right of it and no other Speed blocks. Crystal Flash below the lower block, exactly pixel aligned with its right side, to standup and then begin Moondancing. After Samus sinks through the bottom tile, it is possible to use Grapple to return to a crouch and wiggle right and then Turn-Around Aim Cancel to escape to the right. Without Grapple, count to 174 Moonfalls and delicately Moonfall so as to remain crouched and then wiggle to the right. Finally, use SpeedBooster if needed to break the remaining Speed blocks and reach the door. Requires: "h_canCrystalFlash" "canTrickyJump" "canTurnaroundAimCancel" "canTemporaryBlue" "canMoondance" "canSpeedball" Exit condition: {
"leaveWithStoredFallSpeed": {
"fallSpeedInTiles": 1
}
}
|
|
From: 2
Far Left Door
To: 2
Far Left Door
Notable: true 
Use SpeedBooster to construct a structure for Moondancing that has 1 chest height block and 1 head height block to the right of it and no other Speed blocks. Crystal Flash below the lower block, exactly pixel aligned with its right side, to standup and then begin Moondancing. After Samus sinks through the floor tiles, use Grapple to return to a standing position and count an additional 145 moonfalls. Then use Grapple to return to a crouch and wiggle right and Turn-Around Aim Cancel to escape to the right. Finally, use SpeedBooster if needed to break the remaining Speed blocks and reach the door. Requires: "h_heatProof" "SpeedBooster" "h_canCrystalFlash" "canTrickyJump" "canTurnaroundAimCancel" "canTemporaryBlue" "canExtendedMoondance" "canSpeedball" Exit condition: {
"leaveWithStoredFallSpeed": {
"fallSpeedInTiles": 2
}
}
|
|
From: 2
Far Left Door
To: 2
Far Left Door
Notable: true
Use SpeedBooster to construct a structure for Moondancing that has 1 chest height block and 1 head height block to the right of it and no other Speed blocks. Crystal Flash below the lower block, exactly pixel aligned with its right side, to standup and then begin Moondancing. After Samus sinks through the bottom tile, it is possible to use Grapple to return to a crouch and wiggle right and then Turn-Around Aim Cancel to escape to the right. Without Grapple, count to 174 Moonfalls and delicately Moonfall so as to remain crouched and then wiggle to the right. Finally, use SpeedBooster if needed to break the remaining Speed blocks and reach the door. Requires: "h_heatProof" "SpeedBooster" "h_canCrystalFlash" "canTrickyJump" "canTurnaroundAimCancel" "canTemporaryBlue" "canMoondance" "canSpeedball" Exit condition: {
"leaveWithStoredFallSpeed": {
"fallSpeedInTiles": 1
}
}
|
|
From: 1
Top Left Door
To: 1
Top Left Door
Notable: true 
Use SpeedBooster to construct a structure for Moondancing that has 1 chest height block and 1 head height block to the right of it and no other Speed blocks. Crystal Flash below the lower block, exactly pixel aligned with its right side, to standup and then begin Moondancing. After Samus sinks through the floor tiles, use Grapple to return to a standing position and count an additional 145 moonfalls. Then use Grapple to return to a crouch and wiggle right and Turn-Around Aim Cancel to escape to the right. Finally, shortcharge to break the remaining Speed blocks and reach the door. Requires: "h_canCrystalFlash"
"canTrickyJump"
"canTurnaroundAimCancel"
"canTemporaryBlue"
"canExtendedMoondance"
"canSpeedball"
"Grapple"
{
"canShineCharge": {
"openEnd": 0,
"usedTiles": 16,
"steepDownTiles": 4
}
}
Exit condition: {
"leaveWithStoredFallSpeed": {
"fallSpeedInTiles": 2
}
}
|
|
From: 1
Top Left Door
To: 1
Top Left Door
Notable: true
Use SpeedBooster to construct a structure for Moondancing that has 1 chest height block and 1 head height block to the right of it and no other Speed blocks. Crystal Flash below the lower block, exactly pixel aligned with its right side, to standup and then begin Moondancing. After Samus sinks through the bottom tile, it is possible to use Grapple to return to a crouch and wiggle right and then Turn-Around Aim Cancel to escape to the right. Without Grapple, count to 174 Moonfalls and delicately Moonfall so as to remain crouched and then wiggle to the right. Finally, shortcharge to break the remaining Speed blocks and reach the door. Requires: "h_canCrystalFlash"
"canTrickyJump"
"canTurnaroundAimCancel"
"canTemporaryBlue"
"canSpeedball"
"canMoondance"
{
"canShineCharge": {
"openEnd": 0,
"usedTiles": 16,
"steepDownTiles": 4
}
}
Exit condition: {
"leaveWithStoredFallSpeed": {
"fallSpeedInTiles": 1
}
}
|
|
From: 1
Top Left Door
To: 5
Top Right Item (locked)
Notable: true
Use SpeedBooster to construct a structure for Moondancing that has 1 chest height block and 1 head height block to the right of it and no other Speed blocks. Crystal Flash below the lower block, exactly pixel aligned with its right side, to standup and then begin Moondancing. After Samus sinks through the bottom tile, it is possible to use Grapple to return to a crouch and wiggle right and then Turn-Around Aim Cancel to escape to the right. Without Grapple, count to 174 Moonfalls and delicately Moonfall so as to remain crouched and then wiggle to the right. The Camera will not follow Samus after clipping. Requires: "h_canCrystalFlash"
"canTrickyJump"
"canTurnaroundAimCancel"
"canTemporaryBlue"
"canMoondance"
"canSpeedball"
{
"canShineCharge": {
"openEnd": 0,
"usedTiles": 16,
"steepDownTiles": 4
}
}
Clears obstacles: B |
|
From: 6
Junction Between Items
To: 4
Top Left - Right Item
Requires: "canTurnaroundAimCancel" |
|
Run from or Roll under the pirate lazers. The Pirates will also not shoot if they come on screen while Samus is crouched. Requires: {
"or": [
"HiJump",
"canWalljump",
"h_canFly"
]
}
{
  "or": [
    {
      "and": [
        "canDodgeWhileShooting",
        "canCameraManip",
        {
          "or": [
            "Plasma",
            {
              "and": [
                "h_hasBeamUpgrade",
                "canBePatient"
              ]
            },
            "canBeVeryPatient"
          ]
        }
      ]
    },
    {
      "and": [
        {
          "or": [
            "canBePatient",
            {
              "enemyDamage": {
                "enemy": "Tourian Space Pirate (all)",
                "type": "contact",
                "hits": 1
              }
            }
          ]
        },
        {
          "or": [
            "Morph",
            "canTurnaroundAimCancel",
            "canXRayTurnaround"
          ]
        }
      ]
    }
  ]
}
|
|
Run from or Roll under the pirate lazers. The Pirates will also not shoot if they come on screen while Samus is crouched. Requires: {
"or": [
{
"and": [
"canDodgeWhileShooting",
"canCameraManip",
{
"or": [
"Plasma",
{
"and": [
"h_hasBeamUpgrade",
"canBePatient"
]
},
"canBeVeryPatient"
]
}
]
},
{
"and": [
{
"or": [
"canBePatient",
{
"enemyDamage": {
"enemy": "Tourian Space Pirate (all)",
"type": "contact",
"hits": 1
}
}
]
},
{
"or": [
"Morph",
"canTurnaroundAimCancel",
"canXRayTurnaround"
]
}
]
}
]
}
|