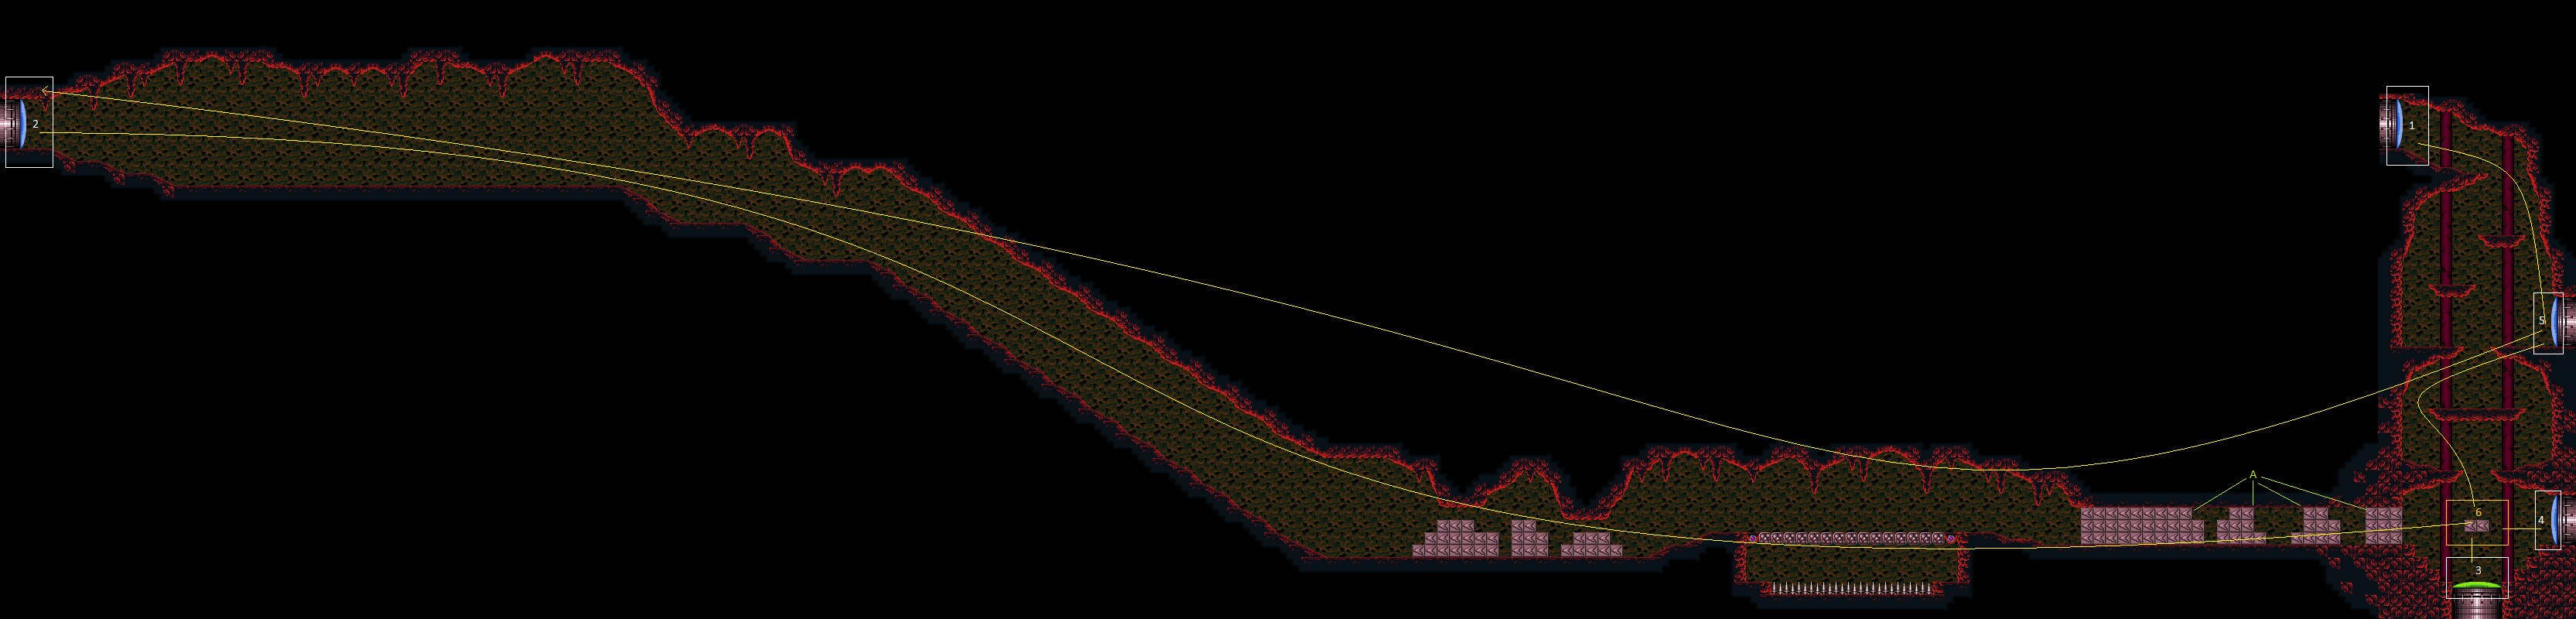
Crocomire Speedway
Room ID: 120
|
From: 1
Top of the Shaft Left Door
To: 1
Top of the Shaft Left Door
Exit condition: {
"leaveWithRunway": {
"length": 8,
"openEnd": 1,
"gentleUpTiles": 4
}
}
|
|
From: 1
Top of the Shaft Left Door
To: 1
Top of the Shaft Left Door
Requires: "h_canHeatedCrystalFlash" |
|
Requires: {
"heatFrames": 130
}
|
|
From: 1
Top of the Shaft Left Door
To: 5
Top Right Door
Entrance condition: {
"comeInShinecharging": {
"length": 0,
"openEnd": 1
}
}
Requires: {
"heatFrames": 140
}
Exit condition: {
"leaveShinecharged": {
"framesRemaining": 70
}
}
|
|
Exit condition: {
"leaveWithRunway": {
"length": 45,
"openEnd": 1,
"steepUpTiles": 6
}
}
|
|
Requires: "h_canHeatedCrystalFlash" |
|
From: 2
Far Left Door
To: 2
Far Left Door
Notable: true 
Use SpeedBooster to construct a structure for Moondancing that has 1 chest height block and 1 head height block to the right of it and no other Speed blocks. Crystal Flash below the lower block, exactly pixel aligned with its right side, to standup and then begin Moondancing. After Samus sinks through the bottom tile, it is possible to use Grapple to return to a crouch and wiggle right and then Turn-Around Aim Cancel to escape to the right. Without Grapple, count to 174 Moonfalls and delicately Moonfall so as to remain crouched and then wiggle to the right. Finally, use SpeedBooster if needed to break the remaining Speed blocks and reach the door. Requires: "h_heatProof" "SpeedBooster" "h_canCrystalFlash" "canTrickyJump" "canTurnaroundAimCancel" "canTemporaryBlue" "canMoondance" "canSpeedball" Exit condition: {
"leaveWithStoredFallSpeed": {
"fallSpeedInTiles": 1
}
}
|
|
From: 2
Far Left Door
To: 2
Far Left Door
Notable: true
Use SpeedBooster to construct a structure for Moondancing that has 1 chest height block and 1 head height block to the right of it and no other Speed blocks. Crystal Flash below the lower block, exactly pixel aligned with its right side, to standup and then begin Moondancing. After Samus sinks through the floor tiles, use Grapple to return to a standing position and count an additional 145 moonfalls. Then use Grapple to return to a crouch and wiggle right and Turn-Around Aim Cancel to escape to the right. Finally, use SpeedBooster if needed to break the remaining Speed blocks and reach the door. Requires: "h_heatProof" "SpeedBooster" "h_canCrystalFlash" "canTrickyJump" "canTurnaroundAimCancel" "canTemporaryBlue" "canExtendedMoondance" "canSpeedball" Exit condition: {
"leaveWithStoredFallSpeed": {
"fallSpeedInTiles": 2
}
}
|
|
Requires: "SpeedBooster"
{
"heatFrames": 380
}
Clears obstacles: A |
|
From: 3
Bottom Door
To: 2
Far Left Door
Notable: true 
Spark left through the speed blocks through Croc Speedway. Then run to the right and back to get speed to go through the rest. The shinespark expects to kill the crumble bridge pirate, to be safe. Entrance condition: {
"comeInShinecharged": {
"framesRequired": 35
},
"comesThroughToilet": "any"
}
Requires: "canShinechargeMovement"
"canHorizontalShinespark"
{
"shinespark": {
"frames": 86,
"excessFrames": 10
}
}
{
"heatFrames": 700
}
Clears obstacles: A |
|
Exit condition: {
"leaveNormally": {}
}
|
|
Entrance condition: {
"comeInWithSpark": {},
"comesThroughToilet": "any"
}
Requires: {
"shinespark": {
"frames": 6,
"excessFrames": 6
}
}
{
"heatFrames": 120
}
|
|
Requires: "h_canHeatedCrystalFlash" |
|
Requires: {
"heatFrames": 50
}
|
|
Entrance condition: {
"comeInWithSpark": {},
"comesThroughToilet": "no"
}
Requires: {
"shinespark": {
"frames": 6
}
}
{
"heatFrames": 85
}
|
|
From: 4
Bottom Right Door
To: 2
Far Left Door
Notable: true 
Break the Speedway Speed blocks by jumping over the gap with speed and continuing through the room in mockball. Entrance condition: {
"comeInShinecharging": {
"length": 1,
"openEnd": 0
}
}
Requires: "canSpeedball"
{
"heatFrames": 570
}
Clears obstacles: A |
|
From: 4
Bottom Right Door
To: 2
Far Left Door
Notable: true
Spark left through the speed blocks through Croc Speedway. Then run to the right and back to get speed to go through the rest. The shinespark expects to kill the crumble bridge pirate, to be safe. Entrance condition: {
"comeInShinecharging": {
"length": 1,
"openEnd": 1
}
}
Requires: "canShinechargeMovement"
"canHorizontalShinespark"
{
"shinespark": {
"frames": 84,
"excessFrames": 10
}
}
{
"heatFrames": 760
}
Clears obstacles: A |
|
From: 4
Bottom Right Door
To: 2
Far Left Door
Notable: true
Spark left through the speed blocks through Croc Speedway. Then run to the right and back to get speed to go through the rest. The shinespark expects to kill the crumble bridge pirate, to be safe. Entrance condition: {
"comeInWithSpark": {
"position": "bottom"
}
}
Requires: {
"shinespark": {
"frames": 94,
"excessFrames": 10
}
}
{
"heatFrames": 700
}
Clears obstacles: A |
|
Entrance condition: {
"comeInWithGrappleTeleport": {
"blockPositions": [
[
5,
3
],
[
7,
2
]
]
}
}
Requires: {
"heatFrames": 50
}
|
|
From: 4
Bottom Right Door
To: 2
Far Left Door
Entrance condition: {
"comeInWithGrappleTeleport": {
"blockPositions": [
[
3,
12
],
[
3,
13
]
]
}
}
Bypasses door shell: true |
|
From: 4
Bottom Right Door
To: 2
Far Left Door
Entrance condition: {
"comeInWithGrappleTeleport": {
"blockPositions": [
[
3,
12
]
]
}
}
Exit condition: {
"leaveWithGrappleTeleport": {
"blockPositions": [
[
3,
12
]
]
}
}
Bypasses door shell: true |
|
From: 4
Bottom Right Door
To: 2
Far Left Door
Entrance condition: {
"comeInWithGrappleTeleport": {
"blockPositions": [
[
3,
13
]
]
}
}
Exit condition: {
"leaveWithGrappleTeleport": {
"blockPositions": [
[
3,
13
]
]
}
}
Bypasses door shell: true |
|
From: 4
Bottom Right Door
To: 2
Far Left Door
Exit the previous room with Samus in a standing pose (while grappled). After teleporting, press right to release Grapple while staying standing (not being forced into a crouch). Then X-ray climb to get up to the door transition, without needing to open the door. Entrance condition: {
"comeInWithGrappleTeleport": {
"blockPositions": [
[
2,
18
],
[
2,
19
],
[
2,
28
],
[
2,
29
]
]
}
}
Requires: "canXRayClimb"
{
"heatFrames": 1600
}
Bypasses door shell: true |
|
From: 4
Bottom Right Door
To: 2
Far Left Door
Exit the previous room with Samus in a standing pose (while grappled). After teleporting, press right to release Grapple while staying standing (not being forced into a crouch). Then X-ray climb to get up to the door transition, without needing to open the door. Entrance condition: {
"comeInWithGrappleTeleport": {
"blockPositions": [
[
2,
34
]
]
}
}
Requires: "canXRayClimb"
{
"heatFrames": 2800
}
Bypasses door shell: true |
|
Exit condition: {
"leaveWithRunway": {
"length": 2,
"openEnd": 1
}
}
|
|
Requires: "h_canHeatedCrystalFlash" |
|
Requires: {
"heatFrames": 50
}
|
|
Requires: {
"heatFrames": 160
}
|
|
From: 5
Top Right Door
To: 1
Top of the Shaft Left Door
Requires: {
"heatFrames": 130
}
Exit condition: {
"leaveWithRunway": {
"length": 8,
"openEnd": 1,
"gentleUpTiles": 4
}
}
|
|
From: 5
Top Right Door
To: 1
Top of the Shaft Left Door
Requires: "canTrickyJump"
{
"or": [
"HiJump",
"canPreciseWalljump"
]
}
{
"heatFrames": 140
}
|
|
From: 5
Top Right Door
To: 1
Top of the Shaft Left Door
Entrance condition: {
"comeInShinecharging": {
"length": 5,
"openEnd": 0
}
}
Requires: {
"heatFrames": 160
}
Exit condition: {
"leaveShinecharged": {
"framesRemaining": 30
}
}
|
|
From: 5
Top Right Door
To: 2
Far Left Door
Notable: true
The timer is tight, so run through the Cacatacs and mid-air spark left through the speed blocks. Then run to the right and back to get speed to go through the rest. The shinespark expects to kill the crumble bridge pirate, to be safe. Entrance condition: {
"comeInShinecharging": {
"length": 5,
"openEnd": 1
}
}
Requires: "canShinechargeMovementTricky"
"canTrickyJump"
"canMidairShinespark"
{
"enemyDamage": {
"enemy": "Cacatac",
"type": "spike",
"hits": 1
}
}
{
"shinespark": {
"frames": 92,
"excessFrames": 10
}
}
{
"heatFrames": 900
}
Clears obstacles: A |
|
Entrance condition: {
"comeInWithGrappleTeleport": {
"blockPositions": [
[
5,
3
],
[
7,
2
]
]
}
}
Requires: {
"heatFrames": 50
}
|
|
From: 5
Top Right Door
To: 2
Far Left Door
Entrance condition: {
"comeInWithGrappleTeleport": {
"blockPositions": [
[
3,
12
],
[
3,
13
]
]
}
}
Bypasses door shell: true |
|
From: 5
Top Right Door
To: 2
Far Left Door
Entrance condition: {
"comeInWithGrappleTeleport": {
"blockPositions": [
[
3,
12
]
]
}
}
Exit condition: {
"leaveWithGrappleTeleport": {
"blockPositions": [
[
3,
12
]
]
}
}
Bypasses door shell: true |
|
From: 5
Top Right Door
To: 2
Far Left Door
Entrance condition: {
"comeInWithGrappleTeleport": {
"blockPositions": [
[
3,
13
]
]
}
}
Exit condition: {
"leaveWithGrappleTeleport": {
"blockPositions": [
[
3,
13
]
]
}
}
Bypasses door shell: true |
|
From: 5
Top Right Door
To: 2
Far Left Door
Exit the previous room with Samus in a standing pose (while grappled). After teleporting, press right to release Grapple while staying standing (not being forced into a crouch). Then X-ray climb to get up to the door transition, without needing to open the door. Entrance condition: {
"comeInWithGrappleTeleport": {
"blockPositions": [
[
2,
18
],
[
2,
19
],
[
2,
28
],
[
2,
29
]
]
}
}
Requires: "canXRayClimb"
{
"heatFrames": 1600
}
Bypasses door shell: true |
|
From: 5
Top Right Door
To: 2
Far Left Door
Exit the previous room with Samus in a standing pose (while grappled). After teleporting, press right to release Grapple while staying standing (not being forced into a crouch). Then X-ray climb to get up to the door transition, without needing to open the door. Entrance condition: {
"comeInWithGrappleTeleport": {
"blockPositions": [
[
2,
34
]
]
}
}
Requires: "canXRayClimb"
{
"heatFrames": 2800
}
Bypasses door shell: true |
|
Exit condition: {
"leaveWithRunway": {
"length": 6,
"openEnd": 1
}
}
|
|
Requires: "h_heatProof"
{
"resetRoom": {
"nodes": [
1,
3,
4,
5
],
"mustStayPut": false
}
}
{
"refill": [
"Energy",
"Super"
]
}
|
|
Requires: "h_canHeatedCrystalFlash" |
|
Requires: {
"heatFrames": 215
}
|
|
Requires: {
"obstaclesCleared": [
"A"
]
}
"SpeedBooster"
{
"heatFrames": 500
}
|
|
Requires: {
"heatFrames": 50
}
|
|
Enabled by coming in from the left and breaking the speed blocks on the way, or coming in charged and opening the path to the left. Requires: "h_heatProof"
{
"obstaclesCleared": [
"A"
]
}
{
"canShineCharge": {
"usedTiles": 33,
"openEnd": 2
}
}
Exit condition: {
"leaveShinecharged": {
"framesRemaining": 100
}
}
|
|
Requires: {
"heatFrames": 50
}
|
|
From: 6
Bottom Right Junction
To: 4
Bottom Right Door
Enabled by coming in from the left and breaking the speed blocks on the way, or coming in charged and opening the path to the left. Requires: "h_heatProof"
{
"obstaclesCleared": [
"A"
]
}
"canShinechargeMovement"
{
"canShineCharge": {
"usedTiles": 33,
"openEnd": 2
}
}
Exit condition: {
"leaveShinecharged": {
"framesRemaining": 60
}
}
|
|
Requires: {
"heatFrames": 300
}
|
|
From: 6
Bottom Right Junction
To: 5
Top Right Door
Move very quickly to bring a shinespark from the speedway up to the Save Room door. Preclear the Cacatacs, and it may help to not run while platforming if HiJump is not available. Requires: "h_heatProof"
{
"obstaclesCleared": [
"A"
]
}
"canShinechargeMovementTricky"
{
"canShineCharge": {
"usedTiles": 33,
"openEnd": 2
}
}
{
"shinespark": {
"frames": 12
}
}
Exit condition: {
"leaveWithSpark": {}
}
|
{
"$schema": "../../../schema/m3-room.schema.json",
"id": 120,
"name": "Crocomire Speedway",
"area": "Norfair",
"subarea": "Upper",
"subsubarea": "West",
"playable": true,
"roomAddress": "0x7A923",
"roomEnvironments": [
{
"heated": true
}
],
"nodes": [
{
"id": 1,
"name": "Top of the Shaft Left Door",
"nodeType": "door",
"nodeSubType": "blue",
"nodeAddress": "0x00193ae",
"doorEnvironments": [
{
"physics": "air"
}
]
},
{
"id": 2,
"name": "Far Left Door",
"nodeType": "door",
"nodeSubType": "blue",
"nodeAddress": "0x00193a2",
"doorEnvironments": [
{
"physics": "air"
}
]
},
{
"id": 3,
"name": "Bottom Door",
"nodeType": "door",
"nodeSubType": "green",
"nodeAddress": "0x00193d2",
"doorEnvironments": [
{
"physics": "air"
}
],
"locks": [
{
"name": "Crocomire Speedway Green Lock (to Crocomire)",
"lockType": "coloredDoor",
"unlockStrats": [
{
"name": "Base",
"notable": false,
"requires": [
"h_canOpenGreenDoors"
]
}
]
}
]
},
{
"id": 4,
"name": "Bottom Right Door",
"nodeType": "door",
"nodeSubType": "blue",
"nodeAddress": "0x00193c6",
"doorEnvironments": [
{
"physics": "air"
}
]
},
{
"id": 5,
"name": "Top Right Door",
"nodeType": "door",
"nodeSubType": "blue",
"nodeAddress": "0x00193ba",
"doorEnvironments": [
{
"physics": "air"
}
]
},
{
"id": 6,
"name": "Bottom Right Junction",
"nodeType": "junction",
"nodeSubType": "junction"
}
],
"obstacles": [
{
"id": "A",
"name": "Right-side Speed Blocks",
"obstacleType": "inanimate",
"note": "The speed blocks on the right side of the speedway. Breaking those is needed for some leaveShinecharged strats."
}
],
"enemies": [
{
"id": "e1",
"groupName": "Crocomire Speedway Left Pirates",
"enemyName": "Red Space Pirate (standing)",
"quantity": 3,
"homeNodes": [
2
],
"dropRequires": [
"h_heatProof"
]
},
{
"id": "e2",
"groupName": "Crocomire Speedway Multiviolas",
"enemyName": "Multiviola",
"quantity": 4,
"homeNodes": [
2
],
"dropRequires": [
"h_heatProof"
]
},
{
"id": "e3",
"groupName": "Crocomire Speedway Right Pirates",
"enemyName": "Red Space Pirate (standing)",
"quantity": 2,
"betweenNodes": [
2,
6
],
"dropRequires": [
"h_heatProof"
]
},
{
"id": "e4",
"groupName": "Crocomire Speedway Cacatacs",
"enemyName": "Cacatac",
"quantity": 2,
"betweenNodes": [
5,
6
],
"dropRequires": [
"h_heatProof"
]
}
],
"reusableRoomwideNotable": [
{
"name": "Croc Speedway Reverse Spark",
"note": "Spark left through the speed blocks through Croc Speedway. Then run to the right and back to get speed to go through the rest."
},
{
"name": "Croc Speedway Speed Block Moondance",
"note": [
"Use SpeedBooster to construct a structure for Moondancing that has 2 top blocks intact, 2 middle blocks removed, and the bottom left block intact but the bottom right block removed.",
"Clear the other unused Speed blocks and enemies.",
"Crystal Flash inside the middle hole to standup and then begin Moondancing.",
"After Samus sinks through the bottom tile, it is possible to wiggle right and then Turn-Around Aim Cancel to escape to the right."
]
}
],
"links": [
{
"from": 1,
"to": [
{
"id": 1
},
{
"id": 5
}
]
},
{
"from": 2,
"to": [
{
"id": 2,
"devNote": [
"FIXME: It is possible to stored fall speed clip through the door at 3 by using a fast run speed turnaround to slide down the stairs."
]
},
{
"id": 6
}
]
},
{
"from": 3,
"to": [
{
"id": 2
},
{
"id": 3
},
{
"id": 6
}
]
},
{
"from": 4,
"to": [
{
"id": 2
},
{
"id": 4
},
{
"id": 6
}
]
},
{
"from": 5,
"to": [
{
"id": 1
},
{
"id": 2
},
{
"id": 5
},
{
"id": 6
}
]
},
{
"from": 6,
"to": [
{
"id": 2
},
{
"id": 3
},
{
"id": 4
},
{
"id": 5
}
]
}
],
"strats": [
{
"link": [
1,
1
],
"name": "Leave with Runway",
"requires": [],
"exitCondition": {
"leaveWithRunway": {
"length": 8,
"openEnd": 1,
"gentleUpTiles": 4
}
}
},
{
"link": [
1,
1
],
"name": "Crystal Flash",
"requires": [
"h_canHeatedCrystalFlash"
]
},
{
"link": [
1,
5
],
"name": "Base",
"requires": [
{
  "heatFrames": 130
}
]
},
{
"link": [
1,
5
],
"name": "Leave Shinecharged",
"entranceCondition": {
"comeInShinecharging": {
"length": 0,
"openEnd": 1
}
},
"requires": [
{
  "heatFrames": 140
}
],
"exitCondition": {
"leaveShinecharged": {
"framesRemaining": 70
}
},
"unlocksDoors": [
{
"types": [
"super"
],
"requires": []
},
{
"types": [
"missiles",
"powerbomb"
],
"requires": [
"never"
]
}
],
"devNote": "FIXME: Entering with too little run speed causes Samus to 'trip', so the runway cannot reliably be used for short shortcharges."
},
{
"link": [
2,
2
],
"name": "Leave with Runway",
"requires": [],
"exitCondition": {
"leaveWithRunway": {
"length": 45,
"openEnd": 1,
"steepUpTiles": 6
}
},
"devNote": "45 tiles is roughly in front of the first red pirate."
},
{
"link": [
2,
2
],
"name": "Crystal Flash",
"requires": [
"h_canHeatedCrystalFlash"
]
},
{
"link": [
2,
2
],
"name": "Croc Speedway Speed Block Moondance (Leave with Stored Fall Speed)",
"notable": true,
"requires": [
"h_heatProof",
"SpeedBooster",
"h_canCrystalFlash",
"canTrickyJump",
"canTurnaroundAimCancel",
"canTemporaryBlue",
"canMoondance",
"canSpeedball"
],
"exitCondition": {
"leaveWithStoredFallSpeed": {
"fallSpeedInTiles": 1
}
},
"reusableRoomwideNotable": "Croc Speedway Speed Block Moondance",
"note": [
"Use SpeedBooster to construct a structure for Moondancing that has 1 chest height block and 1 head height block to the right of it and no other Speed blocks.",
"Crystal Flash below the lower block, exactly pixel aligned with its right side, to standup and then begin Moondancing.",
"After Samus sinks through the bottom tile, it is possible to use Grapple to return to a crouch and wiggle right and then Turn-Around Aim Cancel to escape to the right.",
"Without Grapple, count to 174 Moonfalls and delicately Moonfall so as to remain crouched and then wiggle to the right.",
"Finally, use SpeedBooster if needed to break the remaining Speed blocks and reach the door."
],
"devNote": "FIXME: R-Mode can be used instead of a Crystal Flash but that depends on having more Reserve Energy than Regular Energy."
},
{
"link": [
2,
2
],
"name": "Croc Speedway Speed Block Moondance (Leave with More Stored Fall Speed)",
"notable": true,
"requires": [
"h_heatProof",
"SpeedBooster",
"h_canCrystalFlash",
"canTrickyJump",
"canTurnaroundAimCancel",
"canTemporaryBlue",
"canExtendedMoondance",
"canSpeedball"
],
"exitCondition": {
"leaveWithStoredFallSpeed": {
"fallSpeedInTiles": 2
}
},
"reusableRoomwideNotable": "Croc Speedway Speed Block Moondance",
"note": [
"Use SpeedBooster to construct a structure for Moondancing that has 1 chest height block and 1 head height block to the right of it and no other Speed blocks.",
"Crystal Flash below the lower block, exactly pixel aligned with its right side, to standup and then begin Moondancing.",
"After Samus sinks through the floor tiles, use Grapple to return to a standing position and count an additional 145 moonfalls.",
"Then use Grapple to return to a crouch and wiggle right and Turn-Around Aim Cancel to escape to the right.",
"Finally, use SpeedBooster if needed to break the remaining Speed blocks and reach the door."
],
"devNote": "FIXME: R-Mode can be used instead of a Crystal Flash but that depends on having more Reserve Energy than Regular Energy."
},
{
"link": [
2,
6
],
"name": "Base",
"requires": [
"SpeedBooster",
{
"heatFrames": 380
}
],
"clearsObstacles": [
"A"
]
},
{
"link": [
3,
2
],
"name": "Croc Speedway Reverse Spark (From Croc Door)",
"notable": true,
"entranceCondition": {
"comeInShinecharged": {
"framesRequired": 35
},
"comesThroughToilet": "any"
},
"requires": [
"canShinechargeMovement",
"canHorizontalShinespark",
{
"shinespark": {
"frames": 86,
"excessFrames": 10
}
},
{
"heatFrames": 700
}
],
"clearsObstacles": [
"A"
],
"reusableRoomwideNotable": "Croc Speedway Reverse Spark",
"note": [
"Spark left through the speed blocks through Croc Speedway.",
"Then run to the right and back to get speed to go through the rest.",
"The shinespark expects to kill the crumble bridge pirate, to be safe."
]
},
{
"link": [
3,
3
],
"name": "Leave Normally",
"exitCondition": {
"leaveNormally": {}
},
"requires": []
},
{
"link": [
3,
3
],
"name": "Shinespark",
"entranceCondition": {
"comeInWithSpark": {},
"comesThroughToilet": "any"
},
"requires": [
{
"shinespark": {
"frames": 6,
"excessFrames": 6
}
},
{
"heatFrames": 120
}
],
"devNote": "This strat is not useful in-room, but can satisfy a strat in the room before with an exit shinespark."
},
{
"link": [
3,
3
],
"name": "Crystal Flash",
"requires": [
"h_canHeatedCrystalFlash"
]
},
{
"link": [
3,
6
],
"name": "Base",
"requires": [
{
  "heatFrames": 50
}
]
},
{
"link": [
3,
6
],
"name": "Shinespark",
"entranceCondition": {
"comeInWithSpark": {},
"comesThroughToilet": "no"
},
"requires": [
{
"shinespark": {
"frames": 6
}
},
{
"heatFrames": 85
}
],
"devNote": "This strat is not useful in-room, but can satisfy a strat in the room before with an exit shinespark."
},
{
"link": [
4,
2
],
"name": "Croc Speedway Reverse Speedball",
"notable": true,
"entranceCondition": {
"comeInShinecharging": {
"length": 1,
"openEnd": 0
}
},
"requires": [
"canSpeedball",
{
"heatFrames": 570
}
],
"clearsObstacles": [
"A"
],
"note": "Break the Speedway Speed blocks by jumping over the gap with speed and continuing through the room in mockball.",
"devNote": "FIXME: You can enter through 3 and speedball through the speedway."
},
{
"link": [
4,
2
],
"name": "Croc Speedway Reverse Spark Near SpeedBlocks",
"notable": true,
"entranceCondition": {
"comeInShinecharging": {
"length": 1,
"openEnd": 1
}
},
"requires": [
"canShinechargeMovement",
"canHorizontalShinespark",
{
"shinespark": {
"frames": 84,
"excessFrames": 10
}
},
{
"heatFrames": 760
}
],
"clearsObstacles": [
"A"
],
"reusableRoomwideNotable": "Croc Speedway Reverse Spark",
"note": [
"Spark left through the speed blocks through Croc Speedway.",
"Then run to the right and back to get speed to go through the rest.",
"The shinespark expects to kill the crumble bridge pirate, to be safe."
]
},
{
"link": [
4,
2
],
"name": "Croc Speedway Reverse Spark Through Door",
"notable": true,
"entranceCondition": {
"comeInWithSpark": {
"position": "bottom"
}
},
"requires": [
{
"shinespark": {
"frames": 94,
"excessFrames": 10
}
},
{
"heatFrames": 700
}
],
"clearsObstacles": [
"A"
],
"reusableRoomwideNotable": "Croc Speedway Reverse Spark",
"note": [
"Spark left through the speed blocks through Croc Speedway.",
"Then run to the right and back to get speed to go through the rest.",
"The shinespark expects to kill the crumble bridge pirate, to be safe."
]
},
{
"link": [
4,
2
],
"name": "Grapple Teleport",
"entranceCondition": {
"comeInWithGrappleTeleport": {
"blockPositions": [
[
5,
3
],
[
7,
2
]
]
}
},
"requires": [
{
  "heatFrames": 50
}
]
},
{
"link": [
4,
2
],
"name": "Grapple Teleport Door Lock Skip",
"entranceCondition": {
"comeInWithGrappleTeleport": {
"blockPositions": [
[
3,
12
],
[
3,
13
]
]
}
},
"requires": [],
"bypassesDoorShell": true
},
{
"link": [
4,
2
],
"name": "Carry Grapple Teleport (Top Position)",
"entranceCondition": {
"comeInWithGrappleTeleport": {
"blockPositions": [
[
3,
12
]
]
}
},
"requires": [],
"bypassesDoorShell": true,
"exitCondition": {
"leaveWithGrappleTeleport": {
"blockPositions": [
[
3,
12
]
]
}
}
},
{
"link": [
4,
2
],
"name": "Carry Grapple Teleport (Bottom Position)",
"entranceCondition": {
"comeInWithGrappleTeleport": {
"blockPositions": [
[
3,
13
]
]
}
},
"requires": [],
"bypassesDoorShell": true,
"exitCondition": {
"leaveWithGrappleTeleport": {
"blockPositions": [
[
3,
13
]
]
}
}
},
{
"link": [
4,
2
],
"name": "Grapple Teleport X-Ray Climb",
"entranceCondition": {
"comeInWithGrappleTeleport": {
"blockPositions": [
[
2,
18
],
[
2,
19
],
[
2,
28
],
[
2,
29
]
]
}
},
"requires": [
"canXRayClimb",
{
"heatFrames": 1600
}
],
"bypassesDoorShell": true,
"note": [
"Exit the previous room with Samus in a standing pose (while grappled).",
"After teleporting, press right to release Grapple while staying standing (not being forced into a crouch).",
"Then X-ray climb to get up to the door transition, without needing to open the door."
]
},
{
"link": [
4,
2
],
"name": "Grapple Teleport X-Ray Climb (Two Screens)",
"entranceCondition": {
"comeInWithGrappleTeleport": {
"blockPositions": [
[
2,
34
]
]
}
},
"requires": [
"canXRayClimb",
{
"heatFrames": 2800
}
],
"bypassesDoorShell": true,
"note": [
"Exit the previous room with Samus in a standing pose (while grappled).",
"After teleporting, press right to release Grapple while staying standing (not being forced into a crouch).",
"Then X-ray climb to get up to the door transition, without needing to open the door."
]
},
{
"link": [
4,
4
],
"name": "Leave with Runway",
"requires": [],
"exitCondition": {
"leaveWithRunway": {
"length": 2,
"openEnd": 1
}
}
},
{
"link": [
4,
4
],
"name": "Crystal Flash",
"requires": [
"h_canHeatedCrystalFlash"
]
},
{
"link": [
4,
6
],
"name": "Base",
"requires": [
{
  "heatFrames": 50
}
]
},
{
"link": [
5,
1
],
"name": "Base",
"requires": [
{
  "heatFrames": 160
}
],
"unlocksDoors": [
{
"types": [
"missiles"
],
"requires": [
{
"heatFrames": 30
}
]
},
{
"types": [
"super"
],
"requires": []
},
{
"types": [
"powerbomb"
],
"requires": [
{
"heatFrames": 70
}
]
}
]
},
{
"link": [
5,
1
],
"name": "Leave with Runway",
"requires": [
{
  "heatFrames": 130
}
],
"exitCondition": {
"leaveWithRunway": {
"length": 8,
"openEnd": 1,
"gentleUpTiles": 4
}
},
"unlocksDoors": [
{
"types": [
"missiles"
],
"requires": [
{
"heatFrames": 50
}
]
},
{
"types": [
"super"
],
"requires": []
},
{
"types": [
"powerbomb"
],
"requires": [
{
"heatFrames": 70
}
]
}
]
},
{
"link": [
5,
1
],
"name": "Right Side Climb",
"requires": [
"canTrickyJump",
{
"or": [
"HiJump",
"canPreciseWalljump"
]
},
{
"heatFrames": 140
}
],
"unlocksDoors": [
{
"types": [
"missiles"
],
"requires": [
{
"heatFrames": 30
}
]
},
{
"types": [
"super"
],
"requires": []
},
{
"types": [
"powerbomb"
],
"requires": [
{
"heatFrames": 70
}
]
}
]
},
{
"link": [
5,
1
],
"name": "Leave Shinecharged",
"entranceCondition": {
"comeInShinecharging": {
"length": 5,
"openEnd": 0
}
},
"requires": [
{
  "heatFrames": 160
}
],
"exitCondition": {
"leaveShinecharged": {
"framesRemaining": 30
}
},
"unlocksDoors": [
{
"types": [
"super"
],
"requires": []
},
{
"types": [
"missiles",
"powerbomb"
],
"requires": [
"never"
]
}
]
},
{
"link": [
5,
2
],
"name": "Croc Speedway Reverse Spark (From Save Room)",
"notable": true,
"entranceCondition": {
"comeInShinecharging": {
"length": 5,
"openEnd": 1
}
},
"requires": [
"canShinechargeMovementTricky",
"canTrickyJump",
"canMidairShinespark",
{
"enemyDamage": {
"enemy": "Cacatac",
"type": "spike",
"hits": 1
}
},
{
"shinespark": {
"frames": 92,
"excessFrames": 10
}
},
{
"heatFrames": 900
}
],
"clearsObstacles": [
"A"
],
"reusableRoomwideNotable": "Croc Speedway Reverse Spark",
"note": [
"The timer is tight, so run through the Cacatacs and mid-air spark left through the speed blocks.",
"Then run to the right and back to get speed to go through the rest.",
"The shinespark expects to kill the crumble bridge pirate, to be safe."
]
},
{
"link": [
5,
2
],
"name": "Grapple Teleport",
"entranceCondition": {
"comeInWithGrappleTeleport": {
"blockPositions": [
[
5,
3
],
[
7,
2
]
]
}
},
"requires": [
{
  "heatFrames": 50
}
]
},
{
"link": [
5,
2
],
"name": "Grapple Teleport Door Lock Skip",
"entranceCondition": {
"comeInWithGrappleTeleport": {
"blockPositions": [
[
3,
12
],
[
3,
13
]
]
}
},
"requires": [],
"bypassesDoorShell": true
},
{
"link": [
5,
2
],
"name": "Carry Grapple Teleport (Top Position)",
"entranceCondition": {
"comeInWithGrappleTeleport": {
"blockPositions": [
[
3,
12
]
]
}
},
"requires": [],
"bypassesDoorShell": true,
"exitCondition": {
"leaveWithGrappleTeleport": {
"blockPositions": [
[
3,
12
]
]
}
}
},
{
"link": [
5,
2
],
"name": "Carry Grapple Teleport (Bottom Position)",
"entranceCondition": {
"comeInWithGrappleTeleport": {
"blockPositions": [
[
3,
13
]
]
}
},
"requires": [],
"bypassesDoorShell": true,
"exitCondition": {
"leaveWithGrappleTeleport": {
"blockPositions": [
[
3,
13
]
]
}
}
},
{
"link": [
5,
2
],
"name": "Grapple Teleport X-Ray Climb",
"entranceCondition": {
"comeInWithGrappleTeleport": {
"blockPositions": [
[
2,
18
],
[
2,
19
],
[
2,
28
],
[
2,
29
]
]
}
},
"requires": [
"canXRayClimb",
{
"heatFrames": 1600
}
],
"bypassesDoorShell": true,
"note": [
"Exit the previous room with Samus in a standing pose (while grappled).",
"After teleporting, press right to release Grapple while staying standing (not being forced into a crouch).",
"Then X-ray climb to get up to the door transition, without needing to open the door."
]
},
{
"link": [
5,
2
],
"name": "Grapple Teleport X-Ray Climb (Two Screens)",
"entranceCondition": {
"comeInWithGrappleTeleport": {
"blockPositions": [
[
2,
34
]
]
}
},
"requires": [
"canXRayClimb",
{
"heatFrames": 2800
}
],
"bypassesDoorShell": true,
"note": [
"Exit the previous room with Samus in a standing pose (while grappled).",
"After teleporting, press right to release Grapple while staying standing (not being forced into a crouch).",
"Then X-ray climb to get up to the door transition, without needing to open the door."
]
},
{
"link": [
5,
5
],
"name": "Leave with Runway",
"requires": [],
"exitCondition": {
"leaveWithRunway": {
"length": 6,
"openEnd": 1
}
}
},
{
"link": [
5,
5
],
"name": "Cacatac Farm",
"requires": [
"h_heatProof",
{
"resetRoom": {
"nodes": [
1,
3,
4,
5
],
"mustStayPut": false
}
},
{
"refill": [
"Energy",
"Super"
]
}
]
},
{
"link": [
5,
5
],
"name": "Crystal Flash",
"requires": [
"h_canHeatedCrystalFlash"
]
},
{
"link": [
5,
6
],
"name": "Base",
"requires": [
{
  "heatFrames": 215
}
]
},
{
"link": [
6,
2
],
"name": "Base",
"requires": [
{
"obstaclesCleared": [
"A"
]
},
"SpeedBooster",
{
"heatFrames": 500
}
]
},
{
"link": [
6,
3
],
"name": "Base",
"requires": [
{
  "heatFrames": 50
}
],
"unlocksDoors": [
{
"types": [
"missiles"
],
"requires": [
{
  "heatFrames": 50
}
]
},
{
"types": [
"super"
],
"requires": []
},
{
"types": [
"powerbomb"
],
"requires": [
{
"heatFrames": 70
}
]
}
]
},
{
"link": [
6,
3
],
"name": "Leave Shinecharged",
"requires": [
"h_heatProof",
{
"obstaclesCleared": [
"A"
]
},
{
"canShineCharge": {
"usedTiles": 33,
"openEnd": 2
}
}
],
"exitCondition": {
"leaveShinecharged": {
"framesRemaining": 100
}
},
"unlocksDoors": [
{
"types": [
"ammo"
],
"requires": []
}
],
"note": "Enabled by coming in from the left and breaking the speed blocks on the way, or coming in charged and opening the path to the left."
},
{
"link": [
6,
4
],
"name": "Base",
"requires": [
{
"heatFrames": 50
}
],
"unlocksDoors": [
{
"types": [
"missiles"
],
"requires": [
{
"heatFrames": 30
}
]
},
{
"types": [
"super"
],
"requires": []
},
{
"types": [
"powerbomb"
],
"requires": [
{
"heatFrames": 70
}
]
}
]
},
{
"link": [
6,
4
],
"name": "Leave Shinecharged",
"requires": [
"h_heatProof",
{
"obstaclesCleared": [
"A"
]
},
"canShinechargeMovement",
{
"canShineCharge": {
"usedTiles": 33,
"openEnd": 2
}
}
],
"exitCondition": {
"leaveShinecharged": {
"framesRemaining": 60
}
},
"unlocksDoors": [
{
"types": [
"ammo"
],
"requires": []
}
],
"note": "Enabled by coming in from the left and breaking the speed blocks on the way, or coming in charged and opening the path to the left."
},
{
"link": [
6,
5
],
"name": "Base",
"requires": [
{
  "heatFrames": 300
}
]
},
{
"link": [
6,
5
],
"name": "Quick Platforming Leave Shinecharged",
"requires": [
"h_heatProof",
{
"obstaclesCleared": [
"A"
]
},
"canShinechargeMovementTricky",
{
"canShineCharge": {
"usedTiles": 33,
"openEnd": 2
}
},
{
"shinespark": {
"frames": 12
}
}
],
"exitCondition": {
"leaveWithSpark": {}
},
"unlocksDoors": [
{
"types": [
"ammo"
],
"requires": []
}
],
"note": [
"Move very quickly to bring a shinespark from the speedway up to the Save Room door.",
"Preclear the Cacatacs, and it may help to not run while platforming if HiJump is not available."
]
}
],
"devNote": [
"FIXME: A moonfall using Multiviolas might be possible to bypass the door shell below."
]
}