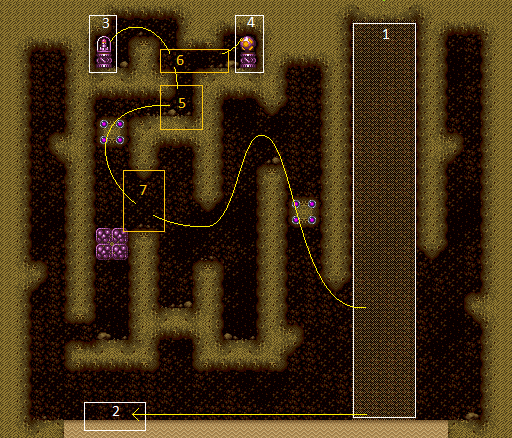
West Sand Hole
Room ID: 209
|
Requires: "h_canCrystalFlash" |
|
|
|
Entrance condition: {
"comeInWithGMode": {
"mode": "any",
"morphed": false
},
"comesThroughToilet": "any"
}
Exit condition: {
"leaveWithGMode": {
"morphed": false
}
}
|
|
Entrance condition: {
"comeInWithGMode": {
"mode": "any",
"morphed": true
},
"comesThroughToilet": "any"
}
Exit condition: {
"leaveWithGMode": {
"morphed": true
}
}
|
|
Land on the solid ground to the right and space jump or Springball over the sand. Requires: "Gravity"
{
"or": [
"SpaceJump",
{
"and": [
"h_canUseSpringBall",
"h_canJumpIntoIBJ"
]
}
]
}
|
|
Gravity with a good jump from the sand can reach the Solid Rock Maze region. Requires: "Gravity"
"canPlayInSand"
{
"or": [
"HiJump",
"canSpringBallJumpMidAir",
"canWalljump",
"h_canIBJ",
"canGravityJump"
]
}
|
|
From: 1
Top Sand Entrance
To: 7
Below Morph Tunnel Junction
Notable: true 
HiJump with a good jump from the sand can reach the Solid Rock Maze region. Use the sandfall if Samus gets stuck in the sand. Perform several wall jumps to climb up to the water level, then precise wall jumps to break free. Requires: "canSuitlessMaridia" "canPlayInSand" "HiJump" "canConsecutiveWalljump" "canPreciseWalljump" |
|
From: 1
Top Sand Entrance
To: 7
Below Morph Tunnel Junction
HiJump with a good jump from the sand can reach the Solid Rock Maze region. Use the sandfall if Samus gets stuck in the sand. Requires: "canSuitlessMaridia" "canPlayInSand" "HiJump" "canConsecutiveWalljump" "canSpaceJumpWaterBounce" |
|
From: 1
Top Sand Entrance
To: 7
Below Morph Tunnel Junction
HiJump with a good jump from the sand can reach the Solid Rock Maze region. Use the sandfall if Samus gets stuck in the sand. Bouncing on the sand as springball can reach the above maze by altering Samus' fall height, like by bouncing under the solid ledge before trying to jump up. Requires: "canSuitlessMaridia"
{
"or": [
"canPrepareForNextRoom",
"canPlayInSand"
]
}
"HiJump"
"h_canMaxHeightSpringBallJump"
|
|
From: 1
Top Sand Entrance
To: 7
Below Morph Tunnel Junction
Shoot the shot block before reaching the sand and then shinespark up. A diagonal ShineSpark will most likely not have any horizontal movement when performed from the sand. Entrance condition: {
"comeInShinecharged": {
"framesRequired": 85
},
"comesThroughToilet": "any"
}
Requires: "h_canNavigateUnderwater"
"canPlayInSand"
"canShinechargeMovementComplex"
"Wave"
{
"shinespark": {
"frames": 24,
"excessFrames": 5
}
}
|
|
From: 1
Top Sand Entrance
To: 7
Below Morph Tunnel Junction
Shoot the shot block on the descent then shinespark diagonally up before hitting the sand. Entrance condition: {
"comeInShinecharged": {
"framesRequired": 55
},
"comesThroughToilet": "any"
}
Requires: "h_canNavigateUnderwater"
"canMidairShinespark"
"canShinechargeMovementComplex"
"Wave"
"canPrepareForNextRoom"
{
"shinespark": {
"frames": 17
}
}
|
|
From: 1
Top Sand Entrance
To: 7
Below Morph Tunnel Junction
Break the shot block before reaching the sand and then shinespark up. Samus cannot shinespark after unmorphing until she touches the sand and this can be used to shoot upwards without sparking. A diagonal ShineSpark will most likely not have any horizontal movement when performed from the sand. Entrance condition: {
"comeInShinecharged": {
"framesRequired": 150
},
"comesThroughToilet": "any"
}
Requires: "h_canNavigateUnderwater"
"canPlayInSand"
"canShinechargeMovementTricky"
{
"or": [
"canResetFallSpeed",
{
"and": [
"canPrepareForNextRoom",
"h_canUsePowerBombs"
]
}
]
}
{
"shinespark": {
"frames": 24,
"excessFrames": 5
}
}
|
|
From: 1
Top Sand Entrance
To: 7
Below Morph Tunnel Junction
Break the shot block before reaching the sand and then shinespark up. A diagonal ShineSpark will most likely not have any horizontal movement when performed from the sand. Entrance condition: {
"comeInShinecharged": {
"framesRequired": 160
},
"comesThroughToilet": "any"
}
Requires: "h_canNavigateUnderwater"
"canPlayInSand"
"canHeroShot"
"canTrickyJump"
"canShinechargeMovementTricky"
{
"shinespark": {
"frames": 25,
"excessFrames": 4
}
}
|
|
From: 1
Top Sand Entrance
To: 7
Below Morph Tunnel Junction
Get to the left side of the room while avoiding the hole in the ground, jump up through the Morph tunnel. Jump up to the ledge with either Gravity, HiJump and a Crouch Jump Down Grab, or a maximum height Spring Ball Jump. Entrance condition: {
"comeInWithGMode": {
"mode": "any",
"morphed": false
},
"comesThroughToilet": "any"
}
Requires: "Morph"
{
"or": [
"Gravity",
{
"and": [
"canSuitlessMaridia",
"HiJump",
"h_canCrouchJumpDownGrab"
]
},
{
"and": [
"canSuitlessMaridia",
"h_canMaxHeightSpringBallJump"
]
}
]
}
|
|
Exit condition: {
"leaveNormally": {}
}
|
|
Requires: {
"or": [
"h_canBombThings",
"h_canUseSpringBall"
]
}
|
|
Requires: "h_canThreeTileJumpMorph" |
|
Requires: "Morph" |
|
Requires: "h_canUseSpringBall" |
|
Requires: "h_canIBJ" |
|
From: 5
Morph Tunnel Junction
To: 6
Junction Between Items
Requires: "h_canFourTileJumpMorph" |
|
Requires: "Morph" |
|
Requires: {
"or": [
"h_canBombThings",
"h_canUseSpringBall"
]
}
|
|
Requires: "h_canThreeTileJumpMorph" |
|
Requires: {
"or": [
"h_canBombThings",
"h_canUseSpringBall"
]
}
|
|
From: 6
Junction Between Items
To: 4
Top Left - Right Item
Requires: "canTurnaroundAimCancel" |
|
From: 6
Junction Between Items
To: 4
Top Left - Right Item
Requires: "canXRayTurnaround" |
|
Requires: "Morph" |
|
Requires: "Gravity" |
|
From: 7
Below Morph Tunnel Junction
To: 1
Top Sand Entrance
Requires: "canSuitlessMaridia"
"HiJump"
{
"or": [
"canPreciseWalljump",
"canSpaceJumpWaterBounce"
]
}
|
|
Requires: "Morph" |
|
Jump and morph directly into the morph tunnel. Using a walljump can help make the jump safer. Requires: "Morph"
"Gravity"
{
"or": [
"canWallJumpInstantMorph",
"canCarefulJump"
]
}
|
|
From: 7
Below Morph Tunnel Junction
To: 5
Morph Tunnel Junction
Springball bounce on top of the crumble blocks. Use either a bomb or HiJump to gain a little bit of extra height. Requires: "Gravity"
"h_canUseSpringBall"
{
"or": [
{
"and": [
"canJumpIntoIBJ",
"h_canBombThings"
]
},
{
"and": [
"canSpringBallBombJump",
"h_canBombThings"
]
},
"HiJump"
]
}
|
|
From: 7
Below Morph Tunnel Junction
To: 5
Morph Tunnel Junction
Escape the water with either HiJump or SpaceJump, then carefully jump and morph into the tunnel. Requires: "canSuitlessMaridia"
"Morph"
{
"or": [
{
"and": [
"HiJump",
"canPreciseWalljump",
"canWallJumpInstantMorph"
]
},
{
"and": [
"HiJump",
"canSpaceJumpWaterEscape"
]
},
{
"and": [
"canPreciseWalljump",
"canSpaceJumpWaterBounce"
]
}
]
}
|
|
From: 7
Below Morph Tunnel Junction
To: 5
Morph Tunnel Junction
Requires: "canSuitlessMaridia" "canTrickySpringBallJump" "canCarefulJump" |
|
From: 7
Below Morph Tunnel Junction
To: 5
Morph Tunnel Junction
Notable: true 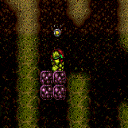
Jump off of the crumble blocks consecutively while placing a bomb on the water line and convert that into an IBJ to climb the West Sand Hole maze. Requires: "canSuitlessMaridia" "h_canJumpIntoIBJ" "canBombJumpWaterEscape" "canCrumbleJump" |
{
"$schema": "../../../schema/m3-room.schema.json",
"id": 209,
"name": "West Sand Hole",
"area": "Maridia",
"subarea": "Inner",
"subsubarea": "Pink",
"playable": true,
"roomAddress": "0x7D4EF",
"roomEnvironments": [
{
"heated": false
}
],
"nodes": [
{
"id": 1,
"name": "Top Sand Entrance",
"nodeType": "entrance",
"nodeSubType": "sandpit",
"nodeAddress": "0x001a6a8"
},
{
"id": 2,
"name": "Bottom Left Sand Exit",
"nodeType": "exit",
"nodeSubType": "sandpit",
"nodeAddress": "0x001a6b4"
},
{
"id": 3,
"name": "Top Left - Left Item",
"nodeType": "item",
"nodeSubType": "visible",
"nodeItem": "Missile",
"nodeAddress": "0x7C5DD"
},
{
"id": 4,
"name": "Top Left - Right Item",
"nodeType": "item",
"nodeSubType": "chozo",
"nodeItem": "ReserveTank",
"nodeAddress": "0x7C5E3"
},
{
"id": 5,
"name": "Morph Tunnel Junction",
"nodeType": "junction",
"nodeSubType": "junction"
},
{
"id": 6,
"name": "Junction Between Items",
"nodeType": "junction",
"nodeSubType": "junction",
"note": "Positioned in a tunnel above 5. You actually have to go back to 5 to move between the left and right portions of this junction, but access both ways has the same requirements."
},
{
"id": 7,
"name": "Below Morph Tunnel Junction",
"nodeType": "junction",
"nodeSubType": "junction",
"note": "Positioned below 5, next to the crumble blocks."
}
],
"enemies": [
{
"id": "e1",
"groupName": "West Sand Hole Boulders",
"enemyName": "Boulder",
"quantity": 2,
"homeNodes": [
7
]
}
],
"links": [
{
"from": 1,
"to": [
{
"id": 1
},
{
"id": 2
},
{
"id": 7
}
]
},
{
"from": 2,
"to": [
{
"id": 2
}
]
},
{
"from": 3,
"to": [
{
"id": 6
}
]
},
{
"from": 4,
"to": [
{
"id": 6
}
]
},
{
"from": 5,
"to": [
{
"id": 6
},
{
"id": 7
}
]
},
{
"from": 6,
"to": [
{
"id": 3
},
{
"id": 4
},
{
"id": 5
}
]
},
{
"from": 7,
"to": [
{
"id": 1
},
{
"id": 5
}
]
}
],
"strats": [
{
"link": [
1,
1
],
"name": "Crystal Flash",
"requires": [
"h_canCrystalFlash"
]
},
{
"link": [
1,
2
],
"name": "Base",
"requires": []
},
{
"link": [
1,
2
],
"name": "G-Mode",
"notable": false,
"entranceCondition": {
"comeInWithGMode": {
"mode": "any",
"morphed": false
},
"comesThroughToilet": "any"
},
"requires": [],
"exitCondition": {
"leaveWithGMode": {
"morphed": false
}
}
},
{
"link": [
1,
2
],
"name": "G-Mode Morph",
"notable": false,
"entranceCondition": {
"comeInWithGMode": {
"mode": "any",
"morphed": true
},
"comesThroughToilet": "any"
},
"requires": [],
"exitCondition": {
"leaveWithGMode": {
"morphed": true
}
}
},
{
"link": [
1,
7
],
"name": "Avoid Sand",
"requires": [
"Gravity",
{
"or": [
"SpaceJump",
{
"and": [
"h_canUseSpringBall",
"h_canJumpIntoIBJ"
]
}
]
}
],
"note": "Land on the solid ground to the right and space jump or Springball over the sand."
},
{
"link": [
1,
7
],
"name": "Gravity In Sand",
"requires": [
"Gravity",
"canPlayInSand",
{
"or": [
"HiJump",
"canSpringBallJumpMidAir",
"canWalljump",
"h_canIBJ",
"canGravityJump"
]
}
],
"note": "Gravity with a good jump from the sand can reach the Solid Rock Maze region."
},
{
"link": [
1,
7
],
"name": "West Sand Hole Suitless Wall Jump Break Free",
"notable": true,
"requires": [
"canSuitlessMaridia",
"canPlayInSand",
"HiJump",
"canConsecutiveWalljump",
"canPreciseWalljump"
],
"note": [
"HiJump with a good jump from the sand can reach the Solid Rock Maze region. Use the sandfall if Samus gets stuck in the sand.",
"Perform several wall jumps to climb up to the water level, then precise wall jumps to break free."
]
},
{
"link": [
1,
7
],
"name": "West Sand Hole Space Wall Climb",
"requires": [
"canSuitlessMaridia",
"canPlayInSand",
"HiJump",
"canConsecutiveWalljump",
"canSpaceJumpWaterBounce"
],
"note": "HiJump with a good jump from the sand can reach the Solid Rock Maze region. Use the sandfall if Samus gets stuck in the sand."
},
{
"link": [
1,
7
],
"name": "Suitless Dual Jump Assist",
"requires": [
"canSuitlessMaridia",
{
"or": [
"canPrepareForNextRoom",
"canPlayInSand"
]
},
"HiJump",
"h_canMaxHeightSpringBallJump"
],
"note": [
"HiJump with a good jump from the sand can reach the Solid Rock Maze region. Use the sandfall if Samus gets stuck in the sand.",
"Bouncing on the sand as springball can reach the above maze by altering Samus' fall height, like by bouncing under the solid ledge before trying to jump up."
],
"devNote": [
"Jumping through the sandfall is failable enough to require canPlayInSand",
"This is not a traditional max height spring ball jump, as it requires HiJump and crosses the waterline, but it requires similar inputs and precision."
]
},
{
"link": [
1,
7
],
"name": "Shinespark - Shoot the Block with Wave",
"entranceCondition": {
"comeInShinecharged": {
"framesRequired": 85
},
"comesThroughToilet": "any"
},
"requires": [
"h_canNavigateUnderwater",
"canPlayInSand",
"canShinechargeMovementComplex",
"Wave",
{
"shinespark": {
"frames": 24,
"excessFrames": 5
}
}
],
"note": [
"Shoot the shot block before reaching the sand and then shinespark up.",
"A diagonal ShineSpark will most likely not have any horizontal movement when performed from the sand."
],
"devNote": "Gravity has minimal effect on the required charge or spark frames."
},
{
"link": [
1,
7
],
"name": "Shinespark - Shoot the Block with Wave, Enter with Spin, Diagonal Spark",
"entranceCondition": {
"comeInShinecharged": {
"framesRequired": 55
},
"comesThroughToilet": "any"
},
"requires": [
"h_canNavigateUnderwater",
"canMidairShinespark",
"canShinechargeMovementComplex",
"Wave",
"canPrepareForNextRoom",
{
"shinespark": {
"frames": 17
}
}
],
"note": "Shoot the shot block on the descent then shinespark diagonally up before hitting the sand.",
"devNote": "Gravity has minimal effect on the required charge or spark frames."
},
{
"link": [
1,
7
],
"name": "Shinespark With Morph",
"entranceCondition": {
"comeInShinecharged": {
"framesRequired": 150
},
"comesThroughToilet": "any"
},
"requires": [
"h_canNavigateUnderwater",
"canPlayInSand",
"canShinechargeMovementTricky",
{
"or": [
"canResetFallSpeed",
{
"and": [
"canPrepareForNextRoom",
"h_canUsePowerBombs"
]
}
]
},
{
"shinespark": {
"frames": 24,
"excessFrames": 5
}
}
],
"note": [
"Break the shot block before reaching the sand and then shinespark up.",
"Samus cannot shinespark after unmorphing until she touches the sand and this can be used to shoot upwards without sparking.",
"A diagonal ShineSpark will most likely not have any horizontal movement when performed from the sand."
]
},
{
"link": [
1,
7
],
"name": "Shinespark With Hero Shot",
"entranceCondition": {
"comeInShinecharged": {
"framesRequired": 160
},
"comesThroughToilet": "any"
},
"requires": [
"h_canNavigateUnderwater",
"canPlayInSand",
"canHeroShot",
"canTrickyJump",
"canShinechargeMovementTricky",
{
"shinespark": {
"frames": 25,
"excessFrames": 4
}
}
],
"note": [
"Break the shot block before reaching the sand and then shinespark up.",
"A diagonal ShineSpark will most likely not have any horizontal movement when performed from the sand."
]
},
{
"link": [
1,
7
],
"name": "G-Mode Through Crumbles from the Left",
"entranceCondition": {
"comeInWithGMode": {
"mode": "any",
"morphed": false
},
"comesThroughToilet": "any"
},
"requires": [
"Morph",
{
"or": [
"Gravity",
{
"and": [
"canSuitlessMaridia",
"HiJump",
"h_canCrouchJumpDownGrab"
]
},
{
"and": [
"canSuitlessMaridia",
"h_canMaxHeightSpringBallJump"
]
}
]
}
],
"note": [
"Get to the left side of the room while avoiding the hole in the ground, jump up through the Morph tunnel.",
"Jump up to the ledge with either Gravity, HiJump and a Crouch Jump Down Grab, or a maximum height Spring Ball Jump."
]
},
{
"link": [
2,
2
],
"name": "Leave Normally",
"exitCondition": {
"leaveNormally": {}
},
"requires": []
},
{
"link": [
3,
6
],
"name": "Base",
"requires": [
{
  "or": [
    "h_canBombThings",
    "h_canUseSpringBall"
  ]
}
]
},
{
"link": [
3,
6
],
"name": "MidAir Morph",
"requires": [
"h_canThreeTileJumpMorph"
]
},
{
"link": [
4,
6
],
"name": "Base",
"requires": [
"Morph"
]
},
{
"link": [
5,
6
],
"name": "Base",
"requires": [
"h_canUseSpringBall"
]
},
{
"link": [
5,
6
],
"name": "IBJ",
"requires": [
"h_canIBJ"
]
},
{
"link": [
5,
6
],
"name": "West Sand Hole MidAir Morph",
"requires": [
"h_canFourTileJumpMorph"
]
},
{
"link": [
5,
7
],
"name": "Base",
"requires": [
"Morph"
]
},
{
"link": [
6,
3
],
"name": "Base",
"requires": [
{
  "or": [
    "h_canBombThings",
    "h_canUseSpringBall"
  ]
}
]
},
{
"link": [
6,
3
],
"name": "MidAir Morph",
"requires": [
"h_canThreeTileJumpMorph"
]
},
{
"link": [
6,
4
],
"name": "Base",
"requires": [
{
  "or": [
    "h_canBombThings",
    "h_canUseSpringBall"
  ]
}
]
},
{
"link": [
6,
4
],
"name": "Turnaround Aim Cancel",
"requires": [
"canTurnaroundAimCancel"
]
},
{
"link": [
6,
4
],
"name": "Xray Turnaround",
"requires": [
"canXRayTurnaround"
]
},
{
"link": [
6,
5
],
"name": "Base",
"requires": [
"Morph"
]
},
{
"link": [
7,
1
],
"name": "Base",
"requires": [
"Gravity"
]
},
{
"link": [
7,
1
],
"name": "Suitless Way Back",
"requires": [
"canSuitlessMaridia",
"HiJump",
{
"or": [
"canPreciseWalljump",
"canSpaceJumpWaterBounce"
]
}
]
},
{
"link": [
7,
1
],
"name": "Crumble Blocks",
"requires": [
"Morph"
]
},
{
"link": [
7,
5
],
"name": "Gravity",
"requires": [
"Morph",
"Gravity",
{
"or": [
"canWallJumpInstantMorph",
"canCarefulJump"
]
}
],
"note": "Jump and morph directly into the morph tunnel. Using a walljump can help make the jump safer."
},
{
"link": [
7,
5
],
"name": "Gravity with Springball",
"requires": [
"Gravity",
"h_canUseSpringBall",
{
"or": [
{
"and": [
"canJumpIntoIBJ",
"h_canBombThings"
]
},
{
"and": [
"canSpringBallBombJump",
"h_canBombThings"
]
},
"HiJump"
]
}
],
"note": "Springball bounce on top of the crumble blocks. Use either a bomb or HiJump to gain a little bit of extra height.",
"devNote": "The tech requirement is `catching yourself on an aerial bomb` which is what canJumpIntoIBJ adds to canIBJ. Only one bomb or powerbomb is needed."
},
{
"link": [
7,
5
],
"name": "Suitless Mid Air Morph",
"requires": [
"canSuitlessMaridia",
"Morph",
{
"or": [
{
"and": [
"HiJump",
"canPreciseWalljump",
"canWallJumpInstantMorph"
]
},
{
"and": [
"HiJump",
"canSpaceJumpWaterEscape"
]
},
{
"and": [
"canPreciseWalljump",
"canSpaceJumpWaterBounce"
]
}
]
}
],
"note": "Escape the water with either HiJump or SpaceJump, then carefully jump and morph into the tunnel."
},
{
"link": [
7,
5
],
"name": "Spring Ball Jump",
"requires": [
"canSuitlessMaridia",
"canTrickySpringBallJump",
"canCarefulJump"
]
},
{
"link": [
7,
5
],
"name": "West Sand Hole Bootless Suitless IBJ",
"notable": true,
"requires": [
"canSuitlessMaridia",
"h_canJumpIntoIBJ",
"canBombJumpWaterEscape",
"canCrumbleJump"
],
"note": "Jump off of the crumble blocks consecutively while placing a bomb on the water line and convert that into an IBJ to climb the West Sand Hole maze."
}
]
}