canJumpIntoCrystalFlashClip (Extreme)
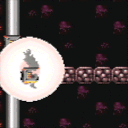
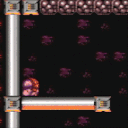
Setting up a Crystal Flash by jumping and morphing. Once to place the Power Bomb, then again to activate the Crystal Flash. This trick has a 1 frame window. If below crumble blocks, hold down to break them. Usually only useful when the crumble blocks do not respawn. If below a single solid tile, Grapple can be used to place Samus above it. To do this, select Grapple as Samus' energy refills then hold down and mash shoot, the earlier the better.
Dependencies: canCeilingClip, canCrystalFlash
Strats ()
|
Jump from below the respawning shot block into a Crystal Flash. Use Grappling Beam as the Crystal Flash finishes to be placed next to the door. Do not aim down as the Crystal Flash finishes. Requires: "h_heatProof" "h_canJumpIntoCrystalFlashClip" "Grapple" |
|
Use a Crystal Flash to clip through the ceiling, where there is one solid tile with 2 empty tiles above it. Use Grapple as the Crystal Flash is ending to be forced above the solid tile. Requires: "h_heatProof" "h_canJumpIntoCrystalFlashClip" "Grapple" |
|
From: 5
Bottom Junction Right of Morph Tunnel
To: 4
Junction Above Acid Plug, Without Acid
Menu to Grappling Beam before the crystal flash ends and mash shoot while holding down. Requires: "h_heatProof" "h_canBombThings" "h_canJumpIntoCrystalFlashClip" "HiJump" "Grapple" |
|
From: 1
Left Door
To: 2
Top Door
Notable: true 
Stand next to the Crumble Blocks and jump into a Crystal Flash Clip to briefly clip into the ceiling above those blocks. Hold down exiting the Crystal Flash to shrink Samus' hitbox and on the next frame press forward to move above the Crumble blocks. Holding down and mashing forward sometimes works, or X-Ray can be used at the end of the Crystal Flash to more easily time the inputs. Requires: "h_heatProof" "h_canJumpIntoCrystalFlashClip" "canTrickyJump" |
|
From: 6
Bottom Right Corner Junction
To: 4
Junction Below Bomb Blocks
Menu to Grappling Beam before the crystal flash ends and mash shoot while holding down to be forced on top of the solid block. Requires: "h_heatProof"
"h_canJumpIntoCrystalFlashClip"
"Grapple"
{
"or": [
{
"obstaclesCleared": [
"D"
]
},
{
"obstaclesCleared": [
"F"
]
},
{
"enemyDamage": {
"enemy": "Multiviola",
"type": "contact",
"hits": 2
}
}
]
}
Clears obstacles: A, D |
|
From: 5
Top Right Item (locked)
To: 1
Top Left Door
Menu to Grappling Beam before the crystal flash ends and mash shoot while holding down. Requires: "h_canJumpIntoCrystalFlashClip"
"Grapple"
{
"obstaclesNotCleared": [
"B"
]
}
|
|
From: 5
Top Right Item (locked)
To: 1
Top Left Door
Fall through the Crumble blocks in order to damage down using either the spikes or repeated Shinesparks. Touching the Chozo statue will lock the camera in a less useful position. Menu to Grappling Beam before the crystal flash ends and mash shoot while holding down. Requires: {
"obstaclesCleared": [
"B"
]
}
"h_ShinesparksCostEnergy"
"h_canJumpIntoCrystalFlashClip"
"Grapple"
"canOffScreenMovement"
{
"canShineCharge": {
"usedTiles": 25,
"openEnd": 1
}
}
|
|
From: 1
Bottom Left Door
To: 2
Right Door
Find the crumble blocks and crystal flash mid-air, just below them. They are on the far right of the ceiling of the bottom right pathway. Hold down as the CF ends to break the non-respawning crumble blocks. This is for the much harder version, without Gravity and Bombs. Requires: "h_canJumpIntoCrystalFlashClip"
"canSuitlessMaridia"
{
"or": [
"HiJump",
"canSpringBallJumpMidAir",
{
"and": [
"h_canCrouchJumpDownGrab",
"canCarefulJump"
]
},
"canUseFrozenEnemies"
]
}
|
|
From: 2
Right Door
To: 1
Bottom Left Door
Find the crumble blocks and crystal flash mid-air, just below them. They are on the far left of the ceiling of the middle left pathway. Hold down as the CF ends to break the non-respawning crumble blocks. This is for the much harder version, without Gravity and Bombs. Requires: "h_canJumpIntoCrystalFlashClip"
"canSuitlessMaridia"
{
"or": [
{
"and": [
"h_canCrouchJumpDownGrab",
"canTrickyJump"
]
},
"HiJump",
"Gravity",
"canSpringBallJumpMidAir"
]
}
|
|
From: 3
Junction Below Right Door
To: 2
Right Door
Place a PB up against the crumble blocks, then jump and midair morph into that same position at the end of the explosion while holding CF inputs. Immediately after the CF, hold down to break the crumble blocks. Requires: "h_canJumpIntoCrystalFlashClip" "canSuitlessMaridia" |
|
Clear the Pirates near the door. Jump into a Crystal Flash clip where the ceiling is a single tile thick. Switch to Grappling Beam before the Crystal Flash ends and mash shoot while holding down. Requires: "h_canJumpIntoCrystalFlashClip" "HiJump" "Grapple" |