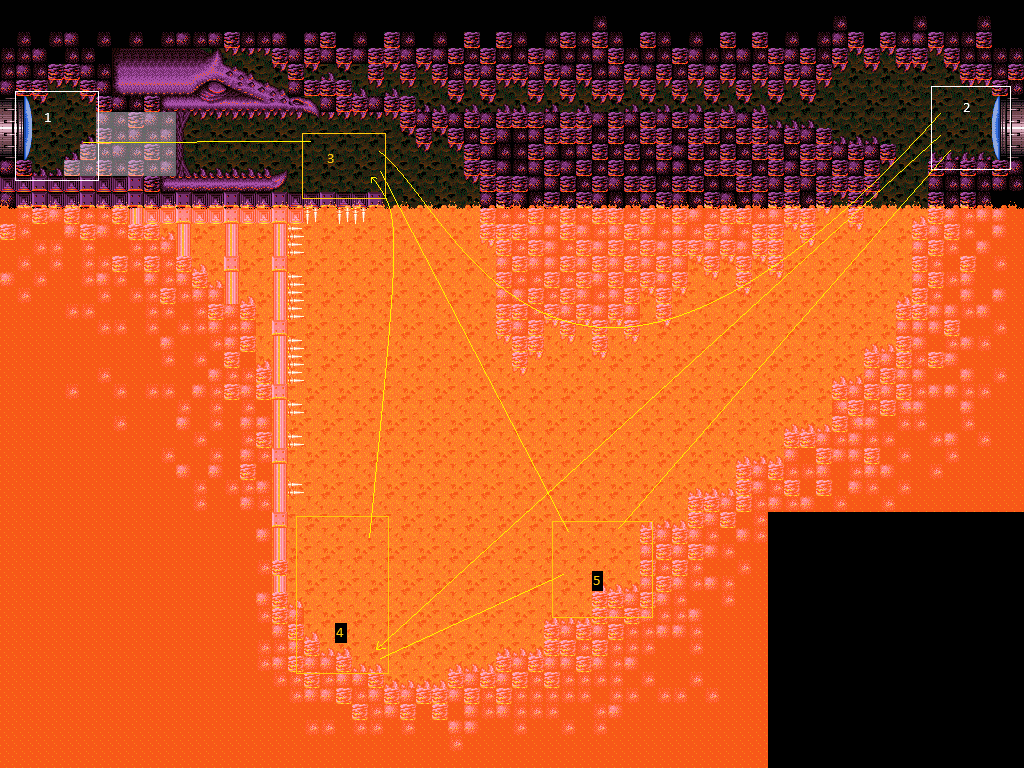
Lava Dive Room
Room ID: 115
|
Exit condition: {
"leaveWithRunway": {
"length": 1,
"openEnd": 1
}
}
|
|
Requires: {
"canShineCharge": {
"usedTiles": 16,
"openEnd": 1
}
}
{
"heatFrames": 225
}
Exit condition: {
"leaveShinecharged": {
"framesRemaining": 140
}
}
|
|
Requires: "h_canHeatedCrystalFlash" |
|
Requires: {
"heatFrames": 90
}
|
|
Entrance condition: {
"comeInWithGrappleTeleport": {
"blockPositions": [
[
5,
3
],
[
7,
2
]
]
}
}
Requires: {
"heatFrames": 60
}
|
|
Entrance condition: {
"comeInWithGrappleTeleport": {
"blockPositions": [
[
3,
12
],
[
3,
13
]
]
}
}
Bypasses door shell: true |
|
Entrance condition: {
"comeInWithGrappleTeleport": {
"blockPositions": [
[
3,
12
]
]
}
}
Exit condition: {
"leaveWithGrappleTeleport": {
"blockPositions": [
[
3,
12
]
]
}
}
Bypasses door shell: true |
|
From: 2
Right Door
To: 1
Left Door
Entrance condition: {
"comeInWithGrappleTeleport": {
"blockPositions": [
[
3,
13
]
]
}
}
Exit condition: {
"leaveWithGrappleTeleport": {
"blockPositions": [
[
3,
13
]
]
}
}
Bypasses door shell: true |
|
Exit the previous room with Samus in a standing pose (while grappled). After teleporting, press right to release Grapple while staying standing (not being forced into a crouch). Then X-ray climb to get up to the door transition, without needing to open the door. Entrance condition: {
"comeInWithGrappleTeleport": {
"blockPositions": [
[
2,
18
],
[
2,
19
],
[
2,
28
],
[
2,
29
]
]
}
}
Requires: "canXRayClimb"
{
"heatFrames": 1600
}
{
"lavaFrames": 1300
}
Bypasses door shell: true |
|
From: 2
Right Door
To: 1
Left Door
Exit the previous room with Samus in a standing pose (while grappled). After teleporting, press right to release Grapple while staying standing (not being forced into a crouch). Then X-ray climb to get up to the door transition, without needing to open the door. Entrance condition: {
"comeInWithGrappleTeleport": {
"blockPositions": [
[
2,
34
]
]
}
}
Requires: "canXRayClimb"
{
"heatFrames": 2800
}
{
"lavaFrames": 2500
}
Bypasses door shell: true |
|
Exit condition: {
"leaveWithRunway": {
"length": 5,
"openEnd": 1
}
}
|
|
Requires: "h_canHeatedCrystalFlash" |
|
Samus will be slowed by lava if SpeedBooster is equipped, even with Gravity. Requires: {
"or": [
"h_lavaProof",
"canSuitlessLavaDive"
]
}
"Gravity"
"SpaceJump"
{
"heatFrames": 340
}
{
"lavaFrames": 280
}
{
"or": [
"canDisableEquipment",
{
"and": [
{
"heatFrames": 120
},
{
"lavaFrames": 120
}
]
}
]
}
|
|
Notable: true 
Store the shinespark on the last possible pixels of runway. Quickly drop to the nearby namihe and damage boost using its flame. Hold the damage boost until just before being below the above platform and spark upwards Entrance condition: {
"comeInShinecharging": {
"length": 4,
"openEnd": 1
}
}
Requires: "Gravity"
{
"or": [
"h_lavaProof",
"canSuitlessLavaDive"
]
}
"canShinechargeMovementTricky"
"canHorizontalDamageBoost"
{
"shinespark": {
"frames": 33
}
}
{
"heatFrames": 320
}
{
"lavaFrames": 155
}
{
"enemyDamage": {
"enemy": "Namihe",
"type": "fireball",
"hits": 1
}
}
|
|
From: 2
Right Door
To: 3
Above Lava Junction
Notable: true 
BounceBall into the Lava, Unmorphing with good timing to sink faster and drift effeciently towards the bottom right Namihe. Walljump at about eye height (4 pixel window) to gain enough height to reach the center portion of ceiling. While rising, wiggle to shrink Samus' hitbox. Some walljump positions will not need to wiggle, when walljumping far away from the Namihe. Jumping, from the wall, around the next lowest overhang is very precise and taking any extra time to position will increase the amount of lava damage being taken. It may help to disable HiJump for this part. Then Walljump again to exit the Lava and reach the left ledge. Requires: "canSuitlessLavaDive"
"canUseEnemies"
"HiJump"
"canBounceBall"
"canMidairWiggle"
"canInsaneWalljump"
{
"lavaFrames": 392
}
{
"heatFrames": 515
}
|
|
From: 2
Right Door
To: 4
Lava, Left Wall
Build up a little run speed and do a small jump into the lava. Morph before reaching the lava, Bounce, and Unmorph shortly after sink slightly before floating down to the stairs. Requires: {
"or": [
"h_lavaProof",
"canSuitlessLavaDive"
]
}
"canTrickyJump"
"canBounceBall"
{
"heatFrames": 435
}
{
"lavaFrames": 305
}
|
|
From: 2
Right Door
To: 4
Lava, Left Wall
Jump into the door frame so that Samus is falling when entering this room. Morph before reaching the lava and Bounce down to the bottom. Entrance condition: {
"comeInJumping": {
"minTiles": 4,
"speedBooster": false
}
}
Requires: {
"or": [
"h_lavaProof",
"canSuitlessLavaDive"
]
}
"canCarefulJump"
"canBounceBall"
{
"heatFrames": 330
}
{
"lavaFrames": 290
}
|
|
Requires: {
"or": [
"h_lavaProof",
"canSuitlessLavaDive"
]
}
"Gravity"
{
"heatFrames": 250
}
{
"lavaFrames": 190
}
{
"or": [
"canDisableEquipment",
{
"and": [
{
"heatFrames": 50
},
{
"lavaFrames": 50
}
]
}
]
}
|
|
Requires: {
"or": [
"h_lavaProof",
"canSuitlessLavaDive"
]
}
{
"heatFrames": 330
}
{
"lavaFrames": 270
}
|
|
From: 2
Right Door
To: 5
Lava, Center Namihe
Build up a little run speed and do a small jump into the lava. Morph before reaching the lava, Bounce, and Unmorph shortly after sink slightly before floating down to the stairs. Requires: {
"or": [
"h_lavaProof",
"canSuitlessLavaDive"
]
}
"canTrickyJump"
"canBounceBall"
{
"heatFrames": 330
}
{
"lavaFrames": 200
}
|
|
From: 2
Right Door
To: 5
Lava, Center Namihe
Jump into the door frame so that Samus is falling when entering this room. Morph before reaching the lava, Bounce, and Unmorph shortly after sink slightly before floating down to the stairs. Entrance condition: {
"comeInJumping": {
"minTiles": 4,
"speedBooster": false
}
}
Requires: {
"or": [
"h_lavaProof",
"canSuitlessLavaDive"
]
}
"canCarefulJump"
"canBounceBall"
{
"heatFrames": 230
}
{
"lavaFrames": 190
}
|
|
Requires: {
"heatFrames": 105
}
|
|
Requires: {
"canShineCharge": {
"usedTiles": 16,
"openEnd": 1
}
}
{
"heatFrames": 115
}
Exit condition: {
"leaveShinecharged": {
"framesRemaining": 140
}
}
|
|
Use a Crystal Flash to clip through the ceiling, where there is one solid tile with 2 empty tiles above it. Use Grapple as the Crystal Flash is ending to be forced above the solid tile. Requires: "h_heatProof" "h_canJumpIntoCrystalFlashClip" "Grapple" |
|
Requires: "h_canHeatedCrystalFlash" |
|
From: 3
Above Lava Junction
To: 5
Lava, Center Namihe
Requires: {
"or": [
"h_lavaProof",
"canSuitlessLavaDive"
]
}
{
"heatFrames": 130
}
{
"lavaFrames": 80
}
{
"or": [
"Gravity",
{
"and": [
{
"heatFrames": 20
},
{
"lavaFrames": 20
}
]
}
]
}
|
|
Walljump off of the lower half of the Upper-Left Namihe to cross to the right side wall. Continue Walljumping up from there, waiting for the above flame to pass if it is in the way. Requires: "HiJump"
"canSuitlessLavaDive"
"canUseEnemies"
"canTrickyJump"
"canStaggeredWalljump"
{
"heatFrames": 270
}
{
"lavaFrames": 240
}
|
|
Lava physics will reduce Samus' horizontal momentum. Requires: {
"or": [
"h_lavaProof",
"canSuitlessLavaDive"
]
}
"canSpringwall"
"canTrickySpringBallJump"
"HiJump"
"canUseEnemies"
{
"heatFrames": 195
}
{
"lavaFrames": 180
}
|
|
From: 4
Lava, Left Wall
To: 3
Above Lava Junction
Notable: true 
Double springball jump out of a walljump starting from the top of the left wall Namihe. Requires: "canSuitlessLavaDive"
"canUseEnemies"
"canDoubleSpringBallJumpMidAir"
"canSpringwall"
"canPreciseWalljump"
{
"heatFrames": 270
}
{
"lavaFrames": 240
}
|
|
From: 4
Lava, Left Wall
To: 3
Above Lava Junction
Notable: true 
Enter the Bottom-Left Namihe by Kagoing inside of it. Wait for a second hit to gain I-Frames and then very quickly walljump up the spikes and across to the right side wall. Requires: "canSuitlessLavaDive"
"canInsaneWalljump"
"canInsaneJump"
"canIframeSpikeJump"
"canStaggeredWalljump"
"canFastWalljumpClimb"
"canUseEnemies"
"canKago"
{
"heatFrames": 510
}
{
"lavaFrames": 480
}
{
"enemyDamage": {
"enemy": "Namihe",
"type": "kago",
"hits": 2
}
}
|
|
From: 4
Lava, Left Wall
To: 3
Above Lava Junction
Notable: true 
Begin on top of the lower left Namihe Jump into a double IBJ with such timing that Samus passes above the fired flame and such a way that there is no horizontal speed. A forward jump with run not held will work. Begin diagonal bomb jumping once past the start of the 2nd spike group from the top. Requires: "h_heatProof"
"Gravity"
{
"or": [
"h_lavaProof",
"canSuitlessLavaDive"
]
}
"h_canJumpIntoIBJ"
"h_canDoubleBombJump"
"h_canDiagonalBombJump"
"h_canStaggeredIBJ"
"canInsaneJump"
{
"heatFrames": 1560
}
{
"lavaFrames": 1520
}
|
|
Requires: "h_canHeatedLavaCrystalFlash" |
|
Requires: {
"or": [
{
"and": [
"Gravity",
{
"heatFrames": 180
},
{
"lavaFrames": 180
}
]
},
{
"and": [
"Gravity",
"canDisableEquipment",
{
"heatFrames": 140
},
{
"lavaFrames": 140
}
]
},
{
"and": [
{
"heatFrames": 210
},
{
"lavaFrames": 210
}
]
}
]
}
|
|
Samus will be slowed by lava if SpeedBooster is equipped, even with Gravity. Requires: "Gravity"
{
"or": [
"h_lavaProof",
"canSuitlessLavaDive"
]
}
{
"or": [
{
"and": [
"canDisableEquipment",
{
"heatFrames": 270
},
{
"lavaFrames": 230
}
]
},
{
"and": [
"canDisableEquipment",
"SpaceJump",
"canCarefulJump",
{
"heatFrames": 225
},
{
"lavaFrames": 180
}
]
},
{
"and": [
{
"heatFrames": 330
},
{
"lavaFrames": 300
}
]
}
]
}
|
|
Samus will be slowed by lava if SpeedBooster is equipped, even with Gravity. Requires: {
"or": [
"h_lavaProof",
"canSuitlessLavaDive"
]
}
{
"or": [
{
"and": [
"HiJump",
{
"heatFrames": 270
},
{
"lavaFrames": 270
}
]
},
{
"and": [
{
"heatFrames": 295
},
{
"lavaFrames": 295
}
]
}
]
}
{
"or": [
{
"and": [
"SpaceJump",
"canCarefulJump",
{
"heatFrames": 100
}
]
},
{
"and": [
"canWalljump",
{
"heatFrames": 60
}
]
},
{
"and": [
"canSpringBallJumpMidAir",
{
"heatFrames": 100
}
]
},
{
"and": [
"canBombJumpWaterEscape",
{
"heatFrames": 180
},
{
"lavaFrames": 30
}
]
},
{
"and": [
"HiJump",
{
"heatFrames": 60
},
{
"lavaFrames": 10
}
]
}
]
}
|
|
From: 5
Lava, Center Namihe
To: 3
Above Lava Junction
Gravity jump from below the Lowest-Right Namihe. Walljump using the right side wall to reach the top of the lava, avoiding the Namihe fireball. Turning Gravity Suit back on can reduce lava damage, but may make the walljumps more difficult. Requires: "canSuitlessLavaDive"
"canGravityJump"
"canStaggeredWalljump"
{
"heatFrames": 290
}
{
"gravitylessLavaFrames": 230
}
{
"lavaFrames": 20
}
|
|
From: 5
Lava, Center Namihe
To: 3
Above Lava Junction
Gravity jump from below the Lowest-Right Namihe. A crouch jump or walljump can help exit the lava in one jump, but are not required. Requires: "canSuitlessLavaDive"
"canGravityJump"
"HiJump"
{
"heatFrames": 155
}
{
"gravitylessLavaFrames": 125
}
{
"lavaFrames": 20
}
|
|
Notable: true 
Use the bottommost right side namihe to generate a flame and walk with it to the bottommost left namihe head Use a turnaround animation as Samus is hit by the flame to cancel out knockback frames. While invulnerability frames are active, walljump up the spikes either 2 or 3 times and jump accross to catch the middle wall and climb from there. Requires: "canSuitlessLavaDive"
"canIframeSpikeJump"
"canStaggeredWalljump"
"canFastWalljumpClimb"
"canUseEnemies"
"canCameraManip"
{
"heatFrames": 600
}
{
"lavaFrames": 500
}
{
"enemyDamage": {
"enemy": "Namihe",
"type": "fireball",
"hits": 1
}
}
|
|
From: 5
Lava, Center Namihe
To: 3
Above Lava Junction
Double Spring Ball Jump from below the Lowest-Right Namihe. Double Spring Ball Jumps are easier in Lava than in Water. Requires: "canSuitlessLavaDive"
"h_canDoubleSpringBallJumpWithHiJump"
{
"heatFrames": 255
}
{
"lavaFrames": 225
}
|
|
From: 5
Lava, Center Namihe
To: 3
Above Lava Junction
Align with the above platform and scroll the camera left by walking into the left side of the bottom-most tiles. Freeze both left side Namihes and begin bomb jumping Requires: "Gravity"
{
"or": [
"h_lavaProof",
"canSuitlessLavaDive"
]
}
"h_canJumpIntoIBJ"
"h_canDoubleBombJump"
"Plasma"
"Ice"
"canCameraManip"
{
"heatFrames": 1040
}
{
"lavaFrames": 1020
}
|
|
Requires: {
"or": [
{
"and": [
"Gravity",
{
"heatFrames": 195
},
{
"lavaFrames": 195
}
]
},
{
"and": [
"Gravity",
"canDisableEquipment",
{
"heatFrames": 150
},
{
"lavaFrames": 150
}
]
},
{
"and": [
{
"heatFrames": 200
},
{
"lavaFrames": 200
}
]
}
]
}
|
|
Requires: "h_canHeatedLavaCrystalFlash" |
{
"$schema": "../../../schema/m3-room.schema.json",
"id": 115,
"name": "Lava Dive Room",
"area": "Norfair",
"subarea": "Upper",
"subsubarea": "East",
"playable": true,
"roomAddress": "0x7AF14",
"roomEnvironments": [
{
"heated": true
}
],
"nodes": [
{
"id": 1,
"name": "Left Door",
"nodeType": "door",
"nodeSubType": "blue",
"nodeAddress": "0x00196de",
"doorEnvironments": [
{
"physics": "air"
}
]
},
{
"id": 2,
"name": "Right Door",
"nodeType": "door",
"nodeSubType": "blue",
"nodeAddress": "0x00196d2",
"doorEnvironments": [
{
"physics": "air"
}
]
},
{
"id": 3,
"name": "Above Lava Junction",
"nodeType": "junction",
"nodeSubType": "junction"
},
{
"id": 4,
"name": "Lava, Left Wall",
"nodeType": "junction",
"nodeSubType": "junction",
"note": "On top of the Bottom-Left Namihe"
},
{
"id": 5,
"name": "Lava, Center Namihe",
"nodeType": "junction",
"nodeSubType": "junction",
"note": "Just below the center Namihe, almost at the bottom of the stairs."
}
],
"enemies": [
{
"id": "e1",
"groupName": "Lava Dive Center Top Namihe",
"enemyName": "Namihe",
"quantity": 1,
"homeNodes": [
3
],
"dropRequires": [
"h_heatProof",
"h_lavaProof"
]
},
{
"id": "e2",
"groupName": "Lava Dive Right Namihes",
"enemyName": "Namihe",
"quantity": 2,
"betweenNodes": [
2,
5
],
"dropRequires": [
"h_heatProof",
"h_lavaProof"
]
},
{
"id": "e3",
"groupName": "Lava Dive Center Bottom Namihe",
"enemyName": "Namihe",
"quantity": 1,
"homeNodes": [
5
],
"dropRequires": [
"h_heatProof",
"h_lavaProof"
]
},
{
"id": "e4",
"groupName": "Lava Dive Left Namihes",
"enemyName": "Namihe",
"quantity": 2,
"homeNodes": [
4
],
"dropRequires": [
"h_heatProof",
"h_lavaProof"
]
}
],
"links": [
{
"from": 1,
"to": [
{
"id": 1
},
{
"id": 3
}
]
},
{
"from": 2,
"to": [
{
"id": 1
},
{
"id": 2
},
{
"id": 3
},
{
"id": 4
},
{
"id": 5
}
]
},
{
"from": 3,
"to": [
{
"id": 1
},
{
"id": 2
},
{
"id": 3
},
{
"id": 5
}
]
},
{
"from": 4,
"to": [
{
"id": 3
},
{
"id": 4
},
{
"id": 5
}
]
},
{
"from": 5,
"to": [
{
"id": 2
},
{
"id": 3
},
{
"id": 4
},
{
"id": 5
}
]
}
],
"strats": [
{
"link": [
1,
1
],
"name": "Leave with Runway",
"requires": [],
"exitCondition": {
"leaveWithRunway": {
"length": 1,
"openEnd": 1
}
}
},
{
"link": [
1,
1
],
"name": "Leave Shinecharged",
"requires": [
{
"canShineCharge": {
"usedTiles": 16,
"openEnd": 1
}
},
{
"heatFrames": 225
}
],
"exitCondition": {
"leaveShinecharged": {
"framesRemaining": 140
}
}
},
{
"link": [
1,
1
],
"name": "Crystal Flash",
"requires": [
"h_canHeatedCrystalFlash"
]
},
{
"link": [
1,
3
],
"name": "Base",
"requires": [
{
  "heatFrames": 90
}
]
},
{
"link": [
2,
1
],
"name": "Grapple Teleport",
"entranceCondition": {
"comeInWithGrappleTeleport": {
"blockPositions": [
[
5,
3
],
[
7,
2
]
]
}
},
"requires": [
{
  "heatFrames": 60
}
],
"note": []
},
{
"link": [
2,
1
],
"name": "Grapple Teleport Door Lock Skip",
"entranceCondition": {
"comeInWithGrappleTeleport": {
"blockPositions": [
[
3,
12
],
[
3,
13
]
]
}
},
"requires": [],
"bypassesDoorShell": true
},
{
"link": [
2,
1
],
"name": "Carry Grapple Teleport (Top Position)",
"entranceCondition": {
"comeInWithGrappleTeleport": {
"blockPositions": [
[
3,
12
]
]
}
},
"requires": [],
"bypassesDoorShell": true,
"exitCondition": {
"leaveWithGrappleTeleport": {
"blockPositions": [
[
3,
12
]
]
}
}
},
{
"link": [
2,
1
],
"name": "Carry Grapple Teleport (Bottom Position)",
"entranceCondition": {
"comeInWithGrappleTeleport": {
"blockPositions": [
[
3,
13
]
]
}
},
"requires": [],
"bypassesDoorShell": true,
"exitCondition": {
"leaveWithGrappleTeleport": {
"blockPositions": [
[
3,
13
]
]
}
}
},
{
"link": [
2,
1
],
"name": "Grapple Teleport X-Ray Climb",
"entranceCondition": {
"comeInWithGrappleTeleport": {
"blockPositions": [
[
2,
18
],
[
2,
19
],
[
2,
28
],
[
2,
29
]
]
}
},
"requires": [
"canXRayClimb",
{
"heatFrames": 1600
},
{
"lavaFrames": 1300
}
],
"bypassesDoorShell": true,
"note": [
"Exit the previous room with Samus in a standing pose (while grappled).",
"After teleporting, press right to release Grapple while staying standing (not being forced into a crouch).",
"Then X-ray climb to get up to the door transition, without needing to open the door."
]
},
{
"link": [
2,
1
],
"name": "Grapple Teleport X-Ray Climb (Two Screens)",
"entranceCondition": {
"comeInWithGrappleTeleport": {
"blockPositions": [
[
2,
34
]
]
}
},
"requires": [
"canXRayClimb",
{
"heatFrames": 2800
},
{
"lavaFrames": 2500
}
],
"bypassesDoorShell": true,
"note": [
"Exit the previous room with Samus in a standing pose (while grappled).",
"After teleporting, press right to release Grapple while staying standing (not being forced into a crouch).",
"Then X-ray climb to get up to the door transition, without needing to open the door."
]
},
{
"link": [
2,
2
],
"name": "Leave with Runway",
"requires": [],
"exitCondition": {
"leaveWithRunway": {
"length": 5,
"openEnd": 1
}
}
},
{
"link": [
2,
2
],
"name": "Crystal Flash",
"requires": [
"h_canHeatedCrystalFlash"
]
},
{
"link": [
2,
3
],
"name": "Base",
"requires": [
{
"or": [
"h_lavaProof",
"canSuitlessLavaDive"
]
},
"Gravity",
"SpaceJump",
{
"heatFrames": 340
},
{
"lavaFrames": 280
},
{
"or": [
"canDisableEquipment",
{
"and": [
{
"heatFrames": 120
},
{
"lavaFrames": 120
}
]
}
]
}
],
"note": "Samus will be slowed by lava if SpeedBooster is equipped, even with Gravity."
},
{
"link": [
2,
3
],
"name": "Lava Dive Shinespark",
"notable": true,
"entranceCondition": {
"comeInShinecharging": {
"length": 4,
"openEnd": 1
}
},
"requires": [
"Gravity",
{
"or": [
"h_lavaProof",
"canSuitlessLavaDive"
]
},
"canShinechargeMovementTricky",
"canHorizontalDamageBoost",
{
"shinespark": {
"frames": 33
}
},
{
"heatFrames": 320
},
{
"lavaFrames": 155
},
{
"enemyDamage": {
"enemy": "Namihe",
"type": "fireball",
"hits": 1
}
}
],
"note": [
"Store the shinespark on the last possible pixels of runway.",
"Quickly drop to the nearby namihe and damage boost using its flame.",
"Hold the damage boost until just before being below the above platform and spark upwards"
]
},
{
"link": [
2,
3
],
"name": "Lava Dive GT Max Suitless Right Side Climb",
"notable": true,
"requires": [
"canSuitlessLavaDive",
"canUseEnemies",
"HiJump",
"canBounceBall",
"canMidairWiggle",
"canInsaneWalljump",
{
"lavaFrames": 392
},
{
"heatFrames": 515
}
],
"note": [
"BounceBall into the Lava, Unmorphing with good timing to sink faster and drift effeciently towards the bottom right Namihe.",
"Walljump at about eye height (4 pixel window) to gain enough height to reach the center portion of ceiling.",
"While rising, wiggle to shrink Samus' hitbox. Some walljump positions will not need to wiggle, when walljumping far away from the Namihe.",
"Jumping, from the wall, around the next lowest overhang is very precise and taking any extra time to position will increase the amount of lava damage being taken.",
"It may help to disable HiJump for this part.",
"Then Walljump again to exit the Lava and reach the left ledge."
]
},
{
"link": [
2,
4
],
"name": "Suitless Bounceball Entry (In-Room Jump)",
"requires": [
{
"or": [
"h_lavaProof",
"canSuitlessLavaDive"
]
},
"canTrickyJump",
"canBounceBall",
{
"heatFrames": 435
},
{
"lavaFrames": 305
}
],
"note": [
"Build up a little run speed and do a small jump into the lava.",
"Morph before reaching the lava, Bounce, and Unmorph shortly after sink slightly before floating down to the stairs."
]
},
{
"link": [
2,
4
],
"name": "Suitless Bounceball Entry (Enter Falling)",
"entranceCondition": {
"comeInJumping": {
"minTiles": 4,
"speedBooster": false
}
},
"requires": [
{
"or": [
"h_lavaProof",
"canSuitlessLavaDive"
]
},
"canCarefulJump",
"canBounceBall",
{
"heatFrames": 330
},
{
"lavaFrames": 290
}
],
"note": [
"Jump into the door frame so that Samus is falling when entering this room.",
"Morph before reaching the lava and Bounce down to the bottom."
],
"devNote": "4 Tile jump entry is the Normalized Kronic Boost room setup."
},
{
"link": [
2,
5
],
"name": "Base",
"requires": [
{
"or": [
"h_lavaProof",
"canSuitlessLavaDive"
]
},
"Gravity",
{
"heatFrames": 250
},
{
"lavaFrames": 190
},
{
"or": [
"canDisableEquipment",
{
"and": [
{
"heatFrames": 50
},
{
"lavaFrames": 50
}
]
}
]
}
]
},
{
"link": [
2,
5
],
"name": "Suitless Lava Entry",
"requires": [
{
"or": [
"h_lavaProof",
"canSuitlessLavaDive"
]
},
{
"heatFrames": 330
},
{
"lavaFrames": 270
}
]
},
{
"link": [
2,
5
],
"name": "Suitless Bounceball Entry (In-Room Jump)",
"requires": [
{
"or": [
"h_lavaProof",
"canSuitlessLavaDive"
]
},
"canTrickyJump",
"canBounceBall",
{
"heatFrames": 330
},
{
"lavaFrames": 200
}
],
"note": [
"Build up a little run speed and do a small jump into the lava.",
"Morph before reaching the lava, Bounce, and Unmorph shortly after sink slightly before floating down to the stairs."
]
},
{
"link": [
2,
5
],
"name": "Suitless Bounceball Entry (Enter Falling)",
"entranceCondition": {
"comeInJumping": {
"minTiles": 4,
"speedBooster": false
}
},
"requires": [
{
"or": [
"h_lavaProof",
"canSuitlessLavaDive"
]
},
"canCarefulJump",
"canBounceBall",
{
"heatFrames": 230
},
{
"lavaFrames": 190
}
],
"note": [
"Jump into the door frame so that Samus is falling when entering this room.",
"Morph before reaching the lava, Bounce, and Unmorph shortly after sink slightly before floating down to the stairs."
],
"devNote": "4 Tile jump entry is the Normalized Kronic Boost room setup."
},
{
"link": [
3,
1
],
"name": "Base",
"requires": [
{
  "heatFrames": 105
}
],
"unlocksDoors": [
{
"types": [
"missiles"
],
"requires": [
{
"heatFrames": 10
}
]
}
]
},
{
"link": [
3,
1
],
"name": "Leave Shinecharged",
"requires": [
{
"canShineCharge": {
"usedTiles": 16,
"openEnd": 1
}
},
{
"heatFrames": 115
}
],
"exitCondition": {
"leaveShinecharged": {
"framesRemaining": 140
}
},
"unlocksDoors": [
{
"types": [
"super"
],
"requires": []
},
{
"types": [
"missiles",
"powerbomb"
],
"requires": [
"never"
]
}
]
},
{
"link": [
3,
2
],
"name": "Jump Into Crystal Flash Clip",
"requires": [
"h_heatProof",
"h_canJumpIntoCrystalFlashClip",
"Grapple"
],
"note": [
"Use a Crystal Flash to clip through the ceiling, where there is one solid tile with 2 empty tiles above it.",
"Use Grapple as the Crystal Flash is ending to be forced above the solid tile."
]
},
{
"link": [
3,
3
],
"name": "Crystal Flash",
"requires": [
"h_canHeatedCrystalFlash"
]
},
{
"link": [
3,
5
],
"name": "Reverse Lava Dive Entry",
"requires": [
{
"or": [
"h_lavaProof",
"canSuitlessLavaDive"
]
},
{
"heatFrames": 130
},
{
"lavaFrames": 80
},
{
"or": [
"Gravity",
{
"and": [
{
"heatFrames": 20
},
{
"lavaFrames": 20
}
]
}
]
}
]
},
{
"link": [
4,
3
],
"name": "Lava Dive with HiJump",
"requires": [
"HiJump",
"canSuitlessLavaDive",
"canUseEnemies",
"canTrickyJump",
"canStaggeredWalljump",
{
"heatFrames": 270
},
{
"lavaFrames": 240
}
],
"note": [
"Walljump off of the lower half of the Upper-Left Namihe to cross to the right side wall.",
"Continue Walljumping up from there, waiting for the above flame to pass if it is in the way."
]
},
{
"link": [
4,
3
],
"name": "Springwall",
"requires": [
{
"or": [
"h_lavaProof",
"canSuitlessLavaDive"
]
},
"canSpringwall",
"canTrickySpringBallJump",
"HiJump",
"canUseEnemies",
{
"heatFrames": 195
},
{
"lavaFrames": 180
}
],
"note": "Lava physics will reduce Samus' horizontal momentum.",
"devNote": "Works with or without Gravity"
},
{
"link": [
4,
3
],
"name": "Lava Dive HiJumpless Suitless Double Springball Jump",
"notable": true,
"requires": [
"canSuitlessLavaDive",
"canUseEnemies",
"canDoubleSpringBallJumpMidAir",
"canSpringwall",
"canPreciseWalljump",
{
"heatFrames": 270
},
{
"lavaFrames": 240
}
],
"note": "Double springball jump out of a walljump starting from the top of the left wall Namihe."
},
{
"link": [
4,
3
],
"name": "Lava Dive HiJumpless Nahime Morph Kago",
"notable": true,
"requires": [
"canSuitlessLavaDive",
"canInsaneWalljump",
"canInsaneJump",
"canIframeSpikeJump",
"canStaggeredWalljump",
"canFastWalljumpClimb",
"canUseEnemies",
"canKago",
{
"heatFrames": 510
},
{
"lavaFrames": 480
},
{
"enemyDamage": {
"enemy": "Namihe",
"type": "kago",
"hits": 2
}
}
],
"note": [
"Enter the Bottom-Left Namihe by Kagoing inside of it.",
"Wait for a second hit to gain I-Frames and then very quickly walljump up the spikes and across to the right side wall."
]
},
{
"link": [
4,
3
],
"name": "Lava Dive Diagonal Bomb Jump",
"notable": true,
"requires": [
"h_heatProof",
"Gravity",
{
"or": [
"h_lavaProof",
"canSuitlessLavaDive"
]
},
"h_canJumpIntoIBJ",
"h_canDoubleBombJump",
"h_canDiagonalBombJump",
"h_canStaggeredIBJ",
"canInsaneJump",
{
"heatFrames": 1560
},
{
"lavaFrames": 1520
}
],
"note": [
"Begin on top of the lower left Namihe",
"Jump into a double IBJ with such timing that Samus passes above the fired flame and such a way that there is no horizontal speed.",
"A forward jump with run not held will work.",
"Begin diagonal bomb jumping once past the start of the 2nd spike group from the top."
],
"failures": [
{
"name": "Namihe Hit",
"cost": [
{
"enemyDamage": {
"enemy": "Namihe",
"hits": 1,
"type": "fireball"
}
},
{
"heatFrames": 300
},
{
"lavaFrames": 300
}
]
},
{
"name": "Dropped IBJ",
"cost": [
{
"heatFrames": 1000
},
{
"lavaFrames": 1000
}
]
}
],
"devNote": "heatProof because each attempt at this strat costs so many heat frames and its hard enough already."
},
{
"link": [
4,
4
],
"name": "Crystal Flash",
"requires": [
"h_canHeatedLavaCrystalFlash"
]
},
{
"link": [
4,
5
],
"name": "Base",
"requires": [
{
  "or": [
    {
      "and": [
        "Gravity",
        {
          "heatFrames": 180
        },
        {
          "lavaFrames": 180
        }
      ]
    },
    {
      "and": [
        "Gravity",
        "canDisableEquipment",
        {
          "heatFrames": 140
        },
        {
          "lavaFrames": 140
        }
      ]
    },
    {
      "and": [
        {
          "heatFrames": 210
        },
        {
          "lavaFrames": 210
        }
      ]
    }
  ]
}
]
},
{
"link": [
5,
2
],
"name": "Reverse Lava Dive (Gravity)",
"requires": [
"Gravity",
{
"or": [
"h_lavaProof",
"canSuitlessLavaDive"
]
},
{
"or": [
{
"and": [
"canDisableEquipment",
{
"heatFrames": 270
},
{
"lavaFrames": 230
}
]
},
{
"and": [
"canDisableEquipment",
"SpaceJump",
"canCarefulJump",
{
"heatFrames": 225
},
{
"lavaFrames": 180
}
]
},
{
"and": [
{
"heatFrames": 330
},
{
"lavaFrames": 300
}
]
}
]
}
],
"note": "Samus will be slowed by lava if SpeedBooster is equipped, even with Gravity."
},
{
"link": [
5,
2
],
"name": "Reverse Lava Dive (Suitless)",
"requires": [
{
"or": [
"h_lavaProof",
"canSuitlessLavaDive"
]
},
{
"or": [
{
"and": [
"HiJump",
{
"heatFrames": 270
},
{
"lavaFrames": 270
}
]
},
{
"and": [
{
"heatFrames": 295
},
{
"lavaFrames": 295
}
]
}
]
},
{
"or": [
{
"and": [
"SpaceJump",
"canCarefulJump",
{
"heatFrames": 100
}
]
},
{
"and": [
"canWalljump",
{
"heatFrames": 60
}
]
},
{
"and": [
"canSpringBallJumpMidAir",
{
"heatFrames": 100
}
]
},
{
"and": [
"canBombJumpWaterEscape",
{
"heatFrames": 180
},
{
"lavaFrames": 30
}
]
},
{
"and": [
"HiJump",
{
"heatFrames": 60
},
{
"lavaFrames": 10
}
]
}
]
}
],
"note": "Samus will be slowed by lava if SpeedBooster is equipped, even with Gravity.",
"devNote": "Varia no etanks is barely possible with vanilla Varia."
},
{
"link": [
5,
3
],
"name": "Gravity Jump without HiJump",
"requires": [
"canSuitlessLavaDive",
"canGravityJump",
"canStaggeredWalljump",
{
"heatFrames": 290
},
{
"gravitylessLavaFrames": 230
},
{
"lavaFrames": 20
}
],
"note": [
"Gravity jump from below the Lowest-Right Namihe.",
"Walljump using the right side wall to reach the top of the lava, avoiding the Namihe fireball.",
"Turning Gravity Suit back on can reduce lava damage, but may make the walljumps more difficult."
],
"devNote": [
"Assumes Gravity is not reenabled until after the strat is complete.",
"A left wall gravity jump would save a small number of gravityless lava frames at the cost of more heat and lava frames."
]
},
{
"link": [
5,
3
],
"name": "Gravity Jump with HiJump",
"requires": [
"canSuitlessLavaDive",
"canGravityJump",
"HiJump",
{
"heatFrames": 155
},
{
"gravitylessLavaFrames": 125
},
{
"lavaFrames": 20
}
],
"note": [
"Gravity jump from below the Lowest-Right Namihe.",
"A crouch jump or walljump can help exit the lava in one jump, but are not required."
]
},
{
"link": [
5,
3
],
"name": "HiJumpless Lava Dive",
"notable": true,
"requires": [
"canSuitlessLavaDive",
"canIframeSpikeJump",
"canStaggeredWalljump",
"canFastWalljumpClimb",
"canUseEnemies",
"canCameraManip",
{
"heatFrames": 600
},
{
"lavaFrames": 500
},
{
"enemyDamage": {
"enemy": "Namihe",
"type": "fireball",
"hits": 1
}
}
],
"note": [
"Use the bottommost right side namihe to generate a flame and walk with it to the bottommost left namihe head",
"Use a turnaround animation as Samus is hit by the flame to cancel out knockback frames.",
"While invulnerability frames are active, walljump up the spikes either 2 or 3 times and jump accross to catch the middle wall and climb from there."
]
},
{
"link": [
5,
3
],
"name": "Double Spring Ball Jump with HiJump",
"requires": [
"canSuitlessLavaDive",
"h_canDoubleSpringBallJumpWithHiJump",
{
"heatFrames": 255
},
{
"lavaFrames": 225
}
],
"note": [
"Double Spring Ball Jump from below the Lowest-Right Namihe.",
"Double Spring Ball Jumps are easier in Lava than in Water."
]
},
{
"link": [
5,
3
],
"name": "Double IBJ with Ice Plasma",
"requires": [
"Gravity",
{
"or": [
"h_lavaProof",
"canSuitlessLavaDive"
]
},
"h_canJumpIntoIBJ",
"h_canDoubleBombJump",
"Plasma",
"Ice",
"canCameraManip",
{
"heatFrames": 1040
},
{
"lavaFrames": 1020
}
],
"note": [
"Align with the above platform and scroll the camera left by walking into the left side of the bottom-most tiles.",
"Freeze both left side Namihes and begin bomb jumping"
]
},
{
"link": [
5,
4
],
"name": "Base",
"requires": [
{
  "or": [
    {
      "and": [
        "Gravity",
        {
          "heatFrames": 195
        },
        {
          "lavaFrames": 195
        }
      ]
    },
    {
      "and": [
        "Gravity",
        "canDisableEquipment",
        {
          "heatFrames": 150
        },
        {
          "lavaFrames": 150
        }
      ]
    },
    {
      "and": [
        {
          "heatFrames": 200
        },
        {
          "lavaFrames": 200
        }
      ]
    }
  ]
}
]
},
{
"link": [
5,
5
],
"name": "Crystal Flash",
"requires": [
"h_canHeatedLavaCrystalFlash"
]
}
]
}