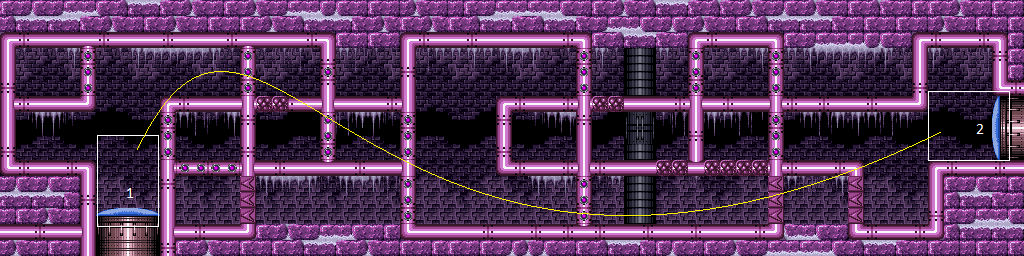
Botwoon Hallway
Room ID: 184
|
From: 1
Bottom Left Door
To: 1
Bottom Left Door
Freeze two Mochtroids above the door to set up a moonfall between them, and aim down. After gaining enough speed, press forward to fall down and clip past the door shell below. Falling with too much speed can cause Samus to go out of bounds. Gravity Suit is needed in order to gain enough fall speed before the Mochtroids thaw. Requires: "Gravity" "canEnemyStuckMoonfall" "canFreeFallClip" "canTrickyUseFrozenEnemies" Bypasses door shell: true |
|
Requires: {
"resetRoom": {
"nodes": [
1
],
"mustStayPut": false
}
}
{
"or": [
"canDodgeWhileShooting",
"Wave",
"Spazer",
"Plasma",
"Grapple",
{
"and": [
"ScrewAttack",
"Gravity"
]
}
]
}
{
"refill": [
"Energy",
"Missile",
"Super"
]
}
|
|
Exit condition: {
"leaveNormally": {}
}
|
|
Entrance condition: {
"comeInWithSpark": {},
"comesThroughToilet": "any"
}
Requires: {
"shinespark": {
"frames": 8,
"excessFrames": 8
}
}
|
|
Break all of the speed and shot blocks and open the door. Charge a shinespark, ending under the last vertical pipes. Carefully jump over the next pipe and through the doorway. Requires: "canShinechargeMovement"
"Gravity"
{
"canShineCharge": {
"usedTiles": 33,
"openEnd": 2
}
}
Exit condition: {
"leaveShinecharged": {
"framesRemaining": 85
}
}
|
|
Requires: "h_canCrystalFlash" |
|
Requires: "Gravity" "SpeedBooster" |
|
From: 1
Bottom Left Door
To: 2
Right Door
Notable: true 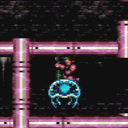
Crouch under the crumble blocks while aiming upward, using both angle buttons then freeze the Mochtroid while it is on Samus. Jump onto the Mochtroid by quickly pressing down after jumping, when on it, press up to stand then jump through the ceiling. With no jump assists, use a frozen Mochtroid as a platform to get to the ledge above the door. Requires: "h_canNavigateUnderwater"
"canCeilingClip"
"canUseFrozenEnemies"
{
"or": [
"canTrickyJump",
{
"enemyDamage": {
"enemy": "Mochtroid",
"type": "contact",
"hits": 1
}
}
]
}
|
|
From: 1
Bottom Left Door
To: 2
Right Door
Find the crumble blocks and crystal flash mid-air, just below them. They are on the far right of the ceiling of the bottom right pathway. Hold down as the CF ends to break the non-respawning crumble blocks. The vertical positioning can be setup using Gravity and Bombs. Requires: "h_canBombIntoCrystalFlashClip" "Gravity" |
|
From: 1
Bottom Left Door
To: 2
Right Door
Find the crumble blocks and crystal flash mid-air, just below them. They are on the far right of the ceiling of the bottom right pathway. Hold down as the CF ends to break the non-respawning crumble blocks. This is for the much harder version, without Gravity and Bombs. Requires: "h_canJumpIntoCrystalFlashClip"
"canSuitlessMaridia"
{
"or": [
"HiJump",
"canSpringBallJumpMidAir",
{
"and": [
"h_canCrouchJumpDownGrab",
"canCarefulJump"
]
},
"canUseFrozenEnemies"
]
}
|
|
Requires: "Gravity" "SpeedBooster" |
|
From: 2
Right Door
To: 1
Bottom Left Door
Notable: true 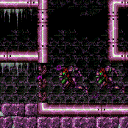
Quickly move next to the first set of speed blocks at the left end of the hole. Shoot a Wave shot, then just before it goes off screen, horizontally spark to the left to get through all the shot and speed blocks. A spin jump may be used to move horizontally into place much quicker. Entrance condition: {
"comeInShinecharged": {
"framesRequired": 120
}
}
Requires: "canSuitlessMaridia"
"canCarefulJump"
"Wave"
"canShinechargeMovementComplex"
"canHorizontalShinespark"
{
"shinespark": {
"frames": 75,
"excessFrames": 8
}
}
|
|
From: 2
Right Door
To: 1
Bottom Left Door
Notable: true
Quickly move next to the first set of speed blocks at the left end of the hole. Shoot a Wave shot, then just before it goes off screen, horizontally spark to the left to get through all the shot and speed blocks. A spin jump may be used to move horizontally into place much quicker. Entrance condition: {
"comeInShinecharging": {
"length": 2,
"openEnd": 1
}
}
Requires: "canWaterShineCharge"
"Wave"
"canShinechargeMovementComplex"
"canHorizontalShinespark"
{
"shinespark": {
"frames": 75,
"excessFrames": 8
}
}
|
|
From: 2
Right Door
To: 1
Bottom Left Door
Notable: true
Crouch under the crumble blocks while aiming upward, using both angle buttons then freeze the Mochtroid while it is on Samus. Jump onto the Mochtroid by quickly pressing down after jumping, when on it, press up to stand then jump through the ceiling. Use the middle section of pipes as a platform to reach the top level, above the Mochtroid. A crouch jump and down grab is enough if the jump begins on the farthest pixel out. Requires: "h_canNavigateUnderwater"
"canCeilingClip"
"canUseFrozenEnemies"
{
"or": [
{
"and": [
"h_canCrouchJumpDownGrab",
"canTrickyJump"
]
},
"HiJump",
"Gravity",
"canTrickySpringBallJump"
]
}
{
"or": [
"canTrickyJump",
{
"enemyDamage": {
"enemy": "Mochtroid",
"type": "contact",
"hits": 1
}
}
]
}
|
|
From: 2
Right Door
To: 1
Bottom Left Door
Find the crumble blocks and crystal flash mid-air, just below them. They are on the far left of the ceiling of the middle left pathway. Hold down as the CF ends to break the non-respawning crumble blocks. The vertical positioning can be setup using Gravity and Bombs. Requires: "h_canBombIntoCrystalFlashClip" "Gravity" |
|
From: 2
Right Door
To: 1
Bottom Left Door
Find the crumble blocks and crystal flash mid-air, just below them. They are on the far left of the ceiling of the middle left pathway. Hold down as the CF ends to break the non-respawning crumble blocks. This is for the much harder version, without Gravity and Bombs. Requires: "h_canJumpIntoCrystalFlashClip"
"canSuitlessMaridia"
{
"or": [
{
"and": [
"h_canCrouchJumpDownGrab",
"canTrickyJump"
]
},
"HiJump",
"Gravity",
"canSpringBallJumpMidAir"
]
}
|
|
Entrance condition: {
"comeInWithGrappleTeleport": {
"blockPositions": [
[
5,
3
],
[
7,
2
],
[
3,
12
],
[
3,
13
]
]
}
}
|
|
Exit condition: {
"leaveWithRunway": {
"length": 5,
"openEnd": 1
}
}
|
|
Lure the Mochtroid into the pit and freeze it, then wait for it on the ledge and freeze it when it is in position. Requires: "h_canFrozenEnemyRunway" Exit condition: {
"leaveWithRunway": {
"length": 6,
"openEnd": 1
}
}
|
|
Requires: "canShinechargeMovement"
"Gravity"
{
"canShineCharge": {
"usedTiles": 33,
"openEnd": 2
}
}
Exit condition: {
"leaveShinecharged": {
"framesRemaining": 120
}
}
|
|
Requires: "h_canCrystalFlash" |
|
Requires: "h_canNavigateUnderwater"
{
"or": [
{
"and": [
"h_canCrouchJumpDownGrab",
"canTrickyJump"
]
},
"HiJump",
"Gravity",
"canSpringBallJumpMidAir"
]
}
Exit condition: {
"leaveWithGModeSetup": {
"knockback": false
}
}
|
{
"$schema": "../../../schema/m3-room.schema.json",
"id": 184,
"name": "Botwoon Hallway",
"area": "Maridia",
"subarea": "Inner",
"subsubarea": "Pink",
"playable": true,
"roomAddress": "0x7D617",
"roomEnvironments": [
{
"heated": false
}
],
"nodes": [
{
"id": 1,
"name": "Bottom Left Door",
"nodeType": "door",
"nodeSubType": "blue",
"nodeAddress": "0x001a768",
"doorOrientation": "down",
"doorEnvironments": [
{
"physics": "water"
}
]
},
{
"id": 2,
"name": "Right Door",
"nodeType": "door",
"nodeSubType": "blue",
"nodeAddress": "0x001a774",
"doorOrientation": "right",
"doorEnvironments": [
{
"physics": "water"
}
]
}
],
"enemies": [
{
"id": "e1",
"groupName": "Botwoon Hallway Left Mochtroids",
"enemyName": "Mochtroid",
"quantity": 2,
"homeNodes": [
1
]
},
{
"id": "e2",
"groupName": "Botwoon Hallway Middle Mochtroid",
"enemyName": "Mochtroid",
"quantity": 1,
"betweenNodes": [
1,
2
],
"dropRequires": [
{
"or": [
"Morph",
"Grapple"
]
}
],
"note": "It's stuck in a prison and you need morph to enter."
},
{
"id": "e3",
"groupName": "Botwoon Hallway Right Mochtroid",
"enemyName": "Mochtroid",
"quantity": 1,
"betweenNodes": [
1,
2
]
},
{
"id": "e4",
"groupName": "Botwoon Hallway Puyos",
"enemyName": "Puyo",
"quantity": 2,
"betweenNodes": [
1,
2
]
}
],
"reusableRoomwideNotable": [
{
"name": "Botwoon Hallway Mochtroid Ice Clip",
"note": [
"Crouch under the crumble blocks while aiming upward, using both angle buttons then freeze the Mochtroid while it is on Samus.",
"Jump onto the Mochtroid by quickly pressing down after jumping, when on it, press up to stand then jump through the ceiling."
]
},
{
"name": "Botwoon Hallway Reverse Shinespark",
"note": [
"Quickly move next to the first set of speed blocks at the left end of the hole.",
"Shoot a Wave shot, then just before it goes off screen, horizontally spark to the left to get through all the shot and speed blocks.",
"A spin jump may be used to move horizontally into place much quicker."
]
}
],
"links": [
{
"from": 1,
"to": [
{
"id": 1
},
{
"id": 2
}
]
},
{
"from": 2,
"to": [
{
"id": 1
},
{
"id": 2
}
]
}
],
"strats": [
{
"link": [
1,
1
],
"name": "Mochtroid Ice Moonfall Door Lock Skip",
"requires": [
"Gravity",
"canEnemyStuckMoonfall",
"canFreeFallClip",
"canTrickyUseFrozenEnemies"
],
"bypassesDoorShell": true,
"note": [
"Freeze two Mochtroids above the door to set up a moonfall between them, and aim down.",
"After gaining enough speed, press forward to fall down and clip past the door shell below.",
"Falling with too much speed can cause Samus to go out of bounds.",
"Gravity Suit is needed in order to gain enough fall speed before the Mochtroids thaw."
]
},
{
"link": [
1,
1
],
"name": "Mochtroid Farm",
"requires": [
{
"resetRoom": {
"nodes": [
1
],
"mustStayPut": false
}
},
{
"or": [
"canDodgeWhileShooting",
"Wave",
"Spazer",
"Plasma",
"Grapple",
{
"and": [
"ScrewAttack",
"Gravity"
]
}
]
},
{
"refill": [
"Energy",
"Missile",
"Super"
]
}
]
},
{
"link": [
1,
1
],
"name": "Leave Normally",
"exitCondition": {
"leaveNormally": {}
},
"requires": []
},
{
"link": [
1,
1
],
"name": "Shinespark",
"entranceCondition": {
"comeInWithSpark": {},
"comesThroughToilet": "any"
},
"requires": [
{
  "shinespark": {
    "frames": 8,
    "excessFrames": 8
  }
}
],
"devNote": "This strat is not useful in-room, but can satisfy a strat in the room before with an exit shinespark."
},
{
"link": [
1,
1
],
"name": "Leave Charged",
"requires": [
"canShinechargeMovement",
"Gravity",
{
"canShineCharge": {
"usedTiles": 33,
"openEnd": 2
}
}
],
"exitCondition": {
"leaveShinecharged": {
"framesRemaining": 85
}
},
"flashSuitChecked": true,
"note": [
"Break all of the speed and shot blocks and open the door. Charge a shinespark, ending under the last vertical pipes.",
"Carefully jump over the next pipe and through the doorway."
]
},
{
"link": [
1,
1
],
"name": "Crystal Flash",
"requires": [
"h_canCrystalFlash"
],
"flashSuitChecked": true
},
{
"link": [
1,
2
],
"name": "Base",
"requires": [
"Gravity",
"SpeedBooster"
]
},
{
"link": [
1,
2
],
"name": "Botwoon Hallway Mochtroid Clip (Left to Right)",
"notable": true,
"requires": [
"h_canNavigateUnderwater",
"canCeilingClip",
"canUseFrozenEnemies",
{
"or": [
"canTrickyJump",
{
"enemyDamage": {
"enemy": "Mochtroid",
"type": "contact",
"hits": 1
}
}
]
}
],
"reusableRoomwideNotable": "Botwoon Hallway Mochtroid Ice Clip",
"note": [
"Crouch under the crumble blocks while aiming upward, using both angle buttons then freeze the Mochtroid while it is on Samus.",
"Jump onto the Mochtroid by quickly pressing down after jumping, when on it, press up to stand then jump through the ceiling.",
"With no jump assists, use a frozen Mochtroid as a platform to get to the ledge above the door."
]
},
{
"link": [
1,
2
],
"name": "CF Clip with Bombs (Left to Right)",
"requires": [
"h_canBombIntoCrystalFlashClip",
"Gravity"
],
"flashSuitChecked": true,
"note": [
"Find the crumble blocks and crystal flash mid-air, just below them.",
"They are on the far right of the ceiling of the bottom right pathway.",
"Hold down as the CF ends to break the non-respawning crumble blocks.",
"The vertical positioning can be setup using Gravity and Bombs."
]
},
{
"link": [
1,
2
],
"name": "Suitless CF Clip (Left to Right)",
"requires": [
"h_canJumpIntoCrystalFlashClip",
"canSuitlessMaridia",
{
"or": [
"HiJump",
"canSpringBallJumpMidAir",
{
"and": [
"h_canCrouchJumpDownGrab",
"canCarefulJump"
]
},
"canUseFrozenEnemies"
]
}
],
"flashSuitChecked": true,
"note": [
"Find the crumble blocks and crystal flash mid-air, just below them.",
"They are on the far right of the ceiling of the bottom right pathway.",
"Hold down as the CF ends to break the non-respawning crumble blocks.",
"This is for the much harder version, without Gravity and Bombs."
]
},
{
"link": [
2,
1
],
"name": "Base",
"requires": [
"Gravity",
"SpeedBooster"
]
},
{
"link": [
2,
1
],
"name": "Botwoon Hallway Reverse Shinespark, Come in Shinecharged",
"notable": true,
"entranceCondition": {
"comeInShinecharged": {
"framesRequired": 120
}
},
"requires": [
"canSuitlessMaridia",
"canCarefulJump",
"Wave",
"canShinechargeMovementComplex",
"canHorizontalShinespark",
{
"shinespark": {
"frames": 75,
"excessFrames": 8
}
}
],
"reusableRoomwideNotable": "Botwoon Hallway Reverse Shinespark",
"flashSuitChecked": true,
"note": [
"Quickly move next to the first set of speed blocks at the left end of the hole.",
"Shoot a Wave shot, then just before it goes off screen, horizontally spark to the left to get through all the shot and speed blocks.",
"A spin jump may be used to move horizontally into place much quicker."
]
},
{
"link": [
2,
1
],
"name": "Botwoon Hallway Reverse Shinespark, Come in Shinecharging",
"notable": true,
"entranceCondition": {
"comeInShinecharging": {
"length": 2,
"openEnd": 1
}
},
"requires": [
"canWaterShineCharge",
"Wave",
"canShinechargeMovementComplex",
"canHorizontalShinespark",
{
"shinespark": {
"frames": 75,
"excessFrames": 8
}
}
],
"reusableRoomwideNotable": "Botwoon Hallway Reverse Shinespark",
"note": [
"Quickly move next to the first set of speed blocks at the left end of the hole.",
"Shoot a Wave shot, then just before it goes off screen, horizontally spark to the left to get through all the shot and speed blocks.",
"A spin jump may be used to move horizontally into place much quicker."
],
"devNote": "The number of usable tiles in room is dependent upon the length of the shinecharge; 2 unusable tiles seems to be reasonable."
},
{
"link": [
2,
1
],
"name": "Botwoon Hallway Mochtroid Clip (Right to Left)",
"notable": true,
"requires": [
"h_canNavigateUnderwater",
"canCeilingClip",
"canUseFrozenEnemies",
{
"or": [
{
"and": [
"h_canCrouchJumpDownGrab",
"canTrickyJump"
]
},
"HiJump",
"Gravity",
"canTrickySpringBallJump"
]
},
{
"or": [
"canTrickyJump",
{
"enemyDamage": {
"enemy": "Mochtroid",
"type": "contact",
"hits": 1
}
}
]
}
],
"reusableRoomwideNotable": "Botwoon Hallway Mochtroid Ice Clip",
"note": [
"Crouch under the crumble blocks while aiming upward, using both angle buttons then freeze the Mochtroid while it is on Samus.",
"Jump onto the Mochtroid by quickly pressing down after jumping, when on it, press up to stand then jump through the ceiling.",
"Use the middle section of pipes as a platform to reach the top level, above the Mochtroid.",
"A crouch jump and down grab is enough if the jump begins on the farthest pixel out."
]
},
{
"link": [
2,
1
],
"name": "CF Clip with Bombs (Right to Left)",
"requires": [
"h_canBombIntoCrystalFlashClip",
"Gravity"
],
"flashSuitChecked": true,
"note": [
"Find the crumble blocks and crystal flash mid-air, just below them.",
"They are on the far left of the ceiling of the middle left pathway.",
"Hold down as the CF ends to break the non-respawning crumble blocks.",
"The vertical positioning can be setup using Gravity and Bombs."
]
},
{
"link": [
2,
1
],
"name": "Suitless CF Clip (Right to Left)",
"requires": [
"h_canJumpIntoCrystalFlashClip",
"canSuitlessMaridia",
{
"or": [
{
"and": [
"h_canCrouchJumpDownGrab",
"canTrickyJump"
]
},
"HiJump",
"Gravity",
"canSpringBallJumpMidAir"
]
}
],
"flashSuitChecked": true,
"note": [
"Find the crumble blocks and crystal flash mid-air, just below them.",
"They are on the far left of the ceiling of the middle left pathway.",
"Hold down as the CF ends to break the non-respawning crumble blocks.",
"This is for the much harder version, without Gravity and Bombs."
]
},
{
"link": [
2,
1
],
"name": "Grapple Teleport",
"entranceCondition": {
"comeInWithGrappleTeleport": {
"blockPositions": [
[
5,
3
],
[
7,
2
],
[
3,
12
],
[
3,
13
]
]
}
},
"requires": []
},
{
"link": [
2,
2
],
"name": "Leave with Runway",
"requires": [],
"exitCondition": {
"leaveWithRunway": {
"length": 5,
"openEnd": 1
}
}
},
{
"link": [
2,
2
],
"name": "Leave With Runway - Frozen Mochtroid",
"requires": [
"h_canFrozenEnemyRunway"
],
"exitCondition": {
"leaveWithRunway": {
"length": 6,
"openEnd": 1
}
},
"note": "Lure the Mochtroid into the pit and freeze it, then wait for it on the ledge and freeze it when it is in position.",
"devNote": "This just assumes 1 extra runway tile, although it is possible to add 1.5 with a decent lure."
},
{
"link": [
2,
2
],
"name": "Leave Charged",
"requires": [
"canShinechargeMovement",
"Gravity",
{
"canShineCharge": {
"usedTiles": 33,
"openEnd": 2
}
}
],
"exitCondition": {
"leaveShinecharged": {
"framesRemaining": 120
}
},
"flashSuitChecked": true
},
{
"link": [
2,
2
],
"name": "Crystal Flash",
"requires": [
"h_canCrystalFlash"
],
"flashSuitChecked": true
},
{
"link": [
2,
2
],
"name": "G-Mode Setup - Get Hit By Mochtroid",
"notable": false,
"requires": [
"h_canNavigateUnderwater",
{
"or": [
{
"and": [
"h_canCrouchJumpDownGrab",
"canTrickyJump"
]
},
"HiJump",
"Gravity",
"canSpringBallJumpMidAir"
]
}
],
"exitCondition": {
"leaveWithGModeSetup": {
"knockback": false
}
},
"flashSuitChecked": true
},
{
"link": [
1,
1
],
"name": "Base (Unlock Door)",
"requires": [],
"unlocksDoors": [
{
"types": [
"ammo"
],
"requires": []
}
]
},
{
"link": [
1,
1
],
"name": "Base (Come In Normally)",
"entranceCondition": {
"comeInNormally": {}
},
"requires": []
},
{
"link": [
2,
2
],
"name": "Base (Unlock Door)",
"requires": [],
"unlocksDoors": [
{
"types": [
"ammo"
],
"requires": []
}
]
},
{
"link": [
2,
2
],
"name": "Base (Come In Normally)",
"entranceCondition": {
"comeInNormally": {}
},
"requires": []
}
]
}