Double Chamber
Room ID: 104
|
Exit condition: {
"leaveWithRunway": {
"length": 4,
"openEnd": 1
}
}
|
|
Requires: "h_canHeatedCrystalFlash" |
|
Requires: {
"heatFrames": 150
}
|
|
Entrance condition: {
"comeInShinecharging": {
"length": 3,
"openEnd": 1
}
}
Requires: "canShinechargeMovement"
{
  "heatFrames": 150
}
Exit condition: {
"leaveShinecharged": {
"framesRemaining": 45
}
}
|
|
Requires: {
"heatFrames": 250
}
Clears obstacles: A |
|
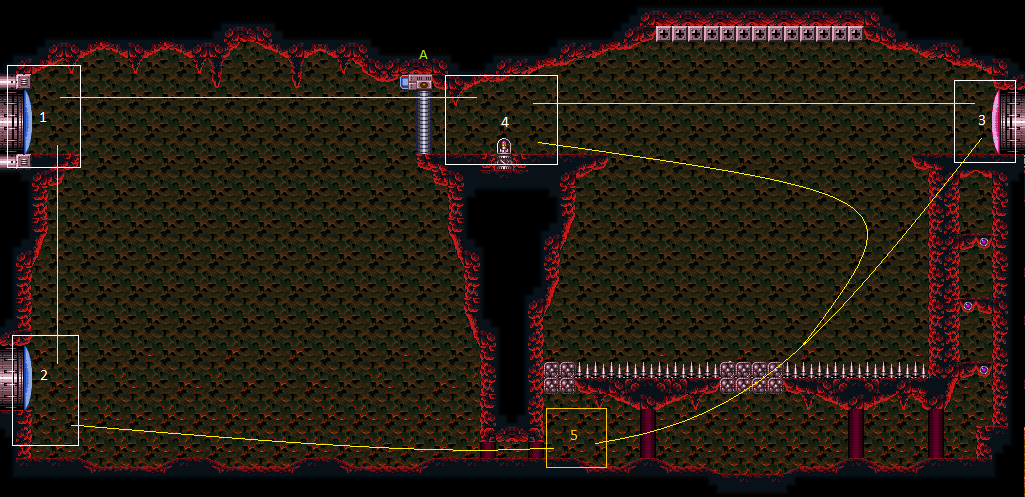
From: 2
Bottom Left Door
To: 1
Top Left Door
Notable: true 
Wall jump up the left wall and then on the moving platform (Kamer) while avoiding the Fune's fireball. The Kamers will temporarily move down if Samus is below them, so it is best to walk under the first Kamer before climbing the wall. It is possible to freeze or kill the Fune with a Super or Power Bomb to make things easier. Requires: "canPreciseWalljump"
"canConsecutiveWalljump"
"canUseEnemies"
{
"or": [
{
"heatFrames": 560
},
{
"and": [
"canCarefulJump",
{
"heatFrames": 360
}
]
},
{
"and": [
"canTrickyJump",
{
"heatFrames": 240
}
]
},
{
"and": [
{
"or": [
"canUseFrozenEnemies",
{
"ammo": {
"type": "Super",
"count": 1
}
}
]
},
{
"heatFrames": 432
}
]
},
{
"and": [
{
"ammo": {
"type": "PowerBomb",
"count": 1
}
},
{
"heatFrames": 456
}
]
}
]
}
|
|
From: 2
Bottom Left Door
To: 1
Top Left Door
Notable: true
Wall jump up the left wall and then on the moving platform (Kamer) while avoiding the Fune's fireball. The Kamers will temporarily move down if Samus is below them, so it is best to walk under the first Kamer before climbing the wall. Requires: "HiJump"
"canUseEnemies"
"canWalljump"
{
"or": [
{
"heatFrames": 360
},
{
"and": [
"canCarefulJump",
{
  "heatFrames": 250
}
]
}
]
}
|
|
Wall jump up the left wall, perform a delayed wall jump on the Fune to reach the door. Requires: "canDelayedWalljump"
"canConsecutiveWalljump"
"canTrickyJump"
"canUseEnemies"
{
"or": [
{
"heatFrames": 190
},
{
"and": [
"canPrepareForNextRoom",
{
"heatFrames": 120
}
]
}
]
}
|
|
Requires: "SpaceJump"
{
"heatFrames": 200
}
{
"or": [
"canPrepareForNextRoom",
{
"heatFrames": 100
}
]
}
|
|
Requires: "HiJump"
"SpaceJump"
{
"heatFrames": 120
}
{
"or": [
"canPrepareForNextRoom",
{
"heatFrames": 70
}
]
}
|
|
Requires: "HiJump"
"canSpringBallJumpMidAir"
{
"heatFrames": 160
}
|
|
Requires: "h_canIBJ"
{
"heatFrames": 1450
}
|
|
Requires: {
"canShineCharge": {
"usedTiles": 28,
"gentleUpTiles": 3,
"gentleDownTiles": 3,
"openEnd": 0
}
}
{
"or": [
{
"shinespark": {
"frames": 27,
"excessFrames": 4
}
},
{
"and": [
"canMidairShinespark",
{
"shinespark": {
"frames": 17,
"excessFrames": 4
}
}
]
}
]
}
{
"heatFrames": 380
}
|
|
From: 2
Bottom Left Door
To: 1
Top Left Door
Climb up 1 screen. Entrance condition: {
"comeInShinecharged": {
"framesRequired": 1
}
}
Requires: {
"shinespark": {
"frames": 1,
"excessFrames": 1
}
}
"canShinesparkDeepStuck"
"canXRayClimb"
"canBePatient"
{
"heatFrames": 1600
}
|
|
Climb up 1 screen. Entrance condition: {
"comeInWithGMode": {
"mode": "direct",
"morphed": false
}
}
Requires: "h_heatProof" "canXRayClimb" |
|
Enter with G-mode direct, back up to between 1 and 6 pixels from the door transition, and activate X-ray to get very deep stuck in the door. Climb up 1 screen, and perform a turnaround buffered spin-jump away from the door to trigger the transition, bypassing any lock on the door. Entrance condition: {
"comeInWithGMode": {
"mode": "direct",
"morphed": false
}
}
Requires: "h_heatProof" "canXRayClimb" Bypasses door shell: true |
|
Entrance condition: {
"comeInShinecharged": {
"framesRequired": 40
}
}
Requires: {
"shinespark": {
"frames": 27,
"excessFrames": 4
}
}
{
"heatFrames": 200
}
|
|
Run from the right wall to 2/3 of the way across the room and jump up onto the moving platforms. Requires: "SpeedBooster"
"HiJump"
{
"heatFrames": 350
}
|
|
Run under the second moving platform from the right to trigger it to move down. Then run back to the left wall, run again to the right, and jump when on the center of the mound just to the right below the platform. Requires: "canTrickyDashJump"
{
"heatFrames": 450
}
|
|
From: 2
Bottom Left Door
To: 1
Top Left Door
Spin jump into the room with at least 1 tile of run speed. Then perform a mid-air Spring Ball jump to reach the ledge above. Entrance condition: {
"comeInJumping": {
"minTiles": 1,
"speedBooster": "any"
}
}
Requires: "HiJump"
"canPrepareForNextRoom"
"canSpringBallJumpMidAir"
{
"heatFrames": 120
}
|
|
From: 2
Bottom Left Door
To: 1
Top Left Door
Spin jump into the room with at least 1 tile of run speed. Perform a lateral mid-air morph into a spring ball jump. Press against the left side of the first moving platform to gain enough height to get on top of it. Entrance condition: {
"comeInJumping": {
"minTiles": 1,
"speedBooster": "any"
}
}
Requires: "canPrepareForNextRoom"
"canLateralMidAirMorph"
"canTrickySpringBallJump"
"canTrickyJump"
{
"heatFrames": 160
}
|
|
Requires: "canShinechargeMovementComplex"
"HiJump"
{
"or": [
"SpaceJump",
{
"and": [
"canPreciseWalljump",
"canTrickyJump"
]
}
]
}
{
"heatFrames": 400
}
{
"canShineCharge": {
"usedTiles": 28,
"gentleUpTiles": 3,
"gentleDownTiles": 3,
"openEnd": 0
}
}
Exit condition: {
"leaveShinecharged": {
"framesRemaining": 30
}
}
|
|
Exit condition: {
"leaveWithRunway": {
"length": 1,
"openEnd": 1
}
}
|
|
Requires: "h_canHeatedCrystalFlash" |
|
Requires: "canShinechargeMovement"
{
"heatFrames": 300
}
{
"canShineCharge": {
"usedTiles": 28,
"gentleUpTiles": 3,
"gentleDownTiles": 3,
"openEnd": 0
}
}
Exit condition: {
"leaveShinecharged": {
"framesRemaining": 140
}
}
|
|
Requires: "HiJump"
"SpeedBooster"
{
"heatFrames": 220
}
|
|
Requires: "HiJump"
"SpaceJump"
{
"heatFrames": 250
}
|
|
Requires: "SpaceJump"
{
"heatFrames": 310
}
|
|
Run to the right, wait a moment for the platforms to come down, then wall jump off the second platform from the right. Requires: "HiJump"
"canWalljump"
"canTrickyJump"
{
"heatFrames": 380
}
|
|
Requires: "HiJump"
"canSpringBallJumpMidAir"
{
"heatFrames": 250
}
|
|
Run under the furthest right moving platform to trigger it to move down. Then run back to the left wall, run again to the right, and jump when on the center of the mound just to the left below the platform. Shoot straight up to open the gate on the way up. Requires: "canTrickyDashJump"
{
"heatFrames": 380
}
|
|
Starting from the left wall, run to the right and when on the center of the mound just to the right of the second moving platform from the right. Wall jump off of the platform as it moves down. Requires: "canTrickyDashJump"
"canWalljump"
{
"heatFrames": 300
}
|
|
Requires: {
"canShineCharge": {
"usedTiles": 28,
"gentleUpTiles": 3,
"gentleDownTiles": 3,
"openEnd": 0
}
}
{
"shinespark": {
"frames": 24,
"excessFrames": 8
}
}
{
"heatFrames": 300
}
{
"or": [
"canHeroShot",
{
"heatFrames": 100
}
]
}
|
|
Entrance condition: {
"comeInJumping": {
"minTiles": 4,
"speedBooster": true
}
}
Requires: "HiJump"
{
"heatFrames": 220
}
|
|
Jump through the door transition, and wall jump off the second moving platform to get on top. Entrance condition: {
"comeInJumping": {
"minTiles": 1,
"speedBooster": "any"
}
}
Requires: "canPrepareForNextRoom"
"HiJump"
"canWalljump"
"canTrickyJump"
{
"heatFrames": 260
}
|
|
Spin jump into the room with at least 2 tiles of run speed. Perform a lateral mid-air morph into a spring ball jump. Land on the second moving platform. Entrance condition: {
"comeInJumping": {
"minTiles": 2,
"speedBooster": "any"
}
}
Requires: "canPrepareForNextRoom"
"canLateralMidAirMorph"
"canTrickySpringBallJump"
"canTrickyJump"
{
"heatFrames": 280
}
|
|
Requires: "Morph"
{
"heatFrames": 200
}
|
|
Entrance condition: {
"comeInWithGrappleTeleport": {
"blockPositions": [
[
5,
3
],
[
7,
2
]
]
}
}
Requires: {
"heatFrames": 50
}
|
|
Exit the previous room with Samus in a standing pose (while grappled) with a horizontal position of 21 (as far right as possible). After teleporting, press right to release Grapple while staying standing (not being forced into a crouch). Then X-ray climb to get up to the door transition, without needing to open the door. Samus will not be visible during the climb. At the beginning of the climb, avoid pressing left without X-Ray being held, to prevent triggering the transition of the bottom door. Entrance condition: {
"comeInWithGrappleTeleport": {
"blockPositions": [
[
2,
29
]
]
}
}
Requires: "canXRayClimb"
{
"heatFrames": 1600
}
Bypasses door shell: true |
|
Entrance condition: {
"comeInWithGrappleTeleport": {
"blockPositions": [
[
2,
29
]
]
}
}
Bypasses door shell: true |
|
Entrance condition: {
"comeInWithGrappleTeleport": {
"blockPositions": [
[
2,
29
]
]
}
}
Exit condition: {
"leaveWithGrappleTeleport": {
"blockPositions": [
[
2,
29
]
]
}
}
Bypasses door shell: true |
|
Exit condition: {
"leaveWithRunway": {
"length": 6,
"openEnd": 1
}
}
|
|
Requires: "h_canHeatedCrystalFlash" |
|
From: 3
Right Door
To: 3
Right Door
Notable: true 
Charge a spark along the bottom of Double Chamber and use it to spark through the right side door. Requires opening the door and shutter first. Requires: "HiJump"
{
"or": [
"SpaceJump",
"Grapple"
]
}
{
"or": [
{
"obstaclesCleared": [
"A"
]
},
"Wave",
{
"and": [
"h_canHeatedBlueGateGlitch",
{
"heatFrames": 60
}
]
}
]
}
{
"or": [
{
"and": [
"canTrickyDashJump",
"canWalljump"
]
},
"SpaceJump"
]
}
{
"canShineCharge": {
"usedTiles": 28,
"gentleUpTiles": 3,
"gentleDownTiles": 3,
"openEnd": 0
}
}
{
"heatFrames": 780
}
{
"shinespark": {
"frames": 57
}
}
Exit condition: {
"leaveWithSpark": {}
}
Clears obstacles: A |
|
From: 3
Right Door
To: 3
Right Door
Notable: true
Charge a spark along the bottom of Double Chamber and use it to spark through the right side door. Requires opening the door and shutter first. Requires: "HiJump"
"Morph"
{
"or": [
{
"obstaclesCleared": [
"A"
]
},
{
"heatFrames": 240
}
]
}
{
"or": [
{
"and": [
"canTrickyDashJump",
"canWalljump"
]
},
"SpaceJump"
]
}
{
"canShineCharge": {
"usedTiles": 28,
"gentleUpTiles": 3,
"gentleDownTiles": 3,
"openEnd": 0
}
}
{
"heatFrames": 780
}
{
"shinespark": {
"frames": 57
}
}
Exit condition: {
"leaveWithSpark": {}
}
Clears obstacles: A |
|
Jump into the spikes and try to bounce on the crumble blocks moving towards the door. Requires: "h_canXMode"
"h_XModeSpikeHit"
"h_XModeSpikeHit"
"h_XModeSpikeHit"
"canWalljump"
"SpeedBooster"
{
"heatFrames": 540
}
{
"shinespark": {
"frames": 5
}
}
Exit condition: {
"leaveWithSpark": {}
}
|
|
Jump into the spikes and try to bounce on the crumble blocks moving towards the door. Requires: "h_canXMode"
"h_XModeSpikeHit"
"h_XModeSpikeHit"
"h_XModeSpikeHit"
"SpeedBooster"
"HiJump"
{
"heatFrames": 480
}
Exit condition: {
"leaveShinecharged": {
"framesRemaining": 40
}
}
|
|
Requires: "Grapple"
{
"heatFrames": 180
}
|
|
Requires: "SpaceJump"
{
"heatFrames": 160
}
|
|
Requires: "h_HeatedIBJFromSpikes"
{
"heatFrames": 1100
}
|
|
Requires: "canIframeSpikeJump"
{
"spikeHits": 1
}
"canSpringBallJumpMidAir"
{
"heatFrames": 300
}
|
|
Entrance condition: {
"comeInRunning": {
"minTiles": 4,
"speedBooster": true
}
}
Requires: "canSpringFling"
"canLateralMidAirMorph"
"canCarefulJump"
{
"heatFrames": 120
}
|
|
Requires: "canIframeSpikeJump"
{
"spikeHits": 1
}
"canWalljump"
"HiJump"
{
"heatFrames": 300
}
|
|
Entrance condition: {
"comeInShinecharging": {
"length": 5,
"openEnd": 0
}
}
Requires: "canHorizontalShinespark"
{
"heatFrames": 140
}
{
"shinespark": {
"frames": 45,
"excessFrames": 14
}
}
|
|
Entrance condition: {
"comeInWithSpark": {}
}
Requires: {
"heatFrames": 140
}
{
"shinespark": {
"frames": 51,
"excessFrames": 14
}
}
|
|
Requires: "canIframeSpikeJump"
{
"spikeHits": 1
}
"SpeedBooster"
"HiJump"
{
"heatFrames": 200
}
|
|
Notable: true 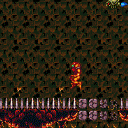
Position Samus into the bottom right corner, using invulnerability frames run then jump while on the crumble blocks. It is possible to use a damage boost on the Ripper to save energy and position Samus into the corner. Requires: "canIframeSpikeJump"
{
"spikeHits": 1
}
"SpeedBooster"
"canTrickyDashJump"
{
"heatFrames": 300
}
|
|
A short hop from the door can bounce on the crumbles. Just be careful of being pushed back onto the crumble blocks by the spikes. Requires: "h_canXMode"
"h_XModeSpikeHit"
"h_XModeSpikeHit"
"canTrickyJump"
"canMidairShinespark"
{
"canShineCharge": {
"usedTiles": 33,
"openEnd": 2
}
}
{
"heatFrames": 400
}
{
"shinespark": {
"frames": 12,
"excessFrames": 4
}
}
|
|
Notable: true 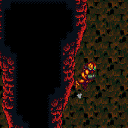
Jump into the spike pit, hitting the Ripper to avoid spike damage. Climb the left wall while avoiding falling onto the spikes or through the crumble blocks. The ledge is the same size of that in writg. Requires: "h_heatProof"
"canInsaneWalljump"
{
"or": [
"canIframeSpikeJump",
"canCrumbleJump"
]
}
{
"enemyDamage": {
"enemy": "Ripper 2 (green)",
"type": "contact",
"hits": 1
}
}
|
|
Requires: {
"heatFrames": 250
}
|
|
Requires: {
"heatFrames": 250
}
{
"or": [
{
"and": [
"Wave",
{
"heatFrames": 100
}
]
},
{
"obstaclesCleared": [
"A"
]
}
]
}
Clears obstacles: A |
|
Requires: {
"heatFrames": 250
}
"h_canHeatedBlueGateGlitch"
Clears obstacles: A |
|
Requires: "canWalljump"
{
"heatFrames": 300
}
|
|
Requires: "Grapple"
{
"heatFrames": 180
}
|
|
Requires: "SpaceJump"
{
"heatFrames": 160
}
|
|
Requires: "canWalljump"
{
"heatFrames": 280
}
Exit condition: {
"leaveWithRunway": {
"length": 6,
"openEnd": 1
}
}
|
|
Requires: "Grapple"
{
"heatFrames": 160
}
Exit condition: {
"leaveWithRunway": {
"length": 6,
"openEnd": 1
}
}
|
|
Requires: "SpaceJump"
{
"heatFrames": 140
}
Exit condition: {
"leaveWithRunway": {
"length": 6,
"openEnd": 1
}
}
|
|
Requires: "h_HeatedIBJFromSpikes"
{
"heatFrames": 1100
}
|
|
Requires: "canIframeSpikeJump"
{
"spikeHits": 1
}
"canSpringBallJumpMidAir"
{
"heatFrames": 300
}
|
|
Requires: "canIframeSpikeJump"
{
"spikeHits": 1
}
"HiJump"
"SpeedBooster"
{
"heatFrames": 250
}
|
|
A short hop from the ledge can bounce on the crumbles and into the spikes. Just be careful of being pushed back onto the crumble blocks by the spikes. Requires: "h_canXMode"
"h_XModeSpikeHit"
"h_XModeSpikeHit"
"canTrickyJump"
"canIframeSpikeJump"
"canMidairShinespark"
{
"canShineCharge": {
"usedTiles": 33,
"openEnd": 2
}
}
{
"heatFrames": 480
}
{
"shinespark": {
"frames": 11,
"excessFrames": 4
}
}
|
|
Requires: "h_canHeatedCrystalFlash" |
|
Requires: {
"heatFrames": 160
}
|
|
Requires: "Morph"
{
"heatFrames": 200
}
|
|
Jump from below the respawning shot block into a Crystal Flash. Use Grappling Beam as the Crystal Flash finishes to be placed next to the door. Do not aim down as the Crystal Flash finishes. Requires: "h_heatProof" "h_canJumpIntoCrystalFlashClip" "Grapple" |
|
Requires: "h_heatProof"
"Morph"
{
"resetRoom": {
"nodes": [
2
],
"mustStayPut": false
}
}
{
"refill": [
"Energy",
"Missile",
"Super",
"PowerBomb"
]
}
|
|
Requires: "h_canHeatedCrystalFlash" |
{
"$schema": "../../../schema/m3-room.schema.json",
"id": 104,
"name": "Double Chamber",
"area": "Norfair",
"subarea": "Upper",
"subsubarea": "East",
"playable": true,
"roomAddress": "0x7ADAD",
"roomEnvironments": [
{
"heated": true
}
],
"nodes": [
{
"id": 1,
"name": "Top Left Door",
"nodeType": "door",
"nodeSubType": "blue",
"nodeAddress": "0x0019606",
"doorEnvironments": [
{
"physics": "air"
}
]
},
{
"id": 2,
"name": "Bottom Left Door",
"nodeType": "door",
"nodeSubType": "blue",
"nodeAddress": "0x0019612",
"doorEnvironments": [
{
"physics": "air"
}
]
},
{
"id": 3,
"name": "Right Door",
"nodeType": "door",
"nodeSubType": "red",
"nodeAddress": "0x001961e",
"doorEnvironments": [
{
"physics": "air"
}
],
"locks": [
{
"name": "Double Chamber Red Lock (to Wave)",
"lockType": "coloredDoor",
"unlockStrats": [
{
"name": "Base",
"notable": false,
"requires": [
"h_canOpenRedDoors"
]
}
]
}
]
},
{
"id": 4,
"name": "Item",
"nodeType": "item",
"nodeSubType": "visible",
"nodeItem": "Missile",
"nodeAddress": "0x78CBC"
},
{
"id": 5,
"name": "Junction Below Spikes",
"nodeType": "junction",
"nodeSubType": "junction"
}
],
"obstacles": [
{
"id": "A",
"name": "Blue Gate",
"obstacleType": "inanimate"
}
],
"enemies": [
{
"id": "e1",
"groupName": "Double Chamber Funes",
"enemyName": "Fune",
"quantity": 2,
"betweenNodes": [
1,
2
],
"dropRequires": [
"h_heatProof"
]
},
{
"id": "e2",
"groupName": "Double Chamber Ripper 2",
"enemyName": "Ripper 2 (green)",
"quantity": 1,
"betweenNodes": [
3,
5
],
"dropRequires": [
"h_heatProof"
]
},
{
"id": "e3",
"groupName": "Double Chamber Kago",
"enemyName": "Kago",
"quantity": 1,
"homeNodes": [
5
],
"dropRequires": [
"h_heatProof"
]
}
],
"reusableRoomwideNotable": [
{
"name": "Double Chamber Walljump Climb Using the Kamer",
"note": [
"Wall jump up the left wall and then on the moving platform (Kamer) while avoiding the Fune's fireball.",
"The Kamers will temporarily move down if Samus is below them, so it is best to walk under the first Kamer before climbing the wall.",
"It is possible to freeze or kill the Fune with a Super or Power Bomb to make things easier."
]
},
{
"name": "Double Chamber Shinespark through Wave Beam Door",
"note": [
"Charge a spark along the bottom of Double Chamber and use it to spark through the right side door.",
"Requires opening the door and shutter first."
]
}
],
"links": [
{
"from": 1,
"to": [
{
"id": 1
},
{
"id": 2
},
{
"id": 4
}
]
},
{
"from": 2,
"to": [
{
"id": 1
},
{
"id": 2
},
{
"id": 4
},
{
"id": 5
}
]
},
{
"from": 3,
"to": [
{
"id": 1
},
{
"id": 2
},
{
"id": 3
},
{
"id": 4
},
{
"id": 5
}
]
},
{
"from": 4,
"to": [
{
"id": 1
},
{
"id": 3
},
{
"id": 4
},
{
"id": 5
}
]
},
{
"from": 5,
"to": [
{
"id": 2
},
{
"id": 3
},
{
"id": 5
}
]
}
],
"strats": [
{
"link": [
1,
1
],
"name": "Leave With Runway",
"requires": [],
"exitCondition": {
"leaveWithRunway": {
"length": 4,
"openEnd": 1
}
}
},
{
"link": [
1,
1
],
"name": "Crystal Flash",
"requires": [
"h_canHeatedCrystalFlash"
]
},
{
"link": [
1,
2
],
"name": "Base",
"requires": [
{
"heatFrames": 150
}
]
},
{
"link": [
1,
2
],
"name": "Leave Shinecharged",
"entranceCondition": {
"comeInShinecharging": {
"length": 3,
"openEnd": 1
}
},
"requires": [
"canShinechargeMovement",
{
"heatFrames": 150
}
],
"exitCondition": {
"leaveShinecharged": {
"framesRemaining": 45
}
},
"unlocksDoors": [
{
"types": [
"super"
],
"requires": []
},
{
"types": [
"missiles",
"powerbomb"
],
"requires": [
"never"
]
}
]
},
{
"link": [
1,
4
],
"name": "Base",
"requires": [
{
"heatFrames": 250
}
],
"clearsObstacles": [
"A"
]
},
{
"link": [
2,
1
],
"name": "Double Chamber Walljump Climb Using the Kamer",
"notable": true,
"requires": [
"canPreciseWalljump",
"canConsecutiveWalljump",
"canUseEnemies",
{
"or": [
{
"heatFrames": 560
},
{
"and": [
"canCarefulJump",
{
"heatFrames": 360
}
]
},
{
"and": [
"canTrickyJump",
{
"heatFrames": 240
}
]
},
{
"and": [
{
"or": [
"canUseFrozenEnemies",
{
"ammo": {
"type": "Super",
"count": 1
}
}
]
},
{
"heatFrames": 432
}
]
},
{
"and": [
{
"ammo": {
"type": "PowerBomb",
"count": 1
}
},
{
"heatFrames": 456
}
]
}
]
}
],
"reusableRoomwideNotable": "Double Chamber Walljump Climb Using the Kamer",
"note": [
"Wall jump up the left wall and then on the moving platform (Kamer) while avoiding the Fune's fireball.",
"The Kamers will temporarily move down if Samus is below them, so it is best to walk under the first Kamer before climbing the wall.",
"It is possible to freeze or kill the Fune with a Super or Power Bomb to make things easier."
]
},
{
"link": [
2,
1
],
"name": "Double Chamber Walljump Climb Using the Kamer with HiJump",
"notable": true,
"requires": [
"HiJump",
"canUseEnemies",
"canWalljump",
{
"or": [
{
"heatFrames": 360
},
{
"and": [
"canCarefulJump",
{
"heatFrames": 250
}
]
}
]
}
],
"reusableRoomwideNotable": "Double Chamber Walljump Climb Using the Kamer",
"note": [
"Wall jump up the left wall and then on the moving platform (Kamer) while avoiding the Fune's fireball.",
"The Kamers will temporarily move down if Samus is below them, so it is best to walk under the first Kamer before climbing the wall."
]
},
{
"link": [
2,
1
],
"name": "Delayed Walljump",
"requires": [
"canDelayedWalljump",
"canConsecutiveWalljump",
"canTrickyJump",
"canUseEnemies",
{
"or": [
{
"heatFrames": 190
},
{
"and": [
"canPrepareForNextRoom",
{
"heatFrames": 120
}
]
}
]
}
],
"note": "Wall jump up the left wall, perform a delayed wall jump on the Fune to reach the door."
},
{
"link": [
2,
1
],
"name": "Space Jump",
"requires": [
"SpaceJump",
{
"heatFrames": 200
},
{
"or": [
"canPrepareForNextRoom",
{
"heatFrames": 100
}
]
}
]
},
{
"link": [
2,
1
],
"name": "HiJump Space Jump",
"requires": [
"HiJump",
"SpaceJump",
{
"heatFrames": 120
},
{
"or": [
"canPrepareForNextRoom",
{
"heatFrames": 70
}
]
}
]
},
{
"link": [
2,
1
],
"name": "HiJump Spring Ball Jump",
"requires": [
"HiJump",
"canSpringBallJumpMidAir",
{
"heatFrames": 160
}
]
},
{
"link": [
2,
1
],
"name": "IBJ",
"requires": [
"h_canIBJ",
{
"heatFrames": 1450
}
]
},
{
"link": [
2,
1
],
"name": "Shinespark (In-Room)",
"requires": [
{
"canShineCharge": {
"usedTiles": 28,
"gentleUpTiles": 3,
"gentleDownTiles": 3,
"openEnd": 0
}
},
{
"or": [
{
"shinespark": {
"frames": 27,
"excessFrames": 4
}
},
{
"and": [
"canMidairShinespark",
{
"shinespark": {
"frames": 17,
"excessFrames": 4
}
}
]
}
]
},
{
"heatFrames": 380
}
]
},
{
"link": [
2,
1
],
"name": "Shinespark Deep Stuck X-Ray Climb",
"entranceCondition": {
"comeInShinecharged": {
"framesRequired": 1
}
},
"requires": [
{
"shinespark": {
"frames": 1,
"excessFrames": 1
}
},
"canShinesparkDeepStuck",
"canXRayClimb",
"canBePatient",
{
"heatFrames": 1600
}
],
"note": "Climb up 1 screen."
},
{
"link": [
2,
1
],
"name": "G-Mode Deep Stuck X-Ray Climb",
"entranceCondition": {
"comeInWithGMode": {
"mode": "direct",
"morphed": false
}
},
"requires": [
"h_heatProof",
"canXRayClimb"
],
"note": "Climb up 1 screen."
},
{
"link": [
2,
1
],
"name": "Very Deep Stuck X-Ray Climb",
"entranceCondition": {
"comeInWithGMode": {
"mode": "direct",
"morphed": false
}
},
"requires": [
"h_heatProof",
"canXRayClimb"
],
"bypassesDoorShell": true,
"note": [
"Enter with G-mode direct, back up to between 1 and 6 pixels from the door transition, and activate X-ray to get very deep stuck in the door.",
"Climb up 1 screen, and perform a turnaround buffered spin-jump away from the door to trigger the transition, bypassing any lock on the door."
]
},
{
"link": [
2,
1
],
"name": "Shinespark (Come in Charged)",
"entranceCondition": {
"comeInShinecharged": {
"framesRequired": 40
}
},
"requires": [
{
"shinespark": {
"frames": 27,
"excessFrames": 4
}
},
{
"heatFrames": 200
}
]
},
{
"link": [
2,
1
],
"name": "Speedjump",
"requires": [
"SpeedBooster",
"HiJump",
{
"heatFrames": 350
}
],
"note": "Run from the right wall to 2/3 of the way across the room and jump up onto the moving platforms."
},
{
"link": [
2,
1
],
"name": "Tricky Dash Jump",
"requires": [
"canTrickyDashJump",
{
"heatFrames": 450
}
],
"note": [
"Run under the second moving platform from the right to trigger it to move down.",
"Then run back to the left wall, run again to the right, and jump when on the center of the mound just to the right below the platform."
]
},
{
"link": [
2,
1
],
"name": "Cross Room HiJump Spring Ball Jump",
"entranceCondition": {
"comeInJumping": {
"minTiles": 1,
"speedBooster": "any"
}
},
"requires": [
"HiJump",
"canPrepareForNextRoom",
"canSpringBallJumpMidAir",
{
"heatFrames": 120
}
],
"note": [
"Spin jump into the room with at least 1 tile of run speed.",
"Then perform a mid-air Spring Ball jump to reach the ledge above."
]
},
{
"link": [
2,
1
],
"name": "Cross Room Tricky Spring Ball Jump",
"entranceCondition": {
"comeInJumping": {
"minTiles": 1,
"speedBooster": "any"
}
},
"requires": [
"canPrepareForNextRoom",
"canLateralMidAirMorph",
"canTrickySpringBallJump",
"canTrickyJump",
{
"heatFrames": 160
}
],
"note": [
"Spin jump into the room with at least 1 tile of run speed.",
"Perform a lateral mid-air morph into a spring ball jump.",
"Press against the left side of the first moving platform to gain enough height to get on top of it."
]
},
{
"link": [
2,
1
],
"name": "Leave Shinecharged",
"requires": [
"canShinechargeMovementComplex",
"HiJump",
{
"or": [
"SpaceJump",
{
"and": [
"canPreciseWalljump",
"canTrickyJump"
]
}
]
},
{
"heatFrames": 400
},
{
"canShineCharge": {
"usedTiles": 28,
"gentleUpTiles": 3,
"gentleDownTiles": 3,
"openEnd": 0
}
}
],
"exitCondition": {
"leaveShinecharged": {
"framesRemaining": 30
}
},
"unlocksDoors": [
{
"types": [
"missiles"
],
"requires": [
{
"heatFrames": 240
}
]
},
{
"types": [
"super"
],
"requires": []
},
{
"types": [
"powerbomb"
],
"requires": [
{
"heatFrames": 100
}
]
}
]
},
{
"link": [
2,
2
],
"name": "Leave With Runway",
"requires": [],
"exitCondition": {
"leaveWithRunway": {
"length": 1,
"openEnd": 1
}
}
},
{
"link": [
2,
2
],
"name": "Crystal Flash",
"requires": [
"h_canHeatedCrystalFlash"
]
},
{
"link": [
2,
2
],
"name": "Leave Shinecharged",
"requires": [
"canShinechargeMovement",
{
"heatFrames": 300
},
{
"canShineCharge": {
"usedTiles": 28,
"gentleUpTiles": 3,
"gentleDownTiles": 3,
"openEnd": 0
}
}
],
"exitCondition": {
"leaveShinecharged": {
"framesRemaining": 140
}
}
},
{
"link": [
2,
4
],
"name": "HiJump Speed Jump",
"requires": [
"HiJump",
"SpeedBooster",
{
"heatFrames": 220
}
]
},
{
"link": [
2,
4
],
"name": "HiJump Space Jump",
"requires": [
"HiJump",
"SpaceJump",
{
"heatFrames": 250
}
]
},
{
"link": [
2,
4
],
"name": "Space Jump",
"requires": [
"SpaceJump",
{
"heatFrames": 310
}
]
},
{
"link": [
2,
4
],
"name": "HiJump Wall Jump",
"requires": [
"HiJump",
"canWalljump",
"canTrickyJump",
{
"heatFrames": 380
}
],
"note": "Run to the right, wait a moment for the platforms to come down, then wall jump off the second platform from the right."
},
{
"link": [
2,
4
],
"name": "HiJump Spring Ball Jump",
"requires": [
"HiJump",
"canSpringBallJumpMidAir",
{
"heatFrames": 250
}
]
},
{
"link": [
2,
4
],
"name": "Tricky Dash Jump",
"requires": [
"canTrickyDashJump",
{
"heatFrames": 380
}
],
"note": [
"Run under the furthest right moving platform to trigger it to move down.",
"Then run back to the left wall, run again to the right, and jump when on the center of the mound just to the left below the platform.",
"Shoot straight up to open the gate on the way up."
]
},
{
"link": [
2,
4
],
"name": "Tricky Dash Jump Wall Jump",
"requires": [
"canTrickyDashJump",
"canWalljump",
{
"heatFrames": 300
}
],
"note": [
"Starting from the left wall, run to the right and when on the center of the mound just to the right of the second moving platform from the right.",
"Wall jump off of the platform as it moves down."
]
},
{
"link": [
2,
4
],
"name": "Shinespark (In-Room)",
"requires": [
{
"canShineCharge": {
"usedTiles": 28,
"gentleUpTiles": 3,
"gentleDownTiles": 3,
"openEnd": 0
}
},
{
"shinespark": {
"frames": 24,
"excessFrames": 8
}
},
{
"heatFrames": 300
},
{
"or": [
"canHeroShot",
{
"heatFrames": 100
}
]
}
]
},
{
"link": [
2,
4
],
"name": "Cross Room HiJump Speed Jump",
"entranceCondition": {
"comeInJumping": {
"minTiles": 4,
"speedBooster": true
}
},
"requires": [
"HiJump",
{
"heatFrames": 220
}
]
},
{
"link": [
2,
4
],
"name": "Cross Room HiJump Wall Jump",
"entranceCondition": {
"comeInJumping": {
"minTiles": 1,
"speedBooster": "any"
}
},
"requires": [
"canPrepareForNextRoom",
"HiJump",
"canWalljump",
"canTrickyJump",
{
"heatFrames": 260
}
],
"note": "Jump through the door transition, and wall jump off the second moving platform to get on top."
},
{
"link": [
2,
4
],
"name": "Cross Room Tricky Spring Ball Jump",
"entranceCondition": {
"comeInJumping": {
"minTiles": 2,
"speedBooster": "any"
}
},
"requires": [
"canPrepareForNextRoom",
"canLateralMidAirMorph",
"canTrickySpringBallJump",
"canTrickyJump",
{
"heatFrames": 280
}
],
"note": [
"Spin jump into the room with at least 2 tiles of run speed.",
"Perform a lateral mid-air morph into a spring ball jump.",
"Land on the second moving platform."
]
},
{
"link": [
2,
5
],
"name": "Base",
"requires": [
"Morph",
{
"heatFrames": 200
}
]
},
{
"link": [
3,
1
],
"name": "Grapple Teleport",
"entranceCondition": {
"comeInWithGrappleTeleport": {
"blockPositions": [
[
5,
3
],
[
7,
2
]
]
}
},
"requires": [
{
  "heatFrames": 50
}
]
},
{
"link": [
3,
1
],
"name": "Grapple Teleport X-Ray Climb",
"entranceCondition": {
"comeInWithGrappleTeleport": {
"blockPositions": [
[
2,
29
]
]
}
},
"requires": [
"canXRayClimb",
{
"heatFrames": 1600
}
],
"bypassesDoorShell": true,
"note": [
"Exit the previous room with Samus in a standing pose (while grappled) with a horizontal position of 21 (as far right as possible).",
"After teleporting, press right to release Grapple while staying standing (not being forced into a crouch).",
"Then X-ray climb to get up to the door transition, without needing to open the door.",
"Samus will not be visible during the climb.",
"At the beginning of the climb, avoid pressing left without X-Ray being held, to prevent triggering the transition of the bottom door."
]
},
{
"link": [
3,
2
],
"name": "Grapple Teleport",
"entranceCondition": {
"comeInWithGrappleTeleport": {
"blockPositions": [
[
2,
29
]
]
}
},
"requires": [],
"bypassesDoorShell": true
},
{
"link": [
3,
2
],
"name": "Carry Grapple Teleport",
"entranceCondition": {
"comeInWithGrappleTeleport": {
"blockPositions": [
[
2,
29
]
]
}
},
"requires": [],
"bypassesDoorShell": true,
"exitCondition": {
"leaveWithGrappleTeleport": {
"blockPositions": [
[
2,
29
]
]
}
}
},
{
"link": [
3,
3
],
"name": "Leave With Runway",
"requires": [],
"exitCondition": {
"leaveWithRunway": {
"length": 6,
"openEnd": 1
}
}
},
{
"link": [
3,
3
],
"name": "Crystal Flash",
"requires": [
"h_canHeatedCrystalFlash"
]
},
{
"link": [
3,
3
],
"name": "Double Chamber Shinespark through Wave Beam Door (Top Path)",
"notable": true,
"requires": [
"HiJump",
{
"or": [
"SpaceJump",
"Grapple"
]
},
{
"or": [
{
"obstaclesCleared": [
"A"
]
},
"Wave",
{
"and": [
"h_canHeatedBlueGateGlitch",
{
"heatFrames": 60
}
]
}
]
},
{
"or": [
{
"and": [
"canTrickyDashJump",
"canWalljump"
]
},
"SpaceJump"
]
},
{
"canShineCharge": {
"usedTiles": 28,
"gentleUpTiles": 3,
"gentleDownTiles": 3,
"openEnd": 0
}
},
{
"heatFrames": 780
},
{
"shinespark": {
"frames": 57
}
}
],
"exitCondition": {
"leaveWithSpark": {}
},
"clearsObstacles": [
"A"
],
"reusableRoomwideNotable": "Double Chamber Shinespark through Wave Beam Door",
"note": [
"Charge a spark along the bottom of Double Chamber and use it to spark through the right side door.",
"Requires opening the door and shutter first."
],
"devNote": [
"A hero shot variation of this strat might be possible, starting from a node to the left;",
"if nothing else it could be done with a shortcharge on the 12-tile platform to the left."
]
},
{
"link": [
3,
3
],
"name": "Double Chamber Shinespark through Wave Beam Door (Through Crumbles)",
"notable": true,
"requires": [
"HiJump",
"Morph",
{
"or": [
{
"obstaclesCleared": [
"A"
]
},
{
"heatFrames": 240
}
]
},
{
"or": [
{
"and": [
"canTrickyDashJump",
"canWalljump"
]
},
"SpaceJump"
]
},
{
"canShineCharge": {
"usedTiles": 28,
"gentleUpTiles": 3,
"gentleDownTiles": 3,
"openEnd": 0
}
},
{
"heatFrames": 780
},
{
"shinespark": {
"frames": 57
}
}
],
"exitCondition": {
"leaveWithSpark": {}
},
"clearsObstacles": [
"A"
],
"reusableRoomwideNotable": "Double Chamber Shinespark through Wave Beam Door",
"note": [
"Charge a spark along the bottom of Double Chamber and use it to spark through the right side door.",
"Requires opening the door and shutter first."
]
},
{
"link": [
3,
3
],
"name": "XMode with Walljump",
"requires": [
"h_canXMode",
"h_XModeSpikeHit",
"h_XModeSpikeHit",
"h_XModeSpikeHit",
"canWalljump",
"SpeedBooster",
{
"heatFrames": 540
},
{
"shinespark": {
"frames": 5
}
}
],
"exitCondition": {
"leaveWithSpark": {}
},
"note": "Jump into the spikes and try to bounce on the crumble blocks moving towards the door.",
"devNote": "Three spike hits are expected per attempt (with any additional leniency hits being multiplied by this amount)."
},
{
"link": [
3,
3
],
"name": "XMode with HiJump",
"requires": [
"h_canXMode",
"h_XModeSpikeHit",
"h_XModeSpikeHit",
"h_XModeSpikeHit",
"SpeedBooster",
"HiJump",
{
"heatFrames": 480
}
],
"exitCondition": {
"leaveShinecharged": {
"framesRemaining": 40
}
},
"note": "Jump into the spikes and try to bounce on the crumble blocks moving towards the door.",
"devNote": "Three spike hits are expected per attempt (with any additional leniency hits being multiplied by this amount)."
},
{
"link": [
3,
4
],
"name": "Grapple",
"requires": [
"Grapple",
{
"heatFrames": 180
}
]
},
{
"link": [
3,
4
],
"name": "Space Jump",
"requires": [
"SpaceJump",
{
"heatFrames": 160
}
]
},
{
"link": [
3,
4
],
"name": "Spike IBJ",
"requires": [
"h_HeatedIBJFromSpikes",
{
"heatFrames": 1100
}
]
},
{
"link": [
3,
4
],
"name": "Double Chamber Spike SpringBall",
"requires": [
"canIframeSpikeJump",
{
"spikeHits": 1
},
"canSpringBallJumpMidAir",
{
"heatFrames": 300
}
]
},
{
"link": [
3,
4
],
"name": "SpringFling over the Spikes",
"entranceCondition": {
"comeInRunning": {
"minTiles": 4,
"speedBooster": true
}
},
"requires": [
"canSpringFling",
"canLateralMidAirMorph",
"canCarefulJump",
{
"heatFrames": 120
}
]
},
{
"link": [
3,
4
],
"name": "Double Chamber Spike HiJump",
"requires": [
"canIframeSpikeJump",
{
"spikeHits": 1
},
"canWalljump",
"HiJump",
{
"heatFrames": 300
}
]
},
{
"link": [
3,
4
],
"name": "Shinespark (Come In Shinecharging)",
"entranceCondition": {
"comeInShinecharging": {
"length": 5,
"openEnd": 0
}
},
"requires": [
"canHorizontalShinespark",
{
"heatFrames": 140
},
{
"shinespark": {
"frames": 45,
"excessFrames": 14
}
}
]
},
{
"link": [
3,
4
],
"name": "Shinespark (Come in with Spark)",
"entranceCondition": {
"comeInWithSpark": {}
},
"requires": [
{
"heatFrames": 140
},
{
"shinespark": {
"frames": 51,
"excessFrames": 14
}
}
]
},
{
"link": [
3,
4
],
"name": "Double Chamber Spike Speedjump",
"requires": [
"canIframeSpikeJump",
{
"spikeHits": 1
},
"SpeedBooster",
"HiJump",
{
"heatFrames": 200
}
]
},
{
"link": [
3,
4
],
"name": "Hijumpless Double Chamber Spike Speedjump",
"notable": true,
"requires": [
"canIframeSpikeJump",
{
"spikeHits": 1
},
"SpeedBooster",
"canTrickyDashJump",
{
"heatFrames": 300
}
],
"failures": [
{
"name": "Crumble Fall",
"leadsToNode": 5,
"note": "Falls down into node 5 with no possiblity of quick crumble escape."
}
],
"note": [
"Position Samus into the bottom right corner, using invulnerability frames run then jump while on the crumble blocks.",
"It is possible to use a damage boost on the Ripper to save energy and position Samus into the corner."
]
},
{
"link": [
3,
4
],
"name": "XMode Shinespark",
"requires": [
"h_canXMode",
"h_XModeSpikeHit",
"h_XModeSpikeHit",
"canTrickyJump",
"canMidairShinespark",
{
"canShineCharge": {
"usedTiles": 33,
"openEnd": 2
}
},
{
"heatFrames": 400
},
{
"shinespark": {
"frames": 12,
"excessFrames": 4
}
}
],
"note": "A short hop from the door can bounce on the crumbles. Just be careful of being pushed back onto the crumble blocks by the spikes.",
"devNote": "Two spike hits are expected per attempt (with any additional leniency hits being multiplied by this amount)."
},
{
"link": [
3,
4
],
"name": "Double Chamber HiJumpless Wall Jump",
"notable": true,
"requires": [
"h_heatProof",
"canInsaneWalljump",
{
"or": [
"canIframeSpikeJump",
"canCrumbleJump"
]
},
{
"enemyDamage": {
"enemy": "Ripper 2 (green)",
"type": "contact",
"hits": 1
}
}
],
"note": [
"Jump into the spike pit, hitting the Ripper to avoid spike damage.",
"Climb the left wall while avoiding falling onto the spikes or through the crumble blocks. The ledge is the same size of that in writg."
]
},
{
"link": [
3,
5
],
"name": "Base",
"requires": [
{
  "heatFrames": 250
}
]
},
{
"link": [
4,
1
],
"name": "Base",
"requires": [
{
"heatFrames": 250
},
{
"or": [
{
"and": [
"Wave",
{
"heatFrames": 100
}
]
},
{
"obstaclesCleared": [
"A"
]
}
]
}
],
"clearsObstacles": [
"A"
]
},
{
"link": [
4,
1
],
"name": "Gate Glitch",
"requires": [
{
"heatFrames": 250
},
"h_canHeatedBlueGateGlitch"
],
"clearsObstacles": [
"A"
]
},
{
"link": [
4,
3
],
"name": "Walljump",
"requires": [
"canWalljump",
{
"heatFrames": 300
}
]
},
{
"link": [
4,
3
],
"name": "Grapple",
"requires": [
"Grapple",
{
"heatFrames": 180
}
]
},
{
"link": [
4,
3
],
"name": "Space Jump",
"requires": [
"SpaceJump",
{
  "heatFrames": 160
}
]
},
{
"link": [
4,
3
],
"name": "Walljump Leave with Runway",
"requires": [
"canWalljump",
{
"heatFrames": 280
}
],
"exitCondition": {
"leaveWithRunway": {
"length": 6,
"openEnd": 1
}
},
"unlocksDoors": [
{
"types": [
"missiles"
],
"requires": [
{
"heatFrames": 50
}
]
},
{
"types": [
"super"
],
"requires": []
},
{
"types": [
"powerbomb"
],
"requires": [
{
"heatFrames": 110
}
]
}
]
},
{
"link": [
4,
3
],
"name": "Grapple Leave with Runway",
"requires": [
"Grapple",
{
"heatFrames": 160
}
],
"exitCondition": {
"leaveWithRunway": {
"length": 6,
"openEnd": 1
}
},
"unlocksDoors": [
{
"types": [
"missiles"
],
"requires": [
{
"heatFrames": 50
}
]
},
{
"types": [
"super"
],
"requires": []
},
{
"types": [
"powerbomb"
],
"requires": [
{
"heatFrames": 110
}
]
}
]
},
{
"link": [
4,
3
],
"name": "Space Jump Leave with Runway",
"requires": [
"SpaceJump",
{
"heatFrames": 140
}
],
"exitCondition": {
"leaveWithRunway": {
"length": 6,
"openEnd": 1
}
},
"unlocksDoors": [
{
"types": [
"missiles"
],
"requires": [
{
"heatFrames": 50
}
]
},
{
"types": [
"super"
],
"requires": []
},
{
"types": [
"powerbomb"
],
"requires": [
{
"heatFrames": 110
}
]
}
]
},
{
"link": [
4,
3
],
"name": "Spike IBJ",
"requires": [
"h_HeatedIBJFromSpikes",
{
"heatFrames": 1100
}
]
},
{
"link": [
4,
3
],
"name": "MidAir SpringBall",
"requires": [
"canIframeSpikeJump",
{
"spikeHits": 1
},
"canSpringBallJumpMidAir",
{
"heatFrames": 300
}
]
},
{
"link": [
4,
3
],
"name": "Speedjump",
"requires": [
"canIframeSpikeJump",
{
"spikeHits": 1
},
"HiJump",
"SpeedBooster",
{
"heatFrames": 250
}
]
},
{
"link": [
4,
3
],
"name": "XMode Shinespark",
"requires": [
"h_canXMode",
"h_XModeSpikeHit",
"h_XModeSpikeHit",
"canTrickyJump",
"canIframeSpikeJump",
"canMidairShinespark",
{
"canShineCharge": {
"usedTiles": 33,
"openEnd": 2
}
},
{
"heatFrames": 480
},
{
"shinespark": {
"frames": 11,
"excessFrames": 4
}
}
],
"note": "A short hop from the ledge can bounce on the crumbles and into the spikes. Just be careful of being pushed back onto the crumble blocks by the spikes.",
"devNote": "Two spike hits are expected per attempt (with any additional leniency hits being multiplied by this amount)."
},
{
"link": [
4,
4
],
"name": "Crystal Flash",
"requires": [
"h_canHeatedCrystalFlash"
]
},
{
"link": [
4,
5
],
"name": "Base",
"requires": [
{
"heatFrames": 160
}
]
},
{
"link": [
5,
2
],
"name": "Base",
"requires": [
"Morph",
{
"heatFrames": 200
}
]
},
{
"link": [
5,
3
],
"name": "Crystal Flash Clip",
"requires": [
"h_heatProof",
"h_canJumpIntoCrystalFlashClip",
"Grapple"
],
"note": [
"Jump from below the respawning shot block into a Crystal Flash.",
"Use Grappling Beam as the Crystal Flash finishes to be placed next to the door.",
"Do not aim down as the Crystal Flash finishes."
]
},
{
"link": [
5,
5
],
"name": "Kago Farm",
"requires": [
"h_heatProof",
"Morph",
{
"resetRoom": {
"nodes": [
2
],
"mustStayPut": false
}
},
{
"refill": [
"Energy",
"Missile",
"Super",
"PowerBomb"
]
}
],
"devNote": "FIXME: Other nodes could be used to reset the room, with additional requirements."
},
{
"link": [
5,
5
],
"name": "Crystal Flash",
"requires": [
"h_canHeatedCrystalFlash"
]
}
]
}