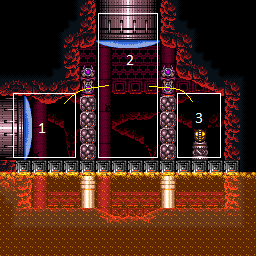
Lower Norfair Escape Power Bomb Room
Room ID: 147
|
Exit condition: {
"leaveWithRunway": {
"length": 4,
"openEnd": 0
}
}
|
|
Requires: "h_canHeatedCrystalFlash" |
|
From: 1
Left Door
To: 2
Top Door
Notable: true 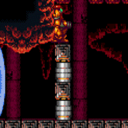
Stand next to the Crumble Blocks and jump into a Crystal Flash Clip to briefly clip into the ceiling above those blocks. Hold down exiting the Crystal Flash to shrink Samus' hitbox and on the next frame press forward to move above the Crumble blocks. Holding down and mashing forward sometimes works, or X-Ray can be used at the end of the Crystal Flash to more easily time the inputs. Requires: "h_heatProof" "h_canJumpIntoCrystalFlashClip" "canTrickyJump" |
|
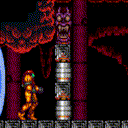
From: 1
Left Door
To: 3
Item
Notable: true In the previous room, avoid triggering the transition too deeply (position 238), otherwise Samus ends up stuck too far right in the wall. After teleporting, Samus should be standing inside the wall. Wait a moment for the acid to lower, then retract Grapple by pressing up, which will pull Samus left and down. Hold left, and release Grapple while still holding left. Perform a turn-around spin jump (to the right). Then morph and roll out to the left. Entrance condition: {
"comeInWithGrappleTeleport": {
"blockPositions": [
[
12,
12
],
[
12,
13
]
]
}
}
Requires: "Morph"
{
"heatFrames": 180
}
|
|
Requires: "h_canNavigateHeatRooms"
{
"heatFrames": 100
}
|
|
From: 2
Top Door
To: 2
Top Door
Requires: {
"heatFrames": 70
}
Exit condition: {
"leaveWithDoorFrameBelow": {
"height": 2
}
}
|
|
From: 2
Top Door
To: 2
Top Door
Requires: {
"heatFrames": 70
}
Exit condition: {
"leaveWithPlatformBelow": {
"height": 9,
"leftPosition": -2,
"rightPosition": 2
}
}
|
|
From: 2
Top Door
To: 2
Top Door
Requires: {
"heatFrames": 200
}
Exit condition: {
"leaveWithPlatformBelow": {
"height": 9,
"leftPosition": -6,
"rightPosition": 2
}
}
|
|
Requires: "h_canNavigateHeatRooms"
{
"heatFrames": 90
}
|
|
Requires: {
"heatFrames": 90
}
|
|
From: 3
Item
To: 2
Top Door
Requires: {
"heatFrames": 90
}
Exit condition: {
"leaveWithDoorFrameBelow": {
"height": 2
}
}
|
|
Requires: {
"heatFrames": 90
}
Exit condition: {
"leaveWithPlatformBelow": {
"height": 9,
"leftPosition": -2,
"rightPosition": 2
}
}
|
|
Requires: "h_canHeatedCrystalFlash" |
{
"$schema": "../../../schema/m3-room.schema.json",
"id": 147,
"name": "Lower Norfair Escape Power Bomb Room",
"area": "Norfair",
"subarea": "Lower",
"subsubarea": "East",
"playable": true,
"roomAddress": "0x7B55A",
"roomEnvironments": [
{
"heated": true
}
],
"nodes": [
{
"id": 1,
"name": "Left Door",
"nodeType": "door",
"nodeSubType": "blue",
"nodeAddress": "0x00199d2",
"doorEnvironments": [
{
"physics": "air"
}
]
},
{
"id": 2,
"name": "Top Door",
"nodeType": "door",
"nodeSubType": "blue",
"nodeAddress": "0x00199de",
"doorEnvironments": [
{
"physics": "air"
}
]
},
{
"id": 3,
"name": "Item",
"nodeType": "item",
"nodeSubType": "visible",
"nodeItem": "PowerBomb",
"nodeAddress": "0x78FD2"
}
],
"enemies": [],
"links": [
{
"from": 1,
"to": [
{
"id": 1
},
{
"id": 2
},
{
"id": 3
}
]
},
{
"from": 2,
"to": [
{
"id": 1
},
{
"id": 2
},
{
"id": 3
}
]
},
{
"from": 3,
"to": [
{
"id": 2
},
{
"id": 3
}
]
}
],
"strats": [
{
"link": [
1,
1
],
"name": "Leave With Runway",
"requires": [],
"exitCondition": {
"leaveWithRunway": {
"length": 4,
"openEnd": 0
}
}
},
{
"link": [
1,
1
],
"name": "Crystal Flash",
"requires": [
"h_canHeatedCrystalFlash"
]
},
{
"link": [
1,
2
],
"name": "Lower Norfair Jail Crystal Flash Clip",
"notable": true,
"requires": [
"h_heatProof",
"h_canJumpIntoCrystalFlashClip",
"canTrickyJump"
],
"note": [
"Stand next to the Crumble Blocks and jump into a Crystal Flash Clip to briefly clip into the ceiling above those blocks.",
"Hold down exiting the Crystal Flash to shrink Samus' hitbox and on the next frame press forward to move above the Crumble blocks.",
"Holding down and mashing forward sometimes works, or X-Ray can be used at the end of the Crystal Flash to more easily time the inputs."
]
},
{
"link": [
1,
3
],
"name": "Lower Norfair Jail Grapple Teleport Inside Wall",
"notable": true,
"entranceCondition": {
"comeInWithGrappleTeleport": {
"blockPositions": [
[
12,
12
],
[
12,
13
]
]
}
},
"requires": [
"Morph",
{
"heatFrames": 180
}
],
"note": [
"In the previous room, avoid triggering the transition too deeply (position 238), otherwise Samus ends up stuck too far right in the wall.",
"After teleporting, Samus should be standing inside the wall.",
"Wait a moment for the acid to lower, then retract Grapple by pressing up, which will pull Samus left and down.",
"Hold left, and release Grapple while still holding left.",
"Perform a turn-around spin jump (to the right).",
"Then morph and roll out to the left."
]
},
{
"link": [
2,
1
],
"name": "Base",
"requires": [
"h_canNavigateHeatRooms",
{
"heatFrames": 100
}
]
},
{
"link": [
2,
2
],
"name": "Leave With Door Frame Below",
"requires": [
{
  "heatFrames": 70
}
],
"exitCondition": {
"leaveWithDoorFrameBelow": {
"height": 2
}
}
},
{
"link": [
2,
2
],
"name": "Leave With Platform Below - Basic Platform",
"requires": [
{
  "heatFrames": 70
}
],
"exitCondition": {
"leaveWithPlatformBelow": {
"height": 9,
"leftPosition": -2,
"rightPosition": 2
}
}
},
{
"link": [
2,
2
],
"name": "Leave With Platform Below - Left Pillar Broken",
"requires": [
{
  "heatFrames": 200
}
],
"exitCondition": {
"leaveWithPlatformBelow": {
"height": 9,
"leftPosition": -6,
"rightPosition": 2
}
},
"devNote": [
"This applies to getting onto the ledge in Red Fish Room, or onto the bottom ledge on the right side of Mt. Everest.",
"It does not require opening the left door.",
"An additional tile could be used by opening the door, but that does not yet appear to have an application."
]
},
{
"link": [
2,
3
],
"name": "Base",
"requires": [
"h_canNavigateHeatRooms",
{
  "heatFrames": 90
}
]
},
{
"link": [
3,
2
],
"name": "Base",
"requires": [
{
  "heatFrames": 90
}
],
"devNote": [
"FIXME: Just reaching the node (as currently drawn in the room diagram) would be doable in 50 frames.",
"We have 90 here because getting into the door takes a bit more time than that.",
"Probably the room diagram should be redrawn with the node including the door only, not the platform below."
]
},
{
"link": [
3,
2
],
"name": "Leave With Door Frame Below",
"requires": [
{
  "heatFrames": 90
}
],
"exitCondition": {
"leaveWithDoorFrameBelow": {
"height": 2
}
},
"unlocksDoors": [
{
"types": [
"missiles"
],
"requires": [
{
"heatFrames": 50
}
]
},
{
"types": [
"super"
],
"requires": []
},
{
"types": [
"powerbomb"
],
"requires": [
{
"heatFrames": 110
}
]
}
]
},
{
"link": [
3,
2
],
"name": "Leave With Platform Below",
"requires": [
{
"heatFrames": 90
}
],
"exitCondition": {
"leaveWithPlatformBelow": {
"height": 9,
"leftPosition": -2,
"rightPosition": 2
}
},
"unlocksDoors": [
{
"types": [
"missiles"
],
"requires": [
{
"heatFrames": 50
}
]
},
{
"types": [
"super"
],
"requires": []
},
{
"types": [
"powerbomb"
],
"requires": [
{
"heatFrames": 110
}
]
}
]
},
{
"link": [
3,
3
],
"name": "Crystal Flash",
"requires": [
"h_canHeatedCrystalFlash"
]
}
]
}