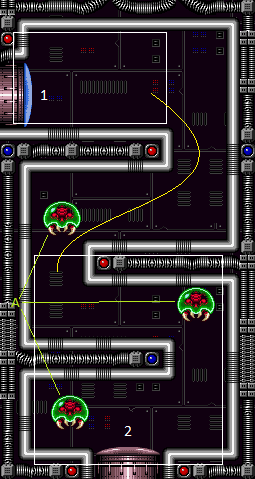
Metroid Room 4
Room ID: 229
|
Exit condition: {
"leaveWithRunway": {
"length": 10,
"openEnd": 1
}
} |
From: 1
Top Left Door
To: 1
Top Left Door


Kill or lure and freeze the Metroid down lower in the room off camera. One simple setup to position a Rinka is to stand or crouch a couple tiles away from the edge of the runway and freeze the Rinka from the right spawner. It is possible maintain a half-tile gap between the Rinka and the runway in order to extend it as far as possible. Requires: "h_trickyFrozenEnemyRunway" Exit condition: {
"leaveWithRunway": {
"length": 12,
"openEnd": 0
}
} |
|
To avoid heavy Rinka damage, perform the Crystal Flash while backed against the left door or inside the open door frame. Lay the Power Bomb immediately after destroying the Rinka with the closer spawn location. Entrance condition: {
"comeInNormally": {}
}Requires: "h_CrystalFlash" |
From: 1
Top Left Door
To: 1
Top Left Door
To avoid heavy Rinka damage, perform the Crystal Flash while backed against the left door or inside the open door frame. Lay the Power Bomb immediately after destroying the Rinka with the closer spawn location. Requires: {
"or": [
"Ice",
{
"or": [
"f_KilledMetroidRoom4",
{
"obstaclesCleared": [
"f_KilledMetroidRoom4"
]
}
]
}
]
}
"h_CrystalFlash" |
|
Exit condition: {
"leaveWithGModeSetup": {}
} |
|

Requires: {
"enemyDamage": {
"enemy": "Rinka",
"type": "contact",
"hits": 1
}
} |
From: 1
Top Left Door
To: 1
Top Left Door
Kill the Metroids while artificially morphed without any movement items. With just 5 Power Bombs, place one on the first platform to kill some Rinkas and to lure a second Metroid. Place a second in the same region, then drop down and quickly place a third on the second platform and fall to the third platform while the first two Metroids die. The remaining two Power Bombs can safely placed here to kill the final Metroid. Note that it is necessary to exit G-Mode before exiting the room in order for the Metroids to remain killed. Entrance condition: {
"comeInWithGMode": {
"mode": "any",
"morphed": true
}
}Requires: "canMetroidAvoid"
{
"ammo": {
"type": "PowerBomb",
"count": 5
}
}Clears obstacles: f_KilledMetroidRoom4 Sets flags: f_KilledMetroidRoom4 Dev note: FIXME: It may be possible to kill the Metroids starting at the bottom door. It is possible, but quite difficult to do this with 4 Power Bombs. |
|

On entry, kill or dodge the first Rinkas then Crystal Flash directly above or below a Rinka Spawner. Entrance condition: {
"comeInWithRMode": {}
}Requires: "canRModeCrystalFlashInterrupt"
{
"ammo": {
"type": "Missile",
"count": 10
}
}
{
"ammo": {
"type": "Super",
"count": 10
}
}Dev note: Note that this and the top of Metroid Room 2 are the only of the Metroid rooms that currently allows the Metroids to be alive, as they can get stuck on the ledge. This is not possible in G-mode, because the Power Bomb will kill the Rinka and prevent more from spawning. |
From: 1
Top Left Door
To: 1
Top Left Door
On entry, kill or dodge the first Rinkas then Crystal Flash. While in the light orb, Samus will be almost immune and the Metroids will take damage. Lure the Metroids after Crystal Flashing, and return to the light orb to kill them. Entrance condition: {
"comeInWithRMode": {}
}Requires: "canComplexGMode" "h_CrystalFlash" Clears obstacles: f_KilledMetroidRoom4 Sets flags: f_KilledMetroidRoom4 |
From: 1
Top Left Door
To: 1
Top Left Door


On entry, Crystal Flash, then lure the Metroids to the light orb. Note that it is necessary to exit G-Mode before exiting the room in order for the Metroids to remain killed. To do this, trigger Reserves on a Rinka below, or first damage down with some of the Metroids before killing them. To minimize damage taken, lure a Rinka away from its spawner before touching it to prevent multiple hits during the auto Reserve trigger. Entrance condition: {
"comeInWithGMode": {
"mode": "direct",
"morphed": true
}
}Requires: "canComplexGMode"
"canMetroidAvoid"
"h_artificialMorphCrystalFlash"
{
"autoReserveTrigger": {}
}Clears obstacles: f_KilledMetroidRoom4 Sets flags: f_KilledMetroidRoom4 |
|
Requires: {
"or": [
"f_KilledMetroidRoom4",
{
"obstaclesCleared": [
"f_KilledMetroidRoom4"
]
}
]
} |
|
Requires: "Ice"
{
"enemyKill": {
"enemies": [
[
"Metroid",
"Metroid",
"Metroid"
]
],
"explicitWeapons": [
"Super",
"Missile"
]
}
}
{
"or": [
"canDodgeWhileShooting",
{
  "enemyDamage": {
    "enemy": "Rinka",
    "type": "contact",
    "hits": 1
  }
}
]
}Clears obstacles: f_KilledMetroidRoom4 Sets flags: f_KilledMetroidRoom4 |
|
Requires: {
"enemyKill": {
"enemies": [
[
"Metroid",
"Metroid",
"Metroid"
]
],
"explicitWeapons": [
"PowerBomb"
]
}
}
{
"metroidFrames": 200
}Clears obstacles: f_KilledMetroidRoom4 Sets flags: f_KilledMetroidRoom4 |
|
Requires: {
"enemyKill": {
"enemies": [
[
"Metroid",
"Metroid"
],
[
"Metroid"
]
],
"explicitWeapons": [
"PowerBomb"
]
}
}
"canDodgeWhileShooting"Clears obstacles: f_KilledMetroidRoom4 Sets flags: f_KilledMetroidRoom4 |
From: 1
Top Left Door
To: 2
Bottom Door
Group the Metroids by descending the room. Then Kill all three Metroids with Power Bombs while avoiding damage. Requires: {
"notable": "Three Power Bomb Kill (Top to Bottom)"
}
{
"enemyKill": {
"enemies": [
[
"Metroid",
"Metroid",
"Metroid"
]
],
"explicitWeapons": [
"PowerBomb"
]
}
}
"canMetroidAvoid"Clears obstacles: f_KilledMetroidRoom4 Sets flags: f_KilledMetroidRoom4 |
|
Note that angle-down shots with a Metroid on Samus are unreliable, so it is recommended to jump and shoot down to open the door if one grabs her. Requires: "canDodgeWhileShooting"
{
"or": [
"ScrewAttack",
{
"haveBlueSuit": {}
},
{
"and": [
"Ice",
"Morph"
]
},
{
"and": [
"Ice",
"canTwoTileSqueeze"
]
}
]
}
{
"or": [
"canTrickyJump",
{
"enemyDamage": {
"enemy": "Rinka",
"type": "contact",
"hits": 1
}
}
]
} |
|

Run under the top Metroid then roll beneath the second and third. Requires: "canMetroidAvoid"
"Morph"
{
"metroidFrames": 20
}Dev note: This expects taking some damage through the door transition. It is possible to avoid all damage, but that would be easier using the Top Metroid Avoid notable (no point in using Morph). |
|
Avoid all of the Rinkas and Metroids with no equipment and taking no damage. One way to do this is to bait the top Rinkas to fire upwards, and then carefully spinjump around each corner as the Metroid below passes by. Requires: {
"notable": "Top Metroid Avoid"
}
"canMetroidAvoid"
"canCarefulJump" |
|
Taking a rinka hit stops the Metroid damage for a while and is less damage. Note that angle-down shots with a Metroid on Samus are unreliable, so it is recommended to jump and shoot down to open the door. Requires: "canDash"
{
"metroidFrames": 240
}Exit condition: {
"leaveNormally": {}
}Unlocks doors: {"types":["missiles"],"requires":[{"ammo":{"type":"Missile","count":1}},{"metroidFrames":50}]}
{"types":["super"],"requires":["canTrickyJump",{"metroidFrames":50}]}
{"types":["powerbomb"],"requires":[{"metroidFrames":50}]}Dev note: Power Bombs negate some of the damage taken while waiting for the door to unlock. |
From: 1
Top Left Door
To: 2
Bottom Door

Use X-ray immediately after shinecharging, in order to be able to dodge the Rinkas. Use spring ball to bounce through the 3-tile-high portion. Entrance condition: {
"comeInShinecharging": {
"length": 9,
"openEnd": 0
}
}Requires: {
"or": [
"f_KilledMetroidRoom4",
{
"obstaclesCleared": [
"f_KilledMetroidRoom4"
]
}
]
}
"canLongChainTemporaryBlue"
"canXRayTurnaround"
"canSpringBallBounce"Exit condition: {
"leaveWithTemporaryBlue": {
"direction": "any"
}
}Unlocks doors: {"types":["ammo"],"requires":[]}Dev note: It might technically be possible to get through the 3-tile-high part without Spring Ball, but this probably isn't really viable? |
|
Do not kill all three Metroids, or else they cannot be farmed again, leaving only Crystal Flash as an option. Kill two and lure the remaining Metroid to the top of the room. Shinecharge in the narrow space at the bottom door and use a Rinka to interrupt. Entrance condition: {
"comeInWithRMode": {}
}Requires: "Ice"
{
"or": [
{
"and": [
"h_CrystalFlashForReserveEnergy",
{
"or": [
"f_KilledMetroidRoom4",
{
"obstaclesCleared": [
"f_KilledMetroidRoom4"
]
}
]
}
]
},
{
"and": [
{
"not": "f_KilledMetroidRoom4"
},
"canRiskPermanentLossOfAccess",
"h_RModeCanRefillReserves",
{
"enemyKill": {
"enemies": [
[
"Metroid"
],
[
"Metroid"
]
],
"explicitWeapons": [
"Missile",
"Super"
]
}
},
{
"partialRefill": {
"type": "ReserveEnergy",
"limit": 20
}
},
{
"or": [
"Morph",
"canMetroidAvoid"
]
}
]
}
]
}
{
"canShineCharge": {
"usedTiles": 12,
"openEnd": 0
}
}
{
"autoReserveTrigger": {
"maxReserveEnergy": 95
}
}
"canRModeSparkInterrupt" |
|
Requires: {
"or": [
"f_KilledMetroidRoom4",
{
"obstaclesCleared": [
"f_KilledMetroidRoom4"
]
}
]
} |
|
Requires: "canDodgeWhileShooting"
{
"or": [
"Ice",
"ScrewAttack"
]
}
{
"or": [
"canTrickyJump",
{
"enemyDamage": {
"enemy": "Rinka",
"type": "contact",
"hits": 1
}
}
]
} |
|
The Metroids bounce off of Samus as long as she keeps moving. Requires: {
"haveBlueSuit": {}
} |
|
Requires: "Ice"
{
"enemyKill": {
"enemies": [
[
"Metroid",
"Metroid",
"Metroid"
]
],
"explicitWeapons": [
"Super",
"Missile"
]
}
}
{
"or": [
"canPrepareForNextRoom",
{
"resetRoom": {
"nodes": [
2
]
}
},
{
"and": [
"h_useMorphBombs",
"canDodgeWhileShooting",
"canEscapeEnemyGrab",
{
"metroidFrames": 120
}
]
}
]
}
{
"or": [
"canTrickyJump",
{
"enemyDamage": {
"enemy": "Rinka",
"type": "contact",
"hits": 1
}
}
]
}Clears obstacles: f_KilledMetroidRoom4 Sets flags: f_KilledMetroidRoom4 |
|

Climb to the middle section and kill all three Metroids while taking damage. Or use a tricky jump morph into the bottom left corner of room to kill all three Metroids from the bottom section. Requires: {
"enemyKill": {
"enemies": [
[
"Metroid",
"Metroid",
"Metroid"
]
],
"explicitWeapons": [
"PowerBomb"
]
}
}
{
"or": [
{
"and": [
"can4HighMidAirMorph",
"canTrickyJump",
{
"metroidFrames": 330
}
]
},
{
"metroidFrames": 530
}
]
}Clears obstacles: f_KilledMetroidRoom4 Sets flags: f_KilledMetroidRoom4 |
|

Move to the middle section after the first Metroid has died to kill the remaining two. Requires: {
"enemyKill": {
"enemies": [
[
"Metroid",
"Metroid"
],
[
"Metroid"
]
],
"explicitWeapons": [
"PowerBomb"
]
}
}
{
"metroidFrames": 280
}
{
"or": [
"canDodgeWhileShooting",
{
"metroidFrames": 100
}
]
}Clears obstacles: f_KilledMetroidRoom4 Sets flags: f_KilledMetroidRoom4 |
From: 2
Bottom Door
To: 1
Top Left Door
Take out the lower two Metroids with Power Bombs while avoiding damage. Then Kill the remaining one with three more Power Bombs. Requires: {
"notable": "Bottom Metroid Avoid (Six Power Bomb Dodge Kill)"
}
{
"enemyKill": {
"enemies": [
[
"Metroid",
"Metroid"
],
[
"Metroid"
]
],
"explicitWeapons": [
"PowerBomb"
]
}
}
"canMetroidAvoid"Clears obstacles: f_KilledMetroidRoom4 Sets flags: f_KilledMetroidRoom4 |
From: 2
Bottom Door
To: 1
Top Left Door
Move to the left side of the lowest section and jump morph before placing the Power Bomb to kill all three Metroids. Then Kill all three Metroids with Power Bombs while avoiding damage. Requires: {
"notable": "Bottom Metroid Avoid"
}
{
"enemyKill": {
"enemies": [
[
"Metroid",
"Metroid",
"Metroid"
]
],
"explicitWeapons": [
"PowerBomb"
]
}
}
"canMetroidAvoid"
"canHitbox"
{
"or": [
"can4HighMidAirMorph",
"canInsaneJump"
]
}Clears obstacles: f_KilledMetroidRoom4 Sets flags: f_KilledMetroidRoom4 |
From: 2
Bottom Door
To: 1
Top Left Door
Avoid all of the Rinkas and Metroids with no equipment and taking no damage. Begin by shooting the bottom Metroid hold it in place, and wait right below the first ledge. Once the middle Metroid passes by, jump up and shoot any Rinkas that are in the way. Repeat for the next ledge, clear any Rinkas, and then run to the door. Requires: {
"notable": "Bottom Metroid Avoid"
}
"canMetroidAvoid"
"canDodgeWhileShooting"
"canCarefulJump"
{
"or": [
"canDash",
"canInsaneJump"
]
} |
|
Taking a rinka hit stops the Metroid damage for a while and is less damage. Requires: "canDash"
{
"enemyDamage": {
"enemy": "Rinka",
"type": "contact",
"hits": 1
}
}
{
"metroidFrames": 256
}Exit condition: {
"leaveNormally": {}
}Unlocks doors: {"types":["missiles"],"requires":[{"metroidFrames":50},{"ammo":{"type":"Missile","count":2}}]}
{"types":["super"],"requires":[{"ammo":{"type":"Super","count":1}}]}
{"types":["powerbomb"],"requires":[]}Dev note: Avoiding Rinkas is more difficult than getting hit, so it is not important to know to want to get hit. Opening a door with a Power Bomb is energy neutral since you can place it early. |
|
Entrance condition: {
"comeInWithSpark": {},
"comesThroughToilet": "any"
}Requires: {
"or": [
"f_KilledMetroidRoom4",
{
"obstaclesCleared": [
"f_KilledMetroidRoom4"
]
}
]
}
{
"shinespark": {
"frames": 1,
"excessFrames": 1
}
}Dev note: This strat is not useful in-room, but can satisfy a strat in the room before with an exit shinespark. This requires the Metroids to be killed, because otherwise Samus will be grabbed on entry, and the other 2->1 strats won't work. |
|
Use two frozen Rinkas to clip down past the door shell. Time the Rinkas to be at correct heights by killing both, starting with the higher Rinka. Freeze the lower Rinka where it is slightly inside the door shell for the moonfall to fall all the way through without any additional input. Requires: "canTrickyUseFrozenEnemies" "canEnemyStuckMoonfall" Bypasses door shell: true |
|
Do not kill all three Metroids, or else they cannot be farmed again, leaving only Crystal Flash as an option. Kill two and lure the remaining Metroid to the top of the room. Shinecharge in the narrow space at the bottom door and use a Rinka to interrupt. Entrance condition: {
"comeInWithRMode": {},
"comesThroughToilet": "no"
}Requires: "Ice"
{
"or": [
{
"and": [
{
"or": [
"f_KilledMetroidRoom4",
{
"obstaclesCleared": [
"f_KilledMetroidRoom4"
]
}
]
},
"h_CrystalFlashForReserveEnergy"
]
},
{
"and": [
{
"not": "f_KilledMetroidRoom4"
},
"canRiskPermanentLossOfAccess",
"h_RModeCanRefillReserves",
{
"enemyKill": {
"enemies": [
[
"Metroid"
],
[
"Metroid"
]
],
"explicitWeapons": [
"Missile",
"Super"
]
}
},
{
"partialRefill": {
"type": "ReserveEnergy",
"limit": 20
}
},
"canCarefulJump"
]
}
]
}
{
"canShineCharge": {
"usedTiles": 12,
"openEnd": 0
}
}
{
"autoReserveTrigger": {
"maxReserveEnergy": 95
}
}
"canRModeSparkInterrupt" |
|
If alive, the Metroids do up to 78 damage before the Rinka hits. Entering through the middle of the door will require less damage. Requires: {
"enemyDamage": {
"enemy": "Rinka",
"type": "contact",
"hits": 1
}
}
{
"or": [
{
"or": [
"f_KilledMetroidRoom4",
{
"obstaclesCleared": [
"f_KilledMetroidRoom4"
]
}
]
},
{
"metroidFrames": 104
}
]
} |
|

On entry, kill or dodge the first Rinkas then Crystal Flash directly above or below a Rinka Spawner. Entrance condition: {
"comeInWithRMode": {},
"comesThroughToilet": "no"
}Requires: {
"or": [
"f_KilledMetroidRoom4",
{
"obstaclesCleared": [
"f_KilledMetroidRoom4"
]
}
]
}
"canRModeCrystalFlashInterrupt"
{
  "ammo": {
    "type": "Missile",
    "count": 10
  }
}
{
  "ammo": {
    "type": "Super",
    "count": 10
  }
}
Dev note: There could be a variant with the Metroids alive, but they will all lure to Samus and the light orb will disappear, so she will take heavy damage. This is not possible in G-mode, because the Power Bomb will kill the Rinka and prevent more from spawning. |
{
"$schema": "../../../schema/m3-room.schema.json",
"id": 229,
"name": "Metroid Room 4",
"area": "Tourian",
"subarea": "Main",
"roomAddress": "0x7DBCD",
"roomEnvironments": [
{
"heated": false
}
],
"mapTileMask": [
[
1
],
[
1
]
],
"nodes": [
{
"id": 1,
"name": "Top Left Door",
"nodeType": "door",
"nodeSubType": "blue",
"nodeAddress": "0x001a9f0",
"doorOrientation": "left",
"doorEnvironments": [
{
"physics": "air"
}
],
"mapTileMask": [
[
2
],
[
1
]
]
},
{
"id": 2,
"name": "Bottom Door",
"nodeType": "door",
"nodeSubType": "gray",
"nodeAddress": "0x001a9fc",
"doorOrientation": "down",
"doorEnvironments": [
{
"physics": "air"
}
],
"locks": [
{
"name": "Metroid Room 4 Gray Lock (to Tourian Hoppers)",
"lockType": "killEnemies",
"unlockStrats": [
{
"name": "Base",
"requires": [
{
  "or": [
    "f_KilledMetroidRoom4",
    {
      "obstaclesCleared": [
        "f_KilledMetroidRoom4"
      ]
    }
  ]
}
],
"flashSuitChecked": true,
"blueSuitChecked": true
}
],
"yields": [
"f_KilledMetroidRoom4"
]
}
],
"mapTileMask": [
[
1
],
[
2
]
]
}
],
"enemies": [
{
"id": "e1",
"groupName": "Metroid Room 4 Metroids",
"enemyName": "Metroid",
"quantity": 3,
"homeNodes": [
2
],
"stopSpawn": [
"f_KilledMetroidRoom4"
]
},
{
"id": "e2",
"groupName": "Metroid Room 4 Rinkas",
"enemyName": "Rinka",
"quantity": 4,
"homeNodes": [
1,
2
]
}
],
"strats": [
{
"link": [
1,
1
],
"name": "Base (Unlock Door)",
"requires": [],
"unlocksDoors": [
{
"types": [
"ammo"
],
"requires": []
}
],
"flashSuitChecked": true,
"blueSuitChecked": true
},
{
"link": [
1,
1
],
"name": "Base (Come In Normally)",
"entranceCondition": {
"comeInNormally": {}
},
"requires": [],
"flashSuitChecked": true,
"blueSuitChecked": true
},
{
"link": [
1,
1
],
"name": "Base (Come In With Mockball)",
"entranceCondition": {
"comeInWithMockball": {
"adjacentMinTiles": 0,
"remoteAndLandingMinTiles": [
[
0,
0
]
],
"speedBooster": "any"
}
},
"requires": [],
"flashSuitChecked": true,
"blueSuitChecked": true
},
{
"link": [
2,
2
],
"name": "Base (Unlock Door)",
"requires": [],
"unlocksDoors": [
{
"types": [
"ammo"
],
"requires": []
}
],
"flashSuitChecked": true,
"blueSuitChecked": true
},
{
"link": [
2,
2
],
"name": "Base (Come In Normally)",
"entranceCondition": {
"comeInNormally": {}
},
"requires": [],
"flashSuitChecked": true,
"blueSuitChecked": true
},
{
"link": [
2,
2
],
"name": "Base (Come In With Grapple Jump)",
"entranceCondition": {
"comeInWithGrappleJump": {
"position": "any"
}
},
"requires": [],
"flashSuitChecked": true,
"blueSuitChecked": true
},
{
"name": "Base",
"requires": [
{
  "or": [
    "f_KilledMetroidRoom4",
    {
      "obstaclesCleared": [
        "f_KilledMetroidRoom4"
      ]
    }
  ]
}
],
"flashSuitChecked": true,
"blueSuitChecked": true,
"link": [
2,
2
],
"setsFlags": [
"f_KilledMetroidRoom4"
],
"clearsObstacles": [
"f_KilledMetroidRoom4"
]
},
{
"id": 1,
"link": [
1,
1
],
"name": "Leave with Runway",
"requires": [],
"exitCondition": {
"leaveWithRunway": {
"length": 10,
"openEnd": 1
}
},
"flashSuitChecked": true,
"blueSuitChecked": true
},
{
"id": 2,
"link": [
1,
1
],
"name": "Leave With Runway - Frozen Rinka",
"requires": [
"h_trickyFrozenEnemyRunway"
],
"exitCondition": {
"leaveWithRunway": {
"length": 12,
"openEnd": 0
}
},
"flashSuitChecked": true,
"blueSuitChecked": true,
"note": [
"Kill or lure and freeze the Metroid down lower in the room off camera.",
"One simple setup to position a Rinka is to stand or crouch a couple tiles away from the edge of the runway and freeze the Rinka from the right spawner.",
"It is possible maintain a half-tile gap between the Rinka and the runway in order to extend it as far as possible."
]
},
{
"id": 3,
"link": [
1,
1
],
"name": "Crystal Flash (Come In Normally)",
"entranceCondition": {
"comeInNormally": {}
},
"requires": [
"h_CrystalFlash"
],
"flashSuitChecked": true,
"blueSuitChecked": true,
"note": [
"To avoid heavy Rinka damage, perform the Crystal Flash while backed against the left door or inside the open door frame.",
"Lay the Power Bomb immediately after destroying the Rinka with the closer spawn location."
]
},
{
"id": 29,
"link": [
1,
1
],
"name": "Crystal Flash (Metroids Dead or Frozen)",
"requires": [
{
"or": [
"Ice",
{
"or": [
"f_KilledMetroidRoom4",
{
"obstaclesCleared": [
"f_KilledMetroidRoom4"
]
}
]
}
]
},
"h_CrystalFlash"
],
"flashSuitChecked": true,
"blueSuitChecked": true,
"note": [
"To avoid heavy Rinka damage, perform the Crystal Flash while backed against the left door or inside the open door frame.",
"Lay the Power Bomb immediately after destroying the Rinka with the closer spawn location."
]
},
{
"id": 4,
"link": [
1,
1
],
"name": "G-Mode Setup - Get Hit By Rinka",
"requires": [],
"exitCondition": {
"leaveWithGModeSetup": {}
},
"flashSuitChecked": true,
"blueSuitChecked": true
},
{
"id": 5,
"link": [
1,
1
],
"name": "G-Mode Regain Mobility",
"requires": [
{
"enemyDamage": {
"enemy": "Rinka",
"type": "contact",
"hits": 1
}
}
],
"gModeRegainMobility": {},
"flashSuitChecked": true,
"blueSuitChecked": true
},
{
"id": 6,
"link": [
1,
1
],
"name": "G-Mode Morph Power Bomb Metroid Kill",
"entranceCondition": {
"comeInWithGMode": {
"mode": "any",
"morphed": true
}
},
"requires": [
"canMetroidAvoid",
{
"ammo": {
"type": "PowerBomb",
"count": 5
}
}
],
"setsFlags": [
"f_KilledMetroidRoom4"
],
"flashSuitChecked": true,
"blueSuitChecked": true,
"note": [
"Kill the Metroids while artificially morphed without any movement items.",
"With just 5 Power Bombs, place one on the first platform to kill some Rinkas and to lure a second Metroid.",
"Place a second in the same region, then drop down and quickly place a third on the second platform and fall to the third platform while the first two Metroids die.",
"The remaining two Power Bombs can safely placed here to kill the final Metroid.",
"Note that it is necessary to exit G-Mode before exiting the room in order for the Metroids to remain killed."
],
"devNote": [
"FIXME: It may be possible to kill the Metroids starting at the bottom door.",
"It is possible, but quite difficult to do this with 4 Power Bombs."
],
"clearsObstacles": [
"f_KilledMetroidRoom4"
]
},
{
"id": 32,
"link": [
1,
1
],
"name": "R-Mode Crystal Flash Interrupt",
"entranceCondition": {
"comeInWithRMode": {}
},
"requires": [
"canRModeCrystalFlashInterrupt",
{
"ammo": {
"type": "Missile",
"count": 10
}
},
{
"ammo": {
"type": "Super",
"count": 10
}
}
],
"flashSuitChecked": true,
"blueSuitChecked": true,
"note": [
"On entry, kill or dodge the first Rinkas then Crystal Flash directly above or below a Rinka Spawner."
],
"devNote": [
"Note that this and the top of Metroid Room 2 are the only of the Metroid rooms that currently allows the Metroids to be alive, as they can get stuck on the ledge.",
"This is not possible in G-mode, because the Power Bomb will kill the Rinka and prevent more from spawning."
]
},
{
"id": 33,
"link": [
1,
1
],
"name": "R-Mode Crystal Flash Light Orb Metroid Kill",
"entranceCondition": {
"comeInWithRMode": {}
},
"requires": [
"canComplexGMode",
"h_CrystalFlash"
],
"setsFlags": [
"f_KilledMetroidRoom4"
],
"flashSuitChecked": true,
"blueSuitChecked": true,
"note": [
"On entry, kill or dodge the first Rinkas then Crystal Flash. While in the light orb, Samus will be almost immune and the Metroids will take damage.",
"Lure the Metroids after Crystal Flashing, and return to the light orb to kill them."
],
"clearsObstacles": [
"f_KilledMetroidRoom4"
]
},
{
"id": 31,
"link": [
1,
1
],
"name": "Direct G-Mode Morph Crystal Flash Light Orb Metroid Kill",
"entranceCondition": {
"comeInWithGMode": {
"mode": "direct",
"morphed": true
}
},
"requires": [
"canComplexGMode",
"canMetroidAvoid",
"h_artificialMorphCrystalFlash",
{
"autoReserveTrigger": {}
}
],
"setsFlags": [
"f_KilledMetroidRoom4"
],
"flashSuitChecked": true,
"blueSuitChecked": true,
"note": [
"On entry, Crystal Flash, then lure the Metroids to the light orb.",
"Note that it is necessary to exit G-Mode before exiting the room in order for the Metroids to remain killed.",
"To do this, trigger Reserves on a Rinka below, or first damage down with some of the Metroids before killing them.",
"To minimize damage taken, lure a Rinka away from its spawner before touching it to prevent multiple hits during the auto Reserve trigger."
],
"clearsObstacles": [
"f_KilledMetroidRoom4"
]
},
{
"id": 7,
"link": [
1,
2
],
"name": "Already Cleared",
"requires": [
{
"or": [
"f_KilledMetroidRoom4",
{
"obstaclesCleared": [
"f_KilledMetroidRoom4"
]
}
]
}
],
"flashSuitChecked": true,
"blueSuitChecked": true
},
{
"id": 8,
"link": [
1,
2
],
"name": "Ammo Kill",
"requires": [
"Ice",
{
"enemyKill": {
"enemies": [
[
"Metroid",
"Metroid",
"Metroid"
]
],
"explicitWeapons": [
"Super",
"Missile"
]
}
},
{
"or": [
"canDodgeWhileShooting",
{
"enemyDamage": {
"enemy": "Rinka",
"type": "contact",
"hits": 1
}
}
]
}
],
"setsFlags": [
"f_KilledMetroidRoom4"
],
"flashSuitChecked": true,
"blueSuitChecked": true,
"clearsObstacles": [
"f_KilledMetroidRoom4"
]
},
{
"id": 9,
"link": [
1,
2
],
"name": "Tank and PB Kill",
"requires": [
{
"enemyKill": {
"enemies": [
[
"Metroid",
"Metroid",
"Metroid"
]
],
"explicitWeapons": [
"PowerBomb"
]
}
},
{
"metroidFrames": 200
}
],
"setsFlags": [
"f_KilledMetroidRoom4"
],
"flashSuitChecked": true,
"blueSuitChecked": true,
"clearsObstacles": [
"f_KilledMetroidRoom4"
]
},
{
"id": 10,
"link": [
1,
2
],
"name": "Safe Six Power Bomb Kill",
"requires": [
{
"enemyKill": {
"enemies": [
[
"Metroid",
"Metroid"
],
[
"Metroid"
]
],
"explicitWeapons": [
"PowerBomb"
]
}
},
"canDodgeWhileShooting"
],
"setsFlags": [
"f_KilledMetroidRoom4"
],
"flashSuitChecked": true,
"blueSuitChecked": true,
"clearsObstacles": [
"f_KilledMetroidRoom4"
]
},
{
"id": 11,
"link": [
1,
2
],
"name": "Three Power Bomb Kill (Top to Bottom)",
"requires": [
{
"notable": "Three Power Bomb Kill (Top to Bottom)"
},
{
"enemyKill": {
"enemies": [
[
"Metroid",
"Metroid",
"Metroid"
]
],
"explicitWeapons": [
"PowerBomb"
]
}
},
"canMetroidAvoid"
],
"setsFlags": [
"f_KilledMetroidRoom4"
],
"flashSuitChecked": true,
"blueSuitChecked": true,
"note": [
"Group the Metroids by descending the room.",
"Then Kill all three Metroids with Power Bombs while avoiding damage."
],
"clearsObstacles": [
"f_KilledMetroidRoom4"
]
},
{
"id": 12,
"link": [
1,
2
],
"name": "Easy Evade",
"requires": [
"canDodgeWhileShooting",
{
"or": [
"ScrewAttack",
{
  "haveBlueSuit": {}
},
{
"and": [
"Ice",
"Morph"
]
},
{
"and": [
"Ice",
"canTwoTileSqueeze"
]
}
]
},
{
"or": [
"canTrickyJump",
{
"enemyDamage": {
"enemy": "Rinka",
"type": "contact",
"hits": 1
}
}
]
}
],
"flashSuitChecked": true,
"blueSuitChecked": true,
"note": "Note that angle-down shots with a Metroid on Samus are unreliable, so it is recommended to jump and shoot down to open the door if one grabs her."
},
{
"id": 13,
"link": [
1,
2
],
"name": "Harder Evade",
"requires": [
"canMetroidAvoid",
"Morph",
{
"metroidFrames": 20
}
],
"flashSuitChecked": true,
"blueSuitChecked": true,
"note": "Run under the top Metroid then roll beneath the second and third.",
"devNote": [
"This expects taking some damage through the door transition.",
"It is possible to avoid all damage, but that would be easier using the Top Metroid Avoid notable (no point in using Morph)."
]
},
{
"id": 14,
"link": [
1,
2
],
"name": "Top Metroid Avoid",
"requires": [
{
"notable": "Top Metroid Avoid"
},
"canMetroidAvoid",
"canCarefulJump"
],
"flashSuitChecked": true,
"blueSuitChecked": true,
"note": [
"Avoid all of the Rinkas and Metroids with no equipment and taking no damage.",
"One way to do this is to bait the top Rinkas to fire upwards, and then carefully spinjump around each corner as the Metroid below passes by."
]
},
{
"id": 15,
"link": [
1,
2
],
"name": "Tank the Damage",
"requires": [
"canDash",
{
"metroidFrames": 240
}
],
"exitCondition": {
"leaveNormally": {}
},
"unlocksDoors": [
{
"types": [
"missiles"
],
"requires": [
{
"ammo": {
"type": "Missile",
"count": 1
}
},
{
"metroidFrames": 50
}
]
},
{
"types": [
"super"
],
"requires": [
"canTrickyJump",
{
"metroidFrames": 50
}
]
},
{
"types": [
"powerbomb"
],
"requires": [
{
"metroidFrames": 50
}
]
}
],
"flashSuitChecked": true,
"blueSuitChecked": true,
"note": [
"Taking a rinka hit stops the Metroid damage for a while and is less damage.",
"Note that angle-down shots with a Metroid on Samus are unreliable, so it is recommended to jump and shoot down to open the door."
],
"devNote": [
"Power Bombs negate some of the damage taken while waiting for the door to unlock."
]
},
{
"id": 16,
"link": [
1,
2
],
"name": "Come in Shinecharging, Leave With Temporary Blue",
"entranceCondition": {
"comeInShinecharging": {
"length": 9,
"openEnd": 0
}
},
"requires": [
{
"or": [
"f_KilledMetroidRoom4",
{
"obstaclesCleared": [
"f_KilledMetroidRoom4"
]
}
]
},
"canLongChainTemporaryBlue",
"canXRayTurnaround",
"canSpringBallBounce"
],
"exitCondition": {
"leaveWithTemporaryBlue": {
"direction": "any"
}
},
"unlocksDoors": [
{
"types": [
"ammo"
],
"requires": []
}
],
"flashSuitChecked": true,
"blueSuitChecked": true,
"note": [
"Use X-ray immediately after shinecharging, in order to be able to dodge the Rinkas.",
"Use spring ball to bounce through the 3-tile-high portion."
],
"devNote": [
"It might technically be possible to get through the 3-tile-high part without Spring Ball, but this probably isn't really viable?"
]
},
{
"id": 34,
"link": [
1,
2
],
"name": "R-Mode Spark Interrupt",
"entranceCondition": {
"comeInWithRMode": {}
},
"requires": [
"Ice",
{
"or": [
{
"and": [
"h_CrystalFlashForReserveEnergy",
{
"or": [
"f_KilledMetroidRoom4",
{
"obstaclesCleared": [
"f_KilledMetroidRoom4"
]
}
]
}
]
},
{
"and": [
{
"not": "f_KilledMetroidRoom4"
},
"canRiskPermanentLossOfAccess",
"h_RModeCanRefillReserves",
{
"enemyKill": {
"enemies": [
[
"Metroid"
],
[
"Metroid"
]
],
"explicitWeapons": [
"Missile",
"Super"
]
}
},
{
"partialRefill": {
"type": "ReserveEnergy",
"limit": 20
}
},
{
"or": [
"Morph",
"canMetroidAvoid"
]
}
]
}
]
},
{
"canShineCharge": {
"usedTiles": 12,
"openEnd": 0
}
},
{
"autoReserveTrigger": {
"maxReserveEnergy": 95
}
},
"canRModeSparkInterrupt"
],
"flashSuitChecked": true,
"blueSuitChecked": true,
"note": [
"Do not kill all three Metroids, or else they cannot be farmed again, leaving only Crystal Flash as an option.",
"Kill two and lure the remaining Metroid to the top of the room. Shinecharge in the narrow space at the bottom door",
"and use a Rinka to interrupt."
]
},
{
"id": 17,
"link": [
2,
1
],
"name": "Already Cleared",
"requires": [
{
"or": [
"f_KilledMetroidRoom4",
{
"obstaclesCleared": [
"f_KilledMetroidRoom4"
]
}
]
}
],
"flashSuitChecked": true,
"blueSuitChecked": true
},
{
"id": 18,
"link": [
2,
1
],
"name": "Easy Evade",
"requires": [
"canDodgeWhileShooting",
{
"or": [
"Ice",
"ScrewAttack"
]
},
{
"or": [
"canTrickyJump",
{
"enemyDamage": {
"enemy": "Rinka",
"type": "contact",
"hits": 1
}
}
]
}
],
"flashSuitChecked": true,
"blueSuitChecked": true
},
{
"id": 37,
"link": [
2,
1
],
"name": "Blue Suit Metroid Avoid",
"requires": [
{
"haveBlueSuit": {}
}
],
"flashSuitChecked": true,
"blueSuitChecked": true,
"note": "The Metroids bounce off of Samus as long as she keeps moving."
},
{
"id": 19,
"link": [
2,
1
],
"name": "Ammo Kill",
"requires": [
"Ice",
{
"enemyKill": {
"enemies": [
[
"Metroid",
"Metroid",
"Metroid"
]
],
"explicitWeapons": [
"Super",
"Missile"
]
}
},
{
"or": [
"canPrepareForNextRoom",
{
"resetRoom": {
"nodes": [
2
]
}
},
{
"and": [
"h_useMorphBombs",
"canDodgeWhileShooting",
"canEscapeEnemyGrab",
{
"metroidFrames": 120
}
]
}
]
},
{
"or": [
"canTrickyJump",
{
"enemyDamage": {
"enemy": "Rinka",
"type": "contact",
"hits": 1
}
}
]
}
],
"setsFlags": [
"f_KilledMetroidRoom4"
],
"flashSuitChecked": true,
"blueSuitChecked": true,
"clearsObstacles": [
"f_KilledMetroidRoom4"
]
},
{
"id": 20,
"link": [
2,
1
],
"name": "Tank and Three PB Kill",
"requires": [
{
"enemyKill": {
"enemies": [
[
"Metroid",
"Metroid",
"Metroid"
]
],
"explicitWeapons": [
"PowerBomb"
]
}
},
{
"or": [
{
"and": [
"can4HighMidAirMorph",
"canTrickyJump",
{
"metroidFrames": 330
}
]
},
{
"metroidFrames": 530
}
]
}
],
"setsFlags": [
"f_KilledMetroidRoom4"
],
"flashSuitChecked": true,
"blueSuitChecked": true,
"note": [
"Climb to the middle section and kill all three Metroids while taking damage.",
"Or use a tricky jump morph into the bottom left corner of room to kill all three Metroids from the bottom section."
],
"clearsObstacles": [
"f_KilledMetroidRoom4"
]
},
{
"id": 21,
"link": [
2,
1
],
"name": "Tank and Six PB Kill",
"requires": [
{
"enemyKill": {
"enemies": [
[
"Metroid",
"Metroid"
],
[
"Metroid"
]
],
"explicitWeapons": [
"PowerBomb"
]
}
},
{
"metroidFrames": 280
},
{
"or": [
"canDodgeWhileShooting",
{
"metroidFrames": 100
}
]
}
],
"setsFlags": [
"f_KilledMetroidRoom4"
],
"flashSuitChecked": true,
"blueSuitChecked": true,
"note": "Move to the middle section after the first Metroid has died to kill the remaining two.",
"clearsObstacles": [
"f_KilledMetroidRoom4"
]
},
{
"id": 22,
"link": [
2,
1
],
"name": "Bottom Metroid Avoid (Six Power Bomb Dodge Kill)",
"requires": [
{
"notable": "Bottom Metroid Avoid (Six Power Bomb Dodge Kill)"
},
{
"enemyKill": {
"enemies": [
[
"Metroid",
"Metroid"
],
[
"Metroid"
]
],
"explicitWeapons": [
"PowerBomb"
]
}
},
"canMetroidAvoid"
],
"setsFlags": [
"f_KilledMetroidRoom4"
],
"flashSuitChecked": true,
"blueSuitChecked": true,
"note": [
"Take out the lower two Metroids with Power Bombs while avoiding damage.",
"Then Kill the remaining one with three more Power Bombs."
],
"clearsObstacles": [
"f_KilledMetroidRoom4"
]
},
{
"id": 23,
"link": [
2,
1
],
"name": "Bottom Metroid Avoid (Three Power Bomb Dodge Kill)",
"requires": [
{
"notable": "Bottom Metroid Avoid"
},
{
"enemyKill": {
"enemies": [
[
"Metroid",
"Metroid",
"Metroid"
]
],
"explicitWeapons": [
"PowerBomb"
]
}
},
"canMetroidAvoid",
"canHitbox",
{
"or": [
"can4HighMidAirMorph",
"canInsaneJump"
]
}
],
"setsFlags": [
"f_KilledMetroidRoom4"
],
"flashSuitChecked": true,
"blueSuitChecked": true,
"note": [
"Move to the left side of the lowest section and jump morph before placing the Power Bomb to kill all three Metroids.",
"Then Kill all three Metroids with Power Bombs while avoiding damage."
],
"clearsObstacles": [
"f_KilledMetroidRoom4"
]
},
{
"id": 24,
"link": [
2,
1
],
"name": "Bottom Metroid Avoid (Traverse Room)",
"requires": [
{
"notable": "Bottom Metroid Avoid"
},
"canMetroidAvoid",
"canDodgeWhileShooting",
"canCarefulJump",
{
"or": [
"canDash",
"canInsaneJump"
]
}
],
"flashSuitChecked": true,
"blueSuitChecked": true,
"note": [
"Avoid all of the Rinkas and Metroids with no equipment and taking no damage.",
"Begin by shooting the bottom Metroid hold it in place, and wait right below the first ledge.",
"Once the middle Metroid passes by, jump up and shoot any Rinkas that are in the way.",
"Repeat for the next ledge, clear any Rinkas, and then run to the door."
]
},
{
"id": 25,
"link": [
2,
1
],
"name": "Tank the Damage",
"requires": [
"canDash",
{
"enemyDamage": {
"enemy": "Rinka",
"type": "contact",
"hits": 1
}
},
{
"metroidFrames": 256
}
],
"exitCondition": {
"leaveNormally": {}
},
"unlocksDoors": [
{
"types": [
"missiles"
],
"requires": [
{
"metroidFrames": 50
},
{
"ammo": {
"type": "Missile",
"count": 2
}
}
]
},
{
"types": [
"super"
],
"requires": [
{
"ammo": {
"type": "Super",
"count": 1
}
}
]
},
{
"types": [
"powerbomb"
],
"requires": []
}
],
"flashSuitChecked": true,
"blueSuitChecked": true,
"note": "Taking a rinka hit stops the Metroid damage for a while and is less damage.",
"devNote": [
"Avoiding Rinkas is more difficult than getting hit, so it is not important to know to want to get hit.",
"Opening a door with a Power Bomb is energy neutral since you can place it early."
]
},
{
"id": 27,
"link": [
2,
2
],
"name": "Shinespark",
"entranceCondition": {
"comeInWithSpark": {},
"comesThroughToilet": "any"
},
"requires": [
{
"or": [
"f_KilledMetroidRoom4",
{
"obstaclesCleared": [
"f_KilledMetroidRoom4"
]
}
]
},
{
"shinespark": {
"frames": 1,
"excessFrames": 1
}
}
],
"flashSuitChecked": true,
"blueSuitChecked": true,
"devNote": [
"This strat is not useful in-room, but can satisfy a strat in the room before with an exit shinespark.",
"This requires the Metroids to be killed, because otherwise Samus will be grabbed on entry, and the other 2->1 strats won't work."
]
},
{
"id": 30,
"link": [
2,
2
],
"name": "Ice Moonfall Door Lock Skip",
"requires": [
"canTrickyUseFrozenEnemies",
"canEnemyStuckMoonfall"
],
"bypassesDoorShell": "yes",
"flashSuitChecked": true,
"blueSuitChecked": true,
"note": [
"Use two frozen Rinkas to clip down past the door shell.",
"Time the Rinkas to be at correct heights by killing both, starting with the higher Rinka.",
"Freeze the lower Rinka where it is slightly inside the door shell for the moonfall to fall all the way through without any additional input."
]
},
{
"id": 35,
"link": [
2,
2
],
"name": "R-Mode Spark Interrupt",
"entranceCondition": {
"comeInWithRMode": {},
"comesThroughToilet": "no"
},
"requires": [
"Ice",
{
"or": [
{
"and": [
{
"or": [
"f_KilledMetroidRoom4",
{
"obstaclesCleared": [
"f_KilledMetroidRoom4"
]
}
]
},
"h_CrystalFlashForReserveEnergy"
]
},
{
"and": [
{
"not": "f_KilledMetroidRoom4"
},
"canRiskPermanentLossOfAccess",
"h_RModeCanRefillReserves",
{
"enemyKill": {
"enemies": [
[
"Metroid"
],
[
"Metroid"
]
],
"explicitWeapons": [
"Missile",
"Super"
]
}
},
{
"partialRefill": {
"type": "ReserveEnergy",
"limit": 20
}
},
"canCarefulJump"
]
}
]
},
{
"canShineCharge": {
"usedTiles": 12,
"openEnd": 0
}
},
{
"autoReserveTrigger": {
"maxReserveEnergy": 95
}
},
"canRModeSparkInterrupt"
],
"flashSuitChecked": true,
"blueSuitChecked": true,
"note": [
"Do not kill all three Metroids, or else they cannot be farmed again, leaving only Crystal Flash as an option.",
"Kill two and lure the remaining Metroid to the top of the room. Shinecharge in the narrow space at the bottom door",
"and use a Rinka to interrupt."
]
},
{
"id": 28,
"link": [
2,
2
],
"name": "G-Mode Regain Mobility",
"requires": [
{
"enemyDamage": {
"enemy": "Rinka",
"type": "contact",
"hits": 1
}
},
{
"or": [
{
"or": [
"f_KilledMetroidRoom4",
{
"obstaclesCleared": [
"f_KilledMetroidRoom4"
]
}
]
},
{
"metroidFrames": 104
}
]
}
],
"gModeRegainMobility": {},
"flashSuitChecked": true,
"blueSuitChecked": true,
"note": "If alive, the Metroids do up to 78 damage before the Rinka hits. Entering through the middle of the door will require less damage."
},
{
"id": 36,
"link": [
2,
2
],
"name": "R-Mode Crystal Flash Interrupt",
"entranceCondition": {
"comeInWithRMode": {},
"comesThroughToilet": "no"
},
"requires": [
{
"or": [
"f_KilledMetroidRoom4",
{
"obstaclesCleared": [
"f_KilledMetroidRoom4"
]
}
]
},
"canRModeCrystalFlashInterrupt",
{
"ammo": {
"type": "Missile",
"count": 10
}
},
{
"ammo": {
"type": "Super",
"count": 10
}
}
],
"flashSuitChecked": true,
"blueSuitChecked": true,
"note": [
"On entry, kill or dodge the first Rinkas then Crystal Flash directly above or below a Rinka Spawner."
],
"devNote": [
"There could be a variant with the Metroids alive, but they will all lure to Samus and the light orb will disappear, so she will take heavy damage.",
"This is not possible in G-mode, because the Power Bomb will kill the Rinka and prevent more from spawning."
]
}
],
"notables": [
{
"id": 1,
"name": "Bottom Metroid Avoid",
"note": [
"Avoid all of the Rinkas and Metroids with minimal equipment and taking no damage.",
"Depending on room entry, it may be necessary to shoot to delay the bottom metroid.",
"Being able to lead the bottom two metroids into favourable positions so that they can be jumped over, while still avoiding every Rinka, is key."
]
},
{
"id": 2,
"name": "Three Power Bomb Kill (Top to Bottom)",
"note": [
"Group the Metroids by descending the room.",
"Then Kill all three Metroids with Power Bombs while avoiding damage."
]
},
{
"id": 3,
"name": "Top Metroid Avoid",
"note": [
"Avoid all of the Rinkas and Metroids with no equipment and taking no damage.",
"One way to do this is to bait the top Rinkas to fire upwards, and then carefully spinjump around each corner as the Metroid below passes by."
]
},
{
"id": 4,
"name": "Bottom Metroid Avoid (Six Power Bomb Dodge Kill)",
"note": [
"Take out the lower two Metroids with Power Bombs while avoiding damage.",
"Then Kill the remaining one with three more Power Bombs."
]
}
],
"nextStratId": 38,
"nextNotableId": 5,
"devNote": [
"FIXME: It may be possible to come into the top of the room shinecharging and Crystal Spark, but it's tricky.",
"Shinecharge then time the jump to jump over the Rinkas. It probably should still require the Metroids killed if it's ever added."
],
"obstacles": [
{
"id": "f_KilledMetroidRoom4",
"name": "f_KilledMetroidRoom4"
}
]
}