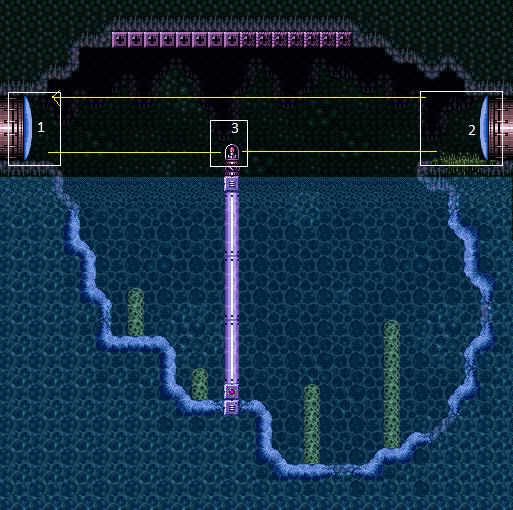
The Moat
Room ID: 7
|
Exit condition: {
"leaveWithRunway": {
"length": 3,
"openEnd": 1,
"steepUpTiles": 1
}
}
|
|
Requires: "h_canCrystalFlash" |
|
Notable: true 
Hold angle-up, jump, bonk the ceiling, and use Grapple just before landing. Moonwalk into the transition on the same frame that the Grapple Beam reaches the Grapple block. Continue holding Grapple through the door transition to initiate a teleport in the next room. Requires: "canMoonwalk" "canInsaneJump" Exit condition: {
"leaveWithGrappleTeleport": {
"blockPositions": [
[
7,
2
]
]
}
}
|
|
Entrance condition: {
"comeInWithSpark": {}
}
Requires: {
"shinespark": {
"frames": 42,
"excessFrames": 7
}
}
|
|
Notable: true 
Run, jump, lateral midair morph on the way down, then bounce off the pedestal to get to the other side. Entrance condition: {
"comeInRunning": {
"speedBooster": "any",
"minTiles": 1
}
}
Requires: "canSpringBallBounce"
"canDisableEquipment"
{
"obstaclesNotCleared": [
"A"
]
}
|
|
Notable: true
Open the door and step as close to the transition as possible. Run, jump, lateral midair morph on the way down, then bounce off the pedestal to get to the other side. Requires: "canSpringBallBounce"
"canDisableEquipment"
{
"doorUnlockedAtNode": 1
}
{
"obstaclesNotCleared": [
"A"
]
}
|
|
Aligning against the closed door shell on the other side of the transition. Run towards the water and jump on the last possible frame. Perform the CWJ off of the item pedestal to cross to the other side. Entrance condition: {
"comeInRunning": {
"speedBooster": "any",
"minTiles": 1.4
}
}
Requires: "canCWJ"
"canDisableEquipment"
{
"obstaclesNotCleared": [
"A"
]
}
|
|
Stand on the farthest pixel into the door possible using moonwalk, X-Ray, or morphball turn around. Run towards the water and jump on the last possible frame. Perform the CWJ off of the item pedestal to cross to the other side. Requires: "canCWJ"
"canDisableEquipment"
{
"doorUnlockedAtNode": 1
}
{
"or": [
"canMoonwalk",
"Morph",
"canXRayTurnaround"
]
}
{
"obstaclesNotCleared": [
"A"
]
}
|
|
Entrance condition: {
"comeInWithGMode": {
"mode": "any",
"morphed": true
}
}
Requires: "Gravity" "h_canArtificialMorphIBJ" |
|
Entrance condition: {
"comeInWithGMode": {
"mode": "any",
"morphed": true
}
}
Requires: {
"or": [
"h_canArtificialMorphCeilingBombJump",
"h_canArtificialMorphHBJ"
]
}
|
|
Run and jump onto the pedestal. Jump again to the right, and shinespark diagonally to make it past the water. Entrance condition: {
"comeInShinecharged": {
"framesRequired": 130
}
}
Requires: "canShinechargeMovementComplex"
{
"shinespark": {
"frames": 7
}
}
|
|
Run and jump onto the pedestal. Jump again to the right to bring the door on-camera. Fire a shot mid-air, and activate the shinespark wind-up. Wait until the shot hits the door before sparking. Entrance condition: {
"comeInShinecharged": {
"framesRequired": 140
}
}
Requires: "canShinechargeMovementComplex"
"canHeroShot"
{
"shinespark": {
"frames": 19
}
}
Exit condition: {
"leaveWithSpark": {}
}
|
|
Run and jump, fire a shot mid-air, and activate the shinespark wind-up. Wait until the shot is at a specific position before sparking. Sparking too late will cause the shot to despawn before reaching the door. Sparking too early will cause Samus to bonk the door as it will not yet be open. A beam shot, Missile, or Super can be used. Entrance condition: {
"comeInShinecharged": {
"framesRequired": 40
}
}
Requires: "canShinechargeMovementTricky"
"canHeroShot"
{
"shinespark": {
"frames": 38
}
}
Exit condition: {
"leaveWithSpark": {}
}
|
|
This jump is much easier without HiJump or Speedbooster equipped. Requires: "canDisableEquipment" |
|
Requires: {
"or": [
"Grapple",
"SpaceJump",
"Gravity"
]
}
|
|
Entrance condition: {
"comeInRunning": {
"speedBooster": "any",
"minTiles": 3
}
}
|
|
Requires: "h_canBombThings" |
|
Come into the room with a shinecharge, run and jump to the left, firing a shot just before landing on the pedestal. Activate the shinespark either just before landing on the pedestal or just afterward (depending on the vertical position needed for the spark). Entrance condition: {
"comeInShinecharged": {
"framesRequired": 90
}
}
Requires: "canShinechargeMovementComplex"
{
"shinespark": {
"frames": 23
}
}
Exit condition: {
"leaveWithSpark": {}
}
|
|
After gaining a shinecharge, run back to the door to make space for a running jump to the left, firing a shot just before landing on the pedestal. Activate the shinespark either just before landing on the pedestal or just afterward (depending on the vertical position needed for the spark). Entrance condition: {
"comeInShinecharging": {
"length": 4,
"openEnd": 0
}
}
Requires: "canShinechargeMovementComplex"
{
"shinespark": {
"frames": 23
}
}
Exit condition: {
"leaveWithSpark": {}
}
|
|
Run, fire a shot mid-air, jump, and activate a mid-air shinespark to the left. Sparking too late will cause the shot to despawn before reaching the door. Sparking too early will cause Samus to bonk the door as it will not yet be open. A beam shot, Missile, or Super can be used. Entrance condition: {
"comeInShinecharged": {
"framesRequired": 25
}
}
Requires: "canShinechargeMovementTricky"
"canHeroShot"
{
"shinespark": {
"frames": 39
}
}
Exit condition: {
"leaveWithSpark": {}
}
|
|
Entrance condition: {
"comeInWithGrappleTeleport": {
"blockPositions": [
[
3,
12
],
[
3,
13
]
]
}
}
Bypasses door shell: true |
|
Entrance condition: {
"comeInWithGrappleTeleport": {
"blockPositions": [
[
3,
12
]
]
}
}
Exit condition: {
"leaveWithGrappleTeleport": {
"blockPositions": [
[
3,
12
]
]
}
}
Bypasses door shell: true |
|
Entrance condition: {
"comeInWithGrappleTeleport": {
"blockPositions": [
[
3,
13
]
]
}
}
Exit condition: {
"leaveWithGrappleTeleport": {
"blockPositions": [
[
3,
13
]
]
}
}
Bypasses door shell: true |
|
Exit the previous room with Samus in a standing pose (while grappled). After teleporting, press right to release Grapple while staying standing (not being forced into a crouch). Then X-ray climb to get up to the door transition, without needing to open the door. Samus will not be visible during the climb. Entrance condition: {
"comeInWithGrappleTeleport": {
"blockPositions": [
[
2,
18
],
[
2,
19
],
[
2,
28
],
[
2,
29
]
]
}
}
Requires: "canXRayClimb" Bypasses door shell: true |
|
Exit condition: {
"leaveWithRunway": {
"length": 5,
"openEnd": 1
}
}
|
|
Requires: "h_canCrystalFlash" |
|
Requires: "Grapple" |
|
Requires: "SpaceJump" |
|
Requires: "Gravity"
{
"or": [
"canWalljump",
"canGravityJump",
{
"and": [
"canSpringBallJumpMidAir",
"HiJump"
]
}
]
}
|
|
Execution of this strat is non-trivial, and failing will lead to falling into the pit. Depending on item loadout, that could be a softlock. Requires: "canDisableEquipment"
"canCarefulJump"
{
"or": [
{
"doorUnlockedAtNode": 2
},
"canTrickyJump",
"canLateralMidAirMorph",
"SpeedBooster"
]
}
|
|
Execution of this strat is non-trivial, and failing will lead to falling into the pit. Depending on item loadout, that could be a softlock. Entrance condition: {
"comeInRunning": {
"speedBooster": "any",
"minTiles": 2
}
}
Requires: "canDisableEquipment" "canCarefulJump" |
|
Entrance condition: {
"comeInWithSpark": {}
}
Requires: {
"shinespark": {
"frames": 23,
"excessFrames": 0
}
}
Clears obstacles: A |
|
Requires: {
"obstaclesNotCleared": [
"A"
]
}
|
|
Requires: {
"shinespark": {
"frames": 19,
"excessFrames": 19
}
}
{
"obstaclesCleared": [
"A"
]
}
|
|
Requires: "Grapple"
{
"obstaclesNotCleared": [
"A"
]
}
|
|
Requires: "SpaceJump"
{
"obstaclesNotCleared": [
"A"
]
}
|
|
Requires: "Gravity"
{
"or": [
"canTrickySpringBallJump",
{
"and": [
"HiJump",
"canWalljump"
]
},
{
"and": [
"HiJump",
"canSpringBallJumpMidAir"
]
},
{
"and": [
"HiJump",
"SpeedBooster"
]
}
]
}
{
"obstaclesNotCleared": [
"A"
]
}
|
|
Requires: "Gravity"
"h_canIBJ"
{
"obstaclesNotCleared": [
"A"
]
}
|
|
Requires: "canGravityJump"
"canSuitlessMaridia"
{
"obstaclesNotCleared": [
"A"
]
}
|
|
Requires: "h_canHBJ"
{
"obstaclesNotCleared": [
"A"
]
}
|
|
Requires: "canSuitlessMaridia"
"h_canDoubleSpringBallJumpWithHiJump"
{
"obstaclesNotCleared": [
"A"
]
}
|
|
Requires: "h_canCeilingBombJump"
{
"obstaclesNotCleared": [
"A"
]
}
|
{
"$schema": "../../../schema/m3-room.schema.json",
"id": 7,
"name": "The Moat",
"area": "Crateria",
"subarea": "East",
"playable": true,
"roomAddress": "0x795FF",
"roomEnvironments": [
{
"heated": false
}
],
"nodes": [
{
"id": 1,
"name": "Left Door",
"nodeType": "door",
"nodeSubType": "blue",
"nodeAddress": "0x0018ade",
"doorEnvironments": [
{
"physics": "air"
}
]
},
{
"id": 2,
"name": "Right Door",
"nodeType": "door",
"nodeSubType": "blue",
"nodeAddress": "0x0018aea",
"doorEnvironments": [
{
"physics": "air"
}
]
},
{
"id": 3,
"name": "Item",
"nodeType": "item",
"nodeSubType": "visible",
"nodeItem": "Missile",
"nodeAddress": "0x78248"
}
],
"enemies": [],
"obstacles": [
{
"id": "A",
"obstacleType": "abstract",
"name": "Shinespark Left"
}
],
"reusableRoomwideNotable": [
{
"name": "Moat SpringBall Bounce",
"note": "From an open doorway or adjacent room, run, jump, lateral midair morph on the way down, then bounce off the pedestal to get to the other side."
}
],
"links": [
{
"from": 1,
"to": [
{
"id": 1
},
{
"id": 2
},
{
"id": 3
}
]
},
{
"from": 2,
"to": [
{
"id": 1
},
{
"id": 2
},
{
"id": 3
}
]
},
{
"from": 3,
"to": [
{
"id": 1
},
{
"id": 2
}
]
}
],
"strats": [
{
"link": [
1,
1
],
"name": "Leave with Runway",
"requires": [],
"exitCondition": {
"leaveWithRunway": {
"length": 3,
"openEnd": 1,
"steepUpTiles": 1
}
}
},
{
"link": [
1,
1
],
"name": "Crystal Flash",
"requires": [
"h_canCrystalFlash"
]
},
{
"link": [
1,
1
],
"name": "Moat Leave With Grapple Teleport",
"notable": true,
"requires": [
"canMoonwalk",
"canInsaneJump"
],
"exitCondition": {
"leaveWithGrappleTeleport": {
"blockPositions": [
[
7,
2
]
]
}
},
"note": [
"Hold angle-up, jump, bonk the ceiling, and use Grapple just before landing.",
"Moonwalk into the transition on the same frame that the Grapple Beam reaches the Grapple block.",
"Continue holding Grapple through the door transition to initiate a teleport in the next room."
]
},
{
"link": [
1,
2
],
"name": "Shinespark",
"entranceCondition": {
"comeInWithSpark": {}
},
"requires": [
{
  "shinespark": {
    "frames": 42,
    "excessFrames": 7
  }
}
],
"devNote": "To avoid making another obstacle, it is assumed the item at 3 is collected by other means."
},
{
"link": [
1,
2
],
"name": "Moat SpringBall Bounce, Run Through the Door",
"notable": true,
"entranceCondition": {
"comeInRunning": {
"speedBooster": "any",
"minTiles": 1
}
},
"requires": [
"canSpringBallBounce",
"canDisableEquipment",
{
"obstaclesNotCleared": [
"A"
]
}
],
"reusableRoomwideNotable": "Moat SpringBall Bounce",
"note": "Run, jump, lateral midair morph on the way down, then bounce off the pedestal to get to the other side."
},
{
"link": [
1,
2
],
"name": "Moat SpringBall Bounce, Open Doorway",
"notable": true,
"requires": [
"canSpringBallBounce",
"canDisableEquipment",
{
"doorUnlockedAtNode": 1
},
{
"obstaclesNotCleared": [
"A"
]
}
],
"reusableRoomwideNotable": "Moat SpringBall Bounce",
"note": "Open the door and step as close to the transition as possible. Run, jump, lateral midair morph on the way down, then bounce off the pedestal to get to the other side."
},
{
"link": [
1,
2
],
"name": "Moat Continuous Walljump, Run Through the Door",
"entranceCondition": {
"comeInRunning": {
"speedBooster": "any",
"minTiles": 1.4
}
},
"requires": [
"canCWJ",
"canDisableEquipment",
{
"obstaclesNotCleared": [
"A"
]
}
],
"note": [
"Aligning against the closed door shell on the other side of the transition.",
"Run towards the water and jump on the last possible frame.",
"Perform the CWJ off of the item pedestal to cross to the other side."
]
},
{
"link": [
1,
2
],
"name": "Moat Continuous Walljump, Open Doorway",
"requires": [
"canCWJ",
"canDisableEquipment",
{
"doorUnlockedAtNode": 1
},
{
"or": [
"canMoonwalk",
"Morph",
"canXRayTurnaround"
]
},
{
"obstaclesNotCleared": [
"A"
]
}
],
"note": [
"Stand on the farthest pixel into the door possible using moonwalk, X-Ray, or morphball turn around.",
"Run towards the water and jump on the last possible frame.",
"Perform the CWJ off of the item pedestal to cross to the other side."
]
},
{
"link": [
1,
2
],
"name": "G-mode Morph IBJ",
"entranceCondition": {
"comeInWithGMode": {
"mode": "any",
"morphed": true
}
},
"requires": [
"Gravity",
"h_canArtificialMorphIBJ"
]
},
{
"link": [
1,
2
],
"name": "G-mode Morph HBJ or Ceiling Bomb Jump",
"entranceCondition": {
"comeInWithGMode": {
"mode": "any",
"morphed": true
}
},
"requires": [
{
  "or": [
    "h_canArtificialMorphCeilingBombJump",
    "h_canArtificialMorphHBJ"
  ]
}
]
},
{
"link": [
1,
2
],
"name": "Diagonal Spark (Come In Shinecharged)",
"entranceCondition": {
"comeInShinecharged": {
"framesRequired": 130
}
},
"requires": [
"canShinechargeMovementComplex",
{
"shinespark": {
"frames": 7
}
}
],
"note": [
"Run and jump onto the pedestal.",
"Jump again to the right, and shinespark diagonally to make it past the water."
]
},
{
"link": [
1,
2
],
"name": "Leave With Spark (Come In Shinecharged)",
"entranceCondition": {
"comeInShinecharged": {
"framesRequired": 140
}
},
"requires": [
"canShinechargeMovementComplex",
"canHeroShot",
{
"shinespark": {
"frames": 19
}
}
],
"exitCondition": {
"leaveWithSpark": {}
},
"unlocksDoors": [
{
"types": [
"super"
],
"requires": []
},
{
"types": [
"missiles",
"powerbomb"
],
"requires": [
"never"
]
}
],
"note": [
"Run and jump onto the pedestal.",
"Jump again to the right to bring the door on-camera.",
"Fire a shot mid-air, and activate the shinespark wind-up.",
"Wait until the shot hits the door before sparking."
]
},
{
"link": [
1,
2
],
"name": "Hero Shot Spark",
"entranceCondition": {
"comeInShinecharged": {
"framesRequired": 40
}
},
"requires": [
"canShinechargeMovementTricky",
"canHeroShot",
{
"shinespark": {
"frames": 38
}
}
],
"exitCondition": {
"leaveWithSpark": {}
},
"unlocksDoors": [
{
"types": [
"super"
],
"requires": []
},
{
"types": [
"missiles",
"powerbomb"
],
"requires": [
"never"
]
}
],
"note": [
"Run and jump, fire a shot mid-air, and activate the shinespark wind-up.",
"Wait until the shot is at a specific position before sparking.",
"Sparking too late will cause the shot to despawn before reaching the door.",
"Sparking too early will cause Samus to bonk the door as it will not yet be open.",
"A beam shot, Missile, or Super can be used."
]
},
{
"link": [
1,
3
],
"name": "Base",
"requires": [
"canDisableEquipment"
],
"note": "This jump is much easier without HiJump or Speedbooster equipped."
},
{
"link": [
1,
3
],
"name": "Movement Assist",
"requires": [
{
  "or": [
    "Grapple",
    "SpaceJump",
    "Gravity"
  ]
}
]
},
{
"link": [
1,
3
],
"name": "Run Through Door",
"entranceCondition": {
"comeInRunning": {
"speedBooster": "any",
"minTiles": 3
}
},
"requires": []
},
{
"link": [
2,
1
],
"name": "Pass Below",
"requires": [
"h_canBombThings"
]
},
{
"link": [
2,
1
],
"name": "Leave With Spark (Come In Shinecharged)",
"entranceCondition": {
"comeInShinecharged": {
"framesRequired": 90
}
},
"requires": [
"canShinechargeMovementComplex",
{
"shinespark": {
"frames": 23
}
}
],
"exitCondition": {
"leaveWithSpark": {}
},
"unlocksDoors": [
{
"types": [
"super"
],
"requires": []
},
{
"types": [
"missiles",
"powerbomb"
],
"requires": [
"never"
]
}
],
"note": [
"Come into the room with a shinecharge, run and jump to the left, firing a shot just before landing on the pedestal.",
"Activate the shinespark either just before landing on the pedestal or just afterward (depending on the vertical position needed for the spark)."
]
},
{
"link": [
2,
1
],
"name": "Leave With Spark (Come In Shinecharging)",
"entranceCondition": {
"comeInShinecharging": {
"length": 4,
"openEnd": 0
}
},
"requires": [
"canShinechargeMovementComplex",
{
"shinespark": {
"frames": 23
}
}
],
"exitCondition": {
"leaveWithSpark": {}
},
"unlocksDoors": [
{
"types": [
"super"
],
"requires": []
},
{
"types": [
"missiles",
"powerbomb"
],
"requires": [
"never"
]
}
],
"note": [
"After gaining a shinecharge, run back to the door to make space for a running jump to the left, firing a shot just before landing on the pedestal.",
"Activate the shinespark either just before landing on the pedestal or just afterward (depending on the vertical position needed for the spark)."
]
},
{
"link": [
2,
1
],
"name": "Hero Shot Spark",
"entranceCondition": {
"comeInShinecharged": {
"framesRequired": 25
}
},
"requires": [
"canShinechargeMovementTricky",
"canHeroShot",
{
"shinespark": {
"frames": 39
}
}
],
"exitCondition": {
"leaveWithSpark": {}
},
"unlocksDoors": [
{
"types": [
"super"
],
"requires": []
},
{
"types": [
"missiles",
"powerbomb"
],
"requires": [
"never"
]
}
],
"note": [
"Run, fire a shot mid-air, jump, and activate a mid-air shinespark to the left.",
"Sparking too late will cause the shot to despawn before reaching the door.",
"Sparking too early will cause Samus to bonk the door as it will not yet be open.",
"A beam shot, Missile, or Super can be used."
]
},
{
"link": [
2,
1
],
"name": "Grapple Teleport",
"entranceCondition": {
"comeInWithGrappleTeleport": {
"blockPositions": [
[
3,
12
],
[
3,
13
]
]
}
},
"requires": [],
"bypassesDoorShell": true
},
{
"link": [
2,
1
],
"name": "Carry Grapple Teleport (Top Position)",
"entranceCondition": {
"comeInWithGrappleTeleport": {
"blockPositions": [
[
3,
12
]
]
}
},
"requires": [],
"bypassesDoorShell": true,
"exitCondition": {
"leaveWithGrappleTeleport": {
"blockPositions": [
[
3,
12
]
]
}
}
},
{
"link": [
2,
1
],
"name": "Carry Grapple Teleport (Bottom Position)",
"entranceCondition": {
"comeInWithGrappleTeleport": {
"blockPositions": [
[
3,
13
]
]
}
},
"requires": [],
"bypassesDoorShell": true,
"exitCondition": {
"leaveWithGrappleTeleport": {
"blockPositions": [
[
3,
13
]
]
}
}
},
{
"link": [
2,
1
],
"name": "Grapple Teleport X-Ray Climb",
"entranceCondition": {
"comeInWithGrappleTeleport": {
"blockPositions": [
[
2,
18
],
[
2,
19
],
[
2,
28
],
[
2,
29
]
]
}
},
"requires": [
"canXRayClimb"
],
"bypassesDoorShell": true,
"note": [
"Exit the previous room with Samus in a standing pose (while grappled).",
"After teleporting, press right to release Grapple while staying standing (not being forced into a crouch).",
"Then X-ray climb to get up to the door transition, without needing to open the door.",
"Samus will not be visible during the climb."
]
},
{
"link": [
2,
2
],
"name": "Leave with Runway",
"requires": [],
"exitCondition": {
"leaveWithRunway": {
"length": 5,
"openEnd": 1
}
}
},
{
"link": [
2,
2
],
"name": "Crystal Flash",
"requires": [
"h_canCrystalFlash"
]
},
{
"link": [
2,
3
],
"name": "Grapple",
"requires": [
"Grapple"
]
},
{
"link": [
2,
3
],
"name": "Space Jump",
"requires": [
"SpaceJump"
]
},
{
"link": [
2,
3
],
"name": "Gravity",
"requires": [
"Gravity",
{
"or": [
"canWalljump",
"canGravityJump",
{
"and": [
"canSpringBallJumpMidAir",
"HiJump"
]
}
]
}
]
},
{
"link": [
2,
3
],
"name": "Moat Reverse Jump",
"requires": [
"canDisableEquipment",
"canCarefulJump",
{
"or": [
{
"doorUnlockedAtNode": 2
},
"canTrickyJump",
"canLateralMidAirMorph",
"SpeedBooster"
]
}
],
"note": [
"Execution of this strat is non-trivial, and failing will lead to falling into the pit.",
"Depending on item loadout, that could be a softlock."
],
"devNote": "Could use a failure definition?"
},
{
"link": [
2,
3
],
"name": "Moat Reverse Jump, Run Through Door",
"entranceCondition": {
"comeInRunning": {
"speedBooster": "any",
"minTiles": 2
}
},
"requires": [
"canDisableEquipment",
"canCarefulJump"
],
"note": [
"Execution of this strat is non-trivial, and failing will lead to falling into the pit.",
"Depending on item loadout, that could be a softlock."
]
},
{
"link": [
2,
3
],
"name": "Shinespark",
"entranceCondition": {
"comeInWithSpark": {}
},
"requires": [
{
  "shinespark": {
    "frames": 23,
    "excessFrames": 0
  }
}
],
"clearsObstacles": [
"A"
],
"devNote": "This will grab the item and continue the spark to the left door. If this is an E-Tank, Samus will not maintain full Energy after the next strat."
},
{
"link": [
3,
1
],
"name": "Base",
"requires": [
{
  "obstaclesNotCleared": [
    "A"
  ]
}
]
},
{
"link": [
3,
1
],
"name": "Continue Shinespark Left",
"requires": [
{
"shinespark": {
"frames": 19,
"excessFrames": 19
}
},
{
"obstaclesCleared": [
"A"
]
}
],
"devNote": "This will continue the Shinespark from the right door. This is needed in case the item is an E-Tank, Samus will not maintain full Energy after the Spark."
},
{
"link": [
3,
2
],
"name": "Grapple",
"requires": [
"Grapple",
{
"obstaclesNotCleared": [
"A"
]
}
]
},
{
"link": [
3,
2
],
"name": "Space Jump",
"requires": [
"SpaceJump",
{
"obstaclesNotCleared": [
"A"
]
}
]
},
{
"link": [
3,
2
],
"name": "Gravity with Jump Assist",
"requires": [
"Gravity",
{
"or": [
"canTrickySpringBallJump",
{
"and": [
"HiJump",
"canWalljump"
]
},
{
"and": [
"HiJump",
"canSpringBallJumpMidAir"
]
},
{
"and": [
"HiJump",
"SpeedBooster"
]
}
]
},
{
"obstaclesNotCleared": [
"A"
]
}
]
},
{
"link": [
3,
2
],
"name": "IBJ",
"requires": [
"Gravity",
"h_canIBJ",
{
"obstaclesNotCleared": [
"A"
]
}
]
},
{
"link": [
3,
2
],
"name": "Gravity Jump",
"requires": [
"canGravityJump",
"canSuitlessMaridia",
{
"obstaclesNotCleared": [
"A"
]
}
]
},
{
"link": [
3,
2
],
"name": "Moat Horizontal Bomb Jump",
"requires": [
"h_canHBJ",
{
"obstaclesNotCleared": [
"A"
]
}
]
},
{
"link": [
3,
2
],
"name": "Double Spring Ball Jump",
"requires": [
"canSuitlessMaridia",
"h_canDoubleSpringBallJumpWithHiJump",
{
"obstaclesNotCleared": [
"A"
]
}
]
},
{
"link": [
3,
2
],
"name": "Moat Ceiling Bomb Jump",
"requires": [
"h_canCeilingBombJump",
{
"obstaclesNotCleared": [
"A"
]
}
]
}
]
}