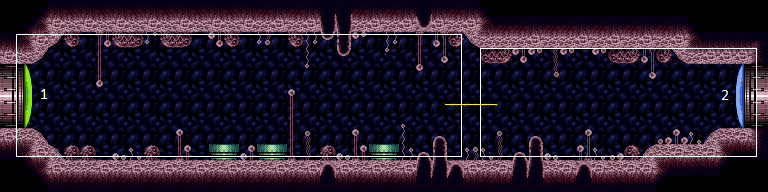
Spore Spawn Farming Room
Room ID: 64
|
Requires: {
"refill": [
"Energy",
"Missile",
"Super"
]
}
|
|
Exit condition: {
"leaveWithRunway": {
"length": 12,
"steepUpTiles": 2,
"openEnd": 0
}
}
|
|
Stand to the right of the right-most bug pipe, and run to the right to gain a shortcharge. Run back to the left, jump over the bug pipes with one jump, and exit through the left door. Requires: {
"canShineCharge": {
"usedTiles": 21,
"steepUpTiles": 2,
"openEnd": 0
}
}
"canShinechargeMovementComplex"
Exit condition: {
"leaveShinecharged": {
"framesRemaining": 15
}
}
|
|
From: 1
Left Door
To: 1
Left Door
Stand to the right of the right-most bug pipe, and run to the right to gain a shortcharge. Run back to the left, Space Jump over the bug pipes, and exit through the left door. Requires: {
"canShineCharge": {
"usedTiles": 21,
"steepUpTiles": 2,
"openEnd": 0
}
}
"SpaceJump"
"canShinechargeMovementComplex"
Exit condition: {
"leaveShinecharged": {
"framesRemaining": 25
}
}
|
|
Stand to the right of the right-most bug pipe, and run to the right to gain a shortcharge. Run back to the left, jump over the bug pipes, and shinespark through the left door. Requires: {
"canShineCharge": {
"usedTiles": 21,
"steepUpTiles": 2,
"openEnd": 0
}
}
"canShinechargeMovement"
{
"shinespark": {
"frames": 20
}
}
Exit condition: {
"leaveWithSpark": {}
}
|
|
Exit condition: {
"leaveWithGModeSetup": {}
}
|
|
|
|
|
|
Entrance condition: {
"comeInWithGrappleTeleport": {
"blockPositions": [
[
3,
12
],
[
3,
13
]
]
}
}
Bypasses door shell: true |
|
From: 2
Right Door
To: 1
Left Door
Entrance condition: {
"comeInWithGrappleTeleport": {
"blockPositions": [
[
3,
12
]
]
}
}
Exit condition: {
"leaveWithGrappleTeleport": {
"blockPositions": [
[
3,
12
]
]
}
}
Bypasses door shell: true |
|
From: 2
Right Door
To: 1
Left Door
Entrance condition: {
"comeInWithGrappleTeleport": {
"blockPositions": [
[
3,
13
]
]
}
}
Exit condition: {
"leaveWithGrappleTeleport": {
"blockPositions": [
[
3,
13
]
]
}
}
Bypasses door shell: true |
|
Exit condition: {
"leaveWithRunway": {
"length": 22,
"steepUpTiles": 2,
"openEnd": 0
}
}
|
|
From: 2
Right Door
To: 2
Right Door
Exit condition: {
"leaveWithGModeSetup": {}
}
|
{
"$schema": "../../../schema/m3-room.schema.json",
"id": 64,
"name": "Spore Spawn Farming Room",
"area": "Brinstar",
"subarea": "Pink",
"playable": true,
"roomAddress": "0x7A0A4",
"roomEnvironments": [
{
"heated": false
}
],
"nodes": [
{
"id": 1,
"name": "Left Door",
"nodeType": "door",
"nodeSubType": "green",
"nodeAddress": "0x0018f82",
"doorEnvironments": [
{
"physics": "air"
}
],
"locks": [
{
"name": "Spore Spawn Farming Room Green Lock (to Big Pink)",
"lockType": "coloredDoor",
"unlockStrats": [
{
"name": "Base",
"notable": false,
"requires": [
"h_canOpenGreenDoors"
]
}
]
}
]
},
{
"id": 2,
"name": "Right Door",
"nodeType": "door",
"nodeSubType": "blue",
"nodeAddress": "0x0018f76",
"doorEnvironments": [
{
"physics": "air"
}
]
}
],
"enemies": [
{
"id": "e1",
"groupName": "Spore Spawn Farming Room Zeelas",
"enemyName": "Zeela",
"quantity": 2,
"homeNodes": [
1
]
},
{
"id": "e2",
"groupName": "Spore Spawn Farming Room Left Zebs",
"enemyName": "Zeb",
"quantity": 2,
"homeNodes": [
1
],
"farmCycles": [
{
"name": "Alternating Farm",
"cycleFrames": 120,
"requires": [],
"note": "Getting the two spawners to desynch and jumping back and forth between the two."
}
]
},
{
"id": "e3",
"groupName": "Spore Spawn Farming Room Right Zeb",
"enemyName": "Zeb",
"quantity": 1,
"homeNodes": [
1
],
"farmCycles": [
{
"name": "Crouch over spawn point",
"cycleFrames": 120,
"requires": []
}
]
}
],
"links": [
{
"from": 1,
"to": [
{
"id": 1
},
{
"id": 2
}
]
},
{
"from": 2,
"to": [
{
"id": 1
},
{
"id": 2
}
]
}
],
"strats": [
{
"link": [
1,
1
],
"name": "Zeb Farm",
"requires": [
{
  "refill": [
    "Energy",
    "Missile",
    "Super"
  ]
}
]
},
{
"link": [
1,
1
],
"name": "Leave With Runway",
"requires": [],
"exitCondition": {
"leaveWithRunway": {
"length": 12,
"steepUpTiles": 2,
"openEnd": 0
}
}
},
{
"link": [
1,
1
],
"name": "Leave Shinecharged",
"requires": [
{
"canShineCharge": {
"usedTiles": 21,
"steepUpTiles": 2,
"openEnd": 0
}
},
"canShinechargeMovementComplex"
],
"exitCondition": {
"leaveShinecharged": {
"framesRemaining": 15
}
},
"note": [
"Stand to the right of the right-most bug pipe, and run to the right to gain a shortcharge.",
"Run back to the left, jump over the bug pipes with one jump, and exit through the left door."
]
},
{
"link": [
1,
1
],
"name": "Leave Shinecharged (Space Jump)",
"requires": [
{
"canShineCharge": {
"usedTiles": 21,
"steepUpTiles": 2,
"openEnd": 0
}
},
"SpaceJump",
"canShinechargeMovementComplex"
],
"exitCondition": {
"leaveShinecharged": {
"framesRemaining": 25
}
},
"note": [
"Stand to the right of the right-most bug pipe, and run to the right to gain a shortcharge.",
"Run back to the left, Space Jump over the bug pipes, and exit through the left door."
]
},
{
"link": [
1,
1
],
"name": "Leave With Shinespark",
"requires": [
{
"canShineCharge": {
"usedTiles": 21,
"steepUpTiles": 2,
"openEnd": 0
}
},
"canShinechargeMovement",
{
"shinespark": {
"frames": 20
}
}
],
"exitCondition": {
"leaveWithSpark": {}
},
"note": [
"Stand to the right of the right-most bug pipe, and run to the right to gain a shortcharge.",
"Run back to the left, jump over the bug pipes, and shinespark through the left door."
]
},
{
"link": [
1,
1
],
"name": "G-Mode Setup - Get Hit By Zeb",
"notable": false,
"requires": [],
"exitCondition": {
"leaveWithGModeSetup": {}
}
},
{
"link": [
1,
2
],
"name": "Base",
"requires": []
},
{
"link": [
2,
1
],
"name": "Base",
"requires": []
},
{
"link": [
2,
1
],
"name": "Grapple Teleport",
"entranceCondition": {
"comeInWithGrappleTeleport": {
"blockPositions": [
[
3,
12
],
[
3,
13
]
]
}
},
"requires": [],
"bypassesDoorShell": true
},
{
"link": [
2,
1
],
"name": "Carry Grapple Teleport (Top Position)",
"entranceCondition": {
"comeInWithGrappleTeleport": {
"blockPositions": [
[
3,
12
]
]
}
},
"requires": [],
"bypassesDoorShell": true,
"exitCondition": {
"leaveWithGrappleTeleport": {
"blockPositions": [
[
3,
12
]
]
}
}
},
{
"link": [
2,
1
],
"name": "Carry Grapple Teleport (Bottom Position)",
"entranceCondition": {
"comeInWithGrappleTeleport": {
"blockPositions": [
[
3,
13
]
]
}
},
"requires": [],
"bypassesDoorShell": true,
"exitCondition": {
"leaveWithGrappleTeleport": {
"blockPositions": [
[
3,
13
]
]
}
}
},
{
"link": [
2,
2
],
"name": "Leave With Runway",
"requires": [],
"exitCondition": {
"leaveWithRunway": {
"length": 22,
"steepUpTiles": 2,
"openEnd": 0
}
}
},
{
"link": [
2,
2
],
"name": "G-Mode Setup - Get Hit By Zeb",
"notable": false,
"requires": [],
"exitCondition": {
"leaveWithGModeSetup": {}
}
}
]
}