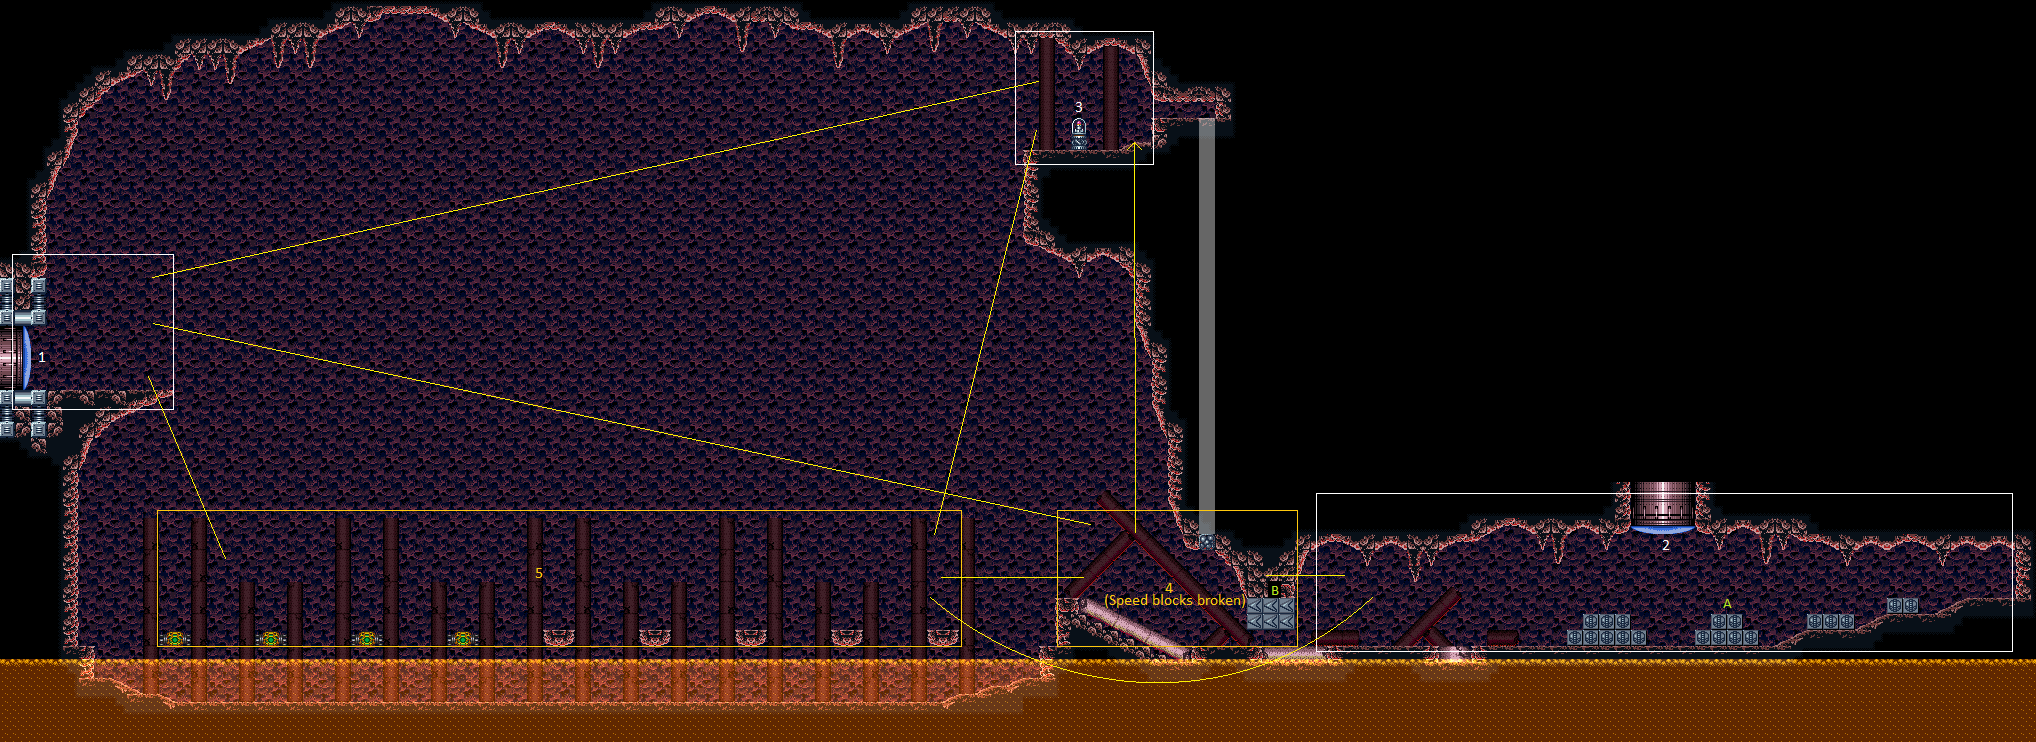
Post Crocomire Jump Room
Room ID: 127
|
Exit condition: {
"leaveWithRunway": {
"length": 10,
"openEnd": 1
}
}
|
|
Requires: "h_canCrystalFlash" |
|
Requires: "SpaceJump" |
|
Jump with enough run speed to reach the wall below the Missile Item Location. Entrance condition: {
"comeInRunning": {
"minTiles": 29,
"speedBooster": true
}
}
Requires: "canWalljump" "canCarefulJump" |
|
Takes three walljumps, and must shinespark at the apex. Entrance condition: {
"comeInShinecharged": {
"framesRequired": 110
}
}
Requires: "canPreciseWalljump"
"canConsecutiveWalljump"
"canShinechargeMovement"
"canMidairShinespark"
{
"shinespark": {
"frames": 78
}
}
|
|
Takes three walljumps, and must shinespark at the apex. Entrance condition: {
"comeInShinecharging": {
"length": 9,
"openEnd": 0
}
}
Requires: "canPreciseWalljump"
"canConsecutiveWalljump"
"canShinechargeMovement"
"canMidairShinespark"
{
"shinespark": {
"frames": 78
}
}
|
|
From: 1
Left Door
To: 3
Item
Walljump or build run speed using the full runway to jump high enough for the shinespark. Entrance condition: {
"comeInShinecharged": {
"framesRequired": 80
}
}
Requires: {
"or": [
{
"and": [
"canWalljump",
{
"shinespark": {
"frames": 20
}
}
]
},
"canTrickyDashJump"
]
}
"HiJump"
"canShinechargeMovement"
"canMidairShinespark"
{
"shinespark": {
"frames": 60
}
}
|
|
Walljump or build run speed using the full runway to jump high enough for the shinespark. Entrance condition: {
"comeInShinecharging": {
"length": 9,
"openEnd": 0
}
}
Requires: {
"or": [
{
"and": [
"canWalljump",
{
"shinespark": {
"frames": 20
}
}
]
},
"canTrickyDashJump"
]
}
"HiJump"
"canShinechargeMovement"
"canMidairShinespark"
{
"shinespark": {
"frames": 60
}
}
|
|
Notable: true 
Store a shinespark near the Grapple Room door and use the remaining runway to jump as far as possible to the right. Once near the acid platforms, Shinespark diagonally to reach the Missile Location. Entrance condition: {
"comeInShinecharged": {
"framesRequired": 175
}
}
Requires: "canTrickyJump"
"canShinechargeMovementComplex"
"canMidairShinespark"
{
"shinespark": {
"frames": 40
}
}
|
|
Notable: true 
Grapple off several Ripper 2. Requires: "canUseEnemies" "canPreciseGrapple" |
|
From: 1
Left Door
To: 4
Right Junction with Speed Blocks Broken
Notable: true 
The blocks can be broken if you can generate a blue suit using the previous room's runway, and carry it to the blocks by slowing floating down with Space Jump. Entrance condition: {
"comeInShinecharging": {
"length": 9,
"openEnd": 0
}
}
Requires: "canBlueSpaceJump" |
|
|
|
From: 2
Right Vertical Door
To: 2
Right Vertical Door
Requires: "h_canUsePowerBombs" Clears obstacles: A |
|
From: 2
Right Vertical Door
To: 2
Right Vertical Door
Freeze a Mella at a precise distance below the door in order to crouch-jump up and clip through the door shell. The pixel window is larger and higher with Morph and an X-Ray stand-up, in which case a standing jump is used. Requires: "canManipulateMellas" "canTrickyUseFrozenEnemies" "h_canNonTrivialCeilingClip" Bypasses door shell: true |
|
Shoot the Mellas when they first begin to come on screen, and they will not move. Requires: {
"or": [
"canDodgeWhileShooting",
"ScrewAttack",
"Ice",
"Wave",
"Spazer",
"Plasma"
]
}
{
"resetRoom": {
"nodes": [
2
],
"mustStayPut": false
}
}
{
"refill": [
"Energy",
"Missile"
]
}
Resets obstacles: A, B |
|
From: 2
Right Vertical Door
To: 2
Right Vertical Door
Get a normal height jump by releasing run with SpeedBooster and no HiJump. Break spin to reach the transition without a wall jump. Requires: {
"obstaclesCleared": [
"A",
"B"
]
}
"canShinechargeMovement"
Exit condition: {
"leaveShinecharged": {
"framesRemaining": 130
}
}
|
|
From: 2
Right Vertical Door
To: 2
Right Vertical Door
Get a normal height jump by releasing run with SpeedBooster and no HiJump. Break spin to reach the transition without a wall jump. Requires: {
"obstaclesCleared": [
"B"
]
}
"canShinechargeMovement"
{
"canShineCharge": {
"usedTiles": 32,
"openEnd": 1
}
}
Exit condition: {
"leaveShinecharged": {
"framesRemaining": 100
}
}
|
|
From: 2
Right Vertical Door
To: 2
Right Vertical Door
Requires: "h_canCrystalFlash" Clears obstacles: A |
|
From: 2
Right Vertical Door
To: 2
Right Vertical Door
Exit condition: {
"leaveWithDoorFrameBelow": {
"height": 2
}
}
|
|
From: 2
Right Vertical Door
To: 2
Right Vertical Door
Exit condition: {
"leaveWithPlatformBelow": {
"height": 9,
"leftPosition": -1,
"rightPosition": 2
}
}
|
|
From: 2
Right Vertical Door
To: 2
Right Vertical Door
Requires: {
"obstaclesNotCleared": [
"A"
]
}
Exit condition: {
"leaveWithPlatformBelow": {
"height": 7,
"leftPosition": -5.5,
"rightPosition": -1.5
}
}
|
|
From: 2
Right Vertical Door
To: 2
Right Vertical Door
Requires: {
"obstaclesCleared": [
"A"
]
}
Exit condition: {
"leaveWithPlatformBelow": {
"height": 9,
"leftPosition": -23,
"rightPosition": 22
}
}
|
|
From: 2
Right Vertical Door
To: 2
Right Vertical Door
Requires: {
"obstaclesCleared": [
"B"
]
}
"canTrickyJump"
Exit condition: {
"leaveWithPlatformBelow": {
"height": 9,
"leftPosition": -38.5,
"rightPosition": -7
}
}
|
|
From: 2
Right Vertical Door
To: 2
Right Vertical Door
Requires: {
"obstaclesCleared": [
"A",
"B"
]
}
Exit condition: {
"leaveWithPlatformBelow": {
"height": 9,
"leftPosition": -38.5,
"rightPosition": 22
}
}
|
|
From: 2
Right Vertical Door
To: 4
Right Junction with Speed Blocks Broken
Requires: {
"obstaclesCleared": [
"B"
]
}
|
|
From: 2
Right Vertical Door
To: 4
Right Junction with Speed Blocks Broken
Requires: "SpeedBooster"
{
"obstaclesCleared": [
"A"
]
}
Clears obstacles: B |
|
From: 2
Right Vertical Door
To: 4
Right Junction with Speed Blocks Broken
Spark from the ground, left of the Power Bomb blocks. Entrance condition: {
"comeInShinecharged": {
"framesRequired": 80
},
"comesThroughToilet": "any"
}
Requires: "canHorizontalShinespark"
{
"shinespark": {
"frames": 115
}
}
Clears obstacles: B |
|
From: 2
Right Vertical Door
To: 4
Right Junction with Speed Blocks Broken
Spark from the ground, left of the Power Bomb blocks. Entrance condition: {
"comeInShinecharged": {
"framesRequired": 80
},
"comesThroughToilet": "any"
}
Requires: "canHorizontalShinespark"
{
"shinespark": {
"frames": 115,
"excessFrames": 85
}
}
{
"or": [
"canTrickyJump",
{
"and": [
{
"or": [
"canWalljump",
"HiJump"
]
},
{
"acidFrames": 25
}
]
},
{
"and": [
"Gravity",
{
"acidFrames": 20
}
]
}
]
}
Clears obstacles: B |
|
From: 2
Right Vertical Door
To: 4
Right Junction with Speed Blocks Broken
Commonly known as a stutter-3, this is also doable as a 4-tap. Requires: {
"canShineCharge": {
"usedTiles": 17,
"openEnd": 0
}
}
Clears obstacles: B |
|
Requires: "Morph" |
|
Notable: true
Involves grappling off several Ripper 2. Requires: "canUseEnemies" "canPreciseGrapple" |
|
|
|
From: 4
Right Junction with Speed Blocks Broken
To: 1
Left Door
Fire off the shinespark at the apex of two consecutive walljumps. Requires: "canWalljump"
"canShinechargeMovement"
"canMidairShinespark"
{
"canShineCharge": {
"usedTiles": 32,
"openEnd": 1
}
}
{
"shinespark": {
"frames": 90
}
}
|
|
From: 4
Right Junction with Speed Blocks Broken
To: 1
Left Door
Notable: true 
Charge a spark to the right, then come back, run and jump, and do a horizontal spark at the apex. Requires: "canShinechargeMovement"
"canMidairShinespark"
{
"canShineCharge": {
"usedTiles": 32,
"openEnd": 1
}
}
{
"shinespark": {
"frames": 52
}
}
|
|
From: 4
Right Junction with Speed Blocks Broken
To: 1
Left Door
Requires: "SpeedBooster"
{
"or": [
"HiJump",
{
"and": [
"canLateralMidAirMorph",
"canTrickySpringBallJump"
]
}
]
}
|
|
From: 4
Right Junction with Speed Blocks Broken
To: 1
Left Door
Requires: "SpeedBooster"
{
"or": [
"h_canUsePowerBombs",
{
"obstaclesCleared": [
"A"
]
}
]
}
Clears obstacles: A |
|
From: 4
Right Junction with Speed Blocks Broken
To: 2
Right Vertical Door
|
|
From: 4
Right Junction with Speed Blocks Broken
To: 3
Item
Requires: {
"canShineCharge": {
"usedTiles": 32,
"openEnd": 1
}
}
{
"shinespark": {
"frames": 40
}
}
|
|
From: 4
Right Junction with Speed Blocks Broken
To: 3
Item
Requires: "SpeedBooster"
"HiJump"
{
"or": [
"canSpringBallJumpMidAir",
"canWalljump"
]
}
|
|
From: 4
Right Junction with Speed Blocks Broken
To: 5
Small Platforms Junction
|
|
Requires: "SpaceJump" |
|
Requires: "h_canJumpIntoIBJ" |
|
Run on the moving platform (Kamer). Requires: "SpeedBooster" "HiJump" "canWalljump" "canCarefulJump" |
|
From: 5
Small Platforms Junction
To: 1
Left Door
Requires: "h_canTrickySpringwall" |
|
From: 5
Small Platforms Junction
To: 1
Left Door
Lure a Mella from the right by breaking the speed blocks or using Morph. Then you need to manipulate it to go high enough to be used as a stepping stone once frozen. Requires: "canUseFrozenEnemies"
"canManipulateMellas"
{
"or": [
{
"obstaclesCleared": [
"B"
]
},
"Morph"
]
}
|
|
Requires: "Morph" |
|
Requires: "h_canFly" |
|
From: 5
Small Platforms Junction
To: 3
Item
Requires: "HiJump" "canTrickyDashJump" "canTrickySpringBallJump" |
|
Notable: true 
A particularly precise springwall. Aim the walljump at the bottom of the second sloped wall fixture, where it looks like you cant jump off of. Optimize pause timing, use an instant morph, and get a max height springball jump. A delayed wall jump helps. Requires: "HiJump" "h_canTrickySpringwall" "canPreciseWalljump" "can3HighWallMidAirMorph" |
|
From: 5
Small Platforms Junction
To: 3
Item
Lure a Mella from the right by breaking the speed blocks or using Morph. Then you need to manipulate it to go high enough to be used as a stepping stone once frozen. Requires: "canUseFrozenEnemies"
"canManipulateMellas"
"HiJump"
{
"or": [
{
"obstaclesCleared": [
"B"
]
},
"Morph"
]
}
|
|
From: 5
Small Platforms Junction
To: 3
Item
Lure a Mella from the right by breaking the speed blocks or using Morph. Then manipulate it to go high enough to be used as a stepping stone once frozen. Without movement items it may be necessary to continue manipulating it from above, jumping and aiming down to freeze it. Requires: "canUseFrozenEnemies"
"canManipulateMellas"
{
"or": [
{
"and": [
"canBePatient",
"canWalljump"
]
},
"canBeVeryPatient"
]
}
{
"or": [
{
"obstaclesCleared": [
"B"
]
},
"Morph"
]
}
|
|
From: 5
Small Platforms Junction
To: 3
Item
Notable: true 
Freeze the Mella at a precise location in order to jump through the crumble block, then wall jump up the long channel and mid air morph to get out. The Mella pixel positioning window is larger and higher with Morph and an X-Ray Stand Up. Requires: "Morph"
"h_canNonTrivialCeilingClip"
"canTrickyUseFrozenEnemies"
{
"or": [
"canConsecutiveWalljump",
{
"and": [
"HiJump",
"canWalljump"
]
}
]
}
|
|
From: 5
Small Platforms Junction
To: 4
Right Junction with Speed Blocks Broken
Notable: true 
Gravity makes it possible to charge a spark in the acid in order to break the speed blocks. Requires: "Gravity"
"canShinechargeMovement"
"canHorizontalShinespark"
{
"canShineCharge": {
"usedTiles": 33,
"openEnd": 2
}
}
{
"acidFrames": 140
}
{
"shinespark": {
"frames": 35
}
}
Clears obstacles: B |
{
"$schema": "../../../schema/m3-room.schema.json",
"id": 127,
"name": "Post Crocomire Jump Room",
"area": "Norfair",
"subarea": "Upper",
"subsubarea": "Crocomire",
"playable": true,
"roomAddress": "0x7AB8F",
"roomEnvironments": [
{
"heated": false
}
],
"nodes": [
{
"id": 1,
"name": "Left Door",
"nodeType": "door",
"nodeSubType": "blue",
"nodeAddress": "0x00194da",
"doorEnvironments": [
{
"physics": "air"
}
]
},
{
"id": 2,
"name": "Right Vertical Door",
"nodeType": "door",
"nodeSubType": "blue",
"nodeAddress": "0x00194ce",
"doorEnvironments": [
{
"physics": "air"
}
]
},
{
"id": 3,
"name": "Item",
"nodeType": "item",
"nodeSubType": "visible",
"nodeItem": "Missile",
"nodeAddress": "0x78C2A"
},
{
"id": 4,
"name": "Right Junction with Speed Blocks Broken",
"nodeType": "junction",
"nodeSubType": "junction",
"note": [
"This node strictly represents access to the speed ramp *with the speed blocks broken*.",
"If they can't be broken, this node is not considered accessible but node 5 might be."
]
},
{
"id": 5,
"name": "Small Platforms Junction",
"nodeType": "junction",
"nodeSubType": "junction",
"note": [
"This node represents the small platforms above the acid.",
"In some situations, it may be accessible without access to node 4, if the Speed blocks can't be broken."
]
}
],
"obstacles": [
{
"id": "A",
"name": "Power bomb blocks",
"obstacleType": "inanimate"
},
{
"id": "B",
"name": "Speed blocks",
"obstacleType": "inanimate"
}
],
"enemies": [
{
"id": "e1",
"groupName": "Post Crocomire Jump Room Rippers 2s",
"enemyName": "Ripper 2 (green)",
"quantity": 4,
"betweenNodes": [
1,
3
]
},
{
"id": "e2",
"groupName": "Post Crocomire Jump Room Mellas",
"enemyName": "Mella",
"quantity": 5,
"homeNodes": [
2
]
}
],
"reusableRoomwideNotable": [
{
"name": "PCJR Indiana Jones Grapple",
"note": "Involves grappling off several Rippers, where falling may lead to a soft lock."
}
],
"links": [
{
"from": 1,
"to": [
{
"id": 1
},
{
"id": 3
},
{
"id": 4
},
{
"id": 5
}
]
},
{
"from": 2,
"to": [
{
"id": 2
},
{
"id": 4
},
{
"id": 5
}
]
},
{
"from": 3,
"to": [
{
"id": 1,
"devNote": "No Space Jump strat because that's taken care of by 3 -> 5 -> 1."
},
{
"id": 5
}
]
},
{
"from": 4,
"to": [
{
"id": 1
},
{
"id": 2,
"devNote": "Since node 4 is only accessed if Speed blocks are broken, access back to 2 is free"
},
{
"id": 3,
"note": "All strats that don't require speed blocks to be broken are in 5 -> 3."
},
{
"id": 5
}
]
},
{
"from": 5,
"to": [
{
"id": 1
},
{
"id": 2,
"note": "If the speed blocks are broken, free access can be attained via node 4"
},
{
"id": 3
},
{
"id": 4
}
]
}
],
"strats": [
{
"link": [
1,
1
],
"name": "Leave with Runway",
"requires": [],
"exitCondition": {
"leaveWithRunway": {
"length": 10,
"openEnd": 1
}
}
},
{
"link": [
1,
1
],
"name": "Crystal Flash",
"requires": [
"h_canCrystalFlash"
]
},
{
"link": [
1,
3
],
"name": "Base",
"requires": [
"SpaceJump"
]
},
{
"link": [
1,
3
],
"name": "Full Speed Jump to Missile",
"entranceCondition": {
"comeInRunning": {
"minTiles": 29,
"speedBooster": true
}
},
"requires": [
"canWalljump",
"canCarefulJump"
],
"note": "Jump with enough run speed to reach the wall below the Missile Item Location."
},
{
"link": [
1,
3
],
"name": "Left-Side Enter with Shinespark",
"entranceCondition": {
"comeInShinecharged": {
"framesRequired": 110
}
},
"requires": [
"canPreciseWalljump",
"canConsecutiveWalljump",
"canShinechargeMovement",
"canMidairShinespark",
{
"shinespark": {
"frames": 78
}
}
],
"note": "Takes three walljumps, and must shinespark at the apex."
},
{
"link": [
1,
3
],
"name": "Left-Side Shinespark",
"entranceCondition": {
"comeInShinecharging": {
"length": 9,
"openEnd": 0
}
},
"requires": [
"canPreciseWalljump",
"canConsecutiveWalljump",
"canShinechargeMovement",
"canMidairShinespark",
{
"shinespark": {
"frames": 78
}
}
],
"note": "Takes three walljumps, and must shinespark at the apex."
},
{
"link": [
1,
3
],
"name": "Left-Side Enter with Shinespark and HiJump",
"entranceCondition": {
"comeInShinecharged": {
"framesRequired": 80
}
},
"requires": [
{
"or": [
{
"and": [
"canWalljump",
{
"shinespark": {
"frames": 20
}
}
]
},
"canTrickyDashJump"
]
},
"HiJump",
"canShinechargeMovement",
"canMidairShinespark",
{
"shinespark": {
"frames": 60
}
}
],
"note": "Walljump or build run speed using the full runway to jump high enough for the shinespark."
},
{
"link": [
1,
3
],
"name": "Left-Side HiJump Shinespark",
"entranceCondition": {
"comeInShinecharging": {
"length": 9,
"openEnd": 0
}
},
"requires": [
{
"or": [
{
"and": [
"canWalljump",
{
"shinespark": {
"frames": 20
}
}
]
},
"canTrickyDashJump"
]
},
"HiJump",
"canShinechargeMovement",
"canMidairShinespark",
{
"shinespark": {
"frames": 60
}
}
],
"note": "Walljump or build run speed using the full runway to jump high enough for the shinespark."
},
{
"link": [
1,
3
],
"name": "PCJR Left Side Diagonal Shinespark",
"notable": true,
"entranceCondition": {
"comeInShinecharged": {
"framesRequired": 175
}
},
"requires": [
"canTrickyJump",
"canShinechargeMovementComplex",
"canMidairShinespark",
{
"shinespark": {
"frames": 40
}
}
],
"note": [
"Store a shinespark near the Grapple Room door and use the remaining runway to jump as far as possible to the right.",
"Once near the acid platforms, Shinespark diagonally to reach the Missile Location."
]
},
{
"link": [
1,
3
],
"name": "Indiana Jones Grapple",
"notable": true,
"requires": [
"canUseEnemies",
"canPreciseGrapple"
],
"reusableRoomwideNotable": "PCJR Indiana Jones Grapple",
"note": "Grapple off several Ripper 2."
},
{
"link": [
1,
4
],
"name": "PCJR Full Room Space Jump Through Speed Blocks",
"notable": true,
"entranceCondition": {
"comeInShinecharging": {
"length": 9,
"openEnd": 0
}
},
"requires": [
"canBlueSpaceJump"
],
"note": "The blocks can be broken if you can generate a blue suit using the previous room's runway, and carry it to the blocks by slowing floating down with Space Jump."
},
{
"link": [
1,
5
],
"name": "Base",
"requires": []
},
{
"link": [
2,
2
],
"name": "Break Power Bomb Blocks",
"requires": [
"h_canUsePowerBombs"
],
"clearsObstacles": [
"A"
]
},
{
"link": [
2,
2
],
"name": "Mella Ice Clip Door Lock Skip",
"requires": [
"canManipulateMellas",
"canTrickyUseFrozenEnemies",
"h_canNonTrivialCeilingClip"
],
"bypassesDoorShell": true,
"note": [
"Freeze a Mella at a precise distance below the door in order to crouch-jump up and clip through the door shell.",
"The pixel window is larger and higher with Morph and an X-Ray stand-up, in which case a standing jump is used."
]
},
{
"link": [
2,
2
],
"name": "Mella Farm",
"requires": [
{
"or": [
"canDodgeWhileShooting",
"ScrewAttack",
"Ice",
"Wave",
"Spazer",
"Plasma"
]
},
{
"resetRoom": {
"nodes": [
2
],
"mustStayPut": false
}
},
{
"refill": [
"Energy",
"Missile"
]
}
],
"resetsObstacles": [
"A",
"B"
],
"note": "Shoot the Mellas when they first begin to come on screen, and they will not move."
},
{
"link": [
2,
2
],
"name": "Leave with Shinecharge - Power Bomb Blocks Destroyed",
"requires": [
{
"obstaclesCleared": [
"A",
"B"
]
},
"canShinechargeMovement"
],
"exitCondition": {
"leaveShinecharged": {
"framesRemaining": 130
}
},
"note": [
"Get a normal height jump by releasing run with SpeedBooster and no HiJump.",
"Break spin to reach the transition without a wall jump."
]
},
{
"link": [
2,
2
],
"name": "Leave with Shinecharge - Power Bomb Blocks Intact",
"requires": [
{
"obstaclesCleared": [
"B"
]
},
"canShinechargeMovement",
{
"canShineCharge": {
"usedTiles": 32,
"openEnd": 1
}
}
],
"exitCondition": {
"leaveShinecharged": {
"framesRemaining": 100
}
},
"note": [
"Get a normal height jump by releasing run with SpeedBooster and no HiJump.",
"Break spin to reach the transition without a wall jump."
]
},
{
"link": [
2,
2
],
"name": "Crystal Flash",
"requires": [
"h_canCrystalFlash"
],
"clearsObstacles": [
"A"
]
},
{
"link": [
2,
2
],
"name": "Leave With Door Frame Below",
"requires": [],
"exitCondition": {
"leaveWithDoorFrameBelow": {
"height": 2
}
}
},
{
"link": [
2,
2
],
"name": "Leave With Platform Below - Basic Platform",
"requires": [],
"exitCondition": {
"leaveWithPlatformBelow": {
"height": 9,
"leftPosition": -1,
"rightPosition": 2
}
}
},
{
"link": [
2,
2
],
"name": "Leave With Platform Below - Upper Left Power Bomb Block",
"requires": [
{
  "obstaclesNotCleared": [
    "A"
  ]
}
],
"exitCondition": {
"leaveWithPlatformBelow": {
"height": 7,
"leftPosition": -5.5,
"rightPosition": -1.5
}
},
"devNote": [
"With HiJump this can be used coming up Main Street, the bottom left of Mt. Everest, and Pseudo Plasma Spark Room.",
"We could add other Power Bomb block platforms too (e.g. the lower ones, and on the right side), but they don't yet appear to have any application."
]
},
{
"link": [
2,
2
],
"name": "Leave With Platform Below - Power Bomb Blocks Broken",
"requires": [
{
  "obstaclesCleared": [
    "A"
  ]
}
],
"exitCondition": {
"leaveWithPlatformBelow": {
"height": 9,
"leftPosition": -23,
"rightPosition": 22
}
}
},
{
"link": [
2,
2
],
"name": "Leave With Platform Below - Speed Blocks Broken",
"requires": [
{
"obstaclesCleared": [
"B"
]
},
"canTrickyJump"
],
"exitCondition": {
"leaveWithPlatformBelow": {
"height": 9,
"leftPosition": -38.5,
"rightPosition": -7
}
},
"devNote": [
"The tile next to the Power Bomb blocks is not counted as part of the jumpway, since using it would cause Samus to bonk.",
"A tricky jump is required because of the difficulty of avoiding the Power Bomb blocks and still reaching the door."
]
},
{
"link": [
2,
2
],
"name": "Leave With Platform Below - Power Bomb and Speed Blocks Broken",
"requires": [
{
  "obstaclesCleared": [
    "A",
    "B"
  ]
}
],
"exitCondition": {
"leaveWithPlatformBelow": {
"height": 9,
"leftPosition": -38.5,
"rightPosition": 22
}
},
"devNote": [
"This strat is for avoiding the canTrickyJump requirement when jumping left-to-right, if the Power Bomb blocks can be destroyed.",
"It also makes it possible to gain more speed by running a few tiles further, which is needed for certain strats."
]
},
{
"link": [
2,
4
],
"name": "Base",
"requires": [
{
  "obstaclesCleared": [
    "B"
  ]
}
]
},
{
"link": [
2,
4
],
"name": "Broken Power Bomb Blocks",
"requires": [
"SpeedBooster",
{
"obstaclesCleared": [
"A"
]
}
],
"clearsObstacles": [
"B"
]
},
{
"link": [
2,
4
],
"name": "Full Shinespark",
"entranceCondition": {
"comeInShinecharged": {
"framesRequired": 80
},
"comesThroughToilet": "any"
},
"requires": [
"canHorizontalShinespark",
{
"shinespark": {
"frames": 115
}
}
],
"clearsObstacles": [
"B"
],
"note": "Spark from the ground, left of the Power Bomb blocks."
},
{
"link": [
2,
4
],
"name": "Shinespark Ends Over Acid",
"entranceCondition": {
"comeInShinecharged": {
"framesRequired": 80
},
"comesThroughToilet": "any"
},
"requires": [
"canHorizontalShinespark",
{
"shinespark": {
"frames": 115,
"excessFrames": 85
}
},
{
"or": [
"canTrickyJump",
{
"and": [
{
"or": [
"canWalljump",
"HiJump"
]
},
{
"acidFrames": 25
}
]
},
{
"and": [
"Gravity",
{
"acidFrames": 20
}
]
}
]
}
],
"clearsObstacles": [
"B"
],
"note": "Spark from the ground, left of the Power Bomb blocks."
},
{
"link": [
2,
4
],
"name": "Shinecharge",
"requires": [
{
  "canShineCharge": {
    "usedTiles": 17,
    "openEnd": 0
  }
}
],
"clearsObstacles": [
"B"
],
"note": "Commonly known as a stutter-3, this is also doable as a 4-tap."
},
{
"link": [
2,
5
],
"name": "Base",
"requires": [
"Morph"
]
},
{
"link": [
3,
1
],
"name": "Indiana Jones Grapple in Reverse",
"notable": true,
"requires": [
"canUseEnemies",
"canPreciseGrapple"
],
"reusableRoomwideNotable": "PCJR Indiana Jones Grapple",
"note": "Involves grappling off several Ripper 2."
},
{
"link": [
3,
5
],
"name": "Base",
"requires": []
},
{
"link": [
4,
1
],
"name": "PCJR Wall Jump Shinespark to Grapple",
"requires": [
"canWalljump",
"canShinechargeMovement",
"canMidairShinespark",
{
"canShineCharge": {
"usedTiles": 32,
"openEnd": 1
}
},
{
"shinespark": {
"frames": 90
}
}
],
"note": "Fire off the shinespark at the apex of two consecutive walljumps.",
"devNote": "You can have a 'max' length runway available here if you break the PB blocks, but we won't duplicate strats for that right now."
},
{
"link": [
4,
1
],
"name": "PCJR Big Jump Shinespark",
"notable": true,
"requires": [
"canShinechargeMovement",
"canMidairShinespark",
{
"canShineCharge": {
"usedTiles": 32,
"openEnd": 1
}
},
{
"shinespark": {
"frames": 52
}
}
],
"note": "Charge a spark to the right, then come back, run and jump, and do a horizontal spark at the apex.",
"devNote": "You can have a 'max' length runway available here if you break the PB blocks, but we won't duplicate strats for that right now."
},
{
"link": [
4,
1
],
"name": "Short Run Speedjump",
"requires": [
"SpeedBooster",
{
"or": [
"HiJump",
{
"and": [
"canLateralMidAirMorph",
"canTrickySpringBallJump"
]
}
]
}
]
},
{
"link": [
4,
1
],
"name": "Long Run Speedjump",
"requires": [
"SpeedBooster",
{
"or": [
"h_canUsePowerBombs",
{
"obstaclesCleared": [
"A"
]
}
]
}
],
"clearsObstacles": [
"A"
]
},
{
"link": [
4,
2
],
"name": "Base",
"requires": []
},
{
"link": [
4,
3
],
"name": "Shinespark",
"requires": [
{
"canShineCharge": {
"usedTiles": 32,
"openEnd": 1
}
},
{
"shinespark": {
"frames": 40
}
}
],
"devNote": "You can have a capped length runway available here if you break the PB blocks, but we won't duplicate strats for that right now."
},
{
"link": [
4,
3
],
"name": "Speedjump",
"requires": [
"SpeedBooster",
"HiJump",
{
"or": [
"canSpringBallJumpMidAir",
"canWalljump"
]
}
]
},
{
"link": [
4,
5
],
"name": "Base",
"requires": []
},
{
"link": [
5,
1
],
"name": "Base",
"requires": [
"SpaceJump"
]
},
{
"link": [
5,
1
],
"name": "PCJR Door IBJ",
"requires": [
"h_canJumpIntoIBJ"
]
},
{
"link": [
5,
1
],
"name": "Speedjump",
"requires": [
"SpeedBooster",
"HiJump",
"canWalljump",
"canCarefulJump"
],
"note": "Run on the moving platform (Kamer)."
},
{
"link": [
5,
1
],
"name": "Tricky Spring Wall",
"requires": [
"h_canTrickySpringwall"
]
},
{
"link": [
5,
1
],
"name": "PCJR Frozen Mella Door",
"requires": [
"canUseFrozenEnemies",
"canManipulateMellas",
{
"or": [
{
"obstaclesCleared": [
"B"
]
},
"Morph"
]
}
],
"note": [
"Lure a Mella from the right by breaking the speed blocks or using Morph.",
"Then you need to manipulate it to go high enough to be used as a stepping stone once frozen."
]
},
{
"link": [
5,
2
],
"name": "Base",
"requires": [
"Morph"
]
},
{
"link": [
5,
3
],
"name": "Base",
"requires": [
"h_canFly"
]
},
{
"link": [
5,
3
],
"name": "PCJR Speedjump SpringBall",
"requires": [
"HiJump",
"canTrickyDashJump",
"canTrickySpringBallJump"
]
},
{
"link": [
5,
3
],
"name": "PCJR Springwall",
"notable": true,
"requires": [
"HiJump",
"h_canTrickySpringwall",
"canPreciseWalljump",
"can3HighWallMidAirMorph"
],
"note": [
"A particularly precise springwall.",
"Aim the walljump at the bottom of the second sloped wall fixture, where it looks like you cant jump off of.",
"Optimize pause timing, use an instant morph, and get a max height springball jump. A delayed wall jump helps."
]
},
{
"link": [
5,
3
],
"name": "Indy Jones Short Mella",
"requires": [
"canUseFrozenEnemies",
"canManipulateMellas",
"HiJump",
{
"or": [
{
"obstaclesCleared": [
"B"
]
},
"Morph"
]
}
],
"note": [
"Lure a Mella from the right by breaking the speed blocks or using Morph.",
"Then you need to manipulate it to go high enough to be used as a stepping stone once frozen."
]
},
{
"link": [
5,
3
],
"name": "Indy Jones Long Mella",
"requires": [
"canUseFrozenEnemies",
"canManipulateMellas",
{
"or": [
{
"and": [
"canBePatient",
"canWalljump"
]
},
"canBeVeryPatient"
]
},
{
"or": [
{
"obstaclesCleared": [
"B"
]
},
"Morph"
]
}
],
"note": [
"Lure a Mella from the right by breaking the speed blocks or using Morph.",
"Then manipulate it to go high enough to be used as a stepping stone once frozen.",
"Without movement items it may be necessary to continue manipulating it from above, jumping and aiming down to freeze it."
]
},
{
"link": [
5,
3
],
"name": "Indy Jones Mella Ice Clip",
"notable": true,
"requires": [
"Morph",
"h_canNonTrivialCeilingClip",
"canTrickyUseFrozenEnemies",
{
"or": [
"canConsecutiveWalljump",
{
"and": [
"HiJump",
"canWalljump"
]
}
]
}
],
"note": [
"Freeze the Mella at a precise location in order to jump through the crumble block, then wall jump up the long channel and mid air morph to get out.",
"The Mella pixel positioning window is larger and higher with Morph and an X-Ray Stand Up."
]
},
{
"link": [
5,
4
],
"name": "PCJR Acid Shinespark",
"notable": true,
"requires": [
"Gravity",
"canShinechargeMovement",
"canHorizontalShinespark",
{
"canShineCharge": {
"usedTiles": 33,
"openEnd": 2
}
},
{
"acidFrames": 140
},
{
"shinespark": {
"frames": 35
}
}
],
"clearsObstacles": [
"B"
],
"note": "Gravity makes it possible to charge a spark in the acid in order to break the speed blocks."
}
]
}