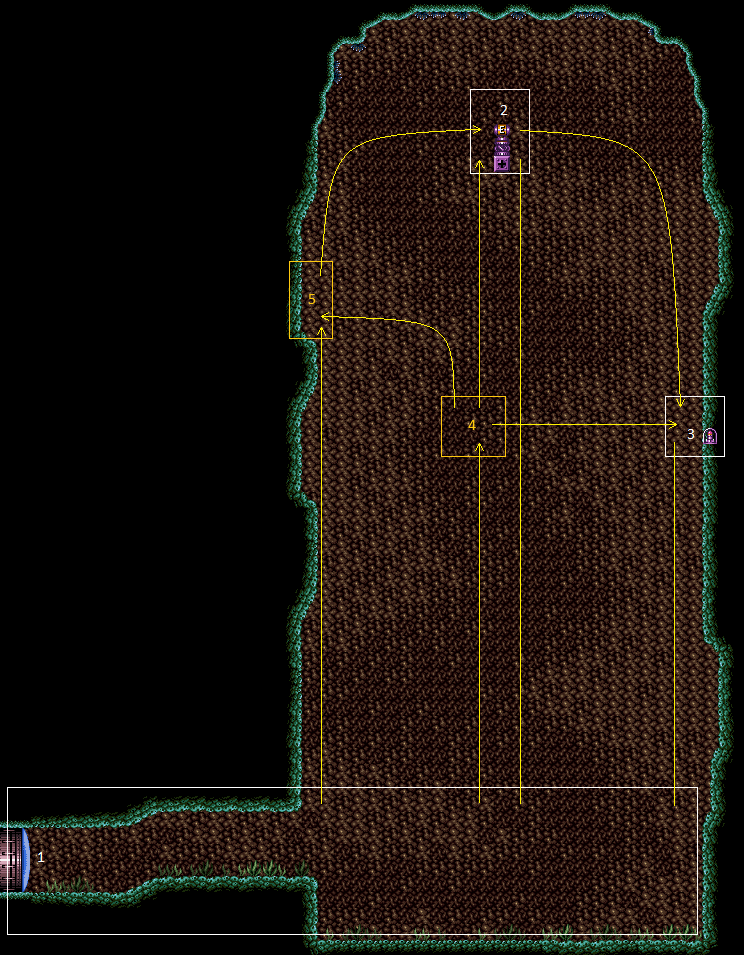
Mama Turtle Room
Room ID: 178
|
Exit condition: {
"leaveWithRunway": {
"length": 19,
"gentleDownTiles": 2,
"openEnd": 1
}
}
|
|
From: 1
Left Door
To: 1
Left Door
Entrance condition: {
"comeInRunning": {
"speedBooster": true,
"minTiles": 2
}
}
Requires: "canStutterWaterShineCharge"
"canShinechargeMovementComplex"
{
"canShineCharge": {
"usedTiles": 33,
"openEnd": 2
}
}
{
"or": [
{
"shinespark": {
"frames": 9
}
},
{
"and": [
"canShinechargeMovementTricky",
{
"shinespark": {
"frames": 2
}
}
]
}
]
}
Exit condition: {
"leaveWithSpark": {}
}
|
|
Requires: "h_canCrystalFlash" |
|
Requires: "Gravity" "SpaceJump" Clears obstacles: B |
|
Requires: "Gravity"
{
"canShineCharge": {
"usedTiles": 19,
"gentleUpTiles": 2,
"openEnd": 1
}
}
"canShinechargeMovement"
{
"or": [
{
"shinespark": {
"frames": 60,
"excessFrames": 5
}
},
{
"and": [
"canMidairShinespark",
{
"shinespark": {
"frames": 55,
"excessFrames": 5
}
}
]
},
{
"and": [
"canMidairShinespark",
"HiJump",
{
"shinespark": {
"frames": 50,
"excessFrames": 5
}
}
]
}
]
}
Clears obstacles: B |
|
Entrance condition: {
"comeInShinecharging": {
"length": 18,
"gentleUpTiles": 2,
"openEnd": 1
}
}
Requires: "Gravity"
"canShinechargeMovement"
{
"or": [
{
"shinespark": {
"frames": 60,
"excessFrames": 5
}
},
{
"and": [
"canMidairShinespark",
{
"shinespark": {
"frames": 55,
"excessFrames": 5
}
}
]
},
{
"and": [
"canMidairShinespark",
"HiJump",
{
"shinespark": {
"frames": 50,
"excessFrames": 5
}
}
]
}
]
}
Clears obstacles: B |
|
Entrance condition: {
"comeInShinecharged": {
"framesRequired": 110
}
}
Requires: "Gravity"
"canShinechargeMovement"
{
"shinespark": {
"frames": 60
}
}
Clears obstacles: B |
|
Entrance condition: {
"comeInShinecharging": {
"length": 4,
"openEnd": 1
}
}
Requires: "canWaterShineCharge"
"canShinechargeMovement"
{
"canShineCharge": {
"usedTiles": 33,
"openEnd": 2
}
}
{
"or": [
{
"shinespark": {
"frames": 61,
"excessFrames": 7
}
},
{
"and": [
"canMidairShinespark",
{
"shinespark": {
"frames": 56,
"excessFrames": 7
}
}
]
},
{
"and": [
"canMidairShinespark",
"HiJump",
{
"shinespark": {
"frames": 52,
"excessFrames": 7
}
}
]
}
]
}
Clears obstacles: B |
|
Entrance condition: {
"comeInRunning": {
"speedBooster": true,
"minTiles": 2
}
}
Requires: "canStutterWaterShineCharge"
"canShinechargeMovement"
{
"canShineCharge": {
"usedTiles": 33,
"openEnd": 2
}
}
{
"or": [
{
"shinespark": {
"frames": 61,
"excessFrames": 7
}
},
{
"and": [
"canMidairShinespark",
{
"shinespark": {
"frames": 56,
"excessFrames": 7
}
}
]
},
{
"and": [
"canMidairShinespark",
"HiJump",
{
"shinespark": {
"frames": 52,
"excessFrames": 7
}
}
]
}
]
}
Clears obstacles: B |
|
Get into position as close to the center of the room as possible while not being too close to any baby turtles. Start an IBJ without hiting any baby turtles otherwhise Mama Turtle will wake up. Entrance condition: {
"comeInWithGMode": {
"mode": "any",
"morphed": true
}
}
Requires: "Gravity" "h_canArtificialMorphIBJ" "h_canArtificialMorphBombHorizontally" Clears obstacles: B |
|
Place a bomb next to one of the baby turtles, then use spring ball to get on Mama Turtle's back. Start an IBJ above the waterline to get to the item. Entrance condition: {
"comeInWithGMode": {
"mode": "any",
"morphed": true
}
}
Requires: "canSuitlessMaridia" "h_canArtificialMorphSpringBall" "h_canArtificialMorphIBJ" Clears obstacles: A, B |
|
Requires getting back on Mama Turtle while she is at the right. Requires: "h_canNavigateUnderwater"
{
"or": [
"canTrickyJump",
{
"enemyDamage": {
"enemy": "Kame (Tatori)",
"type": "contact",
"hits": 1
}
}
]
}
Clears obstacles: A |
|
Requires: "Gravity"
{
"canShineCharge": {
"usedTiles": 19,
"gentleUpTiles": 2,
"openEnd": 1
}
}
{
"or": [
{
"shinespark": {
"frames": 43,
"excessFrames": 4
}
},
{
"and": [
"canMidairShinespark",
{
"shinespark": {
"frames": 37,
"excessFrames": 5
}
}
]
},
{
"and": [
"canMidairShinespark",
"HiJump",
{
"shinespark": {
"frames": 32,
"excessFrames": 4
}
}
]
}
]
}
|
|
Entrance condition: {
"comeInShinecharging": {
"length": 18,
"gentleUpTiles": 2,
"openEnd": 1
}
}
Requires: "Gravity"
{
"or": [
{
"shinespark": {
"frames": 43,
"excessFrames": 4
}
},
{
"and": [
"canMidairShinespark",
{
"shinespark": {
"frames": 37,
"excessFrames": 5
}
}
]
},
{
"and": [
"canMidairShinespark",
"HiJump",
{
"shinespark": {
"frames": 32,
"excessFrames": 4
}
}
]
}
]
}
|
|
Entrance condition: {
"comeInShinecharged": {
"framesRequired": 80
}
}
Requires: "Gravity"
{
"shinespark": {
"frames": 43,
"excessFrames": 4
}
}
|
|
Requires: "Gravity"
{
"or": [
"canWalljump",
"h_canFly"
]
}
|
|
Entrance condition: {
"comeInShinecharging": {
"length": 4,
"openEnd": 1
}
}
Requires: "canWaterShineCharge"
"canShinechargeMovement"
{
"canShineCharge": {
"usedTiles": 33,
"openEnd": 2
}
}
{
"or": [
{
"shinespark": {
"frames": 47,
"excessFrames": 5
}
},
{
"and": [
"canMidairShinespark",
{
"shinespark": {
"frames": 44,
"excessFrames": 5
}
}
]
},
{
"and": [
"canMidairShinespark",
"HiJump",
{
"shinespark": {
"frames": 41,
"excessFrames": 5
}
}
]
}
]
}
|
|
From: 1
Left Door
To: 3
Hidden Right Item
Requires at least 2 tiles in the adjacent room. Entrance condition: {
"comeInRunning": {
"speedBooster": true,
"minTiles": 2
}
}
Requires: "canStutterWaterShineCharge"
"canShinechargeMovement"
{
"canShineCharge": {
"usedTiles": 33,
"openEnd": 2
}
}
{
"or": [
{
"shinespark": {
"frames": 47,
"excessFrames": 5
}
},
{
"and": [
"canMidairShinespark",
{
"shinespark": {
"frames": 44,
"excessFrames": 5
}
}
]
},
{
"and": [
"canMidairShinespark",
"HiJump",
{
"shinespark": {
"frames": 41,
"excessFrames": 5
}
}
]
}
]
}
|
|
From: 1
Left Door
To: 3
Hidden Right Item
IBJ up a bit, then bomb over Mama Turtle and her babies to prevent her from waking. Then IBJ to the high right ledge before exiting g-mode. Entrance condition: {
"comeInWithGMode": {
"mode": "any",
"morphed": true
}
}
Requires: "Gravity" "h_canArtificialMorphIBJ" "h_canArtificialMorphBombHorizontally" |
|
Ride Mama Turtle. To avoid getting hit, shoot one of her babies to wake her up, then quickly get on her back. Requires: "h_canNavigateUnderwater"
"canUseEnemies"
{
"or": [
"canCarefulJump",
{
"enemyDamage": {
"enemy": "Kame (Tatori)",
"type": "contact",
"hits": 1
}
}
]
}
Clears obstacles: A |
|
Requires: "Gravity"
{
"or": [
"canWalljump",
"h_canFly"
]
}
|
|
Letting Mama Turtle sleep, climb the right wall using HiJump (with a down-grab) and escape the water with Space Jump . Requires: "canSuitlessMaridia"
"HiJump"
"canDownGrab"
{
"or": [
{
"and": [
"canSpaceJumpWaterBounce",
"canWalljump"
]
},
"canSpaceJumpWaterEscape"
]
}
|
|
|
|
Get a bit of run speed on the block and jump to the right ledge. If you miss the ledge, try to shoot the block to still collect the item. Requires: {
"obstaclesCleared": [
"B"
]
}
|
|
Requires: "h_canNavigateUnderwater"
{
"or": [
"Gravity",
{
"obstaclesNotCleared": [
"A"
]
},
{
"enemyDamage": {
"enemy": "Kame (Tatori)",
"type": "contact",
"hits": 1
}
}
]
}
{
"or": [
"Gravity",
"HiJump",
"canSpringBallJumpMidAir",
"h_canCrouchJumpDownGrab",
"canUseEnemies"
]
}
|
|
Requires: "canSuitlessMaridia"
"canCarefulJump"
{
"or": [
"HiJump",
"Morph"
]
}
{
"or": [
"HiJump",
"canSpringBallJumpMidAir",
"h_canCrouchJumpDownGrab",
"canUseEnemies"
]
}
|
|
Jump over or on to Mama Turtle. The easiest method is to jump over her by jumping on her babies, spin jumping off of them and over her, then breaking spin before landing. Requires: "canSuitlessMaridia" "canTrickyJump" "canUseEnemies" |
|
If Mama Turtle is in her starting location, stand on the rightmost side of her to be aligned below the grapple block. With a miss, if you havent moved horizontally, simply fall straight down to land safely back on to her. Requires: "Grapple" Clears obstacles: B |
|
Requires: "SpaceJump" Clears obstacles: B |
|
Once out of the water, jump into an IBJ. With a miss, if you haven't moved horizontally, simply fall straight down to land safely back on Mama Turtle. Requires: "h_canJumpIntoIBJ" Clears obstacles: B |
|
Spring Ball jump from Mama Turtle's back. With a fail, if you haven't moved horizontally, simply fall straight down to land safely back on Mama Turtle. Requires: "HiJump" "canSpringBallJumpMidAir" Clears obstacles: B |
|
Requires: {
"or": [
"canWalljump",
"SpaceJump",
"HiJump"
]
}
|
|
|
|
Requires: "SpaceJump" Clears obstacles: B |
|
Notable: true 
Starting from the top left ledge, wall jump to place a bomb or Power Bomb just below and to the right of the bottom left plant on the wall. Use the bomb to boost you towards the item, then unmorph to reduce your fall speed and barely reach the item. Requires: "canWallJumpBombBoost" |
|
Briefly run on the top ledge on either side (left is slightly easier) then jump and wall jump on the grapple block. Requires: "HiJump" "canTrickyJump" "SpeedBooster" "canWalljump" Clears obstacles: B |
|
Requires: "canSpringwall" "canResetFallSpeed" |
|
Requires: "canSpringwall" "canSpringFling" Clears obstacles: B |
|
Time a pause before jumping to give a significant momentum boost in order to reach the Grapple Block. Requires: "h_canMaxHeightSpringBallJump" "canSpringFling" Clears obstacles: B |
|
Notable: true 
Perform a running stationary spinjump from a precise spot, then a CWJ with slightly more speed off the wall one tile further out. This makes it possible to just barely walljump off the grapple block. Requires: "HiJump" "canInsaneJump" "canStationarySpinJump" "canConsecutiveWalljump" "canInsaneWalljump" "canCWJ" Clears obstacles: B |
{
"$schema": "../../../schema/m3-room.schema.json",
"id": 178,
"name": "Mama Turtle Room",
"area": "Maridia",
"subarea": "Outer",
"playable": true,
"roomAddress": "0x7D055",
"roomEnvironments": [
{
"heated": false
}
],
"nodes": [
{
"id": 1,
"name": "Left Door",
"nodeType": "door",
"nodeSubType": "blue",
"nodeAddress": "0x001a408",
"doorEnvironments": [
{
"physics": "water"
}
]
},
{
"id": 2,
"name": "Top Item",
"nodeType": "item",
"nodeSubType": "visible",
"nodeItem": "ETank",
"nodeAddress": "0x7C47D"
},
{
"id": 3,
"name": "Hidden Right Item",
"nodeType": "item",
"nodeSubType": "hidden",
"nodeItem": "Missile",
"nodeAddress": "0x7C483"
},
{
"id": 4,
"name": "On Mama Turtle",
"nodeType": "junction",
"nodeSubType": "junction",
"note": "On Mama Turtle's back, above the waterline, directly above her starting position."
},
{
"id": 5,
"name": "Top Left Junction",
"nodeType": "junction",
"nodeSubType": "junction",
"note": "Out of the water, on the top left ledge."
}
],
"obstacles": [
{
"id": "A",
"name": "Mama Turtle Sleeping",
"obstacleType": "abstract"
},
{
"id": "B",
"name": "Get on top of the Grapple Block",
"obstacleType": "abstract"
}
],
"enemies": [
{
"id": "e1",
"groupName": "Mama Turtle",
"enemyName": "Kame (Tatori)",
"quantity": 1,
"homeNodes": [
1
]
},
{
"id": "e2",
"groupName": "Baby Turtles",
"enemyName": "Kame Baby",
"quantity": 4,
"homeNodes": [
1
]
}
],
"links": [
{
"from": 1,
"to": [
{
"id": 1
},
{
"id": 2
},
{
"id": 3
},
{
"id": 4
},
{
"id": 5
}
]
},
{
"from": 2,
"to": [
{
"id": 1
},
{
"id": 3
}
]
},
{
"from": 3,
"to": [
{
"id": 1
}
]
},
{
"from": 4,
"to": [
{
"id": 2
},
{
"id": 3
},
{
"id": 5
}
]
},
{
"from": 5,
"to": [
{
"id": 2
}
]
}
],
"strats": [
{
"link": [
1,
1
],
"name": "Leave with Runway",
"requires": [],
"exitCondition": {
"leaveWithRunway": {
"length": 19,
"gentleDownTiles": 2,
"openEnd": 1
}
}
},
{
"link": [
1,
1
],
"name": "Suitless Stutter Water Shinecharge, Return",
"entranceCondition": {
"comeInRunning": {
"speedBooster": true,
"minTiles": 2
}
},
"requires": [
"canStutterWaterShineCharge",
"canShinechargeMovementComplex",
{
"canShineCharge": {
"usedTiles": 33,
"openEnd": 2
}
},
{
"or": [
{
"shinespark": {
"frames": 9
}
},
{
"and": [
"canShinechargeMovementTricky",
{
"shinespark": {
"frames": 2
}
}
]
}
]
}
],
"exitCondition": {
"leaveWithSpark": {}
},
"unlocksDoors": [
{
"types": [
"super"
],
"requires": []
},
{
"types": [
"missiles",
"powerbomb"
],
"requires": [
"never"
]
}
]
},
{
"link": [
1,
1
],
"name": "Crystal Flash",
"requires": [
"h_canCrystalFlash"
]
},
{
"link": [
1,
2
],
"name": "Base",
"requires": [
"Gravity",
"SpaceJump"
],
"clearsObstacles": [
"B"
]
},
{
"link": [
1,
2
],
"name": "In-Room Shinespark",
"requires": [
"Gravity",
{
"canShineCharge": {
"usedTiles": 19,
"gentleUpTiles": 2,
"openEnd": 1
}
},
"canShinechargeMovement",
{
"or": [
{
"shinespark": {
"frames": 60,
"excessFrames": 5
}
},
{
"and": [
"canMidairShinespark",
{
"shinespark": {
"frames": 55,
"excessFrames": 5
}
}
]
},
{
"and": [
"canMidairShinespark",
"HiJump",
{
"shinespark": {
"frames": 50,
"excessFrames": 5
}
}
]
}
]
}
],
"clearsObstacles": [
"B"
],
"devNote": "This could have a few more excess frames if not getting on top of the block to go to 2."
},
{
"link": [
1,
2
],
"name": "Shinespark",
"entranceCondition": {
"comeInShinecharging": {
"length": 18,
"gentleUpTiles": 2,
"openEnd": 1
}
},
"requires": [
"Gravity",
"canShinechargeMovement",
{
"or": [
{
"shinespark": {
"frames": 60,
"excessFrames": 5
}
},
{
"and": [
"canMidairShinespark",
{
"shinespark": {
"frames": 55,
"excessFrames": 5
}
}
]
},
{
"and": [
"canMidairShinespark",
"HiJump",
{
"shinespark": {
"frames": 50,
"excessFrames": 5
}
}
]
}
]
}
],
"clearsObstacles": [
"B"
],
"devNote": "This could have a few more excess frames if not getting on top of the block to go to 2."
},
{
"link": [
1,
2
],
"name": "Shinespark, Charge Outside",
"entranceCondition": {
"comeInShinecharged": {
"framesRequired": 110
}
},
"requires": [
"Gravity",
"canShinechargeMovement",
{
"shinespark": {
"frames": 60
}
}
],
"clearsObstacles": [
"B"
],
"devNote": "This could have a few more excess frames if not getting on top of the block to go to 2."
},
{
"link": [
1,
2
],
"name": "Suitless Water Shinecharge",
"entranceCondition": {
"comeInShinecharging": {
"length": 4,
"openEnd": 1
}
},
"requires": [
"canWaterShineCharge",
"canShinechargeMovement",
{
"canShineCharge": {
"usedTiles": 33,
"openEnd": 2
}
},
{
"or": [
{
"shinespark": {
"frames": 61,
"excessFrames": 7
}
},
{
"and": [
"canMidairShinespark",
{
"shinespark": {
"frames": 56,
"excessFrames": 7
}
}
]
},
{
"and": [
"canMidairShinespark",
"HiJump",
{
"shinespark": {
"frames": 52,
"excessFrames": 7
}
}
]
}
]
}
],
"clearsObstacles": [
"B"
],
"devNote": [
"This could have a few more excess frames if not getting on top of the block to go to 2.",
"This runway length is just an estimate of the worst case scenario for difficulties that can't use canStutterWaterShineCharge."
]
},
{
"link": [
1,
2
],
"name": "Suitless Stutter Water Shinecharge",
"entranceCondition": {
"comeInRunning": {
"speedBooster": true,
"minTiles": 2
}
},
"requires": [
"canStutterWaterShineCharge",
"canShinechargeMovement",
{
"canShineCharge": {
"usedTiles": 33,
"openEnd": 2
}
},
{
"or": [
{
"shinespark": {
"frames": 61,
"excessFrames": 7
}
},
{
"and": [
"canMidairShinespark",
{
"shinespark": {
"frames": 56,
"excessFrames": 7
}
}
]
},
{
"and": [
"canMidairShinespark",
"HiJump",
{
"shinespark": {
"frames": 52,
"excessFrames": 7
}
}
]
}
]
}
],
"clearsObstacles": [
"B"
],
"devNote": "This could have a few more excess frames if not getting on top of the block to go to 2."
},
{
"link": [
1,
2
],
"name": "G-Mode Morph - Let Mama Turtle Sleep",
"entranceCondition": {
"comeInWithGMode": {
"mode": "any",
"morphed": true
}
},
"requires": [
"Gravity",
"h_canArtificialMorphIBJ",
"h_canArtificialMorphBombHorizontally"
],
"clearsObstacles": [
"B"
],
"note": [
"Get into position as close to the center of the room as possible while not being too close to any baby turtles.",
"Start an IBJ without hiting any baby turtles otherwhise Mama Turtle will wake up."
]
},
{
"link": [
1,
2
],
"name": "G-Mode Morph - Wake Mama Turtle",
"entranceCondition": {
"comeInWithGMode": {
"mode": "any",
"morphed": true
}
},
"requires": [
"canSuitlessMaridia",
"h_canArtificialMorphSpringBall",
"h_canArtificialMorphIBJ"
],
"clearsObstacles": [
"A",
"B"
],
"note": [
"Place a bomb next to one of the baby turtles, then use spring ball to get on Mama Turtle's back.",
"Start an IBJ above the waterline to get to the item."
]
},
{
"link": [
1,
3
],
"name": "Ride Mama Turtle on the Right",
"requires": [
"h_canNavigateUnderwater",
{
"or": [
"canTrickyJump",
{
"enemyDamage": {
"enemy": "Kame (Tatori)",
"type": "contact",
"hits": 1
}
}
]
}
],
"clearsObstacles": [
"A"
],
"note": "Requires getting back on Mama Turtle while she is at the right."
},
{
"link": [
1,
3
],
"name": "In-Room Shinespark",
"requires": [
"Gravity",
{
"canShineCharge": {
"usedTiles": 19,
"gentleUpTiles": 2,
"openEnd": 1
}
},
{
"or": [
{
"shinespark": {
"frames": 43,
"excessFrames": 4
}
},
{
"and": [
"canMidairShinespark",
{
"shinespark": {
"frames": 37,
"excessFrames": 5
}
}
]
},
{
"and": [
"canMidairShinespark",
"HiJump",
{
"shinespark": {
"frames": 32,
"excessFrames": 4
}
}
]
}
]
}
]
},
{
"link": [
1,
3
],
"name": "Shinespark",
"entranceCondition": {
"comeInShinecharging": {
"length": 18,
"gentleUpTiles": 2,
"openEnd": 1
}
},
"requires": [
"Gravity",
{
"or": [
{
"shinespark": {
"frames": 43,
"excessFrames": 4
}
},
{
"and": [
"canMidairShinespark",
{
"shinespark": {
"frames": 37,
"excessFrames": 5
}
}
]
},
{
"and": [
"canMidairShinespark",
"HiJump",
{
"shinespark": {
"frames": 32,
"excessFrames": 4
}
}
]
}
]
}
]
},
{
"link": [
1,
3
],
"name": "Charge Outside",
"entranceCondition": {
"comeInShinecharged": {
"framesRequired": 80
}
},
"requires": [
"Gravity",
{
"shinespark": {
"frames": 43,
"excessFrames": 4
}
}
]
},
{
"link": [
1,
3
],
"name": "Let Mama Turtle Sleep",
"requires": [
"Gravity",
{
"or": [
"canWalljump",
"h_canFly"
]
}
]
},
{
"link": [
1,
3
],
"name": "Suitless Water Shinecharge",
"entranceCondition": {
"comeInShinecharging": {
"length": 4,
"openEnd": 1
}
},
"requires": [
"canWaterShineCharge",
"canShinechargeMovement",
{
"canShineCharge": {
"usedTiles": 33,
"openEnd": 2
}
},
{
"or": [
{
"shinespark": {
"frames": 47,
"excessFrames": 5
}
},
{
"and": [
"canMidairShinespark",
{
"shinespark": {
"frames": 44,
"excessFrames": 5
}
}
]
},
{
"and": [
"canMidairShinespark",
"HiJump",
{
"shinespark": {
"frames": 41,
"excessFrames": 5
}
}
]
}
]
}
],
"devNote": "This runway length is just an estimate of the worst case scenario for difficulties that can't use canStutterWaterShineCharge."
},
{
"link": [
1,
3
],
"name": "Suitless Stutter Water Shinecharge",
"entranceCondition": {
"comeInRunning": {
"speedBooster": true,
"minTiles": 2
}
},
"requires": [
"canStutterWaterShineCharge",
"canShinechargeMovement",
{
"canShineCharge": {
"usedTiles": 33,
"openEnd": 2
}
},
{
"or": [
{
"shinespark": {
"frames": 47,
"excessFrames": 5
}
},
{
"and": [
"canMidairShinespark",
{
"shinespark": {
"frames": 44,
"excessFrames": 5
}
}
]
},
{
"and": [
"canMidairShinespark",
"HiJump",
{
"shinespark": {
"frames": 41,
"excessFrames": 5
}
}
]
}
]
}
],
"note": "Requires at least 2 tiles in the adjacent room."
},
{
"link": [
1,
3
],
"name": "G-Mode Morph - Let Mama Turtle Sleep",
"entranceCondition": {
"comeInWithGMode": {
"mode": "any",
"morphed": true
}
},
"requires": [
"Gravity",
"h_canArtificialMorphIBJ",
"h_canArtificialMorphBombHorizontally"
],
"note": "IBJ up a bit, then bomb over Mama Turtle and her babies to prevent her from waking. Then IBJ to the high right ledge before exiting g-mode."
},
{
"link": [
1,
4
],
"name": "Ride Mama Turtle",
"requires": [
"h_canNavigateUnderwater",
"canUseEnemies",
{
"or": [
"canCarefulJump",
{
"enemyDamage": {
"enemy": "Kame (Tatori)",
"type": "contact",
"hits": 1
}
}
]
}
],
"clearsObstacles": [
"A"
],
"note": "Ride Mama Turtle. To avoid getting hit, shoot one of her babies to wake her up, then quickly get on her back."
},
{
"link": [
1,
5
],
"name": "Let Mama Turtle Sleep",
"requires": [
"Gravity",
{
"or": [
"canWalljump",
"h_canFly"
]
}
]
},
{
"link": [
1,
5
],
"name": "Suitless Climb the Right Wall",
"requires": [
"canSuitlessMaridia",
"HiJump",
"canDownGrab",
{
"or": [
{
"and": [
"canSpaceJumpWaterBounce",
"canWalljump"
]
},
"canSpaceJumpWaterEscape"
]
}
],
"note": "Letting Mama Turtle sleep, climb the right wall using HiJump (with a down-grab) and escape the water with Space Jump ."
},
{
"link": [
2,
1
],
"name": "Base",
"requires": []
},
{
"link": [
2,
3
],
"name": "Jump to the Right Ledge",
"requires": [
{
  "obstaclesCleared": [
    "B"
  ]
}
],
"note": "Get a bit of run speed on the block and jump to the right ledge. If you miss the ledge, try to shoot the block to still collect the item."
},
{
"link": [
3,
1
],
"name": "Base",
"requires": [
"h_canNavigateUnderwater",
{
"or": [
"Gravity",
{
"obstaclesNotCleared": [
"A"
]
},
{
"enemyDamage": {
"enemy": "Kame (Tatori)",
"type": "contact",
"hits": 1
}
}
]
},
{
"or": [
"Gravity",
"HiJump",
"canSpringBallJumpMidAir",
"h_canCrouchJumpDownGrab",
"canUseEnemies"
]
}
]
},
{
"link": [
3,
1
],
"name": "Suitless Dodge",
"requires": [
"canSuitlessMaridia",
"canCarefulJump",
{
"or": [
"HiJump",
"Morph"
]
},
{
"or": [
"HiJump",
"canSpringBallJumpMidAir",
"h_canCrouchJumpDownGrab",
"canUseEnemies"
]
}
]
},
{
"link": [
3,
1
],
"name": "Suitless Bootless Dodge",
"requires": [
"canSuitlessMaridia",
"canTrickyJump",
"canUseEnemies"
],
"note": [
"Jump over or on to Mama Turtle.",
"The easiest method is to jump over her by jumping on her babies, spin jumping off of them and over her, then breaking spin before landing."
]
},
{
"link": [
4,
2
],
"name": "Grapple",
"requires": [
"Grapple"
],
"clearsObstacles": [
"B"
],
"note": [
"If Mama Turtle is in her starting location, stand on the rightmost side of her to be aligned below the grapple block.",
"With a miss, if you havent moved horizontally, simply fall straight down to land safely back on to her."
]
},
{
"link": [
4,
2
],
"name": "Space Jump",
"requires": [
"SpaceJump"
],
"clearsObstacles": [
"B"
]
},
{
"link": [
4,
2
],
"name": "Jump into IBJ",
"requires": [
"h_canJumpIntoIBJ"
],
"clearsObstacles": [
"B"
],
"note": [
"Once out of the water, jump into an IBJ.",
"With a miss, if you haven't moved horizontally, simply fall straight down to land safely back on Mama Turtle."
]
},
{
"link": [
4,
2
],
"name": "Spring Ball Jump",
"requires": [
"HiJump",
"canSpringBallJumpMidAir"
],
"clearsObstacles": [
"B"
],
"note": [
"Spring Ball jump from Mama Turtle's back.",
"With a fail, if you haven't moved horizontally, simply fall straight down to land safely back on Mama Turtle."
]
},
{
"link": [
4,
3
],
"name": "Base",
"requires": [
{
  "or": [
    "canWalljump",
    "SpaceJump",
    "HiJump"
  ]
}
]
},
{
"link": [
4,
5
],
"name": "Base",
"requires": []
},
{
"link": [
5,
2
],
"name": "Base",
"requires": [
"SpaceJump"
],
"clearsObstacles": [
"B"
]
},
{
"link": [
5,
2
],
"name": "Mama Turtle Wall Jump Bomb Boost",
"notable": true,
"requires": [
"canWallJumpBombBoost"
],
"note": [
"Starting from the top left ledge, wall jump to place a bomb or Power Bomb just below and to the right of the bottom left plant on the wall.",
"Use the bomb to boost you towards the item, then unmorph to reduce your fall speed and barely reach the item."
]
},
{
"link": [
5,
2
],
"name": "Tricky Speed HiJump",
"requires": [
"HiJump",
"canTrickyJump",
"SpeedBooster",
"canWalljump"
],
"clearsObstacles": [
"B"
],
"note": [
"Briefly run on the top ledge on either side (left is slightly easier) then jump and wall jump on the grapple block."
]
},
{
"link": [
5,
2
],
"name": "Springwall",
"requires": [
"canSpringwall",
"canResetFallSpeed"
]
},
{
"link": [
5,
2
],
"name": "Springwall onto Grapple Block",
"requires": [
"canSpringwall",
"canSpringFling"
],
"clearsObstacles": [
"B"
]
},
{
"link": [
5,
2
],
"name": "Walljumpless SpringFling",
"requires": [
"h_canMaxHeightSpringBallJump",
"canSpringFling"
],
"clearsObstacles": [
"B"
],
"note": "Time a pause before jumping to give a significant momentum boost in order to reach the Grapple Block."
},
{
"link": [
5,
2
],
"name": "Mama Turtle Insane Walljump",
"notable": true,
"requires": [
"HiJump",
"canInsaneJump",
"canStationarySpinJump",
"canConsecutiveWalljump",
"canInsaneWalljump",
"canCWJ"
],
"clearsObstacles": [
"B"
],
"note": [
"Perform a running stationary spinjump from a precise spot, then a CWJ with slightly more speed off the wall one tile further out.",
"This makes it possible to just barely walljump off the grapple block."
]
}
]
}