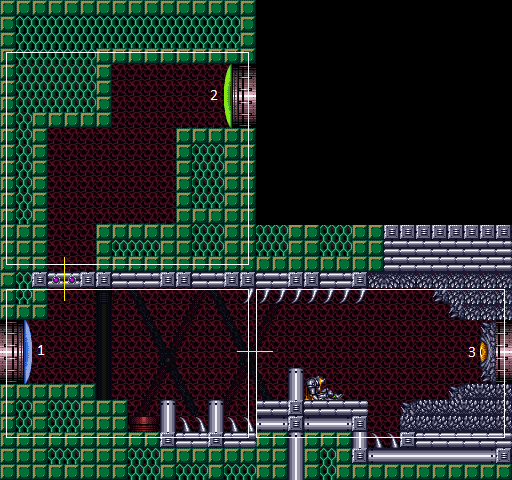
Kraid Eye Door Room
Room ID: 83
|
Requires: {
"refill": [
"Energy",
"Missile",
"Super"
]
}
|
|
Exit condition: {
"leaveWithRunway": {
"length": 5,
"openEnd": 1
}
}
|
|
With Morph: Morph on the small ledge left of the Zeb spawner. After a Zeb starts moving horizontally, quickly unmorph and freeze it. After it thaws, refreeze it once it is in the correct position. Without Morph: Freeze the Zeb as it is rising. When it is close to thawing, walk into the spikes and continue to walk into the wall to prevent a vertical damage boost. Freeze the Zeb after it thaws, noting that it will rise one pixel relative to its first frozen location. Requires: {
"or": [
"Morph",
{
"and": [
"canTrickyEnemyExtendRunway",
"canTrickyJump",
{
"thornHits": 2
}
]
}
]
}
"h_canFrozenEnemyRunway"
Exit condition: {
"leaveWithRunway": {
"length": 7,
"openEnd": 0
}
}
|
|
Exit condition: {
"leaveWithGModeSetup": {}
}
|
|
|
|
Entrance condition: {
"comeInShinecharged": {
"framesRequired": 130
}
}
Requires: "HiJump" "canShinechargeMovementComplex" Exit condition: {
"leaveShinecharged": {
"framesRemaining": "auto"
}
}
|
|
Use quick ledge-grabs to reach the door in time. Entrance condition: {
"comeInShinecharged": {
"framesRequired": 160
}
}
Requires: "canShinechargeMovementTricky" Exit condition: {
"leaveShinecharged": {
"framesRemaining": "auto"
}
}
|
|
From: 1
Left Door
To: 2
Top Right Door
Entrance condition: {
"comeInShinecharged": {
"framesRequired": 105
}
}
Requires: "HiJump"
"canShinechargeMovementComplex"
{
"shinespark": {
"frames": 6
}
}
Exit condition: {
"leaveWithSpark": {}
}
|
|
|
|
From: 1
Left Door
To: 3
Bottom Right Door
Gain a shinecharge while running into the room, sliding off the ledge, then jump to the center of the room. Fire a shot to open the door, jump over the pillar, and spark out of the room. Entrance condition: {
"comeInShinecharging": {
"length": 4,
"openEnd": 1
}
}
Requires: "canShinechargeMovementTricky"
{
"shinespark": {
"frames": 16
}
}
Exit condition: {
"leaveWithSpark": {}
}
|
|
From: 1
Left Door
To: 3
Bottom Right Door
Run and jump to the center of the room. Fire a shot to open the door, jump over the pillar, and spark out of the room. Entrance condition: {
"comeInShinecharged": {
"framesRequired": 125
}
}
Requires: "canShinechargeMovementComplex"
{
"shinespark": {
"frames": 20
}
}
Exit condition: {
"leaveWithSpark": {}
}
|
|
Run and jump, fire a shot mid-air, and activate the shinespark wind-up. Wait until the shot is at a specific position before sparking. Sparking too late will cause the shot to despawn before reaching the door. Sparking too early will cause Samus to bonk the door as it will not yet be open. A beam shot, Missile, or Super can be used. Entrance condition: {
"comeInShinecharged": {
"framesRequired": 40
}
}
Requires: "canShinechargeMovementTricky"
"canHeroShot"
{
"shinespark": {
"frames": 36
}
}
Exit condition: {
"leaveWithSpark": {}
}
|
|
|
|
Entrance condition: {
"comeInShinecharged": {
"framesRequired": 115
}
}
Requires: "canDownBack" "canShinechargeMovementTricky" Exit condition: {
"leaveShinecharged": {
"framesRemaining": "auto"
}
}
|
|
Entrance condition: {
"comeInShinecharged": {
"framesRequired": 145
}
}
Requires: "canShinechargeMovementComplex" Exit condition: {
"leaveShinecharged": {
"framesRemaining": "auto"
}
}
|
|
Entrance condition: {
"comeInWithGrappleTeleport": {
"blockPositions": [
[
2,
18
],
[
2,
19
],
[
2,
28
],
[
2,
29
]
]
}
}
Bypasses door shell: true |
|
From: 2
Top Right Door
To: 1
Left Door
Entrance condition: {
"comeInWithGrappleTeleport": {
"blockPositions": [
[
2,
18
]
]
}
}
Exit condition: {
"leaveWithGrappleTeleport": {
"blockPositions": [
[
2,
18
]
]
}
}
Bypasses door shell: true |
|
From: 2
Top Right Door
To: 1
Left Door
Entrance condition: {
"comeInWithGrappleTeleport": {
"blockPositions": [
[
2,
19
]
]
}
}
Exit condition: {
"leaveWithGrappleTeleport": {
"blockPositions": [
[
2,
19
]
]
}
}
Bypasses door shell: true |
|
From: 2
Top Right Door
To: 1
Left Door
Entrance condition: {
"comeInWithGrappleTeleport": {
"blockPositions": [
[
2,
28
]
]
}
}
Exit condition: {
"leaveWithGrappleTeleport": {
"blockPositions": [
[
2,
28
]
]
}
}
Bypasses door shell: true |
|
From: 2
Top Right Door
To: 1
Left Door
Entrance condition: {
"comeInWithGrappleTeleport": {
"blockPositions": [
[
2,
29
]
]
}
}
Exit condition: {
"leaveWithGrappleTeleport": {
"blockPositions": [
[
2,
29
]
]
}
}
Bypasses door shell: true |
|
Exit condition: {
"leaveWithRunway": {
"length": 4,
"openEnd": 1
}
}
|
|
From: 2
Top Right Door
To: 2
Top Right Door
Stand to the right of the Zeb farm then freeze the Zeb while it is still moving upward. Go to the top door and wait for the Zeb to arrive. Freeze it at the correct height, then drop below it and wait for it to thaw. Freeze it again in the correct horizontal position. Keep a half-tile gap between the Zeb and the runway to extend the runway as much as possible. Requires: "canTrickyJump" "h_canFrozenEnemyRunway" Exit condition: {
"leaveWithRunway": {
"length": 6,
"openEnd": 0
}
}
|
|
From: 2
Top Right Door
To: 2
Top Right Door
Lure a Zeb up from below by freezing it or quickly moving after the Zeb has spawned, but before it becomes visible. Note that Samus must start on the right side of the Zeb in order for it to move rightwards once it starts moving horizontally. Requires: {
"or": [
"canUseFrozenEnemies",
"canTrickyJump"
]
}
Exit condition: {
"leaveWithGModeSetup": {}
}
|
|
|
|
From: 3
Bottom Right Door
To: 1
Left Door
Run and jump to the center of the room and over the pillar. Fire a shot and activate the shinespark wind-up. Wait until the shot hits the door before sparking. Entrance condition: {
"comeInShinecharged": {
"framesRequired": 110
}
}
Requires: "canShinechargeMovementComplex"
{
"shinespark": {
"frames": 25
}
}
Exit condition: {
"leaveWithSpark": {}
}
|
|
Run and jump, fire a shot mid-air, and activate the shinespark wind-up. Wait until the shot is at a specific position before sparking. Sparking too late will cause the shot to despawn before reaching the door. Sparking too early will cause Samus to bonk the door as it will not yet be open. A beam shot, Missile, or Super can be used. Entrance condition: {
"comeInShinecharged": {
"framesRequired": 40
}
}
Requires: "canShinechargeMovementTricky"
"canHeroShot"
"canMidairShinespark"
{
"shinespark": {
"frames": 38
}
}
Exit condition: {
"leaveWithSpark": {
"position": "top"
}
}
|
|
Entrance condition: {
"comeInWithGrappleTeleport": {
"blockPositions": [
[
2,
18
],
[
2,
28
],
[
2,
29
]
]
}
}
Bypasses door shell: true |
|
From: 3
Bottom Right Door
To: 1
Left Door
Entrance condition: {
"comeInWithGrappleTeleport": {
"blockPositions": [
[
2,
18
]
]
}
}
Exit condition: {
"leaveWithGrappleTeleport": {
"blockPositions": [
[
2,
18
]
]
}
}
Bypasses door shell: true |
|
From: 3
Bottom Right Door
To: 1
Left Door
Entrance condition: {
"comeInWithGrappleTeleport": {
"blockPositions": [
[
2,
28
]
]
}
}
Exit condition: {
"leaveWithGrappleTeleport": {
"blockPositions": [
[
2,
28
]
]
}
}
Bypasses door shell: true |
|
From: 3
Bottom Right Door
To: 1
Left Door
Entrance condition: {
"comeInWithGrappleTeleport": {
"blockPositions": [
[
2,
29
]
]
}
}
Exit condition: {
"leaveWithGrappleTeleport": {
"blockPositions": [
[
2,
29
]
]
}
}
Bypasses door shell: true |
|
Exit condition: {
"leaveWithRunway": {
"length": 3,
"openEnd": 1
}
}
|
|
From: 3
Bottom Right Door
To: 3
Bottom Right Door
With Morph: Morph on the small ledge right of the Zeb spawner. After a Zeb starts moving horizontally, quickly unmorph and freeze it. After it thaws, refreeze it once it is in the correct position. Without Morph: Freeze the Zeb as it is rising. When it is close to thawing, walk into the spikes and continue to walk into the wall to prevent a vertical damage boost. Freeze the Zeb after it thaws, noting that it will rise one pixel relative to its first frozen location. Requires: {
"or": [
"Morph",
{
"and": [
"canTrickyEnemyExtendRunway",
"canTrickyJump",
{
"thornHits": 2
}
]
}
]
}
"h_canFrozenEnemyRunway"
Exit condition: {
"leaveWithRunway": {
"length": 5,
"openEnd": 0
}
}
|
|
From: 3
Bottom Right Door
To: 3
Bottom Right Door
Lure a Zeb by freezing it or by moving quickly while carefully preventing it from going off screen. Requires: {
"or": [
"canUseFrozenEnemies",
"canTrickyJump"
]
}
Exit condition: {
"leaveWithGModeSetup": {}
}
|
{
"$schema": "../../../schema/m3-room.schema.json",
"id": 83,
"name": "Kraid Eye Door Room",
"area": "Brinstar",
"subarea": "Kraid",
"playable": true,
"roomAddress": "0x7A56B",
"roomEnvironments": [
{
"heated": false
}
],
"nodes": [
{
"id": 1,
"name": "Left Door",
"nodeType": "door",
"nodeSubType": "blue",
"nodeAddress": "0x00191aa",
"doorEnvironments": [
{
"physics": "air"
}
]
},
{
"id": 2,
"name": "Top Right Door",
"nodeType": "door",
"nodeSubType": "green",
"nodeAddress": "0x00191c2",
"doorEnvironments": [
{
"physics": "air"
}
],
"locks": [
{
"name": "Kraid Eye Room Green Lock (to Recharge)",
"lockType": "coloredDoor",
"unlockStrats": [
{
"name": "Base",
"notable": false,
"requires": [
"h_canOpenGreenDoors"
]
}
]
}
]
},
{
"id": 3,
"name": "Bottom Right Door",
"nodeType": "door",
"nodeSubType": "eye",
"nodeAddress": "0x00191b6",
"doorEnvironments": [
{
"physics": "air"
}
],
"locks": [
{
"name": "Kraid Eye Lock",
"lockType": "coloredDoor",
"unlockStrats": [
{
"name": "Base",
"notable": false,
"requires": [
"h_canOpenEyeDoors"
]
}
]
}
]
}
],
"enemies": [
{
"id": "e1",
"groupName": "Kraid Eye Door Zeb",
"enemyName": "Zeb",
"quantity": 1,
"homeNodes": [
1
],
"farmCycles": [
{
"name": "Crouch over spawn point",
"cycleFrames": 120,
"requires": []
}
]
}
],
"links": [
{
"from": 1,
"to": [
{
"id": 1
},
{
"id": 2
},
{
"id": 3
}
]
},
{
"from": 2,
"to": [
{
"id": 1
},
{
"id": 2
}
]
},
{
"from": 3,
"to": [
{
"id": 1
},
{
"id": 3
}
]
}
],
"strats": [
{
"link": [
1,
1
],
"name": "Zeb Farm",
"requires": [
{
  "refill": [
    "Energy",
    "Missile",
    "Super"
  ]
}
]
},
{
"link": [
1,
1
],
"name": "Leave With Runway",
"requires": [],
"exitCondition": {
"leaveWithRunway": {
"length": 5,
"openEnd": 1
}
}
},
{
"link": [
1,
1
],
"name": "Leave With Runway - Frozen Zeb",
"requires": [
{
"or": [
"Morph",
{
"and": [
"canTrickyEnemyExtendRunway",
"canTrickyJump",
{
"thornHits": 2
}
]
}
]
},
"h_canFrozenEnemyRunway"
],
"exitCondition": {
"leaveWithRunway": {
"length": 7,
"openEnd": 0
}
},
"note": [
"With Morph: Morph on the small ledge left of the Zeb spawner. After a Zeb starts moving horizontally, quickly unmorph and freeze it.",
"After it thaws, refreeze it once it is in the correct position.",
"Without Morph: Freeze the Zeb as it is rising. When it is close to thawing, walk into the spikes and continue to walk into the wall to prevent a vertical damage boost.",
"Freeze the Zeb after it thaws, noting that it will rise one pixel relative to its first frozen location."
]
},
{
"link": [
1,
1
],
"name": "G-Mode Setup - Get Hit By Zeb",
"requires": [],
"exitCondition": {
"leaveWithGModeSetup": {}
}
},
{
"link": [
1,
2
],
"name": "Base",
"requires": []
},
{
"link": [
1,
2
],
"name": "Carry Shinecharge (HiJump)",
"entranceCondition": {
"comeInShinecharged": {
"framesRequired": 130
}
},
"requires": [
"HiJump",
"canShinechargeMovementComplex"
],
"exitCondition": {
"leaveShinecharged": {
"framesRemaining": "auto"
}
},
"unlocksDoors": [
{
"types": [
"super"
],
"requires": []
},
{
"types": [
"missiles",
"powerbomb"
],
"requires": [
"never"
]
}
]
},
{
"link": [
1,
2
],
"name": "Carry Shinecharge",
"entranceCondition": {
"comeInShinecharged": {
"framesRequired": 160
}
},
"requires": [
"canShinechargeMovementTricky"
],
"exitCondition": {
"leaveShinecharged": {
"framesRemaining": "auto"
}
},
"unlocksDoors": [
{
"types": [
"super"
],
"requires": []
},
{
"types": [
"missiles",
"powerbomb"
],
"requires": [
"never"
]
}
],
"note": [
"Use quick ledge-grabs to reach the door in time."
]
},
{
"link": [
1,
2
],
"name": "Come in Shinecharged, Leave With Spark (HiJump)",
"entranceCondition": {
"comeInShinecharged": {
"framesRequired": 105
}
},
"requires": [
"HiJump",
"canShinechargeMovementComplex",
{
"shinespark": {
"frames": 6
}
}
],
"exitCondition": {
"leaveWithSpark": {}
},
"unlocksDoors": [
{
"types": [
"super"
],
"requires": []
},
{
"types": [
"missiles",
"powerbomb"
],
"requires": [
"never"
]
}
]
},
{
"link": [
1,
3
],
"name": "Base",
"requires": []
},
{
"link": [
1,
3
],
"name": "Come in Shinecharging, Leave with Spark",
"entranceCondition": {
"comeInShinecharging": {
"length": 4,
"openEnd": 1
}
},
"requires": [
"canShinechargeMovementTricky",
{
"shinespark": {
"frames": 16
}
}
],
"exitCondition": {
"leaveWithSpark": {}
},
"unlocksDoors": [
{
"types": [
"super"
],
"requires": []
},
{
"types": [
"missiles",
"powerbomb"
],
"requires": [
"never"
]
}
],
"note": [
"Gain a shinecharge while running into the room, sliding off the ledge, then jump to the center of the room.",
"Fire a shot to open the door, jump over the pillar, and spark out of the room."
]
},
{
"link": [
1,
3
],
"name": "Come in Shinecharged, Leave with Spark",
"entranceCondition": {
"comeInShinecharged": {
"framesRequired": 125
}
},
"requires": [
"canShinechargeMovementComplex",
{
"shinespark": {
"frames": 20
}
}
],
"exitCondition": {
"leaveWithSpark": {}
},
"unlocksDoors": [
{
"types": [
"super"
],
"requires": []
},
{
"types": [
"missiles",
"powerbomb"
],
"requires": [
"never"
]
}
],
"note": [
"Run and jump to the center of the room.",
"Fire a shot to open the door, jump over the pillar, and spark out of the room."
]
},
{
"link": [
1,
3
],
"name": "Hero Shot Spark",
"entranceCondition": {
"comeInShinecharged": {
"framesRequired": 40
}
},
"requires": [
"canShinechargeMovementTricky",
"canHeroShot",
{
"shinespark": {
"frames": 36
}
}
],
"exitCondition": {
"leaveWithSpark": {}
},
"unlocksDoors": [
{
"types": [
"super"
],
"requires": []
},
{
"types": [
"missiles",
"powerbomb"
],
"requires": [
"never"
]
}
],
"note": [
"Run and jump, fire a shot mid-air, and activate the shinespark wind-up.",
"Wait until the shot is at a specific position before sparking.",
"Sparking too late will cause the shot to despawn before reaching the door.",
"Sparking too early will cause Samus to bonk the door as it will not yet be open.",
"A beam shot, Missile, or Super can be used."
]
},
{
"link": [
2,
1
],
"name": "Base",
"requires": []
},
{
"link": [
2,
1
],
"name": "Carry Shinecharge (Down-back)",
"entranceCondition": {
"comeInShinecharged": {
"framesRequired": 115
}
},
"requires": [
"canDownBack",
"canShinechargeMovementTricky"
],
"exitCondition": {
"leaveShinecharged": {
"framesRemaining": "auto"
}
},
"unlocksDoors": [
{
"types": [
"super"
],
"requires": []
},
{
"types": [
"missiles",
"powerbomb"
],
"requires": [
"never"
]
}
]
},
{
"link": [
2,
1
],
"name": "Carry Shinecharge",
"entranceCondition": {
"comeInShinecharged": {
"framesRequired": 145
}
},
"requires": [
"canShinechargeMovementComplex"
],
"exitCondition": {
"leaveShinecharged": {
"framesRemaining": "auto"
}
},
"unlocksDoors": [
{
"types": [
"super"
],
"requires": []
},
{
"types": [
"missiles",
"powerbomb"
],
"requires": [
"never"
]
}
]
},
{
"link": [
2,
1
],
"name": "Grapple Teleport",
"entranceCondition": {
"comeInWithGrappleTeleport": {
"blockPositions": [
[
2,
18
],
[
2,
19
],
[
2,
28
],
[
2,
29
]
]
}
},
"requires": [],
"bypassesDoorShell": true
},
{
"link": [
2,
1
],
"name": "Carry Grapple Teleport (Top Position)",
"entranceCondition": {
"comeInWithGrappleTeleport": {
"blockPositions": [
[
2,
18
]
]
}
},
"requires": [],
"bypassesDoorShell": true,
"exitCondition": {
"leaveWithGrappleTeleport": {
"blockPositions": [
[
2,
18
]
]
}
}
},
{
"link": [
2,
1
],
"name": "Carry Grapple Teleport (Upper Middle Position)",
"entranceCondition": {
"comeInWithGrappleTeleport": {
"blockPositions": [
[
2,
19
]
]
}
},
"requires": [],
"bypassesDoorShell": true,
"exitCondition": {
"leaveWithGrappleTeleport": {
"blockPositions": [
[
2,
19
]
]
}
}
},
{
"link": [
2,
1
],
"name": "Carry Grapple Teleport (Lower Middle Position)",
"entranceCondition": {
"comeInWithGrappleTeleport": {
"blockPositions": [
[
2,
28
]
]
}
},
"requires": [],
"bypassesDoorShell": true,
"exitCondition": {
"leaveWithGrappleTeleport": {
"blockPositions": [
[
2,
28
]
]
}
}
},
{
"link": [
2,
1
],
"name": "Carry Grapple Teleport (Bottom Position)",
"entranceCondition": {
"comeInWithGrappleTeleport": {
"blockPositions": [
[
2,
29
]
]
}
},
"requires": [],
"bypassesDoorShell": true,
"exitCondition": {
"leaveWithGrappleTeleport": {
"blockPositions": [
[
2,
29
]
]
}
}
},
{
"link": [
2,
2
],
"name": "Leave With Runway",
"requires": [],
"exitCondition": {
"leaveWithRunway": {
"length": 4,
"openEnd": 1
}
}
},
{
"link": [
2,
2
],
"name": "Leave With Runway - Frozen Zeb",
"requires": [
"canTrickyJump",
"h_canFrozenEnemyRunway"
],
"exitCondition": {
"leaveWithRunway": {
"length": 6,
"openEnd": 0
}
},
"note": [
"Stand to the right of the Zeb farm then freeze the Zeb while it is still moving upward. Go to the top door and wait for the Zeb to arrive.",
"Freeze it at the correct height, then drop below it and wait for it to thaw. Freeze it again in the correct horizontal position.",
"Keep a half-tile gap between the Zeb and the runway to extend the runway as much as possible."
]
},
{
"link": [
2,
2
],
"name": "G-Mode Setup - Get Hit By Zeb",
"requires": [
{
  "or": [
    "canUseFrozenEnemies",
    "canTrickyJump"
  ]
}
],
"exitCondition": {
"leaveWithGModeSetup": {}
},
"note": [
"Lure a Zeb up from below by freezing it or quickly moving after the Zeb has spawned, but before it becomes visible.",
"Note that Samus must start on the right side of the Zeb in order for it to move rightwards once it starts moving horizontally."
]
},
{
"link": [
3,
1
],
"name": "Base",
"requires": []
},
{
"link": [
3,
1
],
"name": "Come in Shinecharged, Leave with Spark",
"entranceCondition": {
"comeInShinecharged": {
"framesRequired": 110
}
},
"requires": [
"canShinechargeMovementComplex",
{
"shinespark": {
"frames": 25
}
}
],
"exitCondition": {
"leaveWithSpark": {}
},
"unlocksDoors": [
{
"types": [
"super"
],
"requires": []
},
{
"types": [
"missiles",
"powerbomb"
],
"requires": [
"never"
]
}
],
"note": [
"Run and jump to the center of the room and over the pillar.",
"Fire a shot and activate the shinespark wind-up.",
"Wait until the shot hits the door before sparking."
]
},
{
"link": [
3,
1
],
"name": "Hero Shot Spark",
"entranceCondition": {
"comeInShinecharged": {
"framesRequired": 40
}
},
"requires": [
"canShinechargeMovementTricky",
"canHeroShot",
"canMidairShinespark",
{
"shinespark": {
"frames": 38
}
}
],
"exitCondition": {
"leaveWithSpark": {
"position": "top"
}
},
"unlocksDoors": [
{
"types": [
"super"
],
"requires": []
},
{
"types": [
"missiles",
"powerbomb"
],
"requires": [
"never"
]
}
],
"note": [
"Run and jump, fire a shot mid-air, and activate the shinespark wind-up.",
"Wait until the shot is at a specific position before sparking.",
"Sparking too late will cause the shot to despawn before reaching the door.",
"Sparking too early will cause Samus to bonk the door as it will not yet be open.",
"A beam shot, Missile, or Super can be used."
]
},
{
"link": [
3,
1
],
"name": "Grapple Teleport",
"entranceCondition": {
"comeInWithGrappleTeleport": {
"blockPositions": [
[
2,
18
],
[
2,
28
],
[
2,
29
]
]
}
},
"requires": [],
"bypassesDoorShell": true
},
{
"link": [
3,
1
],
"name": "Carry Grapple Teleport (Top Position)",
"entranceCondition": {
"comeInWithGrappleTeleport": {
"blockPositions": [
[
2,
18
]
]
}
},
"requires": [],
"bypassesDoorShell": true,
"exitCondition": {
"leaveWithGrappleTeleport": {
"blockPositions": [
[
2,
18
]
]
}
}
},
{
"link": [
3,
1
],
"name": "Carry Grapple Teleport (Middle Position)",
"entranceCondition": {
"comeInWithGrappleTeleport": {
"blockPositions": [
[
2,
28
]
]
}
},
"requires": [],
"bypassesDoorShell": true,
"exitCondition": {
"leaveWithGrappleTeleport": {
"blockPositions": [
[
2,
28
]
]
}
}
},
{
"link": [
3,
1
],
"name": "Carry Grapple Teleport (Bottom Position)",
"entranceCondition": {
"comeInWithGrappleTeleport": {
"blockPositions": [
[
2,
29
]
]
}
},
"requires": [],
"bypassesDoorShell": true,
"exitCondition": {
"leaveWithGrappleTeleport": {
"blockPositions": [
[
2,
29
]
]
}
}
},
{
"link": [
3,
3
],
"name": "Leave With Runway",
"requires": [],
"exitCondition": {
"leaveWithRunway": {
"length": 3,
"openEnd": 1
}
}
},
{
"link": [
3,
3
],
"name": "Leave With Runway - Frozen Zeb",
"requires": [
{
"or": [
"Morph",
{
"and": [
"canTrickyEnemyExtendRunway",
"canTrickyJump",
{
"thornHits": 2
}
]
}
]
},
"h_canFrozenEnemyRunway"
],
"exitCondition": {
"leaveWithRunway": {
"length": 5,
"openEnd": 0
}
},
"note": [
"With Morph: Morph on the small ledge right of the Zeb spawner. After a Zeb starts moving horizontally, quickly unmorph and freeze it.",
"After it thaws, refreeze it once it is in the correct position.",
"Without Morph: Freeze the Zeb as it is rising. When it is close to thawing, walk into the spikes and continue to walk into the wall to prevent a vertical damage boost.",
"Freeze the Zeb after it thaws, noting that it will rise one pixel relative to its first frozen location."
]
},
{
"link": [
3,
3
],
"name": "G-Mode Setup - Get Hit By Zeb",
"requires": [
{
  "or": [
    "canUseFrozenEnemies",
    "canTrickyJump"
  ]
}
],
"exitCondition": {
"leaveWithGModeSetup": {}
},
"note": "Lure a Zeb by freezing it or by moving quickly while carefully preventing it from going off screen."
}
]
}