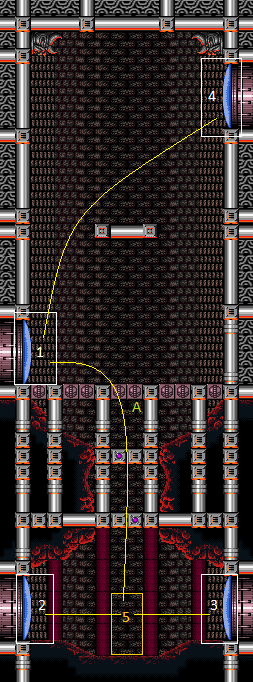
Fast Pillars Setup Room
Room ID: 133
|
From: 1
Top Left Door
To: 1
Top Left Door
Stun the bottom Pirate by shooting it. Requires: {
"obstaclesNotCleared": [
"A"
]
}
"canDodgeWhileShooting"
Exit condition: {
"leaveWithRunway": {
"length": 7,
"openEnd": 1
}
}
|
|
From: 1
Top Left Door
To: 1
Top Left Door
Requires: {
"obstaclesNotCleared": [
"A"
]
}
"ScrewAttack"
{
"heatFrames": 80
}
Exit condition: {
"leaveWithRunway": {
"length": 13,
"openEnd": 0
}
}
|
|
From: 1
Top Left Door
To: 1
Top Left Door
Requires: {
"obstaclesNotCleared": [
"A"
]
}
"h_heatProof"
{
"enemyKill": {
"enemies": [
[
"Yellow Space Pirate (standing)"
]
],
"excludedWeapons": [
"Bombs",
"PowerBomb"
]
}
}
Exit condition: {
"leaveWithRunway": {
"length": 13,
"openEnd": 0
}
}
|
|
From: 1
Top Left Door
To: 1
Top Left Door
Requires: {
"obstaclesNotCleared": [
"A"
]
}
{
"heatFrames": 300
}
{
"enemyKill": {
"enemies": [
[
"Yellow Space Pirate (standing)"
]
],
"explicitWeapons": [
"Missile",
"Super",
"Charge+Plasma"
]
}
}
Exit condition: {
"leaveWithRunway": {
"length": 13,
"openEnd": 0
}
}
|
|
From: 1
Top Left Door
To: 1
Top Left Door
The Power Bombs must be placed carefully to hit the Pirate without destroying the PB blocks. This strat requires heatproof because it's pretty chaotic to execute. Requires: {
"obstaclesNotCleared": [
"A"
]
}
"h_heatProof"
"canDodgeWhileShooting"
"canTrickyJump"
{
"or": [
"canWalljump",
"HiJump",
"SpaceJump"
]
}
{
"enemyKill": {
"enemies": [
[
"Yellow Space Pirate (standing)",
"Yellow Space Pirate (wall)",
"Yellow Space Pirate (wall)"
]
],
"explicitWeapons": [
"PowerBombPeriphery"
]
}
}
Exit condition: {
"leaveWithRunway": {
"length": 13,
"openEnd": 0
}
}
|
|
Requires: "h_canNavigateHeatRooms"
"HiJump"
{
"heatFrames": 130
}
|
|
Walljump from directly above the door to avoid the left wall pirate. Requires: "h_canNavigateHeatRooms"
"canPreciseWalljump"
{
"heatFrames": 150
}
|
|
Shoot the standing pirate with beam shots to prevent it from attacking. Let the wall pirate climb down a little bit to make passing it easier. Requires: "h_canNavigateHeatRooms"
{
"or": [
"canSpringBallJumpMidAir",
"canWalljump",
"SpaceJump"
]
}
{
"heatFrames": 420
}
|
|
Kill the pirates to free up the full runway for a speedy jump, or to start an IBJ. If the wall pirate jumps over a Samus who is not crouched, it will climb offscreen on its own. But may still need to be killed after. Requires: "h_canNavigateHeatRooms"
{
"or": [
{
"and": [
{
"enemyKill": {
"enemies": [
[
"Yellow Space Pirate (standing)"
],
[
"Yellow Space Pirate (wall)"
]
],
"explicitWeapons": [
"Charge"
]
}
},
{
"heatFrames": 2100
}
]
},
{
"and": [
{
"enemyKill": {
"enemies": [
[
"Yellow Space Pirate (standing)"
],
[
"Yellow Space Pirate (wall)"
]
],
"explicitWeapons": [
"Charge+Plasma"
]
}
},
{
"heatFrames": 240
}
]
},
{
"and": [
{
"enemyKill": {
"enemies": [
[
"Yellow Space Pirate (standing)"
],
[
"Yellow Space Pirate (wall)"
]
],
"explicitWeapons": [
"Charge+Ice+Wave+Spazer"
]
}
},
{
"heatFrames": 660
}
]
},
{
"and": [
{
"enemyKill": {
"enemies": [
[
"Yellow Space Pirate (standing)"
],
[
"Yellow Space Pirate (wall)"
]
],
"explicitWeapons": [
"Missile",
"Super"
]
}
},
{
"heatFrames": 330
}
]
}
]
}
{
"or": [
{
"and": [
"canTrickyDashJump",
{
"heatFrames": 180
}
]
},
{
"and": [
"h_canIBJ",
{
"heatFrames": 1320
}
]
},
{
"and": [
"h_canJumpIntoIBJ",
{
"heatFrames": 540
}
]
}
]
}
|
|
Crouch in front of the standing pirate to freely shoot charge shots. Shoot upon entering the room to interupt the pirate lazer attack. Stay far enough away from the wall to avoid the wall pirate. Jumping can be used to distract the wall pirate, in particular when trying to jump to the overhead platform. Requires: "h_canNavigateHeatRooms"
"Charge"
"canUseFrozenEnemies"
{
"or": [
"Wave",
"Spazer",
"Plasma",
{
"ammo": {
"type": "Super",
"count": 2
}
},
{
"ammo": {
"type": "Missile",
"count": 8
}
},
{
"heatFrames": 550
}
]
}
{
"heatFrames": 550
}
|
|
Spark vertically on room entry. Entrance condition: {
"comeInShinecharged": {
"framesRequired": 5
}
}
Requires: "h_canNavigateHeatRooms"
{
"shinespark": {
"frames": 21,
"excessFrames": 5
}
}
{
"heatFrames": 250
}
|
|
X-Ray climb up the left wall in order to jump to the center platform. Quickly kill the pirates using ammo before beginning the X-Ray climb. Climb to just above the door shell and do a turnaround spinjump to reach the platform. Entrance condition: {
"comeInWithDoorStuckSetup": {}
}
Requires: "canXRayClimb"
{
"enemyDamage": {
"enemy": "Yellow Space Pirate (wall)",
"type": "contact",
"hits": 2
}
}
{
"enemyKill": {
"enemies": [
[
"Yellow Space Pirate (standing)",
"Yellow Space Pirate (wall)"
]
],
"explicitWeapons": [
"Missile",
"Super"
]
}
}
{
"heatFrames": 1260
}
|
|
Requires: "h_canNavigateHeatRooms"
{
"heatFrames": 200
}
{
"or": [
{
"and": [
{
"heatFrames": 50
},
"h_canUsePowerBombs"
]
},
{
"obstaclesCleared": [
"A"
]
}
]
}
Clears obstacles: A |
|
From: 1
Top Left Door
To: 5
Bottom Junction
Shoot at the Standing Pirate to prevent it from attacking. Then clip through the Power Bomb blocks with a moonfall. Entrance condition: {
"comeInWithStoredFallSpeed": {
"fallSpeedInTiles": 1
}
}
Requires: "canMoonfall"
{
"heatFrames": 180
}
|
|
Entrance condition: {
"comeInShinecharged": {
"framesRequired": 45
}
}
Requires: {
"shinespark": {
"frames": 12
}
}
"h_canUsePowerBombs"
{
"heatFrames": 400
}
Clears obstacles: A |
|
From: 2
Bottom Left Door
To: 1
Top Left Door
Climb up 1 screen. Entrance condition: {
"comeInWithGMode": {
"mode": "direct",
"morphed": false
}
}
Requires: "canXRayClimb"
{
"heatFrames": 1600
}
|
|
From: 2
Bottom Left Door
To: 1
Top Left Door
Climb up 1 screen. Entrance condition: {
"comeInShinecharged": {
"framesRequired": 1
}
}
Requires: "canShinesparkDeepStuck"
{
"shinespark": {
"frames": 1,
"excessFrames": 1
}
}
"canXRayClimb"
{
  "heatFrames": 1600
}
|
|
From: 2
Bottom Left Door
To: 1
Top Left Door
Enter with G-mode direct, back up to between 1 and 6 pixels from the door transition, and activate X-ray to get very deep stuck in the door. Climb up 1 screen, and perform a turnaround buffered spin-jump away from the door to trigger the transition, bypassing any lock on the door. Entrance condition: {
"comeInWithGMode": {
"mode": "direct",
"morphed": false
}
}
Requires: "h_heatProof" "canXRayClimb" Bypasses door shell: true |
|
Exit condition: {
"leaveWithRunway": {
"length": 13,
"gentleDownTiles": 2,
"gentleUpTiles": 2,
"openEnd": 0
}
}
|
|
Requires: "h_canHeatedCrystalFlash" |
|
From: 2
Bottom Left Door
To: 3
Bottom Right Door
Entrance condition: {
"comeInWithStoredFallSpeed": {
"fallSpeedInTiles": 1
}
}
Requires: {
"heatFrames": 50
}
Exit condition: {
"leaveWithStoredFallSpeed": {
"fallSpeedInTiles": 1
}
}
|
|
From: 2
Bottom Left Door
To: 3
Bottom Right Door
Entrance condition: {
"comeInWithStoredFallSpeed": {
"fallSpeedInTiles": 2
}
}
Requires: {
"heatFrames": 50
}
Exit condition: {
"leaveWithStoredFallSpeed": {
"fallSpeedInTiles": 2
}
}
|
|
Requires: "h_canNavigateHeatRooms"
{
  "heatFrames": 50
}
|
|
Entrance condition: {
"comeInShinecharged": {
"framesRequired": 45
}
}
Requires: {
"shinespark": {
"frames": 12
}
}
"h_canUsePowerBombs"
{
"heatFrames": 400
}
Clears obstacles: A |
|
From: 3
Bottom Right Door
To: 1
Top Left Door
Climb up 1 screen. Entrance condition: {
"comeInWithGMode": {
"mode": "direct",
"morphed": false
}
}
Requires: "canXRayClimb"
{
"heatFrames": 1650
}
|
|
From: 3
Bottom Right Door
To: 1
Top Left Door
Climb up 1 screen. Entrance condition: {
"comeInShinecharged": {
"framesRequired": 1
}
}
Requires: {
"shinespark": {
"frames": 1,
"excessFrames": 1
}
}
"canShinesparkDeepStuck"
"canXRayClimb"
{
"heatFrames": 1650
}
|
|
Entrance condition: {
"comeInWithGrappleTeleport": {
"blockPositions": [
[
5,
3
],
[
7,
2
]
]
}
}
Requires: {
"heatFrames": 105
}
|
|
From: 3
Bottom Right Door
To: 1
Top Left Door
Entrance condition: {
"comeInWithGrappleTeleport": {
"blockPositions": [
[
2,
28
],
[
2,
29
]
]
}
}
Bypasses door shell: true |
|
From: 3
Bottom Right Door
To: 1
Top Left Door
Entrance condition: {
"comeInWithGrappleTeleport": {
"blockPositions": [
[
2,
28
]
]
}
}
Exit condition: {
"leaveWithGrappleTeleport": {
"blockPositions": [
[
2,
28
]
]
}
}
Bypasses door shell: true |
|
From: 3
Bottom Right Door
To: 1
Top Left Door
Entrance condition: {
"comeInWithGrappleTeleport": {
"blockPositions": [
[
2,
29
]
]
}
}
Exit condition: {
"leaveWithGrappleTeleport": {
"blockPositions": [
[
2,
29
]
]
}
}
Bypasses door shell: true |
|
From: 3
Bottom Right Door
To: 2
Bottom Left Door
Entrance condition: {
"comeInWithStoredFallSpeed": {
"fallSpeedInTiles": 1
}
}
Requires: {
"heatFrames": 50
}
Exit condition: {
"leaveWithStoredFallSpeed": {
"fallSpeedInTiles": 1
}
}
|
|
From: 3
Bottom Right Door
To: 2
Bottom Left Door
Entrance condition: {
"comeInWithStoredFallSpeed": {
"fallSpeedInTiles": 2
}
}
Requires: {
"heatFrames": 50
}
Exit condition: {
"leaveWithStoredFallSpeed": {
"fallSpeedInTiles": 2
}
}
|
|
Entrance condition: {
"comeInWithGrappleTeleport": {
"blockPositions": [
[
2,
34
]
]
}
}
Bypasses door shell: true |
|
From: 3
Bottom Right Door
To: 2
Bottom Left Door
Entrance condition: {
"comeInWithGrappleTeleport": {
"blockPositions": [
[
2,
34
]
]
}
}
Exit condition: {
"leaveWithGrappleTeleport": {
"blockPositions": [
[
2,
34
]
]
}
}
Bypasses door shell: true |
|
Exit condition: {
"leaveWithRunway": {
"length": 13,
"gentleDownTiles": 2,
"gentleUpTiles": 2,
"openEnd": 0
}
}
|
|
Requires: "h_canHeatedCrystalFlash" |
|
From: 3
Bottom Right Door
To: 4
Top Right Door
Enter with G-mode direct, back up to between 1 and 6 pixels from the door transition, and activate X-ray to get very deep stuck in the door. Climb up 1 screen, and perform a turnaround buffered spin-jump away from the door to trigger the transition, bypassing any lock on the door. Entrance condition: {
"comeInWithGMode": {
"mode": "direct",
"morphed": false
}
}
Requires: "h_heatProof" "canXRayClimb" Bypasses door shell: true |
|
The camera will not follow Samus so beams and missiles despawn instantly and the Pirates are inactive. The Grapple Beam still fully extends and Power Bombs turn the Pirates active. Entrance condition: {
"comeInWithGrappleTeleport": {
"blockPositions": [
[
5,
3
],
[
7,
2
]
]
}
}
Requires: "canOffScreenMovement"
{
"heatFrames": 125
}
|
|
Requires: "h_canNavigateHeatRooms"
{
  "heatFrames": 50
}
|
|
Requires: "h_canNavigateHeatRooms"
{
"heatFrames": 150
}
|
|
Entrance condition: {
"comeInWithGrappleTeleport": {
"blockPositions": [
[
5,
3
],
[
7,
2
]
]
}
}
Requires: {
"heatFrames": 105
}
|
|
From: 4
Top Right Door
To: 1
Top Left Door
Entrance condition: {
"comeInWithGrappleTeleport": {
"blockPositions": [
[
2,
28
],
[
2,
29
]
]
}
}
Bypasses door shell: true |
|
From: 4
Top Right Door
To: 1
Top Left Door
Entrance condition: {
"comeInWithGrappleTeleport": {
"blockPositions": [
[
2,
28
]
]
}
}
Exit condition: {
"leaveWithGrappleTeleport": {
"blockPositions": [
[
2,
28
]
]
}
}
Bypasses door shell: true |
|
From: 4
Top Right Door
To: 1
Top Left Door
Entrance condition: {
"comeInWithGrappleTeleport": {
"blockPositions": [
[
2,
29
]
]
}
}
Exit condition: {
"leaveWithGrappleTeleport": {
"blockPositions": [
[
2,
29
]
]
}
}
Bypasses door shell: true |
|
Entrance condition: {
"comeInWithGrappleTeleport": {
"blockPositions": [
[
2,
34
]
]
}
}
Bypasses door shell: true |
|
From: 4
Top Right Door
To: 2
Bottom Left Door
Entrance condition: {
"comeInWithGrappleTeleport": {
"blockPositions": [
[
2,
34
]
]
}
}
Exit condition: {
"leaveWithGrappleTeleport": {
"blockPositions": [
[
2,
34
]
]
}
}
Bypasses door shell: true |
|
Exit condition: {
"leaveWithRunway": {
"length": 1,
"openEnd": 1
}
}
|
|
Requires: "canPrepareForNextRoom"
{
"heatFrames": 40
}
"h_canHeatedCrystalFlash"
|
|
Requires: "h_canNavigateHeatRooms"
"HiJump"
{
"heatFrames": 250
}
{
"or": [
{
"and": [
"h_canUsePowerBombs",
{
"heatFrames": 50
}
]
},
{
"obstaclesCleared": [
"A"
]
}
]
}
Clears obstacles: A |
|
Requires: "h_canNavigateHeatRooms"
{
"or": [
"canPreciseWalljump",
"canSpringBallJumpMidAir",
"SpaceJump"
]
}
{
"heatFrames": 400
}
{
"or": [
"h_canUsePowerBombs",
{
"obstaclesCleared": [
"A"
]
}
]
}
Clears obstacles: A |
|
Requires: "h_canNavigateHeatRooms"
"canUseFrozenEnemies"
"h_canCrouchJumpDownGrab"
{
"heatFrames": 700
}
{
"or": [
{
"and": [
"h_canUsePowerBombs",
{
"heatFrames": 50
}
]
},
{
"obstaclesCleared": [
"A"
]
}
]
}
Clears obstacles: A |
|
The shot block may respawn while bomb jumping and can be cleared by weaving a Power Bomb into the IBJ, or with a bomb placed overhead while bomb jumping. The Power Bomb can be placed one tile higher than the doors to also clear the Power Bomb Blocks above at the same time. Requires: "h_canNavigateHeatRooms"
"h_canIBJ"
{
"or": [
{
"and": [
{
"or": [
"h_canBombAboveIBJ",
"h_canUsePowerBombs"
]
},
{
"heatFrames": 1000
}
]
},
{
"and": [
"h_canDoubleBombJump",
{
"heatFrames": 510
}
]
},
{
"and": [
"h_canJumpIntoIBJ",
{
"heatFrames": 480
}
]
},
{
"and": [
"h_canDoubleBombJump",
"h_canJumpIntoIBJ",
{
"heatFrames": 300
}
]
}
]
}
{
"or": [
{
"and": [
"h_canUsePowerBombs",
{
"heatFrames": 50
}
]
},
{
"obstaclesCleared": [
"A"
]
}
]
}
Clears obstacles: A |
|
From: 5
Bottom Junction
To: 1
Top Left Door
Run from the right door and jump at the very end of the raised flat ground. Aim down any time before the peak of the jump in order to not fall out of the block. Note that Samus can destroy the Power Bomb blocks above while waiting for the block to respawn. Requires: "canJumpIntoRespawningBlock"
"canTrickyJump"
{
"or": [
"canInsaneJump",
"h_heatProof"
]
}
{
"heatFrames": 550
}
{
"or": [
"h_canUsePowerBombs",
{
"obstaclesCleared": [
"A"
]
}
]
}
Clears obstacles: A |
|
Requires: "h_canNavigateHeatRooms"
{
"heatFrames": 50
}
|
|
Requires: "h_canNavigateHeatRooms"
{
"heatFrames": 50
}
|
|
Requires: "h_heatProof"
{
"resetRoom": {
"nodes": [
2,
3
],
"mustStayPut": false
}
}
{
"refill": [
"PowerBomb"
]
}
|
|
From: 5
Bottom Junction
To: 5
Bottom Junction
Lay a Power Bomb immediately after killing the Viola, in order to get a Power Bomb drop even if full on Power Bombs. Jump straight up to collect the drop, then remorph and hold the Crystal Flash inputs. Requires: {
"obstaclesNotCleared": [
"A"
]
}
{
"heatFrames": 185
}
"h_can10PowerBombCrystalFlash"
{
"heatFrames": 30
}
|
{
"$schema": "../../../schema/m3-room.schema.json",
"id": 133,
"name": "Fast Pillars Setup Room",
"area": "Norfair",
"subarea": "Lower",
"subsubarea": "East",
"playable": true,
"roomAddress": "0x7B3A5",
"roomEnvironments": [
{
"heated": true
}
],
"nodes": [
{
"id": 1,
"name": "Top Left Door",
"nodeType": "door",
"nodeSubType": "blue",
"nodeAddress": "0x00198e2",
"doorEnvironments": [
{
"physics": "air"
}
]
},
{
"id": 2,
"name": "Bottom Left Door",
"nodeType": "door",
"nodeSubType": "blue",
"nodeAddress": "0x0019906",
"doorEnvironments": [
{
"physics": "air"
}
]
},
{
"id": 3,
"name": "Bottom Right Door",
"nodeType": "door",
"nodeSubType": "blue",
"nodeAddress": "0x0019912",
"doorEnvironments": [
{
"physics": "air"
}
]
},
{
"id": 4,
"name": "Top Right Door",
"nodeType": "door",
"nodeSubType": "blue",
"nodeAddress": "0x00198ee",
"doorEnvironments": [
{
"physics": "air"
}
]
},
{
"id": 5,
"name": "Bottom Junction",
"nodeType": "junction",
"nodeSubType": "junction"
}
],
"obstacles": [
{
"id": "A",
"name": "Power Bomb Blocks",
"obstacleType": "inanimate"
}
],
"enemies": [
{
"id": "e1",
"groupName": "Fast Pillars Standing Pirates",
"enemyName": "Yellow Space Pirate (standing)",
"quantity": 1,
"homeNodes": [
1,
4
],
"dropRequires": [
"h_heatProof"
]
},
{
"id": "e2",
"groupName": "Fast Pillars Wall Pirates",
"enemyName": "Yellow Space Pirate (wall)",
"quantity": 2,
"homeNodes": [
1,
4
],
"dropRequires": [
"h_heatProof"
]
},
{
"id": "e3",
"groupName": "Fast Pillars Violas",
"enemyName": "Viola",
"quantity": 2,
"homeNodes": [
5
],
"dropRequires": [
"h_heatProof"
]
}
],
"links": [
{
"from": 1,
"to": [
{
"id": 1
},
{
"id": 4
},
{
"id": 5
}
]
},
{
"from": 2,
"to": [
{
"id": 1
},
{
"id": 2
},
{
"id": 3
},
{
"id": 5
}
]
},
{
"from": 3,
"to": [
{
"id": 1
},
{
"id": 2
},
{
"id": 3
},
{
"id": 4
},
{
"id": 5
}
]
},
{
"from": 4,
"to": [
{
"id": 1
},
{
"id": 2
},
{
"id": 4
}
]
},
{
"from": 5,
"to": [
{
"id": 1
},
{
"id": 2
},
{
"id": 3
},
{
"id": 5
}
]
}
],
"strats": [
{
"link": [
1,
1
],
"name": "Leave With Runway (Pirates Alive)",
"requires": [
{
"obstaclesNotCleared": [
"A"
]
},
"canDodgeWhileShooting"
],
"exitCondition": {
"leaveWithRunway": {
"length": 7,
"openEnd": 1
}
},
"note": "Stun the bottom Pirate by shooting it."
},
{
"link": [
1,
1
],
"name": "Leave With Runway (Screw Attack Pirate Kill)",
"requires": [
{
"obstaclesNotCleared": [
"A"
]
},
"ScrewAttack",
{
"heatFrames": 80
}
],
"exitCondition": {
"leaveWithRunway": {
"length": 13,
"openEnd": 0
}
}
},
{
"link": [
1,
1
],
"name": "Leave With Runway (Heatproof Pirate Kill)",
"requires": [
{
"obstaclesNotCleared": [
"A"
]
},
"h_heatProof",
{
"enemyKill": {
"enemies": [
[
"Yellow Space Pirate (standing)"
]
],
"excludedWeapons": [
"Bombs",
"PowerBomb"
]
}
}
],
"exitCondition": {
"leaveWithRunway": {
"length": 13,
"openEnd": 0
}
}
},
{
"link": [
1,
1
],
"name": "Leave With Runway (Suitless Pirate Kill)",
"requires": [
{
"obstaclesNotCleared": [
"A"
]
},
{
"heatFrames": 300
},
{
"enemyKill": {
"enemies": [
[
"Yellow Space Pirate (standing)"
]
],
"explicitWeapons": [
"Missile",
"Super",
"Charge+Plasma"
]
}
}
],
"exitCondition": {
"leaveWithRunway": {
"length": 13,
"openEnd": 0
}
}
},
{
"link": [
1,
1
],
"name": "Leave With Runway (PB Periphery Pirate Kill)",
"requires": [
{
"obstaclesNotCleared": [
"A"
]
},
"h_heatProof",
"canDodgeWhileShooting",
"canTrickyJump",
{
"or": [
"canWalljump",
"HiJump",
"SpaceJump"
]
},
{
"enemyKill": {
"enemies": [
[
"Yellow Space Pirate (standing)",
"Yellow Space Pirate (wall)",
"Yellow Space Pirate (wall)"
]
],
"explicitWeapons": [
"PowerBombPeriphery"
]
}
}
],
"exitCondition": {
"leaveWithRunway": {
"length": 13,
"openEnd": 0
}
},
"note": [
"The Power Bombs must be placed carefully to hit the Pirate without destroying the PB blocks.",
"This strat requires heatproof because it's pretty chaotic to execute."
]
},
{
"link": [
1,
4
],
"name": "HiJump",
"requires": [
"h_canNavigateHeatRooms",
"HiJump",
{
"heatFrames": 130
}
]
},
{
"link": [
1,
4
],
"name": "Quick Walljump",
"requires": [
"h_canNavigateHeatRooms",
"canPreciseWalljump",
{
"heatFrames": 150
}
],
"note": "Walljump from directly above the door to avoid the left wall pirate."
},
{
"link": [
1,
4
],
"name": "Avoid Pirates",
"requires": [
"h_canNavigateHeatRooms",
{
"or": [
"canSpringBallJumpMidAir",
"canWalljump",
"SpaceJump"
]
},
{
"heatFrames": 420
}
],
"note": [
"Shoot the standing pirate with beam shots to prevent it from attacking.",
"Let the wall pirate climb down a little bit to make passing it easier."
]
},
{
"link": [
1,
4
],
"name": "Kill Pirates",
"requires": [
"h_canNavigateHeatRooms",
{
"or": [
{
"and": [
{
"enemyKill": {
"enemies": [
[
"Yellow Space Pirate (standing)"
],
[
"Yellow Space Pirate (wall)"
]
],
"explicitWeapons": [
"Charge"
]
}
},
{
"heatFrames": 2100
}
]
},
{
"and": [
{
"enemyKill": {
"enemies": [
[
"Yellow Space Pirate (standing)"
],
[
"Yellow Space Pirate (wall)"
]
],
"explicitWeapons": [
"Charge+Plasma"
]
}
},
{
"heatFrames": 240
}
]
},
{
"and": [
{
"enemyKill": {
"enemies": [
[
"Yellow Space Pirate (standing)"
],
[
"Yellow Space Pirate (wall)"
]
],
"explicitWeapons": [
"Charge+Ice+Wave+Spazer"
]
}
},
{
"heatFrames": 660
}
]
},
{
"and": [
{
"enemyKill": {
"enemies": [
[
"Yellow Space Pirate (standing)"
],
[
"Yellow Space Pirate (wall)"
]
],
"explicitWeapons": [
"Missile",
"Super"
]
}
},
{
"heatFrames": 330
}
]
}
]
},
{
"or": [
{
"and": [
"canTrickyDashJump",
{
"heatFrames": 180
}
]
},
{
"and": [
"h_canIBJ",
{
"heatFrames": 1320
}
]
},
{
"and": [
"h_canJumpIntoIBJ",
{
"heatFrames": 540
}
]
}
]
}
],
"note": [
"Kill the pirates to free up the full runway for a speedy jump, or to start an IBJ.",
"If the wall pirate jumps over a Samus who is not crouched, it will climb offscreen on its own. But may still need to be killed after."
]
},
{
"link": [
1,
4
],
"name": "Freeze a Pirate",
"requires": [
"h_canNavigateHeatRooms",
"Charge",
"canUseFrozenEnemies",
{
"or": [
"Wave",
"Spazer",
"Plasma",
{
"ammo": {
"type": "Super",
"count": 2
}
},
{
"ammo": {
"type": "Missile",
"count": 8
}
},
{
"heatFrames": 550
}
]
},
{
"heatFrames": 550
}
],
"note": [
"Crouch in front of the standing pirate to freely shoot charge shots.",
"Shoot upon entering the room to interupt the pirate lazer attack.",
"Stay far enough away from the wall to avoid the wall pirate.",
"Jumping can be used to distract the wall pirate, in particular when trying to jump to the overhead platform."
]
},
{
"link": [
1,
4
],
"name": "Shinespark",
"entranceCondition": {
"comeInShinecharged": {
"framesRequired": 5
}
},
"requires": [
"h_canNavigateHeatRooms",
{
"shinespark": {
"frames": 21,
"excessFrames": 5
}
},
{
"heatFrames": 250
}
],
"note": "Spark vertically on room entry."
},
{
"link": [
1,
4
],
"name": "X-Ray Climb",
"entranceCondition": {
"comeInWithDoorStuckSetup": {}
},
"requires": [
"canXRayClimb",
{
"enemyDamage": {
"enemy": "Yellow Space Pirate (wall)",
"type": "contact",
"hits": 2
}
},
{
"enemyKill": {
"enemies": [
[
"Yellow Space Pirate (standing)",
"Yellow Space Pirate (wall)"
]
],
"explicitWeapons": [
"Missile",
"Super"
]
}
},
{
"heatFrames": 1260
}
],
"note": [
"X-Ray climb up the left wall in order to jump to the center platform.",
"Quickly kill the pirates using ammo before beginning the X-Ray climb.",
"Climb to just above the door shell and do a turnaround spinjump to reach the platform."
]
},
{
"link": [
1,
5
],
"name": "Base",
"requires": [
"h_canNavigateHeatRooms",
{
"heatFrames": 200
},
{
"or": [
{
"and": [
{
"heatFrames": 50
},
"h_canUsePowerBombs"
]
},
{
"obstaclesCleared": [
"A"
]
}
]
}
],
"clearsObstacles": [
"A"
]
},
{
"link": [
1,
5
],
"name": "Stored Moonfall Clip",
"entranceCondition": {
"comeInWithStoredFallSpeed": {
"fallSpeedInTiles": 1
}
},
"requires": [
"canMoonfall",
{
"heatFrames": 180
}
],
"note": [
"Shoot at the Standing Pirate to prevent it from attacking.",
"Then clip through the Power Bomb blocks with a moonfall."
]
},
{
"link": [
2,
1
],
"name": "Shinespark",
"entranceCondition": {
"comeInShinecharged": {
"framesRequired": 45
}
},
"requires": [
{
"shinespark": {
"frames": 12
}
},
"h_canUsePowerBombs",
{
"heatFrames": 400
}
],
"clearsObstacles": [
"A"
]
},
{
"link": [
2,
1
],
"name": "G-Mode Deep Stuck X-Ray Climb",
"entranceCondition": {
"comeInWithGMode": {
"mode": "direct",
"morphed": false
}
},
"requires": [
"canXRayClimb",
{
"heatFrames": 1600
}
],
"note": "Climb up 1 screen."
},
{
"link": [
2,
1
],
"name": "Shinespark Deep Stuck X-Ray Climb",
"entranceCondition": {
"comeInShinecharged": {
"framesRequired": 1
}
},
"requires": [
"canShinesparkDeepStuck",
{
"shinespark": {
"frames": 1,
"excessFrames": 1
}
},
"canXRayClimb",
{
"heatFrames": 1600
}
],
"note": "Climb up 1 screen."
},
{
"link": [
2,
1
],
"name": "Very Deep Stuck X-Ray Climb",
"entranceCondition": {
"comeInWithGMode": {
"mode": "direct",
"morphed": false
}
},
"requires": [
"h_heatProof",
"canXRayClimb"
],
"bypassesDoorShell": true,
"note": [
"Enter with G-mode direct, back up to between 1 and 6 pixels from the door transition, and activate X-ray to get very deep stuck in the door.",
"Climb up 1 screen, and perform a turnaround buffered spin-jump away from the door to trigger the transition, bypassing any lock on the door."
]
},
{
"link": [
2,
2
],
"name": "Leave With Runway",
"requires": [],
"exitCondition": {
"leaveWithRunway": {
"length": 13,
"gentleDownTiles": 2,
"gentleUpTiles": 2,
"openEnd": 0
}
}
},
{
"link": [
2,
2
],
"name": "Crystal Flash",
"requires": [
"h_canHeatedCrystalFlash"
]
},
{
"link": [
2,
3
],
"name": "Transition with Stored Fall Speed",
"entranceCondition": {
"comeInWithStoredFallSpeed": {
"fallSpeedInTiles": 1
}
},
"requires": [
{
"heatFrames": 50
}
],
"exitCondition": {
"leaveWithStoredFallSpeed": {
"fallSpeedInTiles": 1
}
},
"unlocksDoors": [
{
"types": [
"missiles",
"super"
],
"requires": []
},
{
"types": [
"powerbomb"
],
"requires": [
"never"
]
}
]
},
{
"link": [
2,
3
],
"name": "Transition with Stored Fall Speed (more speed)",
"entranceCondition": {
"comeInWithStoredFallSpeed": {
"fallSpeedInTiles": 2
}
},
"requires": [
{
"heatFrames": 50
}
],
"exitCondition": {
"leaveWithStoredFallSpeed": {
"fallSpeedInTiles": 2
}
},
"unlocksDoors": [
{
"types": [
"missiles",
"super"
],
"requires": []
},
{
"types": [
"powerbomb"
],
"requires": [
"never"
]
}
]
},
{
"link": [
2,
5
],
"name": "Base",
"requires": [
"h_canNavigateHeatRooms",
{
"heatFrames": 50
}
]
},
{
"link": [
3,
1
],
"name": "Shinespark",
"entranceCondition": {
"comeInShinecharged": {
"framesRequired": 45
}
},
"requires": [
{
"shinespark": {
"frames": 12
}
},
"h_canUsePowerBombs",
{
"heatFrames": 400
}
],
"clearsObstacles": [
"A"
]
},
{
"link": [
3,
1
],
"name": "G-Mode Deep Stuck X-Ray Climb",
"entranceCondition": {
"comeInWithGMode": {
"mode": "direct",
"morphed": false
}
},
"requires": [
"canXRayClimb",
{
"heatFrames": 1650
}
],
"note": "Climb up 1 screen."
},
{
"link": [
3,
1
],
"name": "Shinespark Deep Stuck X-Ray Climb",
"entranceCondition": {
"comeInShinecharged": {
"framesRequired": 1
}
},
"requires": [
{
"shinespark": {
"frames": 1,
"excessFrames": 1
}
},
"canShinesparkDeepStuck",
"canXRayClimb",
{
"heatFrames": 1650
}
],
"note": "Climb up 1 screen."
},
{
"link": [
3,
1
],
"name": "Grapple Teleport",
"entranceCondition": {
"comeInWithGrappleTeleport": {
"blockPositions": [
[
5,
3
],
[
7,
2
]
]
}
},
"requires": [
{
  "heatFrames": 105
}
]
},
{
"link": [
3,
1
],
"name": "Grapple Teleport Door Skip",
"entranceCondition": {
"comeInWithGrappleTeleport": {
"blockPositions": [
[
2,
28
],
[
2,
29
]
]
}
},
"requires": [],
"bypassesDoorShell": true
},
{
"link": [
3,
1
],
"name": "Carry Grapple Teleport (Middle Position)",
"entranceCondition": {
"comeInWithGrappleTeleport": {
"blockPositions": [
[
2,
28
]
]
}
},
"requires": [],
"bypassesDoorShell": true,
"exitCondition": {
"leaveWithGrappleTeleport": {
"blockPositions": [
[
2,
28
]
]
}
}
},
{
"link": [
3,
1
],
"name": "Carry Grapple Teleport (Bottom Position)",
"entranceCondition": {
"comeInWithGrappleTeleport": {
"blockPositions": [
[
2,
29
]
]
}
},
"requires": [],
"bypassesDoorShell": true,
"exitCondition": {
"leaveWithGrappleTeleport": {
"blockPositions": [
[
2,
29
]
]
}
}
},
{
"link": [
3,
2
],
"name": "Transition with Stored Fall Speed",
"entranceCondition": {
"comeInWithStoredFallSpeed": {
"fallSpeedInTiles": 1
}
},
"requires": [
{
  "heatFrames": 50
}
],
"exitCondition": {
"leaveWithStoredFallSpeed": {
"fallSpeedInTiles": 1
}
},
"unlocksDoors": [
{
"types": [
"missiles",
"super"
],
"requires": []
},
{
"types": [
"powerbomb"
],
"requires": [
"never"
]
}
]
},
{
"link": [
3,
2
],
"name": "Transition with Stored Fall Speed (more speed)",
"entranceCondition": {
"comeInWithStoredFallSpeed": {
"fallSpeedInTiles": 2
}
},
"requires": [
{
  "heatFrames": 50
}
],
"exitCondition": {
"leaveWithStoredFallSpeed": {
"fallSpeedInTiles": 2
}
},
"unlocksDoors": [
{
"types": [
"missiles",
"super"
],
"requires": []
},
{
"types": [
"powerbomb"
],
"requires": [
"never"
]
}
]
},
{
"link": [
3,
2
],
"name": "Grapple Teleport",
"entranceCondition": {
"comeInWithGrappleTeleport": {
"blockPositions": [
[
2,
34
]
]
}
},
"requires": [],
"bypassesDoorShell": true
},
{
"link": [
3,
2
],
"name": "Carry Grapple Teleport",
"entranceCondition": {
"comeInWithGrappleTeleport": {
"blockPositions": [
[
2,
34
]
]
}
},
"requires": [],
"bypassesDoorShell": true,
"exitCondition": {
"leaveWithGrappleTeleport": {
"blockPositions": [
[
2,
34
]
]
}
}
},
{
"link": [
3,
3
],
"name": "Leave With Runway",
"requires": [],
"exitCondition": {
"leaveWithRunway": {
"length": 13,
"gentleDownTiles": 2,
"gentleUpTiles": 2,
"openEnd": 0
}
}
},
{
"link": [
3,
3
],
"name": "Crystal Flash",
"requires": [
"h_canHeatedCrystalFlash"
]
},
{
"link": [
3,
4
],
"name": "Very Deep Stuck X-Ray Climb",
"entranceCondition": {
"comeInWithGMode": {
"mode": "direct",
"morphed": false
}
},
"requires": [
"h_heatProof",
"canXRayClimb"
],
"bypassesDoorShell": true,
"note": [
"Enter with G-mode direct, back up to between 1 and 6 pixels from the door transition, and activate X-ray to get very deep stuck in the door.",
"Climb up 1 screen, and perform a turnaround buffered spin-jump away from the door to trigger the transition, bypassing any lock on the door."
]
},
{
"link": [
3,
4
],
"name": "Grapple Teleport",
"entranceCondition": {
"comeInWithGrappleTeleport": {
"blockPositions": [
[
5,
3
],
[
7,
2
]
]
}
},
"requires": [
"canOffScreenMovement",
{
"heatFrames": 125
}
],
"note": [
"The camera will not follow Samus so beams and missiles despawn instantly and the Pirates are inactive.",
"The Grapple Beam still fully extends and Power Bombs turn the Pirates active."
]
},
{
"link": [
3,
5
],
"name": "Base",
"requires": [
"h_canNavigateHeatRooms",
{
"heatFrames": 50
}
]
},
{
"link": [
4,
1
],
"name": "Base",
"requires": [
"h_canNavigateHeatRooms",
{
"heatFrames": 150
}
]
},
{
"link": [
4,
1
],
"name": "Grapple Teleport",
"entranceCondition": {
"comeInWithGrappleTeleport": {
"blockPositions": [
[
5,
3
],
[
7,
2
]
]
}
},
"requires": [
{
  "heatFrames": 105
}
]
},
{
"link": [
4,
1
],
"name": "Grapple Teleport Door Skip",
"entranceCondition": {
"comeInWithGrappleTeleport": {
"blockPositions": [
[
2,
28
],
[
2,
29
]
]
}
},
"requires": [],
"bypassesDoorShell": true
},
{
"link": [
4,
1
],
"name": "Carry Grapple Teleport (Middle Position)",
"entranceCondition": {
"comeInWithGrappleTeleport": {
"blockPositions": [
[
2,
28
]
]
}
},
"requires": [],
"bypassesDoorShell": true,
"exitCondition": {
"leaveWithGrappleTeleport": {
"blockPositions": [
[
2,
28
]
]
}
}
},
{
"link": [
4,
1
],
"name": "Carry Grapple Teleport (Bottom Position)",
"entranceCondition": {
"comeInWithGrappleTeleport": {
"blockPositions": [
[
2,
29
]
]
}
},
"requires": [],
"bypassesDoorShell": true,
"exitCondition": {
"leaveWithGrappleTeleport": {
"blockPositions": [
[
2,
29
]
]
}
}
},
{
"link": [
4,
2
],
"name": "Grapple Teleport",
"entranceCondition": {
"comeInWithGrappleTeleport": {
"blockPositions": [
[
2,
34
]
]
}
},
"requires": [],
"bypassesDoorShell": true
},
{
"link": [
4,
2
],
"name": "Carry Grapple Teleport",
"entranceCondition": {
"comeInWithGrappleTeleport": {
"blockPositions": [
[
2,
34
]
]
}
},
"requires": [],
"bypassesDoorShell": true,
"exitCondition": {
"leaveWithGrappleTeleport": {
"blockPositions": [
[
2,
34
]
]
}
}
},
{
"link": [
4,
4
],
"name": "Leave With Runway",
"requires": [],
"exitCondition": {
"leaveWithRunway": {
"length": 1,
"openEnd": 1
}
}
},
{
"link": [
4,
4
],
"name": "Crystal Flash",
"requires": [
"canPrepareForNextRoom",
{
"heatFrames": 40
},
"h_canHeatedCrystalFlash"
],
"devNote": [
"The extra requirements are in case this is used after coming through the door.",
"FIXME: This could be refined slightly by using a spawnAt."
]
},
{
"link": [
5,
1
],
"name": "HiJump",
"requires": [
"h_canNavigateHeatRooms",
"HiJump",
{
"heatFrames": 250
},
{
"or": [
{
"and": [
"h_canUsePowerBombs",
{
"heatFrames": 50
}
]
},
{
"obstaclesCleared": [
"A"
]
}
]
}
],
"unlocksDoors": [
{
"types": [
"missiles"
],
"requires": [
{
"heatFrames": 30
}
]
},
{
"types": [
"powerbomb"
],
"requires": [],
"useImplicitRequires": false
}
],
"clearsObstacles": [
"A"
]
},
{
"link": [
5,
1
],
"name": "HiJumpless",
"requires": [
"h_canNavigateHeatRooms",
{
"or": [
"canPreciseWalljump",
"canSpringBallJumpMidAir",
"SpaceJump"
]
},
{
"heatFrames": 400
},
{
"or": [
"h_canUsePowerBombs",
{
"obstaclesCleared": [
"A"
]
}
]
}
],
"unlocksDoors": [
{
"types": [
"missiles"
],
"requires": [
{
"heatFrames": 30
}
]
},
{
"types": [
"powerbomb"
],
"requires": [],
"useImplicitRequires": false
}
],
"clearsObstacles": [
"A"
],
"devNote": [
"Destroying the obstacle isn't seen to take extra time for two reasons.",
"1- It destroys the shot blocks as well which are assumed to be manually destroyed each time since they respawn.",
"2- Some of the time loss of waiting for the PB is offset by having to setup for the jump up anyway."
]
},
{
"link": [
5,
1
],
"name": "Ice Assist",
"requires": [
"h_canNavigateHeatRooms",
"canUseFrozenEnemies",
"h_canCrouchJumpDownGrab",
{
"heatFrames": 700
},
{
"or": [
{
"and": [
"h_canUsePowerBombs",
{
"heatFrames": 50
}
]
},
{
"obstaclesCleared": [
"A"
]
}
]
}
],
"unlocksDoors": [
{
"types": [
"missiles"
],
"requires": [
{
"heatFrames": 30
}
]
},
{
"types": [
"powerbomb"
],
"requires": [],
"useImplicitRequires": false
}
],
"clearsObstacles": [
"A"
]
},
{
"link": [
5,
1
],
"name": "IBJ",
"requires": [
"h_canNavigateHeatRooms",
"h_canIBJ",
{
"or": [
{
"and": [
{
"or": [
"h_canBombAboveIBJ",
"h_canUsePowerBombs"
]
},
{
"heatFrames": 1000
}
]
},
{
"and": [
"h_canDoubleBombJump",
{
"heatFrames": 510
}
]
},
{
"and": [
"h_canJumpIntoIBJ",
{
"heatFrames": 480
}
]
},
{
"and": [
"h_canDoubleBombJump",
"h_canJumpIntoIBJ",
{
"heatFrames": 300
}
]
}
]
},
{
"or": [
{
"and": [
"h_canUsePowerBombs",
{
"heatFrames": 50
}
]
},
{
"obstaclesCleared": [
"A"
]
}
]
}
],
"clearsObstacles": [
"A"
],
"unlocksDoors": [
{
"types": [
"missiles"
],
"requires": [
{
"heatFrames": 30
}
]
},
{
"types": [
"powerbomb"
],
"requires": [],
"useImplicitRequires": false
}
],
"note": [
"The shot block may respawn while bomb jumping and can be cleared by weaving a Power Bomb into the IBJ, or with a bomb placed overhead while bomb jumping.",
"The Power Bomb can be placed one tile higher than the doors to also clear the Power Bomb Blocks above at the same time."
],
"devNote": "Placing a power bomb to break the shot block and the power bomb blocks without dropping the IBJ is the same level of control as canBombAboveIBJ."
},
{
"link": [
5,
1
],
"name": "Jump into Respawning Block",
"requires": [
"canJumpIntoRespawningBlock",
"canTrickyJump",
{
"or": [
"canInsaneJump",
"h_heatProof"
]
},
{
"heatFrames": 550
},
{
"or": [
"h_canUsePowerBombs",
{
"obstaclesCleared": [
"A"
]
}
]
}
],
"unlocksDoors": [
{
"types": [
"missiles"
],
"requires": [
{
"heatFrames": 30
}
]
},
{
"types": [
"powerbomb"
],
"requires": [],
"useImplicitRequires": false
}
],
"clearsObstacles": [
"A"
],
"note": [
"Run from the right door and jump at the very end of the raised flat ground.",
"Aim down any time before the peak of the jump in order to not fall out of the block.",
"Note that Samus can destroy the Power Bomb blocks above while waiting for the block to respawn."
]
},
{
"link": [
5,
2
],
"name": "Base",
"requires": [
"h_canNavigateHeatRooms",
{
"heatFrames": 50
}
],
"unlocksDoors": [
{
"types": [
"missiles"
],
"requires": [
{
"heatFrames": 30
}
]
}
]
},
{
"link": [
5,
3
],
"name": "Base",
"requires": [
"h_canNavigateHeatRooms",
{
"heatFrames": 50
}
],
"unlocksDoors": [
{
"types": [
"missiles"
],
"requires": [
{
"heatFrames": 30
}
]
}
]
},
{
"link": [
5,
5
],
"name": "Viola Farm",
"requires": [
"h_heatProof",
{
"resetRoom": {
"nodes": [
2,
3
],
"mustStayPut": false
}
},
{
"refill": [
"PowerBomb"
]
}
]
},
{
"link": [
5,
5
],
"name": "10 Power Bomb Crystal Flash",
"requires": [
{
"obstaclesNotCleared": [
"A"
]
},
{
"heatFrames": 185
},
"h_can10PowerBombCrystalFlash",
{
"heatFrames": 30
}
],
"note": [
"Lay a Power Bomb immediately after killing the Viola, in order to get a Power Bomb drop even if full on Power Bombs.",
"Jump straight up to collect the drop, then remorph and hold the Crystal Flash inputs."
],
"devNote": [
"Destroying obstacle A from above would kill the Violas prematurely.",
"FIXME: It is possible to get past their drops from above to still be able to use them; find out if there is a consistent setup for this."
]
}
]
}