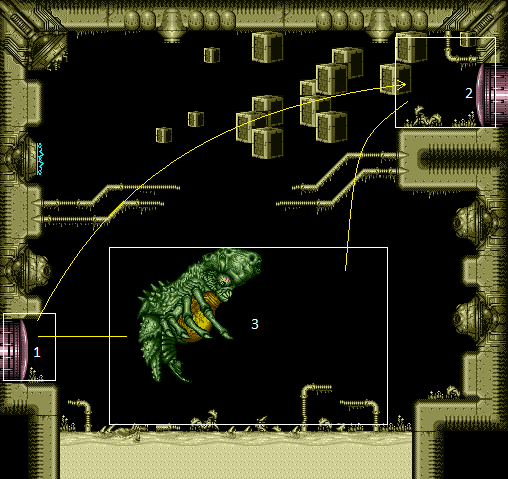
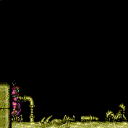
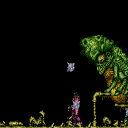
Draygon's Room
Room ID: 193
|
Exit condition: {
"leaveWithRunway": {
"length": 3,
"openEnd": 1
}
}
|
|
Requires: {
"or": [
"f_DefeatedDraygon",
"h_canBreakOneDraygonTurret"
]
}
"h_canCrystalFlash"
|
|
Requires: {
"not": "f_DefeatedDraygon"
}
"canRiskPermanentLossOfAccess"
{
"enemyDamage": {
"enemy": "Draygon",
"type": "contact",
"hits": 1
}
}
|
|
From: 1
Left Door (locked)
To: 1
Left Door (locked)
Get a boost from a Bomb or Power Bomb while grappled to the bottom half of the turret above the door. Samus will enter a 'glitched grapple hanging' state where Samus' graphics will appear corrupted while swinging with Grapple. Slightly delay the down press to extend Grapple, to avoid getting caught on the corner of the floor. Swing down, and hold left while approaching the door to trigger the transition. Continue holding Grapple through the door transition to initiate a teleport in the next room. If Samus needs to be standing in the next room (e.g. for an X-Ray climb), then be sure to touch the ground before reaching the transition; this can be done by timing the Grapple extension early enough, or, if enough energy is available, by doing a small bounce before going through the transition. Samus can reach the transition at either horizontal position 20 or 21, depending on the specific timing and positioning of the swing. Pressing diagonal up-left just before the transition (to retracting Grapple slightly) can help more consistently reach it at position 21. Requires: "h_canBreakOneDraygonTurret"
"Gravity"
"canGrappleBombHang"
"h_canBombThings"
{
"draygonElectricityFrames": 40
}
{
"or": [
"canInsaneJump",
{
"draygonElectricityFrames": 40
}
]
}
Exit condition: {
"leaveWithGrappleTeleport": {
"blockPositions": [
[
2,
19
]
]
}
}
|
|
From: 1
Left Door (locked)
To: 1
Left Door (locked)
Get a boost from a Bomb or Power Bomb while grappled to the top half of the turret above the door. Samus will enter a 'glitched grapple hanging' state where Samus' graphics will appear corrupted while swinging with Grapple. Swing down, and hold left while approaching the door to trigger the transition. Continue holding Grapple through the door transition to initiate a teleport in the next room. If Samus needs to be standing in the next room (e.g. for an X-Ray climb), then be sure to touch the ground before reaching the transition; this can be done by timing the Grapple extension early enough, or, if enough energy is available, by doing a small bounce before going through the transition. If it is needed to enter far to the right (at horizontal position 21), this can be done by pressing up to retract Grapple just before the transition. Requires: "h_canBreakOneDraygonTurret"
"Gravity"
"canGrappleBombHang"
"h_canBombThings"
{
"draygonElectricityFrames": 40
}
{
"or": [
"canInsaneJump",
{
"draygonElectricityFrames": 40
}
]
}
Exit condition: {
"leaveWithGrappleTeleport": {
"blockPositions": [
[
2,
18
]
]
}
}
|
|
From: 1
Left Door (locked)
To: 1
Left Door (locked)
Get a boost from a Bomb or Power Bomb while grappled to the bottom half of the turret above the door. This can be done by standing at the very edge of the ledge, jumping up into a mid-air morph, laying a bomb or Power Bomb, unmorphing, then grappling diagonally. It can also be done with a crouch jump, without needing to be so close to the edge of the ledge. Samus will enter a 'glitched grapple hanging' state where Samus' graphics will appear corrupted while swinging with Grapple. After the Grapple attachment, hold diagonally down-left to swing directly into the door and through the transition. Continue holding Grapple through the door transition to initiate a teleport in the next room. Samus should be able to stand in the next room (e.g. in case this is needed for an X-Ray climb). Samus may trigger the transition at either horizontal position 20 or 21, depending on the specific timing and positioning of the swing. To reliably trigger it at position 21, press diagonally up-left just before the transition to retract Grapple slightly. Requires: "h_canBreakOneDraygonTurret"
"canGrappleBombHang"
"h_canBombThings"
{
"draygonElectricityFrames": 45
}
{
"or": [
"canInsaneJump",
{
"draygonElectricityFrames": 45
}
]
}
Exit condition: {
"leaveWithGrappleTeleport": {
"blockPositions": [
[
2,
19
]
]
}
}
|
|
From: 1
Left Door (locked)
To: 1
Left Door (locked)
Get a boost from a Bomb or Power Bomb while grappled to the top half of the turret above the door. With HiJump, this can be done by standing on the low ground a couple tiles right of the ledge, jumping up into a mid-air morph, laying a bomb or Power Bomb, unmorphing, then grappling diagonally. Samus will enter a 'glitched grapple hanging' state where Samus' graphics will appear corrupted while swinging with Grapple. Slightly delay the down press to extend Grapple, to avoid getting caught on the corner of the floor. Swing down, and hold left while approaching the door to trigger the transition. Continue holding Grapple through the door transition to initiate a teleport in the next room. Samus should be able to stand in the next room (e.g. in case this is needed for an X-Ray climb). Samus can reach the transition at either horizontal position 20 or 21, depending on the specific timing and positioning of the swing. Requires: "h_canBreakOneDraygonTurret"
"HiJump"
"canGrappleBombHang"
"h_canBombThings"
{
"draygonElectricityFrames": 50
}
{
"or": [
"canInsaneJump",
{
"draygonElectricityFrames": 50
}
]
}
Exit condition: {
"leaveWithGrappleTeleport": {
"blockPositions": [
[
2,
18
]
]
}
}
|
|
Entrance condition: {
"comeInShinecharged": {
"framesRequired": 50
}
}
Requires: "Gravity"
{
"shinespark": {
"frames": 25
}
}
|
|
Takes more time to setup than with Gravity, but you can spark from a bit further out because of the water physics. Entrance condition: {
"comeInShinecharged": {
"framesRequired": 90
}
}
Requires: "canSuitlessMaridia"
{
"shinespark": {
"frames": 25
}
}
|
|
From: 1
Left Door (locked)
To: 2
Right Door (locked)
Requires a runway of at least 3 tiles (with no open end) in the adjacent room. Entrance condition: {
"comeInJumping": {
"speedBooster": "any",
"minTiles": 2.4375
}
}
Requires: "canCrossRoomJumpIntoWater" |
|
From: 1
Left Door (locked)
To: 2
Right Door (locked)
Requires a runway of at least 2 tiles (with no open end) in the adjacent room. Jump as late as possible to avoid the ledge hanging over the door. Entrance condition: {
"comeInJumping": {
"speedBooster": false,
"minTiles": 1.4375
}
}
Requires: "canCrossRoomJumpIntoWater" "canTrickyJump" |
|
Requires a runway of at least 2 tiles in the adjacent room. Jump as late as possible to avoid the ledge hanging over the door. Entrance condition: {
"comeInJumping": {
"speedBooster": "any",
"minTiles": 2
}
}
Requires: "canCrossRoomJumpIntoWater" "canTrickyJump" |
|
From: 1
Left Door (locked)
To: 2
Right Door (locked)
Entrance condition: {
"comeInJumping": {
"speedBooster": true,
"minTiles": 0.4375
}
}
Requires: "canCrossRoomJumpIntoWater" "canTrickyDashJump" |
|
From: 1
Left Door (locked)
To: 2
Right Door (locked)
Requires an air ball and a runway of only 1 tile in the adjacent room. Aim to morph on contact with the ceiling to slide accross it for extra distance. Entrance condition: {
"comeInJumping": {
"speedBooster": "any",
"minTiles": 1
}
}
Requires: "canCrossRoomJumpIntoWater" "canLateralMidAirMorph" "canTrickyJump" |
|
From: 1
Left Door (locked)
To: 2
Right Door (locked)
Entrance condition: {
"comeInWithGMode": {
"mode": "any",
"morphed": true
}
}
Requires: "f_DefeatedDraygon" "Gravity" "h_canArtificialMorphIBJ" |
|
From: 1
Left Door (locked)
To: 2
Right Door (locked)
There is enough time to IBJ to the top door before Draygon appears. Entrance condition: {
"comeInWithGMode": {
"mode": "any",
"morphed": true,
"mobility": "mobile"
}
}
Requires: "Gravity" "h_canArtificialMorphIBJ" |
|
|
|
Entrance condition: {
"comeInWithGrappleTeleport": {
"blockPositions": [
[
2,
18
],
[
2,
19
],
[
2,
28
],
[
2,
29
]
]
}
}
Bypasses door shell: true |
|
From: 2
Right Door (locked)
To: 1
Left Door (locked)
Entrance condition: {
"comeInWithGrappleTeleport": {
"blockPositions": [
[
2,
18
]
]
}
}
Exit condition: {
"leaveWithGrappleTeleport": {
"blockPositions": [
[
2,
18
]
]
}
}
Bypasses door shell: true |
|
From: 2
Right Door (locked)
To: 1
Left Door (locked)
Entrance condition: {
"comeInWithGrappleTeleport": {
"blockPositions": [
[
2,
19
]
]
}
}
Exit condition: {
"leaveWithGrappleTeleport": {
"blockPositions": [
[
2,
19
]
]
}
}
Bypasses door shell: true |
|
From: 2
Right Door (locked)
To: 1
Left Door (locked)
Entrance condition: {
"comeInWithGrappleTeleport": {
"blockPositions": [
[
2,
28
]
]
}
}
Exit condition: {
"leaveWithGrappleTeleport": {
"blockPositions": [
[
2,
28
]
]
}
}
Bypasses door shell: true |
|
From: 2
Right Door (locked)
To: 1
Left Door (locked)
Entrance condition: {
"comeInWithGrappleTeleport": {
"blockPositions": [
[
2,
29
]
]
}
}
Exit condition: {
"leaveWithGrappleTeleport": {
"blockPositions": [
[
2,
29
]
]
}
}
Bypasses door shell: true |
|
Exit condition: {
"leaveWithRunway": {
"length": 6,
"openEnd": 1
}
}
|
|
Requires: "f_DefeatedDraygon" "h_canCrystalFlash" |
|
|
|
|
|
Requires: "Gravity"
"canShinechargeMovement"
{
"canShineCharge": {
"usedTiles": 22,
"openEnd": 0
}
}
Exit condition: {
"leaveShinecharged": {
"framesRemaining": 80
}
}
|
|
Requires: "Gravity" "h_canFly" |
|
Requires: "Gravity" "canGravityJump" |
|
Requires: "Gravity" "HiJump" "canSpringBallJumpMidAir" |
|
Requires: "Gravity"
"HiJump"
"SpeedBooster"
{
"or": [
"canWalljump",
"canTrickyDashJump"
]
}
|
|
From: 3
Draygon (locked)
To: 2
Right Door (locked)
There is a very precise speed where the HiJumpless speedjump is doable. Starting against the left wall, jump just to the left of the rightmost pipe sticking out of the ground. Requires: "Gravity" "canTrickyDashJump" "canPreciseWalljump" |
|
Requires: "Gravity"
"canSpringwall"
"canTrickySpringBallJump"
{
"resetRoom": {
"nodes": [
1
]
}
}
|
|
Requires: "Gravity"
{
"canShineCharge": {
"usedTiles": 22,
"openEnd": 1
}
}
{
"or": [
{
"shinespark": {
"frames": 26,
"excessFrames": 5
}
},
{
"and": [
"canMidairShinespark",
{
"shinespark": {
"frames": 20,
"excessFrames": 4
}
}
]
}
]
}
|
|
From: 3
Draygon (locked)
To: 2
Right Door (locked)
Notable: true 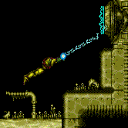
Performing a grapple jump off of a Draygon turret. Usually done by bouncing off the wall for momentum. Requires: "canSuitlessMaridia"
"canGrappleJump"
{
"draygonElectricityFrames": 60
}
"h_canBreakOneDraygonTurret"
|
|
From: 3
Draygon (locked)
To: 2
Right Door (locked)
Notable: true 
Charge a shinespark in the bottom of Draygon's room, then Gravity jump up in order to shinespark out of the right door. Requires: "canGravityJump"
"canShinechargeMovementComplex"
"canMidairShinespark"
{
"canShineCharge": {
"usedTiles": 20,
"openEnd": 1
}
}
{
"shinespark": {
"frames": 14
}
}
Exit condition: {
"leaveWithSpark": {}
}
|
|
Requires: "f_DefeatedDraygon" |
|
|
|
Requires: "f_DefeatedDraygon" |
|
|
|
Notable: true 
Kill Draygon by grappling to the top left turret. Number of Draygon hits seems to vary, taking a worst case guess at 5. Requires: "h_canNavigateUnderwater"
"canUseGrapple"
{
"draygonElectricityFrames": 240
}
{
"enemyDamage": {
"enemy": "Draygon",
"type": "contact",
"hits": 5
}
}
Clears obstacles: f_DefeatedDraygon |
|
From: 3
Draygon (locked)
To: 6
Draygon (unlocked)
Notable: true 
Kill Draygon by grappling to a bottom turret as you get grabbed. Avoids taking all the hits from Draygon. Requires: "h_canNavigateUnderwater"
"canPreciseGrapple"
"h_canBreakOneDraygonTurret"
{
"draygonElectricityFrames": 240
}
Clears obstacles: f_DefeatedDraygon |
|
From: 3
Draygon (locked)
To: 6
Draygon (unlocked)
Notable: true 
Shinecharge in-room, then horizontally spark through Draygon multiple times. It takes 3 Shinesparks if that is the only source of damage onto Draygon. Be careful of taking damage at the end of a Shinespark when near walls and on the killing Shinespark. Requires: "Gravity"
"canMidairShinespark"
"canShinechargeMovementComplex"
{
"or": [
"canShinechargeMovementTricky",
"h_canBreakThreeDraygonTurrets"
]
}
{
"canShineCharge": {
"usedTiles": 22,
"openEnd": 0
}
}
{
"enemyDamage": {
"enemy": "Draygon",
"type": "contact",
"hits": 2
}
}
{
"or": [
"HiJump",
{
"enemyDamage": {
"enemy": "Draygon",
"type": "contact",
"hits": 1
}
}
]
}
{
"shinespark": {
"frames": 150
}
}
Clears obstacles: f_DefeatedDraygon |
|
Requires: "Gravity"
{
"enemyKill": {
"enemies": [
[
"Draygon"
]
],
"farmableAmmo": [
"Missile",
"Super"
]
}
}
Clears obstacles: f_DefeatedDraygon |
|
Notable: true 
Fight Draygon without gravity, but with morph. Requires: "canSuitlessMaridia"
"Morph"
"h_canBreakThreeDraygonTurrets"
{
"enemyKill": {
"enemies": [
[
"Draygon"
]
],
"farmableAmmo": [
"Missile",
"Super"
]
}
}
Clears obstacles: f_DefeatedDraygon |
|
|
|
From: 1
Left Door (locked)
To: 2
Right Door (locked)
Entrance condition: {
"comeInWithGMode": {
"mode": "any",
"morphed": true
}
}
Requires: {
"obstaclesCleared": [
"f_DefeatedDraygon"
]
}
"Gravity"
"h_canArtificialMorphIBJ"
|
|
Requires: {
"obstaclesCleared": [
"f_DefeatedDraygon"
]
}
"h_canCrystalFlash"
|
|
Requires: {
"obstaclesCleared": [
"f_DefeatedDraygon"
]
}
|
|
Requires: {
"obstaclesCleared": [
"f_DefeatedDraygon"
]
}
|
{
"$schema": "../../../schema/m3-room.schema.json",
"id": 193,
"name": "Draygon's Room",
"area": "Maridia",
"subarea": "Inner",
"subsubarea": "Pink",
"playable": true,
"roomAddress": "0x7DA60",
"roomEnvironments": [
{
"heated": false
}
],
"nodes": [
{
"id": 1,
"name": "Left Door (locked)",
"nodeType": "junction",
"nodeSubType": "grey",
"nodeAddress": "0x001a978",
"doorEnvironments": [
{
"physics": "water"
}
]
},
{
"id": 2,
"name": "Right Door (locked)",
"nodeType": "junction",
"nodeSubType": "grey",
"nodeAddress": "0x001a96c",
"doorEnvironments": [
{
"physics": "water"
}
]
},
{
"id": 3,
"name": "Draygon (locked)",
"nodeType": "junction",
"nodeSubType": "boss"
},
{
"id": 4,
"name": "Left Door (unlocked)",
"nodeType": "door",
"nodeSubType": "grey",
"nodeAddress": "0x001a978",
"doorEnvironments": [
{
"physics": "water"
}
]
},
{
"id": 5,
"name": "Right Door (unlocked)",
"nodeType": "door",
"nodeSubType": "grey",
"nodeAddress": "0x001a96c",
"doorEnvironments": [
{
"physics": "water"
}
]
},
{
"id": 6,
"name": "Draygon (unlocked)",
"nodeType": "event",
"nodeSubType": "boss",
"yields": [
"f_DefeatedDraygon"
]
}
],
"enemies": [
{
"id": "e1",
"groupName": "Draygon",
"enemyName": "Draygon",
"quantity": 1,
"homeNodes": [
3
],
"stopSpawn": [
"f_DefeatedDraygon"
]
}
],
"links": [
{
"from": 1,
"to": [
{
"id": 1
},
{
"id": 2,
"devNote": "All other strats should go 1 -> 3 -> 2."
},
{
"id": 3
}
]
},
{
"from": 2,
"to": [
{
"id": 1
},
{
"id": 2
},
{
"id": 3
}
]
},
{
"from": 3,
"to": [
{
"id": 1
},
{
"id": 2
}
]
}
],
"strats": [
{
"link": [
1,
1
],
"name": "Leave with Runway",
"requires": [],
"exitCondition": {
"leaveWithRunway": {
"length": 3,
"openEnd": 1
}
}
},
{
"link": [
1,
1
],
"name": "Crystal Flash",
"requires": [
{
"or": [
"f_DefeatedDraygon",
"h_canBreakOneDraygonTurret"
]
},
"h_canCrystalFlash"
]
},
{
"link": [
1,
1
],
"name": "G-Mode Regain Mobility",
"requires": [
{
"not": "f_DefeatedDraygon"
},
"canRiskPermanentLossOfAccess",
{
"enemyDamage": {
"enemy": "Draygon",
"type": "contact",
"hits": 1
}
}
],
"gModeRegainMobility": {}
},
{
"link": [
1,
1
],
"name": "Leave With Grapple Teleport (Bottom Position)",
"requires": [
"h_canBreakOneDraygonTurret",
"Gravity",
"canGrappleBombHang",
"h_canBombThings",
{
"draygonElectricityFrames": 40
},
{
"or": [
"canInsaneJump",
{
"draygonElectricityFrames": 40
}
]
}
],
"exitCondition": {
"leaveWithGrappleTeleport": {
"blockPositions": [
[
2,
19
]
]
}
},
"note": [
"Get a boost from a Bomb or Power Bomb while grappled to the bottom half of the turret above the door.",
"Samus will enter a 'glitched grapple hanging' state where Samus' graphics will appear corrupted while swinging with Grapple.",
"Slightly delay the down press to extend Grapple, to avoid getting caught on the corner of the floor.",
"Swing down, and hold left while approaching the door to trigger the transition.",
"Continue holding Grapple through the door transition to initiate a teleport in the next room.",
"If Samus needs to be standing in the next room (e.g. for an X-Ray climb), then be sure to touch the ground before reaching the transition;",
"this can be done by timing the Grapple extension early enough,",
"or, if enough energy is available, by doing a small bounce before going through the transition.",
"Samus can reach the transition at either horizontal position 20 or 21, depending on the specific timing and positioning of the swing.",
"Pressing diagonal up-left just before the transition (to retracting Grapple slightly) can help more consistently reach it at position 21."
],
"devNote": [
"FIXME: We could model the turret as an obstacle in case it was already broken for the Draygon fight.",
"FIXME: Add strats with canUnmorphGrappleHang alternatives to canGrappleBombHang, also canGrappleJump and/or canInsaneJump versions for reaching the higher block position."
]
},
{
"link": [
1,
1
],
"name": "Leave With Grapple Teleport (Top Position)",
"requires": [
"h_canBreakOneDraygonTurret",
"Gravity",
"canGrappleBombHang",
"h_canBombThings",
{
"draygonElectricityFrames": 40
},
{
"or": [
"canInsaneJump",
{
"draygonElectricityFrames": 40
}
]
}
],
"exitCondition": {
"leaveWithGrappleTeleport": {
"blockPositions": [
[
2,
18
]
]
}
},
"note": [
"Get a boost from a Bomb or Power Bomb while grappled to the top half of the turret above the door.",
"Samus will enter a 'glitched grapple hanging' state where Samus' graphics will appear corrupted while swinging with Grapple.",
"Swing down, and hold left while approaching the door to trigger the transition.",
"Continue holding Grapple through the door transition to initiate a teleport in the next room.",
"If Samus needs to be standing in the next room (e.g. for an X-Ray climb), then be sure to touch the ground before reaching the transition;",
"this can be done by timing the Grapple extension early enough,",
"or, if enough energy is available, by doing a small bounce before going through the transition.",
"If it is needed to enter far to the right (at horizontal position 21), this can be done by pressing up to retract Grapple just before the transition."
]
},
{
"link": [
1,
1
],
"name": "Leave With Grapple Teleport (Suitless, Bottom Position)",
"requires": [
"h_canBreakOneDraygonTurret",
"canGrappleBombHang",
"h_canBombThings",
{
"draygonElectricityFrames": 45
},
{
"or": [
"canInsaneJump",
{
"draygonElectricityFrames": 45
}
]
}
],
"exitCondition": {
"leaveWithGrappleTeleport": {
"blockPositions": [
[
2,
19
]
]
}
},
"note": [
"Get a boost from a Bomb or Power Bomb while grappled to the bottom half of the turret above the door.",
"This can be done by standing at the very edge of the ledge, jumping up into a mid-air morph, laying a bomb or Power Bomb, unmorphing, then grappling diagonally.",
"It can also be done with a crouch jump, without needing to be so close to the edge of the ledge.",
"Samus will enter a 'glitched grapple hanging' state where Samus' graphics will appear corrupted while swinging with Grapple.",
"After the Grapple attachment, hold diagonally down-left to swing directly into the door and through the transition.",
"Continue holding Grapple through the door transition to initiate a teleport in the next room.",
"Samus should be able to stand in the next room (e.g. in case this is needed for an X-Ray climb).",
"Samus may trigger the transition at either horizontal position 20 or 21, depending on the specific timing and positioning of the swing.",
"To reliably trigger it at position 21, press diagonally up-left just before the transition to retract Grapple slightly."
]
},
{
"link": [
1,
1
],
"name": "Leave With Grapple Teleport (Suitless, Top Position)",
"requires": [
"h_canBreakOneDraygonTurret",
"HiJump",
"canGrappleBombHang",
"h_canBombThings",
{
"draygonElectricityFrames": 50
},
{
"or": [
"canInsaneJump",
{
"draygonElectricityFrames": 50
}
]
}
],
"exitCondition": {
"leaveWithGrappleTeleport": {
"blockPositions": [
[
2,
18
]
]
}
},
"note": [
"Get a boost from a Bomb or Power Bomb while grappled to the top half of the turret above the door.",
"With HiJump, this can be done by standing on the low ground a couple tiles right of the ledge, jumping up into a mid-air morph, laying a bomb or Power Bomb, unmorphing, then grappling diagonally.",
"Samus will enter a 'glitched grapple hanging' state where Samus' graphics will appear corrupted while swinging with Grapple.",
"Slightly delay the down press to extend Grapple, to avoid getting caught on the corner of the floor.",
"Swing down, and hold left while approaching the door to trigger the transition.",
"Continue holding Grapple through the door transition to initiate a teleport in the next room.",
"Samus should be able to stand in the next room (e.g. in case this is needed for an X-Ray climb).",
"Samus can reach the transition at either horizontal position 20 or 21, depending on the specific timing and positioning of the swing."
]
},
{
"link": [
1,
2
],
"name": "Shinespark",
"entranceCondition": {
"comeInShinecharged": {
"framesRequired": 50
}
},
"requires": [
"Gravity",
{
"shinespark": {
"frames": 25
}
}
]
},
{
"link": [
1,
2
],
"name": "Suitless shinespark",
"entranceCondition": {
"comeInShinecharged": {
"framesRequired": 90
}
},
"requires": [
"canSuitlessMaridia",
{
"shinespark": {
"frames": 25
}
}
],
"note": "Takes more time to setup than with Gravity, but you can spark from a bit further out because of the water physics."
},
{
"link": [
1,
2
],
"name": "Cross Room Jump (Lenient)",
"entranceCondition": {
"comeInJumping": {
"speedBooster": "any",
"minTiles": 2.4375
}
},
"requires": [
"canCrossRoomJumpIntoWater"
],
"note": "Requires a runway of at least 3 tiles (with no open end) in the adjacent room."
},
{
"link": [
1,
2
],
"name": "Cross Room Jump (Speed Booster Off)",
"entranceCondition": {
"comeInJumping": {
"speedBooster": false,
"minTiles": 1.4375
}
},
"requires": [
"canCrossRoomJumpIntoWater",
"canTrickyJump"
],
"note": [
"Requires a runway of at least 2 tiles (with no open end) in the adjacent room.",
"Jump as late as possible to avoid the ledge hanging over the door."
]
},
{
"link": [
1,
2
],
"name": "Cross Room Jump",
"entranceCondition": {
"comeInJumping": {
"speedBooster": "any",
"minTiles": 2
}
},
"requires": [
"canCrossRoomJumpIntoWater",
"canTrickyJump"
],
"note": [
"Requires a runway of at least 2 tiles in the adjacent room.",
"Jump as late as possible to avoid the ledge hanging over the door."
],
"devNote": "This can be done with a slightly shorter runway (closed end), with a down grab, but that setup doesn't exist."
},
{
"link": [
1,
2
],
"name": "Cross Room Jump with Speedbooster",
"entranceCondition": {
"comeInJumping": {
"speedBooster": true,
"minTiles": 0.4375
}
},
"requires": [
"canCrossRoomJumpIntoWater",
"canTrickyDashJump"
]
},
{
"link": [
1,
2
],
"name": "Cross Room Jump with Air Ball",
"entranceCondition": {
"comeInJumping": {
"speedBooster": "any",
"minTiles": 1
}
},
"requires": [
"canCrossRoomJumpIntoWater",
"canLateralMidAirMorph",
"canTrickyJump"
],
"note": [
"Requires an air ball and a runway of only 1 tile in the adjacent room.",
"Aim to morph on contact with the ceiling to slide accross it for extra distance."
]
},
{
"link": [
1,
2
],
"name": "G-Mode Morph (Draygon Defeated)",
"entranceCondition": {
"comeInWithGMode": {
"mode": "any",
"morphed": true
}
},
"requires": [
"f_DefeatedDraygon",
"Gravity",
"h_canArtificialMorphIBJ"
]
},
{
"link": [
1,
2
],
"name": "G-Mode Morph (Draygon Alive)",
"entranceCondition": {
"comeInWithGMode": {
"mode": "any",
"morphed": true,
"mobility": "mobile"
}
},
"requires": [
"Gravity",
"h_canArtificialMorphIBJ"
],
"note": "There is enough time to IBJ to the top door before Draygon appears."
},
{
"link": [
1,
3
],
"name": "Base",
"requires": []
},
{
"link": [
2,
1
],
"name": "Grapple Teleport",
"entranceCondition": {
"comeInWithGrappleTeleport": {
"blockPositions": [
[
2,
18
],
[
2,
19
],
[
2,
28
],
[
2,
29
]
]
}
},
"requires": [],
"bypassesDoorShell": true
},
{
"link": [
2,
1
],
"name": "Carry Grapple Teleport (Top Position)",
"entranceCondition": {
"comeInWithGrappleTeleport": {
"blockPositions": [
[
2,
18
]
]
}
},
"requires": [],
"bypassesDoorShell": true,
"exitCondition": {
"leaveWithGrappleTeleport": {
"blockPositions": [
[
2,
18
]
]
}
}
},
{
"link": [
2,
1
],
"name": "Carry Grapple Teleport (Upper Middle Position)",
"entranceCondition": {
"comeInWithGrappleTeleport": {
"blockPositions": [
[
2,
19
]
]
}
},
"requires": [],
"bypassesDoorShell": true,
"exitCondition": {
"leaveWithGrappleTeleport": {
"blockPositions": [
[
2,
19
]
]
}
}
},
{
"link": [
2,
1
],
"name": "Carry Grapple Teleport (Lower Middle Position)",
"entranceCondition": {
"comeInWithGrappleTeleport": {
"blockPositions": [
[
2,
28
]
]
}
},
"requires": [],
"bypassesDoorShell": true,
"exitCondition": {
"leaveWithGrappleTeleport": {
"blockPositions": [
[
2,
28
]
]
}
}
},
{
"link": [
2,
1
],
"name": "Carry Grapple Teleport (Bottom Position)",
"entranceCondition": {
"comeInWithGrappleTeleport": {
"blockPositions": [
[
2,
29
]
]
}
},
"requires": [],
"bypassesDoorShell": true,
"exitCondition": {
"leaveWithGrappleTeleport": {
"blockPositions": [
[
2,
29
]
]
}
}
},
{
"link": [
2,
2
],
"name": "Leave with Runway",
"requires": [],
"exitCondition": {
"leaveWithRunway": {
"length": 6,
"openEnd": 1
}
}
},
{
"link": [
2,
2
],
"name": "Crystal Flash",
"requires": [
"f_DefeatedDraygon",
"h_canCrystalFlash"
]
},
{
"link": [
2,
3
],
"name": "Base",
"requires": []
},
{
"link": [
3,
1
],
"name": "Base",
"requires": []
},
{
"link": [
3,
1
],
"name": "Leave Shinecharged",
"requires": [
"Gravity",
"canShinechargeMovement",
{
"canShineCharge": {
"usedTiles": 22,
"openEnd": 0
}
}
],
"exitCondition": {
"leaveShinecharged": {
"framesRemaining": 80
}
},
"unlocksDoors": [
{
"types": [
"ammo"
],
"requires": []
}
]
},
{
"link": [
3,
2
],
"name": "Base",
"requires": [
"Gravity",
"h_canFly"
]
},
{
"link": [
3,
2
],
"name": "Gravity Jump",
"requires": [
"Gravity",
"canGravityJump"
]
},
{
"link": [
3,
2
],
"name": "Spring Ball Jump",
"requires": [
"Gravity",
"HiJump",
"canSpringBallJumpMidAir"
]
},
{
"link": [
3,
2
],
"name": "Speedjump",
"requires": [
"Gravity",
"HiJump",
"SpeedBooster",
{
"or": [
"canWalljump",
"canTrickyDashJump"
]
}
]
},
{
"link": [
3,
2
],
"name": "Draygon HiJumpless Speedjump",
"requires": [
"Gravity",
"canTrickyDashJump",
"canPreciseWalljump"
],
"note": [
"There is a very precise speed where the HiJumpless speedjump is doable.",
"Starting against the left wall, jump just to the left of the rightmost pipe sticking out of the ground."
]
},
{
"link": [
3,
2
],
"name": "Draygon Springwall",
"requires": [
"Gravity",
"canSpringwall",
"canTrickySpringBallJump",
{
"resetRoom": {
"nodes": [
1
]
}
}
],
"devNote": "The turret cannot be broken."
},
{
"link": [
3,
2
],
"name": "In-Room Shinespark",
"requires": [
"Gravity",
{
"canShineCharge": {
"usedTiles": 22,
"openEnd": 1
}
},
{
"or": [
{
"shinespark": {
"frames": 26,
"excessFrames": 5
}
},
{
"and": [
"canMidairShinespark",
{
"shinespark": {
"frames": 20,
"excessFrames": 4
}
}
]
}
]
}
]
},
{
"link": [
3,
2
],
"name": "Draygon Turret Grapple Jump",
"notable": true,
"requires": [
"canSuitlessMaridia",
"canGrappleJump",
{
"draygonElectricityFrames": 60
},
"h_canBreakOneDraygonTurret"
],
"note": "Performing a grapple jump off of a Draygon turret. Usually done by bouncing off the wall for momentum."
},
{
"link": [
3,
2
],
"name": "Draygon Shinespark out the Right with a Gravity Jump",
"notable": true,
"requires": [
"canGravityJump",
"canShinechargeMovementComplex",
"canMidairShinespark",
{
"canShineCharge": {
"usedTiles": 20,
"openEnd": 1
}
},
{
"shinespark": {
"frames": 14
}
}
],
"exitCondition": {
"leaveWithSpark": {}
},
"unlocksDoors": [
{
"types": [
"ammo"
],
"requires": []
}
],
"note": "Charge a shinespark in the bottom of Draygon's room, then Gravity jump up in order to shinespark out of the right door."
},
{
"name": "Base",
"notable": false,
"requires": [
"f_DefeatedDraygon"
],
"link": [
1,
4
]
},
{
"link": [
4,
1
],
"name": "Base",
"notable": false,
"requires": []
},
{
"name": "Base",
"notable": false,
"requires": [
"f_DefeatedDraygon"
],
"link": [
2,
5
]
},
{
"link": [
5,
2
],
"name": "Base",
"notable": false,
"requires": []
},
{
"name": "Draygon Grapple Kill",
"notable": true,
"requires": [
"h_canNavigateUnderwater",
"canUseGrapple",
{
"draygonElectricityFrames": 240
},
{
"enemyDamage": {
"enemy": "Draygon",
"type": "contact",
"hits": 5
}
}
],
"note": [
"Kill Draygon by grappling to the top left turret.",
"Number of Draygon hits seems to vary, taking a worst case guess at 5."
],
"link": [
3,
6
],
"clearsObstacles": [
"f_DefeatedDraygon"
]
},
{
"name": "Draygon Grapple Quick Kill",
"notable": true,
"requires": [
"h_canNavigateUnderwater",
"canPreciseGrapple",
"h_canBreakOneDraygonTurret",
{
"draygonElectricityFrames": 240
}
],
"note": [
"Kill Draygon by grappling to a bottom turret as you get grabbed.",
"Avoids taking all the hits from Draygon."
],
"link": [
3,
6
],
"clearsObstacles": [
"f_DefeatedDraygon"
]
},
{
"name": "Draygon Shinespark Kill",
"notable": true,
"requires": [
"Gravity",
"canMidairShinespark",
"canShinechargeMovementComplex",
{
"or": [
"canShinechargeMovementTricky",
"h_canBreakThreeDraygonTurrets"
]
},
{
"canShineCharge": {
"usedTiles": 22,
"openEnd": 0
}
},
{
"enemyDamage": {
"enemy": "Draygon",
"type": "contact",
"hits": 2
}
},
{
"or": [
"HiJump",
{
"enemyDamage": {
"enemy": "Draygon",
"type": "contact",
"hits": 1
}
}
]
},
{
"shinespark": {
"frames": 150
}
}
],
"note": [
"Shinecharge in-room, then horizontally spark through Draygon multiple times.",
"It takes 3 Shinesparks if that is the only source of damage onto Draygon.",
"Be careful of taking damage at the end of a Shinespark when near walls and on the killing Shinespark."
],
"devNote": "150 frames is an approximate sum of all required shinesparks.",
"link": [
3,
6
],
"clearsObstacles": [
"f_DefeatedDraygon"
]
},
{
"name": "Gravity Draygon",
"notable": false,
"requires": [
"Gravity",
{
"enemyKill": {
"enemies": [
[
"Draygon"
]
],
"farmableAmmo": [
"Missile",
"Super"
]
}
}
],
"link": [
3,
6
],
"clearsObstacles": [
"f_DefeatedDraygon"
]
},
{
"name": "Suitless Draygon",
"notable": true,
"requires": [
"canSuitlessMaridia",
"Morph",
"h_canBreakThreeDraygonTurrets",
{
"enemyKill": {
"enemies": [
[
"Draygon"
]
],
"farmableAmmo": [
"Missile",
"Super"
]
}
}
],
"note": "Fight Draygon without gravity, but with morph.",
"devNote": "This will require coming into the fight with ammo to kill the turrets. Although that ammo could instead be farmed in the fight.",
"link": [
3,
6
],
"clearsObstacles": [
"f_DefeatedDraygon"
]
},
{
"link": [
6,
3
],
"name": "Base",
"notable": false,
"requires": []
},
{
"link": [
1,
2
],
"name": "G-Mode Morph (Draygon Defeated)",
"entranceCondition": {
"comeInWithGMode": {
"mode": "any",
"morphed": true
}
},
"requires": [
{
  "obstaclesCleared": [
    "f_DefeatedDraygon"
  ]
},
"Gravity",
"h_canArtificialMorphIBJ"
]
},
{
"link": [
2,
2
],
"name": "Crystal Flash",
"requires": [
{
  "obstaclesCleared": [
    "f_DefeatedDraygon"
  ]
},
"h_canCrystalFlash"
]
},
{
"name": "Base",
"notable": false,
"requires": [
{
"obstaclesCleared": [
"f_DefeatedDraygon"
]
}
],
"link": [
1,
4
]
},
{
"name": "Base",
"notable": false,
"requires": [
{
"obstaclesCleared": [
"f_DefeatedDraygon"
]
}
],
"link": [
2,
5
]
}
],
"obstacles": [
{
"id": "f_DefeatedDraygon",
"name": "f_DefeatedDraygon"
}
]
}