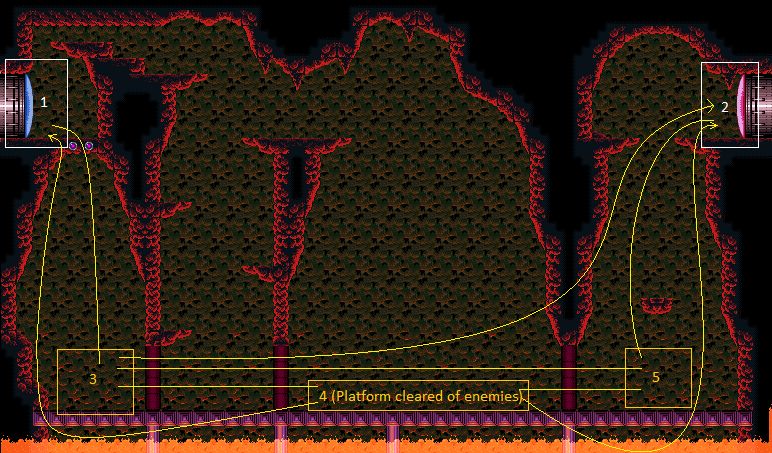
Cathedral Entrance
Room ID: 90
|
Exit condition: {
"leaveWithRunway": {
"length": 5,
"openEnd": 0
}
}
|
|
Requires: "h_canHeatedCrystalFlash" |
|
Requires: {
"heatFrames": 150
}
|
|
From: 1
Left Door
To: 5
Bottom Right Junction
Entrance condition: {
"comeInShinecharged": {
"framesRequired": 100
}
}
Requires: "canShinechargeMovement"
"canHorizontalShinespark"
{
"heatFrames": 155
}
{
"shinespark": {
"frames": 54,
"excessFrames": 15
}
}
{
"heatFrames": 105
}
|
|
From: 1
Left Door
To: 5
Bottom Right Junction
Notable: true 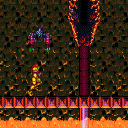
Normalized movement through the room can be used to manipulate the Sm. Dessgeegas and do this strat reliably without heat protection. The following is one way to do this; other approaches may also be possible. Before entering the room, damage down to between 127 and 159 energy, and unequip Speed Booster if it is collected. Position one pixel away from the door in the previous room. Hold angle-down (and optionally dash), enter the door transition, then hold shot while continuing to hold forward, angle-down, and dash. The shot block will be destroyed by the buffered shot. Continue holding right and dash to run under both Sm. Dessgeegas. After running under the second one, stop for a moment to prevent it from scrolling off camera. Morph, roll all the way against the right wall and quickly lay a Power Bomb. Move slightly to the left to avoid being bounced by the Power Bomb explosion. As the Sm. Dessgeega approaches, roll under it to the left to avoid being hit. Roll back to the right to collect its Power Bomb drop (which should be a ground level) and return to where the Power Bomb was laid, in time to perform the Crystal Flash inputs. Entrance condition: {
"comeInRunning": {
"minTiles": 0,
"maxTiles": 0.0625,
"speedBooster": false
}
}
Requires: "canPrepareForNextRoom"
{
"heatFrames": 570
}
"h_can10PowerBombCrystalFlash"
|
|
Entrance condition: {
"comeInWithGrappleTeleport": {
"blockPositions": [
[
7,
2
]
]
}
}
Requires: {
"heatFrames": 45
}
|
|
Exit condition: {
"leaveWithRunway": {
"length": 5,
"openEnd": 1
}
}
|
|
Requires: "h_canHeatedCrystalFlash" |
|
From: 2
Right Door
To: 3
Bottom Left Junction
Entrance condition: {
"comeInShinecharged": {
"framesRequired": 105
}
}
Requires: "canShinechargeMovement"
"canHorizontalShinespark"
{
"heatFrames": 195
}
{
"shinespark": {
"frames": 58,
"excessFrames": 0
}
}
{
"heatFrames": 105
}
|
|
Requires: {
"heatFrames": 150
}
|
|
From: 2
Right Door
To: 5
Bottom Right Junction
Notable: true
A normalized entrance to the room can be used to manipulate the Sm. Dessgeegas and do this strat reliably without heat protection. The following is one way to do this; other approaches may also be possible. Before entering the room, damage down to between 90 and 125 energy. Position one pixel away from the door in the previous room. Enter the door transition (with or without holding dash), then hold dash and left until falling off the platform. Turn around and hold right, landing in the corner. Morph and lay a Power Bomb. Move slightly to the left to avoid being bounced by the Power Bomb explosion. As the Sm. Dessgeega approaches, roll under it to the left to avoid being hit. Roll back to the right to collect its Power Bomb drop (which should be a ground level) and return to where the Power Bomb was laid, in time to perform the Crystal Flash inputs. Entrance condition: {
"comeInRunning": {
"minTiles": 0,
"maxTiles": 0.0625,
"speedBooster": "any"
}
}
Requires: "canPrepareForNextRoom"
{
"heatFrames": 420
}
"h_can10PowerBombCrystalFlash"
|
|
Only one bomb is needed after using a spinjump to get into the two tile tunnel. Requires: "h_canBombThings"
{
"heatFrames": 450
}
|
|
Requires: "h_canUseSpringBall"
{
"heatFrames": 375
}
|
|
Either race the nearby sova to the morph tunnel or wait for the global Sova to come around. Build speed on the lower platform and jump towards the morph tunnel while performing a Midair Morph to reach the Sova in time. Guiding the local Sova around through the shot block again can be faster, but is not expected. Requires: "canNeutralDamageBoost"
"Morph"
{
"enemyDamage": {
"enemy": "Sova",
"hits": 1,
"type": "contact"
}
}
{
"or": [
{
"and": [
"canTrickyJump",
"canLateralMidAirMorph",
{
"heatFrames": 340
}
]
},
{
"heatFrames": 2700
}
]
}
|
|
Requires: {
"or": [
"canPreciseWalljump",
"SpaceJump",
{
"and": [
"HiJump",
{
"or": [
"canWalljump",
"SpeedBooster"
]
}
]
}
]
}
{
"heatFrames": 210
}
|
|
From: 3
Bottom Left Junction
To: 1
Left Door
Notable: true 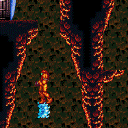
Guide the morph tunnel Sova on top of the shot blocks by keeping it on camera. Move the camera away once it is on top of the shot blocks. It will not move while off camera. Stand directly below the OffCamera Sova and fire up and jump to break the shot blocks. Either lower its health while guiding it, or as it begins to fall, there is time. As it falls, shoot again to freeze it at the right height. As a backup, the same Sova can be frozen on the left wall, dropped from the shot blocks again, or frozen on the right wall. Requires: "canUseFrozenEnemies"
"canTrickyJump"
"canCameraManip"
{
"heatFrames": 1100
}
|
|
Requires: "canUseFrozenEnemies"
{
"heatFrames": 950
}
|
|
From: 3
Bottom Left Junction
To: 2
Right Door
Notable: true 
Use a very well timed and precise walljump into morph to hit the global Sova so that the damage bonks Samus up to the door ledge. Aim for the lowest part of slope looking wall tile, where it does not look possible to make contact with a walljump, and fully delay the jump. To try again, the Sova loops to the left side wall. Or a Super can knock it off the wall to climb the right side again. Requires: "canInsaneWalljump"
"Morph"
"canNeutralDamageBoost"
{
"enemyDamage": {
"enemy": "Sova",
"hits": 1,
"type": "contact"
}
}
{
"heatFrames": 1050
}
|
|
From: 3
Bottom Left Junction
To: 3
Bottom Left Junction
Requires: "h_heatProof"
{
"or": [
{
"and": [
{
"resetRoom": {
"nodes": [
1
],
"mustStayPut": false
}
},
{
"or": [
"canWalljump",
"SpaceJump",
"h_canUseSpringBall"
]
}
]
},
{
"and": [
{
"resetRoom": {
"nodes": [
2
],
"mustStayPut": false
}
},
{
"or": [
"HiJump",
"SpaceJump"
]
}
]
}
]
}
{
"refill": [
"Energy",
"Missile",
"Super",
"PowerBomb"
]
}
|
|
From: 3
Bottom Left Junction
To: 3
Bottom Left Junction
Requires: "h_canHeatedCrystalFlash" |
|
From: 3
Bottom Left Junction
To: 4
Bottom Junction (Cleared Runway)
Requires: "Plasma"
{
"heatFrames": 100
}
|
|
From: 3
Bottom Left Junction
To: 4
Bottom Junction (Cleared Runway)
Requires: "ScrewAttack"
{
"heatFrames": 100
}
|
|
From: 3
Bottom Left Junction
To: 4
Bottom Junction (Cleared Runway)
Requires: {
"enemyKill": {
"enemies": [
[
"Sm. Dessgeega",
"Sm. Dessgeega"
]
],
"explicitWeapons": [
"Missile",
"Super"
]
}
}
{
"heatFrames": 100
}
|
|
From: 3
Bottom Left Junction
To: 4
Bottom Junction (Cleared Runway)
Requires: {
"or": [
"Wave",
"Spazer"
]
}
{
"heatFrames": 200
}
|
|
From: 3
Bottom Left Junction
To: 4
Bottom Junction (Cleared Runway)
Requires: {
"heatFrames": 350
}
|
|
Requires: {
"heatFrames": 150
}
{
"enemyDamage": {
"enemy": "Sm. Dessgeega",
"type": "contact",
"hits": 1
}
}
|
|
Requires: "canMockball"
{
"heatFrames": 100
}
|
|
Jump and shoot the block, then quickly run away and back to charge the shinespark and shine through before the block respawns. Requires: {
"canShineCharge": {
"usedTiles": 33,
"openEnd": 2
}
}
{
"heatFrames": 500
}
{
"shinespark": {
"frames": 22,
"excessFrames": 3
}
}
|
|
From: 4
Bottom Junction (Cleared Runway)
To: 1
Left Door
With plasma, it is possible to shoot the block from the ground and immediately shinespark. Other beams will disappear off-screen before Samus has moved up enough. A charge shot can be used instead, as it moves a bit slower, but there is a relatively small window. Requires: "Plasma"
{
"canShineCharge": {
"usedTiles": 33,
"openEnd": 2
}
}
{
"heatFrames": 250
}
{
"shinespark": {
"frames": 22,
"excessFrames": 3
}
}
|
|
From: 4
Bottom Junction (Cleared Runway)
To: 1
Left Door
It is possible to shoot upwards from the ground then immediately as the shot is leaving the screen, press up and jump to shinespark without delay. A Charge shot can help, as it slows down the shot. Requires: "canHeroShot"
{
"canShineCharge": {
"usedTiles": 33,
"openEnd": 2
}
}
{
"heatFrames": 250
}
{
"shinespark": {
"frames": 22,
"excessFrames": 3
}
}
|
|
From: 4
Bottom Junction (Cleared Runway)
To: 1
Left Door
Notable: true .png)
.gif)
This is a precise strat which requires maximum run speed. Perform a spin jump right next to the left wall. Shoot the block as Samus is about to leap through it, and land next to the door. A down grab makes this a little easier. Requires: "canTrickyDashJump"
{
  "heatFrames": 150
}
|
|
From: 4
Bottom Junction (Cleared Runway)
To: 1
Left Door
Kill the enemies, break the shot block, then use the bottom to charge a spark. Quickly climb up before the block respawns, and continue through the left door. Requires: "HiJump"
"canShinechargeMovementComplex"
{
"canShineCharge": {
"usedTiles": 33,
"openEnd": 2
}
}
{
"or": [
"canPreciseWalljump",
"canTrickyJump",
"SpaceJump"
]
}
{
"heatFrames": 540
}
Exit condition: {
"leaveShinecharged": {
"framesRemaining": 35
}
}
|
|
From: 4
Bottom Junction (Cleared Runway)
To: 1
Left Door
Kill the enemies, then use the bottom to charge a spark. Shoot the shot block from the ground and follow it up so that it breaks, and continue through the left door. Requires: "HiJump"
"canShinechargeMovementComplex"
"canHeroShot"
{
"canShineCharge": {
"usedTiles": 33,
"openEnd": 2
}
}
{
"or": [
"canPreciseWalljump",
"canTrickyJump",
"SpaceJump"
]
}
{
"heatFrames": 310
}
Exit condition: {
"leaveShinecharged": {
"framesRemaining": 25
}
}
|
|
Requires: "canWalljump"
"canShinechargeMovement"
{
"canShineCharge": {
"usedTiles": 33,
"openEnd": 2
}
}
{
"heatFrames": 380
}
{
"shinespark": {
"frames": 16,
"excessFrames": 4
}
}
|
|
From: 4
Bottom Junction (Cleared Runway)
To: 2
Right Door
Notable: true .png)
.gif)
This is a precise strat which requires maximum run speed. Jump when passing under the floating platform and barely avoid hitting the rightmost wall. Wall jump on the horizontal spire near to the door. Requires: "canTrickyDashJump"
"canWalljump"
{
"heatFrames": 150
}
|
|
From: 4
Bottom Junction (Cleared Runway)
To: 2
Right Door
Kill the enemies and use the bottom to charge a spark. Quickly climb then spark through the right door. Requires: "HiJump"
"canShinechargeMovementComplex"
{
"canShineCharge": {
"usedTiles": 33,
"openEnd": 2
}
}
{
"heatFrames": 320
}
Exit condition: {
"leaveShinecharged": {
"framesRemaining": 60
}
}
|
|
Requires: {
"heatFrames": 100
}
|
|
From: 4
Bottom Junction (Cleared Runway)
To: 4
Bottom Junction (Cleared Runway)
Requires: "h_canHeatedCrystalFlash" |
|
From: 4
Bottom Junction (Cleared Runway)
To: 5
Bottom Right Junction
|
|
Requires: {
"or": [
{
"and": [
"HiJump",
{
"heatFrames": 70
}
]
},
{
"and": [
"SpaceJump",
{
"heatFrames": 125
}
]
}
]
}
|
|
From: 5
Bottom Right Junction
To: 2
Right Door
Requires: {
"or": [
{
"and": [
"HiJump",
{
"heatFrames": 50
}
]
},
{
"and": [
"SpaceJump",
{
"heatFrames": 105
}
]
}
]
}
Exit condition: {
"leaveWithRunway": {
"length": 5,
"openEnd": 0
}
}
|
|
Requires: "canSpringBallJumpMidAir"
{
"heatFrames": 200
}
|
|
Requires: {
"or": [
{
"and": [
"h_canIBJ",
{
"heatFrames": 1020
}
]
},
{
"and": [
"h_canDoubleBombJump",
{
"heatFrames": 510
}
]
}
]
}
|
|
Requires: {
"or": [
{
"and": [
"h_canJumpIntoIBJ",
{
"heatFrames": 450
}
]
},
{
"and": [
"h_canDoubleBombJump",
{
"heatFrames": 300
}
]
}
]
}
|
|
Requires: "canDodgeWhileShooting"
{
"heatFrames": 350
}
|
|
Requires: {
"heatFrames": 160
}
{
"enemyDamage": {
"enemy": "Sm. Dessgeega",
"type": "contact",
"hits": 1
}
}
|
|
From: 5
Bottom Right Junction
To: 4
Bottom Junction (Cleared Runway)
Requires: "Plasma"
{
"heatFrames": 100
}
|
|
From: 5
Bottom Right Junction
To: 4
Bottom Junction (Cleared Runway)
Requires: "ScrewAttack"
{
"heatFrames": 100
}
|
|
From: 5
Bottom Right Junction
To: 4
Bottom Junction (Cleared Runway)
Requires: {
"enemyKill": {
"enemies": [
[
"Sm. Dessgeega",
"Sm. Dessgeega"
]
],
"explicitWeapons": [
"Missile",
"Super"
]
}
}
{
"heatFrames": 100
}
|
|
From: 5
Bottom Right Junction
To: 4
Bottom Junction (Cleared Runway)
Requires: {
"or": [
"Wave",
"Spazer"
]
}
{
"heatFrames": 200
}
|
|
From: 5
Bottom Right Junction
To: 4
Bottom Junction (Cleared Runway)
Requires: {
"heatFrames": 350
}
|
{
"$schema": "../../../schema/m3-room.schema.json",
"id": 90,
"name": "Cathedral Entrance",
"area": "Norfair",
"subarea": "Upper",
"subsubarea": "East",
"playable": true,
"roomAddress": "0x7A7B3",
"roomEnvironments": [
{
"heated": true
}
],
"nodes": [
{
"id": 1,
"name": "Left Door",
"nodeType": "door",
"nodeSubType": "blue",
"nodeAddress": "0x00192a6",
"doorEnvironments": [
{
"physics": "air"
}
]
},
{
"id": 2,
"name": "Right Door",
"nodeType": "door",
"nodeSubType": "red",
"nodeAddress": "0x00192b2",
"doorEnvironments": [
{
"physics": "air"
}
],
"locks": [
{
"name": "Cathedral Entrance Red Lock (to Cathedral)",
"lockType": "coloredDoor",
"unlockStrats": [
{
"name": "Base",
"notable": false,
"requires": [
"h_canOpenRedDoors"
]
}
]
}
]
},
{
"id": 3,
"name": "Bottom Left Junction",
"nodeType": "junction",
"nodeSubType": "junction"
},
{
"id": 4,
"name": "Bottom Junction (Cleared Runway)",
"nodeType": "junction",
"nodeSubType": "junction",
"note": "This node is only considered reached if the runway is clear of enemies, to setup SpeedBooster strats."
},
{
"id": 5,
"name": "Bottom Right Junction",
"nodeType": "junction",
"nodeSubType": "junction"
}
],
"enemies": [
{
"id": "e1",
"groupName": "Cathedral Entrance Sovas",
"enemyName": "Sova",
"quantity": 4,
"homeNodes": [
3
],
"dropRequires": [
"h_heatProof"
]
},
{
"id": "e2",
"groupName": "Cathedral Entrance Small Dessgeegas",
"enemyName": "Sm. Dessgeega",
"quantity": 2,
"betweenNodes": [
3,
5
],
"dropRequires": [
"h_heatProof"
]
}
],
"links": [
{
"from": 1,
"to": [
{
"id": 1
},
{
"id": 3
},
{
"id": 5
}
]
},
{
"from": 2,
"to": [
{
"id": 1
},
{
"id": 2
},
{
"id": 3
},
{
"id": 5
}
]
},
{
"from": 3,
"to": [
{
"id": 1
},
{
"id": 2,
"devNote": "This link goes straight from 3 to 2 because waiting for the Sova is the same time, regardless of how quickly you can travel through the other nodes"
},
{
"id": 3
},
{
"id": 4
},
{
"id": 5
}
]
},
{
"from": 4,
"to": [
{
"id": 1
},
{
"id": 2
},
{
"id": 3
},
{
"id": 4
},
{
"id": 5,
"devNote": "Node 4 is considered equivalent to 5 (though 5 isn't equivlent to 4)."
}
]
},
{
"from": 5,
"to": [
{
"id": 2
},
{
"id": 3
},
{
"id": 4
},
{
"id": 5
}
]
}
],
"reusableRoomwideNotable": [
{
"name": "Cathedral Entrance 10 Power Bomb Crystal Flash",
"note": [
"Use a Sm. Dessgeega to collect a Power Bomb, to be able to perform a Crystal Flash with a capacity of only 10 Power Bombs.",
"Normalized whole-room movement can be used to manipulate the Sm. Dessgeegas, to be able to do this strat reliably without heat protection.",
"For details, see the individual strats, as the specific technique depends on whether entering from the left or right side of the room."
]
}
],
"strats": [
{
"link": [
1,
1
],
"name": "Leave with Runway",
"requires": [],
"exitCondition": {
"leaveWithRunway": {
"length": 5,
"openEnd": 0
}
}
},
{
"link": [
1,
1
],
"name": "Crystal Flash",
"requires": [
"h_canHeatedCrystalFlash"
]
},
{
"link": [
1,
3
],
"name": "Base",
"requires": [
{
"heatFrames": 150
}
]
},
{
"link": [
1,
5
],
"name": "Shinespark (Come In Shinecharged)",
"entranceCondition": {
"comeInShinecharged": {
"framesRequired": 100
}
},
"requires": [
"canShinechargeMovement",
"canHorizontalShinespark",
{
"heatFrames": 155
},
{
"shinespark": {
"frames": 54,
"excessFrames": 15
}
},
{
"heatFrames": 105
}
]
},
{
"link": [
1,
5
],
"name": "Cathedral Entrance 10 Power Bomb Crystal Flash",
"notable": true,
"reusableRoomwideNotable": "Cathedral Entrance 10 Power Bomb Crystal Flash",
"entranceCondition": {
"comeInRunning": {
"minTiles": 0,
"maxTiles": 0.0625,
"speedBooster": false
}
},
"requires": [
"canPrepareForNextRoom",
{
"heatFrames": 570
},
"h_can10PowerBombCrystalFlash"
],
"note": [
"Normalized movement through the room can be used to manipulate the Sm. Dessgeegas and do this strat reliably without heat protection.",
"The following is one way to do this; other approaches may also be possible.",
"Before entering the room, damage down to between 127 and 159 energy, and unequip Speed Booster if it is collected.",
"Position one pixel away from the door in the previous room.",
"Hold angle-down (and optionally dash), enter the door transition, then hold shot while continuing to hold forward, angle-down, and dash.",
"The shot block will be destroyed by the buffered shot.",
"Continue holding right and dash to run under both Sm. Dessgeegas.",
"After running under the second one, stop for a moment to prevent it from scrolling off camera.",
"Morph, roll all the way against the right wall and quickly lay a Power Bomb.",
"Move slightly to the left to avoid being bounced by the Power Bomb explosion.",
"As the Sm. Dessgeega approaches, roll under it to the left to avoid being hit.",
"Roll back to the right to collect its Power Bomb drop (which should be a ground level) and return to where the Power Bomb was laid, in time to perform the Crystal Flash inputs."
],
"devNote": [
"The heat frames include about a half second of leniency to position in the previous room in case it is also heated.",
"FIXME: Find some way to properly express being above health bomb range, though it shouldn't be a serious problem here.",
"Without heat protection, this is already accounted for by the heatFrames (though this is a bit hacky).",
"With heat protection, it should be possible to farm a bit to get out of health bomb range."
]
},
{
"link": [
2,
1
],
"name": "Grapple Teleport",
"entranceCondition": {
"comeInWithGrappleTeleport": {
"blockPositions": [
[
7,
2
]
]
}
},
"requires": [
{
  "heatFrames": 45
}
]
},
{
"link": [
2,
2
],
"name": "Leave with Runway",
"requires": [],
"exitCondition": {
"leaveWithRunway": {
"length": 5,
"openEnd": 1
}
}
},
{
"link": [
2,
2
],
"name": "Crystal Flash",
"requires": [
"h_canHeatedCrystalFlash"
]
},
{
"link": [
2,
3
],
"name": "Shinespark (Come In Shinecharged)",
"entranceCondition": {
"comeInShinecharged": {
"framesRequired": 105
}
},
"requires": [
"canShinechargeMovement",
"canHorizontalShinespark",
{
"heatFrames": 195
},
{
"shinespark": {
"frames": 58,
"excessFrames": 0
}
},
{
"heatFrames": 105
}
]
},
{
"link": [
2,
5
],
"name": "Base",
"requires": [
{
  "heatFrames": 150
}
]
},
{
"link": [
2,
5
],
"name": "Cathedral Entrance 10 Power Bomb Crystal Flash",
"notable": true,
"reusableRoomwideNotable": "Cathedral Entrance 10 Power Bomb Crystal Flash",
"entranceCondition": {
"comeInRunning": {
"minTiles": 0,
"maxTiles": 0.0625,
"speedBooster": "any"
}
},
"requires": [
"canPrepareForNextRoom",
{
"heatFrames": 420
},
"h_can10PowerBombCrystalFlash"
],
"note": [
"A normalized entrance to the room can be used to manipulate the Sm. Dessgeegas and do this strat reliably without heat protection.",
"The following is one way to do this; other approaches may also be possible.",
"Before entering the room, damage down to between 90 and 125 energy.",
"Position one pixel away from the door in the previous room.",
"Enter the door transition (with or without holding dash), then hold dash and left until falling off the platform.",
"Turn around and hold right, landing in the corner.",
"Morph and lay a Power Bomb.",
"Move slightly to the left to avoid being bounced by the Power Bomb explosion.",
"As the Sm. Dessgeega approaches, roll under it to the left to avoid being hit.",
"Roll back to the right to collect its Power Bomb drop (which should be a ground level) and return to where the Power Bomb was laid, in time to perform the Crystal Flash inputs."
],
"devNote": [
"The heat frames include about a half second of leniency to position in the previous room in case it is also heated.",
"FIXME: Find some way to properly express being above health bomb range, though it shouldn't be a serious problem here.",
"Without heat protection, this is already accounted for by the heatFrames (though this is a bit hacky).",
"With heat protection, it should be possible to farm a bit to get out of health bomb range."
]
},
{
"link": [
3,
1
],
"name": "Base",
"requires": [
"h_canBombThings",
{
"heatFrames": 450
}
],
"note": "Only one bomb is needed after using a spinjump to get into the two tile tunnel."
},
{
"link": [
3,
1
],
"name": "Base with Spring Ball",
"requires": [
"h_canUseSpringBall",
{
"heatFrames": 375
}
]
},
{
"link": [
3,
1
],
"name": "Sova Boost",
"requires": [
"canNeutralDamageBoost",
"Morph",
{
"enemyDamage": {
"enemy": "Sova",
"hits": 1,
"type": "contact"
}
},
{
"or": [
{
"and": [
"canTrickyJump",
"canLateralMidAirMorph",
{
"heatFrames": 340
}
]
},
{
"heatFrames": 2700
}
]
}
],
"note": [
"Either race the nearby sova to the morph tunnel or wait for the global Sova to come around.",
"Build speed on the lower platform and jump towards the morph tunnel while performing a Midair Morph to reach the Sova in time.",
"Guiding the local Sova around through the shot block again can be faster, but is not expected."
],
"devNote": "The global Sova is moving while the player reaches this node and this heatFrame count reflects that."
},
{
"link": [
3,
1
],
"name": "Up from Below",
"requires": [
{
"or": [
"canPreciseWalljump",
"SpaceJump",
{
"and": [
"HiJump",
{
"or": [
"canWalljump",
"SpeedBooster"
]
}
]
}
]
},
{
"heatFrames": 210
}
]
},
{
"link": [
3,
1
],
"name": "Cathedral Entrance Left Door Frozen Sova Step",
"notable": true,
"requires": [
"canUseFrozenEnemies",
"canTrickyJump",
"canCameraManip",
{
"heatFrames": 1100
}
],
"note": [
"Guide the morph tunnel Sova on top of the shot blocks by keeping it on camera.",
"Move the camera away once it is on top of the shot blocks. It will not move while off camera.",
"Stand directly below the OffCamera Sova and fire up and jump to break the shot blocks.",
"Either lower its health while guiding it, or as it begins to fall, there is time.",
"As it falls, shoot again to freeze it at the right height.",
"As a backup, the same Sova can be frozen on the left wall, dropped from the shot blocks again, or frozen on the right wall."
]
},
{
"link": [
3,
2
],
"name": "Frozen Sova",
"requires": [
"canUseFrozenEnemies",
{
"heatFrames": 950
}
]
},
{
"link": [
3,
2
],
"name": "Cathedral Entrance Sova Morph Only Boost",
"notable": true,
"requires": [
"canInsaneWalljump",
"Morph",
"canNeutralDamageBoost",
{
"enemyDamage": {
"enemy": "Sova",
"hits": 1,
"type": "contact"
}
},
{
"heatFrames": 1050
}
],
"note": [
"Use a very well timed and precise walljump into morph to hit the global Sova so that the damage bonks Samus up to the door ledge.",
"Aim for the lowest part of slope looking wall tile, where it does not look possible to make contact with a walljump, and fully delay the jump.",
"To try again, the Sova loops to the left side wall. Or a Super can knock it off the wall to climb the right side again."
]
},
{
"link": [
3,
3
],
"name": "Sova and Sm. Dessgeega Farm",
"requires": [
"h_heatProof",
{
"or": [
{
"and": [
{
"resetRoom": {
"nodes": [
1
],
"mustStayPut": false
}
},
{
"or": [
"canWalljump",
"SpaceJump",
"h_canUseSpringBall"
]
}
]
},
{
"and": [
{
"resetRoom": {
"nodes": [
2
],
"mustStayPut": false
}
},
{
"or": [
"HiJump",
"SpaceJump"
]
}
]
}
]
},
{
"refill": [
"Energy",
"Missile",
"Super",
"PowerBomb"
]
}
]
},
{
"link": [
3,
3
],
"name": "Crystal Flash",
"requires": [
"h_canHeatedCrystalFlash"
]
},
{
"link": [
3,
4
],
"name": "Plasma Kill",
"requires": [
"Plasma",
{
"heatFrames": 100
}
]
},
{
"link": [
3,
4
],
"name": "Screw Kill",
"requires": [
"ScrewAttack",
{
"heatFrames": 100
}
]
},
{
"link": [
3,
4
],
"name": "Ammo Kill",
"requires": [
{
"enemyKill": {
"enemies": [
[
"Sm. Dessgeega",
"Sm. Dessgeega"
]
],
"explicitWeapons": [
"Missile",
"Super"
]
}
},
{
"heatFrames": 100
}
]
},
{
"link": [
3,
4
],
"name": "Intermediate Beam Kill",
"requires": [
{
"or": [
"Wave",
"Spazer"
]
},
{
"heatFrames": 200
}
]
},
{
"link": [
3,
4
],
"name": "Power Beam Kill",
"requires": [
{
  "heatFrames": 350
}
]
},
{
"link": [
3,
5
],
"name": "Tank a Hit",
"requires": [
{
"heatFrames": 150
},
{
"enemyDamage": {
"enemy": "Sm. Dessgeega",
"type": "contact",
"hits": 1
}
}
]
},
{
"link": [
3,
5
],
"name": "Mockball Through",
"requires": [
"canMockball",
{
  "heatFrames": 100
}
]
},
{
"link": [
4,
1
],
"name": "Shinespark",
"requires": [
{
"canShineCharge": {
"usedTiles": 33,
"openEnd": 2
}
},
{
"heatFrames": 500
},
{
"shinespark": {
"frames": 22,
"excessFrames": 3
}
}
],
"note": "Jump and shoot the block, then quickly run away and back to charge the shinespark and shine through before the block respawns.",
"devNote": [
"FIXME: Some of the heatFrames should come after the shinespark"
]
},
{
"link": [
4,
1
],
"name": "Shinespark With Plasma",
"requires": [
"Plasma",
{
"canShineCharge": {
"usedTiles": 33,
"openEnd": 2
}
},
{
"heatFrames": 250
},
{
"shinespark": {
"frames": 22,
"excessFrames": 3
}
}
],
"note": [
"With plasma, it is possible to shoot the block from the ground and immediately shinespark.",
"Other beams will disappear off-screen before Samus has moved up enough.",
"A charge shot can be used instead, as it moves a bit slower, but there is a relatively small window."
],
"devNote": [
"FIXME: Some of the heatFrames should come after the shinespark"
]
},
{
"link": [
4,
1
],
"name": "Cathedral Entrance Hero Shot Shinespark",
"requires": [
"canHeroShot",
{
"canShineCharge": {
"usedTiles": 33,
"openEnd": 2
}
},
{
"heatFrames": 250
},
{
"shinespark": {
"frames": 22,
"excessFrames": 3
}
}
],
"note": [
"It is possible to shoot upwards from the ground then immediately as the shot is leaving the screen, press up and jump to shinespark without delay.",
"A Charge shot can help, as it slows down the shot."
],
"devNote": [
"FIXME: Some of the heatFrames should come after the shinespark"
]
},
{
"link": [
4,
1
],
"name": "Cathedral Entrance Speedjump (Right to Left)",
"notable": true,
"requires": [
"canTrickyDashJump",
{
"heatFrames": 150
}
],
"note": [
"This is a precise strat which requires maximum run speed.",
"Perform a spin jump right next to the left wall.",
"Shoot the block as Samus is about to leap through it, and land next to the door.",
"A down grab makes this a little easier."
]
},
{
"link": [
4,
1
],
"name": "Leave Shinecharged",
"requires": [
"HiJump",
"canShinechargeMovementComplex",
{
"canShineCharge": {
"usedTiles": 33,
"openEnd": 2
}
},
{
"or": [
"canPreciseWalljump",
"canTrickyJump",
"SpaceJump"
]
},
{
"heatFrames": 540
}
],
"exitCondition": {
"leaveShinecharged": {
"framesRemaining": 35
}
},
"unlocksDoors": [
{
"types": [
"missiles"
],
"requires": [
{
"heatFrames": 240
}
]
},
{
"types": [
"super"
],
"requires": []
},
{
"types": [
"powerbomb"
],
"requires": [
{
"heatFrames": 40
}
]
}
],
"note": "Kill the enemies, break the shot block, then use the bottom to charge a spark. Quickly climb up before the block respawns, and continue through the left door."
},
{
"link": [
4,
1
],
"name": "Leave Shinecharged Hero Shot",
"requires": [
"HiJump",
"canShinechargeMovementComplex",
"canHeroShot",
{
"canShineCharge": {
"usedTiles": 33,
"openEnd": 2
}
},
{
"or": [
"canPreciseWalljump",
"canTrickyJump",
"SpaceJump"
]
},
{
"heatFrames": 310
}
],
"exitCondition": {
"leaveShinecharged": {
"framesRemaining": 25
}
},
"unlocksDoors": [
{
"types": [
"missiles"
],
"requires": [
{
"heatFrames": 500
}
]
},
{
"types": [
"super"
],
"requires": []
},
{
"types": [
"powerbomb"
],
"requires": [
{
"heatFrames": 180
}
]
}
],
"note": "Kill the enemies, then use the bottom to charge a spark. Shoot the shot block from the ground and follow it up so that it breaks, and continue through the left door."
},
{
"link": [
4,
2
],
"name": "Shinespark",
"requires": [
"canWalljump",
"canShinechargeMovement",
{
"canShineCharge": {
"usedTiles": 33,
"openEnd": 2
}
},
{
"heatFrames": 380
},
{
"shinespark": {
"frames": 16,
"excessFrames": 4
}
}
],
"devNote": [
"FIXME: Some of the heatFrames should come after the shinespark"
]
},
{
"link": [
4,
2
],
"name": "Cathedral Entrance Speedjump (Left to Right)",
"notable": true,
"requires": [
"canTrickyDashJump",
"canWalljump",
{
"heatFrames": 150
}
],
"note": [
"This is a precise strat which requires maximum run speed.",
"Jump when passing under the floating platform and barely avoid hitting the rightmost wall.",
"Wall jump on the horizontal spire near to the door."
]
},
{
"link": [
4,
2
],
"name": "Leave Shinecharged",
"requires": [
"HiJump",
"canShinechargeMovementComplex",
{
"canShineCharge": {
"usedTiles": 33,
"openEnd": 2
}
},
{
"heatFrames": 320
}
],
"exitCondition": {
"leaveShinecharged": {
"framesRemaining": 60
}
},
"unlocksDoors": [
{
"types": [
"missiles"
],
"requires": [
{
"heatFrames": 180
}
]
},
{
"types": [
"super"
],
"requires": []
},
{
"types": [
"powerbomb"
],
"requires": [
{
"heatFrames": 120
}
]
}
],
"note": "Kill the enemies and use the bottom to charge a spark. Quickly climb then spark through the right door."
},
{
"link": [
4,
3
],
"name": "Base",
"requires": [
{
"heatFrames": 100
}
]
},
{
"link": [
4,
4
],
"name": "Crystal Flash",
"requires": [
"h_canHeatedCrystalFlash"
]
},
{
"link": [
4,
5
],
"name": "Base",
"requires": []
},
{
"link": [
5,
2
],
"name": "Base",
"requires": [
{
  "or": [
    {
      "and": [
        "HiJump",
        {
          "heatFrames": 70
        }
      ]
    },
    {
      "and": [
        "SpaceJump",
        {
          "heatFrames": 125
        }
      ]
    }
  ]
}
]
},
{
"link": [
5,
2
],
"name": "Move Assist Leave with Runway",
"requires": [
{
  "or": [
    {
      "and": [
        "HiJump",
        {
          "heatFrames": 50
        }
      ]
    },
    {
      "and": [
        "SpaceJump",
        {
          "heatFrames": 105
        }
      ]
    }
  ]
}
],
"exitCondition": {
"leaveWithRunway": {
"length": 5,
"openEnd": 0
}
},
"unlocksDoors": [
{
"types": [
"missiles"
],
"requires": [
{
"heatFrames": 50
}
]
},
{
"types": [
"super"
],
"requires": []
},
{
"types": [
"powerbomb"
],
"requires": [
{
"heatFrames": 110
}
]
}
]
},
{
"link": [
5,
2
],
"name": "MidAir SpringBall",
"requires": [
"canSpringBallJumpMidAir",
{
"heatFrames": 200
}
]
},
{
"link": [
5,
2
],
"name": "IBJ",
"requires": [
{
  "or": [
    {
      "and": [
        "h_canIBJ",
        {
          "heatFrames": 1020
        }
      ]
    },
    {
      "and": [
        "h_canDoubleBombJump",
        {
          "heatFrames": 510
        }
      ]
    }
  ]
}
]
},
{
"link": [
5,
2
],
"name": "Jump into IBJ",
"requires": [
{
  "or": [
    {
      "and": [
        "h_canJumpIntoIBJ",
        {
          "heatFrames": 450
        }
      ]
    },
    {
      "and": [
        "h_canDoubleBombJump",
        {
          "heatFrames": 300
        }
      ]
    }
  ]
}
]
},
{
"link": [
5,
3
],
"name": "Base",
"requires": [
"canDodgeWhileShooting",
{
  "heatFrames": 350
}
]
},
{
"link": [
5,
3
],
"name": "Tank a Hit",
"requires": [
{
"heatFrames": 160
},
{
"enemyDamage": {
"enemy": "Sm. Dessgeega",
"type": "contact",
"hits": 1
}
}
]
},
{
"link": [
5,
4
],
"name": "Plasma Kill",
"requires": [
"Plasma",
{
"heatFrames": 100
}
]
},
{
"link": [
5,
4
],
"name": "Screw Kill",
"requires": [
"ScrewAttack",
{
"heatFrames": 100
}
]
},
{
"link": [
5,
4
],
"name": "Ammo Kill",
"requires": [
{
"enemyKill": {
"enemies": [
[
"Sm. Dessgeega",
"Sm. Dessgeega"
]
],
"explicitWeapons": [
"Missile",
"Super"
]
}
},
{
"heatFrames": 100
}
]
},
{
"link": [
5,
4
],
"name": "Intermediate Beam Kill",
"requires": [
{
"or": [
"Wave",
"Spazer"
]
},
{
"heatFrames": 200
}
]
},
{
"link": [
5,
4
],
"name": "Power Beam Kill",
"requires": [
{
"heatFrames": 350
}
]
}
]
}