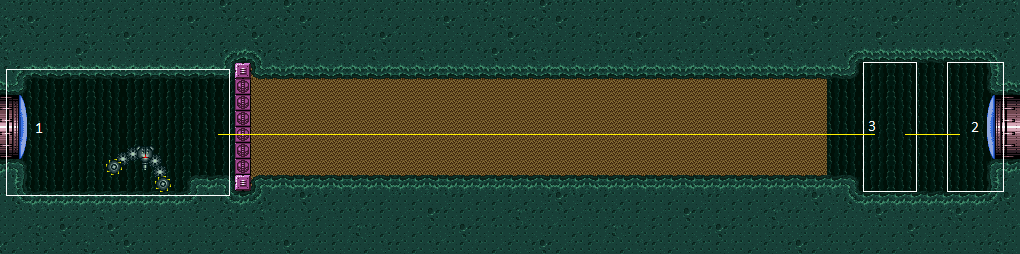
Shaktool Room
Room ID: 222
|
Entrance condition: {
"comeInWithRMode": {}
}Requires: {
"or": [
"f_ShaktoolDoneDigging",
{
"obstaclesCleared": [
"f_ShaktoolDoneDigging"
]
}
]
}Clears obstacles: A, B, R-Mode Dev note: Entering the room with the flag 'f_ShaktoolDoneDigging' set means that the sand blocks and Power Bomb blocks will not spawn. |
|
Entrance condition: {
"comeInNormally": {}
}Requires: {
"or": [
"f_ShaktoolDoneDigging",
{
"obstaclesCleared": [
"f_ShaktoolDoneDigging"
]
}
]
}Clears obstacles: A, B Dev note: Entering the room with the flag 'f_ShaktoolDoneDigging' set means that the sand blocks and Power Bomb blocks will not spawn. |
|
Exit condition: {
"leaveWithRunway": {
"length": 1,
"openEnd": 1
}
} |
|


Requires: "Gravity" Exit condition: {
"leaveWithSidePlatform": {
"height": 2,
"runway": {
"length": 10,
"openEnd": 0
},
"obstruction": [
1,
0
]
}
}Dev note: Max extra run speed $2.5 |
|
Requires: {
"obstaclesCleared": [
"A",
"B"
]
}
"canShinechargeMovement"
"canWaterShineCharge"
{
"canShineCharge": {
"usedTiles": 35,
"openEnd": 2
}
}
{
"shineChargeFrames": 90
}Exit condition: {
"leaveShinecharged": {}
}Dev note: This runway could be longer with precise timing or a stutter, but it seems unnecessary at this difficulty. |
|
Requires: {
"obstaclesCleared": [
"A",
"B"
]
}
"canShinechargeMovement"
"Gravity"
{
"canShineCharge": {
"usedTiles": 42,
"openEnd": 2
}
}
{
"shineChargeFrames": 55
}Exit condition: {
"leaveShinecharged": {}
} |
|
Requires: {
"or": [
{
"resetRoom": {
"nodes": [
1
]
}
},
{
"and": [
{
  "or": [
    "f_ShaktoolDoneDigging",
    {
      "obstaclesCleared": [
        "f_ShaktoolDoneDigging"
      ]
    }
  ]
},
{
"resetRoom": {
"nodes": [
2
]
}
},
{
"or": [
{
"and": [
"Gravity",
"canDash",
{
"cycleFrames": 290
}
]
},
{
"and": [
"canSuitlessMaridia",
"canDash",
{
"cycleFrames": 350
}
]
},
{
"and": [
"Gravity",
{
"cycleFrames": 500
}
]
},
{
"and": [
"canSuitlessMaridia",
{
"cycleFrames": 560
}
]
}
]
}
]
}
]
}
{
"or": [
{
"and": [
"canSuitlessMaridia",
{
"or": [
{
"and": [
"Plasma",
{
"cycleFrames": 280
}
]
},
{
"and": [
"Wave",
{
"cycleFrames": 420
}
]
},
{
"and": [
"Spazer",
{
"cycleFrames": 420
}
]
},
{
"and": [
"Ice",
{
"cycleFrames": 450
}
]
},
{
"cycleFrames": 570
}
]
}
]
},
{
"and": [
"Gravity",
{
"or": [
{
"and": [
"Plasma",
{
"cycleFrames": 160
}
]
},
{
"and": [
"Wave",
{
"cycleFrames": 250
}
]
},
{
"and": [
"Spazer",
{
"cycleFrames": 330
}
]
},
{
"and": [
"Ice",
{
"cycleFrames": 350
}
]
},
{
"cycleFrames": 510
}
]
}
]
}
]
}Resets obstacles: A, B, R-Mode Farm cycle drops: 1 Shaktool |
|
Requires: {
"obstaclesNotCleared": [
"R-Mode"
]
}
"h_CrystalFlash" |
|
Time the shinecharge for when the water is low. Requires: {
"obstaclesCleared": [
"A",
"B"
]
}
{
"or": [
"Gravity",
"canWaterShineCharge"
]
}
"h_shinechargeMaxRunway"
"h_CrystalSpark" |
From: 1
Left Door
To: 1
Left Door
If Shaktool is done digging, it is faster to use one of the snails from the right side of the room. Exit condition: {
"leaveWithGModeSetup": {}
} |
|
This takes 1 min 40 sec if Shaktool is done digging. Requires: {
"enemyDamage": {
"enemy": "Shaktool",
"type": "contact",
"hits": 1
}
}
{
"or": [
"canBePatient",
{
"and": [
"canRiskPermanentLossOfAccess",
{
"not": "f_ShaktoolDoneDigging"
}
]
}
]
} |
|


This requires a precisely timed Crystal Flash, such that Shaktool hits Samus immediately after she gets Reserve Energy, to prevent getting double hit. With a second Reserve Tank and an Energy Tank, or the damage reduction from a suit, Samus is able to survive a second hit. Entrance condition: {
"comeInWithRMode": {}
}Requires: "canRModeCrystalFlashInterrupt"
{
"or": [
{
"and": [
{
"ammo": {
"type": "Missile",
"count": 10
}
},
{
"or": [
"h_partialEnemyDamageReduction",
{
"and": [
{
"resourceCapacity": [
{
"type": "RegularEnergy",
"count": 199
}
]
},
{
"resourceCapacity": [
{
"type": "ReserveEnergy",
"count": 199
}
]
}
]
}
]
}
]
},
{
"and": [
{
"ammo": {
"type": "Missile",
"count": 2
}
},
"canComplexRModeCrystalFlashInterrupt"
]
}
]
} |
From: 1
Left Door
To: 1
Left Door

This requires a precisely timed Crystal Flash, such that Shaktool hits Samus immediately after she gets Reserve Energy, to prevent getting double hit. With a second Reserve Tank and an Energy Tank, or the damage reduction from a suit, Samus is able to survive a second hit. If the wall is already broken, either wait for Shaktool to cross the room or move in front of it. It is possible to enter the room and land on the doorsill, then bomb or Power Bomb boost across when the tide is high. Entrance condition: {
"comeInWithGMode": {
"mode": "direct",
"morphed": true
}
}Requires: "h_artificialMorphRModeCrystalFlashInterrupt"
{
"or": [
{
"and": [
{
"ammo": {
"type": "Missile",
"count": 10
}
},
{
"or": [
"h_partialEnemyDamageReduction",
{
"and": [
{
"resourceCapacity": [
{
"type": "RegularEnergy",
"count": 199
}
]
},
{
"resourceCapacity": [
{
"type": "ReserveEnergy",
"count": 199
}
]
}
]
}
]
}
]
},
{
"and": [
{
"ammo": {
"type": "Missile",
"count": 2
}
},
"h_artificialMorphComplexRModeCrystalFlashInterrupt"
]
}
]
}
{
"or": [
"h_artificialMorphSpringBall",
{
"and": [
{
"or": [
"canInsaneJump",
"Gravity"
]
},
{
"or": [
"h_artificialMorphBombs",
{
"ammo": {
"type": "PowerBomb",
"count": 2
}
}
]
}
]
},
"canBePatient",
{
"and": [
"canRiskPermanentLossOfAccess",
{
"not": "f_ShaktoolDoneDigging"
}
]
}
]
} |
|
Requires: {
"or": [
{
"obstaclesCleared": [
"A",
"B"
]
},
"h_usePowerBomb"
]
}Clears obstacles: A, B, f_ShaktoolDoneDigging Sets flags: f_ShaktoolDoneDigging |
|
Entrance condition: {
"comeInWithGMode": {
"mode": "any",
"morphed": true
}
}Requires: "h_artificialMorphPowerBomb" Clears obstacles: A, B, f_ShaktoolDoneDigging Sets flags: f_ShaktoolDoneDigging |
|
Requires: {
"obstaclesCleared": [
"A",
"B"
]
} |
|
Let the Snails (Yards) dig through the sand and follow them. They will not dig while off screen or while Samus is facing them, even while morphed. Requires: {
"notable": "Reverse"
}
"h_usePowerBomb"Clears obstacles: A, B, f_ShaktoolDoneDigging Sets flags: f_ShaktoolDoneDigging |
|

The Snails will dig through the sand without showing any visual difference. Each block they pass through gets closer to overloading PLMs. In order to Power Bomb the left wall before PLMs are overloaded, it is necessary to only allow one snail to dig, either by bombing one or by facing one to prevent movement until it is off screen. If using mobile G-mode, it is easiest to get past the bottom one and prevent it from digging. If using immobile G-mode, it is easiest to have whichever one hits Samus go off screen. It is important to place the Power Bomb while as far right as possible to ensure that PLMs have not been overloaded before breaking the wall, or, wait until the snail has fully overloaded PLMs and dug a small place where Samus can unmorph against the wall to place the Power Bomb before quickly unmorphing and exiting G-mode. The green stone changes one tile earlier than the wall, and can be used as a visual cue to place the Power Bomb. Note that the Snails will not dig while off screen or while Samus is facing them, even while she is morphed. Entrance condition: {
"comeInWithGMode": {
"mode": "any",
"morphed": true
}
}Requires: {
"notable": "Reverse G-Mode Morph"
}
"canComplexGMode"
{
"or": [
{
"and": [
"Gravity",
"h_artificialMorphIBJ"
]
},
"h_artificialMorphSpringBall"
]
}
"h_artificialMorphPowerBomb"Clears obstacles: A, B, f_ShaktoolDoneDigging Sets flags: f_ShaktoolDoneDigging |
|
Enter the room in direct G-mode, and land on the doorsill while artificially morphed. Use a bomb to boost over the the left runway, or land on a snail and bomb off of it while the water is low. If entering in immobile, it is important to avoid being pulled through the floor and into the water by the snail. The Snails will dig through the sand without showing any visual difference. Each block they pass through gets closer to overloading PLMs. In order to Power Bomb the left wall before PLMs are overloaded, it is necessary to only allow one snail to dig, either by bombing one or by facing one to prevent movement until it is off screen. It is important to place the Power Bomb while as far right as possible to ensure that PLMs have not been overloaded before breaking the wall, or, wait until the snail has fully overloaded PLMs and dug a small place where Samus can unmorph against the wall to place the Power Bomb before quickly unmorphing and exiting G-mode. The green stone changes one tile earlier than the wall, and can be used as a visual cue to place the Power Bomb. Note that the Snails will not dig while off screen or while Samus is facing them, even while she is morphed. Entrance condition: {
"comeInWithGMode": {
"mode": "direct",
"morphed": true
}
}Requires: {
"notable": "Reverse G-Mode Morph"
}
"canComplexGMode"
"h_artificialMorphIBJ"
"h_artificialMorphPowerBomb"Clears obstacles: A, B, f_ShaktoolDoneDigging Sets flags: f_ShaktoolDoneDigging |
|
Entrance condition: {
"comeInWithGrappleTeleport": {
"blockPositions": [
[
5,
3
],
[
7,
2
]
]
}
}Requires: "h_ShaktoolVanillaFlag" Dev note: With the vanilla game behavior, grapple teleporting here does not set the flag 'f_ShaktoolDoneDigging', as Samus does not spend a frame on the right side of the room. |
|
Entrance condition: {
"comeInWithGrappleTeleport": {
"blockPositions": [
[
5,
3
],
[
7,
2
]
]
}
}Requires: "h_ShaktoolSymmetricFlag" Clears obstacles: f_ShaktoolDoneDigging Sets flags: f_ShaktoolDoneDigging Dev note: Grapple teleporting crosses the room, so it will set the flag 'f_ShaktoolDoneDigging', assuming that the game is modified to treat the room symmetrically with how the flag gets set. |
From: 2
Right Door
To: 1
Left Door
Entrance condition: {
"comeInWithGrappleTeleport": {
"blockPositions": [
[
3,
12
],
[
3,
13
]
]
}
}Requires: "h_ShaktoolVanillaFlag" Bypasses door shell: true Dev note: With the vanilla game behavior, grapple teleporting here does not set the flag 'f_ShaktoolDoneDigging', as Samus does not spend a frame on the right side of the room. |
From: 2
Right Door
To: 1
Left Door
Entrance condition: {
"comeInWithGrappleTeleport": {
"blockPositions": [
[
3,
12
],
[
3,
13
]
]
}
}Requires: "h_ShaktoolSymmetricFlag" Clears obstacles: f_ShaktoolDoneDigging Sets flags: f_ShaktoolDoneDigging Bypasses door shell: true Dev note: Grapple teleporting crosses the room, so it will set the flag 'f_ShaktoolDoneDigging', assuming that the game is modified to treat the room symmetrically with how the flag gets set. |
From: 2
Right Door
To: 1
Left Door
Entrance condition: {
"comeInWithGrappleTeleport": {
"blockPositions": [
[
3,
12
]
]
}
}Requires: "h_ShaktoolVanillaFlag" Exit condition: {
"leaveWithGrappleTeleport": {
"blockPositions": [
[
3,
12
]
]
}
}Bypasses door shell: true Dev note: With the vanilla game behavior, grapple teleporting here does not set the flag 'f_ShaktoolDoneDigging', as Samus does not spend a frame on the right side of the room. |
From: 2
Right Door
To: 1
Left Door
Entrance condition: {
"comeInWithGrappleTeleport": {
"blockPositions": [
[
3,
12
]
]
}
}Requires: "h_ShaktoolSymmetricFlag" Exit condition: {
"leaveWithGrappleTeleport": {
"blockPositions": [
[
3,
12
]
]
}
}Clears obstacles: f_ShaktoolDoneDigging Sets flags: f_ShaktoolDoneDigging Bypasses door shell: true Dev note: Grapple teleporting crosses the room, so it will set the flag 'f_ShaktoolDoneDigging', assuming that the game is modified to treat the room symmetrically with how the flag gets set. |
From: 2
Right Door
To: 1
Left Door
Entrance condition: {
"comeInWithGrappleTeleport": {
"blockPositions": [
[
3,
13
]
]
}
}Requires: "h_ShaktoolVanillaFlag" Exit condition: {
"leaveWithGrappleTeleport": {
"blockPositions": [
[
3,
13
]
]
}
}Bypasses door shell: true Dev note: With the vanilla game behavior, grapple teleporting here does not set the flag 'f_ShaktoolDoneDigging', as Samus does not spend a frame on the right side of the room. |
From: 2
Right Door
To: 1
Left Door
Entrance condition: {
"comeInWithGrappleTeleport": {
"blockPositions": [
[
3,
13
]
]
}
}Requires: "h_ShaktoolSymmetricFlag" Exit condition: {
"leaveWithGrappleTeleport": {
"blockPositions": [
[
3,
13
]
]
}
}Clears obstacles: f_ShaktoolDoneDigging Sets flags: f_ShaktoolDoneDigging Bypasses door shell: true Dev note: Grapple teleporting crosses the room, so it will set the flag 'f_ShaktoolDoneDigging', assuming that the game is modified to treat the room symmetrically with how the flag gets set. |
|
Entrance condition: {
"comeInWithRMode": {}
}Clears obstacles: R-Mode |
|
Entrance condition: {
"comeInWithRMode": {}
}Requires: {
"or": [
"f_ShaktoolDoneDigging",
{
"obstaclesCleared": [
"f_ShaktoolDoneDigging"
]
}
]
}Clears obstacles: A, B, R-Mode Dev note: Entering the room with the flag 'f_ShaktoolDoneDigging' set means that the sand blocks and Power Bomb blocks will not spawn. |
|


From left side, Wait for Shaktool to loop around to the ceiling. Crystal Flash, shinecharge, and jump into the path of Shaktool's rear wheel to interrupt. Or, farm Shaktool with a timed Shinespark: start a diagonal spark from the ground just as Shaktool's back wheel leaves the ceiling, and Shaktool will spawn five drops. Shinecharge again, and use a Yard to interrupt. If Samus came in from the right and can't free Shaktool, there are only the two Yards to work with. Kill a Yard by angering with a shot and then running through it with speed. Requires: {
"obstaclesCleared": [
"R-Mode",
"B"
]
}
{
"or": [
"h_CrystalFlashForReserveEnergy",
{
"and": [
"h_RModeCanRefillReserves",
{
"or": [
{
"and": [
{
"obstaclesCleared": [
"A"
]
},
"h_shinechargeMaxRunway",
{
"shinespark": {
"frames": 4,
"excessFrames": 0
}
},
{
"or": [
{
"and": [
{
"resourceMissingAtMost": [
{
"type": "Missile",
"count": 0
}
]
},
{
"partialRefill": {
"type": "ReserveEnergy",
"limit": 60
}
}
]
},
{
"partialRefill": {
"type": "ReserveEnergy",
"limit": 20
}
}
]
}
]
},
{
"partialRefill": {
"type": "ReserveEnergy",
"limit": 10
}
},
{
"and": [
"canBeLucky",
{
"partialRefill": {
"type": "ReserveEnergy",
"limit": 25
}
}
]
}
]
}
]
}
]
}
"h_shinechargeMaxRunway"
{
"or": [
"canWaterShineCharge",
"Gravity"
]
}
{
"autoReserveTrigger": {}
}
"canRModeSparkInterrupt"Resets obstacles: R-Mode |
|
Entrance condition: {
"comeInNormally": {}
}Requires: {
"or": [
"f_ShaktoolDoneDigging",
{
"obstaclesCleared": [
"f_ShaktoolDoneDigging"
]
}
]
}Clears obstacles: A, B Dev note: Entering the room with the flag 'f_ShaktoolDoneDigging' set means that the sand blocks and Power Bomb blocks will not spawn. |
|
Bounce the snails around the room in order to destroy the sand blocks, opening up the runway. A snail can be made to bounce in 3 ways: shooting it off a wall or ceiling, kicking it on the ground, or touching it while it is already bouncing. Kicking a snail involves running or jumping into it with a non-zero amount of run speed. A snail can be kicked from any direction when in its initial (not angered) state or when it is stunned for a moment after being shot. While a snail is angered and is moving quickly, it can only safely be kicked from a certain side: from behind if on the ground, or head-on if on the ceiling (and not at all while on a wall). If Morph is unavailable, be careful not to let the snails go off-camera, and avoid getting stuck in two-tile-high spaces. If a snail is on the ground and still on camera, it can be forced to move toward Samus again by shooting it; let it wrap around the right side of the room onto the ceiling, where it can be shot to cause it to fall and continue destroying sand blocks. Requires: {
"notable": "Bounce the Snails Around the Room"
}
"h_ShaktoolCameraFix"
"canDodgeWhileShooting"
"canTrickyJump"
"Gravity"
{
"noBlueSuit": {}
}Clears obstacles: B |
From: 2
Right Door
To: 2
Right Door
Bounce the snails around the room in order to destroy the sand blocks, opening up the runway. Without Gravity, this requires greater caution as the water will slow Samus down and increase the risk of taking damage from a snail. A snail can be made to bounce in 3 ways: shooting it off a wall or ceiling, kicking it on the ground, or touching it while it is already bouncing. Kicking a snail involves running or jumping into it with a non-zero amount of run speed, gained by dashing for at least one frame while in air physics. A snail can be kicked from any direction when in its initial (not angered) state or when it is stunned for a moment after being shot. While a snail is angered and is moving quickly, it can only safely be kicked from a certain side: from behind if on the ground, or head-on if on the ceiling (and not at all while on a wall). If Morph is unavailable, be careful not to let the snails go off-camera, and avoid getting stuck in two-tile-high spaces. If a snail is on the ground and still on camera, it can be forced to move toward Samus again by shooting it; let it wrap around the right side of the room onto the ceiling, where it can be shot to cause it to fall and continue destroying sand blocks. Requires: {
"notable": "Suitless Bounce the Snails Around the Room"
}
"canDodgeWhileShooting"
"canTrickyJump"
{
"or": [
"canBePatient",
"canInsaneJump",
{
"enemyDamage": {
"enemy": "Yard",
"type": "contact",
"hits": 1
}
}
]
}
{
"noBlueSuit": {}
}Clears obstacles: B |
|
Exit condition: {
"leaveWithRunway": {
"length": 1,
"openEnd": 1
}
} |
|


Requires: "Gravity" Exit condition: {
"leaveWithSidePlatform": {
"height": 2,
"runway": {
"length": 8,
"openEnd": 0
},
"obstruction": [
1,
0
]
}
}Dev note: Max extra run speed $1.F |
|
Requires: {
"obstaclesCleared": [
"B"
]
}
"canShinechargeMovement"
"canWaterShineCharge"
{
"canShineCharge": {
"usedTiles": 35,
"openEnd": 2
}
}
{
"shineChargeFrames": 80
}Exit condition: {
"leaveShinecharged": {}
}Dev note: This runway could be longer with precise timing or a stutter, but it seems unnecessary at this difficulty. |
|
Requires: {
"obstaclesCleared": [
"B"
]
}
"canShinechargeMovement"
"Gravity"
{
"canShineCharge": {
"usedTiles": 42,
"openEnd": 2
}
}
{
"shineChargeFrames": 45
}Exit condition: {
"leaveShinecharged": {}
} |
|
Requires: {
"or": [
"h_ShaktoolCameraFix",
{
  "or": [
    "f_ShaktoolDoneDigging",
    {
      "obstaclesCleared": [
        "f_ShaktoolDoneDigging"
      ]
    }
  ]
}
]
}
{
"or": [
"h_useMorphBombs",
{
"haveBlueSuit": {}
}
]
}
"canDodgeWhileShooting"
{
"or": [
{
"and": [
{
"resetRoom": {
"nodes": [
2
]
}
},
{
"or": [
{
"and": [
"canSuitlessMaridia",
{
"cycleFrames": 350
}
]
},
{
"and": [
"Gravity",
{
"cycleFrames": 280
}
]
}
]
}
]
},
{
"and": [
{
"or": [
"f_ShaktoolDoneDigging",
{
"obstaclesCleared": [
"f_ShaktoolDoneDigging"
]
}
]
},
{
"resetRoom": {
"nodes": [
1
]
}
},
{
"or": [
{
"and": [
"canSuitlessMaridia",
"canTrickyDodgeEnemies",
{
"cycleFrames": 1150
}
]
},
{
"and": [
"Gravity",
{
"cycleFrames": 770
}
]
}
]
}
]
}
]
}Resets obstacles: A, B, R-Mode Farm cycle drops: 2 Yard |
|
Requires: {
"obstaclesNotCleared": [
"R-Mode"
]
}
"h_CrystalFlash" |
|

Requires: {
"obstaclesCleared": [
"A",
"B"
]
}Exit condition: {
"leaveWithGModeSetup": {}
} |
|
Shoot a Snail to make it chase Samus. Requires: "h_ShaktoolCameraFix" Exit condition: {
"leaveWithGModeSetup": {}
} |
|
Wait for Shaktool. If Shaktool's camera is fixed it is possible without Shaktool, by using a Snail (Yard): a Super or any SBA can trigger a Yard to attack. Requires: {
"enemyDamage": {
"enemy": "Shaktool",
"type": "contact",
"hits": 1
}
}
{
"or": [
"f_ShaktoolDoneDigging",
{
"obstaclesCleared": [
"f_ShaktoolDoneDigging"
]
}
]
} |
From: 2
Right Door
To: 2
Right Door
If Shaktool's camera is fixed it is possible to regain mobility by using a Snail (Yard): a Super or any SBA can trigger a Yard to attack. Requires: {
"enemyDamage": {
"enemy": "Yard",
"type": "contact",
"hits": 1
}
}
"h_ShaktoolCameraFix"
{
"or": [
{
"ammo": {
"type": "Super",
"count": 1
}
},
{
"and": [
"canTrickyGMode",
"canSpecialBeamAttack",
{
"ammo": {
"type": "PowerBomb",
"count": 1
}
}
]
}
]
} |
|
In the vanilla game, if the flag is not already set, entering from the right door immediately sets the flag, though the room must be reset for it to take effect. Resetting the room also fixes the camera, which gets broken in this state. Requires: "h_ShaktoolVanillaFlag" Exit condition: {
"leaveNormally": {}
}Clears obstacles: f_ShaktoolDoneDigging Sets flags: f_ShaktoolDoneDigging |
|


This requires a precisely timed Crystal Flash, such that Shaktool hits Samus immediately after she gets Reserve Energy, to prevent getting double hit. With a second Reserve Tank and an Energy Tank, or the damage reduction from a suit, Samus is able to survive a second hit. Entrance condition: {
"comeInWithRMode": {}
}Requires: {
"or": [
"f_ShaktoolDoneDigging",
{
"obstaclesCleared": [
"f_ShaktoolDoneDigging"
]
}
]
}
"canRModeCrystalFlashInterrupt"
{
  "or": [
    {
      "and": [
        {
          "ammo": {
            "type": "Missile",
            "count": 10
          }
        },
        {
          "or": [
            "h_partialEnemyDamageReduction",
            {
              "and": [
                {
                  "resourceCapacity": [
                    {
                      "type": "RegularEnergy",
                      "count": 199
                    }
                  ]
                },
                {
                  "resourceCapacity": [
                    {
                      "type": "ReserveEnergy",
                      "count": 199
                    }
                  ]
                }
              ]
            }
          ]
        }
      ]
    },
    {
      "and": [
        {
          "ammo": {
            "type": "Missile",
            "count": 2
          }
        },
        "canComplexRModeCrystalFlashInterrupt"
      ]
    }
  ]
} |
From: 2
Right Door
To: 2
Right Door

This requires a precisely timed Crystal Flash, such that Shaktool hits Samus immediately after she gets Reserve Energy, to prevent getting double hit. With a second Reserve Tank and an Energy Tank, or the damage reduction from a suit, Samus is able to survive a second hit. Entrance condition: {
"comeInWithGMode": {
"mode": "direct",
"morphed": true
}
}Requires: {
"or": [
"f_ShaktoolDoneDigging",
{
"obstaclesCleared": [
"f_ShaktoolDoneDigging"
]
}
]
}
"h_artificialMorphRModeCrystalFlashInterrupt"
{
"or": [
{
"and": [
{
"ammo": {
"type": "Missile",
"count": 10
}
},
{
"or": [
"h_partialEnemyDamageReduction",
{
"and": [
{
"resourceCapacity": [
{
"type": "RegularEnergy",
"count": 199
}
]
},
{
"resourceCapacity": [
{
"type": "ReserveEnergy",
"count": 199
}
]
}
]
}
]
}
]
},
{
"and": [
{
"ammo": {
"type": "Missile",
"count": 2
}
},
"h_artificialMorphComplexRModeCrystalFlashInterrupt"
]
}
]
} |
{
"$schema": "../../../schema/m3-room.schema.json",
"id": 222,
"name": "Shaktool Room",
"area": "Maridia",
"subarea": "Inner",
"subsubarea": "Green",
"roomAddress": "0x7D8C5",
"roomEnvironments": [
{
"heated": false
}
],
"mapTileMask": [
[
1,
1,
1,
1
]
],
"nodes": [
{
"id": 1,
"name": "Left Door",
"nodeType": "door",
"nodeSubType": "blue",
"nodeAddress": "0x001a8c4",
"doorOrientation": "left",
"doorEnvironments": [
{
"physics": "air"
}
],
"mapTileMask": [
[
2,
1,
1,
1
]
]
},
{
"id": 2,
"name": "Right Door",
"nodeType": "door",
"nodeSubType": "blue",
"nodeAddress": "0x001a8d0",
"doorOrientation": "right",
"doorEnvironments": [
{
"physics": "air"
}
],
"mapTileMask": [
[
1,
2,
2,
2
]
]
}
],
"obstacles": [
{
"id": "A",
"name": "Power Bomb Blocks",
"obstacleType": "inanimate"
},
{
"id": "B",
"name": "Sand Blocks",
"obstacleType": "inanimate",
"note": "Cleared by having the sand blocks be fully destroyed by Shaktool or snails"
},
{
"id": "R-Mode",
"name": "Entered with R-Mode",
"obstacleType": "abstract"
},
{
"id": "f_ShaktoolDoneDigging",
"name": "f_ShaktoolDoneDigging"
}
],
"enemies": [
{
"id": "e1",
"groupName": "Shaktool",
"enemyName": "Shaktool",
"quantity": 1,
"homeNodes": [
1
]
},
{
"id": "e2",
"groupName": "Shaktool Room Yards",
"enemyName": "Yard",
"quantity": 2,
"homeNodes": [
2
]
}
],
"strats": [
{
"link": [
1,
1
],
"name": "Base (Unlock Door)",
"requires": [],
"unlocksDoors": [
{
"types": [
"ammo"
],
"requires": []
}
],
"flashSuitChecked": true,
"blueSuitChecked": true
},
{
"link": [
1,
1
],
"name": "Base (Come In Normally)",
"entranceCondition": {
"comeInNormally": {}
},
"requires": [],
"flashSuitChecked": true,
"blueSuitChecked": true
},
{
"link": [
1,
1
],
"name": "Base (Come In With Mockball)",
"entranceCondition": {
"comeInWithMockball": {
"adjacentMinTiles": 0,
"remoteAndLandingMinTiles": [
[
0,
0
]
],
"speedBooster": "any"
}
},
"requires": [],
"flashSuitChecked": true,
"blueSuitChecked": true
},
{
"link": [
2,
2
],
"name": "Base (Unlock Door)",
"requires": [],
"unlocksDoors": [
{
"types": [
"ammo"
],
"requires": []
}
],
"flashSuitChecked": true,
"blueSuitChecked": true
},
{
"link": [
2,
2
],
"name": "Base (Come In Normally)",
"entranceCondition": {
"comeInNormally": {}
},
"requires": [],
"flashSuitChecked": true,
"blueSuitChecked": true
},
{
"link": [
2,
2
],
"name": "Base (Come In With Mockball)",
"entranceCondition": {
"comeInWithMockball": {
"adjacentMinTiles": 0,
"remoteAndLandingMinTiles": [
[
0,
0
]
],
"speedBooster": "any"
}
},
"requires": [],
"flashSuitChecked": true,
"blueSuitChecked": true
},
{
"id": 42,
"link": [
1,
1
],
"name": "R-Mode Entry - Shaktool Done Digging",
"entranceCondition": {
"comeInWithRMode": {}
},
"requires": [
{
"or": [
"f_ShaktoolDoneDigging",
{
"obstaclesCleared": [
"f_ShaktoolDoneDigging"
]
}
]
}
],
"clearsObstacles": [
"A",
"B",
"R-Mode"
],
"flashSuitChecked": true,
"blueSuitChecked": true,
"devNote": "Entering the room with the flag 'f_ShaktoolDoneDigging' set means that the sand blocks and Power Bomb blocks will not spawn."
},
{
"id": 1,
"link": [
1,
1
],
"name": "Come In With Shaktool Done Digging",
"entranceCondition": {
"comeInNormally": {}
},
"requires": [
{
"or": [
"f_ShaktoolDoneDigging",
{
"obstaclesCleared": [
"f_ShaktoolDoneDigging"
]
}
]
}
],
"clearsObstacles": [
"A",
"B"
],
"flashSuitChecked": true,
"blueSuitChecked": true,
"devNote": "Entering the room with the flag 'f_ShaktoolDoneDigging' set means that the sand blocks and Power Bomb blocks will not spawn."
},
{
"id": 2,
"link": [
1,
1
],
"name": "Leave with Runway",
"requires": [],
"exitCondition": {
"leaveWithRunway": {
"length": 1,
"openEnd": 1
}
},
"flashSuitChecked": true,
"blueSuitChecked": true
},
{
"id": 32,
"link": [
1,
1
],
"name": "Leave With Side Platform",
"requires": [
"Gravity"
],
"exitCondition": {
"leaveWithSidePlatform": {
"height": 2,
"runway": {
"length": 10,
"openEnd": 0
},
"obstruction": [
1,
0
]
}
},
"flashSuitChecked": true,
"blueSuitChecked": true,
"devNote": "Max extra run speed $2.5"
},
{
"id": 3,
"link": [
1,
1
],
"name": "Leave Shinecharged (Suitless)",
"requires": [
{
"obstaclesCleared": [
"A",
"B"
]
},
"canShinechargeMovement",
"canWaterShineCharge",
{
"canShineCharge": {
"usedTiles": 35,
"openEnd": 2
}
},
{
"shineChargeFrames": 90
}
],
"exitCondition": {
"leaveShinecharged": {}
},
"flashSuitChecked": true,
"blueSuitChecked": true,
"devNote": "This runway could be longer with precise timing or a stutter, but it seems unnecessary at this difficulty."
},
{
"id": 4,
"link": [
1,
1
],
"name": "Leave Shinecharged (Gravity)",
"requires": [
{
"obstaclesCleared": [
"A",
"B"
]
},
"canShinechargeMovement",
"Gravity",
{
"canShineCharge": {
"usedTiles": 42,
"openEnd": 2
}
},
{
"shineChargeFrames": 55
}
],
"exitCondition": {
"leaveShinecharged": {}
},
"flashSuitChecked": true,
"blueSuitChecked": true
},
{
"id": 36,
"link": [
1,
1
],
"name": "Shaktool Farm",
"requires": [
{
"or": [
{
"resetRoom": {
"nodes": [
1
]
}
},
{
"and": [
{
"or": [
"f_ShaktoolDoneDigging",
{
"obstaclesCleared": [
"f_ShaktoolDoneDigging"
]
}
]
},
{
"resetRoom": {
"nodes": [
2
]
}
},
{
"or": [
{
"and": [
"Gravity",
"canDash",
{
"cycleFrames": 290
}
]
},
{
"and": [
"canSuitlessMaridia",
"canDash",
{
"cycleFrames": 350
}
]
},
{
"and": [
"Gravity",
{
"cycleFrames": 500
}
]
},
{
"and": [
"canSuitlessMaridia",
{
"cycleFrames": 560
}
]
}
]
}
]
}
]
},
{
"or": [
{
"and": [
"canSuitlessMaridia",
{
"or": [
{
"and": [
"Plasma",
{
"cycleFrames": 280
}
]
},
{
"and": [
"Wave",
{
"cycleFrames": 420
}
]
},
{
"and": [
"Spazer",
{
"cycleFrames": 420
}
]
},
{
"and": [
"Ice",
{
"cycleFrames": 450
}
]
},
{
"cycleFrames": 570
}
]
}
]
},
{
"and": [
"Gravity",
{
"or": [
{
"and": [
"Plasma",
{
"cycleFrames": 160
}
]
},
{
"and": [
"Wave",
{
"cycleFrames": 250
}
]
},
{
"and": [
"Spazer",
{
"cycleFrames": 330
}
]
},
{
"and": [
"Ice",
{
"cycleFrames": 350
}
]
},
{
"cycleFrames": 510
}
]
}
]
}
]
}
],
"resetsObstacles": [
"A",
"B",
"R-Mode"
],
"farmCycleDrops": [
{
"enemy": "Shaktool",
"count": 1
}
],
"flashSuitChecked": true,
"blueSuitChecked": true
},
{
"id": 5,
"link": [
1,
1
],
"name": "Crystal Flash",
"requires": [
{
"obstaclesNotCleared": [
"R-Mode"
]
},
"h_CrystalFlash"
],
"flashSuitChecked": true,
"blueSuitChecked": true
},
{
"id": 46,
"link": [
1,
1
],
"name": "Crystal Spark",
"requires": [
{
"obstaclesCleared": [
"A",
"B"
]
},
{
"or": [
"Gravity",
"canWaterShineCharge"
]
},
"h_shinechargeMaxRunway",
"h_CrystalSpark"
],
"flashSuitChecked": true,
"blueSuitChecked": true,
"note": "Time the shinecharge for when the water is low."
},
{
"id": 6,
"link": [
1,
1
],
"name": "G-Mode Setup - Get Hit By Shaktool or Yard",
"requires": [],
"exitCondition": {
"leaveWithGModeSetup": {}
},
"flashSuitChecked": true,
"blueSuitChecked": true,
"note": "If Shaktool is done digging, it is faster to use one of the snails from the right side of the room."
},
{
"id": 7,
"link": [
1,
1
],
"name": "G-Mode Regain Mobility",
"requires": [
{
"enemyDamage": {
"enemy": "Shaktool",
"type": "contact",
"hits": 1
}
},
{
"or": [
"canBePatient",
{
"and": [
"canRiskPermanentLossOfAccess",
{
"not": "f_ShaktoolDoneDigging"
}
]
}
]
}
],
"gModeRegainMobility": {},
"flashSuitChecked": true,
"blueSuitChecked": true,
"note": "This takes 1 min 40 sec if Shaktool is done digging."
},
{
"id": 38,
"link": [
1,
1
],
"name": "R-Mode Crystal Flash Interrupt",
"entranceCondition": {
"comeInWithRMode": {}
},
"requires": [
"canRModeCrystalFlashInterrupt",
{
"or": [
{
"and": [
{
"ammo": {
"type": "Missile",
"count": 10
}
},
{
"or": [
"h_partialEnemyDamageReduction",
{
"and": [
{
"resourceCapacity": [
{
"type": "RegularEnergy",
"count": 199
}
]
},
{
"resourceCapacity": [
{
"type": "ReserveEnergy",
"count": 199
}
]
}
]
}
]
}
]
},
{
"and": [
{
"ammo": {
"type": "Missile",
"count": 2
}
},
"canComplexRModeCrystalFlashInterrupt"
]
}
]
}
],
"flashSuitChecked": true,
"blueSuitChecked": true,
"note": [
"This requires a precisely timed Crystal Flash, such that Shaktool hits Samus immediately after she gets Reserve Energy, to prevent getting double hit.",
"With a second Reserve Tank and an Energy Tank, or the damage reduction from a suit, Samus is able to survive a second hit."
]
},
{
"id": 39,
"link": [
1,
1
],
"name": "Direct G-Mode Morph, Crystal Flash Interrupt",
"entranceCondition": {
"comeInWithGMode": {
"mode": "direct",
"morphed": true
}
},
"requires": [
"h_artificialMorphRModeCrystalFlashInterrupt",
{
"or": [
{
"and": [
{
"ammo": {
"type": "Missile",
"count": 10
}
},
{
"or": [
"h_partialEnemyDamageReduction",
{
"and": [
{
"resourceCapacity": [
{
"type": "RegularEnergy",
"count": 199
}
]
},
{
"resourceCapacity": [
{
"type": "ReserveEnergy",
"count": 199
}
]
}
]
}
]
}
]
},
{
"and": [
{
"ammo": {
"type": "Missile",
"count": 2
}
},
"h_artificialMorphComplexRModeCrystalFlashInterrupt"
]
}
]
},
{
"or": [
"h_artificialMorphSpringBall",
{
"and": [
{
"or": [
"canInsaneJump",
"Gravity"
]
},
{
"or": [
"h_artificialMorphBombs",
{
"ammo": {
"type": "PowerBomb",
"count": 2
}
}
]
}
]
},
"canBePatient",
{
"and": [
"canRiskPermanentLossOfAccess",
{
"not": "f_ShaktoolDoneDigging"
}
]
}
]
}
],
"flashSuitChecked": true,
"blueSuitChecked": true,
"note": [
"This requires a precisely timed Crystal Flash, such that Shaktool hits Samus immediately after she gets Reserve Energy, to prevent getting double hit.",
"With a second Reserve Tank and an Energy Tank, or the damage reduction from a suit, Samus is able to survive a second hit."
],
"detailNote": [
"If the wall is already broken, either wait for Shaktool to cross the room or move in front of it.",
"It is possible to enter the room and land on the doorsill, then bomb or Power Bomb boost across when the tide is high."
]
},
{
"id": 8,
"link": [
1,
2
],
"name": "Base",
"requires": [
{
  "or": [
    {
      "obstaclesCleared": [
        "A",
        "B"
      ]
    },
    "h_usePowerBomb"
  ]
}
],
"clearsObstacles": [
"A",
"B",
"f_ShaktoolDoneDigging"
],
"setsFlags": [
"f_ShaktoolDoneDigging"
],
"flashSuitChecked": true,
"blueSuitChecked": true
},
{
"id": 9,
"link": [
1,
2
],
"name": "G-Mode Morph Power Bomb",
"entranceCondition": {
"comeInWithGMode": {
"mode": "any",
"morphed": true
}
},
"requires": [
"h_artificialMorphPowerBomb"
],
"clearsObstacles": [
"A",
"B",
"f_ShaktoolDoneDigging"
],
"setsFlags": [
"f_ShaktoolDoneDigging"
],
"flashSuitChecked": true,
"blueSuitChecked": true
},
{
"id": 10,
"link": [
2,
1
],
"name": "Base",
"requires": [
{
  "obstaclesCleared": [
    "A",
    "B"
  ]
}
],
"flashSuitChecked": true,
"blueSuitChecked": true
},
{
"id": 11,
"link": [
2,
1
],
"name": "Reverse",
"requires": [
{
"notable": "Reverse"
},
"h_usePowerBomb"
],
"clearsObstacles": [
"A",
"B",
"f_ShaktoolDoneDigging"
],
"setsFlags": [
"f_ShaktoolDoneDigging"
],
"flashSuitChecked": true,
"blueSuitChecked": true,
"note": "Let the Snails (Yards) dig through the sand and follow them. They will not dig while off screen or while Samus is facing them, even while morphed."
},
{
"id": 12,
"link": [
2,
1
],
"name": "Reverse G-Mode Morph",
"entranceCondition": {
"comeInWithGMode": {
"mode": "any",
"morphed": true
}
},
"requires": [
{
"notable": "Reverse G-Mode Morph"
},
"canComplexGMode",
{
"or": [
{
"and": [
"Gravity",
"h_artificialMorphIBJ"
]
},
"h_artificialMorphSpringBall"
]
},
"h_artificialMorphPowerBomb"
],
"clearsObstacles": [
"A",
"B",
"f_ShaktoolDoneDigging"
],
"setsFlags": [
"f_ShaktoolDoneDigging"
],
"flashSuitChecked": true,
"blueSuitChecked": true,
"note": [
"The Snails will dig through the sand without showing any visual difference. Each block they pass through gets closer to overloading PLMs.",
"In order to Power Bomb the left wall before PLMs are overloaded, it is necessary to only allow one snail to dig, either by bombing one or by facing one to prevent movement until it is off screen.",
"If using mobile G-mode, it is easiest to get past the bottom one and prevent it from digging. If using immobile G-mode, it is easiest to have whichever one hits Samus go off screen.",
"It is important to place the Power Bomb while as far right as possible to ensure that PLMs have not been overloaded before breaking the wall,",
"or, wait until the snail has fully overloaded PLMs and dug a small place where Samus can unmorph against the wall to place the Power Bomb before quickly unmorphing and exiting G-mode.",
"The green stone changes one tile earlier than the wall, and can be used as a visual cue to place the Power Bomb.",
"Note that the Snails will not dig while off screen or while Samus is facing them, even while she is morphed."
]
},
{
"id": 34,
"link": [
2,
1
],
"name": "Reverse G-Mode Morph, Direct",
"entranceCondition": {
"comeInWithGMode": {
"mode": "direct",
"morphed": true
}
},
"requires": [
{
"notable": "Reverse G-Mode Morph"
},
"canComplexGMode",
"h_artificialMorphIBJ",
"h_artificialMorphPowerBomb"
],
"clearsObstacles": [
"A",
"B",
"f_ShaktoolDoneDigging"
],
"setsFlags": [
"f_ShaktoolDoneDigging"
],
"flashSuitChecked": true,
"blueSuitChecked": true,
"note": [
"Enter the room in direct G-mode, and land on the doorsill while artificially morphed. Use a bomb to boost over the the left runway, or land on a snail and bomb off of it while the water is low.",
"If entering in immobile, it is important to avoid being pulled through the floor and into the water by the snail.",
"The Snails will dig through the sand without showing any visual difference. Each block they pass through gets closer to overloading PLMs.",
"In order to Power Bomb the left wall before PLMs are overloaded, it is necessary to only allow one snail to dig, either by bombing one or by facing one to prevent movement until it is off screen.",
"It is important to place the Power Bomb while as far right as possible to ensure that PLMs have not been overloaded before breaking the wall,",
"or, wait until the snail has fully overloaded PLMs and dug a small place where Samus can unmorph against the wall to place the Power Bomb before quickly unmorphing and exiting G-mode.",
"The green stone changes one tile earlier than the wall, and can be used as a visual cue to place the Power Bomb.",
"Note that the Snails will not dig while off screen or while Samus is facing them, even while she is morphed."
]
},
{
"id": 13,
"link": [
2,
1
],
"name": "Grapple Teleport (Vanilla)",
"entranceCondition": {
"comeInWithGrappleTeleport": {
"blockPositions": [
[
5,
3
],
[
7,
2
]
]
}
},
"requires": [
"h_ShaktoolVanillaFlag"
],
"flashSuitChecked": true,
"blueSuitChecked": true,
"devNote": [
"With the vanilla game behavior, grapple teleporting here does not set the flag 'f_ShaktoolDoneDigging', as Samus does not spend a frame on the right side of the room."
]
},
{
"id": 14,
"link": [
2,
1
],
"name": "Grapple Teleport (Symmetric)",
"entranceCondition": {
"comeInWithGrappleTeleport": {
"blockPositions": [
[
5,
3
],
[
7,
2
]
]
}
},
"requires": [
"h_ShaktoolSymmetricFlag"
],
"setsFlags": [
"f_ShaktoolDoneDigging"
],
"flashSuitChecked": true,
"blueSuitChecked": true,
"devNote": [
"Grapple teleporting crosses the room, so it will set the flag 'f_ShaktoolDoneDigging', assuming that the game is modified to treat the room symmetrically with how the flag gets set."
],
"clearsObstacles": [
"f_ShaktoolDoneDigging"
]
},
{
"id": 15,
"link": [
2,
1
],
"name": "Grapple Teleport Door Lock Skip (Vanilla)",
"entranceCondition": {
"comeInWithGrappleTeleport": {
"blockPositions": [
[
3,
12
],
[
3,
13
]
]
}
},
"requires": [
"h_ShaktoolVanillaFlag"
],
"bypassesDoorShell": "yes",
"flashSuitChecked": true,
"blueSuitChecked": true,
"devNote": [
"With the vanilla game behavior, grapple teleporting here does not set the flag 'f_ShaktoolDoneDigging', as Samus does not spend a frame on the right side of the room."
]
},
{
"id": 16,
"link": [
2,
1
],
"name": "Grapple Teleport Door Lock Skip (Symmetric)",
"entranceCondition": {
"comeInWithGrappleTeleport": {
"blockPositions": [
[
3,
12
],
[
3,
13
]
]
}
},
"requires": [
"h_ShaktoolSymmetricFlag"
],
"bypassesDoorShell": "yes",
"setsFlags": [
"f_ShaktoolDoneDigging"
],
"flashSuitChecked": true,
"blueSuitChecked": true,
"devNote": [
"Grapple teleporting crosses the room, so it will set the flag 'f_ShaktoolDoneDigging', assuming that the game is modified to treat the room symmetrically with how the flag gets set."
],
"clearsObstacles": [
"f_ShaktoolDoneDigging"
]
},
{
"id": 17,
"link": [
2,
1
],
"name": "Carry Grapple Teleport (Top Position, Vanilla)",
"entranceCondition": {
"comeInWithGrappleTeleport": {
"blockPositions": [
[
3,
12
]
]
}
},
"requires": [
"h_ShaktoolVanillaFlag"
],
"exitCondition": {
"leaveWithGrappleTeleport": {
"blockPositions": [
[
3,
12
]
]
}
},
"bypassesDoorShell": "yes",
"flashSuitChecked": true,
"blueSuitChecked": true,
"devNote": [
"With the vanilla game behavior, grapple teleporting here does not set the flag 'f_ShaktoolDoneDigging', as Samus does not spend a frame on the right side of the room."
]
},
{
"id": 18,
"link": [
2,
1
],
"name": "Carry Grapple Teleport (Top Position, Symmetric)",
"entranceCondition": {
"comeInWithGrappleTeleport": {
"blockPositions": [
[
3,
12
]
]
}
},
"requires": [
"h_ShaktoolSymmetricFlag"
],
"exitCondition": {
"leaveWithGrappleTeleport": {
"blockPositions": [
[
3,
12
]
]
}
},
"bypassesDoorShell": "yes",
"setsFlags": [
"f_ShaktoolDoneDigging"
],
"flashSuitChecked": true,
"blueSuitChecked": true,
"devNote": [
"Grapple teleporting crosses the room, so it will set the flag 'f_ShaktoolDoneDigging', assuming that the game is modified to treat the room symmetrically with how the flag gets set."
],
"clearsObstacles": [
"f_ShaktoolDoneDigging"
]
},
{
"id": 19,
"link": [
2,
1
],
"name": "Carry Grapple Teleport (Bottom Position, Vanilla)",
"entranceCondition": {
"comeInWithGrappleTeleport": {
"blockPositions": [
[
3,
13
]
]
}
},
"requires": [
"h_ShaktoolVanillaFlag"
],
"exitCondition": {
"leaveWithGrappleTeleport": {
"blockPositions": [
[
3,
13
]
]
}
},
"bypassesDoorShell": "yes",
"flashSuitChecked": true,
"blueSuitChecked": true,
"devNote": [
"With the vanilla game behavior, grapple teleporting here does not set the flag 'f_ShaktoolDoneDigging', as Samus does not spend a frame on the right side of the room."
]
},
{
"id": 20,
"link": [
2,
1
],
"name": "Carry Grapple Teleport (Bottom Position, Symmetric)",
"entranceCondition": {
"comeInWithGrappleTeleport": {
"blockPositions": [
[
3,
13
]
]
}
},
"requires": [
"h_ShaktoolSymmetricFlag"
],
"exitCondition": {
"leaveWithGrappleTeleport": {
"blockPositions": [
[
3,
13
]
]
}
},
"bypassesDoorShell": "yes",
"setsFlags": [
"f_ShaktoolDoneDigging"
],
"flashSuitChecked": true,
"blueSuitChecked": true,
"devNote": [
"Grapple teleporting crosses the room, so it will set the flag 'f_ShaktoolDoneDigging', assuming that the game is modified to treat the room symmetrically with how the flag gets set."
],
"clearsObstacles": [
"f_ShaktoolDoneDigging"
]
},
{
"id": 43,
"link": [
2,
2
],
"name": "R-Mode Entry",
"entranceCondition": {
"comeInWithRMode": {}
},
"requires": [],
"clearsObstacles": [
"R-Mode"
],
"flashSuitChecked": true,
"blueSuitChecked": true
},
{
"id": 44,
"link": [
2,
2
],
"name": "R-Mode Entry - Shaktool Done Digging",
"entranceCondition": {
"comeInWithRMode": {}
},
"requires": [
{
  "or": [
    "f_ShaktoolDoneDigging",
    {
      "obstaclesCleared": [
        "f_ShaktoolDoneDigging"
      ]
    }
  ]
}
],
"clearsObstacles": [
"A",
"B",
"R-Mode"
],
"flashSuitChecked": true,
"blueSuitChecked": true,
"devNote": "Entering the room with the flag 'f_ShaktoolDoneDigging' set means that the sand blocks and Power Bomb blocks will not spawn."
},
{
"id": 45,
"link": [
2,
2
],
"name": "R-Mode Spark Interrupt",
"requires": [
{
"obstaclesCleared": [
"R-Mode",
"B"
]
},
{
"or": [
"h_CrystalFlashForReserveEnergy",
{
"and": [
"h_RModeCanRefillReserves",
{
"or": [
{
"and": [
{
"obstaclesCleared": [
"A"
]
},
"h_shinechargeMaxRunway",
{
"shinespark": {
"frames": 4,
"excessFrames": 0
}
},
{
"or": [
{
"and": [
{
"resourceMissingAtMost": [
{
"type": "Missile",
"count": 0
}
]
},
{
"partialRefill": {
"type": "ReserveEnergy",
"limit": 60
}
}
]
},
{
"partialRefill": {
"type": "ReserveEnergy",
"limit": 20
}
}
]
}
]
},
{
"partialRefill": {
"type": "ReserveEnergy",
"limit": 10
}
},
{
"and": [
"canBeLucky",
{
"partialRefill": {
"type": "ReserveEnergy",
"limit": 25
}
}
]
}
]
}
]
}
]
},
"h_shinechargeMaxRunway",
{
"or": [
"canWaterShineCharge",
"Gravity"
]
},
{
"autoReserveTrigger": {}
},
"canRModeSparkInterrupt"
],
"resetsObstacles": [
"R-Mode"
],
"flashSuitChecked": true,
"blueSuitChecked": true,
"note": [
"From left side, Wait for Shaktool to loop around to the ceiling.",
"Crystal Flash, shinecharge, and jump into the path of Shaktool's rear",
"wheel to interrupt.",
"Or, farm Shaktool with a timed Shinespark: start a diagonal spark from the",
"ground just as Shaktool's back wheel leaves the ceiling, and Shaktool will spawn",
"five drops. Shinecharge again, and use a Yard to interrupt.",
"If Samus came in from the right and can't free Shaktool, there are only the two Yards",
"to work with. Kill a Yard by angering with a shot and then running through it with speed."
]
},
{
"id": 21,
"link": [
2,
2
],
"name": "Come In With Shaktool Done Digging",
"entranceCondition": {
"comeInNormally": {}
},
"requires": [
{
  "or": [
    "f_ShaktoolDoneDigging",
    {
      "obstaclesCleared": [
        "f_ShaktoolDoneDigging"
      ]
    }
  ]
}
],
"clearsObstacles": [
"A",
"B"
],
"flashSuitChecked": true,
"blueSuitChecked": true,
"devNote": "Entering the room with the flag 'f_ShaktoolDoneDigging' set means that the sand blocks and Power Bomb blocks will not spawn."
},
{
"id": 22,
"link": [
2,
2
],
"name": "Bounce the Snails Around the Room",
"requires": [
{
"notable": "Bounce the Snails Around the Room"
},
"h_ShaktoolCameraFix",
"canDodgeWhileShooting",
"canTrickyJump",
"Gravity",
{
"noBlueSuit": {}
}
],
"clearsObstacles": [
"B"
],
"flashSuitChecked": true,
"blueSuitChecked": true,
"note": [
"Bounce the snails around the room in order to destroy the sand blocks, opening up the runway.",
"A snail can be made to bounce in 3 ways: shooting it off a wall or ceiling, kicking it on the ground, or touching it while it is already bouncing.",
"Kicking a snail involves running or jumping into it with a non-zero amount of run speed.",
"A snail can be kicked from any direction when in its initial (not angered) state or when it is stunned for a moment after being shot.",
"While a snail is angered and is moving quickly, it can only safely be kicked from a certain side: from behind if on the ground, or head-on if on the ceiling (and not at all while on a wall).",
"If Morph is unavailable, be careful not to let the snails go off-camera, and avoid getting stuck in two-tile-high spaces.",
"If a snail is on the ground and still on camera, it can be forced to move toward Samus again by shooting it;",
"let it wrap around the right side of the room onto the ceiling, where it can be shot to cause it to fall and continue destroying sand blocks."
]
},
{
"id": 23,
"link": [
2,
2
],
"name": "Suitless Bounce the Snails Around the Room",
"requires": [
{
"notable": "Suitless Bounce the Snails Around the Room"
},
"canDodgeWhileShooting",
"canTrickyJump",
{
"or": [
"canBePatient",
"canInsaneJump",
{
"enemyDamage": {
"enemy": "Yard",
"type": "contact",
"hits": 1
}
}
]
},
{
"noBlueSuit": {}
}
],
"clearsObstacles": [
"B"
],
"flashSuitChecked": true,
"blueSuitChecked": true,
"note": [
"Bounce the snails around the room in order to destroy the sand blocks, opening up the runway.",
"Without Gravity, this requires greater caution as the water will slow Samus down and increase the risk of taking damage from a snail.",
"A snail can be made to bounce in 3 ways: shooting it off a wall or ceiling, kicking it on the ground, or touching it while it is already bouncing.",
"Kicking a snail involves running or jumping into it with a non-zero amount of run speed, gained by dashing for at least one frame while in air physics.",
"A snail can be kicked from any direction when in its initial (not angered) state or when it is stunned for a moment after being shot.",
"While a snail is angered and is moving quickly, it can only safely be kicked from a certain side: from behind if on the ground, or head-on if on the ceiling (and not at all while on a wall).",
"If Morph is unavailable, be careful not to let the snails go off-camera, and avoid getting stuck in two-tile-high spaces.",
"If a snail is on the ground and still on camera, it can be forced to move toward Samus again by shooting it;",
"let it wrap around the right side of the room onto the ceiling, where it can be shot to cause it to fall and continue destroying sand blocks."
]
},
{
"id": 24,
"link": [
2,
2
],
"name": "Leave with Runway",
"requires": [],
"exitCondition": {
"leaveWithRunway": {
"length": 1,
"openEnd": 1
}
},
"flashSuitChecked": true,
"blueSuitChecked": true
},
{
"id": 33,
"link": [
2,
2
],
"name": "Leave With Side Platform",
"requires": [
"Gravity"
],
"exitCondition": {
"leaveWithSidePlatform": {
"height": 2,
"runway": {
"length": 8,
"openEnd": 0
},
"obstruction": [
1,
0
]
}
},
"flashSuitChecked": true,
"blueSuitChecked": true,
"devNote": "Max extra run speed $1.F"
},
{
"id": 25,
"link": [
2,
2
],
"name": "Leave Shinecharged",
"requires": [
{
"obstaclesCleared": [
"B"
]
},
"canShinechargeMovement",
"canWaterShineCharge",
{
"canShineCharge": {
"usedTiles": 35,
"openEnd": 2
}
},
{
"shineChargeFrames": 80
}
],
"exitCondition": {
"leaveShinecharged": {}
},
"flashSuitChecked": true,
"blueSuitChecked": true,
"devNote": "This runway could be longer with precise timing or a stutter, but it seems unnecessary at this difficulty."
},
{
"id": 26,
"link": [
2,
2
],
"name": "Leave Shinecharged, Gravity",
"requires": [
{
"obstaclesCleared": [
"B"
]
},
"canShinechargeMovement",
"Gravity",
{
"canShineCharge": {
"usedTiles": 42,
"openEnd": 2
}
},
{
"shineChargeFrames": 45
}
],
"exitCondition": {
"leaveShinecharged": {}
},
"flashSuitChecked": true,
"blueSuitChecked": true
},
{
"id": 37,
"link": [
2,
2
],
"name": "Yard Farm",
"requires": [
{
"or": [
"h_ShaktoolCameraFix",
{
"or": [
"f_ShaktoolDoneDigging",
{
"obstaclesCleared": [
"f_ShaktoolDoneDigging"
]
}
]
}
]
},
{
"or": [
"h_useMorphBombs",
{
"haveBlueSuit": {}
}
]
},
"canDodgeWhileShooting",
{
"or": [
{
"and": [
{
"resetRoom": {
"nodes": [
2
]
}
},
{
"or": [
{
"and": [
"canSuitlessMaridia",
{
"cycleFrames": 350
}
]
},
{
"and": [
"Gravity",
{
"cycleFrames": 280
}
]
}
]
}
]
},
{
"and": [
{
"or": [
"f_ShaktoolDoneDigging",
{
"obstaclesCleared": [
"f_ShaktoolDoneDigging"
]
}
]
},
{
"resetRoom": {
"nodes": [
1
]
}
},
{
"or": [
{
"and": [
"canSuitlessMaridia",
"canTrickyDodgeEnemies",
{
"cycleFrames": 1150
}
]
},
{
"and": [
"Gravity",
{
"cycleFrames": 770
}
]
}
]
}
]
}
]
}
],
"resetsObstacles": [
"A",
"B",
"R-Mode"
],
"farmCycleDrops": [
{
"enemy": "Yard",
"count": 2
}
],
"flashSuitChecked": true,
"blueSuitChecked": true
},
{
"id": 27,
"link": [
2,
2
],
"name": "Crystal Flash",
"requires": [
{
"obstaclesNotCleared": [
"R-Mode"
]
},
"h_CrystalFlash"
],
"flashSuitChecked": true,
"blueSuitChecked": true
},
{
"id": 28,
"link": [
2,
2
],
"name": "G-Mode Setup - Get Hit By Shaktool",
"requires": [
{
  "obstaclesCleared": [
    "A",
    "B"
  ]
}
],
"exitCondition": {
"leaveWithGModeSetup": {}
},
"flashSuitChecked": true,
"blueSuitChecked": true
},
{
"id": 29,
"link": [
2,
2
],
"name": "G-Mode Setup - Get Hit By Yard (Snail)",
"requires": [
"h_ShaktoolCameraFix"
],
"exitCondition": {
"leaveWithGModeSetup": {}
},
"flashSuitChecked": true,
"blueSuitChecked": true,
"note": "Shoot a Snail to make it chase Samus."
},
{
"id": 30,
"link": [
2,
2
],
"name": "G-Mode Regain Mobility (Shaktool)",
"requires": [
{
"enemyDamage": {
"enemy": "Shaktool",
"type": "contact",
"hits": 1
}
},
{
"or": [
"f_ShaktoolDoneDigging",
{
"obstaclesCleared": [
"f_ShaktoolDoneDigging"
]
}
]
}
],
"gModeRegainMobility": {},
"flashSuitChecked": true,
"blueSuitChecked": true,
"note": "Wait for Shaktool. If Shaktool's camera is fixed it is possible without Shaktool, by using a Snail (Yard): a Super or any SBA can trigger a Yard to attack."
},
{
"id": 35,
"link": [
2,
2
],
"name": "G-Mode Regain Mobility (Yard, Camera Fixed)",
"requires": [
{
"enemyDamage": {
"enemy": "Yard",
"type": "contact",
"hits": 1
}
},
"h_ShaktoolCameraFix",
{
"or": [
{
"ammo": {
"type": "Super",
"count": 1
}
},
{
"and": [
"canTrickyGMode",
"canSpecialBeamAttack",
{
"ammo": {
"type": "PowerBomb",
"count": 1
}
}
]
}
]
}
],
"gModeRegainMobility": {},
"flashSuitChecked": true,
"blueSuitChecked": true,
"note": "If Shaktool's camera is fixed it is possible to regain mobility by using a Snail (Yard): a Super or any SBA can trigger a Yard to attack."
},
{
"id": 31,
"link": [
2,
2
],
"name": "Vanilla",
"requires": [
"h_ShaktoolVanillaFlag"
],
"exitCondition": {
"leaveNormally": {}
},
"setsFlags": [
"f_ShaktoolDoneDigging"
],
"flashSuitChecked": true,
"blueSuitChecked": true,
"note": [
"In the vanilla game, if the flag is not already set, entering from the right door immediately sets the flag, though the room must be reset for it to take effect.",
"Resetting the room also fixes the camera, which gets broken in this state."
],
"clearsObstacles": [
"f_ShaktoolDoneDigging"
]
},
{
"id": 40,
"link": [
2,
2
],
"name": "R-Mode Crystal Flash Interrupt",
"entranceCondition": {
"comeInWithRMode": {}
},
"requires": [
{
"or": [
"f_ShaktoolDoneDigging",
{
"obstaclesCleared": [
"f_ShaktoolDoneDigging"
]
}
]
},
"canRModeCrystalFlashInterrupt",
{
"or": [
{
"and": [
{
"ammo": {
"type": "Missile",
"count": 10
}
},
{
"or": [
"h_partialEnemyDamageReduction",
{
"and": [
{
"resourceCapacity": [
{
"type": "RegularEnergy",
"count": 199
}
]
},
{
"resourceCapacity": [
{
"type": "ReserveEnergy",
"count": 199
}
]
}
]
}
]
}
]
},
{
"and": [
{
"ammo": {
"type": "Missile",
"count": 2
}
},
"canComplexRModeCrystalFlashInterrupt"
]
}
]
}
],
"flashSuitChecked": true,
"blueSuitChecked": true,
"note": [
"This requires a precisely timed Crystal Flash, such that Shaktool hits Samus immediately after she gets Reserve Energy, to prevent getting double hit.",
"With a second Reserve Tank and an Energy Tank, or the damage reduction from a suit, Samus is able to survive a second hit."
]
},
{
"id": 41,
"link": [
2,
2
],
"name": "Direct G-Mode Morph, Crystal Flash Interrupt",
"entranceCondition": {
"comeInWithGMode": {
"mode": "direct",
"morphed": true
}
},
"requires": [
{
"or": [
"f_ShaktoolDoneDigging",
{
"obstaclesCleared": [
"f_ShaktoolDoneDigging"
]
}
]
},
"h_artificialMorphRModeCrystalFlashInterrupt",
{
"or": [
{
"and": [
{
"ammo": {
"type": "Missile",
"count": 10
}
},
{
"or": [
"h_partialEnemyDamageReduction",
{
"and": [
{
"resourceCapacity": [
{
"type": "RegularEnergy",
"count": 199
}
]
},
{
"resourceCapacity": [
{
"type": "ReserveEnergy",
"count": 199
}
]
}
]
}
]
}
]
},
{
"and": [
{
"ammo": {
"type": "Missile",
"count": 2
}
},
"h_artificialMorphComplexRModeCrystalFlashInterrupt"
]
}
]
}
],
"flashSuitChecked": true,
"blueSuitChecked": true,
"note": [
"This requires a precisely timed Crystal Flash, such that Shaktool hits Samus immediately after she gets Reserve Energy, to prevent getting double hit.",
"With a second Reserve Tank and an Energy Tank, or the damage reduction from a suit, Samus is able to survive a second hit."
]
}
],
"notables": [
{
"id": 1,
"name": "Reverse",
"note": "Let the Snails (Yards) dig through the sand and follow them. They will not dig while off screen or while Samus is facing them, even while morphed."
},
{
"id": 2,
"name": "Reverse G-Mode Morph",
"note": [
"The Snails will dig through the sand without showing any visual difference. Each block they pass through gets closer to overloading PLMs.",
"In order to Power Bomb the left wall before PLMs are overloaded, it is necessary to only allow one snail to dig, either by bombing one or by facing one to prevent movement until it is off screen.",
"If using mobile G-mode, it is easiest to get past the bottom one and prevent it from digging. If using immobile G-mode, it is easiest to have whichever one hits Samus go off screen.",
"It is important to place the Power Bomb while as far right as possible to ensure that PLMs have not been overloaded before breaking the wall,",
"or, wait until the snail has fully overloaded PLMs and dug a small place where Samus can unmorph against the wall to place the Power Bomb before quickly unmorphing and exiting G-mode.",
"The green stone changes one tile earlier than the wall, and can be used as a visual cue to place the Power Bomb.",
"Note that the Snails will not dig while off screen or while Samus is facing them, even while she is morphed."
]
},
{
"id": 3,
"name": "Bounce the Snails Around the Room",
"note": [
"Bounce the snails around the room in order to destroy the sand blocks, opening up the runway.",
"A snail can be made to bounce in 3 ways: shooting it off a wall or ceiling, kicking it on the ground, or touching it while it is already bouncing.",
"Kicking a snail involves running or jumping into it with a non-zero amount of run speed.",
"A snail can be kicked from any direction when in its initial (not angered) state or when it is stunned for a moment after being shot.",
"While a snail is angered and is moving quickly, it can only safely be kicked from a certain side: from behind if on the ground, or head-on if on the ceiling (and not at all while on a wall).",
"If Morph is unavailable, be careful not to let the snails go off-camera, and avoid getting stuck in two-tile-high spaces.",
"If a snail is on the ground and still on camera, it can be forced to move toward Samus again by shooting it;",
"let it wrap around the right side of the room onto the ceiling, where it can be shot to cause it to fall and continue destroying sand blocks."
]
},
{
"id": 4,
"name": "Suitless Bounce the Snails Around the Room",
"note": [
"Bounce the snails around the room in order to destroy the sand blocks, opening up the runway.",
"Without Gravity, this requires greater caution as the water will slow Samus down and increase the risk of taking damage from a snail.",
"A snail can be made to bounce in 3 ways: shooting it off a wall or ceiling, kicking it on the ground, or touching it while it is already bouncing.",
"Kicking a snail involves running or jumping into it with a non-zero amount of run speed, gained by dashing for at least one frame while in air physics.",
"A snail can be kicked from any direction when in its initial (not angered) state or when it is stunned for a moment after being shot.",
"While a snail is angered and is moving quickly, it can only safely be kicked from a certain side: from behind if on the ground, or head-on if on the ceiling (and not at all while on a wall).",
"If Morph is unavailable, be careful not to let the snails go off-camera, and avoid getting stuck in two-tile-high spaces.",
"If a snail is on the ground and still on camera, it can be forced to move toward Samus again by shooting it;",
"let it wrap around the right side of the room onto the ceiling, where it can be shot to cause it to fall and continue destroying sand blocks."
]
}
],
"nextStratId": 47,
"nextNotableId": 5
}