Wasteland
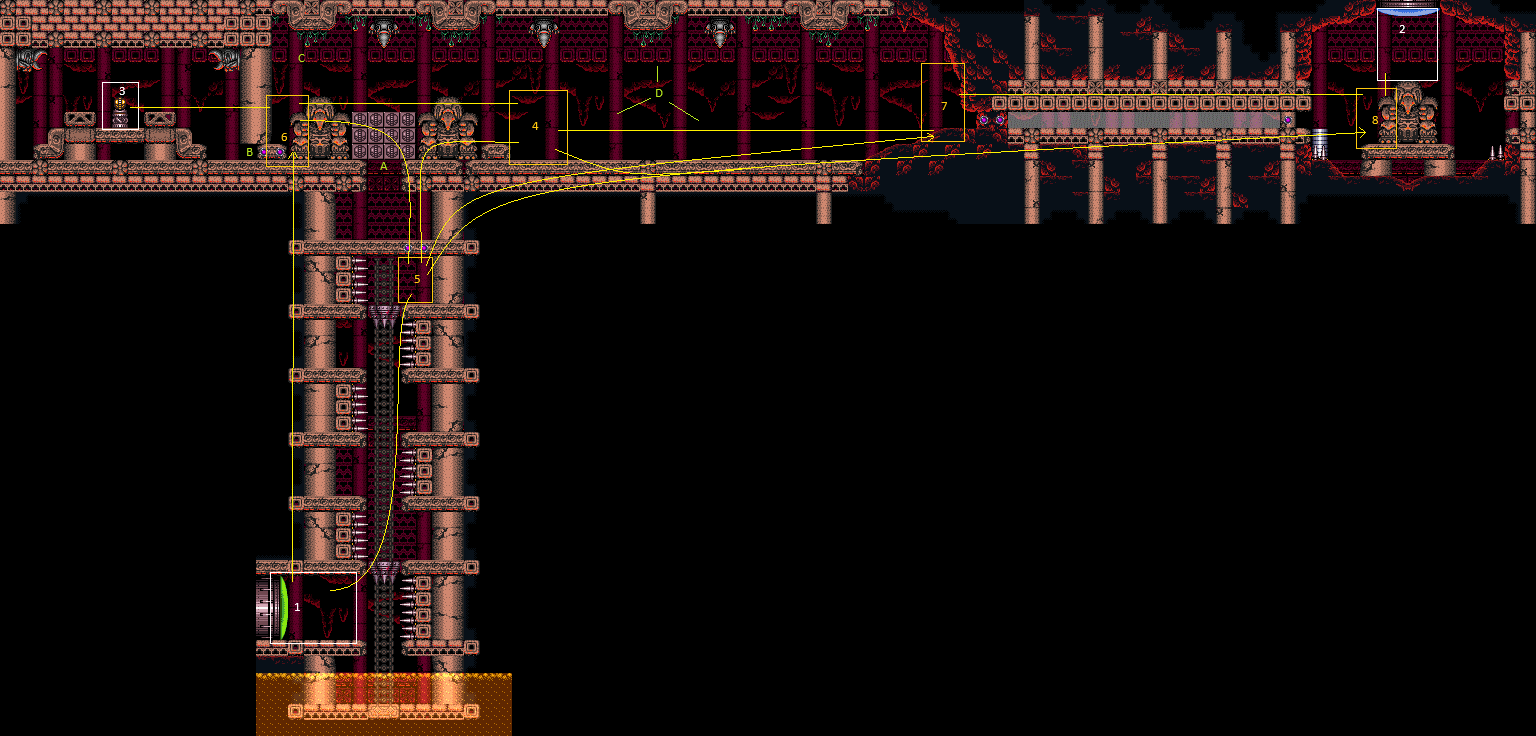
Room ID: 138
|
Exit condition: {
"leaveWithRunway": {
"length": 6,
"openEnd": 1
}
}
|
|
From: 1
Bottom Left Door
To: 1
Bottom Left Door
Requires: "canUseEnemies"
"canTrickyJump"
{
"heatFrames": 120
}
Exit condition: {
"leaveWithRunway": {
"length": 8,
"openEnd": 0
}
}
|
|
Ride the Spike Platform up and back down again to more easily position for using it as a runway. Requires: "canUseEnemies"
{
"heatFrames": 480
}
Exit condition: {
"leaveWithRunway": {
"length": 8,
"openEnd": 0
}
}
|
|
Requires: "h_canHeatedCrystalFlash" |
|
Entrance condition: {
"comeInWithGrappleTeleport": {
"blockPositions": [
[
12,
12
],
[
12,
13
]
]
}
}
Requires: {
"heatFrames": 100
}
|
|
Requires: "canUseEnemies"
{
"or": [
{
"and": [
"canWalljump",
{
"heatFrames": 390
}
]
},
{
"and": [
"canConsecutiveWalljump",
"canCarefulJump",
{
"heatFrames": 330
}
]
},
{
"and": [
"HiJump",
{
"heatFrames": 490
}
]
},
{
"and": [
"h_canCrouchJumpDownGrab",
{
"heatFrames": 610
}
]
}
]
}
|
|
Requires: "SpaceJump"
{
"or": [
{
"heatFrames": 440
},
{
"and": [
"HiJump",
{
"heatFrames": 350
}
]
}
]
}
|
|
Requires: "canTrickyJump"
{
"heatFrames": 420
}
|
|
From: 1
Bottom Left Door
To: 6
Junction Left of Power Bomb Blocks
Climb up 2 screens. Entrance condition: {
"comeInWithDoorStuckSetup": {}
}
Requires: "canXRayClimb"
{
"heatFrames": 2840
}
|
|
Requires: {
"heatFrames": 10
}
"h_canHeatedCrystalFlash"
|
|
Requires: {
"heatFrames": 50
}
Exit condition: {
"leaveWithDoorFrameBelow": {
"height": 2
}
}
|
|
Requires: {
"heatFrames": 50
}
Exit condition: {
"leaveWithPlatformBelow": {
"height": 6,
"leftPosition": -1.5,
"rightPosition": 1.5
}
}
|
|
Requires: {
"heatFrames": 50
}
|
|
Requires: "h_canHeatedCrystalFlash" |
|
Requires: "h_canNavigateHeatRooms"
"Morph"
{
"heatFrames": 120
}
{
"obstaclesCleared": [
"B"
]
}
|
|
Requires: "h_canNavigateHeatRooms"
"h_canUseMorphBombs"
{
"heatFrames": 160
}
Clears obstacles: B |
|
Requires: "h_canUsePowerBombs"
{
"heatFrames": 180
}
Clears obstacles: A, B |
|
From: 4
Junction Right of Power Bomb Blocks
To: 4
Junction Right of Power Bomb Blocks
Requires: {
"obstaclesCleared": [
"D"
]
}
"h_canHeatedCrystalFlash"
Clears obstacles: A, B |
|
From: 4
Junction Right of Power Bomb Blocks
To: 4
Junction Right of Power Bomb Blocks
Use I-Frames from the first Dessgeega to run through the remaining enemies and store a shinespark. 1-tap Shortcharge, then run back towards the Hoppers and try to hit all three at once by shinesparking horizontally as the ceiling hopper jumps down. Requires: {
"canShineCharge": {
"usedTiles": 25,
"openEnd": 1,
"steepUpTiles": 4
}
}
{
"enemyDamage": {
"enemy": "Dessgeega",
"type": "contact",
"hits": 1
}
}
"canHitbox"
"canShinechargeMovementComplex"
"canHorizontalShinespark"
{
"shinespark": {
"frames": 40
}
}
{
"heatFrames": 330
}
Clears obstacles: D |
|
Requires: "h_canUsePowerBombs"
{
"or": [
{
"enemyDamage": {
"enemy": "Dessgeega",
"type": "contact",
"hits": 1
}
},
{
"and": [
"canHitbox",
"canTrickyJump"
]
}
]
}
{
"heatFrames": 240
}
Clears obstacles: A, B |
|
From: 4
Junction Right of Power Bomb Blocks
To: 5
Junction Below Shot Block
Requires: {
"heatFrames": 180
}
{
"obstaclesCleared": [
"A",
"C"
]
}
|
|
From: 4
Junction Right of Power Bomb Blocks
To: 6
Junction Left of Power Bomb Blocks
Requires: {
"or": [
{
"obstaclesCleared": [
"C"
]
},
{
"enemyDamage": {
"enemy": "Dessgeega",
"type": "contact",
"hits": 1
}
}
]
}
{
"heatFrames": 180
}
|
|
From: 4
Junction Right of Power Bomb Blocks
To: 6
Junction Left of Power Bomb Blocks
Requires: "ScrewAttack"
{
"heatFrames": 180
}
Clears obstacles: B, C |
|
From: 4
Junction Right of Power Bomb Blocks
To: 6
Junction Left of Power Bomb Blocks
Requires: {
"enemyKill": {
"enemies": [
[
"Dessgeega"
]
],
"explicitWeapons": [
"Wave+Plasma",
"Ice+Plasma",
"Super",
"Missile"
]
}
}
{
"heatFrames": 210
}
Clears obstacles: C |
|
From: 4
Junction Right of Power Bomb Blocks
To: 6
Junction Left of Power Bomb Blocks
Requires: {
"obstaclesCleared": [
"D"
]
}
"canDodgeWhileShooting"
{
"enemyKill": {
"enemies": [
[
"Dessgeega"
]
],
"explicitWeapons": [
"Ice+Wave+Spazer",
"Plasma"
]
}
}
{
"heatFrames": 270
}
Clears obstacles: C |
|
From: 4
Junction Right of Power Bomb Blocks
To: 6
Junction Left of Power Bomb Blocks
Requires: {
"obstaclesCleared": [
"D"
]
}
"canDodgeWhileShooting"
{
"or": [
"Charge",
"Spazer"
]
}
{
"heatFrames": 12000
}
Clears obstacles: C |
|
From: 4
Junction Right of Power Bomb Blocks
To: 6
Junction Left of Power Bomb Blocks
Requires: {
"obstaclesCleared": [
"D"
]
}
"canDodgeWhileShooting"
"Morph"
{
"ammo": {
"type": "PowerBomb",
"count": 2
}
}
{
"or": [
"canHitbox",
{
"ammo": {
"type": "PowerBomb",
"count": 1
}
}
]
}
{
"heatFrames": 420
}
Clears obstacles: A, B, C |
|
From: 4
Junction Right of Power Bomb Blocks
To: 7
Junction Left of Morph Tunnel
Requires: {
"obstaclesCleared": [
"D"
]
}
{
"heatFrames": 120
}
|
|
From: 4
Junction Right of Power Bomb Blocks
To: 7
Junction Left of Morph Tunnel
Requires: {
"heatFrames": 140
}
{
"enemyDamage": {
"enemy": "Dessgeega",
"type": "contact",
"hits": 1
}
}
|
|
From: 4
Junction Right of Power Bomb Blocks
To: 7
Junction Left of Morph Tunnel
Requires: {
"heatFrames": 150
}
"canHitbox"
"h_canUsePowerBombs"
Clears obstacles: A, B |
|
From: 4
Junction Right of Power Bomb Blocks
To: 7
Junction Left of Morph Tunnel
Requires: {
"heatFrames": 120
}
"canHitbox"
"Plasma"
|
|
From: 4
Junction Right of Power Bomb Blocks
To: 8
Junction Below Top Right Door
Requires: "canSpeedball"
{
"obstaclesCleared": [
"D"
]
}
{
"canShineCharge": {
"usedTiles": 20,
"openEnd": 1
}
}
{
"or": [
"h_canUseSpringBall",
{
"hibashiHits": 1
}
]
}
{
"heatFrames": 300
}
|
|
Requires: {
"heatFrames": 450
}
|
|
Requires: "canUseEnemies"
{
"heatFrames": 430
}
Exit condition: {
"leaveWithRunway": {
"length": 8,
"openEnd": 0
}
}
|
|
Walk into a Spike and then Morph-Kago through the top Spike-Platform. Requires: "canKago"
"Morph"
{
"spikeHits": 1
}
{
"heatFrames": 270
}
|
|
From: 5
Junction Below Shot Block
To: 1
Bottom Left Door
Walk into a Spike and then Morph-Kago through the top Spike-Platform. Requires: "canKago"
"Morph"
"canUseEnemies"
{
"spikeHits": 1
}
{
"heatFrames": 250
}
Exit condition: {
"leaveWithRunway": {
"length": 8,
"openEnd": 0
}
}
|
|
Morph Kago through the top Spike platform and use the I-Frames to Kago again through the second. Requires: "canKago"
"Morph"
"canResetFallSpeed"
{
"enemyDamage": {
"enemy": "Kzan",
"type": "contact",
"hits": 1
}
}
{
"heatFrames": 180
}
|
|
From: 5
Junction Below Shot Block
To: 4
Junction Right of Power Bomb Blocks
Requires: {
"obstaclesCleared": [
"A",
"C",
"D"
]
}
{
"heatFrames": 120
}
|
|
From: 5
Junction Below Shot Block
To: 4
Junction Right of Power Bomb Blocks
Requires: {
"or": [
{
"obstaclesCleared": [
"A"
]
},
"h_canUsePowerBombs"
]
}
{
"heatFrames": 240
}
{
"enemyDamage": {
"enemy": "Dessgeega",
"type": "contact",
"hits": 1
}
}
Clears obstacles: A, B |
|
From: 5
Junction Below Shot Block
To: 4
Junction Right of Power Bomb Blocks
Requires: {
"or": [
{
"obstaclesCleared": [
"A"
]
},
"h_canUsePowerBombs"
]
}
"ScrewAttack"
{
"heatFrames": 270
}
Clears obstacles: A, B, D |
|
From: 5
Junction Below Shot Block
To: 4
Junction Right of Power Bomb Blocks
Requires: {
"or": [
{
"obstaclesCleared": [
"A"
]
},
"h_canUsePowerBombs"
]
}
{
"enemyKill": {
"enemies": [
[
"Dessgeega"
],
[
"Dessgeega",
"Dessgeega",
"Dessgeega"
]
],
"explicitWeapons": [
"Super"
]
}
}
{
"heatFrames": 600
}
Clears obstacles: A, B, C, D |
|
From: 5
Junction Below Shot Block
To: 4
Junction Right of Power Bomb Blocks
Safely kill the left two Dessgeegas where the Power Bomb statue used to be. Lure the right side Ceiling hopper to the left before dealing with it. Requires: {
"or": [
{
"obstaclesCleared": [
"A"
]
},
"h_canUsePowerBombs"
]
}
"canDodgeWhileShooting"
{
"enemyKill": {
"enemies": [
[
"Dessgeega"
],
[
"Dessgeega",
"Dessgeega",
"Dessgeega"
]
],
"explicitWeapons": [
"Missile"
]
}
}
{
"heatFrames": 720
}
Clears obstacles: A, B, C, D |
|
From: 5
Junction Below Shot Block
To: 4
Junction Right of Power Bomb Blocks
Requires: "Morph"
{
"ammo": {
"type": "PowerBomb",
"count": 5
}
}
"canDodgeWhileShooting"
{
"or": [
"canHitbox",
{
"enemyDamage": {
"enemy": "Dessgeega",
"type": "contact",
"hits": 1
}
}
]
}
{
"heatFrames": 1080
}
Clears obstacles: A, B, C, D |
|
From: 5
Junction Below Shot Block
To: 4
Junction Right of Power Bomb Blocks
Safely kill the left two Dessgeegas where the Power Bomb statue used to be. Lure the right side Ceiling hopper to the left before dealing with it. Requires: {
"or": [
{
"obstaclesCleared": [
"A"
]
},
"h_canUsePowerBombs"
]
}
{
"or": [
{
"and": [
"Plasma",
{
"or": [
"Ice",
"Wave"
]
},
{
"heatFrames": 540
}
]
},
{
"and": [
"canDodgeWhileShooting",
"Plasma",
{
"heatFrames": 1020
}
]
},
{
"and": [
"canDodgeWhileShooting",
"Ice",
"Spazer",
"Wave",
{
"heatFrames": 1800
}
]
},
{
"and": [
"canDodgeWhileShooting",
"Spazer",
{
"heatFrames": 3000
}
]
}
]
}
Clears obstacles: A, B, C, D |
|
From: 5
Junction Below Shot Block
To: 5
Junction Below Shot Block
Requires: "h_canHeatedCrystalFlash" Clears obstacles: A, B |
|
From: 5
Junction Below Shot Block
To: 6
Junction Left of Power Bomb Blocks
Requires: {
"obstaclesCleared": [
"A",
"C"
]
}
{
"heatFrames": 180
}
|
|
From: 5
Junction Below Shot Block
To: 6
Junction Left of Power Bomb Blocks
Requires: {
"or": [
{
"obstaclesCleared": [
"A"
]
},
"h_canUsePowerBombs"
]
}
{
"enemyDamage": {
"enemy": "Dessgeega",
"type": "contact",
"hits": 1
}
}
{
"heatFrames": 255
}
Clears obstacles: A, B |
|
From: 5
Junction Below Shot Block
To: 6
Junction Left of Power Bomb Blocks
Requires: {
"or": [
{
"obstaclesCleared": [
"A"
]
},
"h_canUsePowerBombs"
]
}
"ScrewAttack"
{
"heatFrames": 240
}
Clears obstacles: A, B, C |
|
From: 5
Junction Below Shot Block
To: 6
Junction Left of Power Bomb Blocks
Requires: {
"or": [
{
"obstaclesCleared": [
"A"
]
},
"h_canUsePowerBombs"
]
}
{
"enemyKill": {
"enemies": [
[
"Dessgeega"
]
],
"explicitWeapons": [
"Wave+Plasma",
"Ice+Plasma",
"Missile",
"Super"
]
}
}
{
"heatFrames": 350
}
Clears obstacles: A, B, C |
|
From: 5
Junction Below Shot Block
To: 6
Junction Left of Power Bomb Blocks
Stand crouched where the statue used to be to safely kill the Dessgeega. Requires: {
"or": [
{
"obstaclesCleared": [
"A"
]
},
"h_canUsePowerBombs"
]
}
{
"enemyKill": {
"enemies": [
[
"Dessgeega"
]
],
"explicitWeapons": [
"Ice+Wave+Spazer",
"Plasma",
"PowerBomb"
]
}
}
{
"heatFrames": 420
}
Clears obstacles: A, B, C |
|
From: 5
Junction Below Shot Block
To: 6
Junction Left of Power Bomb Blocks
Stand crouched where the statue used to be to safely kill the Dessgeega. Requires: {
"or": [
{
"obstaclesCleared": [
"A"
]
},
"h_canUsePowerBombs"
]
}
{
"or": [
"Charge",
"Spazer"
]
}
{
"heatFrames": 900
}
Clears obstacles: A, B, C |
|
From: 5
Junction Below Shot Block
To: 7
Junction Left of Morph Tunnel
Notable: true 
Break the Power Bomb statue leaving 1 row of blocks. Partially clip beneath the Power Bomb blocks and the sold tiles beneath. Wait for a Dessgeega to jump over head and jump into it. The left ceiling Dessgeega works better. Damage boost to the right and use I-Frames to run through all of the enemies. Requires: {
"obstaclesNotCleared": [
"A"
]
}
"h_canUsePowerBombs"
"HiJump"
"canPartialFloorClip"
"canCeilingClip"
"canHorizontalDamageBoost"
"canHitbox"
{
"enemyDamage": {
"enemy": "Dessgeega",
"type": "contact",
"hits": 1
}
}
{
"heatFrames": 225
}
|
|
From: 5
Junction Below Shot Block
To: 7
Junction Left of Morph Tunnel
Notable: true 
Break the Power Bomb statue leaving 1 row of blocks. Partially clip beneath the Power Bomb blocks and the sold tiles beneath. Wait for a Dessgeega to jump over head and jump into it. The left ceiling Dessgeega works better. Aim down after jumping in order to fully boost over the solid statue. Damage boost to the right and use I-Frames to run through all of the enemies. Requires: {
"obstaclesNotCleared": [
"A"
]
}
"h_canUsePowerBombs"
"canTrickyJump"
"canPartialFloorClip"
"canCeilingClip"
"canHorizontalDamageBoost"
"canHitbox"
{
"enemyDamage": {
"enemy": "Dessgeega",
"type": "contact",
"hits": 1
}
}
{
"heatFrames": 225
}
|
|
From: 5
Junction Below Shot Block
To: 8
Junction Below Top Right Door
Notable: true
Break the Power Bomb statue leaving 1 row of blocks. Partially clip beneath the Power Bomb blocks and the sold tiles beneath. Wait for a Dessgeega to jump over head and jump into it. The left ceiling Dessgeega works better. Damage boost to the right and use I-Frames to run through all of the enemies. Begin shortcharging while running through the Dessgeegas for a speedball. It may help to end the damage boost early, but then it becomes more difficult to stutter for the shortcharge. Requires: {
"obstaclesNotCleared": [
"A"
]
}
"h_canUsePowerBombs"
"HiJump"
"canPartialFloorClip"
"canCeilingClip"
"canHorizontalDamageBoost"
"canHitbox"
"canSpeedball"
{
"canShineCharge": {
"usedTiles": 16,
"openEnd": 1
}
}
{
"enemyDamage": {
"enemy": "Dessgeega",
"type": "contact",
"hits": 1
}
}
{
"heatFrames": 390
}
{
"or": [
"h_canUseSpringBall",
{
"hibashiHits": 1
}
]
}
|
|
From: 5
Junction Below Shot Block
To: 8
Junction Below Top Right Door
Notable: true
Break the Power Bomb statue leaving 1 row of blocks. Partially clip beneath the Power Bomb blocks and the sold tiles beneath. Wait for a Dessgeega to jump over head and jump into it. The left ceiling Dessgeega works better. Aim down after jumping in order to fully boost over the solid statue. Damage boost to the right and use I-Frames to run through all of the enemies. Begin shortcharging while running through the Dessgeegas for a speedball. It may help to end the damage boost early, but then it becomes more difficult to stutter for the shortcharge. Requires: {
"obstaclesNotCleared": [
"A"
]
}
"h_canUsePowerBombs"
"canPartialFloorClip"
"canCeilingClip"
"canTrickyJump"
"canHorizontalDamageBoost"
"canHitbox"
"canSpeedball"
{
"canShineCharge": {
"usedTiles": 16,
"openEnd": 1
}
}
{
"enemyDamage": {
"enemy": "Dessgeega",
"type": "contact",
"hits": 1
}
}
{
"heatFrames": 390
}
{
"or": [
"h_canUseSpringBall",
{
"hibashiHits": 1
}
]
}
|
|
Requires: "Morph"
{
  "heatFrames": 100
}
{
"obstaclesCleared": [
"B"
]
}
|
|
Requires: "ScrewAttack"
"Morph"
{
"heatFrames": 120
}
Clears obstacles: B |
|
Requires: "h_canUseMorphBombs"
{
"heatFrames": 150
}
Clears obstacles: B |
|
Requires: "h_canNavigateHeatRooms"
"h_canUsePowerBombs"
{
"heatFrames": 210
}
Clears obstacles: A, B |
|
From: 6
Junction Left of Power Bomb Blocks
To: 4
Junction Right of Power Bomb Blocks
Requires: {
"heatFrames": 150
}
{
"obstaclesCleared": [
"C",
"D"
]
}
|
|
From: 6
Junction Left of Power Bomb Blocks
To: 4
Junction Right of Power Bomb Blocks
Requires: {
"heatFrames": 170
}
{
"enemyDamage": {
"enemy": "Dessgeega",
"type": "contact",
"hits": 1
}
}
|
|
From: 6
Junction Left of Power Bomb Blocks
To: 4
Junction Right of Power Bomb Blocks
Requires: "ScrewAttack"
{
"heatFrames": 270
}
Clears obstacles: C, D |
|
From: 6
Junction Left of Power Bomb Blocks
To: 4
Junction Right of Power Bomb Blocks
Requires: {
"or": [
{
"obstaclesCleared": [
"C"
]
},
{
"and": [
{
"enemyKill": {
"enemies": [
[
"Dessgeega"
]
],
"explicitWeapons": [
"Super",
"Missile",
"Plasma",
"Ice+Wave+Spazer"
]
}
},
{
"heatFrames": 75
}
]
}
]
}
{
"or": [
{
"obstaclesCleared": [
"D"
]
},
{
"and": [
{
"enemyKill": {
"enemies": [
[
"Dessgeega",
"Dessgeega",
"Dessgeega"
]
],
"explicitWeapons": [
"Super",
"Missile",
"Plasma",
"Ice+Wave+Spazer"
]
}
},
{
"heatFrames": 315
}
]
}
]
}
{
"heatFrames": 150
}
Clears obstacles: C, D |
|
From: 6
Junction Left of Power Bomb Blocks
To: 4
Junction Right of Power Bomb Blocks
Requires: "h_heatProof"
{
"or": [
"Charge",
"Spazer"
]
}
"canBePatient"
Clears obstacles: C, D |
|
From: 6
Junction Left of Power Bomb Blocks
To: 5
Junction Below Shot Block
Requires: {
"heatFrames": 150
}
{
"obstaclesCleared": [
"A",
"C"
]
}
|
|
From: 6
Junction Left of Power Bomb Blocks
To: 5
Junction Below Shot Block
Requires: {
"or": [
"h_canUsePowerBombs",
{
"obstaclesCleared": [
"A"
]
}
]
}
{
"enemyDamage": {
"enemy": "Dessgeega",
"type": "contact",
"hits": 1
}
}
{
"heatFrames": 240
}
Clears obstacles: A, B |
|
From: 6
Junction Left of Power Bomb Blocks
To: 5
Junction Below Shot Block
Requires: "h_canUsePowerBombs"
"canHitbox"
{
"heatFrames": 240
}
Clears obstacles: A, B |
|
From: 6
Junction Left of Power Bomb Blocks
To: 5
Junction Below Shot Block
Requires: {
"or": [
"h_canUsePowerBombs",
{
"obstaclesCleared": [
"A"
]
}
]
}
"ScrewAttack"
{
"heatFrames": 240
}
Clears obstacles: A, B, C |
|
From: 6
Junction Left of Power Bomb Blocks
To: 5
Junction Below Shot Block
Requires: {
"or": [
"h_canUsePowerBombs",
{
"obstaclesCleared": [
"A"
]
}
]
}
{
"enemyKill": {
"enemies": [
[
"Dessgeega"
]
],
"explicitWeapons": [
"Super",
"Missile",
"Plasma",
"Ice+Wave+Spazer"
]
}
}
{
"heatFrames": 360
}
Clears obstacles: A, B, C |
|
From: 6
Junction Left of Power Bomb Blocks
To: 5
Junction Below Shot Block
Requires: "h_heatProof"
{
"or": [
"h_canUsePowerBombs",
{
"obstaclesCleared": [
"A"
]
}
]
}
{
"or": [
"Charge",
"Spazer"
]
}
Clears obstacles: A, B, C |
|
From: 6
Junction Left of Power Bomb Blocks
To: 6
Junction Left of Power Bomb Blocks
Requires: "h_canHeatedCrystalFlash"
{
"or": [
{
"obstaclesCleared": [
"B"
]
},
{
"obstaclesCleared": [
"C"
]
}
]
}
Clears obstacles: A, B |
|
From: 7
Junction Left of Morph Tunnel
To: 4
Junction Right of Power Bomb Blocks
Requires: "h_canNavigateHeatRooms"
{
"heatFrames": 120
}
{
"obstaclesCleared": [
"D"
]
}
|
|
From: 7
Junction Left of Morph Tunnel
To: 4
Junction Right of Power Bomb Blocks
Requires: {
"heatFrames": 150
}
{
"enemyDamage": {
"enemy": "Dessgeega",
"type": "contact",
"hits": 1
}
}
|
|
From: 7
Junction Left of Morph Tunnel
To: 4
Junction Right of Power Bomb Blocks
Notable: true 
Roll under the Dessgeegas until all three move off camera and stop chasing Samus. Roll directly from the Morph tunnel, past the first Dessgeega. Stop and let it jump left of Samus, then move it off camera on the next jump. Back away from the Left ground hopper then roll under it. Lastly, manipulate the ceiling hopper off camera if it has followed Samus this far. Requires: "Morph"
"canCameraManip"
{
"heatFrames": 210
}
|
|
From: 7
Junction Left of Morph Tunnel
To: 4
Junction Right of Power Bomb Blocks
Let the right hopper jump twice towards Samus. At the start of the second jump, jump above where the ground Dessgeega can jump but below where the ceiling enemy can reach. Mockball below the third hopper. Requires: "Morph"
{
"or": [
"canTrickyJump",
{
"and": [
"h_canUsePowerBombs",
"canCarefulJump",
"canHitbox"
]
}
]
}
"canMockball"
{
"heatFrames": 210
}
|
|
From: 7
Junction Left of Morph Tunnel
To: 4
Junction Right of Power Bomb Blocks
Lure the Ground Hoppers to the Morph Tunnel The left ceiling Dessgeega can be safely killed above the Power Bomb statue. Requires: "h_heatProof" "canBePatient" "h_canUseMorphBombs" Clears obstacles: C, D |
|
From: 7
Junction Left of Morph Tunnel
To: 4
Junction Right of Power Bomb Blocks
Requires: "ScrewAttack"
{
"heatFrames": 150
}
Clears obstacles: D |
|
From: 7
Junction Left of Morph Tunnel
To: 4
Junction Right of Power Bomb Blocks
Requires: "h_canNavigateHeatRooms"
{
"enemyKill": {
"enemies": [
[
"Dessgeega",
"Dessgeega",
"Dessgeega"
]
],
"explicitWeapons": [
"Super"
]
}
}
{
"heatFrames": 420
}
Clears obstacles: D |
|
From: 7
Junction Left of Morph Tunnel
To: 4
Junction Right of Power Bomb Blocks
Requires: "Plasma"
{
"or": [
"Ice",
"Wave"
]
}
{
"heatFrames": 480
}
Clears obstacles: D |
|
From: 7
Junction Left of Morph Tunnel
To: 4
Junction Right of Power Bomb Blocks
Requires: "canDodgeWhileShooting"
{
"enemyKill": {
"enemies": [
[
"Dessgeega"
],
[
"Dessgeega"
],
[
"Dessgeega"
]
],
"explicitWeapons": [
"Missile",
"PowerBomb",
"Plasma",
"Charge+Ice+Wave+Spazer"
]
}
}
{
"enemyDamage": {
"enemy": "Dessgeega",
"type": "contact",
"hits": 2
}
}
{
"heatFrames": 1020
}
Clears obstacles: D |
|
From: 7
Junction Left of Morph Tunnel
To: 6
Junction Left of Power Bomb Blocks
Requires: {
"obstaclesCleared": [
"D"
]
}
{
"canShineCharge": {
"usedTiles": 20,
"openEnd": 1,
"steepDownTiles": 4
}
}
"canCarefulJump"
{
"heatFrames": 200
}
Clears obstacles: C |
|
From: 7
Junction Left of Morph Tunnel
To: 6
Junction Left of Power Bomb Blocks
Requires: {
"obstaclesCleared": [
"C",
"D"
]
}
{
"canShineCharge": {
"usedTiles": 20,
"openEnd": 1,
"steepDownTiles": 4
}
}
"canCarefulJump"
"canChainTemporaryBlue"
{
"heatFrames": 240
}
Clears obstacles: B |
|
From: 7
Junction Left of Morph Tunnel
To: 7
Junction Left of Morph Tunnel
Requires: "h_canHeatedCrystalFlash" |
|
From: 7
Junction Left of Morph Tunnel
To: 7
Junction Left of Morph Tunnel
Use I-Frames from the first Dessgeega to run through the remaining enemies and store a shinespark. It helps to run towards the first hopper to take damage and then not stutter. Mid-air spark to kill all three at once. Requires: {
"canShineCharge": {
"usedTiles": 17,
"openEnd": 1
}
}
{
"enemyDamage": {
"enemy": "Dessgeega",
"type": "contact",
"hits": 1
}
}
"canHitbox"
"canMidairShinespark"
"canShinechargeMovementComplex"
{
"shinespark": {
"frames": 40
}
}
{
"heatFrames": 310
}
Clears obstacles: D |
|
From: 7
Junction Left of Morph Tunnel
To: 8
Junction Below Top Right Door
The hibashi hit can be avoided by waiting for the pillar to go up. That requires the use of one PB and more time than is worth unless heat proof. Requires: "h_heatResistant"
"h_canBombThings"
"h_canUsePowerBombs"
{
"heatFrames": 350
}
|
|
Requires: "h_canUseMorphBombs"
{
"heatFrames": 350
}
{
"hibashiHits": 1
}
|
|
From: 7
Junction Left of Morph Tunnel
To: 8
Junction Below Top Right Door
Requires: "h_canNavigateHeatRooms"
"Morph"
{
"ammo": {
"type": "PowerBomb",
"count": 2
}
}
{
"heatFrames": 350
}
{
"hibashiHits": 1
}
|
|
Requires: {
"heatFrames": 60
}
|
|
From: 8
Junction Below Top Right Door
To: 2
Top Right Door
Requires: {
"heatFrames": 60
}
Exit condition: {
"leaveWithDoorFrameBelow": {
"height": 2
}
}
|
|
From: 8
Junction Below Top Right Door
To: 2
Top Right Door
Requires: {
"heatFrames": 60
}
Exit condition: {
"leaveWithPlatformBelow": {
"height": 6,
"leftPosition": -1.5,
"rightPosition": 1.5
}
}
|
|
From: 8
Junction Below Top Right Door
To: 7
Junction Left of Morph Tunnel
Requires: {
"or": [
"canCarefulJump",
{
"hibashiHits": 1
}
]
}
"h_canUseMorphBombs"
{
"heatFrames": 300
}
|
|
From: 8
Junction Below Top Right Door
To: 7
Junction Left of Morph Tunnel
Requires: {
"or": [
"canCarefulJump",
{
"hibashiHits": 1
}
]
}
"Morph"
{
"ammo": {
"type": "PowerBomb",
"count": 2
}
}
{
"or": [
{
"heatFrames": 270
},
{
"and": [
"canPrepareForNextRoom",
{
"heatFrames": 240
}
]
}
]
}
|
|
From: 8
Junction Below Top Right Door
To: 8
Junction Below Top Right Door
Requires: "h_canHeatedCrystalFlash" |
{
"$schema": "../../../schema/m3-room.schema.json",
"id": 138,
"name": "Wasteland",
"area": "Norfair",
"subarea": "Lower",
"subsubarea": "East",
"playable": true,
"roomAddress": "0x7B5D5",
"roomEnvironments": [
{
"heated": true
}
],
"nodes": [
{
"id": 1,
"name": "Bottom Left Door",
"nodeType": "door",
"nodeSubType": "green",
"nodeAddress": "0x0019a1a",
"doorEnvironments": [
{
"physics": "air"
}
],
"locks": [
{
"name": "Wasteland Green Lock (to Metal Pirates)",
"lockType": "coloredDoor",
"unlockStrats": [
{
"name": "Base",
"notable": false,
"requires": [
"h_canOpenGreenDoors"
]
}
]
}
]
},
{
"id": 2,
"name": "Top Right Door",
"nodeType": "door",
"nodeSubType": "blue",
"nodeAddress": "0x0019a26",
"doorEnvironments": [
{
"physics": "air"
}
]
},
{
"id": 3,
"name": "Item",
"nodeType": "item",
"nodeSubType": "visible",
"nodeItem": "PowerBomb",
"nodeAddress": "0x790C0"
},
{
"id": 4,
"name": "Junction Right of Power Bomb Blocks",
"nodeType": "junction",
"nodeSubType": "junction"
},
{
"id": 5,
"name": "Junction Below Shot Block",
"nodeType": "junction",
"nodeSubType": "junction"
},
{
"id": 6,
"name": "Junction Left of Power Bomb Blocks",
"nodeType": "junction",
"nodeSubType": "junction"
},
{
"id": 7,
"name": "Junction Left of Morph Tunnel",
"nodeType": "junction",
"nodeSubType": "junction"
},
{
"id": 8,
"name": "Junction Below Top Right Door",
"nodeType": "junction",
"nodeSubType": "junction"
}
],
"obstacles": [
{
"id": "A",
"name": "Power Bomb Blocks",
"obstacleType": "inanimate"
},
{
"id": "B",
"name": "Bomb Blocks of Shame",
"obstacleType": "inanimate"
},
{
"id": "C",
"name": "Dessgeega on PB-blocks",
"obstacleType": "enemies"
},
{
"id": "D",
"name": "3 Dessgeegas",
"obstacleType": "enemies"
}
],
"enemies": [
{
"id": "e1",
"groupName": "Wasteland Left Dessgeega",
"enemyName": "Dessgeega",
"quantity": 1,
"homeNodes": [
4
],
"dropRequires": [
"h_heatProof"
]
},
{
"id": "e2",
"groupName": "Wasteland Right Dessgeegas",
"enemyName": "Dessgeega",
"quantity": 3,
"betweenNodes": [
4,
7
],
"dropRequires": [
"h_heatProof"
]
}
],
"reusableRoomwideNotable": [
{
"name": "Wasteland Statue Clip Damage Boost",
"note": [
"Break the Power Bomb statue leaving 1 row of blocks.",
"Partially clip between the Power Bomb blocks and the solid tiles beneath.",
"Wait for a Dessgeega to jump over head and jump into it.",
"The left ceiling Dessgeega works better.",
"Damage boost to the right and use I-Frames to run through all of the enemies."
]
},
{
"name": "Wasteland HiJumpless Statue Clip Damage Boost",
"note": [
"Break the Power Bomb statue leaving 1 row of blocks.",
"Partially clip between the Power Bomb blocks and the solid tiles beneath.",
"Wait for a Dessgeega to jump over head and jump into it.",
"The left ceiling Dessgeega works better.",
"Aim down after jumping in order to fully boost over the solid statue.",
"Damage boost to the right and use I-Frames to run through all of the enemies."
]
}
],
"links": [
{
"from": 1,
"to": [
{
"id": 1
},
{
"id": 3
},
{
"id": 5
},
{
"id": 6
}
]
},
{
"from": 2,
"to": [
{
"id": 2
},
{
"id": 8
}
]
},
{
"from": 3,
"to": [
{
"id": 3
},
{
"id": 6
}
]
},
{
"from": 4,
"to": [
{
"id": 4
},
{
"id": 5
},
{
"id": 6
},
{
"id": 7
},
{
"id": 8
}
]
},
{
"from": 5,
"to": [
{
"id": 1
},
{
"id": 4
},
{
"id": 5
},
{
"id": 6
},
{
"id": 7
},
{
"id": 8
}
]
},
{
"from": 6,
"to": [
{
"id": 3
},
{
"id": 4
},
{
"id": 5
},
{
"id": 6
}
]
},
{
"from": 7,
"to": [
{
"id": 4
},
{
"id": 6
},
{
"id": 7
},
{
"id": 8
}
]
},
{
"from": 8,
"to": [
{
"id": 2
},
{
"id": 7
},
{
"id": 8
}
]
}
],
"strats": [
{
"link": [
1,
1
],
"name": "Leave With Runway",
"requires": [],
"exitCondition": {
"leaveWithRunway": {
"length": 6,
"openEnd": 1
}
}
},
{
"link": [
1,
1
],
"name": "Wait for Kzan and Leave With Runway",
"requires": [
"canUseEnemies",
"canTrickyJump",
{
"heatFrames": 120
}
],
"exitCondition": {
"leaveWithRunway": {
"length": 8,
"openEnd": 0
}
},
"unlocksDoors": [
{
"types": [
"ammo"
],
"requires": []
}
]
},
{
"link": [
1,
1
],
"name": "Ride Kzan and Leave With Runway",
"requires": [
"canUseEnemies",
{
"heatFrames": 480
}
],
"exitCondition": {
"leaveWithRunway": {
"length": 8,
"openEnd": 0
}
},
"unlocksDoors": [
{
"types": [
"ammo"
],
"requires": []
}
],
"note": "Ride the Spike Platform up and back down again to more easily position for using it as a runway."
},
{
"link": [
1,
1
],
"name": "Crystal Flash",
"requires": [
"h_canHeatedCrystalFlash"
]
},
{
"link": [
1,
3
],
"name": "Grapple Teleport",
"entranceCondition": {
"comeInWithGrappleTeleport": {
"blockPositions": [
[
12,
12
],
[
12,
13
]
]
}
},
"requires": [
{
"heatFrames": 100
}
]
},
{
"link": [
1,
5
],
"name": "Base",
"requires": [
"canUseEnemies",
{
"or": [
{
"and": [
"canWalljump",
{
"heatFrames": 390
}
]
},
{
"and": [
"canConsecutiveWalljump",
"canCarefulJump",
{
"heatFrames": 330
}
]
},
{
"and": [
"HiJump",
{
"heatFrames": 490
}
]
},
{
"and": [
"h_canCrouchJumpDownGrab",
{
"heatFrames": 610
}
]
}
]
}
]
},
{
"link": [
1,
5
],
"name": "SpaceJump",
"requires": [
"SpaceJump",
{
"or": [
{
"heatFrames": 440
},
{
"and": [
"HiJump",
{
"heatFrames": 350
}
]
}
]
}
],
"devNote": "FIXME: Heat count assumes the Kzan is blocking your path."
},
{
"link": [
1,
5
],
"name": "Tricky Platforming",
"requires": [
"canTrickyJump",
{
"heatFrames": 420
}
],
"devNote": "FIXME: Heat count assumes the Kzan is blocking your path."
},
{
"link": [
1,
6
],
"name": "Wasteland X-Ray Climb",
"entranceCondition": {
"comeInWithDoorStuckSetup": {}
},
"requires": [
"canXRayClimb",
{
"heatFrames": 2840
}
],
"note": "Climb up 2 screens."
},
{
"link": [
2,
2
],
"name": "Crystal Flash",
"requires": [
{
"heatFrames": 10
},
"h_canHeatedCrystalFlash"
]
},
{
"link": [
2,
2
],
"name": "Leave With Door Frame Below",
"requires": [
{
  "heatFrames": 50
}
],
"exitCondition": {
"leaveWithDoorFrameBelow": {
"height": 2
}
}
},
{
"link": [
2,
2
],
"name": "Leave With Platform Below",
"requires": [
{
  "heatFrames": 50
}
],
"exitCondition": {
"leaveWithPlatformBelow": {
"height": 6,
"leftPosition": -1.5,
"rightPosition": 1.5
}
}
},
{
"link": [
2,
8
],
"name": "Base",
"requires": [
{
  "heatFrames": 50
}
]
},
{
"link": [
3,
3
],
"name": "Crystal Flash",
"requires": [
"h_canHeatedCrystalFlash"
]
},
{
"link": [
3,
6
],
"name": "Base",
"requires": [
"h_canNavigateHeatRooms",
"Morph",
{
"heatFrames": 120
},
{
"obstaclesCleared": [
"B"
]
}
]
},
{
"link": [
3,
6
],
"name": "Bombs",
"requires": [
"h_canNavigateHeatRooms",
"h_canUseMorphBombs",
{
"heatFrames": 160
}
],
"clearsObstacles": [
"B"
]
},
{
"link": [
3,
6
],
"name": "Power Bombs",
"requires": [
"h_canUsePowerBombs",
{
"heatFrames": 180
}
],
"clearsObstacles": [
"A",
"B"
]
},
{
"link": [
4,
4
],
"name": "Crystal Flash",
"requires": [
{
"obstaclesCleared": [
"D"
]
},
"h_canHeatedCrystalFlash"
],
"clearsObstacles": [
"A",
"B"
]
},
{
"link": [
4,
4
],
"name": "Shinespark Kill",
"requires": [
{
"canShineCharge": {
"usedTiles": 25,
"openEnd": 1,
"steepUpTiles": 4
}
},
{
"enemyDamage": {
"enemy": "Dessgeega",
"type": "contact",
"hits": 1
}
},
"canHitbox",
"canShinechargeMovementComplex",
"canHorizontalShinespark",
{
"shinespark": {
"frames": 40
}
},
{
"heatFrames": 330
}
],
"clearsObstacles": [
"D"
],
"note": [
"Use I-Frames from the first Dessgeega to run through the remaining enemies and store a shinespark.",
"1-tap Shortcharge, then run back towards the Hoppers and try to hit all three at once by shinesparking horizontally as the ceiling hopper jumps down."
]
},
{
"link": [
4,
5
],
"name": "Base",
"requires": [
"h_canUsePowerBombs",
{
"or": [
{
"enemyDamage": {
"enemy": "Dessgeega",
"type": "contact",
"hits": 1
}
},
{
"and": [
"canHitbox",
"canTrickyJump"
]
}
]
},
{
"heatFrames": 240
}
],
"clearsObstacles": [
"A",
"B"
]
},
{
"link": [
4,
5
],
"name": "Clear Path",
"requires": [
{
"heatFrames": 180
},
{
"obstaclesCleared": [
"A",
"C"
]
}
]
},
{
"link": [
4,
6
],
"name": "Base",
"requires": [
{
"or": [
{
"obstaclesCleared": [
"C"
]
},
{
"enemyDamage": {
"enemy": "Dessgeega",
"type": "contact",
"hits": 1
}
}
]
},
{
"heatFrames": 180
}
]
},
{
"link": [
4,
6
],
"name": "Screw Attack",
"requires": [
"ScrewAttack",
{
"heatFrames": 180
}
],
"clearsObstacles": [
"B",
"C"
]
},
{
"link": [
4,
6
],
"name": "Kill Dessgeega (Fast)",
"requires": [
{
"enemyKill": {
"enemies": [
[
"Dessgeega"
]
],
"explicitWeapons": [
"Wave+Plasma",
"Ice+Plasma",
"Super",
"Missile"
]
}
},
{
"heatFrames": 210
}
],
"clearsObstacles": [
"C"
]
},
{
"link": [
4,
6
],
"name": "Kill Dessgeega (Medium)",
"requires": [
{
"obstaclesCleared": [
"D"
]
},
"canDodgeWhileShooting",
{
"enemyKill": {
"enemies": [
[
"Dessgeega"
]
],
"explicitWeapons": [
"Ice+Wave+Spazer",
"Plasma"
]
}
},
{
"heatFrames": 270
}
],
"clearsObstacles": [
"C"
]
},
{
"link": [
4,
6
],
"name": "Kill Dessgeega (Slow)",
"requires": [
{
"obstaclesCleared": [
"D"
]
},
"canDodgeWhileShooting",
{
"or": [
"Charge",
"Spazer"
]
},
{
"heatFrames": 12000
}
],
"clearsObstacles": [
"C"
]
},
{
"link": [
4,
6
],
"name": "Kill Dessgeega (Power Bombs)",
"requires": [
{
"obstaclesCleared": [
"D"
]
},
"canDodgeWhileShooting",
"Morph",
{
"ammo": {
"type": "PowerBomb",
"count": 2
}
},
{
"or": [
"canHitbox",
{
"ammo": {
"type": "PowerBomb",
"count": 1
}
}
]
},
{
"heatFrames": 420
}
],
"clearsObstacles": [
"A",
"B",
"C"
]
},
{
"link": [
4,
7
],
"name": "Base",
"requires": [
{
"obstaclesCleared": [
"D"
]
},
{
"heatFrames": 120
}
]
},
{
"link": [
4,
7
],
"name": "Tank the Damage",
"requires": [
{
"heatFrames": 140
},
{
"enemyDamage": {
"enemy": "Dessgeega",
"type": "contact",
"hits": 1
}
}
]
},
{
"link": [
4,
7
],
"name": "Hitbox the Dessgeegas (Power Bombs)",
"requires": [
{
"heatFrames": 150
},
"canHitbox",
"h_canUsePowerBombs"
],
"clearsObstacles": [
"A",
"B"
]
},
{
"link": [
4,
7
],
"name": "Hitbox the Dessgeegas (Plasma)",
"requires": [
{
"heatFrames": 120
},
"canHitbox",
"Plasma"
]
},
{
"link": [
4,
8
],
"name": "Speedball",
"requires": [
"canSpeedball",
{
"obstaclesCleared": [
"D"
]
},
{
"canShineCharge": {
"usedTiles": 20,
"openEnd": 1
}
},
{
"or": [
"h_canUseSpringBall",
{
"hibashiHits": 1
}
]
},
{
"heatFrames": 300
}
]
},
{
"link": [
5,
1
],
"name": "Base",
"requires": [
{
  "heatFrames": 450
}
],
"devNote": "FIXME: Assumes the Kzans are in their default positions"
},
{
"link": [
5,
1
],
"name": "Leave with Runway",
"requires": [
"canUseEnemies",
{
"heatFrames": 430
}
],
"exitCondition": {
"leaveWithRunway": {
"length": 8,
"openEnd": 0
}
},
"unlocksDoors": [
{
"types": [
"super",
"powerbomb"
],
"requires": []
},
{
"types": [
"missiles"
],
"requires": [
"never"
]
}
],
"devNote": "FIXME: Assumes the Kzans are in their default positions"
},
{
"link": [
5,
1
],
"name": "Spike Kzan Kago",
"requires": [
"canKago",
"Morph",
{
"spikeHits": 1
},
{
"heatFrames": 270
}
],
"note": "Walk into a Spike and then Morph-Kago through the top Spike-Platform.",
"devNote": "About equivalent to waiting, if there is no form of damage reduction."
},
{
"link": [
5,
1
],
"name": "Spike Kzan Kago, Leave with Runway",
"requires": [
"canKago",
"Morph",
"canUseEnemies",
{
"spikeHits": 1
},
{
"heatFrames": 250
}
],
"exitCondition": {
"leaveWithRunway": {
"length": 8,
"openEnd": 0
}
},
"unlocksDoors": [
{
"types": [
"missiles"
],
"requires": [
{
"heatFrames": 50
}
]
},
{
"types": [
"super"
],
"requires": []
},
{
"types": [
"powerbomb"
],
"requires": [
{
"heatFrames": 110
}
]
}
],
"note": "Walk into a Spike and then Morph-Kago through the top Spike-Platform.",
"devNote": "About equivalent to waiting, if there is no form of damage reduction."
},
{
"link": [
5,
1
],
"name": "Kzan Double Kago",
"requires": [
"canKago",
"Morph",
"canResetFallSpeed",
{
"enemyDamage": {
"enemy": "Kzan",
"type": "contact",
"hits": 1
}
},
{
"heatFrames": 180
}
],
"note": "Morph Kago through the top Spike platform and use the I-Frames to Kago again through the second.",
"devNote": "Useful when enemy damage can be reduced while still taking full heat damage."
},
{
"link": [
5,
4
],
"name": "The Way is Clear",
"requires": [
{
"obstaclesCleared": [
"A",
"C",
"D"
]
},
{
"heatFrames": 120
}
]
},
{
"link": [
5,
4
],
"name": "Tank the Damage",
"requires": [
{
"or": [
{
"obstaclesCleared": [
"A"
]
},
"h_canUsePowerBombs"
]
},
{
"heatFrames": 240
},
{
"enemyDamage": {
"enemy": "Dessgeega",
"type": "contact",
"hits": 1
}
}
],
"clearsObstacles": [
"A",
"B"
]
},
{
"link": [
5,
4
],
"name": "Screw Kill",
"requires": [
{
"or": [
{
"obstaclesCleared": [
"A"
]
},
"h_canUsePowerBombs"
]
},
"ScrewAttack",
{
"heatFrames": 270
}
],
"clearsObstacles": [
"A",
"B",
"D"
]
},
{
"link": [
5,
4
],
"name": "Supers Kill",
"requires": [
{
"or": [
{
"obstaclesCleared": [
"A"
]
},
"h_canUsePowerBombs"
]
},
{
"enemyKill": {
"enemies": [
[
"Dessgeega"
],
[
"Dessgeega",
"Dessgeega",
"Dessgeega"
]
],
"explicitWeapons": [
"Super"
]
}
},
{
"heatFrames": 600
}
],
"clearsObstacles": [
"A",
"B",
"C",
"D"
]
},
{
"link": [
5,
4
],
"name": "Missile Kill",
"requires": [
{
"or": [
{
"obstaclesCleared": [
"A"
]
},
"h_canUsePowerBombs"
]
},
"canDodgeWhileShooting",
{
"enemyKill": {
"enemies": [
[
"Dessgeega"
],
[
"Dessgeega",
"Dessgeega",
"Dessgeega"
]
],
"explicitWeapons": [
"Missile"
]
}
},
{
"heatFrames": 720
}
],
"clearsObstacles": [
"A",
"B",
"C",
"D"
],
"note": [
"Safely kill the left two Dessgeegas where the Power Bomb statue used to be.",
"Lure the right side Ceiling hopper to the left before dealing with it."
]
},
{
"link": [
5,
4
],
"name": "Power Bomb Kill",
"requires": [
"Morph",
{
"ammo": {
"type": "PowerBomb",
"count": 5
}
},
"canDodgeWhileShooting",
{
"or": [
"canHitbox",
{
"enemyDamage": {
"enemy": "Dessgeega",
"type": "contact",
"hits": 1
}
}
]
},
{
"heatFrames": 1080
}
],
"clearsObstacles": [
"A",
"B",
"C",
"D"
]
},
{
"link": [
5,
4
],
"name": "Beam Kill",
"requires": [
{
"or": [
{
"obstaclesCleared": [
"A"
]
},
"h_canUsePowerBombs"
]
},
{
"or": [
{
"and": [
"Plasma",
{
"or": [
"Ice",
"Wave"
]
},
{
"heatFrames": 540
}
]
},
{
"and": [
"canDodgeWhileShooting",
"Plasma",
{
"heatFrames": 1020
}
]
},
{
"and": [
"canDodgeWhileShooting",
"Ice",
"Spazer",
"Wave",
{
"heatFrames": 1800
}
]
},
{
"and": [
"canDodgeWhileShooting",
"Spazer",
{
"heatFrames": 3000
}
]
}
]
}
],
"clearsObstacles": [
"A",
"B",
"C",
"D"
],
"note": [
"Safely kill the left two Dessgeegas where the Power Bomb statue used to be.",
"Lure the right side Ceiling hopper to the left before dealing with it."
]
},
{
"link": [
5,
5
],
"name": "Crystal Flash",
"requires": [
"h_canHeatedCrystalFlash"
],
"clearsObstacles": [
"A",
"B"
]
},
{
"link": [
5,
6
],
"name": "The Way is Clear",
"requires": [
{
"obstaclesCleared": [
"A",
"C"
]
},
{
"heatFrames": 180
}
]
},
{
"link": [
5,
6
],
"name": "Tank a Dessgeega Hit",
"requires": [
{
"or": [
{
"obstaclesCleared": [
"A"
]
},
"h_canUsePowerBombs"
]
},
{
"enemyDamage": {
"enemy": "Dessgeega",
"type": "contact",
"hits": 1
}
},
{
"heatFrames": 255
}
],
"clearsObstacles": [
"A",
"B"
]
},
{
"link": [
5,
6
],
"name": "Screw Attack",
"requires": [
{
"or": [
{
"obstaclesCleared": [
"A"
]
},
"h_canUsePowerBombs"
]
},
"ScrewAttack",
{
"heatFrames": 240
}
],
"clearsObstacles": [
"A",
"B",
"C"
]
},
{
"link": [
5,
6
],
"name": "Kill Dessgeega (Fast)",
"requires": [
{
"or": [
{
"obstaclesCleared": [
"A"
]
},
"h_canUsePowerBombs"
]
},
{
"enemyKill": {
"enemies": [
[
"Dessgeega"
]
],
"explicitWeapons": [
"Wave+Plasma",
"Ice+Plasma",
"Missile",
"Super"
]
}
},
{
"heatFrames": 350
}
],
"clearsObstacles": [
"A",
"B",
"C"
]
},
{
"link": [
5,
6
],
"name": "Kill Dessgeega (Medium)",
"requires": [
{
"or": [
{
"obstaclesCleared": [
"A"
]
},
"h_canUsePowerBombs"
]
},
{
"enemyKill": {
"enemies": [
[
"Dessgeega"
]
],
"explicitWeapons": [
"Ice+Wave+Spazer",
"Plasma",
"PowerBomb"
]
}
},
{
"heatFrames": 420
}
],
"clearsObstacles": [
"A",
"B",
"C"
],
"note": "Stand crouched where the statue used to be to safely kill the Dessgeega.",
"devNote": "Hitboxing with a Power Bomb while breaking the statue is not reliable."
},
{
"link": [
5,
6
],
"name": "Kill Dessgeega (Slow)",
"requires": [
{
"or": [
{
"obstaclesCleared": [
"A"
]
},
"h_canUsePowerBombs"
]
},
{
"or": [
"Charge",
"Spazer"
]
},
{
"heatFrames": 900
}
],
"note": "Stand crouched where the statue used to be to safely kill the Dessgeega.",
"clearsObstacles": [
"A",
"B",
"C"
]
},
{
"link": [
5,
7
],
"name": "Wasteland Statue Clip Damage Boost (HiJump)",
"notable": true,
"requires": [
{
"obstaclesNotCleared": [
"A"
]
},
"h_canUsePowerBombs",
"HiJump",
"canPartialFloorClip",
"canCeilingClip",
"canHorizontalDamageBoost",
"canHitbox",
{
"enemyDamage": {
"enemy": "Dessgeega",
"type": "contact",
"hits": 1
}
},
{
"heatFrames": 225
}
],
"reusableRoomwideNotable": "Wasteland Statue Clip Damage Boost",
"note": [
"Break the Power Bomb statue leaving 1 row of blocks.",
"Partially clip beneath the Power Bomb blocks and the sold tiles beneath.",
"Wait for a Dessgeega to jump over head and jump into it.",
"The left ceiling Dessgeega works better.",
"Damage boost to the right and use I-Frames to run through all of the enemies."
]
},
{
"link": [
5,
7
],
"name": "Wasteland HiJumpless Statue Clip Damage Boost",
"notable": true,
"requires": [
{
"obstaclesNotCleared": [
"A"
]
},
"h_canUsePowerBombs",
"canTrickyJump",
"canPartialFloorClip",
"canCeilingClip",
"canHorizontalDamageBoost",
"canHitbox",
{
"enemyDamage": {
"enemy": "Dessgeega",
"type": "contact",
"hits": 1
}
},
{
"heatFrames": 225
}
],
"reusableRoomwideNotable": "Wasteland HiJumpless Statue Clip Damage Boost",
"note": [
"Break the Power Bomb statue leaving 1 row of blocks.",
"Partially clip beneath the Power Bomb blocks and the sold tiles beneath.",
"Wait for a Dessgeega to jump over head and jump into it.",
"The left ceiling Dessgeega works better.",
"Aim down after jumping in order to fully boost over the solid statue.",
"Damage boost to the right and use I-Frames to run through all of the enemies."
]
},
{
"link": [
5,
8
],
"name": "Wasteland Statue Clip Damage Boost (HiJump, SpeedBall)",
"notable": true,
"requires": [
{
"obstaclesNotCleared": [
"A"
]
},
"h_canUsePowerBombs",
"HiJump",
"canPartialFloorClip",
"canCeilingClip",
"canHorizontalDamageBoost",
"canHitbox",
"canSpeedball",
{
"canShineCharge": {
"usedTiles": 16,
"openEnd": 1
}
},
{
"enemyDamage": {
"enemy": "Dessgeega",
"type": "contact",
"hits": 1
}
},
{
"heatFrames": 390
},
{
"or": [
"h_canUseSpringBall",
{
"hibashiHits": 1
}
]
}
],
"reusableRoomwideNotable": "Wasteland Statue Clip Damage Boost",
"note": [
"Break the Power Bomb statue leaving 1 row of blocks.",
"Partially clip beneath the Power Bomb blocks and the sold tiles beneath.",
"Wait for a Dessgeega to jump over head and jump into it.",
"The left ceiling Dessgeega works better.",
"Damage boost to the right and use I-Frames to run through all of the enemies.",
"Begin shortcharging while running through the Dessgeegas for a speedball.",
"It may help to end the damage boost early, but then it becomes more difficult to stutter for the shortcharge."
]
},
{
"link": [
5,
8
],
"name": "Wasteland HiJumpless Statue Clip Damage Boost (SpeedBall)",
"notable": true,
"requires": [
{
"obstaclesNotCleared": [
"A"
]
},
"h_canUsePowerBombs",
"canPartialFloorClip",
"canCeilingClip",
"canTrickyJump",
"canHorizontalDamageBoost",
"canHitbox",
"canSpeedball",
{
"canShineCharge": {
"usedTiles": 16,
"openEnd": 1
}
},
{
"enemyDamage": {
"enemy": "Dessgeega",
"type": "contact",
"hits": 1
}
},
{
"heatFrames": 390
},
{
"or": [
"h_canUseSpringBall",
{
"hibashiHits": 1
}
]
}
],
"reusableRoomwideNotable": "Wasteland HiJumpless Statue Clip Damage Boost",
"note": [
"Break the Power Bomb statue leaving 1 row of blocks.",
"Partially clip beneath the Power Bomb blocks and the sold tiles beneath.",
"Wait for a Dessgeega to jump over head and jump into it.",
"The left ceiling Dessgeega works better.",
"Aim down after jumping in order to fully boost over the solid statue.",
"Damage boost to the right and use I-Frames to run through all of the enemies.",
"Begin shortcharging while running through the Dessgeegas for a speedball.",
"It may help to end the damage boost early, but then it becomes more difficult to stutter for the shortcharge."
]
},
{
"link": [
6,
3
],
"name": "Base",
"requires": [
"Morph",
{
"heatFrames": 100
},
{
"obstaclesCleared": [
"B"
]
}
]
},
{
"link": [
6,
3
],
"name": "Screw",
"requires": [
"ScrewAttack",
"Morph",
{
"heatFrames": 120
}
],
"clearsObstacles": [
"B"
]
},
{
"link": [
6,
3
],
"name": "Bombs",
"requires": [
"h_canUseMorphBombs",
{
"heatFrames": 150
}
],
"clearsObstacles": [
"B"
]
},
{
"link": [
6,
3
],
"name": "Power Bomb",
"requires": [
"h_canNavigateHeatRooms",
"h_canUsePowerBombs",
{
"heatFrames": 210
}
],
"clearsObstacles": [
"A",
"B"
],
"devNote": "The xray climb would need to wait for the explosion. Other strats may break the block earlier."
},
{
"link": [
6,
4
],
"name": "Clear Path",
"requires": [
{
"heatFrames": 150
},
{
"obstaclesCleared": [
"C",
"D"
]
}
]
},
{
"link": [
6,
4
],
"name": "Tank the Damage",
"requires": [
{
"heatFrames": 170
},
{
"enemyDamage": {
"enemy": "Dessgeega",
"type": "contact",
"hits": 1
}
}
]
},
{
"link": [
6,
4
],
"name": "Screw Kill",
"requires": [
"ScrewAttack",
{
"heatFrames": 270
}
],
"clearsObstacles": [
"C",
"D"
]
},
{
"link": [
6,
4
],
"name": "Quick Dessgeega Kill",
"requires": [
{
"or": [
{
"obstaclesCleared": [
"C"
]
},
{
"and": [
{
"enemyKill": {
"enemies": [
[
"Dessgeega"
]
],
"explicitWeapons": [
"Super",
"Missile",
"Plasma",
"Ice+Wave+Spazer"
]
}
},
{
"heatFrames": 75
}
]
}
]
},
{
"or": [
{
"obstaclesCleared": [
"D"
]
},
{
"and": [
{
"enemyKill": {
"enemies": [
[
"Dessgeega",
"Dessgeega",
"Dessgeega"
]
],
"explicitWeapons": [
"Super",
"Missile",
"Plasma",
"Ice+Wave+Spazer"
]
}
},
{
"heatFrames": 315
}
]
}
]
},
{
"heatFrames": 150
}
],
"clearsObstacles": [
"C",
"D"
]
},
{
"link": [
6,
4
],
"name": "Slow Kill",
"requires": [
"h_heatProof",
{
"or": [
"Charge",
"Spazer"
]
},
"canBePatient"
],
"clearsObstacles": [
"C",
"D"
]
},
{
"link": [
6,
5
],
"name": "Clear Path",
"requires": [
{
"heatFrames": 150
},
{
"obstaclesCleared": [
"A",
"C"
]
}
]
},
{
"link": [
6,
5
],
"name": "Take Damage",
"requires": [
{
"or": [
"h_canUsePowerBombs",
{
"obstaclesCleared": [
"A"
]
}
]
},
{
"enemyDamage": {
"enemy": "Dessgeega",
"type": "contact",
"hits": 1
}
},
{
"heatFrames": 240
}
],
"clearsObstacles": [
"A",
"B"
]
},
{
"link": [
6,
5
],
"name": "HitBox enemy (Power Bomb)",
"requires": [
"h_canUsePowerBombs",
"canHitbox",
{
"heatFrames": 240
}
],
"clearsObstacles": [
"A",
"B"
]
},
{
"link": [
6,
5
],
"name": "Screw Attack",
"requires": [
{
"or": [
"h_canUsePowerBombs",
{
"obstaclesCleared": [
"A"
]
}
]
},
"ScrewAttack",
{
"heatFrames": 240
}
],
"clearsObstacles": [
"A",
"B",
"C"
]
},
{
"link": [
6,
5
],
"name": "Fast Kill",
"requires": [
{
"or": [
"h_canUsePowerBombs",
{
"obstaclesCleared": [
"A"
]
}
]
},
{
"enemyKill": {
"enemies": [
[
"Dessgeega"
]
],
"explicitWeapons": [
"Super",
"Missile",
"Plasma",
"Ice+Wave+Spazer"
]
}
},
{
"heatFrames": 360
}
],
"clearsObstacles": [
"A",
"B",
"C"
]
},
{
"link": [
6,
5
],
"name": "Slow Kill",
"requires": [
"h_heatProof",
{
"or": [
"h_canUsePowerBombs",
{
"obstaclesCleared": [
"A"
]
}
]
},
{
"or": [
"Charge",
"Spazer"
]
}
],
"clearsObstacles": [
"A",
"B",
"C"
]
},
{
"link": [
6,
6
],
"name": "Crystal Flash",
"requires": [
"h_canHeatedCrystalFlash",
{
"or": [
{
"obstaclesCleared": [
"B"
]
},
{
"obstaclesCleared": [
"C"
]
}
]
}
],
"clearsObstacles": [
"A",
"B"
],
"devNote": [
"FIXME: This can have a side effect of damaging the Dessgeega which is not modelled."
]
},
{
"link": [
7,
4
],
"name": "Base",
"requires": [
"h_canNavigateHeatRooms",
{
"heatFrames": 120
},
{
"obstaclesCleared": [
"D"
]
}
]
},
{
"link": [
7,
4
],
"name": "Tank the Damage",
"requires": [
{
"heatFrames": 150
},
{
"enemyDamage": {
"enemy": "Dessgeega",
"type": "contact",
"hits": 1
}
}
]
},
{
"link": [
7,
4
],
"name": "Wasteland Avoid Dessgeegas by Rolling",
"notable": true,
"requires": [
"Morph",
"canCameraManip",
{
"heatFrames": 210
}
],
"note": [
"Roll under the Dessgeegas until all three move off camera and stop chasing Samus.",
"Roll directly from the Morph tunnel, past the first Dessgeega.",
"Stop and let it jump left of Samus, then move it off camera on the next jump.",
"Back away from the Left ground hopper then roll under it.",
"Lastly, manipulate the ceiling hopper off camera if it has followed Samus this far."
]
},
{
"link": [
7,
4
],
"name": "Avoid Dessgeegas (Mockball)",
"requires": [
"Morph",
{
"or": [
"canTrickyJump",
{
"and": [
"h_canUsePowerBombs",
"canCarefulJump",
"canHitbox"
]
}
]
},
"canMockball",
{
"heatFrames": 210
}
],
"note": [
"Let the right hopper jump twice towards Samus.",
"At the start of the second jump, jump above where the ground Dessgeega can jump but below where the ceiling enemy can reach.",
"Mockball below the third hopper."
],
"devNote": "FIXME: The Power Bomb from breaking the tunnel bomb block could be used for this strat."
},
{
"link": [
7,
4
],
"name": "HeatProof Bombs Kill",
"requires": [
"h_heatProof",
"canBePatient",
"h_canUseMorphBombs"
],
"clearsObstacles": [
"C",
"D"
],
"note": [
"Lure the Ground Hoppers to the Morph Tunnel",
"The left ceiling Dessgeega can be safely killed above the Power Bomb statue."
],
"devNote": "Other Slow kill methods may need to take contact damage."
},
{
"link": [
7,
4
],
"name": "Screw Kill",
"requires": [
"ScrewAttack",
{
"heatFrames": 150
}
],
"clearsObstacles": [
"D"
]
},
{
"link": [
7,
4
],
"name": "Supers Kill",
"requires": [
"h_canNavigateHeatRooms",
{
"enemyKill": {
"enemies": [
[
"Dessgeega",
"Dessgeega",
"Dessgeega"
]
],
"explicitWeapons": [
"Super"
]
}
},
{
"heatFrames": 420
}
],
"clearsObstacles": [
"D"
]
},
{
"link": [
7,
4
],
"name": "Strong Beam Kill",
"requires": [
"Plasma",
{
"or": [
"Ice",
"Wave"
]
},
{
"heatFrames": 480
}
],
"clearsObstacles": [
"D"
]
},
{
"link": [
7,
4
],
"name": "Weapon Kill (Moderate)",
"requires": [
"canDodgeWhileShooting",
{
"enemyKill": {
"enemies": [
[
"Dessgeega"
],
[
"Dessgeega"
],
[
"Dessgeega"
]
],
"explicitWeapons": [
"Missile",
"PowerBomb",
"Plasma",
"Charge+Ice+Wave+Spazer"
]
}
},
{
"enemyDamage": {
"enemy": "Dessgeega",
"type": "contact",
"hits": 2
}
},
{
"heatFrames": 1020
}
],
"clearsObstacles": [
"D"
]
},
{
"link": [
7,
6
],
"name": "Speed Kill",
"requires": [
{
"obstaclesCleared": [
"D"
]
},
{
"canShineCharge": {
"usedTiles": 20,
"openEnd": 1,
"steepDownTiles": 4
}
},
"canCarefulJump",
{
"heatFrames": 200
}
],
"clearsObstacles": [
"C"
]
},
{
"link": [
7,
6
],
"name": "Temporary Blue",
"requires": [
{
"obstaclesCleared": [
"C",
"D"
]
},
{
"canShineCharge": {
"usedTiles": 20,
"openEnd": 1,
"steepDownTiles": 4
}
},
"canCarefulJump",
"canChainTemporaryBlue",
{
"heatFrames": 240
}
],
"clearsObstacles": [
"B"
],
"devNote": "It is easier to chainTemporaryBlue than to unmorph at the correct timing."
},
{
"link": [
7,
7
],
"name": "Crystal Flash",
"requires": [
"h_canHeatedCrystalFlash"
],
"devNote": [
"FIXME: This can have a side effect of damaging the Dessgeega or breaking the bomb blocks, neither of which are modeled."
]
},
{
"link": [
7,
7
],
"name": "Shinespark Kill",
"requires": [
{
"canShineCharge": {
"usedTiles": 17,
"openEnd": 1
}
},
{
"enemyDamage": {
"enemy": "Dessgeega",
"type": "contact",
"hits": 1
}
},
"canHitbox",
"canMidairShinespark",
"canShinechargeMovementComplex",
{
"shinespark": {
"frames": 40
}
},
{
"heatFrames": 310
}
],
"clearsObstacles": [
"D"
],
"note": [
"Use I-Frames from the first Dessgeega to run through the remaining enemies and store a shinespark.",
"It helps to run towards the first hopper to take damage and then not stutter.",
"Mid-air spark to kill all three at once."
]
},
{
"link": [
7,
8
],
"name": "Avoid Hibashi",
"requires": [
"h_heatResistant",
"h_canBombThings",
"h_canUsePowerBombs",
{
"heatFrames": 350
}
],
"note": [
"The hibashi hit can be avoided by waiting for the pillar to go up.",
"That requires the use of one PB and more time than is worth unless heat proof."
],
"devNote": "Note that if using PBs, two is required. One each from h_canBombThings, h_canUsePowerBombs."
},
{
"link": [
7,
8
],
"name": "Bombs",
"requires": [
"h_canUseMorphBombs",
{
"heatFrames": 350
},
{
"hibashiHits": 1
}
]
},
{
"link": [
7,
8
],
"name": "Power Bombs",
"requires": [
"h_canNavigateHeatRooms",
"Morph",
{
"ammo": {
"type": "PowerBomb",
"count": 2
}
},
{
"heatFrames": 350
},
{
"hibashiHits": 1
}
]
},
{
"link": [
8,
2
],
"name": "Base",
"requires": [
{
  "heatFrames": 60
}
]
},
{
"link": [
8,
2
],
"name": "Leave With Door Frame Below",
"requires": [
{
  "heatFrames": 60
}
],
"exitCondition": {
"leaveWithDoorFrameBelow": {
"height": 2
}
},
"unlocksDoors": [
{
"types": [
"missiles"
],
"requires": [
{
"heatFrames": 50
}
]
},
{
"types": [
"super"
],
"requires": []
},
{
"types": [
"powerbomb"
],
"requires": [
{
"heatFrames": 110
}
]
}
]
},
{
"link": [
8,
2
],
"name": "Leave With Platform Below",
"requires": [
{
  "heatFrames": 60
}
],
"exitCondition": {
"leaveWithPlatformBelow": {
"height": 6,
"leftPosition": -1.5,
"rightPosition": 1.5
}
},
"unlocksDoors": [
{
"types": [
"missiles"
],
"requires": [
{
"heatFrames": 50
}
]
},
{
"types": [
"super"
],
"requires": []
},
{
"types": [
"powerbomb"
],
"requires": [
{
"heatFrames": 110
}
]
}
]
},
{
"link": [
8,
7
],
"name": "Morph Bombs",
"requires": [
{
"or": [
"canCarefulJump",
{
"hibashiHits": 1
}
]
},
"h_canUseMorphBombs",
{
"heatFrames": 300
}
]
},
{
"link": [
8,
7
],
"name": "Power Bombs",
"requires": [
{
"or": [
"canCarefulJump",
{
"hibashiHits": 1
}
]
},
"Morph",
{
"ammo": {
"type": "PowerBomb",
"count": 2
}
},
{
"or": [
{
"heatFrames": 270
},
{
"and": [
"canPrepareForNextRoom",
{
"heatFrames": 240
}
]
}
]
}
]
},
{
"link": [
8,
8
],
"name": "Crystal Flash",
"requires": [
"h_canHeatedCrystalFlash"
],
"devNote": [
"FIXME: This can have a side effect of damaging the Bomb block which is not modelled."
]
}
]
}