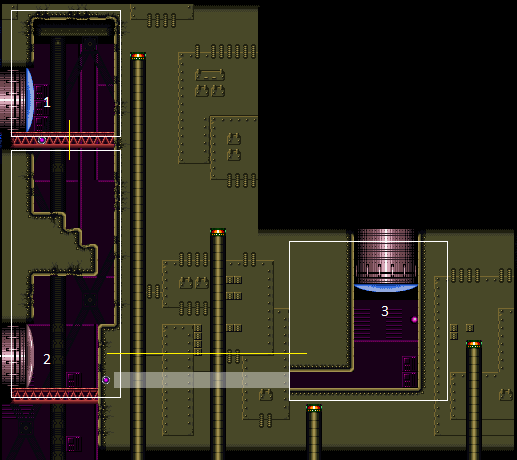
Warehouse Zeela Room
Room ID: 79
|
Requires: {
"resetRoom": {
"nodes": [
1,
2
],
"mustStayPut": false
}
}
{
"refill": [
"Energy",
"Missile",
"Super"
]
}
|
|
Exit condition: {
"leaveWithRunway": {
"length": 6,
"openEnd": 0
}
}
|
|
Requires: "h_canCrystalFlash" |
|
From: 1
Top Left Door
To: 1
Top Left Door
Exit condition: {
"leaveWithGModeSetup": {}
}
|
|
Requires: {
"enemyDamage": {
"enemy": "Zeela",
"type": "contact",
"hits": 1
}
}
|
|
|
|
From: 1
Top Left Door
To: 2
Bottom Left Door
Gain a shinecharging while entering the room, and angle diagonally down to shoot the block. While falling, kill the Zeela or perform a Kago through it. Quickly reach the door below and spark out. Entrance condition: {
"comeInShinecharging": {
"length": 5,
"openEnd": 0
}
}
Requires: {
"or": [
{
"enemyKill": {
"enemies": [
[
"Zeela"
]
],
"explicitWeapons": [
"Wave",
"Spazer",
"Plasma",
"Missile",
"Super"
]
}
},
{
"and": [
"canKago",
{
  "enemyDamage": {
    "enemy": "Zeela",
    "type": "contact",
    "hits": 1
  }
}
]
}
]
}
"canShinechargeMovementTricky"
{
"shinespark": {
"frames": 5
}
}
Exit condition: {
"leaveWithSpark": {}
}
|
|
From: 1
Top Left Door
To: 2
Bottom Left Door
Enter with a shinecharge, jumping and aiming down and shoot the block. While falling, kill the Zeela or perform a Kago through it. Quickly reach the door below and spark out. Entrance condition: {
"comeInShinecharged": {
"framesRequired": 165
}
}
Requires: {
"or": [
{
"enemyKill": {
"enemies": [
[
"Zeela"
]
],
"explicitWeapons": [
"Wave",
"Spazer",
"Plasma",
"Missile",
"Super"
]
}
},
{
"and": [
"canKago",
{
  "enemyDamage": {
    "enemy": "Zeela",
    "type": "contact",
    "hits": 1
  }
}
]
}
]
}
"canShinechargeMovementTricky"
{
"shinespark": {
"frames": 4
}
}
Exit condition: {
"leaveWithSpark": {}
}
|
|
|
|
From: 2
Bottom Left Door
To: 1
Top Left Door
Enter with G-mode direct, back up to between 1 and 6 pixels from the door transition, and activate X-ray to get very deep stuck in the door. The camera will be messed up, so you will need to move blindly to get into position. Don't wait too long or the Zeela will hit you. Climb up 1 screen, and perform a turnaround buffered spin-jump away from the door to trigger the transition, bypassing any lock on the door. Entrance condition: {
"comeInWithGMode": {
"mode": "direct",
"morphed": false
}
}
Requires: "canXRayClimb" Bypasses door shell: true |
|
From: 2
Bottom Left Door
To: 1
Top Left Door
Enter with a shinecharge, and move up toward the door above. Use Wave or Plasma to shoot open the door from below while killing the approaching Zeelas. Entrance condition: {
"comeInShinecharging": {
"length": 4,
"openEnd": 0
}
}
Requires: {
"enemyKill": {
"enemies": [
[
"Zeela"
]
],
"explicitWeapons": [
"Wave",
"Plasma"
]
}
}
"canShinechargeMovementTricky"
{
"shinespark": {
"frames": 2
}
}
Exit condition: {
"leaveWithSpark": {}
}
|
|
From: 2
Bottom Left Door
To: 1
Top Left Door
Enter with a shinecharge, and move up toward the door above. Use Wave or Plasma to shoot open the door from below while killing the approaching Zeelas. Entrance condition: {
"comeInShinecharged": {
"framesRequired": 160
}
}
Requires: {
"enemyKill": {
"enemies": [
[
"Zeela"
]
],
"explicitWeapons": [
"Wave",
"Plasma"
]
}
}
"canShinechargeMovementTricky"
{
"shinespark": {
"frames": 2
}
}
Exit condition: {
"leaveWithSpark": {}
}
|
|
Exit condition: {
"leaveWithRunway": {
"length": 5,
"openEnd": 0
}
}
|
|
From: 2
Bottom Left Door
To: 2
Bottom Left Door
Exit condition: {
"leaveWithGModeSetup": {}
}
|
|
From: 2
Bottom Left Door
To: 2
Bottom Left Door
Requires: {
"enemyDamage": {
"enemy": "Zeela",
"type": "contact",
"hits": 1
}
}
|
|
Requires: "h_canBombThings" |
|
From: 2
Bottom Left Door
To: 3
Right Vertical Door
Entrance condition: {
"comeInSpeedballing": {
"runway": {
"length": 4,
"openEnd": 0
}
}
}
|
|
From: 2
Bottom Left Door
To: 3
Right Vertical Door
Entrance condition: {
"comeInShinecharging": {
"length": 3,
"openEnd": 0
}
}
Requires: "canTemporaryBlue" "canLateralMidAirMorph" |
|
From: 2
Bottom Left Door
To: 3
Right Vertical Door
Moonfall to clip into the ground and then spinjump up from the ground to break the Bomb block using Screw Attack. Entrance condition: {
"comeInWithStoredFallSpeed": {
"fallSpeedInTiles": 2
}
}
Requires: "ScrewAttack" "Morph" |
|
From: 2
Bottom Left Door
To: 3
Right Vertical Door
Notable: true Freeze two Zeelas, one on the left wall below the top door platform, and one on the right wall between 1 and 2 tiles lower, both moving downward; Kill the third Zeela. Go to the bottom of the room, unequip ice to thaw the Zeelas, synchronizing their movement. Freeze the right Zeela after it turns past the single-tile ledge, with its top level with or slightly above the ledge; then freeze the left Zeela just before it turns the corner above. Quickly moonfall between them, and shoot the bottom Zeela (or slide past its edge) just before it thaws. If successful, Samus will clip down through two tiles and end up crouching. Press forward to stand, then perform another moonfall to clip down further, breaking the bomb block with Screw Attack. Unmorph and morph once or twice if needed to get unstuck from the floor. Requires: "canEnemyStuckMoonfall" "canTrickyUseFrozenEnemies" "ScrewAttack" "Morph" |
|
From: 2
Bottom Left Door
To: 3
Right Vertical Door
Wiggle back and forth to get through the bomb blocks before the Zeela hits Samus. Entrance condition: {
"comeInWithGMode": {
"mode": "any",
"morphed": true
}
}
|
|
Requires: "h_canBombThings" |
|
From: 3
Right Vertical Door
To: 2
Bottom Left Door
Wiggle back and forth to get through the bomb blocks while avoiding the off screen Zeela. Unmorph and exit G-Mode then quickly run back and forth to fix the camera or go through the door. Entrance condition: {
"comeInWithGMode": {
"mode": "any",
"morphed": true
},
"comesThroughToilet": "any"
}
Requires: "canOffScreenMovement" |
|
From: 3
Right Vertical Door
To: 3
Right Vertical Door
Freeze a Zeela at a precise distance below the door in order to jump up and clip through the door shell. The pixel window is larger and higher with Morph and an X-Ray stand-up. Requires: "canTrickyUseFrozenEnemies" "h_canNonTrivialCeilingClip" Bypasses door shell: true |
|
From: 3
Right Vertical Door
To: 3
Right Vertical Door
Requires: "h_canCrystalFlash" |
|
From: 3
Right Vertical Door
To: 3
Right Vertical Door
Exit condition: {
"leaveWithDoorFrameBelow": {
"height": 8
}
}
|
|
From: 3
Right Vertical Door
To: 3
Right Vertical Door
Exit condition: {
"leaveWithPlatformBelow": {
"height": 9,
"leftPosition": -2,
"rightPosition": 2
}
}
|
|
From: 3
Right Vertical Door
To: 3
Right Vertical Door
Requires: "canUpwardGModeSetup" "canTrickyUseFrozenEnemies" "h_canBombThings" Exit condition: {
"leaveWithGModeSetup": {}
}
|
{
"$schema": "../../../schema/m3-room.schema.json",
"id": 79,
"name": "Warehouse Zeela Room",
"area": "Brinstar",
"subarea": "Kraid",
"playable": true,
"roomAddress": "0x7A471",
"roomEnvironments": [
{
"heated": false
}
],
"nodes": [
{
"id": 1,
"name": "Top Left Door",
"nodeType": "door",
"nodeSubType": "blue",
"nodeAddress": "0x001913e",
"doorEnvironments": [
{
"physics": "air"
}
]
},
{
"id": 2,
"name": "Bottom Left Door",
"nodeType": "door",
"nodeSubType": "grey",
"nodeAddress": "0x001914a",
"doorEnvironments": [
{
"physics": "air"
}
],
"locks": [
{
"name": "Warehouse Zeela Room Grey Lock (to E-Tank)",
"lockType": "gameFlag",
"unlockStrats": [
{
"name": "Base",
"notable": false,
"requires": [
"f_DefeatedKraid"
]
}
]
}
]
},
{
"id": 3,
"name": "Right Vertical Door",
"nodeType": "door",
"nodeSubType": "blue",
"nodeAddress": "0x0019156",
"doorEnvironments": [
{
"physics": "air"
}
]
}
],
"enemies": [
{
"id": "e1",
"groupName": "Warehouse Top Zeelas",
"enemyName": "Zeela",
"quantity": 2,
"homeNodes": [
1
]
},
{
"id": "e2",
"groupName": "Warehouse Bottom Zeela",
"enemyName": "Zeela",
"quantity": 1,
"homeNodes": [
2
]
}
],
"links": [
{
"from": 1,
"to": [
{
"id": 1
},
{
"id": 2
}
]
},
{
"from": 2,
"to": [
{
"id": 1
},
{
"id": 2
},
{
"id": 3
}
]
},
{
"from": 3,
"to": [
{
"id": 2
},
{
"id": 3
}
]
}
],
"strats": [
{
"link": [
1,
1
],
"name": "Zeela Farm",
"requires": [
{
"resetRoom": {
"nodes": [
1,
2
],
"mustStayPut": false
}
},
{
"refill": [
"Energy",
"Missile",
"Super"
]
}
],
"devNote": [
"FIXME: Node 3 could be used to reset the room, with additional requirements."
]
},
{
"link": [
1,
1
],
"name": "Leave With Runway",
"requires": [],
"exitCondition": {
"leaveWithRunway": {
"length": 6,
"openEnd": 0
}
}
},
{
"link": [
1,
1
],
"name": "Crystal Flash",
"requires": [
"h_canCrystalFlash"
]
},
{
"link": [
1,
1
],
"name": "G-Mode Setup - Get Hit By Zeela",
"notable": false,
"requires": [],
"exitCondition": {
"leaveWithGModeSetup": {}
}
},
{
"link": [
1,
1
],
"name": "G-Mode Regain Mobility",
"requires": [
{
"enemyDamage": {
"enemy": "Zeela",
"type": "contact",
"hits": 1
}
}
],
"gModeRegainMobility": {}
},
{
"link": [
1,
2
],
"name": "Base",
"requires": []
},
{
"link": [
1,
2
],
"name": "Come in Shinecharging, Leave With Spark",
"entranceCondition": {
"comeInShinecharging": {
"length": 5,
"openEnd": 0
}
},
"requires": [
{
"or": [
{
"enemyKill": {
"enemies": [
[
"Zeela"
]
],
"explicitWeapons": [
"Wave",
"Spazer",
"Plasma",
"Missile",
"Super"
]
}
},
{
"and": [
"canKago",
{
"enemyDamage": {
"enemy": "Zeela",
"type": "contact",
"hits": 1
}
}
]
}
]
},
"canShinechargeMovementTricky",
{
"shinespark": {
"frames": 5
}
}
],
"exitCondition": {
"leaveWithSpark": {}
},
"unlocksDoors": [
{
"types": [
"super"
],
"requires": []
},
{
"types": [
"missiles",
"powerbomb"
],
"requires": [
"never"
]
}
],
"note": [
"Gain a shinecharging while entering the room, and angle diagonally down to shoot the block.",
"While falling, kill the Zeela or perform a Kago through it.",
"Quickly reach the door below and spark out."
]
},
{
"link": [
1,
2
],
"name": "Come in Shinecharged, Leave With Spark",
"entranceCondition": {
"comeInShinecharged": {
"framesRequired": 165
}
},
"requires": [
{
"or": [
{
"enemyKill": {
"enemies": [
[
"Zeela"
]
],
"explicitWeapons": [
"Wave",
"Spazer",
"Plasma",
"Missile",
"Super"
]
}
},
{
"and": [
"canKago",
{
"enemyDamage": {
"enemy": "Zeela",
"type": "contact",
"hits": 1
}
}
]
}
]
},
"canShinechargeMovementTricky",
{
"shinespark": {
"frames": 4
}
}
],
"exitCondition": {
"leaveWithSpark": {}
},
"unlocksDoors": [
{
"types": [
"super"
],
"requires": []
},
{
"types": [
"missiles",
"powerbomb"
],
"requires": [
"never"
]
}
],
"note": [
"Enter with a shinecharge, jumping and aiming down and shoot the block.",
"While falling, kill the Zeela or perform a Kago through it.",
"Quickly reach the door below and spark out."
],
"devNote": [
"FIXME: Add faster strat that morphs and takes a neutral damage boost off the Zeela and then down-backs."
]
},
{
"link": [
2,
1
],
"name": "Base",
"requires": []
},
{
"link": [
2,
1
],
"name": "Very Deep Stuck X-Ray Climb",
"entranceCondition": {
"comeInWithGMode": {
"mode": "direct",
"morphed": false
}
},
"requires": [
"canXRayClimb"
],
"bypassesDoorShell": true,
"note": [
"Enter with G-mode direct, back up to between 1 and 6 pixels from the door transition, and activate X-ray to get very deep stuck in the door.",
"The camera will be messed up, so you will need to move blindly to get into position.",
"Don't wait too long or the Zeela will hit you.",
"Climb up 1 screen, and perform a turnaround buffered spin-jump away from the door to trigger the transition, bypassing any lock on the door."
]
},
{
"link": [
2,
1
],
"name": "Come in Shinecharging, Leave With Spark",
"entranceCondition": {
"comeInShinecharging": {
"length": 4,
"openEnd": 0
}
},
"requires": [
{
"enemyKill": {
"enemies": [
[
"Zeela"
]
],
"explicitWeapons": [
"Wave",
"Plasma"
]
}
},
"canShinechargeMovementTricky",
{
"shinespark": {
"frames": 2
}
}
],
"exitCondition": {
"leaveWithSpark": {}
},
"unlocksDoors": [
{
"types": [
"super"
],
"requires": []
},
{
"types": [
"missiles",
"powerbomb"
],
"requires": [
"never"
]
}
],
"note": [
"Enter with a shinecharge, and move up toward the door above.",
"Use Wave or Plasma to shoot open the door from below while killing the approaching Zeelas."
]
},
{
"link": [
2,
1
],
"name": "Come in Shinecharged, Leave With Spark",
"entranceCondition": {
"comeInShinecharged": {
"framesRequired": 160
}
},
"requires": [
{
"enemyKill": {
"enemies": [
[
"Zeela"
]
],
"explicitWeapons": [
"Wave",
"Plasma"
]
}
},
"canShinechargeMovementTricky",
{
"shinespark": {
"frames": 2
}
}
],
"exitCondition": {
"leaveWithSpark": {}
},
"unlocksDoors": [
{
"types": [
"super"
],
"requires": []
},
{
"types": [
"missiles",
"powerbomb"
],
"requires": [
"never"
]
}
],
"note": [
"Enter with a shinecharge, and move up toward the door above.",
"Use Wave or Plasma to shoot open the door from below while killing the approaching Zeelas."
]
},
{
"link": [
2,
2
],
"name": "Leave With Runway",
"requires": [],
"exitCondition": {
"leaveWithRunway": {
"length": 5,
"openEnd": 0
}
}
},
{
"link": [
2,
2
],
"name": "G-Mode Setup - Get Hit By Zeela",
"notable": false,
"requires": [],
"exitCondition": {
"leaveWithGModeSetup": {}
}
},
{
"link": [
2,
2
],
"name": "G-Mode Regain Mobility",
"requires": [
{
"enemyDamage": {
"enemy": "Zeela",
"type": "contact",
"hits": 1
}
}
],
"gModeRegainMobility": {}
},
{
"link": [
2,
3
],
"name": "Base",
"requires": [
"h_canBombThings"
]
},
{
"link": [
2,
3
],
"name": "Through Door Speedball",
"entranceCondition": {
"comeInSpeedballing": {
"runway": {
"length": 4,
"openEnd": 0
}
}
},
"requires": []
},
{
"link": [
2,
3
],
"name": "Temporary Blue Bounce",
"entranceCondition": {
"comeInShinecharging": {
"length": 3,
"openEnd": 0
}
},
"requires": [
"canTemporaryBlue",
"canLateralMidAirMorph"
],
"devNote": "The runway has 1 unusable tile, to allow space to perform the blue bounce."
},
{
"link": [
2,
3
],
"name": "Stored Moonfall Clip",
"entranceCondition": {
"comeInWithStoredFallSpeed": {
"fallSpeedInTiles": 2
}
},
"requires": [
"ScrewAttack",
"Morph"
],
"note": "Moonfall to clip into the ground and then spinjump up from the ground to break the Bomb block using Screw Attack."
},
{
"link": [
2,
3
],
"name": "Warehouse Zeela Ice Moonfall Screw Attack Clip",
"notable": true,
"requires": [
"canEnemyStuckMoonfall",
"canTrickyUseFrozenEnemies",
"ScrewAttack",
"Morph"
],
"note": [
"Freeze two Zeelas, one on the left wall below the top door platform, and one on the right wall between 1 and 2 tiles lower, both moving downward;",
"Kill the third Zeela.",
"Go to the bottom of the room, unequip ice to thaw the Zeelas, synchronizing their movement.",
"Freeze the right Zeela after it turns past the single-tile ledge, with its top level with or slightly above the ledge;",
"then freeze the left Zeela just before it turns the corner above.",
"Quickly moonfall between them, and shoot the bottom Zeela (or slide past its edge) just before it thaws.",
"If successful, Samus will clip down through two tiles and end up crouching.",
"Press forward to stand, then perform another moonfall to clip down further, breaking the bomb block with Screw Attack.",
"Unmorph and morph once or twice if needed to get unstuck from the floor."
]
},
{
"link": [
2,
3
],
"name": "G-Mode Morph Overload PLMs",
"entranceCondition": {
"comeInWithGMode": {
"mode": "any",
"morphed": true
}
},
"requires": [],
"note": "Wiggle back and forth to get through the bomb blocks before the Zeela hits Samus.",
"devNote": "This is off camera, but doesnt require canOffScreenMovement because of its simplicity."
},
{
"link": [
3,
2
],
"name": "Base",
"requires": [
"h_canBombThings"
]
},
{
"link": [
3,
2
],
"name": "G-Mode Morph Overload PLMs",
"entranceCondition": {
"comeInWithGMode": {
"mode": "any",
"morphed": true
},
"comesThroughToilet": "any"
},
"requires": [
"canOffScreenMovement"
],
"note": [
"Wiggle back and forth to get through the bomb blocks while avoiding the off screen Zeela.",
"Unmorph and exit G-Mode then quickly run back and forth to fix the camera or go through the door."
]
},
{
"link": [
3,
3
],
"name": "Zeela Ice Clip Door Lock Skip",
"requires": [
"canTrickyUseFrozenEnemies",
"h_canNonTrivialCeilingClip"
],
"bypassesDoorShell": true,
"note": [
"Freeze a Zeela at a precise distance below the door in order to jump up and clip through the door shell.",
"The pixel window is larger and higher with Morph and an X-Ray stand-up."
]
},
{
"link": [
3,
3
],
"name": "Crystal Flash",
"requires": [
"h_canCrystalFlash"
]
},
{
"link": [
3,
3
],
"name": "Leave With Door Frame Below",
"requires": [],
"exitCondition": {
"leaveWithDoorFrameBelow": {
"height": 8
}
}
},
{
"link": [
3,
3
],
"name": "Leave With Platform Below",
"requires": [],
"exitCondition": {
"leaveWithPlatformBelow": {
"height": 9,
"leftPosition": -2,
"rightPosition": 2
}
}
},
{
"link": [
3,
3
],
"name": "G-Mode Setup - Frozen Zeela",
"notable": false,
"requires": [
"canUpwardGModeSetup",
"canTrickyUseFrozenEnemies",
"h_canBombThings"
],
"exitCondition": {
"leaveWithGModeSetup": {}
}
}
]
}