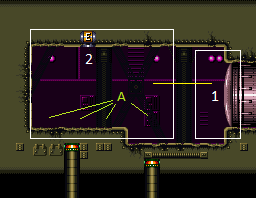
Warehouse Energy Tank Room
Room ID: 80
|
Kill the Beetoms with Screw Attack or by freezing or carefully avoiding them and using Bombs or Power Bombs. Requires: {
"resetRoom": {
"nodes": [
1
],
"mustStayPut": false
}
}
{
"or": [
"ScrewAttack",
{
"and": [
{
"or": [
"Ice",
"canCarefulJump"
]
},
"h_canUseMorphBombs"
]
}
]
}
{
"refill": [
"Energy",
"PowerBomb"
]
}
|
|
Exit condition: {
"leaveWithRunway": {
"length": 1,
"openEnd": 1
}
}
|
|
From: 1
Right Door
To: 1
Right Door
Freeze a single Beetom to extend the runway. Freeze any Beetoms that latch onto Samus to minimize taking damage. Requires: {
"obstaclesNotCleared": [
"A"
]
}
"h_canFrozenEnemyRunway"
{
"enemyDamage": {
"enemy": "Beetom",
"type": "contact",
"hits": 1
}
}
Exit condition: {
"leaveWithRunway": {
"length": 2,
"openEnd": 1
}
}
|
|
From: 1
Right Door
To: 1
Right Door
Notable: true 

Freeze multiple Beetoms to extend the runway. Continually refreeze the ones that are in a good position while manipulating the rest. This assumes three extra tiles of runway, which can be accomplished with two perfectly placed Beetoms, three adjacent ones, or four which are partially overlapping. Requires: {
"obstaclesNotCleared": [
"A"
]
}
"canTrickyJump"
"h_canTrickyFrozenEnemyRunway"
{
"enemyDamage": {
"enemy": "Beetom",
"type": "contact",
"hits": 6
}
}
Exit condition: {
"leaveWithRunway": {
"length": 4,
"openEnd": 1
}
}
|
|
Requires: {
"or": [
"canPrepareForNextRoom",
{
"enemyDamage": {
"enemy": "Beetom",
"type": "contact",
"hits": 2
}
}
]
}
"h_canCrystalFlash"
|
|
Requires: {
"or": [
"canPrepareForNextRoom",
{
"enemyDamage": {
"enemy": "Beetom",
"type": "contact",
"hits": 2
}
}
]
}
{
"resetRoom": {
"nodes": [
1
],
"mustStayPut": false
}
}
"h_can10PowerBombCrystalFlash"
|
|
From: 1
Right Door
To: 1
Right Door
Exit condition: {
"leaveWithGModeSetup": {
"knockback": false
}
}
|
|
Requires: {
"or": [
{
"enemyKill": {
"enemies": [
[
"Beetom",
"Beetom",
"Beetom",
"Beetom"
]
]
}
},
{
"obstaclesCleared": [
"A"
]
}
]
}
Clears obstacles: A |
|
Requires: "Ice" |
|
Requires: {
"enemyDamage": {
"enemy": "Beetom",
"type": "contact",
"hits": 4
}
}
|
|
Wait by the door briefly before spin jumping over and grabbing the item. It is also possible to do this instead by entering with run speed and quickly grabbing the item. Requires: "canTrickyJump"
{
"enemyDamage": {
"enemy": "Beetom",
"type": "contact",
"hits": 1
}
}
|
|
From: 1
Right Door
To: 2
Hidden Ceiling Item
Roll in while avoiding the Beetoms. It is possible to kill them all without getting hit; one of the most safe areas is the center of the lower floor. Entrance condition: {
"comeInWithGMode": {
"mode": "indirect",
"morphed": true
}
}
Requires: {
"or": [
"h_canArtificialMorphPowerBomb",
{
"and": [
"h_canArtificialMorphBombs",
{
"or": [
"canTrickyJump",
{
"enemyDamage": {
"enemy": "Beetom",
"type": "contact",
"hits": 1
}
}
]
}
]
}
]
}
Clears obstacles: A |
|
Requires: {
"or": [
{
"enemyKill": {
"enemies": [
[
"Beetom",
"Beetom",
"Beetom",
"Beetom"
]
]
}
},
{
"obstaclesCleared": [
"A"
]
}
]
}
Clears obstacles: A |
|
Requires: "Ice" |
|
Requires: {
"enemyDamage": {
"enemy": "Beetom",
"type": "contact",
"hits": 6
}
}
|
{
"$schema": "../../../schema/m3-room.schema.json",
"id": 80,
"name": "Warehouse Energy Tank Room",
"area": "Brinstar",
"subarea": "Kraid",
"playable": true,
"roomAddress": "0x7A4B1",
"roomEnvironments": [
{
"heated": false
}
],
"nodes": [
{
"id": 1,
"name": "Right Door",
"nodeType": "door",
"nodeSubType": "grey",
"nodeAddress": "0x0019162",
"doorEnvironments": [
{
"physics": "air"
}
],
"locks": [
{
"name": "Warehouse E-Tank Grey Lock (to Zeelas)",
"lockType": "killEnemies",
"unlockStrats": [
{
"name": "Base",
"notable": false,
"requires": [
{
"obstaclesCleared": [
"A"
]
}
],
"note": "This is a softlock if no means to kill Beetoms are available."
}
],
"yields": [
"f_ZebesAwake"
]
}
]
},
{
"id": 2,
"name": "Hidden Ceiling Item",
"nodeType": "item",
"nodeSubType": "hidden",
"nodeItem": "ETank",
"nodeAddress": "0x7899C"
}
],
"obstacles": [
{
"id": "A",
"name": "Four Beetoms",
"obstacleType": "enemies"
}
],
"enemies": [
{
"id": "e1",
"groupName": "Warehouse Beetoms",
"enemyName": "Beetom",
"quantity": 4,
"homeNodes": [
2
]
}
],
"links": [
{
"from": 1,
"to": [
{
"id": 1
},
{
"id": 2
}
]
},
{
"from": 2,
"to": [
{
"id": 1
}
]
}
],
"strats": [
{
"link": [
1,
1
],
"name": "Beetom Farm",
"requires": [
{
"resetRoom": {
"nodes": [
1
],
"mustStayPut": false
}
},
{
"or": [
"ScrewAttack",
{
"and": [
{
"or": [
"Ice",
"canCarefulJump"
]
},
"h_canUseMorphBombs"
]
}
]
},
{
"refill": [
"Energy",
"PowerBomb"
]
}
],
"note": "Kill the Beetoms with Screw Attack or by freezing or carefully avoiding them and using Bombs or Power Bombs.",
"devNote": [
"FIXME: Using a Missile, Super, or Power Bomb at the start could be added to the logic to get the first Power Bombs to use for further farming, but this needs a way to express that we're not in health-bomb energy range."
]
},
{
"link": [
1,
1
],
"name": "Leave With Runway",
"requires": [],
"exitCondition": {
"leaveWithRunway": {
"length": 1,
"openEnd": 1
}
}
},
{
"link": [
1,
1
],
"name": "Leave With Runway - Single Frozen Beetom",
"requires": [
{
"obstaclesNotCleared": [
"A"
]
},
"h_canFrozenEnemyRunway",
{
"enemyDamage": {
"enemy": "Beetom",
"type": "contact",
"hits": 1
}
}
],
"exitCondition": {
"leaveWithRunway": {
"length": 2,
"openEnd": 1
}
},
"note": "Freeze a single Beetom to extend the runway. Freeze any Beetoms that latch onto Samus to minimize taking damage."
},
{
"link": [
1,
1
],
"name": "Warehouse Energy Tank Frozen Beetom Runway",
"notable": true,
"requires": [
{
"obstaclesNotCleared": [
"A"
]
},
"canTrickyJump",
"h_canTrickyFrozenEnemyRunway",
{
"enemyDamage": {
"enemy": "Beetom",
"type": "contact",
"hits": 6
}
}
],
"exitCondition": {
"leaveWithRunway": {
"length": 4,
"openEnd": 1
}
},
"note": [
"Freeze multiple Beetoms to extend the runway. Continually refreeze the ones that are in a good position while manipulating the rest.",
"This assumes three extra tiles of runway, which can be accomplished with two perfectly placed Beetoms, three adjacent ones, or four which are partially overlapping."
]
},
{
"link": [
1,
1
],
"name": "Crystal Flash",
"requires": [
{
"or": [
"canPrepareForNextRoom",
{
"enemyDamage": {
"enemy": "Beetom",
"type": "contact",
"hits": 2
}
}
]
},
"h_canCrystalFlash"
]
},
{
"link": [
1,
1
],
"name": "10 Power Bomb Crystal Flash",
"requires": [
{
"or": [
"canPrepareForNextRoom",
{
"enemyDamage": {
"enemy": "Beetom",
"type": "contact",
"hits": 2
}
}
]
},
{
"resetRoom": {
"nodes": [
1
],
"mustStayPut": false
}
},
"h_can10PowerBombCrystalFlash"
],
"devNote": "Resetting the room could be required to farm a bit of energy to get above health-bomb range, to ensure a Power Bomb drop."
},
{
"link": [
1,
1
],
"name": "G-Mode Setup - Get Hit By Beetom",
"notable": false,
"requires": [],
"exitCondition": {
"leaveWithGModeSetup": {
"knockback": false
}
}
},
{
"link": [
1,
2
],
"name": "Kill the Beetoms",
"requires": [
{
  "or": [
    {
      "enemyKill": {
        "enemies": [
          [
            "Beetom",
            "Beetom",
            "Beetom",
            "Beetom"
          ]
        ]
      }
    },
    {
      "obstaclesCleared": [
        "A"
      ]
    }
  ]
}
],
"clearsObstacles": [
"A"
]
},
{
"link": [
1,
2
],
"name": "Freeze the Beetoms",
"requires": [
"Ice"
]
},
{
"link": [
1,
2
],
"name": "Tank the Damage",
"requires": [
{
  "enemyDamage": {
    "enemy": "Beetom",
    "type": "contact",
    "hits": 4
  }
}
]
},
{
"link": [
1,
2
],
"name": "Tricky Evade",
"requires": [
"canTrickyJump",
{
"enemyDamage": {
"enemy": "Beetom",
"type": "contact",
"hits": 1
}
}
],
"note": [
"Wait by the door briefly before spin jumping over and grabbing the item.",
"It is also possible to do this instead by entering with run speed and quickly grabbing the item."
]
},
{
"link": [
1,
2
],
"name": "G-Mode Morph Kill the Beetoms",
"entranceCondition": {
"comeInWithGMode": {
"mode": "indirect",
"morphed": true
}
},
"requires": [
{
  "or": [
    "h_canArtificialMorphPowerBomb",
    {
      "and": [
        "h_canArtificialMorphBombs",
        {
          "or": [
            "canTrickyJump",
            {
              "enemyDamage": {
                "enemy": "Beetom",
                "type": "contact",
                "hits": 1
              }
            }
          ]
        }
      ]
    }
  ]
}
],
"clearsObstacles": [
"A"
],
"note": "Roll in while avoiding the Beetoms. It is possible to kill them all without getting hit; one of the most safe areas is the center of the lower floor.",
"devNote": [
"There is no way to avoid all damage in direct g-mode, nor a way to get out of immobile.",
"It is technically possible but very precise to kill them with a Power Bomb entering with 4 energy and both suits."
]
},
{
"link": [
2,
1
],
"name": "Kill the Beetoms",
"requires": [
{
  "or": [
    {
      "enemyKill": {
        "enemies": [
          [
            "Beetom",
            "Beetom",
            "Beetom",
            "Beetom"
          ]
        ]
      }
    },
    {
      "obstaclesCleared": [
        "A"
      ]
    }
  ]
}
],
"clearsObstacles": [
"A"
]
},
{
"link": [
2,
1
],
"name": "Freeze the Beetoms",
"requires": [
"Ice"
]
},
{
"link": [
2,
1
],
"name": "Tank the Damage",
"requires": [
{
  "enemyDamage": {
    "enemy": "Beetom",
    "type": "contact",
    "hits": 6
  }
}
]
}
]
}