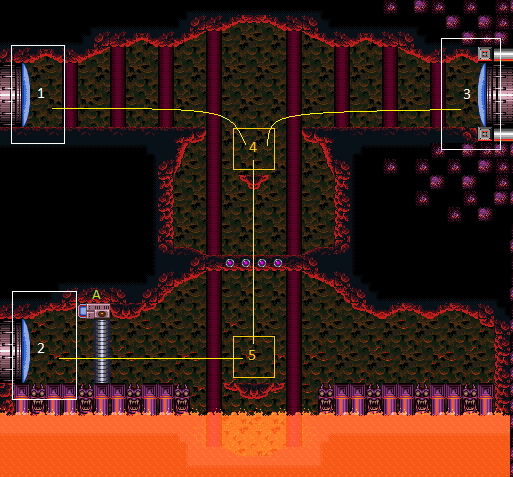
Upper Norfair Farming Room
Room ID: 94
|
Exit condition: {
"leaveWithRunway": {
"length": 12,
"openEnd": 1
}
}
|
|
Requires: "h_canHeatedCrystalFlash" |
|
From: 1
Top Left Door
To: 2
Bottom Left Door
Entrance condition: {
"comeInShinecharging": {
"length": 12,
"openEnd": 1
}
}
Requires: "Wave"
"canShinechargeMovementTricky"
{
"heatFrames": 200
}
Exit condition: {
"leaveShinecharged": {
"framesRemaining": 20
}
}
|
|
From: 1
Top Left Door
To: 2
Bottom Left Door
Requires: {
"or": [
"Wave",
{
"obstaclesCleared": [
"A"
]
}
]
}
{
"or": [
{
"canShineCharge": {
"usedTiles": 12,
"openEnd": 1
}
},
{
"and": [
{
"canShineCharge": {
"usedTiles": 13,
"openEnd": 1
}
},
{
"doorUnlockedAtNode": 1
}
]
}
]
}
"canShinechargeMovementTricky"
{
"heatFrames": 250
}
Exit condition: {
"leaveShinecharged": {
"framesRemaining": 20
}
}
|
|
Entrance condition: {
"comeInShinecharged": {
"framesRequired": 120
}
}
Requires: "canShinechargeMovementComplex"
{
"heatFrames": 120
}
Exit condition: {
"leaveShinecharged": {
"framesRemaining": "auto"
}
}
|
|
From: 1
Top Left Door
To: 3
Top Right Door
Entrance condition: {
"comeInShinecharged": {
"framesRequired": 80
}
}
Requires: "canShinechargeMovementComplex"
{
"heatFrames": 100
}
{
"shinespark": {
"frames": 16,
"excessFrames": 0
}
}
Exit condition: {
"leaveWithSpark": {}
}
|
|
From: 1
Top Left Door
To: 3
Top Right Door
Entrance condition: {
"comeInShinecharged": {
"framesRequired": 35
}
}
Requires: "canShinechargeMovementTricky"
"canHeroShot"
{
"heatFrames": 85
}
{
"shinespark": {
"frames": 37,
"excessFrames": 0
}
}
Exit condition: {
"leaveWithSpark": {}
}
|
|
From: 1
Top Left Door
To: 3
Top Right Door
Entrance condition: {
"comeInShinecharging": {
"length": 12,
"openEnd": 1
}
}
Requires: "canShinechargeMovementComplex"
{
"heatFrames": 155
}
Exit condition: {
"leaveShinecharged": {
"framesRemaining": 65
}
}
|
|
Requires: {
"heatFrames": 75
}
|
|
From: 2
Bottom Left Door
To: 2
Bottom Left Door
Exit condition: {
"leaveWithRunway": {
"length": 5,
"openEnd": 0
}
}
|
|
From: 2
Bottom Left Door
To: 2
Bottom Left Door
Requires: {
"or": [
{
"obstaclesCleared": [
"A"
]
},
{
"heatFrames": 60
}
]
}
Exit condition: {
"leaveWithRunway": {
"length": 11,
"openEnd": 1
}
}
|
|
From: 2
Bottom Left Door
To: 5
Bottom Floating Platform Junction
Requires: {
"heatFrames": 120
}
{
"or": [
{
"heatFrames": 30
},
{
"obstaclesCleared": [
"A"
]
}
]
}
Clears obstacles: A |
|
Entrance condition: {
"comeInShinecharged": {
"framesRequired": 120
}
}
Requires: "canShinechargeMovementComplex"
{
"heatFrames": 120
}
Exit condition: {
"leaveShinecharged": {
"framesRemaining": "auto"
}
}
|
|
From: 3
Top Right Door
To: 1
Top Left Door
Entrance condition: {
"comeInShinecharged": {
"framesRequired": 80
}
}
Requires: "canShinechargeMovementComplex"
{
"heatFrames": 100
}
{
"shinespark": {
"frames": 16,
"excessFrames": 0
}
}
Exit condition: {
"leaveWithSpark": {}
}
|
|
From: 3
Top Right Door
To: 1
Top Left Door
Entrance condition: {
"comeInShinecharged": {
"framesRequired": 35
}
}
Requires: "canShinechargeMovementTricky"
"canHeroShot"
{
"heatFrames": 85
}
{
"shinespark": {
"frames": 37,
"excessFrames": 0
}
}
Exit condition: {
"leaveWithSpark": {}
}
|
|
From: 3
Top Right Door
To: 1
Top Left Door
Entrance condition: {
"comeInShinecharging": {
"length": 12,
"openEnd": 1
}
}
Requires: "canShinechargeMovementComplex"
{
"heatFrames": 155
}
Exit condition: {
"leaveShinecharged": {
"framesRemaining": 65
}
}
|
|
Entrance condition: {
"comeInWithGrappleTeleport": {
"blockPositions": [
[
3,
12
],
[
3,
13
]
]
}
}
Bypasses door shell: true |
|
From: 3
Top Right Door
To: 1
Top Left Door
Entrance condition: {
"comeInWithGrappleTeleport": {
"blockPositions": [
[
3,
12
]
]
}
}
Exit condition: {
"leaveWithGrappleTeleport": {
"blockPositions": [
[
3,
12
]
]
}
}
Bypasses door shell: true |
|
From: 3
Top Right Door
To: 1
Top Left Door
Entrance condition: {
"comeInWithGrappleTeleport": {
"blockPositions": [
[
3,
13
]
]
}
}
Exit condition: {
"leaveWithGrappleTeleport": {
"blockPositions": [
[
3,
13
]
]
}
}
Bypasses door shell: true |
|
From: 3
Top Right Door
To: 1
Top Left Door
Exit the previous room with Samus in a standing pose (while grappled) with a horizontal position of 21 (as far right as possible). After teleporting, press right to release Grapple while staying standing (not being forced into a crouch). Then X-ray climb to get to the door transition above, without needing to open the door. Samus will not be visible during the climb. At the beginning of the climb, avoid pressing left without X-Ray being held, to prevent triggering the transition of the bottom door. Entrance condition: {
"comeInWithGrappleTeleport": {
"blockPositions": [
[
2,
18
],
[
2,
19
],
[
2,
28
],
[
2,
29
]
]
}
}
Requires: "canXRayClimb"
{
"heatFrames": 1600
}
Bypasses door shell: true |
|
From: 3
Top Right Door
To: 2
Bottom Left Door
Entrance condition: {
"comeInShinecharging": {
"length": 12,
"openEnd": 1
}
}
Requires: "Wave"
"canShinechargeMovementTricky"
{
"heatFrames": 205
}
Exit condition: {
"leaveShinecharged": {
"framesRemaining": 10
}
}
|
|
From: 3
Top Right Door
To: 2
Bottom Left Door
Requires: {
"or": [
"Wave",
{
"obstaclesCleared": [
"A"
]
}
]
}
{
"or": [
{
"canShineCharge": {
"usedTiles": 12,
"openEnd": 1
}
},
{
"and": [
{
"canShineCharge": {
"usedTiles": 13,
"openEnd": 1
}
},
{
"doorUnlockedAtNode": 2
}
]
}
]
}
"canShinechargeMovementTricky"
{
"heatFrames": 255
}
Exit condition: {
"leaveShinecharged": {
"framesRemaining": 10
}
}
|
|
Entrance condition: {
"comeInWithGrappleTeleport": {
"blockPositions": [
[
2,
18
],
[
2,
19
],
[
2,
28
],
[
2,
29
]
]
}
}
Bypasses door shell: true |
|
From: 3
Top Right Door
To: 2
Bottom Left Door
Entrance condition: {
"comeInWithGrappleTeleport": {
"blockPositions": [
[
2,
18
]
]
}
}
Exit condition: {
"leaveWithGrappleTeleport": {
"blockPositions": [
[
2,
18
]
]
}
}
Bypasses door shell: true |
|
From: 3
Top Right Door
To: 2
Bottom Left Door
Entrance condition: {
"comeInWithGrappleTeleport": {
"blockPositions": [
[
2,
19
]
]
}
}
Exit condition: {
"leaveWithGrappleTeleport": {
"blockPositions": [
[
2,
19
]
]
}
}
Bypasses door shell: true |
|
From: 3
Top Right Door
To: 2
Bottom Left Door
Entrance condition: {
"comeInWithGrappleTeleport": {
"blockPositions": [
[
2,
28
]
]
}
}
Exit condition: {
"leaveWithGrappleTeleport": {
"blockPositions": [
[
2,
28
]
]
}
}
Bypasses door shell: true |
|
From: 3
Top Right Door
To: 2
Bottom Left Door
Entrance condition: {
"comeInWithGrappleTeleport": {
"blockPositions": [
[
2,
29
]
]
}
}
Exit condition: {
"leaveWithGrappleTeleport": {
"blockPositions": [
[
2,
29
]
]
}
}
Bypasses door shell: true |
|
Exit condition: {
"leaveWithRunway": {
"length": 12,
"openEnd": 1
}
}
|
|
Requires: "h_canHeatedCrystalFlash" |
|
Requires: {
"heatFrames": 75
}
|
|
Requires: {
"heatFrames": 75
}
|
|
From: 4
Top Floating Platform Junction
To: 1
Top Left Door
Requires: {
"heatFrames": 30
}
Exit condition: {
"leaveWithRunway": {
"length": 12,
"openEnd": 1
}
}
|
|
Requires: {
"heatFrames": 75
}
|
|
From: 4
Top Floating Platform Junction
To: 3
Top Right Door
Requires: {
"heatFrames": 30
}
Exit condition: {
"leaveWithRunway": {
"length": 12,
"openEnd": 1
}
}
|
|
From: 4
Top Floating Platform Junction
To: 5
Bottom Floating Platform Junction
Requires: {
"heatFrames": 35
}
|
|
From: 5
Bottom Floating Platform Junction
To: 2
Bottom Left Door
Requires: {
"heatFrames": 85
}
{
"obstaclesCleared": [
"A"
]
}
|
|
From: 5
Bottom Floating Platform Junction
To: 2
Bottom Left Door
Requires: {
"heatFrames": 45
}
{
"obstaclesCleared": [
"A"
]
}
Exit condition: {
"leaveWithRunway": {
"length": 11,
"openEnd": 1
}
}
|
|
From: 5
Bottom Floating Platform Junction
To: 4
Top Floating Platform Junction
Requires: {
"or": [
"canWalljump",
"HiJump",
"SpaceJump"
]
}
{
"heatFrames": 125
}
|
|
From: 5
Bottom Floating Platform Junction
To: 4
Top Floating Platform Junction
Requires: "h_canCrouchJumpDownGrab"
{
"heatFrames": 125
}
|
|
From: 5
Bottom Floating Platform Junction
To: 4
Top Floating Platform Junction
Kill a Gamet and don't pick up its drops, so that they won't spawn while performing the IBJ. Requires: "h_canIBJ"
{
"heatFrames": 850
}
|
|
From: 5
Bottom Floating Platform Junction
To: 4
Top Floating Platform Junction
Requires: "canUseFrozenEnemies"
{
"heatFrames": 250
}
|
|
From: 5
Bottom Floating Platform Junction
To: 5
Bottom Floating Platform Junction
Requires: {
"heatFrames": 60
}
"Wave"
Clears obstacles: A |
|
From: 5
Bottom Floating Platform Junction
To: 5
Bottom Floating Platform Junction
Requires: {
"heatFrames": 135
}
"h_canHeatedBlueGateGlitch"
Clears obstacles: A |
|
From: 5
Bottom Floating Platform Junction
To: 5
Bottom Floating Platform Junction
Notable: true 
Farm before, during, and after the gate glitch in order to open the gate without wasting ammo or Energy. Requires: {
"heatFrames": 300
}
"canGateGlitch"
{
"or": [
{
"ammo": {
"type": "Missile",
"count": 1
}
},
{
"ammo": {
"type": "Super",
"count": 1
}
}
]
}
Clears obstacles: A |
|
From: 5
Bottom Floating Platform Junction
To: 5
Bottom Floating Platform Junction
Requires: {
"or": [
"canPauseAbuse",
{
"heatFrames": 50
}
]
}
{
"refill": [
"Energy",
"Missile",
"Super",
"PowerBomb"
]
}
|
{
"$schema": "../../../schema/m3-room.schema.json",
"id": 94,
"name": "Upper Norfair Farming Room",
"area": "Norfair",
"subarea": "Upper",
"subsubarea": "East",
"playable": true,
"roomAddress": "0x7AF72",
"roomEnvironments": [
{
"heated": true
}
],
"nodes": [
{
"id": 1,
"name": "Top Left Door",
"nodeType": "door",
"nodeSubType": "blue",
"nodeAddress": "0x001970e",
"doorEnvironments": [
{
"physics": "air"
}
]
},
{
"id": 2,
"name": "Bottom Left Door",
"nodeType": "door",
"nodeSubType": "blue",
"nodeAddress": "0x0019726",
"doorEnvironments": [
{
"physics": "air"
}
]
},
{
"id": 3,
"name": "Top Right Door",
"nodeType": "door",
"nodeSubType": "blue",
"nodeAddress": "0x001971a",
"doorEnvironments": [
{
"physics": "air"
}
]
},
{
"id": 4,
"name": "Top Floating Platform Junction",
"nodeType": "junction",
"nodeSubType": "junction"
},
{
"id": 5,
"name": "Bottom Floating Platform Junction",
"nodeType": "junction",
"nodeSubType": "junction"
}
],
"obstacles": [
{
"id": "A",
"name": "Blue Gate",
"obstacleType": "inanimate"
}
],
"enemies": [
{
"id": "e1",
"groupName": "Upper Norfair Farming Room Fune",
"enemyName": "Fune",
"quantity": 1,
"homeNodes": [
5
],
"dropRequires": [
"h_heatProof"
]
},
{
"id": "e2",
"groupName": "Upper Norfair Farming Room Gamets",
"enemyName": "Gamet",
"quantity": 5,
"homeNodes": [
5
],
"note": "Can't be farmed quite as quickly as other spots without requirements",
"farmCycles": [
{
"name": "Gamet down shots",
"cycleFrames": 120,
"requires": [
{
"heatFrames": 120
}
],
"note": "Just crouching over them is slower because they have to rise a bit after spawning. "
}
]
}
],
"links": [
{
"from": 1,
"to": [
{
"id": 1
},
{
"id": 2
},
{
"id": 3
},
{
"id": 4
}
]
},
{
"from": 2,
"to": [
{
"id": 2
},
{
"id": 5
}
]
},
{
"from": 3,
"to": [
{
"id": 1
},
{
"id": 2
},
{
"id": 3
},
{
"id": 4
}
]
},
{
"from": 4,
"to": [
{
"id": 1
},
{
"id": 3
},
{
"id": 5
}
]
},
{
"from": 5,
"to": [
{
"id": 2
},
{
"id": 4
},
{
"id": 5
}
]
}
],
"strats": [
{
"link": [
1,
1
],
"name": "Leave with Runway",
"requires": [],
"exitCondition": {
"leaveWithRunway": {
"length": 12,
"openEnd": 1
}
}
},
{
"link": [
1,
1
],
"name": "Crystal Flash",
"requires": [
"h_canHeatedCrystalFlash"
]
},
{
"link": [
1,
2
],
"name": "Come in Shinecharging, Leave Shinecharged",
"entranceCondition": {
"comeInShinecharging": {
"length": 12,
"openEnd": 1
}
},
"requires": [
"Wave",
"canShinechargeMovementTricky",
{
"heatFrames": 200
}
],
"exitCondition": {
"leaveShinecharged": {
"framesRemaining": 20
}
},
"unlocksDoors": [
{
"types": [
"ammo"
],
"requires": [
"never"
]
}
]
},
{
"link": [
1,
2
],
"name": "Leave Shinecharged (In-Room Runway)",
"requires": [
{
"or": [
"Wave",
{
"obstaclesCleared": [
"A"
]
}
]
},
{
"or": [
{
"canShineCharge": {
"usedTiles": 12,
"openEnd": 1
}
},
{
"and": [
{
"canShineCharge": {
"usedTiles": 13,
"openEnd": 1
}
},
{
"doorUnlockedAtNode": 1
}
]
}
]
},
"canShinechargeMovementTricky",
{
"heatFrames": 250
}
],
"exitCondition": {
"leaveShinecharged": {
"framesRemaining": 20
}
},
"unlocksDoors": [
{
"types": [
"ammo"
],
"requires": [
{
"obstaclesCleared": [
"A"
]
}
]
}
]
},
{
"link": [
1,
3
],
"name": "Carry Shinecharge",
"entranceCondition": {
"comeInShinecharged": {
"framesRequired": 120
}
},
"requires": [
"canShinechargeMovementComplex",
{
"heatFrames": 120
}
],
"exitCondition": {
"leaveShinecharged": {
"framesRemaining": "auto"
}
},
"unlocksDoors": [
{
"types": [
"super"
],
"requires": []
},
{
"types": [
"missiles",
"powerbomb"
],
"requires": [
"never"
]
}
]
},
{
"link": [
1,
3
],
"name": "Come in Shinecharged, Leave With Spark",
"entranceCondition": {
"comeInShinecharged": {
"framesRequired": 80
}
},
"requires": [
"canShinechargeMovementComplex",
{
"heatFrames": 100
},
{
"shinespark": {
"frames": 16,
"excessFrames": 0
}
}
],
"exitCondition": {
"leaveWithSpark": {}
},
"unlocksDoors": [
{
"types": [
"super"
],
"requires": []
},
{
"types": [
"missiles",
"powerbomb"
],
"requires": [
"never"
]
}
]
},
{
"link": [
1,
3
],
"name": "Come in Shinecharged, Leave With Spark (Hero Shot)",
"entranceCondition": {
"comeInShinecharged": {
"framesRequired": 35
}
},
"requires": [
"canShinechargeMovementTricky",
"canHeroShot",
{
"heatFrames": 85
},
{
"shinespark": {
"frames": 37,
"excessFrames": 0
}
}
],
"exitCondition": {
"leaveWithSpark": {}
},
"unlocksDoors": [
{
"types": [
"super"
],
"requires": []
},
{
"types": [
"missiles",
"powerbomb"
],
"requires": [
"never"
]
}
]
},
{
"link": [
1,
3
],
"name": "Come in Shinecharging, Leave Shinecharged",
"entranceCondition": {
"comeInShinecharging": {
"length": 12,
"openEnd": 1
}
},
"requires": [
"canShinechargeMovementComplex",
{
"heatFrames": 155
}
],
"exitCondition": {
"leaveShinecharged": {
"framesRemaining": 65
}
},
"unlocksDoors": [
{
"types": [
"super"
],
"requires": []
},
{
"types": [
"missiles",
"powerbomb"
],
"requires": [
"never"
]
}
]
},
{
"link": [
1,
4
],
"name": "Base",
"requires": [
{
  "heatFrames": 75
}
]
},
{
"link": [
2,
2
],
"name": "Leave with Blocked Runway",
"requires": [],
"exitCondition": {
"leaveWithRunway": {
"length": 5,
"openEnd": 0
}
}
},
{
"link": [
2,
2
],
"name": "Open Gate and Leave with Runway",
"requires": [
{
  "or": [
    {
      "obstaclesCleared": [
        "A"
      ]
    },
    {
      "heatFrames": 60
    }
  ]
}
],
"exitCondition": {
"leaveWithRunway": {
"length": 11,
"openEnd": 1
}
}
},
{
"link": [
2,
5
],
"name": "Base",
"requires": [
{
"heatFrames": 120
},
{
"or": [
{
"heatFrames": 30
},
{
"obstaclesCleared": [
"A"
]
}
]
}
],
"clearsObstacles": [
"A"
]
},
{
"link": [
3,
1
],
"name": "Carry Shinecharge",
"entranceCondition": {
"comeInShinecharged": {
"framesRequired": 120
}
},
"requires": [
"canShinechargeMovementComplex",
{
"heatFrames": 120
}
],
"exitCondition": {
"leaveShinecharged": {
"framesRemaining": "auto"
}
},
"unlocksDoors": [
{
"types": [
"super"
],
"requires": []
},
{
"types": [
"missiles",
"powerbomb"
],
"requires": [
"never"
]
}
]
},
{
"link": [
3,
1
],
"name": "Come in Shinecharged, Leave With Spark",
"entranceCondition": {
"comeInShinecharged": {
"framesRequired": 80
}
},
"requires": [
"canShinechargeMovementComplex",
{
"heatFrames": 100
},
{
"shinespark": {
"frames": 16,
"excessFrames": 0
}
}
],
"exitCondition": {
"leaveWithSpark": {}
},
"unlocksDoors": [
{
"types": [
"super"
],
"requires": []
},
{
"types": [
"missiles",
"powerbomb"
],
"requires": [
"never"
]
}
]
},
{
"link": [
3,
1
],
"name": "Come in Shinecharged, Leave With Spark (Hero Shot)",
"entranceCondition": {
"comeInShinecharged": {
"framesRequired": 35
}
},
"requires": [
"canShinechargeMovementTricky",
"canHeroShot",
{
"heatFrames": 85
},
{
"shinespark": {
"frames": 37,
"excessFrames": 0
}
}
],
"exitCondition": {
"leaveWithSpark": {}
},
"unlocksDoors": [
{
"types": [
"super"
],
"requires": []
},
{
"types": [
"missiles",
"powerbomb"
],
"requires": [
"never"
]
}
]
},
{
"link": [
3,
1
],
"name": "Come in Shinecharging, Leave Shinecharged",
"entranceCondition": {
"comeInShinecharging": {
"length": 12,
"openEnd": 1
}
},
"requires": [
"canShinechargeMovementComplex",
{
"heatFrames": 155
}
],
"exitCondition": {
"leaveShinecharged": {
"framesRemaining": 65
}
},
"unlocksDoors": [
{
"types": [
"super"
],
"requires": []
},
{
"types": [
"missiles",
"powerbomb"
],
"requires": [
"never"
]
}
]
},
{
"link": [
3,
1
],
"name": "Grapple Teleport",
"entranceCondition": {
"comeInWithGrappleTeleport": {
"blockPositions": [
[
3,
12
],
[
3,
13
]
]
}
},
"requires": [],
"bypassesDoorShell": true
},
{
"link": [
3,
1
],
"name": "Carry Grapple Teleport (Top Position)",
"entranceCondition": {
"comeInWithGrappleTeleport": {
"blockPositions": [
[
3,
12
]
]
}
},
"requires": [],
"bypassesDoorShell": true,
"exitCondition": {
"leaveWithGrappleTeleport": {
"blockPositions": [
[
3,
12
]
]
}
}
},
{
"link": [
3,
1
],
"name": "Carry Grapple Teleport (Bottom Position)",
"entranceCondition": {
"comeInWithGrappleTeleport": {
"blockPositions": [
[
3,
13
]
]
}
},
"requires": [],
"bypassesDoorShell": true,
"exitCondition": {
"leaveWithGrappleTeleport": {
"blockPositions": [
[
3,
13
]
]
}
}
},
{
"link": [
3,
1
],
"name": "Grapple Teleport X-Ray Climb",
"entranceCondition": {
"comeInWithGrappleTeleport": {
"blockPositions": [
[
2,
18
],
[
2,
19
],
[
2,
28
],
[
2,
29
]
]
}
},
"requires": [
"canXRayClimb",
{
"heatFrames": 1600
}
],
"bypassesDoorShell": true,
"note": [
"Exit the previous room with Samus in a standing pose (while grappled) with a horizontal position of 21 (as far right as possible).",
"After teleporting, press right to release Grapple while staying standing (not being forced into a crouch).",
"Then X-ray climb to get to the door transition above, without needing to open the door.",
"Samus will not be visible during the climb.",
"At the beginning of the climb, avoid pressing left without X-Ray being held, to prevent triggering the transition of the bottom door."
]
},
{
"link": [
3,
2
],
"name": "Come in Shinecharging, Leave Shinecharged",
"entranceCondition": {
"comeInShinecharging": {
"length": 12,
"openEnd": 1
}
},
"requires": [
"Wave",
"canShinechargeMovementTricky",
{
"heatFrames": 205
}
],
"exitCondition": {
"leaveShinecharged": {
"framesRemaining": 10
}
},
"unlocksDoors": [
{
"types": [
"ammo"
],
"requires": [
"never"
]
}
]
},
{
"link": [
3,
2
],
"name": "Leave Shinecharged (In-Room Runway)",
"requires": [
{
"or": [
"Wave",
{
"obstaclesCleared": [
"A"
]
}
]
},
{
"or": [
{
"canShineCharge": {
"usedTiles": 12,
"openEnd": 1
}
},
{
"and": [
{
"canShineCharge": {
"usedTiles": 13,
"openEnd": 1
}
},
{
"doorUnlockedAtNode": 2
}
]
}
]
},
"canShinechargeMovementTricky",
{
"heatFrames": 255
}
],
"exitCondition": {
"leaveShinecharged": {
"framesRemaining": 10
}
},
"unlocksDoors": [
{
"types": [
"ammo"
],
"requires": [
{
"obstaclesCleared": [
"A"
]
}
]
}
]
},
{
"link": [
3,
2
],
"name": "Grapple Teleport",
"entranceCondition": {
"comeInWithGrappleTeleport": {
"blockPositions": [
[
2,
18
],
[
2,
19
],
[
2,
28
],
[
2,
29
]
]
}
},
"requires": [],
"bypassesDoorShell": true
},
{
"link": [
3,
2
],
"name": "Carry Grapple Teleport (Top Position)",
"entranceCondition": {
"comeInWithGrappleTeleport": {
"blockPositions": [
[
2,
18
]
]
}
},
"requires": [],
"bypassesDoorShell": true,
"exitCondition": {
"leaveWithGrappleTeleport": {
"blockPositions": [
[
2,
18
]
]
}
}
},
{
"link": [
3,
2
],
"name": "Carry Grapple Teleport (Upper Middle Position)",
"entranceCondition": {
"comeInWithGrappleTeleport": {
"blockPositions": [
[
2,
19
]
]
}
},
"requires": [],
"bypassesDoorShell": true,
"exitCondition": {
"leaveWithGrappleTeleport": {
"blockPositions": [
[
2,
19
]
]
}
}
},
{
"link": [
3,
2
],
"name": "Carry Grapple Teleport (Lower Middle Position)",
"entranceCondition": {
"comeInWithGrappleTeleport": {
"blockPositions": [
[
2,
28
]
]
}
},
"requires": [],
"bypassesDoorShell": true,
"exitCondition": {
"leaveWithGrappleTeleport": {
"blockPositions": [
[
2,
28
]
]
}
}
},
{
"link": [
3,
2
],
"name": "Carry Grapple Teleport (Bottom Position)",
"entranceCondition": {
"comeInWithGrappleTeleport": {
"blockPositions": [
[
2,
29
]
]
}
},
"requires": [],
"bypassesDoorShell": true,
"exitCondition": {
"leaveWithGrappleTeleport": {
"blockPositions": [
[
2,
29
]
]
}
}
},
{
"link": [
3,
3
],
"name": "Leave with Runway",
"requires": [],
"exitCondition": {
"leaveWithRunway": {
"length": 12,
"openEnd": 1
}
}
},
{
"link": [
3,
3
],
"name": "Crystal Flash",
"requires": [
"h_canHeatedCrystalFlash"
]
},
{
"link": [
3,
4
],
"name": "Base",
"requires": [
{
  "heatFrames": 75
}
]
},
{
"link": [
4,
1
],
"name": "Base",
"requires": [
{
  "heatFrames": 75
}
],
"unlocksDoors": [
{
"types": [
"missiles"
],
"requires": [
{
"heatFrames": 10
}
]
}
]
},
{
"link": [
4,
1
],
"name": "Leave with Runway",
"requires": [
{
  "heatFrames": 30
}
],
"exitCondition": {
"leaveWithRunway": {
"length": 12,
"openEnd": 1
}
},
"unlocksDoors": [
{
"types": [
"missiles"
],
"requires": [
{
"heatFrames": 50
}
]
},
{
"types": [
"super"
],
"requires": []
},
{
"types": [
"powerbomb"
],
"requires": [
{
"heatFrames": 110
}
]
}
]
},
{
"link": [
4,
3
],
"name": "Base",
"requires": [
{
  "heatFrames": 75
}
],
"unlocksDoors": [
{
"types": [
"missiles"
],
"requires": [
{
"heatFrames": 10
}
]
}
]
},
{
"link": [
4,
3
],
"name": "Leave with Runway",
"requires": [
{
  "heatFrames": 30
}
],
"exitCondition": {
"leaveWithRunway": {
"length": 12,
"openEnd": 1
}
},
"unlocksDoors": [
{
"types": [
"missiles"
],
"requires": [
{
"heatFrames": 50
}
]
},
{
"types": [
"super"
],
"requires": []
},
{
"types": [
"powerbomb"
],
"requires": [
{
"heatFrames": 110
}
]
}
]
},
{
"link": [
4,
5
],
"name": "Base",
"requires": [
{
  "heatFrames": 35
}
]
},
{
"link": [
5,
2
],
"name": "Base",
"requires": [
{
"heatFrames": 85
},
{
"obstaclesCleared": [
"A"
]
}
]
},
{
"link": [
5,
2
],
"name": "Leave with Runway",
"requires": [
{
"heatFrames": 45
},
{
"obstaclesCleared": [
"A"
]
}
],
"exitCondition": {
"leaveWithRunway": {
"length": 11,
"openEnd": 1
}
},
"unlocksDoors": [
{
"types": [
"ammo"
],
"requires": []
}
]
},
{
"link": [
5,
4
],
"name": "Base",
"requires": [
{
"or": [
"canWalljump",
"HiJump",
"SpaceJump"
]
},
{
"heatFrames": 125
}
]
},
{
"link": [
5,
4
],
"name": "Crouch Jump Down Grab",
"requires": [
"h_canCrouchJumpDownGrab",
{
"heatFrames": 125
}
]
},
{
"link": [
5,
4
],
"name": "IBJ",
"requires": [
"h_canIBJ",
{
"heatFrames": 850
}
],
"note": "Kill a Gamet and don't pick up its drops, so that they won't spawn while performing the IBJ."
},
{
"link": [
5,
4
],
"name": "Frozen Gamet",
"requires": [
"canUseFrozenEnemies",
{
"heatFrames": 250
}
]
},
{
"link": [
5,
5
],
"name": "Wave Beam the Gate",
"requires": [
{
"heatFrames": 60
},
"Wave"
],
"clearsObstacles": [
"A"
]
},
{
"link": [
5,
5
],
"name": "Gate Glitch",
"requires": [
{
"heatFrames": 135
},
"h_canHeatedBlueGateGlitch"
],
"clearsObstacles": [
"A"
]
},
{
"link": [
5,
5
],
"name": "Upper Norfair Farming Room Gate Glitch With Farming",
"notable": true,
"requires": [
{
"heatFrames": 300
},
"canGateGlitch",
{
"or": [
{
"ammo": {
"type": "Missile",
"count": 1
}
},
{
"ammo": {
"type": "Super",
"count": 1
}
}
]
}
],
"clearsObstacles": [
"A"
],
"note": "Farm before, during, and after the gate glitch in order to open the gate without wasting ammo or Energy.",
"devNote": [
"There is still some leniency built in, so that perfect execution is not required, but Samus ends without losing resources.",
"Without leniency, this can be done with about 235 heatFrames."
]
},
{
"link": [
5,
5
],
"name": "Gamet Farm",
"requires": [
{
"or": [
"canPauseAbuse",
{
"heatFrames": 50
}
]
},
{
"refill": [
"Energy",
"Missile",
"Super",
"PowerBomb"
]
}
]
}
]
}