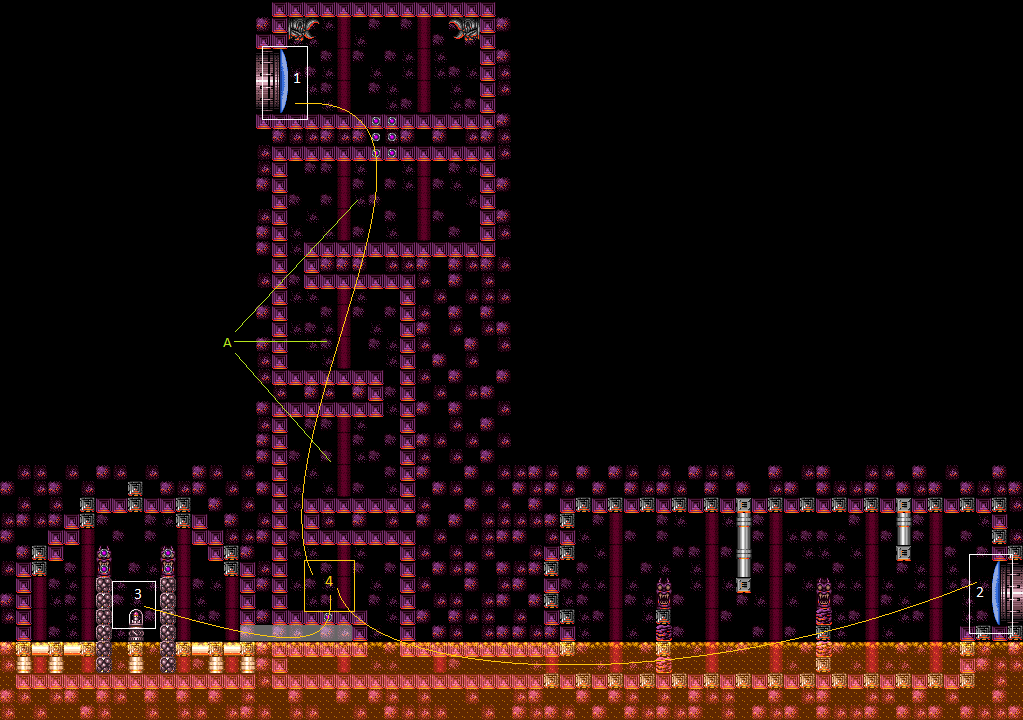
Three Musketeers' Room
Room ID: 148
|
From: 1
Top Left Door
To: 1
Top Left Door
Exit condition: {
"leaveWithRunway": {
"length": 6,
"openEnd": 1
}
}
|
|
From: 1
Top Left Door
To: 1
Top Left Door
Requires: {
"obstaclesNotCleared": [
"A"
]
}
Exit condition: {
"leaveWithRunway": {
"length": 13,
"openEnd": 0
}
}
|
|
Requires: "h_heatProof"
{
"or": [
"ScrewAttack",
{
"and": [
"Plasma",
"Wave",
"Ice"
]
}
]
}
{
"resetRoom": {
"nodes": [
1
],
"mustStayPut": false
}
}
{
"refill": [
"Energy",
"Super"
]
}
|
|
Requires: "h_canHeatedCrystalFlash" |
|
From: 1
Top Left Door
To: 4
Junction Above Bomb Block
Requires: "h_canNavigateHeatRooms"
{
"heatFrames": 400
}
{
"obstaclesCleared": [
"A"
]
}
|
|
From: 1
Top Left Door
To: 4
Junction Above Bomb Block
Wait for the first KiHunter to pass and then run through the remaining two. Requires: "h_canNavigateHeatRooms"
{
"heatFrames": 400
}
{
"enemyDamage": {
"enemy": "Kihunter (red)",
"type": "contact",
"hits": 2
}
}
|
|
From: 1
Top Left Door
To: 4
Junction Above Bomb Block
Requires: "h_canNavigateHeatRooms"
"h_canPlasmaHitbox"
{
"heatFrames": 420
}
|
|
From: 1
Top Left Door
To: 4
Junction Above Bomb Block
Notable: true 
Wait for the top one to pass by. Jump down when the lower two are by the left wall and jump over them when they swoop. Requires: "h_canNavigateHeatRooms"
"canTrickyJump"
{
"heatFrames": 500
}
|
|
By moving quickly, the KiHunters will be in favourable positions. Otherwise wait until it is safe to continue. Requires: "h_canNavigateHeatRooms"
"ScrewAttack"
{
"or": [
{
"heatFrames": 100
},
{
"and": [
"canCarefulJump",
{
"heatFrames": 50
}
]
},
"canTrickyJump"
]
}
{
"heatFrames": 330
}
Clears obstacles: A |
|
From: 1
Top Left Door
To: 4
Junction Above Bomb Block
Shooting straight down can hit the KiHunter below. Jumping before shooting down can even double hit, instantly killing them. Requires: "h_canNavigateHeatRooms"
"Charge"
"Plasma"
"Ice"
"Wave"
{
"or": [
{
"heatFrames": 360
},
"canTrickyJump"
]
}
{
"heatFrames": 520
}
Clears obstacles: A |
|
From: 1
Top Left Door
To: 4
Junction Above Bomb Block
Requires: "h_canNavigateHeatRooms"
"Plasma"
"Wave"
{
"heatFrames": 720
}
Clears obstacles: A |
|
Jump to the previous level when the enemy gets close, or fight entirely from safety. Requires: "h_canNavigateHeatRooms"
"Plasma"
{
"or": [
"canDodgeWhileShooting",
{
"and": [
"Charge",
{
"heatFrames": 1800
}
]
}
]
}
{
"heatFrames": 1200
}
Clears obstacles: A |
|
Jump to the previous level when the enemy gets close, or fight entirely from safety. Two supers can hit per cycle when shooting from above. Requires: "h_canNavigateHeatRooms"
{
"enemyKill": {
"enemies": [
[
"Kihunter (red)",
"Kihunter (red)",
"Kihunter (red)"
]
],
"explicitWeapons": [
"Super"
]
}
}
{
"heatFrames": 800
}
{
"or": [
"canDodgeWhileShooting",
{
"and": [
"canCarefulJump",
{
"heatFrames": 800
}
]
}
]
}
Clears obstacles: A |
|
From: 1
Top Left Door
To: 4
Junction Above Bomb Block
Shooting rapidly at an angle is faster than jumping and firing down. Requires: "h_canNavigateHeatRooms"
"Spazer"
"Ice"
"Wave"
{
"heatFrames": 1210
}
Clears obstacles: A |
|
From: 1
Top Left Door
To: 4
Junction Above Bomb Block
Requires: "h_heatProof"
"canBePatient"
{
"enemyKill": {
"enemies": [
[
"Kihunter (red)",
"Kihunter (red)",
"Kihunter (red)"
]
]
}
}
Clears obstacles: A |
|
Exit condition: {
"leaveWithRunway": {
"length": 3,
"openEnd": 1
}
}
|
|
Requires: "h_canHeatedCrystalFlash" |
|
Requires: "h_canNavigateHeatRooms"
"Morph"
{
"heatFrames": 660
}
|
|
From: 2
Right Door
To: 4
Junction Above Bomb Block
Run into the acid to quickly jump over the first pillar. Build speed and jump over the second pillar to mockball through the tunnel without taking much acid damage. Requires: "h_canNavigateHeatRooms"
"canMockball"
"HiJump"
"SpeedBooster"
"canCarefulJump"
"Gravity"
{
"heatFrames": 310
}
{
"acidFrames": 25
}
|
|
From: 2
Right Door
To: 4
Junction Above Bomb Block
Run into the acid to quickly jump over the first pillar. Build speed and jump over the second pillar to mockball through the tunnel without taking much acid damage. Entrance condition: {
"comeInRunning": {
"minTiles": 3,
"speedBooster": "any"
}
}
Requires: "h_canNavigateHeatRooms"
"canMockball"
"HiJump"
"SpeedBooster"
"canCarefulJump"
"canWalljump"
{
"or": [
"canInsaneWalljump",
{
"acidFrames": 30
}
]
}
{
"heatFrames": 310
}
{
"acidFrames": 5
}
|
|
From: 2
Right Door
To: 4
Junction Above Bomb Block
Enter the room while spacejumping and weave between the pillars. Entrance condition: {
"comeInRunning": {
"minTiles": 4,
"speedBooster": "any"
}
}
Requires: "h_canNavigateHeatRooms"
"SpaceJump"
"Morph"
"canTrickyJump"
"canPrepareForNextRoom"
{
"heatFrames": 270
}
|
|
Requires: "h_canHeatedCrystalFlash" |
|
Requires: "h_canNavigateHeatRooms"
"Morph"
{
"heatFrames": 180
}
|
|
From: 4
Junction Above Bomb Block
To: 1
Top Left Door
Requires: "h_canNavigateHeatRooms"
{
"obstaclesCleared": [
"A"
]
}
{
"or": [
"h_canCrouchJumpDownGrab",
"canWalljump",
"HiJump",
{
"and": [
"canSpringBallJumpMidAir",
{
"heatFrames": 120
}
]
},
"SpaceJump",
{
"and": [
"h_canIBJ",
{
"heatFrames": 1820
}
]
},
{
"and": [
"h_canSpringBallBombJump",
"h_additionalBomb",
"h_additionalBomb",
{
"heatFrames": 250
}
]
}
]
}
{
"heatFrames": 390
}
|
|
From: 4
Junction Above Bomb Block
To: 1
Top Left Door
Wait for the Kihunters to move away from where Samus will jump up. This may mean Hitboxing through the middle KiHunter multiple times. Requires: "h_canNavigateHeatRooms"
"Plasma"
"canHitbox"
{
"or": [
"h_canCrouchJumpDownGrab",
"canWalljump",
"HiJump",
"SpaceJump"
]
}
"canTrickyJump"
{
"heatFrames": 600
}
Clears obstacles: A |
|
From: 4
Junction Above Bomb Block
To: 1
Top Left Door
Notable: true 
Read the movements of the Kihunters and jump over or roll under them as appropriate. Changing platforms is the hardest part: jumping extra high and morphing works sometimes, other times jump short and roll under. Requires: "h_canNavigateHeatRooms"
"canTrickyJump"
{
"or": [
{
"and": [
"canWallJumpInstantMorph",
"canPreciseWalljump"
]
},
{
"and": [
"SpeedBooster",
"HiJump",
"canMidAirMorph"
]
}
]
}
{
"heatFrames": 540
}
Clears obstacles: A |
|
From: 4
Junction Above Bomb Block
To: 1
Top Left Door
Requires: "h_canNavigateHeatRooms"
{
"or": [
"h_canCrouchJumpDownGrab",
"canWalljump",
"HiJump",
{
"and": [
"canSpringBallJumpMidAir",
{
"heatFrames": 300
},
{
"enemyDamage": {
"enemy": "Kihunter (red)",
"type": "contact",
"hits": 1
}
}
]
},
{
"and": [
"h_canJumpIntoIBJ",
{
"heatFrames": 300
}
]
},
"SpaceJump"
]
}
{
"heatFrames": 570
}
{
"enemyDamage": {
"enemy": "Kihunter (red)",
"type": "contact",
"hits": 3
}
}
Clears obstacles: A |
|
From: 4
Junction Above Bomb Block
To: 1
Top Left Door
Jump over the first Kihunter and attempt to either use IFrames to pass through the top Kihunter, or dodge it if possible. Requires: "h_canNavigateHeatRooms"
{
"or": [
"canWalljump",
"HiJump"
]
}
"canTrickyJump"
{
"or": [
{
"and": [
"canHorizontalDamageBoost",
"canHitbox",
{
"enemyDamage": {
"enemy": "Kihunter (red)",
"type": "contact",
"hits": 1
}
}
]
},
{
"enemyDamage": {
"enemy": "Kihunter (red)",
"type": "contact",
"hits": 2
}
}
]
}
Clears obstacles: A |
|
Requires: "h_canNavigateHeatRooms"
"ScrewAttack"
{
"or": [
"canWalljump",
{
"and": [
"h_canCrouchJumpDownGrab",
{
"heatFrames": 120
},
{
"or": [
"canCarefulJump",
{
"enemyDamage": {
"enemy": "Kihunter (red)",
"type": "contact",
"hits": 1
}
}
]
}
]
},
"HiJump",
{
"and": [
"canSpringBallJumpMidAir",
{
"heatFrames": 120
},
{
"enemyDamage": {
"enemy": "Kihunter (red)",
"type": "contact",
"hits": 2
}
}
]
},
"SpaceJump",
{
"and": [
"h_canIBJ",
"h_heatProof",
{
"enemyDamage": {
"enemy": "Kihunter (red)",
"type": "contact",
"hits": 2
}
}
]
}
]
}
{
"heatFrames": 500
}
Clears obstacles: A |
|
From: 4
Junction Above Bomb Block
To: 1
Top Left Door
Firing upwards has a good chance of hitting multiple Kihunters. And charge shot double hits will instantly kill a Kihunter. Requires: "h_canNavigateHeatRooms"
"Ice"
"Wave"
"Plasma"
{
"or": [
"Charge",
{
"heatFrames": 240
}
]
}
{
"or": [
"h_canCrouchJumpDownGrab",
"canWalljump",
"HiJump",
{
"and": [
"canSpringBallJumpMidAir",
{
"heatFrames": 120
}
]
},
"SpaceJump",
{
"and": [
"h_canIBJ",
"h_heatProof"
]
},
{
"and": [
"h_canSpringBallBombJump",
"h_additionalBomb",
"h_additionalBomb",
{
"heatFrames": 250
}
]
}
]
}
{
"heatFrames": 550
}
Clears obstacles: A |
|
From: 4
Junction Above Bomb Block
To: 1
Top Left Door
Requires: "h_canNavigateHeatRooms"
"Wave"
"Plasma"
{
"or": [
"h_canCrouchJumpDownGrab",
"canWalljump",
"HiJump",
{
"and": [
"canSpringBallJumpMidAir",
{
"heatFrames": 120
}
]
},
"SpaceJump",
{
"and": [
"h_canIBJ",
"h_heatProof"
]
},
{
"and": [
"h_canSpringBallBombJump",
"h_additionalBomb",
"h_additionalBomb",
{
"heatFrames": 250
}
]
}
]
}
{
"heatFrames": 940
}
Clears obstacles: A |
|
Fire up from below and try not to jump too high as that will put the camera in a bad position. Requires: "h_canNavigateHeatRooms"
"Plasma"
{
"or": [
"canCarefulJump",
{
"heatFrames": 100
}
]
}
{
"or": [
"h_canCrouchJumpDownGrab",
"canWalljump",
"HiJump",
{
"and": [
"canSpringBallJumpMidAir",
{
"heatFrames": 120
}
]
},
"SpaceJump",
{
"and": [
"h_canIBJ",
"h_heatProof"
]
},
{
"and": [
"h_canSpringBallBombJump",
"h_additionalBomb",
"h_additionalBomb",
{
"heatFrames": 250
}
]
}
]
}
{
"heatFrames": 1360
}
Clears obstacles: A |
|
Fire up from below and try not to jump too high as that will put the camera in a bad position. Requires: "h_canNavigateHeatRooms"
{
"enemyKill": {
"enemies": [
[
"Kihunter (red)",
"Kihunter (red)",
"Kihunter (red)"
]
],
"explicitWeapons": [
"Super"
]
}
}
{
"or": [
"canCarefulJump",
{
"heatFrames": 210
}
]
}
{
"or": [
"h_canCrouchJumpDownGrab",
"canWalljump",
"HiJump",
{
"and": [
"canSpringBallJumpMidAir",
{
"heatFrames": 120
}
]
},
"SpaceJump",
{
"and": [
"h_canIBJ",
"h_heatProof"
]
},
{
"and": [
"h_canSpringBallBombJump",
"h_additionalBomb",
"h_additionalBomb",
{
"heatFrames": 250
}
]
}
]
}
{
"heatFrames": 1300
}
Clears obstacles: A |
|
From: 4
Junction Above Bomb Block
To: 1
Top Left Door
Fire up from below and try not to jump too high as that will out the camera in a bad position. Requires: "h_canNavigateHeatRooms"
"Ice"
"Wave"
"Spazer"
{
"or": [
"Charge",
"canCarefulJump",
"h_heatProof"
]
}
{
"or": [
"h_canCrouchJumpDownGrab",
"canWalljump",
"HiJump",
{
"and": [
"canSpringBallJumpMidAir",
{
"heatFrames": 120
}
]
},
"SpaceJump",
{
"and": [
"h_canIBJ",
"h_heatProof"
]
},
{
"and": [
"h_canSpringBallBombJump",
"h_additionalBomb",
"h_additionalBomb",
{
"heatFrames": 250
}
]
}
]
}
{
"heatFrames": 1520
}
Clears obstacles: A |
|
From: 4
Junction Above Bomb Block
To: 1
Top Left Door
Shoot them from below. It is possible for the KiHunters to fall through the gaps in the side, but is unlikely. Jumping may lower the camera position making it harder to shoot the KiHunters. But once it is lowered, jump to make them active and vulnerable to damage. Requires: "h_heatProof"
"canBePatient"
{
"enemyKill": {
"enemies": [
[
"Kihunter (red)",
"Kihunter (red)",
"Kihunter (red)"
]
]
}
}
{
"or": [
"h_canCrouchJumpDownGrab",
"canWalljump",
"HiJump",
"canSpringBallJumpMidAir",
"SpaceJump",
"h_canIBJ",
{
"and": [
"h_canSpringBallBombJump",
"h_additionalBomb",
"h_additionalBomb"
]
}
]
}
Clears obstacles: A |
|
Wait for the acid to go down before entering the Morph tunnel, and again once reaching the other side. Requires: "h_canNavigateHeatRooms"
"Morph"
{
"heatFrames": 750
}
{
"acidFrames": 16
}
|
|
From: 4
Junction Above Bomb Block
To: 2
Right Door
Walljump in place while the acid goes away. Requires: "h_canNavigateHeatRooms"
"Morph"
"canStaggeredWalljump"
{
"heatFrames": 660
}
|
|
Requires: "h_canNavigateHeatRooms"
"Morph"
"SpaceJump"
{
"or": [
{
"heatFrames": 660
},
{
"and": [
"canCarefulJump",
{
"acidFrames": 2
},
{
"heatFrames": 600
}
]
}
]
}
|
|
Requires: "h_canNavigateHeatRooms"
"Morph"
"Gravity"
{
"acidFrames": 32
}
{
"heatFrames": 510
}
|
|
Requires: "h_canNavigateHeatRooms"
"Morph"
"ScrewAttack"
{
"heatFrames": 200
}
|
|
Requires: "h_canNavigateHeatRooms"
"h_canUseMorphBombs"
{
"heatFrames": 250
}
|
|
Requires: "h_canNavigateHeatRooms"
"h_canUsePowerBombs"
{
"heatFrames": 230
}
|
|
From: 4
Junction Above Bomb Block
To: 4
Junction Above Bomb Block
Requires: "h_canHeatedCrystalFlash" |
{
"$schema": "../../../schema/m3-room.schema.json",
"id": 148,
"name": "Three Musketeers' Room",
"area": "Norfair",
"subarea": "Lower",
"subsubarea": "East",
"playable": true,
"roomAddress": "0x7B656",
"roomEnvironments": [
{
"heated": true
}
],
"nodes": [
{
"id": 1,
"name": "Top Left Door",
"nodeType": "door",
"nodeSubType": "blue",
"nodeAddress": "0x0019a4a",
"doorEnvironments": [
{
"physics": "air"
}
]
},
{
"id": 2,
"name": "Right Door",
"nodeType": "door",
"nodeSubType": "blue",
"nodeAddress": "0x0019a56",
"doorEnvironments": [
{
"physics": "air"
}
]
},
{
"id": 3,
"name": "Hidden Item",
"nodeType": "item",
"nodeSubType": "visible",
"nodeItem": "Missile",
"nodeAddress": "0x79100"
},
{
"id": 4,
"name": "Junction Above Bomb Block",
"nodeType": "junction",
"nodeSubType": "junction"
}
],
"obstacles": [
{
"id": "A",
"name": "Three Musketeers",
"obstacleType": "enemies",
"devNote": [
"The shot blocks are treated as broken when this obstacle is cleared.",
"For that reason the Musketeers are treated as cleared when travelling to the top door even if they may not be dead."
]
}
],
"enemies": [
{
"id": "e1",
"groupName": "Three Musketeers",
"enemyName": "Kihunter (red)",
"quantity": 3,
"betweenNodes": [
1,
4
],
"dropRequires": [
"h_heatProof"
]
}
],
"links": [
{
"from": 1,
"to": [
{
"id": 1
},
{
"id": 4
}
]
},
{
"from": 2,
"to": [
{
"id": 2
},
{
"id": 4
}
]
},
{
"from": 3,
"to": [
{
"id": 3
},
{
"id": 4
}
]
},
{
"from": 4,
"to": [
{
"id": 1
},
{
"id": 2
},
{
"id": 3
},
{
"id": 4
}
]
}
],
"strats": [
{
"link": [
1,
1
],
"name": "Leave With Runway (Short Runway)",
"requires": [],
"exitCondition": {
"leaveWithRunway": {
"length": 6,
"openEnd": 1
}
}
},
{
"link": [
1,
1
],
"name": "Leave With Runway (Full Runway)",
"requires": [
{
  "obstaclesNotCleared": [
    "A"
  ]
}
],
"exitCondition": {
"leaveWithRunway": {
"length": 13,
"openEnd": 0
}
}
},
{
"link": [
1,
1
],
"name": "Red Kihunter Farm",
"requires": [
"h_heatProof",
{
"or": [
"ScrewAttack",
{
"and": [
"Plasma",
"Wave",
"Ice"
]
}
]
},
{
"resetRoom": {
"nodes": [
1
],
"mustStayPut": false
}
},
{
"refill": [
"Energy",
"Super"
]
}
]
},
{
"link": [
1,
1
],
"name": "Crystal Flash",
"requires": [
"h_canHeatedCrystalFlash"
]
},
{
"link": [
1,
4
],
"name": "Kihunters Already Killed",
"requires": [
"h_canNavigateHeatRooms",
{
"heatFrames": 400
},
{
"obstaclesCleared": [
"A"
]
}
]
},
{
"link": [
1,
4
],
"name": "Tank the Damage",
"requires": [
"h_canNavigateHeatRooms",
{
"heatFrames": 400
},
{
"enemyDamage": {
"enemy": "Kihunter (red)",
"type": "contact",
"hits": 2
}
}
],
"note": "Wait for the first KiHunter to pass and then run through the remaining two."
},
{
"link": [
1,
4
],
"name": "Hitbox the Kihunters",
"requires": [
"h_canNavigateHeatRooms",
"h_canPlasmaHitbox",
{
"heatFrames": 420
}
]
},
{
"link": [
1,
4
],
"name": "Dodge the Three Musketeers Going Down",
"notable": true,
"requires": [
"h_canNavigateHeatRooms",
"canTrickyJump",
{
"heatFrames": 500
}
],
"note": [
"Wait for the top one to pass by.",
"Jump down when the lower two are by the left wall and jump over them when they swoop."
]
},
{
"link": [
1,
4
],
"name": "Screw Kill",
"requires": [
"h_canNavigateHeatRooms",
"ScrewAttack",
{
"or": [
{
"heatFrames": 100
},
{
"and": [
"canCarefulJump",
{
"heatFrames": 50
}
]
},
"canTrickyJump"
]
},
{
"heatFrames": 330
}
],
"clearsObstacles": [
"A"
],
"note": "By moving quickly, the KiHunters will be in favourable positions. Otherwise wait until it is safe to continue."
},
{
"link": [
1,
4
],
"name": "Full Combo Kill",
"requires": [
"h_canNavigateHeatRooms",
"Charge",
"Plasma",
"Ice",
"Wave",
{
"or": [
{
"heatFrames": 360
},
"canTrickyJump"
]
},
{
"heatFrames": 520
}
],
"clearsObstacles": [
"A"
],
"note": [
"Shooting straight down can hit the KiHunter below.",
"Jumping before shooting down can even double hit, instantly killing them."
]
},
{
"link": [
1,
4
],
"name": "Chargeless Wave Plasma Kill",
"requires": [
"h_canNavigateHeatRooms",
"Plasma",
"Wave",
{
"heatFrames": 720
}
],
"clearsObstacles": [
"A"
]
},
{
"link": [
1,
4
],
"name": "Plasma Kill",
"requires": [
"h_canNavigateHeatRooms",
"Plasma",
{
"or": [
"canDodgeWhileShooting",
{
"and": [
"Charge",
{
"heatFrames": 1800
}
]
}
]
},
{
"heatFrames": 1200
}
],
"clearsObstacles": [
"A"
],
"note": "Jump to the previous level when the enemy gets close, or fight entirely from safety."
},
{
"link": [
1,
4
],
"name": "Supers Kill",
"requires": [
"h_canNavigateHeatRooms",
{
"enemyKill": {
"enemies": [
[
"Kihunter (red)",
"Kihunter (red)",
"Kihunter (red)"
]
],
"explicitWeapons": [
"Super"
]
}
},
{
"heatFrames": 800
},
{
"or": [
"canDodgeWhileShooting",
{
"and": [
"canCarefulJump",
{
"heatFrames": 800
}
]
}
]
}
],
"clearsObstacles": [
"A"
],
"note": [
"Jump to the previous level when the enemy gets close, or fight entirely from safety.",
"Two supers can hit per cycle when shooting from above."
]
},
{
"link": [
1,
4
],
"name": "Ice Wave Spazer Kill",
"requires": [
"h_canNavigateHeatRooms",
"Spazer",
"Ice",
"Wave",
{
"heatFrames": 1210
}
],
"clearsObstacles": [
"A"
],
"note": "Shooting rapidly at an angle is faster than jumping and firing down."
},
{
"link": [
1,
4
],
"name": "Slow HeatProof Kill",
"requires": [
"h_heatProof",
"canBePatient",
{
"enemyKill": {
"enemies": [
[
"Kihunter (red)",
"Kihunter (red)",
"Kihunter (red)"
]
]
}
}
],
"clearsObstacles": [
"A"
]
},
{
"link": [
2,
2
],
"name": "Leave With Runway",
"requires": [],
"exitCondition": {
"leaveWithRunway": {
"length": 3,
"openEnd": 1
}
}
},
{
"link": [
2,
2
],
"name": "Crystal Flash",
"requires": [
"h_canHeatedCrystalFlash"
]
},
{
"link": [
2,
4
],
"name": "Base",
"requires": [
"h_canNavigateHeatRooms",
"Morph",
{
"heatFrames": 660
}
]
},
{
"link": [
2,
4
],
"name": "HiJump Speed Mockball (Gravity)",
"requires": [
"h_canNavigateHeatRooms",
"canMockball",
"HiJump",
"SpeedBooster",
"canCarefulJump",
"Gravity",
{
"heatFrames": 310
},
{
"acidFrames": 25
}
],
"note": [
"Run into the acid to quickly jump over the first pillar.",
"Build speed and jump over the second pillar to mockball through the tunnel without taking much acid damage."
]
},
{
"link": [
2,
4
],
"name": "HiJump Speed Mockball (Come in Running)",
"entranceCondition": {
"comeInRunning": {
"minTiles": 3,
"speedBooster": "any"
}
},
"requires": [
"h_canNavigateHeatRooms",
"canMockball",
"HiJump",
"SpeedBooster",
"canCarefulJump",
"canWalljump",
{
"or": [
"canInsaneWalljump",
{
"acidFrames": 30
}
]
},
{
"heatFrames": 310
},
{
"acidFrames": 5
}
],
"note": [
"Run into the acid to quickly jump over the first pillar.",
"Build speed and jump over the second pillar to mockball through the tunnel without taking much acid damage."
]
},
{
"link": [
2,
4
],
"name": "SpaceJump Weave",
"entranceCondition": {
"comeInRunning": {
"minTiles": 4,
"speedBooster": "any"
}
},
"requires": [
"h_canNavigateHeatRooms",
"SpaceJump",
"Morph",
"canTrickyJump",
"canPrepareForNextRoom",
{
"heatFrames": 270
}
],
"note": "Enter the room while spacejumping and weave between the pillars."
},
{
"link": [
3,
3
],
"name": "Crystal Flash",
"requires": [
"h_canHeatedCrystalFlash"
]
},
{
"link": [
3,
4
],
"name": "Base",
"requires": [
"h_canNavigateHeatRooms",
"Morph",
{
"heatFrames": 180
}
],
"devNote": "There's technically a bomb block to break, but it's impossible to reach this node without destroying it beforehand."
},
{
"link": [
4,
1
],
"name": "Kihunters Already Dead",
"requires": [
"h_canNavigateHeatRooms",
{
"obstaclesCleared": [
"A"
]
},
{
"or": [
"h_canCrouchJumpDownGrab",
"canWalljump",
"HiJump",
{
"and": [
"canSpringBallJumpMidAir",
{
"heatFrames": 120
}
]
},
"SpaceJump",
{
"and": [
"h_canIBJ",
{
"heatFrames": 1820
}
]
},
{
"and": [
"h_canSpringBallBombJump",
"h_additionalBomb",
"h_additionalBomb",
{
"heatFrames": 250
}
]
}
]
},
{
"heatFrames": 390
}
],
"devNote": "SpringBallBombJump uses 3 power bombs total."
},
{
"link": [
4,
1
],
"name": "Hitbox the Kihunters",
"requires": [
"h_canNavigateHeatRooms",
"Plasma",
"canHitbox",
{
"or": [
"h_canCrouchJumpDownGrab",
"canWalljump",
"HiJump",
"SpaceJump"
]
},
"canTrickyJump",
{
"heatFrames": 600
}
],
"clearsObstacles": [
"A"
],
"note": [
"Wait for the Kihunters to move away from where Samus will jump up.",
"This may mean Hitboxing through the middle KiHunter multiple times."
]
},
{
"link": [
4,
1
],
"name": "Dodge the 3 Musketeers Going Up",
"notable": true,
"requires": [
"h_canNavigateHeatRooms",
"canTrickyJump",
{
"or": [
{
"and": [
"canWallJumpInstantMorph",
"canPreciseWalljump"
]
},
{
"and": [
"SpeedBooster",
"HiJump",
"canMidAirMorph"
]
}
]
},
{
"heatFrames": 540
}
],
"clearsObstacles": [
"A"
],
"note": [
"Read the movements of the Kihunters and jump over or roll under them as appropriate.",
"Changing platforms is the hardest part: ",
"jumping extra high and morphing works sometimes, other times jump short and roll under."
]
},
{
"link": [
4,
1
],
"name": "Tank the Damage",
"requires": [
"h_canNavigateHeatRooms",
{
"or": [
"h_canCrouchJumpDownGrab",
"canWalljump",
"HiJump",
{
"and": [
"canSpringBallJumpMidAir",
{
"heatFrames": 300
},
{
"enemyDamage": {
"enemy": "Kihunter (red)",
"type": "contact",
"hits": 1
}
}
]
},
{
"and": [
"h_canJumpIntoIBJ",
{
"heatFrames": 300
}
]
},
"SpaceJump"
]
},
{
"heatFrames": 570
},
{
"enemyDamage": {
"enemy": "Kihunter (red)",
"type": "contact",
"hits": 3
}
}
],
"clearsObstacles": [
"A"
]
},
{
"link": [
4,
1
],
"name": "Partial Kihunter Dodge",
"requires": [
"h_canNavigateHeatRooms",
{
"or": [
"canWalljump",
"HiJump"
]
},
"canTrickyJump",
{
"or": [
{
"and": [
"canHorizontalDamageBoost",
"canHitbox",
{
"enemyDamage": {
"enemy": "Kihunter (red)",
"type": "contact",
"hits": 1
}
}
]
},
{
"enemyDamage": {
"enemy": "Kihunter (red)",
"type": "contact",
"hits": 2
}
}
]
}
],
"clearsObstacles": [
"A"
],
"note": "Jump over the first Kihunter and attempt to either use IFrames to pass through the top Kihunter, or dodge it if possible."
},
{
"link": [
4,
1
],
"name": "Screw Kill",
"requires": [
"h_canNavigateHeatRooms",
"ScrewAttack",
{
"or": [
"canWalljump",
{
"and": [
"h_canCrouchJumpDownGrab",
{
"heatFrames": 120
},
{
"or": [
"canCarefulJump",
{
"enemyDamage": {
"enemy": "Kihunter (red)",
"type": "contact",
"hits": 1
}
}
]
}
]
},
"HiJump",
{
"and": [
"canSpringBallJumpMidAir",
{
"heatFrames": 120
},
{
"enemyDamage": {
"enemy": "Kihunter (red)",
"type": "contact",
"hits": 2
}
}
]
},
"SpaceJump",
{
"and": [
"h_canIBJ",
"h_heatProof",
{
"enemyDamage": {
"enemy": "Kihunter (red)",
"type": "contact",
"hits": 2
}
}
]
}
]
},
{
"heatFrames": 500
}
],
"clearsObstacles": [
"A"
]
},
{
"link": [
4,
1
],
"name": "Ice Wave Plasma Kill",
"requires": [
"h_canNavigateHeatRooms",
"Ice",
"Wave",
"Plasma",
{
"or": [
"Charge",
{
"heatFrames": 240
}
]
},
{
"or": [
"h_canCrouchJumpDownGrab",
"canWalljump",
"HiJump",
{
"and": [
"canSpringBallJumpMidAir",
{
"heatFrames": 120
}
]
},
"SpaceJump",
{
"and": [
"h_canIBJ",
"h_heatProof"
]
},
{
"and": [
"h_canSpringBallBombJump",
"h_additionalBomb",
"h_additionalBomb",
{
"heatFrames": 250
}
]
}
]
},
{
"heatFrames": 550
}
],
"clearsObstacles": [
"A"
],
"note": [
"Firing upwards has a good chance of hitting multiple Kihunters.",
"And charge shot double hits will instantly kill a Kihunter."
]
},
{
"link": [
4,
1
],
"name": "Wave Plasma Kill",
"requires": [
"h_canNavigateHeatRooms",
"Wave",
"Plasma",
{
"or": [
"h_canCrouchJumpDownGrab",
"canWalljump",
"HiJump",
{
"and": [
"canSpringBallJumpMidAir",
{
"heatFrames": 120
}
]
},
"SpaceJump",
{
"and": [
"h_canIBJ",
"h_heatProof"
]
},
{
"and": [
"h_canSpringBallBombJump",
"h_additionalBomb",
"h_additionalBomb",
{
"heatFrames": 250
}
]
}
]
},
{
"heatFrames": 940
}
],
"clearsObstacles": [
"A"
]
},
{
"link": [
4,
1
],
"name": "Plasma Kill",
"requires": [
"h_canNavigateHeatRooms",
"Plasma",
{
"or": [
"canCarefulJump",
{
"heatFrames": 100
}
]
},
{
"or": [
"h_canCrouchJumpDownGrab",
"canWalljump",
"HiJump",
{
"and": [
"canSpringBallJumpMidAir",
{
"heatFrames": 120
}
]
},
"SpaceJump",
{
"and": [
"h_canIBJ",
"h_heatProof"
]
},
{
"and": [
"h_canSpringBallBombJump",
"h_additionalBomb",
"h_additionalBomb",
{
"heatFrames": 250
}
]
}
]
},
{
"heatFrames": 1360
}
],
"clearsObstacles": [
"A"
],
"note": "Fire up from below and try not to jump too high as that will put the camera in a bad position.",
"devNote": "FIXME IBJ strats could be added with heat frames."
},
{
"link": [
4,
1
],
"name": "Supers Kill",
"requires": [
"h_canNavigateHeatRooms",
{
"enemyKill": {
"enemies": [
[
"Kihunter (red)",
"Kihunter (red)",
"Kihunter (red)"
]
],
"explicitWeapons": [
"Super"
]
}
},
{
"or": [
"canCarefulJump",
{
"heatFrames": 210
}
]
},
{
"or": [
"h_canCrouchJumpDownGrab",
"canWalljump",
"HiJump",
{
"and": [
"canSpringBallJumpMidAir",
{
"heatFrames": 120
}
]
},
"SpaceJump",
{
"and": [
"h_canIBJ",
"h_heatProof"
]
},
{
"and": [
"h_canSpringBallBombJump",
"h_additionalBomb",
"h_additionalBomb",
{
"heatFrames": 250
}
]
}
]
},
{
"heatFrames": 1300
}
],
"clearsObstacles": [
"A"
],
"note": "Fire up from below and try not to jump too high as that will put the camera in a bad position."
},
{
"link": [
4,
1
],
"name": "Ice Wave Spazer Kill",
"requires": [
"h_canNavigateHeatRooms",
"Ice",
"Wave",
"Spazer",
{
"or": [
"Charge",
"canCarefulJump",
"h_heatProof"
]
},
{
"or": [
"h_canCrouchJumpDownGrab",
"canWalljump",
"HiJump",
{
"and": [
"canSpringBallJumpMidAir",
{
"heatFrames": 120
}
]
},
"SpaceJump",
{
"and": [
"h_canIBJ",
"h_heatProof"
]
},
{
"and": [
"h_canSpringBallBombJump",
"h_additionalBomb",
"h_additionalBomb",
{
"heatFrames": 250
}
]
}
]
},
{
"heatFrames": 1520
}
],
"clearsObstacles": [
"A"
],
"note": "Fire up from below and try not to jump too high as that will out the camera in a bad position.",
"devNote": "FIXME IBJ strats could be added with heat frames."
},
{
"link": [
4,
1
],
"name": "Slow HeatProof Kill",
"requires": [
"h_heatProof",
"canBePatient",
{
"enemyKill": {
"enemies": [
[
"Kihunter (red)",
"Kihunter (red)",
"Kihunter (red)"
]
]
}
},
{
"or": [
"h_canCrouchJumpDownGrab",
"canWalljump",
"HiJump",
"canSpringBallJumpMidAir",
"SpaceJump",
"h_canIBJ",
{
"and": [
"h_canSpringBallBombJump",
"h_additionalBomb",
"h_additionalBomb"
]
}
]
}
],
"clearsObstacles": [
"A"
],
"note": [
"Shoot them from below.",
"It is possible for the KiHunters to fall through the gaps in the side, but is unlikely.",
"Jumping may lower the camera position making it harder to shoot the KiHunters.",
"But once it is lowered, jump to make them active and vulnerable to damage."
],
"devNote": "SpringBallBombJump uses 3 powerbombs total."
},
{
"link": [
4,
2
],
"name": "Base",
"requires": [
"h_canNavigateHeatRooms",
"Morph",
{
"heatFrames": 750
},
{
"acidFrames": 16
}
],
"note": "Wait for the acid to go down before entering the Morph tunnel, and again once reaching the other side."
},
{
"link": [
4,
2
],
"name": "Staggered Wall Jump",
"requires": [
"h_canNavigateHeatRooms",
"Morph",
"canStaggeredWalljump",
{
"heatFrames": 660
}
],
"note": "Walljump in place while the acid goes away."
},
{
"link": [
4,
2
],
"name": "Space Jump",
"requires": [
"h_canNavigateHeatRooms",
"Morph",
"SpaceJump",
{
"or": [
{
"heatFrames": 660
},
{
"and": [
"canCarefulJump",
{
"acidFrames": 2
},
{
"heatFrames": 600
}
]
}
]
}
]
},
{
"link": [
4,
2
],
"name": "Gravity",
"requires": [
"h_canNavigateHeatRooms",
"Morph",
"Gravity",
{
"acidFrames": 32
},
{
"heatFrames": 510
}
]
},
{
"link": [
4,
3
],
"name": "Screw",
"requires": [
"h_canNavigateHeatRooms",
"Morph",
"ScrewAttack",
{
"heatFrames": 200
}
]
},
{
"link": [
4,
3
],
"name": "Bombs",
"requires": [
"h_canNavigateHeatRooms",
"h_canUseMorphBombs",
{
"heatFrames": 250
}
]
},
{
"link": [
4,
3
],
"name": "Power Bombs",
"requires": [
"h_canNavigateHeatRooms",
"h_canUsePowerBombs",
{
"heatFrames": 230
}
]
},
{
"link": [
4,
4
],
"name": "Crystal Flash",
"requires": [
"h_canHeatedCrystalFlash"
]
}
]
}