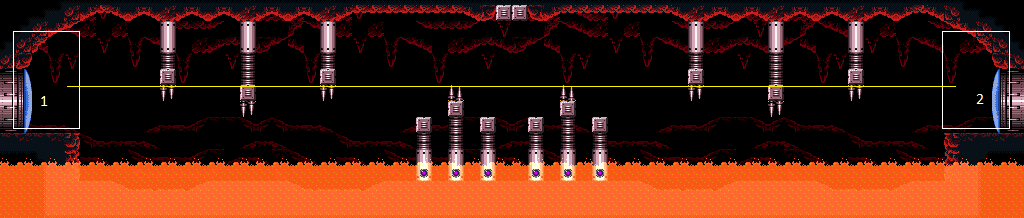
Spiky Platforms Tunnel
Room ID: 117
|
Exit condition: {
"leaveWithRunway": {
"length": 4,
"openEnd": 1
}
}
|
|
Requires: "h_canHeatedCrystalFlash" |
|
If you have Speed Booster, unequip it to be able to run faster in the lava. Requires: "Gravity"
{
"heatFrames": 360
}
{
"lavaFrames": 130
}
{
"or": [
"canCarefulJump",
{
"heatFrames": 40
}
]
}
|
|
Requires: "Morph"
{
"heatFrames": 1050
}
|
|
Spin-jump across both sets of lava, trying to minimize the time spent in lava. To get onto the first pillar, either use a wall jump off the pillar, or use the Tripper briefly as a platform by crouch jumping or down grabbing onto it. Requires: "canSuitlessLavaDive"
{
"heatFrames": 750
}
{
"lavaFrames": 120
}
{
"or": [
"canWalljump",
{
"and": [
{
"or": [
"canCrouchJump",
"canDownGrab"
]
},
{
"heatFrames": 110
},
{
"lavaFrames": 20
}
]
}
]
}
|
|
Use the Tripper to cross the first lava pit while avoiding all damage from the spikes and lava. If you do not have Morph, this is tricky but can be done by carefully timing a jump against the pillar and releasing the d-pad inputs, to land on the Tripper as early as possible. This allows the Tripper to sink low enough that crouching on the Tripper is enough to avoid spike damage. From the Tripper, run and jump directly onto the first pillar past the shutter; it can help to moonwalk back left on the Tripper to maximize run speed for the jump. From the pillar, run and jump directly into the lava rather than waiting for the second Tripper. Perform quick spin jumps to minimize lava damage. Requires: {
"or": [
"canTrickyJump",
"Morph"
]
}
"canSuitlessLavaDive"
{
"heatFrames": 760
}
{
"lavaFrames": 60
}
|
|
From: 1
Left Door
To: 2
Right Door
Perform a bounceball to minimize lava damage. Move quickly to reach the second Tripper on its first cycle. Ride it, morph to avoid spike damage, shoot open the door, and run off of the Tripper (rather than jumping off). Entrance condition: {
"comeInRunning": {
"minTiles": 3,
"speedBooster": false
}
}
Requires: "canBounceBall"
"canWalljump"
{
"heatFrames": 600
}
{
"lavaFrames": 60
}
|
|
From: 1
Left Door
To: 2
Right Door
Perform a bounceball to minimize lava damage. Move quickly to reach the second Tripper on its first cycle. Ride it, morph to avoid spike damage, shoot open the door, and run off of the Tripper (rather than jumping off). Entrance condition: {
"comeInRunning": {
"minTiles": 1,
"speedBooster": false
}
}
Requires: "canBounceBall"
"canWalljump"
{
"heatFrames": 600
}
{
"lavaFrames": 85
}
|
|
If you have Speed Booster, unequip it to be able to run faster in the lava. Requires: "Gravity"
{
"heatFrames": 360
}
{
"lavaFrames": 130
}
{
"or": [
"canCarefulJump",
{
"heatFrames": 40
}
]
}
|
|
Requires: "Morph"
{
"heatFrames": 1050
}
|
|
Spin-jump across both sets of lava, trying to minimize the time spent in lava. To get onto the first pillar, either use a wall jump off the pillar, or use the Tripper briefly as a platform by crouch jumping or down grabbing onto it. Requires: "canSuitlessLavaDive"
{
"heatFrames": 700
}
{
"lavaFrames": 130
}
{
"or": [
"canWalljump",
{
"and": [
{
"or": [
"canCrouchJump",
"canDownGrab"
]
},
{
"heatFrames": 220
},
{
"lavaFrames": 70
}
]
}
]
}
|
|
Wait for the Tripper to approach the right platform, then run onto and off its left side. Spin jump to the left one time, then jump up onto the right side of the Tripper. Run to the left and jump directly onto the first pillar after the shutter. Spin jump across the remaining lava, trying to minimize the time spent in lava. Requires: "canSuitlessLavaDive"
"canTrickyJump"
{
"heatFrames": 780
}
{
"lavaFrames": 100
}
|
|
Ride the first Tripper, using Morph to avoid spike damage. From the Tripper, run and jump directly onto the first pillar after the shutter. Spin jump across the remaining lava, trying to minimize the time spent in lava. Requires: "canSuitlessLavaDive"
"Morph"
{
"heatFrames": 780
}
{
"lavaFrames": 70
}
|
|
From: 2
Right Door
To: 1
Left Door
Perform a bounceball to minimize lava damage. Ride the second Tripper. Entrance condition: {
"comeInRunning": {
"minTiles": 3,
"speedBooster": false
}
}
Requires: "canBounceBall"
"canWalljump"
{
"heatFrames": 600
}
{
"lavaFrames": 60
}
|
|
From: 2
Right Door
To: 1
Left Door
Perform a bounceball to minimize lava damage. Ride the second Tripper. Entrance condition: {
"comeInRunning": {
"minTiles": 3,
"speedBooster": false
}
}
Requires: "canBounceBall"
"canWalljump"
{
"heatFrames": 600
}
{
"lavaFrames": 85
}
|
|
Entrance condition: {
"comeInWithGrappleTeleport": {
"blockPositions": [
[
7,
2
]
]
}
}
Requires: {
"heatFrames": 45
}
|
|
Entrance condition: {
"comeInWithGrappleTeleport": {
"blockPositions": [
[
3,
12
],
[
3,
13
]
]
}
}
Bypasses door shell: true |
|
From: 2
Right Door
To: 1
Left Door
Entrance condition: {
"comeInWithGrappleTeleport": {
"blockPositions": [
[
3,
12
]
]
}
}
Exit condition: {
"leaveWithGrappleTeleport": {
"blockPositions": [
[
3,
12
]
]
}
}
Bypasses door shell: true |
|
From: 2
Right Door
To: 1
Left Door
Entrance condition: {
"comeInWithGrappleTeleport": {
"blockPositions": [
[
3,
13
]
]
}
}
Exit condition: {
"leaveWithGrappleTeleport": {
"blockPositions": [
[
3,
13
]
]
}
}
Bypasses door shell: true |
|
Exit condition: {
"leaveWithRunway": {
"length": 4,
"openEnd": 1
}
}
|
|
Requires: "h_canHeatedCrystalFlash" |
{
"$schema": "../../../schema/m3-room.schema.json",
"id": 117,
"name": "Spiky Platforms Tunnel",
"area": "Norfair",
"subarea": "Upper",
"subsubarea": "East",
"playable": true,
"roomAddress": "0x7AE07",
"roomEnvironments": [
{
"heated": true
}
],
"nodes": [
{
"id": 1,
"name": "Left Door",
"nodeType": "door",
"nodeSubType": "blue",
"nodeAddress": "0x0019636",
"doorEnvironments": [
{
"physics": "air"
}
]
},
{
"id": 2,
"name": "Right Door",
"nodeType": "door",
"nodeSubType": "blue",
"nodeAddress": "0x0019642",
"doorEnvironments": [
{
"physics": "air"
}
]
}
],
"enemies": [
{
"id": "e1",
"groupName": "Spiky Platforms Tunnel Left Tripper",
"enemyName": "Tripper",
"quantity": 1,
"homeNodes": [
1
],
"dropRequires": [
"h_heatProof",
"Gravity"
]
},
{
"id": "e2",
"groupName": "Spiky Platforms Tunnel Right Tripper",
"enemyName": "Tripper",
"quantity": 1,
"homeNodes": [
2
],
"dropRequires": [
"h_heatProof",
"Gravity"
]
}
],
"links": [
{
"from": 1,
"to": [
{
"id": 1
},
{
"id": 2
}
]
},
{
"from": 2,
"to": [
{
"id": 1
},
{
"id": 2
}
]
}
],
"strats": [
{
"link": [
1,
1
],
"name": "Leave with Runway",
"requires": [],
"exitCondition": {
"leaveWithRunway": {
"length": 4,
"openEnd": 1
}
}
},
{
"link": [
1,
1
],
"name": "Crystal Flash",
"requires": [
"h_canHeatedCrystalFlash"
]
},
{
"link": [
1,
2
],
"name": "Gravity",
"requires": [
"Gravity",
{
"heatFrames": 360
},
{
"lavaFrames": 130
},
{
"or": [
"canCarefulJump",
{
"heatFrames": 40
}
]
}
],
"note": "If you have Speed Booster, unequip it to be able to run faster in the lava."
},
{
"link": [
1,
2
],
"name": "Tripper Morphing",
"requires": [
"Morph",
{
"heatFrames": 1050
}
]
},
{
"link": [
1,
2
],
"name": "Double Lava Bath",
"requires": [
"canSuitlessLavaDive",
{
"heatFrames": 750
},
{
"lavaFrames": 120
},
{
"or": [
"canWalljump",
{
"and": [
{
"or": [
"canCrouchJump",
"canDownGrab"
]
},
{
"heatFrames": 110
},
{
"lavaFrames": 20
}
]
}
]
}
],
"note": [
"Spin-jump across both sets of lava, trying to minimize the time spent in lava.",
"To get onto the first pillar, either use a wall jump off the pillar, or use the Tripper briefly as a platform by crouch jumping or down grabbing onto it."
]
},
{
"link": [
1,
2
],
"name": "Single Lava Bath",
"requires": [
{
"or": [
"canTrickyJump",
"Morph"
]
},
"canSuitlessLavaDive",
{
"heatFrames": 760
},
{
"lavaFrames": 60
}
],
"note": [
"Use the Tripper to cross the first lava pit while avoiding all damage from the spikes and lava.",
"If you do not have Morph, this is tricky but can be done by carefully timing a jump against the pillar and releasing the d-pad inputs, to land on the Tripper as early as possible.",
"This allows the Tripper to sink low enough that crouching on the Tripper is enough to avoid spike damage.",
"From the Tripper, run and jump directly onto the first pillar past the shutter; it can help to moonwalk back left on the Tripper to maximize run speed for the jump.",
"From the pillar, run and jump directly into the lava rather than waiting for the second Tripper.",
"Perform quick spin jumps to minimize lava damage."
],
"devNote": "Wall jumps are not needed for this strat and would not be helpful."
},
{
"link": [
1,
2
],
"name": "Bounceball Double Lava Bath (Longer Runway)",
"entranceCondition": {
"comeInRunning": {
"minTiles": 3,
"speedBooster": false
}
},
"requires": [
"canBounceBall",
"canWalljump",
{
"heatFrames": 600
},
{
"lavaFrames": 60
}
],
"note": [
"Perform a bounceball to minimize lava damage.",
"Move quickly to reach the second Tripper on its first cycle.",
"Ride it, morph to avoid spike damage, shoot open the door, and run off of the Tripper (rather than jumping off)."
]
},
{
"link": [
1,
2
],
"name": "Bounceball Double Lava Bath (Short Runway)",
"entranceCondition": {
"comeInRunning": {
"minTiles": 1,
"speedBooster": false
}
},
"requires": [
"canBounceBall",
"canWalljump",
{
"heatFrames": 600
},
{
"lavaFrames": 85
}
],
"note": [
"Perform a bounceball to minimize lava damage.",
"Move quickly to reach the second Tripper on its first cycle.",
"Ride it, morph to avoid spike damage, shoot open the door, and run off of the Tripper (rather than jumping off)."
]
},
{
"link": [
2,
1
],
"name": "Gravity",
"requires": [
"Gravity",
{
"heatFrames": 360
},
{
"lavaFrames": 130
},
{
"or": [
"canCarefulJump",
{
"heatFrames": 40
}
]
}
],
"note": "If you have Speed Booster, unequip it to be able to run faster in the lava."
},
{
"link": [
2,
1
],
"name": "Tripper Morphing",
"requires": [
"Morph",
{
"heatFrames": 1050
}
]
},
{
"link": [
2,
1
],
"name": "Double Lava Bath",
"requires": [
"canSuitlessLavaDive",
{
"heatFrames": 700
},
{
"lavaFrames": 130
},
{
"or": [
"canWalljump",
{
"and": [
{
"or": [
"canCrouchJump",
"canDownGrab"
]
},
{
"heatFrames": 220
},
{
"lavaFrames": 70
}
]
}
]
}
],
"note": [
"Spin-jump across both sets of lava, trying to minimize the time spent in lava.",
"To get onto the first pillar, either use a wall jump off the pillar, or use the Tripper briefly as a platform by crouch jumping or down grabbing onto it."
]
},
{
"link": [
2,
1
],
"name": "Reduced Lava Bath",
"requires": [
"canSuitlessLavaDive",
"canTrickyJump",
{
"heatFrames": 780
},
{
"lavaFrames": 100
}
],
"note": [
"Wait for the Tripper to approach the right platform, then run onto and off its left side.",
"Spin jump to the left one time, then jump up onto the right side of the Tripper.",
"Run to the left and jump directly onto the first pillar after the shutter.",
"Spin jump across the remaining lava, trying to minimize the time spent in lava."
],
"devNote": "Wall jumps are not needed for this strat."
},
{
"link": [
2,
1
],
"name": "Single Lava Bath",
"requires": [
"canSuitlessLavaDive",
"Morph",
{
"heatFrames": 780
},
{
"lavaFrames": 70
}
],
"note": [
"Ride the first Tripper, using Morph to avoid spike damage.",
"From the Tripper, run and jump directly onto the first pillar after the shutter.",
"Spin jump across the remaining lava, trying to minimize the time spent in lava."
],
"devNote": "Wall jumps are not needed for this strat."
},
{
"link": [
2,
1
],
"name": "Bounceball Double Lava Bath (Longer Runway)",
"entranceCondition": {
"comeInRunning": {
"minTiles": 3,
"speedBooster": false
}
},
"requires": [
"canBounceBall",
"canWalljump",
{
"heatFrames": 600
},
{
"lavaFrames": 60
}
],
"note": [
"Perform a bounceball to minimize lava damage.",
"Ride the second Tripper."
]
},
{
"link": [
2,
1
],
"name": "Bounceball Double Lava Bath (Shorter Runway)",
"entranceCondition": {
"comeInRunning": {
"minTiles": 3,
"speedBooster": false
}
},
"requires": [
"canBounceBall",
"canWalljump",
{
"heatFrames": 600
},
{
"lavaFrames": 85
}
],
"note": [
"Perform a bounceball to minimize lava damage.",
"Ride the second Tripper."
]
},
{
"link": [
2,
1
],
"name": "Grapple Teleport",
"entranceCondition": {
"comeInWithGrappleTeleport": {
"blockPositions": [
[
7,
2
]
]
}
},
"requires": [
{
  "heatFrames": 45
}
]
},
{
"link": [
2,
1
],
"name": "Grapple Teleport Door Lock Skip",
"entranceCondition": {
"comeInWithGrappleTeleport": {
"blockPositions": [
[
3,
12
],
[
3,
13
]
]
}
},
"requires": [],
"bypassesDoorShell": true
},
{
"link": [
2,
1
],
"name": "Carry Grapple Teleport (Top Position)",
"entranceCondition": {
"comeInWithGrappleTeleport": {
"blockPositions": [
[
3,
12
]
]
}
},
"requires": [],
"bypassesDoorShell": true,
"exitCondition": {
"leaveWithGrappleTeleport": {
"blockPositions": [
[
3,
12
]
]
}
}
},
{
"link": [
2,
1
],
"name": "Carry Grapple Teleport (Bottom Position)",
"entranceCondition": {
"comeInWithGrappleTeleport": {
"blockPositions": [
[
3,
13
]
]
}
},
"requires": [],
"bypassesDoorShell": true,
"exitCondition": {
"leaveWithGrappleTeleport": {
"blockPositions": [
[
3,
13
]
]
}
}
},
{
"link": [
2,
2
],
"name": "Leave with Runway",
"requires": [],
"exitCondition": {
"leaveWithRunway": {
"length": 4,
"openEnd": 1
}
}
},
{
"link": [
2,
2
],
"name": "Crystal Flash",
"requires": [
"h_canHeatedCrystalFlash"
]
}
]
}