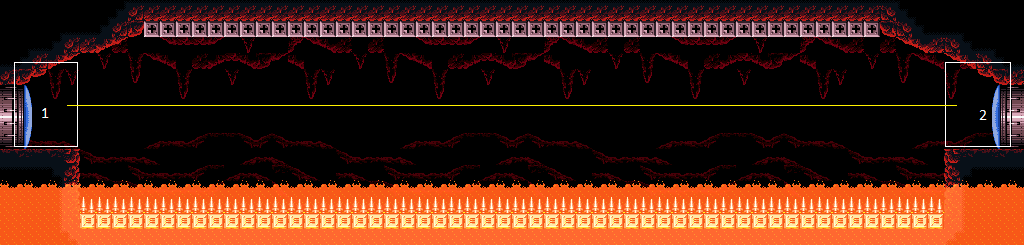
Spiky Acid Snakes Tunnel
Room ID: 112
|
Exit condition: {
"leaveWithRunway": {
"length": 4,
"openEnd": 1
}
}
|
|
Requires: "h_canHeatedCrystalFlash" |
|
Requires: "Grapple"
{
"heatFrames": 450
}
|
|
Requires: "SpaceJump"
{
"heatFrames": 420
}
|
|
Entrance condition: {
"comeInRunning": {
"minTiles": 3,
"speedBooster": "any"
}
}
Requires: "SpaceJump"
{
"heatFrames": 285
}
|
|
Requires: {
"heatFrames": 820
}
{
"lavaFrames": 150
}
{
"spikeHits": 7
}
|
|
From: 1
Left Door
To: 2
Right Door
Notable: true 
Damage boosts can be used to save energy - delay the damage boost from the spikes slightly in order to rise above the lava before moving. Requires: {
"heatFrames": 520
}
{
"lavaFrames": 80
}
{
"spikeHits": 3
}
"canIframeSpikeJump"
"canHorizontalDamageBoost"
|
|
Speedbooster significantly reduces your jump speed in lava and should be turned off. Requires: "Gravity"
"canDisableEquipment"
{
"heatFrames": 350
}
{
"lavaFrames": 100
}
{
"spikeHits": 2
}
{
"or": [
"canIframeSpikeJump",
{
"and": [
{
"spikeHits": 2
},
{
"heatFrames": 50
}
]
},
"canHorizontalDamageBoost"
]
}
|
|
From: 1
Left Door
To: 2
Right Door
Entrance condition: {
"comeInRunning": {
"minTiles": 4,
"speedBooster": false
}
}
Requires: "Gravity"
"canCarefulJump"
"canDisableEquipment"
"canSpringBallBounce"
{
"spikeHits": 2
}
{
"heatFrames": 350
}
{
"lavaFrames": 20
}
|
|
From: 1
Left Door
To: 2
Right Door
Uses a runway of at least 14 tiles in the adjacent room. Disable SpeedBooster after jumping so that the lava will not take away all of Samus' momentum. Entrance condition: {
"comeInRunning": {
"minTiles": 14,
"speedBooster": true
}
}
Requires: "Gravity"
"canDisableEquipment"
"canSpringBallBounce"
"canTrickyJump"
{
"spikeHits": 1
}
{
"heatFrames": 240
}
{
"lavaFrames": 10
}
|
|
From: 1
Left Door
To: 2
Right Door
It may help to perform the first jump with HiJump disabled. Entrance condition: {
"comeInRunning": {
"minTiles": 4,
"speedBooster": false
}
}
Requires: "canCarefulJump"
"HiJump"
"canDisableEquipment"
"canSpringBallBounce"
{
"spikeHits": 3
}
{
"heatFrames": 350
}
{
"lavaFrames": 32
}
|
|
From: 1
Left Door
To: 2
Right Door
Uses a runway of at least 8 tiles in the adjacent room. It will help to perform the first jump with HiJump disabled. Disable SpeedBooster before Samus reaches the lava. Entrance condition: {
"comeInRunning": {
"minTiles": 8,
"speedBooster": true
}
}
Requires: "canTrickyJump"
"HiJump"
"canDisableEquipment"
"canSpringBallBounce"
{
"spikeHits": 2
}
{
"heatFrames": 311
}
{
"lavaFrames": 22
}
|
|
From: 1
Left Door
To: 2
Right Door
Uses a runway of at least 21 tiles in the adjacent room. It will help to perform the first jump with HiJump disabled. Disable SpeedBooster before Samus reaches the lava. Entrance condition: {
"comeInRunning": {
"minTiles": 21,
"speedBooster": true
}
}
Requires: "HiJump"
"canDisableEquipment"
"canSpringBallBounce"
"canTrickyJump"
{
"spikeHits": 1
}
{
"heatFrames": 200
}
{
"lavaFrames": 11
}
|
|
Entrance condition: {
"comeInWithSpark": {}
}
Requires: {
"shinespark": {
"frames": 80,
"excessFrames": 4
}
}
{
"heatFrames": 210
}
|
|
Entrance condition: {
"comeInShinecharging": {
"length": 3,
"openEnd": 0
}
}
Requires: {
"or": [
{
"and": [
"canHorizontalShinespark",
{
"shinespark": {
"frames": 76,
"excessFrames": 4
}
},
{
"heatFrames": 210
}
]
},
{
"and": [
"canShinechargeMovement",
"canMidairShinespark",
{
"shinespark": {
"frames": 67,
"excessFrames": 4
}
},
{
"heatFrames": 300
}
]
}
]
}
|
|
From: 1
Left Door
To: 2
Right Door
Notable: true 
While crossing the Spiky Lava, land on frozen Yapping Maws to reduce the number of spike hits needed. Damage boost towards then freeze the Leftmost enemy as it extends. Morph and unmorph while above the middle Yapping Maw to land on it just above the lava line. Ignore the rightmost Yapping Maw. Delay the damage boost from the spikes slightly in order to rise above the lava before moving. Requires: "canResetFallSpeed"
"canTrickyUseFrozenEnemies"
"canTrickyJump"
{
"or": [
"canHorizontalDamageBoost",
{
"and": [
{
"spikeHits": 2
},
{
"lavaFrames": 30
},
{
"heatFrames": 240
}
]
}
]
}
"canIframeSpikeJump"
{
"spikeHits": 2
}
{
"lavaFrames": 15
}
{
"heatFrames": 580
}
|
|
Requires: "Grapple"
{
"heatFrames": 450
}
|
|
Requires: "SpaceJump"
{
"heatFrames": 420
}
|
|
Entrance condition: {
"comeInRunning": {
"minTiles": 3,
"speedBooster": "any"
}
}
Requires: "SpaceJump"
{
"heatFrames": 285
}
|
|
Requires: {
"heatFrames": 820
}
{
"lavaFrames": 150
}
{
"spikeHits": 7
}
|
|
From: 2
Right Door
To: 1
Left Door
Notable: true
Damage boosts can be used to save energy - delay the damage boost from the spikes slightly in order to rise above the lava before moving. Requires: {
"heatFrames": 520
}
{
"lavaFrames": 80
}
{
"spikeHits": 3
}
"canIframeSpikeJump"
"canHorizontalDamageBoost"
|
|
Speedbooster significantly reduces your jump speed in lava and should be turned off. Requires: "Gravity"
"canDisableEquipment"
{
"heatFrames": 350
}
{
"lavaFrames": 100
}
{
"spikeHits": 2
}
{
"or": [
"canIframeSpikeJump",
{
"and": [
{
"spikeHits": 2
},
{
"heatFrames": 50
}
]
},
"canHorizontalDamageBoost"
]
}
|
|
From: 2
Right Door
To: 1
Left Door
Entrance condition: {
"comeInRunning": {
"minTiles": 4,
"speedBooster": false
}
}
Requires: "Gravity"
"canDisableEquipment"
"canSpringBallBounce"
{
"spikeHits": 2
}
{
"heatFrames": 350
}
{
"lavaFrames": 20
}
|
|
From: 2
Right Door
To: 1
Left Door
Uses a runway of at least 14 tiles in the adjacent room. Disable SpeedBooster after jumping so that the lava will not take away all of Samus' momentum. Entrance condition: {
"comeInRunning": {
"minTiles": 14,
"speedBooster": true
}
}
Requires: "Gravity"
"canDisableEquipment"
"canSpringBallBounce"
"canTrickyJump"
{
"spikeHits": 1
}
{
"heatFrames": 240
}
{
"lavaFrames": 10
}
|
|
From: 2
Right Door
To: 1
Left Door
It may help to perform the first jump with HiJump disabled. Entrance condition: {
"comeInRunning": {
"minTiles": 4,
"speedBooster": false
}
}
Requires: "canCarefulJump"
"HiJump"
"canDisableEquipment"
"canSpringBallBounce"
{
"spikeHits": 3
}
{
"heatFrames": 350
}
{
"lavaFrames": 32
}
|
|
From: 2
Right Door
To: 1
Left Door
Uses a runway of at least 8 tiles in the adjacent room. It will help to perform the first jump with HiJump disabled. Disable SpeedBooster before Samus reaches the lava. Entrance condition: {
"comeInRunning": {
"minTiles": 8,
"speedBooster": true
}
}
Requires: "canTrickyJump"
"HiJump"
"canDisableEquipment"
"canSpringBallBounce"
{
"spikeHits": 2
}
{
"heatFrames": 311
}
{
"lavaFrames": 22
}
|
|
From: 2
Right Door
To: 1
Left Door
Uses a runway of at least 21 tiles in the adjacent room. It will help to perform the first jump with HiJump disabled. Disable SpeedBooster before Samus reaches the lava. Entrance condition: {
"comeInRunning": {
"minTiles": 21,
"speedBooster": true
}
}
Requires: "HiJump"
"canDisableEquipment"
"canSpringBallBounce"
"canTrickyJump"
{
"spikeHits": 1
}
{
"heatFrames": 200
}
{
"lavaFrames": 11
}
|
|
Entrance condition: {
"comeInWithSpark": {}
}
Requires: {
"shinespark": {
"frames": 80,
"excessFrames": 4
}
}
{
"heatFrames": 210
}
|
|
Entrance condition: {
"comeInShinecharging": {
"length": 3,
"openEnd": 0
}
}
Requires: {
"or": [
{
"and": [
"canHorizontalShinespark",
{
"shinespark": {
"frames": 76,
"excessFrames": 4
}
},
{
"heatFrames": 210
}
]
},
{
"and": [
"canShinechargeMovement",
"canMidairShinespark",
{
"shinespark": {
"frames": 67,
"excessFrames": 4
}
},
{
"heatFrames": 300
}
]
}
]
}
|
|
From: 2
Right Door
To: 1
Left Door
Notable: true
While crossing the Spiky Lava, land on frozen Yapping Maws to reduce the number of spike hits needed. Morph and unmorph while above the rightmost Yapping Maw to land on it just above the lava line. Ignore the second Yapping Maw. Freeze the Leftmost enemy as it extends. Delay the damage boost from the spikes slightly in order to rise above the lava before moving. Requires: "canResetFallSpeed"
"canTrickyUseFrozenEnemies"
"canTrickyJump"
{
"or": [
"canHorizontalDamageBoost",
{
"and": [
{
"spikeHits": 1
},
{
"lavaFrames": 20
},
{
"heatFrames": 240
}
]
}
]
}
"canIframeSpikeJump"
{
"spikeHits": 2
}
{
"lavaFrames": 15
}
{
"heatFrames": 580
}
|
|
Entrance condition: {
"comeInWithGrappleTeleport": {
"blockPositions": [
[
5,
3
],
[
7,
2
]
]
}
}
Requires: {
"heatFrames": 45
}
|
|
From: 2
Right Door
To: 1
Left Door
Entrance condition: {
"comeInWithGrappleTeleport": {
"blockPositions": [
[
3,
12
],
[
3,
13
]
]
}
}
Bypasses door shell: true |
|
From: 2
Right Door
To: 1
Left Door
Entrance condition: {
"comeInWithGrappleTeleport": {
"blockPositions": [
[
3,
12
]
]
}
}
Exit condition: {
"leaveWithGrappleTeleport": {
"blockPositions": [
[
3,
12
]
]
}
}
Bypasses door shell: true |
|
From: 2
Right Door
To: 1
Left Door
Entrance condition: {
"comeInWithGrappleTeleport": {
"blockPositions": [
[
3,
13
]
]
}
}
Exit condition: {
"leaveWithGrappleTeleport": {
"blockPositions": [
[
3,
13
]
]
}
}
Bypasses door shell: true |
|
Exit condition: {
"leaveWithRunway": {
"length": 4,
"openEnd": 1
}
}
|
|
Requires: "h_canHeatedCrystalFlash" |
{
"$schema": "../../../schema/m3-room.schema.json",
"id": 112,
"name": "Spiky Acid Snakes Tunnel",
"area": "Norfair",
"subarea": "Upper",
"subsubarea": "East",
"playable": true,
"roomAddress": "0x7AFFB",
"roomEnvironments": [
{
"heated": true
}
],
"nodes": [
{
"id": 1,
"name": "Left Door",
"nodeType": "door",
"nodeSubType": "blue",
"nodeAddress": "0x001976e",
"doorEnvironments": [
{
"physics": "air"
}
]
},
{
"id": 2,
"name": "Right Door",
"nodeType": "door",
"nodeSubType": "blue",
"nodeAddress": "0x001977a",
"doorEnvironments": [
{
"physics": "air"
}
]
}
],
"enemies": [
{
"id": "e1",
"groupName": "Spiky Acid Snakes Tunnel Yapping Maws",
"enemyName": "Yapping Maw",
"quantity": 3,
"betweenNodes": [
1,
2
],
"dropRequires": [
"never"
],
"note": "Possible but requires multiple spikehits in most configurations so rarely worth it"
}
],
"reusableRoomwideNotable": [
{
"name": "Spiky Acid Snakes Frozen Platforms",
"note": [
"While crossing the Spiky Lava, land on frozen Yapping Maws to reduce the number of spike hits needed.",
"Delay the damage boost from the spikes slightly in order to rise above the lava before moving."
]
},
{
"name": "Spiky Acid Snakes Suitless Damage Boosts",
"note": "Delay the damage boost from the spikes slightly in order to rise above the lava before moving."
}
],
"links": [
{
"from": 1,
"to": [
{
"id": 1
},
{
"id": 2
}
]
},
{
"from": 2,
"to": [
{
"id": 1
},
{
"id": 2
}
]
}
],
"strats": [
{
"link": [
1,
1
],
"name": "Leave with Runway",
"requires": [],
"exitCondition": {
"leaveWithRunway": {
"length": 4,
"openEnd": 1
}
}
},
{
"link": [
1,
1
],
"name": "Crystal Flash",
"requires": [
"h_canHeatedCrystalFlash"
]
},
{
"link": [
1,
2
],
"name": "Grapple",
"requires": [
"Grapple",
{
"heatFrames": 450
}
]
},
{
"link": [
1,
2
],
"name": "Space Jump",
"requires": [
"SpaceJump",
{
"heatFrames": 420
}
]
},
{
"link": [
1,
2
],
"name": "Running Space Jump",
"entranceCondition": {
"comeInRunning": {
"minTiles": 3,
"speedBooster": "any"
}
},
"requires": [
"SpaceJump",
{
"heatFrames": 285
}
]
},
{
"link": [
1,
2
],
"name": "Tank the Damage",
"requires": [
{
"heatFrames": 820
},
{
"lavaFrames": 150
},
{
"spikeHits": 7
}
]
},
{
"link": [
1,
2
],
"name": "Spiky Acid Snakes Suitless Damage Boosts (Left to Right)",
"notable": true,
"requires": [
{
"heatFrames": 520
},
{
"lavaFrames": 80
},
{
"spikeHits": 3
},
"canIframeSpikeJump",
"canHorizontalDamageBoost"
],
"reusableRoomwideNotable": "Spiky Acid Snakes Suitless Damage Boosts",
"note": "Damage boosts can be used to save energy - delay the damage boost from the spikes slightly in order to rise above the lava before moving."
},
{
"link": [
1,
2
],
"name": "Tank the Damage with Gravity",
"requires": [
"Gravity",
"canDisableEquipment",
{
"heatFrames": 350
},
{
"lavaFrames": 100
},
{
"spikeHits": 2
},
{
"or": [
"canIframeSpikeJump",
{
"and": [
{
"spikeHits": 2
},
{
"heatFrames": 50
}
]
},
"canHorizontalDamageBoost"
]
}
],
"note": "Speedbooster significantly reduces your jump speed in lava and should be turned off."
},
{
"link": [
1,
2
],
"name": "Gravity SpringBall Bounce (SpeedBooster Off)",
"entranceCondition": {
"comeInRunning": {
"minTiles": 4,
"speedBooster": false
}
},
"requires": [
"Gravity",
"canCarefulJump",
"canDisableEquipment",
"canSpringBallBounce",
{
"spikeHits": 2
},
{
"heatFrames": 350
},
{
"lavaFrames": 20
}
]
},
{
"link": [
1,
2
],
"name": "Gravity SpringBall Bounce (SpeedBooster On)",
"entranceCondition": {
"comeInRunning": {
"minTiles": 14,
"speedBooster": true
}
},
"requires": [
"Gravity",
"canDisableEquipment",
"canSpringBallBounce",
"canTrickyJump",
{
"spikeHits": 1
},
{
"heatFrames": 240
},
{
"lavaFrames": 10
}
],
"note": [
"Uses a runway of at least 14 tiles in the adjacent room.",
"Disable SpeedBooster after jumping so that the lava will not take away all of Samus' momentum."
]
},
{
"link": [
1,
2
],
"name": "Suitless SpringBall Bounce (SpeedBooster Off)",
"entranceCondition": {
"comeInRunning": {
"minTiles": 4,
"speedBooster": false
}
},
"requires": [
"canCarefulJump",
"HiJump",
"canDisableEquipment",
"canSpringBallBounce",
{
"spikeHits": 3
},
{
"heatFrames": 350
},
{
"lavaFrames": 32
}
],
"note": "It may help to perform the first jump with HiJump disabled."
},
{
"link": [
1,
2
],
"name": "Suitless SpringBall Bounce (SpeedBooster On)",
"entranceCondition": {
"comeInRunning": {
"minTiles": 8,
"speedBooster": true
}
},
"requires": [
"canTrickyJump",
"HiJump",
"canDisableEquipment",
"canSpringBallBounce",
{
"spikeHits": 2
},
{
"heatFrames": 311
},
{
"lavaFrames": 22
}
],
"note": [
"Uses a runway of at least 8 tiles in the adjacent room.",
"It will help to perform the first jump with HiJump disabled.",
"Disable SpeedBooster before Samus reaches the lava."
]
},
{
"link": [
1,
2
],
"name": "Suitless SpringBall Bounce (Long Runway)",
"entranceCondition": {
"comeInRunning": {
"minTiles": 21,
"speedBooster": true
}
},
"requires": [
"HiJump",
"canDisableEquipment",
"canSpringBallBounce",
"canTrickyJump",
{
"spikeHits": 1
},
{
"heatFrames": 200
},
{
"lavaFrames": 11
}
],
"note": [
"Uses a runway of at least 21 tiles in the adjacent room.",
"It will help to perform the first jump with HiJump disabled.",
"Disable SpeedBooster before Samus reaches the lava."
],
"devNote": "SpringFling can be used to extend the last SpringBall bounce so that runway can be shortened, but it mostly inflates the number of strats."
},
{
"link": [
1,
2
],
"name": "Shinespark",
"entranceCondition": {
"comeInWithSpark": {}
},
"requires": [
{
"shinespark": {
"frames": 80,
"excessFrames": 4
}
},
{
"heatFrames": 210
}
]
},
{
"link": [
1,
2
],
"name": "Come In Running and Shinespark",
"entranceCondition": {
"comeInShinecharging": {
"length": 3,
"openEnd": 0
}
},
"requires": [
{
  "or": [
    {
      "and": [
        "canHorizontalShinespark",
        {
          "shinespark": {
            "frames": 76,
            "excessFrames": 4
          }
        },
        {
          "heatFrames": 210
        }
      ]
    },
    {
      "and": [
        "canShinechargeMovement",
        "canMidairShinespark",
        {
          "shinespark": {
            "frames": 67,
            "excessFrames": 4
          }
        },
        {
          "heatFrames": 300
        }
      ]
    }
  ]
}
]
},
{
"link": [
1,
2
],
"name": "Spiky Acid Snakes Frozen Platforms (Left to Right)",
"notable": true,
"requires": [
"canResetFallSpeed",
"canTrickyUseFrozenEnemies",
"canTrickyJump",
{
"or": [
"canHorizontalDamageBoost",
{
"and": [
{
"spikeHits": 2
},
{
"lavaFrames": 30
},
{
"heatFrames": 240
}
]
}
]
},
"canIframeSpikeJump",
{
"spikeHits": 2
},
{
"lavaFrames": 15
},
{
"heatFrames": 580
}
],
"reusableRoomwideNotable": "Spiky Acid Snakes Frozen Platforms",
"note": [
"While crossing the Spiky Lava, land on frozen Yapping Maws to reduce the number of spike hits needed.",
"Damage boost towards then freeze the Leftmost enemy as it extends.",
"Morph and unmorph while above the middle Yapping Maw to land on it just above the lava line.",
"Ignore the rightmost Yapping Maw.",
"Delay the damage boost from the spikes slightly in order to rise above the lava before moving."
]
},
{
"link": [
2,
1
],
"name": "Grapple",
"requires": [
"Grapple",
{
"heatFrames": 450
}
]
},
{
"link": [
2,
1
],
"name": "Space Jump",
"requires": [
"SpaceJump",
{
"heatFrames": 420
}
]
},
{
"link": [
2,
1
],
"name": "Running Space Jump",
"entranceCondition": {
"comeInRunning": {
"minTiles": 3,
"speedBooster": "any"
}
},
"requires": [
"SpaceJump",
{
"heatFrames": 285
}
]
},
{
"link": [
2,
1
],
"name": "Tank the Damage",
"requires": [
{
"heatFrames": 820
},
{
"lavaFrames": 150
},
{
"spikeHits": 7
}
]
},
{
"link": [
2,
1
],
"name": "Spiky Acid Snakes Suitless Damage Boosts (Right to Left)",
"notable": true,
"requires": [
{
"heatFrames": 520
},
{
"lavaFrames": 80
},
{
"spikeHits": 3
},
"canIframeSpikeJump",
"canHorizontalDamageBoost"
],
"reusableRoomwideNotable": "Spiky Acid Snakes Suitless Damage Boosts",
"note": "Damage boosts can be used to save energy - delay the damage boost from the spikes slightly in order to rise above the lava before moving."
},
{
"link": [
2,
1
],
"name": "Tank the Damage with Gravity",
"requires": [
"Gravity",
"canDisableEquipment",
{
"heatFrames": 350
},
{
"lavaFrames": 100
},
{
"spikeHits": 2
},
{
"or": [
"canIframeSpikeJump",
{
"and": [
{
"spikeHits": 2
},
{
"heatFrames": 50
}
]
},
"canHorizontalDamageBoost"
]
}
],
"note": "Speedbooster significantly reduces your jump speed in lava and should be turned off."
},
{
"link": [
2,
1
],
"name": "Gravity SpringBall Bounce (SpeedBooster Off)",
"entranceCondition": {
"comeInRunning": {
"minTiles": 4,
"speedBooster": false
}
},
"requires": [
"Gravity",
"canDisableEquipment",
"canSpringBallBounce",
{
"spikeHits": 2
},
{
"heatFrames": 350
},
{
"lavaFrames": 20
}
]
},
{
"link": [
2,
1
],
"name": "Gravity SpringBall Bounce (SpeedBooster On)",
"entranceCondition": {
"comeInRunning": {
"minTiles": 14,
"speedBooster": true
}
},
"requires": [
"Gravity",
"canDisableEquipment",
"canSpringBallBounce",
"canTrickyJump",
{
"spikeHits": 1
},
{
"heatFrames": 240
},
{
"lavaFrames": 10
}
],
"note": [
"Uses a runway of at least 14 tiles in the adjacent room.",
"Disable SpeedBooster after jumping so that the lava will not take away all of Samus' momentum."
]
},
{
"link": [
2,
1
],
"name": "Suitless SpringBall Bounce (SpeedBooster Off)",
"entranceCondition": {
"comeInRunning": {
"minTiles": 4,
"speedBooster": false
}
},
"requires": [
"canCarefulJump",
"HiJump",
"canDisableEquipment",
"canSpringBallBounce",
{
"spikeHits": 3
},
{
"heatFrames": 350
},
{
"lavaFrames": 32
}
],
"note": "It may help to perform the first jump with HiJump disabled."
},
{
"link": [
2,
1
],
"name": "Suitless SpringBall Bounce (SpeedBooster On)",
"entranceCondition": {
"comeInRunning": {
"minTiles": 8,
"speedBooster": true
}
},
"requires": [
"canTrickyJump",
"HiJump",
"canDisableEquipment",
"canSpringBallBounce",
{
"spikeHits": 2
},
{
"heatFrames": 311
},
{
"lavaFrames": 22
}
],
"note": [
"Uses a runway of at least 8 tiles in the adjacent room.",
"It will help to perform the first jump with HiJump disabled.",
"Disable SpeedBooster before Samus reaches the lava."
]
},
{
"link": [
2,
1
],
"name": "Suitless SpringBall Bounce (Long Runway)",
"entranceCondition": {
"comeInRunning": {
"minTiles": 21,
"speedBooster": true
}
},
"requires": [
"HiJump",
"canDisableEquipment",
"canSpringBallBounce",
"canTrickyJump",
{
"spikeHits": 1
},
{
"heatFrames": 200
},
{
"lavaFrames": 11
}
],
"note": [
"Uses a runway of at least 21 tiles in the adjacent room.",
"It will help to perform the first jump with HiJump disabled.",
"Disable SpeedBooster before Samus reaches the lava."
],
"devNote": "SpringFling can be used to extend the last SpringBall bounce so that runway can be shortened, but it mostly inflates the number of strats."
},
{
"link": [
2,
1
],
"name": "Shinespark",
"entranceCondition": {
"comeInWithSpark": {}
},
"requires": [
{
"shinespark": {
"frames": 80,
"excessFrames": 4
}
},
{
"heatFrames": 210
}
]
},
{
"link": [
2,
1
],
"name": "Come In Running and Shinespark",
"entranceCondition": {
"comeInShinecharging": {
"length": 3,
"openEnd": 0
}
},
"requires": [
{
  "or": [
    {
      "and": [
        "canHorizontalShinespark",
        {
          "shinespark": {
            "frames": 76,
            "excessFrames": 4
          }
        },
        {
          "heatFrames": 210
        }
      ]
    },
    {
      "and": [
        "canShinechargeMovement",
        "canMidairShinespark",
        {
          "shinespark": {
            "frames": 67,
            "excessFrames": 4
          }
        },
        {
          "heatFrames": 300
        }
      ]
    }
  ]
}
]
},
{
"link": [
2,
1
],
"name": "Spiky Acid Snakes Frozen Platforms (Right to Left)",
"notable": true,
"requires": [
"canResetFallSpeed",
"canTrickyUseFrozenEnemies",
"canTrickyJump",
{
"or": [
"canHorizontalDamageBoost",
{
"and": [
{
"spikeHits": 1
},
{
"lavaFrames": 20
},
{
"heatFrames": 240
}
]
}
]
},
"canIframeSpikeJump",
{
"spikeHits": 2
},
{
"lavaFrames": 15
},
{
"heatFrames": 580
}
],
"reusableRoomwideNotable": "Spiky Acid Snakes Frozen Platforms",
"note": [
"While crossing the Spiky Lava, land on frozen Yapping Maws to reduce the number of spike hits needed.",
"Morph and unmorph while above the rightmost Yapping Maw to land on it just above the lava line.",
"Ignore the second Yapping Maw.",
"Freeze the Leftmost enemy as it extends.",
"Delay the damage boost from the spikes slightly in order to rise above the lava before moving."
]
},
{
"link": [
2,
1
],
"name": "Grapple Teleport",
"entranceCondition": {
"comeInWithGrappleTeleport": {
"blockPositions": [
[
5,
3
],
[
7,
2
]
]
}
},
"requires": [
{
  "heatFrames": 45
}
]
},
{
"link": [
2,
1
],
"name": "Grapple Teleport Door Lock Skip",
"entranceCondition": {
"comeInWithGrappleTeleport": {
"blockPositions": [
[
3,
12
],
[
3,
13
]
]
}
},
"requires": [],
"bypassesDoorShell": true
},
{
"link": [
2,
1
],
"name": "Carry Grapple Teleport (Top Position)",
"entranceCondition": {
"comeInWithGrappleTeleport": {
"blockPositions": [
[
3,
12
]
]
}
},
"requires": [],
"bypassesDoorShell": true,
"exitCondition": {
"leaveWithGrappleTeleport": {
"blockPositions": [
[
3,
12
]
]
}
}
},
{
"link": [
2,
1
],
"name": "Carry Grapple Teleport (Bottom Position)",
"entranceCondition": {
"comeInWithGrappleTeleport": {
"blockPositions": [
[
3,
13
]
]
}
},
"requires": [],
"bypassesDoorShell": true,
"exitCondition": {
"leaveWithGrappleTeleport": {
"blockPositions": [
[
3,
13
]
]
}
}
},
{
"link": [
2,
2
],
"name": "Leave with Runway",
"requires": [],
"exitCondition": {
"leaveWithRunway": {
"length": 4,
"openEnd": 1
}
}
},
{
"link": [
2,
2
],
"name": "Crystal Flash",
"requires": [
"h_canHeatedCrystalFlash"
]
}
]
}