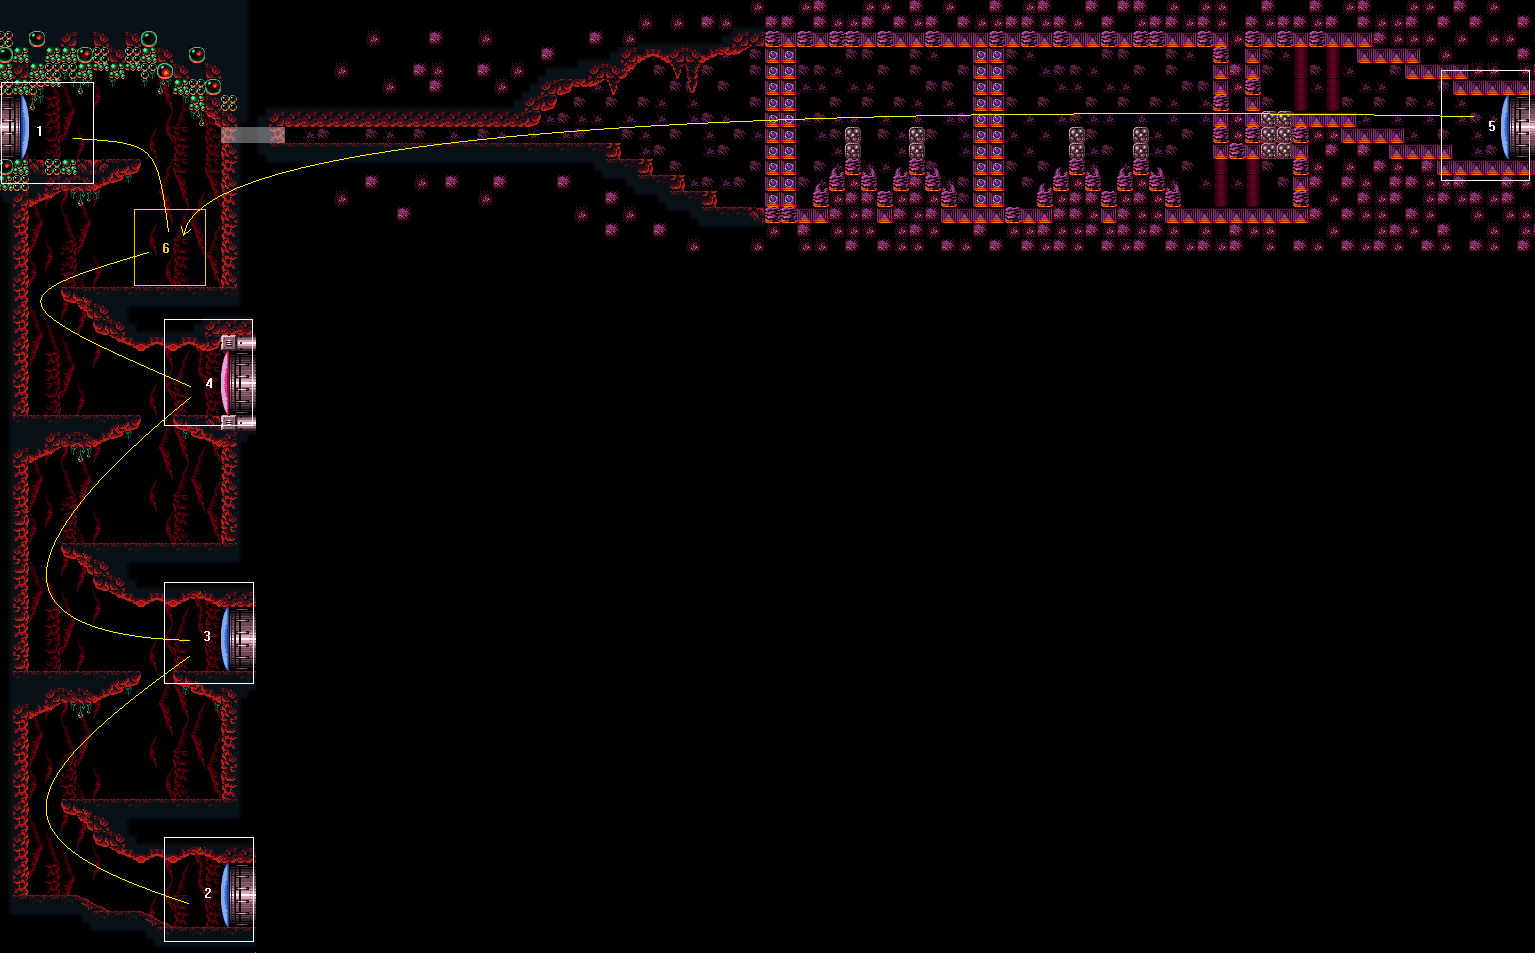
Single Chamber
Room ID: 103
|
From: 1
Left Shaft - Top Left Door
To: 1
Left Shaft - Top Left Door
Exit condition: {
"leaveWithRunway": {
"length": 8,
"openEnd": 1
}
}
|
|
From: 1
Left Shaft - Top Left Door
To: 1
Left Shaft - Top Left Door
Requires: "h_canHeatedCrystalFlash" |
|
From: 1
Left Shaft - Top Left Door
To: 4
Left Shaft - Top Right Door
Entrance condition: {
"comeInShinecharging": {
"length": 7,
"openEnd": 1
}
}
Requires: {
"or": [
{
"and": [
"canShinechargeMovementComplex",
{
"heatFrames": 225
},
{
"shinespark": {
"frames": 15,
"excessFrames": 0
}
}
]
},
{
"and": [
"canShinechargeMovementTricky",
{
"heatFrames": 215
},
{
"shinespark": {
"frames": 6,
"excessFrames": 0
}
}
]
}
]
}
Exit condition: {
"leaveWithSpark": {}
}
|
|
Requires: {
"heatFrames": 100
}
|
|
From: 2
Left Shaft - Bottom Right Door
To: 1
Left Shaft - Top Left Door
Entrance condition: {
"comeInWithGrappleTeleport": {
"blockPositions": [
[
5,
3
],
[
7,
2
]
]
}
}
Requires: {
"heatFrames": 45
}
|
|
From: 2
Left Shaft - Bottom Right Door
To: 1
Left Shaft - Top Left Door
Entrance condition: {
"comeInWithGrappleTeleport": {
"blockPositions": [
[
3,
12
]
]
}
}
Bypasses door shell: true |
|
From: 2
Left Shaft - Bottom Right Door
To: 1
Left Shaft - Top Left Door
Entrance condition: {
"comeInWithGrappleTeleport": {
"blockPositions": [
[
3,
12
]
]
}
}
Exit condition: {
"leaveWithGrappleTeleport": {
"blockPositions": [
[
3,
12
]
]
}
}
Bypasses door shell: true |
|
From: 2
Left Shaft - Bottom Right Door
To: 1
Left Shaft - Top Left Door
Exit the previous room with Samus in a standing pose (while grappled). After teleporting, press right to release Grapple while staying standing (not being forced into a crouch). Then X-ray climb to get up to the door transition, without needing to open the door. Entrance condition: {
"comeInWithGrappleTeleport": {
"blockPositions": [
[
2,
28
]
]
}
}
Requires: "canXRayClimb"
{
"heatFrames": 1600
}
Bypasses door shell: true |
|
From: 2
Left Shaft - Bottom Right Door
To: 2
Left Shaft - Bottom Right Door
Exit condition: {
"leaveWithRunway": {
"length": 13,
"openEnd": 0,
"gentleDownTiles": 4
}
}
|
|
From: 2
Left Shaft - Bottom Right Door
To: 2
Left Shaft - Bottom Right Door
Requires: "h_canHeatedCrystalFlash" |
|
From: 2
Left Shaft - Bottom Right Door
To: 3
Left Shaft - Middle Right Door
Requires: {
"or": [
"canWalljump",
"HiJump",
"SpaceJump",
"h_canCrouchJumpDownGrab"
]
}
{
"heatFrames": 280
}
|
|
From: 2
Left Shaft - Bottom Right Door
To: 3
Left Shaft - Middle Right Door
Requires: {
"or": [
"canWalljump",
"HiJump",
"SpaceJump",
"h_canCrouchJumpDownGrab"
]
}
{
"heatFrames": 260
}
Exit condition: {
"leaveWithRunway": {
"length": 4,
"openEnd": 1
}
}
|
|
From: 2
Left Shaft - Bottom Right Door
To: 3
Left Shaft - Middle Right Door
Entrance condition: {
"comeInShinecharging": {
"length": 12,
"openEnd": 0,
"gentleUpTiles": 4
}
}
Requires: "canShinechargeMovementComplex"
{
"or": [
"HiJump",
"canWalljump"
]
}
{
"shinespark": {
"frames": 5
}
}
{
"heatFrames": 230
}
Exit condition: {
"leaveWithSpark": {}
}
|
|
From: 2
Left Shaft - Bottom Right Door
To: 3
Left Shaft - Middle Right Door
Quickly ledge grab the platform to run below the Multiviola and get ahead of it. Entrance condition: {
"comeInShinecharging": {
"length": 11,
"openEnd": 1,
"gentleUpTiles": 4
}
}
Requires: "HiJump"
"canShinechargeMovementComplex"
"canTrickyJump"
{
"heatFrames": 150
}
Exit condition: {
"leaveShinecharged": {
"framesRemaining": 60
}
}
|
|
From: 2
Left Shaft - Bottom Right Door
To: 3
Left Shaft - Middle Right Door
Requires: "h_canIBJ"
{
"heatFrames": 1200
}
|
|
From: 2
Left Shaft - Bottom Right Door
To: 3
Left Shaft - Middle Right Door
Kill the Alcoon, then freeze the Multiviola to use as a platform. Requires: "canUseFrozenEnemies"
{
"heatFrames": 450
}
|
|
From: 3
Left Shaft - Middle Right Door
To: 1
Left Shaft - Top Left Door
Entrance condition: {
"comeInWithGrappleTeleport": {
"blockPositions": [
[
5,
3
],
[
7,
2
]
]
}
}
Requires: {
"heatFrames": 45
}
|
|
From: 3
Left Shaft - Middle Right Door
To: 1
Left Shaft - Top Left Door
Entrance condition: {
"comeInWithGrappleTeleport": {
"blockPositions": [
[
3,
12
]
]
}
}
Bypasses door shell: true |
|
From: 3
Left Shaft - Middle Right Door
To: 1
Left Shaft - Top Left Door
Exit the previous room with Samus in a standing pose (while grappled). After teleporting, press right to release Grapple while staying standing (not being forced into a crouch). Then X-ray climb to get up to the door transition, without needing to open the door. Entrance condition: {
"comeInWithGrappleTeleport": {
"blockPositions": [
[
2,
28
]
]
}
}
Requires: "canXRayClimb"
{
"heatFrames": 1600
}
Bypasses door shell: true |
|
From: 3
Left Shaft - Middle Right Door
To: 2
Left Shaft - Bottom Right Door
Requires: {
"heatFrames": 200
}
|
|
From: 3
Left Shaft - Middle Right Door
To: 2
Left Shaft - Bottom Right Door
Requires: {
"heatFrames": 140
}
Exit condition: {
"leaveWithRunway": {
"length": 13,
"openEnd": 0,
"gentleDownTiles": 4
}
}
|
|
From: 3
Left Shaft - Middle Right Door
To: 2
Left Shaft - Bottom Right Door
Entrance condition: {
"comeInShinecharging": {
"length": 3,
"openEnd": 1
}
}
Requires: "canShinechargeMovementTricky"
{
"heatFrames": 180
}
Exit condition: {
"leaveShinecharged": {
"framesRemaining": 10
}
}
|
|
From: 3
Left Shaft - Middle Right Door
To: 2
Left Shaft - Bottom Right Door
Entrance condition: {
"comeInShinecharging": {
"length": 3,
"openEnd": 1
}
}
Requires: "canShinechargeMovementComplex"
{
"shinespark": {
"frames": 5
}
}
{
"heatFrames": 220
}
Exit condition: {
"leaveWithSpark": {
"position": "top"
}
}
|
|
From: 3
Left Shaft - Middle Right Door
To: 2
Left Shaft - Bottom Right Door
Entrance condition: {
"comeInShinecharged": {
"framesRequired": 145
}
}
Requires: "canShinechargeMovementComplex"
{
"shinespark": {
"frames": 18
}
}
{
"heatFrames": 190
}
Exit condition: {
"leaveWithSpark": {
"position": "top"
}
}
|
|
From: 3
Left Shaft - Middle Right Door
To: 3
Left Shaft - Middle Right Door
Exit condition: {
"leaveWithRunway": {
"length": 4,
"openEnd": 1
}
}
|
|
From: 3
Left Shaft - Middle Right Door
To: 3
Left Shaft - Middle Right Door
Requires: "h_canHeatedCrystalFlash" |
|
From: 3
Left Shaft - Middle Right Door
To: 4
Left Shaft - Top Right Door
Requires: {
"or": [
"canWalljump",
"HiJump",
"SpaceJump",
"h_canCrouchJumpDownGrab"
]
}
{
"heatFrames": 310
}
|
|
From: 3
Left Shaft - Middle Right Door
To: 4
Left Shaft - Top Right Door
Requires: {
"or": [
"canWalljump",
"HiJump",
"SpaceJump",
"h_canCrouchJumpDownGrab"
]
}
{
"heatFrames": 290
}
Exit condition: {
"leaveWithRunway": {
"length": 4,
"openEnd": 1
}
}
|
|
From: 3
Left Shaft - Middle Right Door
To: 4
Left Shaft - Top Right Door
Entrance condition: {
"comeInShinecharging": {
"length": 3,
"openEnd": 0
}
}
Requires: "HiJump"
"canTrickyJump"
"canShinechargeMovementTricky"
{
"heatFrames": 170
}
Exit condition: {
"leaveShinecharged": {
"framesRemaining": 15
}
}
|
|
From: 3
Left Shaft - Middle Right Door
To: 4
Left Shaft - Top Right Door
Entrance condition: {
"comeInShinecharged": {
"framesRequired": 140
}
}
Requires: "HiJump"
"canTrickyJump"
"canShinechargeMovementComplex"
{
"shinespark": {
"frames": 9
}
}
{
"heatFrames": 170
}
Exit condition: {
"leaveWithSpark": {}
}
|
|
From: 3
Left Shaft - Middle Right Door
To: 4
Left Shaft - Top Right Door
Jump the Alcoon and kill the Multiviola, then IBJ. Requires: "h_canIBJ"
{
"heatFrames": 1950
}
|
|
From: 3
Left Shaft - Middle Right Door
To: 4
Left Shaft - Top Right Door
Wait for the Alcoon to walk off the edge. Use it and the Multiviola as platforms. Spawn the Alcoon, then run back to the right so it will not stop and fire projectiles. Requires: "canUseFrozenEnemies"
{
"heatFrames": 1300
}
|
|
From: 4
Left Shaft - Top Right Door
To: 1
Left Shaft - Top Left Door
Entrance condition: {
"comeInShinecharging": {
"length": 3,
"openEnd": 0
}
}
Requires: "HiJump"
"canTrickyJump"
"canShinechargeMovementComplex"
"canDodgeWhileShooting"
{
"or": [
{
"ammo": {
"type": "Missile",
"count": 1
}
},
"Plasma"
]
}
{
"shinespark": {
"frames": 14
}
}
{
"heatFrames": 190
}
Exit condition: {
"leaveWithSpark": {}
}
|
|
From: 4
Left Shaft - Top Right Door
To: 1
Left Shaft - Top Left Door
Entrance condition: {
"comeInWithGrappleTeleport": {
"blockPositions": [
[
5,
3
],
[
7,
2
]
]
}
}
Requires: {
"heatFrames": 45
}
|
|
From: 4
Left Shaft - Top Right Door
To: 1
Left Shaft - Top Left Door
Entrance condition: {
"comeInWithGrappleTeleport": {
"blockPositions": [
[
3,
12
]
]
}
}
Bypasses door shell: true |
|
From: 4
Left Shaft - Top Right Door
To: 1
Left Shaft - Top Left Door
Exit the previous room with Samus in a standing pose (while grappled). After teleporting, press right to release Grapple while staying standing (not being forced into a crouch). Then X-ray climb to get up to the door transition, without needing to open the door. Entrance condition: {
"comeInWithGrappleTeleport": {
"blockPositions": [
[
2,
28
]
]
}
}
Requires: "canXRayClimb"
{
"heatFrames": 1600
}
Bypasses door shell: true |
|
From: 4
Left Shaft - Top Right Door
To: 3
Left Shaft - Middle Right Door
Requires: {
"heatFrames": 220
}
|
|
From: 4
Left Shaft - Top Right Door
To: 3
Left Shaft - Middle Right Door
Requires: {
"heatFrames": 200
}
Exit condition: {
"leaveWithRunway": {
"length": 4,
"openEnd": 1
}
}
|
|
From: 4
Left Shaft - Top Right Door
To: 3
Left Shaft - Middle Right Door
Entrance condition: {
"comeInShinecharging": {
"length": 3,
"openEnd": 1
}
}
Requires: {
"or": [
{
"and": [
"canShinechargeMovementComplex",
{
"heatFrames": 215
},
{
"shinespark": {
"frames": 15,
"excessFrames": 0
}
}
]
},
{
"and": [
"canShinechargeMovementTricky",
{
"heatFrames": 195
},
{
"shinespark": {
"frames": 5,
"excessFrames": 0
}
}
]
}
]
}
Exit condition: {
"leaveWithSpark": {}
}
|
|
From: 4
Left Shaft - Top Right Door
To: 4
Left Shaft - Top Right Door
Exit condition: {
"leaveWithRunway": {
"length": 4,
"openEnd": 1
}
}
|
|
From: 4
Left Shaft - Top Right Door
To: 4
Left Shaft - Top Right Door
Requires: "h_canHeatedCrystalFlash" |
|
Requires: {
"or": [
"canWalljump",
"HiJump",
"SpaceJump",
"h_canCrouchJumpDownGrab"
]
}
{
"heatFrames": 200
}
|
|
Kill the enemies, then IBJ. Requires: "h_canIBJ"
{
"heatFrames": 750
}
|
|
From: 4
Left Shaft - Top Right Door
To: 6
Left Shaft - Top Junction
Wait for the Alcoon to walk off the edge. Use it and the Multiviola as platforms. Requires: "canUseFrozenEnemies"
{
"heatFrames": 830
}
|
|
Entrance condition: {
"comeInWithGrappleTeleport": {
"blockPositions": [
[
5,
3
],
[
7,
2
]
]
}
}
Requires: {
"heatFrames": 45
}
|
|
From: 5
Far Right Door
To: 1
Left Shaft - Top Left Door
Entrance condition: {
"comeInWithGrappleTeleport": {
"blockPositions": [
[
3,
12
]
]
}
}
Bypasses door shell: true |
|
From: 5
Far Right Door
To: 1
Left Shaft - Top Left Door
Exit the previous room with Samus in a standing pose (while grappled). After teleporting, press right to release Grapple while staying standing (not being forced into a crouch). Then X-ray climb to get up to the door transition, without needing to open the door. Entrance condition: {
"comeInWithGrappleTeleport": {
"blockPositions": [
[
2,
28
]
]
}
}
Requires: "canXRayClimb"
{
"heatFrames": 1600
}
Bypasses door shell: true |
|
Exit condition: {
"leaveWithRunway": {
"length": 4,
"openEnd": 0
}
}
|
|
Requires: "h_canHeatedCrystalFlash" |
|
Requires: "Morph"
"ScrewAttack"
{
"heatFrames": 780
}
|
|
Requires: "h_canUsePowerBombs"
{
"heatFrames": 850
}
|
|
Requires: "h_canUseMorphBombs"
{
"heatFrames": 1130
}
|
|
Requires: {
"or": [
"canWalljump",
"HiJump",
"SpaceJump",
"h_canCrouchJumpDownGrab"
]
}
{
"heatFrames": 100
}
|
|
From: 6
Left Shaft - Top Junction
To: 1
Left Shaft - Top Left Door
Requires: {
"or": [
"canWalljump",
"HiJump",
"h_canCrouchJumpDownGrab"
]
}
{
"heatFrames": 60
}
Exit condition: {
"leaveWithRunway": {
"length": 8,
"openEnd": 1
}
}
|
|
Kill the enemies, then IBJ. Requires: "h_canIBJ"
{
"heatFrames": 1500
}
|
|
From: 6
Left Shaft - Top Junction
To: 1
Left Shaft - Top Left Door
Requires: "canUseFrozenEnemies"
{
"heatFrames": 600
}
|
|
Requires: {
"heatFrames": 150
}
|
|
From: 6
Left Shaft - Top Junction
To: 4
Left Shaft - Top Right Door
Requires: {
"heatFrames": 120
}
Exit condition: {
"leaveWithRunway": {
"length": 4,
"openEnd": 1
}
}
|
|
From: 6
Left Shaft - Top Junction
To: 6
Left Shaft - Top Junction
Requires: "h_heatProof"
{
"or": [
"canDodgeWhileShooting",
"ScrewAttack",
"Wave",
"Ice",
"Spazer",
"Plasma"
]
}
{
"or": [
"canWalljump",
"HiJump",
"h_canCrouchJumpDownGrab"
]
}
{
"resetRoom": {
"nodes": [
1,
2,
3,
4
],
"mustStayPut": false
}
}
{
"refill": [
"Missile",
"PowerBomb"
]
}
|
{
"$schema": "../../../schema/m3-room.schema.json",
"id": 103,
"name": "Single Chamber",
"area": "Norfair",
"subarea": "Upper",
"subsubarea": "East",
"playable": true,
"roomAddress": "0x7AD5E",
"roomEnvironments": [
{
"heated": true
}
],
"nodes": [
{
"id": 1,
"name": "Left Shaft - Top Left Door",
"nodeType": "door",
"nodeSubType": "blue",
"nodeAddress": "0x00195ca",
"doorEnvironments": [
{
"physics": "air"
}
]
},
{
"id": 2,
"name": "Left Shaft - Bottom Right Door",
"nodeType": "door",
"nodeSubType": "blue",
"nodeAddress": "0x00195ee",
"doorEnvironments": [
{
"physics": "air"
}
]
},
{
"id": 3,
"name": "Left Shaft - Middle Right Door",
"nodeType": "door",
"nodeSubType": "blue",
"nodeAddress": "0x00195e2",
"doorEnvironments": [
{
"physics": "air"
}
]
},
{
"id": 4,
"name": "Left Shaft - Top Right Door",
"nodeType": "door",
"nodeSubType": "red",
"nodeAddress": "0x00195d6",
"doorEnvironments": [
{
"physics": "air"
}
],
"locks": [
{
"name": "Single Chamber Red Lock (to Double Chamber Top)",
"lockType": "coloredDoor",
"unlockStrats": [
{
"name": "Base",
"notable": false,
"requires": [
"h_canOpenRedDoors"
]
}
]
}
]
},
{
"id": 5,
"name": "Far Right Door",
"nodeType": "door",
"nodeSubType": "blue",
"nodeAddress": "0x00195fa",
"doorEnvironments": [
{
"physics": "air"
}
]
},
{
"id": 6,
"name": "Left Shaft - Top Junction",
"nodeType": "junction",
"nodeSubType": "junction",
"note": "Represents the platform where Samus will land after falling from the morph tunnel when arriving from Lower Norfair."
}
],
"enemies": [
{
"id": "e1",
"groupName": "Single Chamber Top Alcoons",
"enemyName": "Alcoon",
"quantity": 2,
"homeNodes": [
6
],
"dropRequires": [
"h_heatProof"
]
},
{
"id": "e2",
"groupName": "Single Chamber Top Multiviola",
"enemyName": "Multiviola",
"quantity": 1,
"homeNodes": [
6
],
"dropRequires": [
"h_heatProof"
]
},
{
"id": "e3",
"groupName": "Single Chamber Middle Alcoon",
"enemyName": "Alcoon",
"quantity": 1,
"betweenNodes": [
3,
4
],
"dropRequires": [
"h_heatProof"
]
},
{
"id": "e4",
"groupName": "Single Chamber Middle Multiviola",
"enemyName": "Multiviola",
"quantity": 1,
"betweenNodes": [
3,
4
],
"dropRequires": [
"h_heatProof"
]
},
{
"id": "e5",
"groupName": "Single Chamber Bottom Alcoon",
"enemyName": "Alcoon",
"quantity": 1,
"betweenNodes": [
2,
3
],
"dropRequires": [
"h_heatProof"
]
},
{
"id": "e6",
"groupName": "Single Chamber Bottom Multiviola",
"enemyName": "Multiviola",
"quantity": 1,
"betweenNodes": [
2,
3
],
"dropRequires": [
"h_heatProof"
]
}
],
"links": [
{
"from": 1,
"to": [
{
"id": 1
},
{
"id": 4
},
{
"id": 6
}
]
},
{
"from": 2,
"to": [
{
"id": 1
},
{
"id": 2
},
{
"id": 3
}
]
},
{
"from": 3,
"to": [
{
"id": 1
},
{
"id": 2
},
{
"id": 3
},
{
"id": 4
}
]
},
{
"from": 4,
"to": [
{
"id": 1
},
{
"id": 3
},
{
"id": 4
},
{
"id": 6
}
]
},
{
"from": 5,
"to": [
{
"id": 1
},
{
"id": 5
},
{
"id": 6
}
]
},
{
"from": 6,
"to": [
{
"id": 1
},
{
"id": 4
},
{
"id": 6
}
]
}
],
"strats": [
{
"link": [
1,
1
],
"name": "Leave with Runway",
"requires": [],
"exitCondition": {
"leaveWithRunway": {
"length": 8,
"openEnd": 1
}
}
},
{
"link": [
1,
1
],
"name": "Crystal Flash",
"requires": [
"h_canHeatedCrystalFlash"
]
},
{
"link": [
1,
4
],
"name": "Come in Shinecharging, Leave With Spark",
"entranceCondition": {
"comeInShinecharging": {
"length": 7,
"openEnd": 1
}
},
"requires": [
{
  "or": [
    {
      "and": [
        "canShinechargeMovementComplex",
        {
          "heatFrames": 225
        },
        {
          "shinespark": {
            "frames": 15,
            "excessFrames": 0
          }
        }
      ]
    },
    {
      "and": [
        "canShinechargeMovementTricky",
        {
          "heatFrames": 215
        },
        {
          "shinespark": {
            "frames": 6,
            "excessFrames": 0
          }
        }
      ]
    }
  ]
}
],
"exitCondition": {
"leaveWithSpark": {}
},
"unlocksDoors": [
{
"types": [
"super"
],
"requires": []
},
{
"types": [
"missiles",
"powerbomb"
],
"requires": [
"never"
]
}
]
},
{
"link": [
1,
6
],
"name": "Base",
"requires": [
{
  "heatFrames": 100
}
]
},
{
"link": [
2,
1
],
"name": "Grapple Teleport",
"entranceCondition": {
"comeInWithGrappleTeleport": {
"blockPositions": [
[
5,
3
],
[
7,
2
]
]
}
},
"requires": [
{
  "heatFrames": 45
}
]
},
{
"link": [
2,
1
],
"name": "Grapple Teleport Door Lock Skip",
"entranceCondition": {
"comeInWithGrappleTeleport": {
"blockPositions": [
[
3,
12
]
]
}
},
"requires": [],
"bypassesDoorShell": true
},
{
"link": [
2,
1
],
"name": "Carry Grapple Teleport",
"entranceCondition": {
"comeInWithGrappleTeleport": {
"blockPositions": [
[
3,
12
]
]
}
},
"requires": [],
"bypassesDoorShell": true,
"exitCondition": {
"leaveWithGrappleTeleport": {
"blockPositions": [
[
3,
12
]
]
}
}
},
{
"link": [
2,
1
],
"name": "Grapple Teleport X-Ray Climb",
"entranceCondition": {
"comeInWithGrappleTeleport": {
"blockPositions": [
[
2,
28
]
]
}
},
"requires": [
"canXRayClimb",
{
"heatFrames": 1600
}
],
"bypassesDoorShell": true,
"note": [
"Exit the previous room with Samus in a standing pose (while grappled).",
"After teleporting, press right to release Grapple while staying standing (not being forced into a crouch).",
"Then X-ray climb to get up to the door transition, without needing to open the door."
]
},
{
"link": [
2,
2
],
"name": "Leave with Runway",
"requires": [],
"exitCondition": {
"leaveWithRunway": {
"length": 13,
"openEnd": 0,
"gentleDownTiles": 4
}
}
},
{
"link": [
2,
2
],
"name": "Crystal Flash",
"requires": [
"h_canHeatedCrystalFlash"
]
},
{
"link": [
2,
3
],
"name": "Base",
"requires": [
{
"or": [
"canWalljump",
"HiJump",
"SpaceJump",
"h_canCrouchJumpDownGrab"
]
},
{
"heatFrames": 280
}
]
},
{
"link": [
2,
3
],
"name": "Leave with Runway",
"requires": [
{
"or": [
"canWalljump",
"HiJump",
"SpaceJump",
"h_canCrouchJumpDownGrab"
]
},
{
"heatFrames": 260
}
],
"exitCondition": {
"leaveWithRunway": {
"length": 4,
"openEnd": 1
}
},
"unlocksDoors": [
{
"types": [
"missiles"
],
"requires": [
{
"heatFrames": 50
}
]
},
{
"types": [
"super"
],
"requires": []
},
{
"types": [
"powerbomb"
],
"requires": [
{
"heatFrames": 110
}
]
}
]
},
{
"link": [
2,
3
],
"name": "Enter Shinecharging, Leave Sparking",
"entranceCondition": {
"comeInShinecharging": {
"length": 12,
"openEnd": 0,
"gentleUpTiles": 4
}
},
"requires": [
"canShinechargeMovementComplex",
{
"or": [
"HiJump",
"canWalljump"
]
},
{
"shinespark": {
"frames": 5
}
},
{
"heatFrames": 230
}
],
"exitCondition": {
"leaveWithSpark": {}
},
"unlocksDoors": [
{
"types": [
"super"
],
"requires": []
},
{
"types": [
"missiles",
"powerbomb"
],
"requires": [
"never"
]
}
]
},
{
"link": [
2,
3
],
"name": "Come in Shinecharging, Leave Shinecharged",
"entranceCondition": {
"comeInShinecharging": {
"length": 11,
"openEnd": 1,
"gentleUpTiles": 4
}
},
"requires": [
"HiJump",
"canShinechargeMovementComplex",
"canTrickyJump",
{
"heatFrames": 150
}
],
"exitCondition": {
"leaveShinecharged": {
"framesRemaining": 60
}
},
"unlocksDoors": [
{
"types": [
"super"
],
"requires": []
},
{
"types": [
"missiles",
"powerbomb"
],
"requires": [
"never"
]
}
],
"note": "Quickly ledge grab the platform to run below the Multiviola and get ahead of it.",
"devNote": "1 unused tile since you must jump earlier for this strat."
},
{
"link": [
2,
3
],
"name": "IBJ",
"requires": [
"h_canIBJ",
{
"heatFrames": 1200
}
]
},
{
"link": [
2,
3
],
"name": "Frozen Multiviola",
"requires": [
"canUseFrozenEnemies",
{
"heatFrames": 450
}
],
"note": "Kill the Alcoon, then freeze the Multiviola to use as a platform."
},
{
"link": [
3,
1
],
"name": "Grapple Teleport",
"entranceCondition": {
"comeInWithGrappleTeleport": {
"blockPositions": [
[
5,
3
],
[
7,
2
]
]
}
},
"requires": [
{
  "heatFrames": 45
}
]
},
{
"link": [
3,
1
],
"name": "Grapple Teleport Door Lock Skip",
"entranceCondition": {
"comeInWithGrappleTeleport": {
"blockPositions": [
[
3,
12
]
]
}
},
"requires": [],
"bypassesDoorShell": true
},
{
"link": [
3,
1
],
"name": "Grapple Teleport X-Ray Climb",
"entranceCondition": {
"comeInWithGrappleTeleport": {
"blockPositions": [
[
2,
28
]
]
}
},
"requires": [
"canXRayClimb",
{
"heatFrames": 1600
}
],
"bypassesDoorShell": true,
"note": [
"Exit the previous room with Samus in a standing pose (while grappled).",
"After teleporting, press right to release Grapple while staying standing (not being forced into a crouch).",
"Then X-ray climb to get up to the door transition, without needing to open the door."
]
},
{
"link": [
3,
2
],
"name": "Base",
"requires": [
{
  "heatFrames": 200
}
],
"unlocksDoors": [
{
"types": [
"missiles"
],
"requires": [
{
"heatFrames": 30
}
]
},
{
"types": [
"powerbomb"
],
"requires": [
{
"heatFrames": 10
}
]
}
]
},
{
"link": [
3,
2
],
"name": "Leave with Runway",
"requires": [
{
  "heatFrames": 140
}
],
"exitCondition": {
"leaveWithRunway": {
"length": 13,
"openEnd": 0,
"gentleDownTiles": 4
}
},
"unlocksDoors": [
{
"types": [
"missiles"
],
"requires": [
{
"heatFrames": 50
}
]
},
{
"types": [
"super"
],
"requires": []
},
{
"types": [
"powerbomb"
],
"requires": [
{
"heatFrames": 30
}
]
}
]
},
{
"link": [
3,
2
],
"name": "Come in Shinecharging, Leave Shinecharged",
"entranceCondition": {
"comeInShinecharging": {
"length": 3,
"openEnd": 1
}
},
"requires": [
"canShinechargeMovementTricky",
{
"heatFrames": 180
}
],
"exitCondition": {
"leaveShinecharged": {
"framesRemaining": 10
}
},
"unlocksDoors": [
{
"types": [
"super"
],
"requires": []
},
{
"types": [
"missiles",
"powerbomb"
],
"requires": [
"never"
]
}
]
},
{
"link": [
3,
2
],
"name": "Come in Shinecharging, Leave With Spark",
"entranceCondition": {
"comeInShinecharging": {
"length": 3,
"openEnd": 1
}
},
"requires": [
"canShinechargeMovementComplex",
{
"shinespark": {
"frames": 5
}
},
{
"heatFrames": 220
}
],
"exitCondition": {
"leaveWithSpark": {
"position": "top"
}
},
"unlocksDoors": [
{
"types": [
"super"
],
"requires": []
},
{
"types": [
"missiles",
"powerbomb"
],
"requires": [
"never"
]
}
]
},
{
"link": [
3,
2
],
"name": "Come in Shinecharged, Leave With Spark",
"entranceCondition": {
"comeInShinecharged": {
"framesRequired": 145
}
},
"requires": [
"canShinechargeMovementComplex",
{
"shinespark": {
"frames": 18
}
},
{
"heatFrames": 190
}
],
"exitCondition": {
"leaveWithSpark": {
"position": "top"
}
},
"unlocksDoors": [
{
"types": [
"super"
],
"requires": []
},
{
"types": [
"missiles",
"powerbomb"
],
"requires": [
"never"
]
}
]
},
{
"link": [
3,
3
],
"name": "Leave with Runway",
"requires": [],
"exitCondition": {
"leaveWithRunway": {
"length": 4,
"openEnd": 1
}
}
},
{
"link": [
3,
3
],
"name": "Crystal Flash",
"requires": [
"h_canHeatedCrystalFlash"
]
},
{
"link": [
3,
4
],
"name": "Base",
"requires": [
{
"or": [
"canWalljump",
"HiJump",
"SpaceJump",
"h_canCrouchJumpDownGrab"
]
},
{
"heatFrames": 310
}
]
},
{
"link": [
3,
4
],
"name": "Leave with Runway",
"requires": [
{
"or": [
"canWalljump",
"HiJump",
"SpaceJump",
"h_canCrouchJumpDownGrab"
]
},
{
"heatFrames": 290
}
],
"exitCondition": {
"leaveWithRunway": {
"length": 4,
"openEnd": 1
}
},
"unlocksDoors": [
{
"types": [
"missiles"
],
"requires": [
{
"heatFrames": 50
}
]
},
{
"types": [
"super"
],
"requires": []
},
{
"types": [
"powerbomb"
],
"requires": [
{
"heatFrames": 110
}
]
}
]
},
{
"link": [
3,
4
],
"name": "Come in Shinecharging, Leave Shinecharged",
"entranceCondition": {
"comeInShinecharging": {
"length": 3,
"openEnd": 0
}
},
"requires": [
"HiJump",
"canTrickyJump",
"canShinechargeMovementTricky",
{
"heatFrames": 170
}
],
"exitCondition": {
"leaveShinecharged": {
"framesRemaining": 15
}
},
"unlocksDoors": [
{
"types": [
"super"
],
"requires": []
},
{
"types": [
"missiles",
"powerbomb"
],
"requires": [
"never"
]
}
]
},
{
"link": [
3,
4
],
"name": "Come In Shinecharged, Leave With Spark",
"entranceCondition": {
"comeInShinecharged": {
"framesRequired": 140
}
},
"requires": [
"HiJump",
"canTrickyJump",
"canShinechargeMovementComplex",
{
"shinespark": {
"frames": 9
}
},
{
"heatFrames": 170
}
],
"exitCondition": {
"leaveWithSpark": {}
},
"unlocksDoors": [
{
"types": [
"super"
],
"requires": []
},
{
"types": [
"missiles",
"powerbomb"
],
"requires": [
"never"
]
}
]
},
{
"link": [
3,
4
],
"name": "IBJ",
"requires": [
"h_canIBJ",
{
"heatFrames": 1950
}
],
"note": "Jump the Alcoon and kill the Multiviola, then IBJ."
},
{
"link": [
3,
4
],
"name": "Frozen Enemies",
"requires": [
"canUseFrozenEnemies",
{
"heatFrames": 1300
}
],
"note": [
"Wait for the Alcoon to walk off the edge. Use it and the Multiviola as platforms.",
"Spawn the Alcoon, then run back to the right so it will not stop and fire projectiles."
]
},
{
"link": [
4,
1
],
"name": "Enter Shinecharging, Leave Sparking",
"entranceCondition": {
"comeInShinecharging": {
"length": 3,
"openEnd": 0
}
},
"requires": [
"HiJump",
"canTrickyJump",
"canShinechargeMovementComplex",
"canDodgeWhileShooting",
{
"or": [
{
"ammo": {
"type": "Missile",
"count": 1
}
},
"Plasma"
]
},
{
"shinespark": {
"frames": 14
}
},
{
"heatFrames": 190
}
],
"exitCondition": {
"leaveWithSpark": {}
},
"unlocksDoors": [
{
"types": [
"super"
],
"requires": []
},
{
"types": [
"missiles",
"powerbomb"
],
"requires": [
"never"
]
}
]
},
{
"link": [
4,
1
],
"name": "Grapple Teleport",
"entranceCondition": {
"comeInWithGrappleTeleport": {
"blockPositions": [
[
5,
3
],
[
7,
2
]
]
}
},
"requires": [
{
  "heatFrames": 45
}
]
},
{
"link": [
4,
1
],
"name": "Grapple Teleport Door Lock Skip",
"entranceCondition": {
"comeInWithGrappleTeleport": {
"blockPositions": [
[
3,
12
]
]
}
},
"requires": [],
"bypassesDoorShell": true
},
{
"link": [
4,
1
],
"name": "Grapple Teleport X-Ray Climb",
"entranceCondition": {
"comeInWithGrappleTeleport": {
"blockPositions": [
[
2,
28
]
]
}
},
"requires": [
"canXRayClimb",
{
"heatFrames": 1600
}
],
"bypassesDoorShell": true,
"note": [
"Exit the previous room with Samus in a standing pose (while grappled).",
"After teleporting, press right to release Grapple while staying standing (not being forced into a crouch).",
"Then X-ray climb to get up to the door transition, without needing to open the door."
]
},
{
"link": [
4,
3
],
"name": "Base",
"requires": [
{
  "heatFrames": 220
}
],
"unlocksDoors": [
{
"types": [
"missiles"
],
"requires": [
{
"heatFrames": 20
}
]
},
{
"types": [
"powerbomb"
],
"requires": [
{
"heatFrames": 10
}
]
}
]
},
{
"link": [
4,
3
],
"name": "Leave with Runway",
"requires": [
{
  "heatFrames": 200
}
],
"exitCondition": {
"leaveWithRunway": {
"length": 4,
"openEnd": 1
}
},
"unlocksDoors": [
{
"types": [
"missiles"
],
"requires": [
{
"heatFrames": 65
}
]
},
{
"types": [
"super"
],
"requires": []
},
{
"types": [
"powerbomb"
],
"requires": [
{
"heatFrames": 30
}
]
}
]
},
{
"link": [
4,
3
],
"name": "Come in Shinecharging, Leave With Spark",
"entranceCondition": {
"comeInShinecharging": {
"length": 3,
"openEnd": 1
}
},
"requires": [
{
  "or": [
    {
      "and": [
        "canShinechargeMovementComplex",
        {
          "heatFrames": 215
        },
        {
          "shinespark": {
            "frames": 15,
            "excessFrames": 0
          }
        }
      ]
    },
    {
      "and": [
        "canShinechargeMovementTricky",
        {
          "heatFrames": 195
        },
        {
          "shinespark": {
            "frames": 5,
            "excessFrames": 0
          }
        }
      ]
    }
  ]
}
],
"exitCondition": {
"leaveWithSpark": {}
},
"unlocksDoors": [
{
"types": [
"super"
],
"requires": []
},
{
"types": [
"missiles",
"powerbomb"
],
"requires": [
"never"
]
}
]
},
{
"link": [
4,
4
],
"name": "Leave with Runway",
"requires": [],
"exitCondition": {
"leaveWithRunway": {
"length": 4,
"openEnd": 1
}
}
},
{
"link": [
4,
4
],
"name": "Crystal Flash",
"requires": [
"h_canHeatedCrystalFlash"
]
},
{
"link": [
4,
6
],
"name": "Base",
"requires": [
{
"or": [
"canWalljump",
"HiJump",
"SpaceJump",
"h_canCrouchJumpDownGrab"
]
},
{
"heatFrames": 200
}
]
},
{
"link": [
4,
6
],
"name": "IBJ",
"requires": [
"h_canIBJ",
{
"heatFrames": 750
}
],
"note": "Kill the enemies, then IBJ."
},
{
"link": [
4,
6
],
"name": "Frozen Enemies",
"requires": [
"canUseFrozenEnemies",
{
"heatFrames": 830
}
],
"note": "Wait for the Alcoon to walk off the edge. Use it and the Multiviola as platforms."
},
{
"link": [
5,
1
],
"name": "Grapple Teleport",
"entranceCondition": {
"comeInWithGrappleTeleport": {
"blockPositions": [
[
5,
3
],
[
7,
2
]
]
}
},
"requires": [
{
  "heatFrames": 45
}
]
},
{
"link": [
5,
1
],
"name": "Grapple Teleport Door Lock Skip",
"entranceCondition": {
"comeInWithGrappleTeleport": {
"blockPositions": [
[
3,
12
]
]
}
},
"requires": [],
"bypassesDoorShell": true
},
{
"link": [
5,
1
],
"name": "Grapple Teleport X-Ray Climb",
"entranceCondition": {
"comeInWithGrappleTeleport": {
"blockPositions": [
[
2,
28
]
]
}
},
"requires": [
"canXRayClimb",
{
"heatFrames": 1600
}
],
"bypassesDoorShell": true,
"note": [
"Exit the previous room with Samus in a standing pose (while grappled).",
"After teleporting, press right to release Grapple while staying standing (not being forced into a crouch).",
"Then X-ray climb to get up to the door transition, without needing to open the door."
]
},
{
"link": [
5,
5
],
"name": "Leave with Runway",
"requires": [],
"exitCondition": {
"leaveWithRunway": {
"length": 4,
"openEnd": 0
}
}
},
{
"link": [
5,
5
],
"name": "Crystal Flash",
"requires": [
"h_canHeatedCrystalFlash"
]
},
{
"link": [
5,
6
],
"name": "Screw",
"requires": [
"Morph",
"ScrewAttack",
{
"heatFrames": 780
}
]
},
{
"link": [
5,
6
],
"name": "Power Bomb",
"requires": [
"h_canUsePowerBombs",
{
"heatFrames": 850
}
]
},
{
"link": [
5,
6
],
"name": "Bombs",
"requires": [
"h_canUseMorphBombs",
{
"heatFrames": 1130
}
]
},
{
"link": [
6,
1
],
"name": "Base",
"requires": [
{
"or": [
"canWalljump",
"HiJump",
"SpaceJump",
"h_canCrouchJumpDownGrab"
]
},
{
"heatFrames": 100
}
],
"unlocksDoors": [
{
"types": [
"missiles"
],
"requires": [
{
"heatFrames": 30
}
]
},
{
"types": [
"powerbomb"
],
"requires": [
{
"heatFrames": 70
}
]
}
]
},
{
"link": [
6,
1
],
"name": "Leave with Runway",
"requires": [
{
"or": [
"canWalljump",
"HiJump",
"h_canCrouchJumpDownGrab"
]
},
{
"heatFrames": 60
}
],
"exitCondition": {
"leaveWithRunway": {
"length": 8,
"openEnd": 1
}
},
"unlocksDoors": [
{
"types": [
"missiles"
],
"requires": [
{
"heatFrames": 50
}
]
},
{
"types": [
"super"
],
"requires": []
},
{
"types": [
"powerbomb"
],
"requires": [
{
"heatFrames": 70
}
]
}
]
},
{
"link": [
6,
1
],
"name": "IBJ",
"requires": [
"h_canIBJ",
{
"heatFrames": 1500
}
],
"note": "Kill the enemies, then IBJ."
},
{
"link": [
6,
1
],
"name": "Frozen Enemies",
"requires": [
"canUseFrozenEnemies",
{
"heatFrames": 600
}
]
},
{
"link": [
6,
4
],
"name": "Base",
"requires": [
{
  "heatFrames": 150
}
],
"unlocksDoors": [
{
"types": [
"missiles"
],
"requires": [
{
"heatFrames": 20
}
]
},
{
"types": [
"powerbomb"
],
"requires": [
{
"heatFrames": 20
}
]
}
]
},
{
"link": [
6,
4
],
"name": "Leave with Runway",
"requires": [
{
  "heatFrames": 120
}
],
"exitCondition": {
"leaveWithRunway": {
"length": 4,
"openEnd": 1
}
},
"unlocksDoors": [
{
"types": [
"missiles"
],
"requires": [
{
"heatFrames": 20
}
]
},
{
"types": [
"super"
],
"requires": []
},
{
"types": [
"powerbomb"
],
"requires": [
{
"heatFrames": 20
}
]
}
]
},
{
"link": [
6,
6
],
"name": "Alcoon and Multiviola Farm",
"requires": [
"h_heatProof",
{
"or": [
"canDodgeWhileShooting",
"ScrewAttack",
"Wave",
"Ice",
"Spazer",
"Plasma"
]
},
{
"or": [
"canWalljump",
"HiJump",
"h_canCrouchJumpDownGrab"
]
},
{
"resetRoom": {
"nodes": [
1,
2,
3,
4
],
"mustStayPut": false
}
},
{
"refill": [
"Missile",
"PowerBomb"
]
}
]
}
]
}