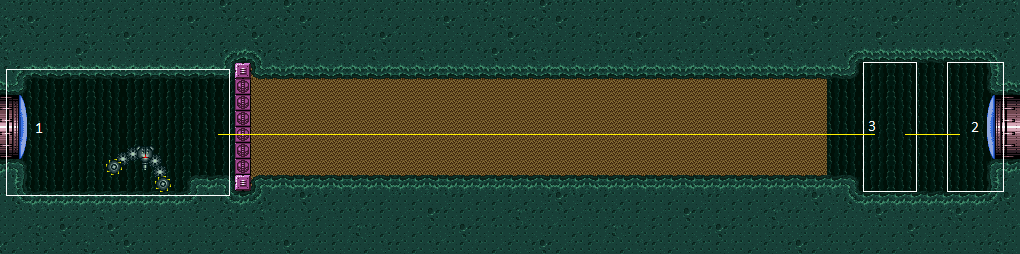
Shaktool Room
Room ID: 222
|
Exit condition: {
"leaveWithRunway": {
"length": 1,
"openEnd": 1
}
}
|
|
Requires: "f_ShaktoolDoneDigging"
"canShinechargeMovement"
"canWaterShineCharge"
{
"canShineCharge": {
"usedTiles": 33,
"openEnd": 2
}
}
Exit condition: {
"leaveShinecharged": {
"framesRemaining": 80
}
}
|
|
Requires: "f_ShaktoolDoneDigging"
"canShinechargeMovement"
"Gravity"
{
"canShineCharge": {
"usedTiles": 33,
"openEnd": 2
}
}
Exit condition: {
"leaveShinecharged": {
"framesRemaining": 100
}
}
|
|
Requires: "h_canCrystalFlash" |
|
Exit condition: {
"leaveWithGModeSetup": {}
}
|
|
This takes 1 min 40 sec if Shaktool is done digging. Requires: {
"enemyDamage": {
"enemy": "Shaktool",
"type": "contact",
"hits": 1
}
}
{
"or": [
"canBePatient",
{
"and": [
"canRiskPermanentLossOfAccess",
{
"not": "f_ShaktoolDoneDigging"
}
]
}
]
}
|
|
Requires: {
"or": [
"f_ShaktoolDoneDigging",
"h_canUsePowerBombs"
]
}
|
|
Entrance condition: {
"comeInWithGMode": {
"mode": "any",
"morphed": true
}
}
Requires: "h_canArtificialMorphPowerBomb" |
|
Entrance condition: {
"comeInWithGrappleTeleport": {
"blockPositions": [
[
5,
3
],
[
7,
2
]
]
}
}
|
|
Entrance condition: {
"comeInWithGrappleTeleport": {
"blockPositions": [
[
3,
12
],
[
3,
13
]
]
}
}
Bypasses door shell: true |
|
Entrance condition: {
"comeInWithGrappleTeleport": {
"blockPositions": [
[
3,
12
]
]
}
}
Exit condition: {
"leaveWithGrappleTeleport": {
"blockPositions": [
[
3,
12
]
]
}
}
Bypasses door shell: true |
|
Entrance condition: {
"comeInWithGrappleTeleport": {
"blockPositions": [
[
3,
13
]
]
}
}
Exit condition: {
"leaveWithGrappleTeleport": {
"blockPositions": [
[
3,
13
]
]
}
}
Bypasses door shell: true |
|
Exit condition: {
"leaveWithRunway": {
"length": 1,
"openEnd": 1
}
}
|
|
Requires: "f_ShaktoolDoneDigging"
"canShinechargeMovement"
"canWaterShineCharge"
{
"canShineCharge": {
"usedTiles": 33,
"openEnd": 2
}
}
Exit condition: {
"leaveShinecharged": {
"framesRemaining": 80
}
}
|
|
Requires: "f_ShaktoolDoneDigging"
"canShinechargeMovement"
"Gravity"
{
"canShineCharge": {
"usedTiles": 33,
"openEnd": 2
}
}
Exit condition: {
"leaveShinecharged": {
"framesRemaining": 100
}
}
|
|
Requires: "h_canCrystalFlash" |
|
Requires: "f_ShaktoolDoneDigging" Exit condition: {
"leaveWithGModeSetup": {}
}
|
|
Shoot a Snail to make it chase Samus. Requires: "h_ShaktoolCameraFix" Exit condition: {
"leaveWithGModeSetup": {}
}
|
|
Wait for Shaktool. If Shaktool's camera is fixed it is possible without Shaktool, by using a Snail (Yard): a Super or any SBA can trigger a Yard to attack. Requires: {
"or": [
{
"and": [
{
"enemyDamage": {
"enemy": "Shaktool",
"type": "contact",
"hits": 1
}
},
"f_ShaktoolDoneDigging"
]
},
{
"and": [
{
"enemyDamage": {
"enemy": "Yard",
"type": "contact",
"hits": 1
}
},
"h_ShaktoolCameraFix",
{
"or": [
{
"ammo": {
"type": "Super",
"count": 1
}
},
{
"and": [
"canSpecialBeamAttack",
{
"ammo": {
"type": "PowerBomb",
"count": 1
}
}
]
}
]
}
]
}
]
}
|
|
Requires: "f_ShaktoolDoneDigging" |
|
Entering from the right door gives a weird alignment glitch, but it's possible to exit back through the door and that triggers the event flag, which opens up the room on the next re-entry Requires: "h_ShaktoolVanillaFlag" |
|
Notable: true 
Let the Snails (Yards) dig through the sand and follow them. They will not dig while off screen or while Samus is facing them, even while morphed. Requires: "h_canUsePowerBombs" |
|
From: 2
Right Door
To: 3
Shaktool Dug Event (locked)
Notable: true 
The Snails will dig through the sand without showing any visual difference. Each block they pass through gets closer to overloading PLMs. In order to PB the left wall before PLMs are overloaded, it is necessary to only allow one snail to dig, either by bombing one or by facing one to prevent movement until it is off screen. If using mobile g-mode, it is easiest to get past the bottom one and prevent it from digging. If using immobile g-mode, it is easiest to have whichever one hits Samus go off screen. In the morph tunnel, it is important to place the PB as far right as possible, while still hitting the PB blocks, otherwise the Snails will have overloaded the PLMs and the blocks won't break. The green stone changes one tile earlier than the PB wall, and can be a good visual cue to place the PB. After using the PB, exit the sand, leave G-Mode, and wait for Shaktool. Note that the Snails will not dig while off screen or while Samus is facing them, even while she is morphed. Entrance condition: {
"comeInWithGMode": {
"mode": "any",
"morphed": true
}
}
Requires: {
"or": [
{
"and": [
"Gravity",
"h_canArtificialMorphIBJ"
]
},
"h_canArtificialMorphSpringBall"
]
}
"h_canArtificialMorphPowerBomb"
|
|
Requires: "f_ShaktoolDoneDigging" |
|
|
|
Clears obstacles: f_ShaktoolDoneDigging |
|
|
|
Requires: {
"obstaclesCleared": [
"f_ShaktoolDoneDigging"
]
}
"canShinechargeMovement"
"canWaterShineCharge"
{
"canShineCharge": {
"usedTiles": 33,
"openEnd": 2
}
}
Exit condition: {
"leaveShinecharged": {
"framesRemaining": 80
}
}
|
|
Requires: {
"obstaclesCleared": [
"f_ShaktoolDoneDigging"
]
}
"canShinechargeMovement"
"Gravity"
{
"canShineCharge": {
"usedTiles": 33,
"openEnd": 2
}
}
Exit condition: {
"leaveShinecharged": {
"framesRemaining": 100
}
}
|
|
Requires: {
"obstaclesCleared": [
"f_ShaktoolDoneDigging"
]
}
"canShinechargeMovement"
"canWaterShineCharge"
{
"canShineCharge": {
"usedTiles": 33,
"openEnd": 2
}
}
Exit condition: {
"leaveShinecharged": {
"framesRemaining": 80
}
}
|
|
Requires: {
"obstaclesCleared": [
"f_ShaktoolDoneDigging"
]
}
"canShinechargeMovement"
"Gravity"
{
"canShineCharge": {
"usedTiles": 33,
"openEnd": 2
}
}
Exit condition: {
"leaveShinecharged": {
"framesRemaining": 100
}
}
|
|
Requires: {
"obstaclesCleared": [
"f_ShaktoolDoneDigging"
]
}
Exit condition: {
"leaveWithGModeSetup": {}
}
|
|
Requires: {
"obstaclesCleared": [
"f_ShaktoolDoneDigging"
]
}
|
|
Requires: {
"obstaclesCleared": [
"f_ShaktoolDoneDigging"
]
}
|
{
"$schema": "../../../schema/m3-room.schema.json",
"id": 222,
"name": "Shaktool Room",
"area": "Maridia",
"subarea": "Inner",
"subsubarea": "Green",
"playable": true,
"roomAddress": "0x7D8C5",
"roomEnvironments": [
{
"heated": false
}
],
"nodes": [
{
"id": 1,
"name": "Left Door",
"nodeType": "door",
"nodeSubType": "blue",
"nodeAddress": "0x001a8c4",
"doorEnvironments": [
{
"physics": "air"
}
]
},
{
"id": 2,
"name": "Right Door",
"nodeType": "door",
"nodeSubType": "blue",
"nodeAddress": "0x001a8d0",
"doorEnvironments": [
{
"physics": "air"
}
]
},
{
"id": 3,
"name": "Shaktool Dug Event (locked)",
"nodeType": "junction",
"nodeSubType": "flag",
"devNote": "No unlock requirements for this event, since just reaching it is enough but the requirements for reaching it depend on where you're coming from"
},
{
"id": 4,
"name": "Shaktool Dug Event (unlocked)",
"nodeType": "event",
"nodeSubType": "flag",
"yields": [
"f_ShaktoolDoneDigging"
],
"devNote": "No unlock requirements for this event, since just reaching it is enough but the requirements for reaching it depend on where you're coming from"
}
],
"enemies": [
{
"id": "e1",
"groupName": "Shaktool",
"enemyName": "Shaktool",
"quantity": 1,
"homeNodes": [
1
]
},
{
"id": "e2",
"groupName": "Shaktool Room Yards",
"enemyName": "Yard",
"quantity": 2,
"homeNodes": [
2
]
}
],
"links": [
{
"from": 1,
"to": [
{
"id": 1
},
{
"id": 3
}
]
},
{
"from": 2,
"to": [
{
"id": 1
},
{
"id": 2
},
{
"id": 3
}
]
},
{
"from": 3,
"to": [
{
"id": 1
},
{
"id": 2
}
]
}
],
"strats": [
{
"link": [
1,
1
],
"name": "Leave with Runway",
"requires": [],
"exitCondition": {
"leaveWithRunway": {
"length": 1,
"openEnd": 1
}
}
},
{
"link": [
1,
1
],
"name": "Leave Shinecharged",
"requires": [
"f_ShaktoolDoneDigging",
"canShinechargeMovement",
"canWaterShineCharge",
{
"canShineCharge": {
"usedTiles": 33,
"openEnd": 2
}
}
],
"exitCondition": {
"leaveShinecharged": {
"framesRemaining": 80
}
}
},
{
"link": [
1,
1
],
"name": "Leave Shinecharged, Gravity",
"requires": [
"f_ShaktoolDoneDigging",
"canShinechargeMovement",
"Gravity",
{
"canShineCharge": {
"usedTiles": 33,
"openEnd": 2
}
}
],
"exitCondition": {
"leaveShinecharged": {
"framesRemaining": 100
}
},
"devNote": "FIXME: By falling off the runway with precise movement, 135 frames are possible."
},
{
"link": [
1,
1
],
"name": "Crystal Flash",
"requires": [
"h_canCrystalFlash"
]
},
{
"link": [
1,
1
],
"name": "G-Mode Setup - Get Hit By Shaktool",
"notable": false,
"requires": [],
"exitCondition": {
"leaveWithGModeSetup": {}
}
},
{
"link": [
1,
1
],
"name": "G-Mode Regain Mobility",
"requires": [
{
"enemyDamage": {
"enemy": "Shaktool",
"type": "contact",
"hits": 1
}
},
{
"or": [
"canBePatient",
{
"and": [
"canRiskPermanentLossOfAccess",
{
"not": "f_ShaktoolDoneDigging"
}
]
}
]
}
],
"gModeRegainMobility": {},
"note": "This takes 1 min 40 sec if Shaktool is done digging."
},
{
"link": [
1,
3
],
"name": "Base",
"requires": [
{
  "or": [
    "f_ShaktoolDoneDigging",
    "h_canUsePowerBombs"
  ]
}
]
},
{
"link": [
1,
3
],
"name": "G-Mode Morph Power Bomb",
"entranceCondition": {
"comeInWithGMode": {
"mode": "any",
"morphed": true
}
},
"requires": [
"h_canArtificialMorphPowerBomb"
]
},
{
"link": [
2,
1
],
"name": "Grapple Teleport",
"entranceCondition": {
"comeInWithGrappleTeleport": {
"blockPositions": [
[
5,
3
],
[
7,
2
]
]
}
},
"requires": []
},
{
"link": [
2,
1
],
"name": "Grapple Teleport Door Lock Skip",
"entranceCondition": {
"comeInWithGrappleTeleport": {
"blockPositions": [
[
3,
12
],
[
3,
13
]
]
}
},
"requires": [],
"bypassesDoorShell": true
},
{
"link": [
2,
1
],
"name": "Carry Grapple Teleport (Top Position)",
"entranceCondition": {
"comeInWithGrappleTeleport": {
"blockPositions": [
[
3,
12
]
]
}
},
"requires": [],
"bypassesDoorShell": true,
"exitCondition": {
"leaveWithGrappleTeleport": {
"blockPositions": [
[
3,
12
]
]
}
}
},
{
"link": [
2,
1
],
"name": "Carry Grapple Teleport (Bottom Position)",
"entranceCondition": {
"comeInWithGrappleTeleport": {
"blockPositions": [
[
3,
13
]
]
}
},
"requires": [],
"bypassesDoorShell": true,
"exitCondition": {
"leaveWithGrappleTeleport": {
"blockPositions": [
[
3,
13
]
]
}
}
},
{
"link": [
2,
2
],
"name": "Leave with Runway",
"requires": [],
"exitCondition": {
"leaveWithRunway": {
"length": 1,
"openEnd": 1
}
}
},
{
"link": [
2,
2
],
"name": "Leave Shinecharged",
"requires": [
"f_ShaktoolDoneDigging",
"canShinechargeMovement",
"canWaterShineCharge",
{
"canShineCharge": {
"usedTiles": 33,
"openEnd": 2
}
}
],
"exitCondition": {
"leaveShinecharged": {
"framesRemaining": 80
}
}
},
{
"link": [
2,
2
],
"name": "Leave Shinecharged, Gravity",
"requires": [
"f_ShaktoolDoneDigging",
"canShinechargeMovement",
"Gravity",
{
"canShineCharge": {
"usedTiles": 33,
"openEnd": 2
}
}
],
"exitCondition": {
"leaveShinecharged": {
"framesRemaining": 100
}
},
"devNote": "FIXME: By falling off the runway with precise movement, 135 frames are possible."
},
{
"link": [
2,
2
],
"name": "Crystal Flash",
"requires": [
"h_canCrystalFlash"
]
},
{
"link": [
2,
2
],
"name": "G-Mode Setup - Get Hit By Shaktool",
"notable": false,
"requires": [
"f_ShaktoolDoneDigging"
],
"exitCondition": {
"leaveWithGModeSetup": {}
}
},
{
"link": [
2,
2
],
"name": "G-Mode Setup - Get Hit By Yard (Snail)",
"notable": false,
"requires": [
"h_ShaktoolCameraFix"
],
"exitCondition": {
"leaveWithGModeSetup": {}
},
"note": "Shoot a Snail to make it chase Samus."
},
{
"link": [
2,
2
],
"name": "G-Mode Regain Mobility",
"requires": [
{
  "or": [
    {
      "and": [
        {
          "enemyDamage": {
            "enemy": "Shaktool",
            "type": "contact",
            "hits": 1
          }
        },
        "f_ShaktoolDoneDigging"
      ]
    },
    {
      "and": [
        {
          "enemyDamage": {
            "enemy": "Yard",
            "type": "contact",
            "hits": 1
          }
        },
        "h_ShaktoolCameraFix",
        {
          "or": [
            {
              "ammo": {
                "type": "Super",
                "count": 1
              }
            },
            {
              "and": [
                "canSpecialBeamAttack",
                {
                  "ammo": {
                    "type": "PowerBomb",
                    "count": 1
                  }
                }
              ]
            }
          ]
        }
      ]
    }
  ]
}
],
"gModeRegainMobility": {},
"note": "Wait for Shaktool. If Shaktool's camera is fixed it is possible without Shaktool, by using a Snail (Yard): a Super or any SBA can trigger a Yard to attack."
},
{
"link": [
2,
3
],
"name": "Base",
"requires": [
"f_ShaktoolDoneDigging"
]
},
{
"link": [
2,
3
],
"name": "Vanilla",
"requires": [
"h_ShaktoolVanillaFlag"
],
"note": "Entering from the right door gives a weird alignment glitch, but it's possible to exit back through the door and that triggers the event flag, which opens up the room on the next re-entry"
},
{
"link": [
2,
3
],
"name": "Shaktool Room Reverse",
"notable": true,
"requires": [
"h_canUsePowerBombs"
],
"note": "Let the Snails (Yards) dig through the sand and follow them. They will not dig while off screen or while Samus is facing them, even while morphed."
},
{
"link": [
2,
3
],
"name": "G-Mode Morph Reverse Shaktool",
"notable": true,
"entranceCondition": {
"comeInWithGMode": {
"mode": "any",
"morphed": true
}
},
"requires": [
{
"or": [
{
"and": [
"Gravity",
"h_canArtificialMorphIBJ"
]
},
"h_canArtificialMorphSpringBall"
]
},
"h_canArtificialMorphPowerBomb"
],
"note": [
"The Snails will dig through the sand without showing any visual difference. Each block they pass through gets closer to overloading PLMs.",
"In order to PB the left wall before PLMs are overloaded, it is necessary to only allow one snail to dig, either by bombing one or by facing one to prevent movement until it is off screen.",
"If using mobile g-mode, it is easiest to get past the bottom one and prevent it from digging. If using immobile g-mode, it is easiest to have whichever one hits Samus go off screen.",
"In the morph tunnel, it is important to place the PB as far right as possible, while still hitting the PB blocks, otherwise the Snails will have overloaded the PLMs and the blocks won't break.",
"The green stone changes one tile earlier than the PB wall, and can be a good visual cue to place the PB.",
"After using the PB, exit the sand, leave G-Mode, and wait for Shaktool. Note that the Snails will not dig while off screen or while Samus is facing them, even while she is morphed."
]
},
{
"link": [
3,
1
],
"name": "Base",
"requires": [
"f_ShaktoolDoneDigging"
]
},
{
"link": [
3,
2
],
"name": "Base",
"requires": []
},
{
"name": "Base",
"notable": false,
"requires": [],
"link": [
3,
4
],
"clearsObstacles": [
"f_ShaktoolDoneDigging"
]
},
{
"link": [
4,
3
],
"name": "Base",
"notable": false,
"requires": []
},
{
"link": [
1,
1
],
"name": "Leave Shinecharged",
"requires": [
{
  "obstaclesCleared": [
    "f_ShaktoolDoneDigging"
  ]
},
"canShinechargeMovement",
"canWaterShineCharge",
{
"canShineCharge": {
"usedTiles": 33,
"openEnd": 2
}
}
],
"exitCondition": {
"leaveShinecharged": {
"framesRemaining": 80
}
}
},
{
"link": [
1,
1
],
"name": "Leave Shinecharged, Gravity",
"requires": [
{
  "obstaclesCleared": [
    "f_ShaktoolDoneDigging"
  ]
},
"canShinechargeMovement",
"Gravity",
{
"canShineCharge": {
"usedTiles": 33,
"openEnd": 2
}
}
],
"exitCondition": {
"leaveShinecharged": {
"framesRemaining": 100
}
},
"devNote": "FIXME: By falling off the runway with precise movement, 135 frames are possible."
},
{
"link": [
2,
2
],
"name": "Leave Shinecharged",
"requires": [
{
  "obstaclesCleared": [
    "f_ShaktoolDoneDigging"
  ]
},
"canShinechargeMovement",
"canWaterShineCharge",
{
"canShineCharge": {
"usedTiles": 33,
"openEnd": 2
}
}
],
"exitCondition": {
"leaveShinecharged": {
"framesRemaining": 80
}
}
},
{
"link": [
2,
2
],
"name": "Leave Shinecharged, Gravity",
"requires": [
{
"obstaclesCleared": [
"f_ShaktoolDoneDigging"
]
},
"canShinechargeMovement",
"Gravity",
{
"canShineCharge": {
"usedTiles": 33,
"openEnd": 2
}
}
],
"exitCondition": {
"leaveShinecharged": {
"framesRemaining": 100
}
},
"devNote": "FIXME: By falling off the runway with precise movement, 135 frames are possible."
},
{
"link": [
2,
2
],
"name": "G-Mode Setup - Get Hit By Shaktool",
"notable": false,
"requires": [
{
"obstaclesCleared": [
"f_ShaktoolDoneDigging"
]
}
],
"exitCondition": {
"leaveWithGModeSetup": {}
}
},
{
"link": [
2,
3
],
"name": "Base",
"requires": [
{
"obstaclesCleared": [
"f_ShaktoolDoneDigging"
]
}
]
},
{
"link": [
3,
1
],
"name": "Base",
"requires": [
{
"obstaclesCleared": [
"f_ShaktoolDoneDigging"
]
}
]
}
],
"obstacles": [
{
"id": "f_ShaktoolDoneDigging",
"name": "f_ShaktoolDoneDigging"
}
]
}