Seaweed Room
Room ID: 233
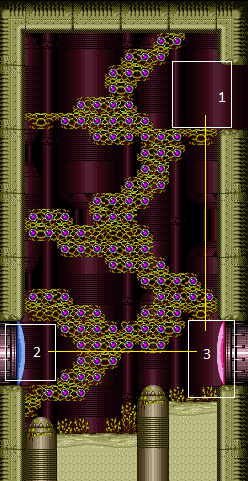
|
From: 1
Top Right Doorway
To: 1
Top Right Doorway
If coming from below, carefully get up on the left side of the room without breaking the runway blocks. Exit condition: {
"leaveWithRunway": {
"length": 9,
"openEnd": 1
}
}
|
|
Requires: "h_canCrystalFlash" |
|
From: 1
Top Right Doorway
To: 2
Left Door
Use Wave to clear the seaweed quickly. Entrance condition: {
"comeInShinecharging": {
"length": 4,
"openEnd": 0
}
}
Requires: "Wave"
"canShinechargeMovementComplex"
{
"shinespark": {
"frames": 5
}
}
Exit condition: {
"leaveWithSpark": {}
}
|
|
Entrance condition: {
"comeInWithGrappleTeleport": {
"blockPositions": [
[
2,
28
],
[
2,
29
]
]
}
}
Bypasses door shell: true |
|
From: 1
Top Right Doorway
To: 2
Left Door
Entrance condition: {
"comeInWithGrappleTeleport": {
"blockPositions": [
[
2,
28
]
]
}
}
Exit condition: {
"leaveWithGrappleTeleport": {
"blockPositions": [
[
2,
28
]
]
}
}
Bypasses door shell: true |
|
From: 1
Top Right Doorway
To: 2
Left Door
Entrance condition: {
"comeInWithGrappleTeleport": {
"blockPositions": [
[
2,
29
]
]
}
}
Exit condition: {
"leaveWithGrappleTeleport": {
"blockPositions": [
[
2,
29
]
]
}
}
Bypasses door shell: true |
|
|
|
From: 1
Top Right Doorway
To: 3
Bottom Right Door
Use Wave or Spazer to clear the seaweed quickly. Entrance condition: {
"comeInShinecharging": {
"length": 4,
"openEnd": 0
}
}
Requires: {
"or": [
{
"and": [
"Wave",
"canShinechargeMovementComplex"
]
},
{
"and": [
"Spazer",
"canShinechargeMovementTricky"
]
}
]
}
Exit condition: {
"leaveShinecharged": {
"framesRemaining": 40
}
}
|
|
From: 1
Top Right Doorway
To: 3
Bottom Right Door
Use Missiles to clear the seaweed quickly. Entrance condition: {
"comeInShinecharging": {
"length": 4,
"openEnd": 0
}
}
Requires: "canShinechargeMovementTricky"
{
"ammo": {
"type": "Missile",
"count": 7
}
}
Exit condition: {
"leaveShinecharged": {
"framesRemaining": 30
}
}
|
|
From: 1
Top Right Doorway
To: 3
Bottom Right Door
Clear the seaweed one block at a time, with just barely enough time remaining to spark out the door. Entrance condition: {
"comeInShinecharging": {
"length": 4,
"openEnd": 0
}
}
Requires: "canShinechargeMovementTricky"
{
"shinespark": {
"frames": 2
}
}
Exit condition: {
"leaveWithSpark": {}
}
|
|
Use Wave to clear the seaweed quickly. Entrance condition: {
"comeInShinecharged": {
"framesRequired": 135
}
}
Requires: "Wave" "canShinechargeMovementComplex" Exit condition: {
"leaveShinecharged": {
"framesRemaining": "auto"
}
}
|
|
From: 1
Top Right Doorway
To: 3
Bottom Right Door
Use Wave to clear the seaweed quickly. Entrance condition: {
"comeInShinecharged": {
"framesRequired": 125
}
}
Requires: "Wave"
"canShinechargeMovementComplex"
{
"shinespark": {
"frames": 2
}
}
Exit condition: {
"leaveWithSpark": {}
}
|
|
Exit condition: {
"leaveWithRunway": {
"length": 5,
"openEnd": 1
}
}
|
|
|
|
From: 2
Left Door
To: 3
Bottom Right Door
Gain a shinecharge while entering the room. Hold run and forward to stand up and press against the seaweed. Then fire a Wave shot to clear the seaweed and open the door, and run and jump across the room. If you fire the Wave shot too early (while having forward momentum), it will shoot too high and not break the blocks at Samus' knees. Entrance condition: {
"comeInShinecharging": {
"length": 2,
"openEnd": 0
}
}
Requires: "canShinechargeMovementTricky" Exit condition: {
"leaveShinecharged": {
"framesRemaining": 80
}
}
|
|
From: 2
Left Door
To: 3
Bottom Right Door
Gain a shinecharge while entering the room. Angle down to shoot the first seaweed block at the level of Samus' knees. Take four tiny steps forward, firing a shot with forward momentum on each step, destroying the seaweed at the level of Samus' head, with the last shot continuing on to open the door. Do one more angle down shot to destroy the last seaweed block at Samus' knees. To minimize energy usage, jump across the room before shinesparking through the door. Entrance condition: {
"comeInShinecharging": {
"length": 2,
"openEnd": 0
}
}
Requires: "canShinechargeMovementTricky"
{
"shinespark": {
"frames": 5
}
}
Exit condition: {
"leaveWithSpark": {
"position": "bottom"
}
}
|
|
Use Wave to clear the seaweed quickly. Entrance condition: {
"comeInShinecharged": {
"framesRequired": 100
}
}
Requires: "Wave" "canShinechargeMovementComplex" Exit condition: {
"leaveShinecharged": {
"framesRemaining": "auto"
}
}
|
|
From: 2
Left Door
To: 3
Bottom Right Door
Angle down to shoot the first seaweed block at the level of Samus' knees. Take four tiny steps forward, firing a shot with forward momentum on each step, destroying the seaweed at the level of Samus' head, with the last shot continuing on to open the door. Do one more angle down shot to destroy the last seaweed block at Samus' knees. Then shinespark through the door. Entrance condition: {
"comeInShinecharged": {
"framesRequired": 110
}
}
Requires: "canShinechargeMovementTricky"
{
"shinespark": {
"frames": 18
}
}
Exit condition: {
"leaveWithSpark": {
"position": "bottom"
}
}
|
|
|
|
From: 3
Bottom Right Door
To: 1
Top Right Doorway
Entrance condition: {
"comeInShinecharged": {
"framesRequired": 120
}
}
Requires: "HiJump" "canWalljump" "canShinechargeMovementComplex" Exit condition: {
"leaveShinecharged": {
"framesRemaining": "auto"
}
}
|
|
From: 3
Bottom Right Door
To: 1
Top Right Doorway
Entrance condition: {
"comeInShinecharged": {
"framesRequired": 125
}
}
Requires: "HiJump" "canShinechargeMovementComplex" Exit condition: {
"leaveShinecharged": {
"framesRemaining": "auto"
}
}
|
|
From: 3
Bottom Right Door
To: 1
Top Right Doorway
Entrance condition: {
"comeInShinecharged": {
"framesRequired": 100
}
}
Requires: "HiJump"
"canWalljump"
"canShinechargeMovementComplex"
{
"shinespark": {
"frames": 5
}
}
Exit condition: {
"leaveWithSpark": {}
}
|
|
From: 3
Bottom Right Door
To: 1
Top Right Doorway
Entrance condition: {
"comeInShinecharged": {
"framesRequired": 130
}
}
Requires: "canWalljump"
"canShinechargeMovementComplex"
{
"shinespark": {
"frames": 4
}
}
Exit condition: {
"leaveWithSpark": {}
}
|
|
|
|
Use single well-timed Wave shot to clear the seaweed quickly. Entrance condition: {
"comeInShinecharged": {
"framesRequired": 100
}
}
Requires: "Wave" "canShinechargeMovementComplex" Exit condition: {
"leaveShinecharged": {
"framesRemaining": "auto"
}
}
|
|
From: 3
Bottom Right Door
To: 2
Left Door
Use single well-timed Wave shot to clear the seaweed quickly. Entrance condition: {
"comeInShinecharged": {
"framesRequired": 30
}
}
Requires: "Wave"
"canShinechargeMovementComplex"
{
"shinespark": {
"frames": 18
}
}
Exit condition: {
"leaveWithSpark": {
"position": "bottom"
}
}
|
|
From: 3
Bottom Right Door
To: 2
Left Door
Use five shots to destroy the seaweed blocks: Buffer the first shot while entering the room. Spin jump for the second shot (landing on the slightly raised platform), firing at an intermediate height in order to destroy two blocks. Fire two shots while standing on the platform. Spin jump for the final shot, and activate the shinespark mid-air. Entrance condition: {
"comeInShinecharged": {
"framesRequired": 100
}
}
Requires: "canShinechargeMovementComplex"
{
"shinespark": {
"frames": 14
}
}
Exit condition: {
"leaveWithSpark": {
"position": "bottom"
}
}
|
|
Entrance condition: {
"comeInWithGrappleTeleport": {
"blockPositions": [
[
2,
28
],
[
2,
29
]
]
}
}
Bypasses door shell: true |
|
From: 3
Bottom Right Door
To: 2
Left Door
Entrance condition: {
"comeInWithGrappleTeleport": {
"blockPositions": [
[
2,
28
]
]
}
}
Exit condition: {
"leaveWithGrappleTeleport": {
"blockPositions": [
[
2,
28
]
]
}
}
Bypasses door shell: true |
|
From: 3
Bottom Right Door
To: 2
Left Door
Entrance condition: {
"comeInWithGrappleTeleport": {
"blockPositions": [
[
2,
29
]
]
}
}
Exit condition: {
"leaveWithGrappleTeleport": {
"blockPositions": [
[
2,
29
]
]
}
}
Bypasses door shell: true |
|
Exit condition: {
"leaveWithRunway": {
"length": 1,
"openEnd": 1
}
}
|
{
"$schema": "../../../schema/m3-room.schema.json",
"id": 233,
"name": "Seaweed Room",
"area": "Tourian",
"subarea": "Main",
"playable": true,
"roomAddress": "0x7DCFF",
"roomEnvironments": [
{
"heated": false
}
],
"nodes": [
{
"id": 1,
"name": "Top Right Doorway",
"nodeType": "door",
"nodeSubType": "doorway",
"nodeAddress": "0x001aa50",
"doorEnvironments": [
{
"physics": "air"
}
]
},
{
"id": 2,
"name": "Left Door",
"nodeType": "door",
"nodeSubType": "blue",
"nodeAddress": "0x001aa68",
"doorEnvironments": [
{
"physics": "air"
}
]
},
{
"id": 3,
"name": "Bottom Right Door",
"nodeType": "door",
"nodeSubType": "red",
"nodeAddress": "0x001aa5c",
"doorEnvironments": [
{
"physics": "air"
}
],
"locks": [
{
"name": "Seaweed Room Red Lock (to Eye Room)",
"lockType": "coloredDoor",
"unlockStrats": [
{
"name": "Base",
"notable": false,
"requires": [
"h_canOpenRedDoors"
]
}
]
}
]
}
],
"enemies": [],
"links": [
{
"from": 1,
"to": [
{
"id": 1
},
{
"id": 2
},
{
"id": 3
}
]
},
{
"from": 2,
"to": [
{
"id": 2
},
{
"id": 3
}
]
},
{
"from": 3,
"to": [
{
"id": 1
},
{
"id": 2
},
{
"id": 3
}
]
}
],
"strats": [
{
"link": [
1,
1
],
"name": "Leave with Runway, Extended Seaweed Runway",
"requires": [],
"exitCondition": {
"leaveWithRunway": {
"length": 9,
"openEnd": 1
}
},
"note": "If coming from below, carefully get up on the left side of the room without breaking the runway blocks."
},
{
"link": [
1,
1
],
"name": "Crystal Flash",
"requires": [
"h_canCrystalFlash"
],
"devNote": "If it is needed to use one of the extended runways, then the Crystal Flash can be performed on the opposite side of the room from the needed runway."
},
{
"link": [
1,
2
],
"name": "Come in Shinecharging, Leave With Spark (Wave)",
"entranceCondition": {
"comeInShinecharging": {
"length": 4,
"openEnd": 0
}
},
"requires": [
"Wave",
"canShinechargeMovementComplex",
{
"shinespark": {
"frames": 5
}
}
],
"exitCondition": {
"leaveWithSpark": {}
},
"unlocksDoors": [
{
"types": [
"ammo"
],
"requires": [
"never"
]
}
],
"note": "Use Wave to clear the seaweed quickly."
},
{
"link": [
1,
2
],
"name": "Grapple Teleport",
"entranceCondition": {
"comeInWithGrappleTeleport": {
"blockPositions": [
[
2,
28
],
[
2,
29
]
]
}
},
"requires": [],
"bypassesDoorShell": true
},
{
"link": [
1,
2
],
"name": "Carry Grapple Teleport (Middle Position)",
"entranceCondition": {
"comeInWithGrappleTeleport": {
"blockPositions": [
[
2,
28
]
]
}
},
"requires": [],
"bypassesDoorShell": true,
"exitCondition": {
"leaveWithGrappleTeleport": {
"blockPositions": [
[
2,
28
]
]
}
}
},
{
"link": [
1,
2
],
"name": "Carry Grapple Teleport (Bottom Position)",
"entranceCondition": {
"comeInWithGrappleTeleport": {
"blockPositions": [
[
2,
29
]
]
}
},
"requires": [],
"bypassesDoorShell": true,
"exitCondition": {
"leaveWithGrappleTeleport": {
"blockPositions": [
[
2,
29
]
]
}
}
},
{
"link": [
1,
3
],
"name": "Base",
"requires": []
},
{
"link": [
1,
3
],
"name": "Come in Shinecharging, Leave Shinecharged (Wave or Spazer)",
"entranceCondition": {
"comeInShinecharging": {
"length": 4,
"openEnd": 0
}
},
"requires": [
{
  "or": [
    {
      "and": [
        "Wave",
        "canShinechargeMovementComplex"
      ]
    },
    {
      "and": [
        "Spazer",
        "canShinechargeMovementTricky"
      ]
    }
  ]
}
],
"exitCondition": {
"leaveShinecharged": {
"framesRemaining": 40
}
},
"unlocksDoors": [
{
"types": [
"ammo"
],
"requires": [
"never"
]
}
],
"note": "Use Wave or Spazer to clear the seaweed quickly."
},
{
"link": [
1,
3
],
"name": "Come in Shinecharging, Leave Shinecharged (Missiles)",
"entranceCondition": {
"comeInShinecharging": {
"length": 4,
"openEnd": 0
}
},
"requires": [
"canShinechargeMovementTricky",
{
"ammo": {
"type": "Missile",
"count": 7
}
}
],
"exitCondition": {
"leaveShinecharged": {
"framesRemaining": 30
}
},
"unlocksDoors": [
{
"types": [
"ammo"
],
"requires": [
"never"
]
}
],
"note": "Use Missiles to clear the seaweed quickly.",
"devNote": "It may be possible to use fewer Missiles by switching weapons."
},
{
"link": [
1,
3
],
"name": "Come in Shinecharging, Leave With Spark",
"entranceCondition": {
"comeInShinecharging": {
"length": 4,
"openEnd": 0
}
},
"requires": [
"canShinechargeMovementTricky",
{
"shinespark": {
"frames": 2
}
}
],
"exitCondition": {
"leaveWithSpark": {}
},
"unlocksDoors": [
{
"types": [
"ammo"
],
"requires": [
"never"
]
}
],
"note": "Clear the seaweed one block at a time, with just barely enough time remaining to spark out the door."
},
{
"link": [
1,
3
],
"name": "Carry Shinecharge (Wave)",
"entranceCondition": {
"comeInShinecharged": {
"framesRequired": 135
}
},
"requires": [
"Wave",
"canShinechargeMovementComplex"
],
"exitCondition": {
"leaveShinecharged": {
"framesRemaining": "auto"
}
},
"unlocksDoors": [
{
"types": [
"ammo"
],
"requires": [
"never"
]
}
],
"note": "Use Wave to clear the seaweed quickly."
},
{
"link": [
1,
3
],
"name": "Come in Shinecharged, Leave with Spark (Wave)",
"entranceCondition": {
"comeInShinecharged": {
"framesRequired": 125
}
},
"requires": [
"Wave",
"canShinechargeMovementComplex",
{
"shinespark": {
"frames": 2
}
}
],
"exitCondition": {
"leaveWithSpark": {}
},
"unlocksDoors": [
{
"types": [
"ammo"
],
"requires": [
"never"
]
}
],
"note": "Use Wave to clear the seaweed quickly."
},
{
"link": [
2,
2
],
"name": "Leave with Runway, Extended Seaweed Runway",
"requires": [],
"exitCondition": {
"leaveWithRunway": {
"length": 5,
"openEnd": 1
}
}
},
{
"link": [
2,
3
],
"name": "Base",
"requires": []
},
{
"link": [
2,
3
],
"name": "Come in Shinecharging, Leave Shinecharged (Wave)",
"entranceCondition": {
"comeInShinecharging": {
"length": 2,
"openEnd": 0
}
},
"requires": [
"canShinechargeMovementTricky"
],
"exitCondition": {
"leaveShinecharged": {
"framesRemaining": 80
}
},
"unlocksDoors": [
{
"types": [
"ammo"
],
"requires": [
"never"
]
}
],
"note": [
"Gain a shinecharge while entering the room.",
"Hold run and forward to stand up and press against the seaweed.",
"Then fire a Wave shot to clear the seaweed and open the door, and run and jump across the room.",
"If you fire the Wave shot too early (while having forward momentum), it will shoot too high and not break the blocks at Samus' knees."
]
},
{
"link": [
2,
3
],
"name": "Come in Shinecharging, Leave with Spark",
"entranceCondition": {
"comeInShinecharging": {
"length": 2,
"openEnd": 0
}
},
"requires": [
"canShinechargeMovementTricky",
{
"shinespark": {
"frames": 5
}
}
],
"exitCondition": {
"leaveWithSpark": {
"position": "bottom"
}
},
"unlocksDoors": [
{
"types": [
"ammo"
],
"requires": [
"never"
]
}
],
"note": [
"Gain a shinecharge while entering the room.",
"Angle down to shoot the first seaweed block at the level of Samus' knees.",
"Take four tiny steps forward, firing a shot with forward momentum on each step, destroying the seaweed at the level of Samus' head, with the last shot continuing on to open the door.",
"Do one more angle down shot to destroy the last seaweed block at Samus' knees.",
"To minimize energy usage, jump across the room before shinesparking through the door."
]
},
{
"link": [
2,
3
],
"name": "Carry Shinecharge (Wave)",
"entranceCondition": {
"comeInShinecharged": {
"framesRequired": 100
}
},
"requires": [
"Wave",
"canShinechargeMovementComplex"
],
"exitCondition": {
"leaveShinecharged": {
"framesRemaining": "auto"
}
},
"unlocksDoors": [
{
"types": [
"ammo"
],
"requires": [
"never"
]
}
],
"note": "Use Wave to clear the seaweed quickly."
},
{
"link": [
2,
3
],
"name": "Come in Shinecharged, Leave with Spark",
"entranceCondition": {
"comeInShinecharged": {
"framesRequired": 110
}
},
"requires": [
"canShinechargeMovementTricky",
{
"shinespark": {
"frames": 18
}
}
],
"exitCondition": {
"leaveWithSpark": {
"position": "bottom"
}
},
"unlocksDoors": [
{
"types": [
"ammo"
],
"requires": [
"never"
]
}
],
"note": [
"Angle down to shoot the first seaweed block at the level of Samus' knees.",
"Take four tiny steps forward, firing a shot with forward momentum on each step, destroying the seaweed at the level of Samus' head, with the last shot continuing on to open the door.",
"Do one more angle down shot to destroy the last seaweed block at Samus' knees.",
"Then shinespark through the door."
]
},
{
"link": [
3,
1
],
"name": "Base",
"requires": []
},
{
"link": [
3,
1
],
"name": "Carry Shinecharge (HiJump Wall Jump)",
"entranceCondition": {
"comeInShinecharged": {
"framesRequired": 120
}
},
"requires": [
"HiJump",
"canWalljump",
"canShinechargeMovementComplex"
],
"exitCondition": {
"leaveShinecharged": {
"framesRemaining": "auto"
}
}
},
{
"link": [
3,
1
],
"name": "Carry Shinecharge (HiJump)",
"entranceCondition": {
"comeInShinecharged": {
"framesRequired": 125
}
},
"requires": [
"HiJump",
"canShinechargeMovementComplex"
],
"exitCondition": {
"leaveShinecharged": {
"framesRemaining": "auto"
}
}
},
{
"link": [
3,
1
],
"name": "Come In Shinecharged, Leave With Spark (HiJump Wall Jump)",
"entranceCondition": {
"comeInShinecharged": {
"framesRequired": 100
}
},
"requires": [
"HiJump",
"canWalljump",
"canShinechargeMovementComplex",
{
"shinespark": {
"frames": 5
}
}
],
"exitCondition": {
"leaveWithSpark": {}
}
},
{
"link": [
3,
1
],
"name": "Come In Shinecharged, Leave With Spark (Wall Jump)",
"entranceCondition": {
"comeInShinecharged": {
"framesRequired": 130
}
},
"requires": [
"canWalljump",
"canShinechargeMovementComplex",
{
"shinespark": {
"frames": 4
}
}
],
"exitCondition": {
"leaveWithSpark": {}
}
},
{
"link": [
3,
2
],
"name": "Base",
"requires": []
},
{
"link": [
3,
2
],
"name": "Carry Shinecharge (Wave)",
"entranceCondition": {
"comeInShinecharged": {
"framesRequired": 100
}
},
"requires": [
"Wave",
"canShinechargeMovementComplex"
],
"exitCondition": {
"leaveShinecharged": {
"framesRemaining": "auto"
}
},
"unlocksDoors": [
{
"types": [
"super"
],
"requires": []
},
{
"types": [
"missiles",
"powerbomb"
],
"requires": [
"never"
]
}
],
"note": "Use single well-timed Wave shot to clear the seaweed quickly."
},
{
"link": [
3,
2
],
"name": "Come in Shinecharged, Leave with Spark (Wave)",
"entranceCondition": {
"comeInShinecharged": {
"framesRequired": 30
}
},
"requires": [
"Wave",
"canShinechargeMovementComplex",
{
"shinespark": {
"frames": 18
}
}
],
"exitCondition": {
"leaveWithSpark": {
"position": "bottom"
}
},
"unlocksDoors": [
{
"types": [
"ammo"
],
"requires": [
"never"
]
}
],
"note": [
"Use single well-timed Wave shot to clear the seaweed quickly."
]
},
{
"link": [
3,
2
],
"name": "Come in Shinecharged, Leave with Spark",
"entranceCondition": {
"comeInShinecharged": {
"framesRequired": 100
}
},
"requires": [
"canShinechargeMovementComplex",
{
"shinespark": {
"frames": 14
}
}
],
"exitCondition": {
"leaveWithSpark": {
"position": "bottom"
}
},
"unlocksDoors": [
{
"types": [
"ammo"
],
"requires": [
"never"
]
}
],
"note": [
"Use five shots to destroy the seaweed blocks:",
"Buffer the first shot while entering the room.",
"Spin jump for the second shot (landing on the slightly raised platform), firing at an intermediate height in order to destroy two blocks.",
"Fire two shots while standing on the platform.",
"Spin jump for the final shot, and activate the shinespark mid-air."
]
},
{
"link": [
3,
2
],
"name": "Grapple Teleport",
"entranceCondition": {
"comeInWithGrappleTeleport": {
"blockPositions": [
[
2,
28
],
[
2,
29
]
]
}
},
"requires": [],
"bypassesDoorShell": true
},
{
"link": [
3,
2
],
"name": "Carry Grapple Teleport (Middle Position)",
"entranceCondition": {
"comeInWithGrappleTeleport": {
"blockPositions": [
[
2,
28
]
]
}
},
"requires": [],
"bypassesDoorShell": true,
"exitCondition": {
"leaveWithGrappleTeleport": {
"blockPositions": [
[
2,
28
]
]
}
}
},
{
"link": [
3,
2
],
"name": "Carry Grapple Teleport (Bottom Position)",
"entranceCondition": {
"comeInWithGrappleTeleport": {
"blockPositions": [
[
2,
29
]
]
}
},
"requires": [],
"bypassesDoorShell": true,
"exitCondition": {
"leaveWithGrappleTeleport": {
"blockPositions": [
[
2,
29
]
]
}
}
},
{
"link": [
3,
3
],
"name": "Leave with Runway",
"requires": [],
"exitCondition": {
"leaveWithRunway": {
"length": 1,
"openEnd": 1
}
}
}
]
}