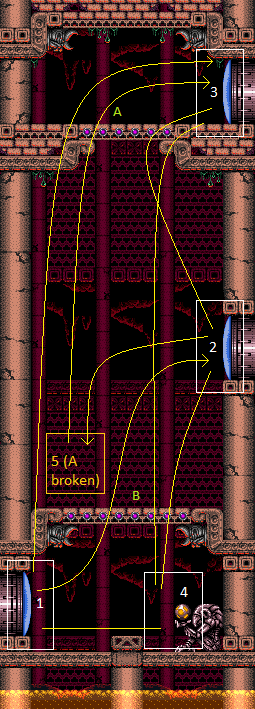
Screw Attack Room
Room ID: 151
|
Exit condition: {
"leaveWithRunway": {
"length": 1,
"openEnd": 1
}
}
|
|
Requires: {
"obstaclesNotCleared": [
"C"
]
}
{
"heatFrames": 10
}
"h_canHeatedCrystalFlash"
{
"heatFrames": 10
}
Clears obstacles: B |
|
Entrance condition: {
"comeInShinecharged": {
"framesRequired": 25
}
}
Requires: "h_canNavigateHeatRooms"
{
"heatFrames": 200
}
{
"shinespark": {
"frames": 31,
"excessFrames": 10
}
}
Clears obstacles: B |
|
From: 1
Bottom Left Door
To: 2
Middle Right Door
Climb up half a screen. Entrance condition: {
"comeInWithDoorStuckSetup": {}
}
Requires: "canXRayClimb"
{
"heatFrames": 1000
}
|
|
Entrance condition: {
"comeInShinecharged": {
"framesRequired": 50
}
}
Requires: "h_canNavigateHeatRooms"
{
"heatFrames": 250
}
{
"shinespark": {
"frames": 41,
"excessFrames": 4
}
}
Clears obstacles: A, B |
|
From: 1
Bottom Left Door
To: 3
Top Right Door
Climb up 2 screens. Entrance condition: {
"comeInWithDoorStuckSetup": {}
}
Requires: "canXRayClimb"
{
"heatFrames": 2800
}
|
|
Entrance condition: {
"comeInWithGrappleTeleport": {
"blockPositions": [
[
12,
12
],
[
12,
13
]
]
}
}
Bypasses door shell: true |
|
From: 1
Bottom Left Door
To: 3
Top Right Door
Entrance condition: {
"comeInWithGrappleTeleport": {
"blockPositions": [
[
12,
12
]
]
}
}
Exit condition: {
"leaveWithGrappleTeleport": {
"blockPositions": [
[
12,
12
]
]
}
}
Bypasses door shell: true |
|
From: 1
Bottom Left Door
To: 3
Top Right Door
Entrance condition: {
"comeInWithGrappleTeleport": {
"blockPositions": [
[
12,
13
]
]
}
}
Exit condition: {
"leaveWithGrappleTeleport": {
"blockPositions": [
[
12,
13
]
]
}
}
Bypasses door shell: true |
|
Requires: "h_canNavigateHeatRooms"
{
"heatFrames": 60
}
|
|
Entrance condition: {
"comeInWithGrappleTeleport": {
"blockPositions": [
[
2,
34
]
]
}
}
Bypasses door shell: true |
|
Entrance condition: {
"comeInWithGrappleTeleport": {
"blockPositions": [
[
2,
34
]
]
}
}
Exit condition: {
"leaveWithGrappleTeleport": {
"blockPositions": [
[
2,
34
]
]
}
}
Bypasses door shell: true |
|
Exit condition: {
"leaveWithRunway": {
"length": 1,
"openEnd": 1
}
}
|
|
Requires: "canPrepareForNextRoom"
{
"heatFrames": 40
}
"h_canHeatedCrystalFlash"
Clears obstacles: B |
|
Requires: "h_canNavigateHeatRooms"
"SpaceJump"
"ScrewAttack"
{
"heatFrames": 400
}
Clears obstacles: A |
|
From: 2
Middle Right Door
To: 3
Top Right Door
Notable: true Run through the doorway with enough momentum to break the bomb blocks with Screw. Entrance condition: {
"comeInRunning": {
"minTiles": 6,
"speedBooster": true
}
}
Requires: "h_canNavigateHeatRooms"
"ScrewAttack"
"HiJump"
{
"heatFrames": 150
}
Clears obstacles: A |
|
From: 2
Middle Right Door
To: 3
Top Right Door
Notable: true Run through the doorway with enough momentum to break the bomb blocks with Screw. Entrance condition: {
"comeInRunning": {
"minTiles": 2,
"speedBooster": true
}
}
Requires: "h_canNavigateHeatRooms"
"ScrewAttack"
"HiJump"
"canTrickyDashJump"
{
"heatFrames": 150
}
Clears obstacles: A |
|
Entrance condition: {
"comeInShinecharged": {
"framesRequired": 50
}
}
Requires: "h_canNavigateHeatRooms"
{
"heatFrames": 250
}
{
"shinespark": {
"frames": 35,
"excessFrames": 4
}
}
Clears obstacles: A |
|
From: 2
Middle Right Door
To: 3
Top Right Door
Jump into Screw Attack Room and spark diagonally once above the center of the door vertically. Or diagonally spark anywhere that is not the bottom of the door in the previous room. Entrance condition: {
"comeInShinecharged": {
"framesRequired": 15
}
}
Requires: "h_canNavigateHeatRooms"
"canMidairShinespark"
"canShinechargeMovement"
"canPrepareForNextRoom"
{
"heatFrames": 250
}
{
"shinespark": {
"frames": 18,
"excessFrames": 4
}
}
Clears obstacles: A |
|
Climb up 1 screen. Entrance condition: {
"comeInWithDoorStuckSetup": {}
}
Requires: "canXRayClimb"
{
"heatFrames": 1600
}
|
|
From: 2
Middle Right Door
To: 3
Top Right Door
Enter with G-mode direct, back up to between 1 and 6 pixels from the door transition, and activate X-ray to get very deep stuck in the door. Climb up 1 screen, and perform a turnaround buffered spin-jump away from the door to trigger the transition, bypassing any lock on the door. Entrance condition: {
"comeInWithGMode": {
"mode": "direct",
"morphed": false
}
}
Requires: "h_heatProof"
{
"or": [
"canWalljump",
"h_canCrouchJumpDownGrab",
"HiJump",
"h_canFly",
"canArtificialMorph"
]
}
"canXRayClimb"
Bypasses door shell: true |
|
Entrance condition: {
"comeInWithGrappleTeleport": {
"blockPositions": [
[
5,
3
],
[
7,
2
]
]
}
}
Requires: {
"heatFrames": 65
}
|
|
From: 2
Middle Right Door
To: 3
Top Right Door
Notable: true After teleporting, Samus should be standing inside the wall. Retract Grapple by pressing up, which will pull Samus down and right. Hold right, and release Grapple while still holding right. Perform a turn-around spin jump (to the left). Then morph and roll out to the right. Entrance condition: {
"comeInWithGrappleTeleport": {
"blockPositions": [
[
3,
12
]
]
}
}
Requires: "canOffScreenMovement"
"Morph"
{
"heatFrames": 200
}
|
|
Requires: "h_canNavigateHeatRooms"
{
"heatFrames": 90
}
{
"or": [
{
"obstaclesCleared": [
"B"
]
},
{
"and": [
"ScrewAttack",
{
"or": [
"canPrepareForNextRoom",
{
"heatFrames": 30
}
]
}
]
}
]
}
Clears obstacles: B |
|
Requires: "h_canNavigateHeatRooms"
"h_canUsePowerBombs"
{
"heatFrames": 190
}
Clears obstacles: B |
|
Requires: "h_canNavigateHeatRooms"
"h_canUseMorphBombs"
{
"heatFrames": 180
}
Clears obstacles: B |
|
This expects the more controlled Temporary Blue to fall though the blocks, not storing a shinecharge through the door. Entrance condition: {
"comeInShinecharging": {
"length": 0,
"openEnd": 1
}
}
Requires: "canTemporaryBlue"
"canPrepareForNextRoom"
{
"heatFrames": 75
}
Clears obstacles: B |
|
Screw Attack Room Temporary Blue Descent and Shinespark Escape Middle Door Part 1 (Expert)
Screw Attack Room
From: 2
Middle Right Door
To: 4
Item
Notable: true 
Store the shinecharge while hitting the door transition to maintain the ability to break blocks. Entrance condition: {
"comeInShinecharging": {
"length": 0,
"openEnd": 1
}
}
Requires: "canTemporaryBlue"
"canPrepareForNextRoom"
{
"heatFrames": 75
}
Clears obstacles: B, C |
|
From: 2
Middle Right Door
To: 4
Item
Notable: true
Enter with a shinespark stored and screw attack down to the item. Entrance condition: {
"comeInShinecharged": {
"framesRequired": 125
}
}
Requires: "ScrewAttack"
"canShinechargeMovement"
{
"heatFrames": 120
}
Clears obstacles: B, C |
|
From: 2
Middle Right Door
To: 5
Junction Above Bottom Blocks with Top Blocks Broken
Requires: {
"obstaclesCleared": [
"A"
]
}
|
|
From: 2
Middle Right Door
To: 5
Junction Above Bottom Blocks with Top Blocks Broken
Requires: "h_canNavigateHeatRooms"
"h_canUsePowerBombs"
{
"heatFrames": 200
}
Clears obstacles: A |
|
From: 2
Middle Right Door
To: 5
Junction Above Bottom Blocks with Top Blocks Broken
Expects that you fall down afterwards. Requires: "h_canNavigateHeatRooms"
"h_canIBJ"
{
"heatFrames": 1200
}
Clears obstacles: A |
|
From: 2
Middle Right Door
To: 5
Junction Above Bottom Blocks with Top Blocks Broken
Requires: "h_canNavigateHeatRooms"
"h_canUseMorphBombs"
"SpaceJump"
{
"heatFrames": 300
}
Clears obstacles: A |
|
From: 2
Middle Right Door
To: 5
Junction Above Bottom Blocks with Top Blocks Broken
Use a Springwall to get up to the bomb blocks, to break them with a bomb. Requires: "h_canNavigateHeatRooms"
"h_canUseMorphBombs"
"canSpringwall"
"canTrickySpringBallJump"
{
"heatFrames": 300
}
Clears obstacles: A |
|
From: 2
Middle Right Door
To: 5
Junction Above Bottom Blocks with Top Blocks Broken
Notable: true Run in the adjacent room and jump through the door, to place a Bomb to break the obstacle. Entrance condition: {
"comeInJumping": {
"minTiles": 6,
"speedBooster": true
}
}
Requires: "h_canNavigateHeatRooms"
"HiJump"
"h_canUseMorphBombs"
{
"heatFrames": 200
}
Clears obstacles: A |
|
From: 2
Middle Right Door
To: 5
Junction Above Bottom Blocks with Top Blocks Broken
Notable: true Run in the adjacent room and jump through the door, to place a Bomb to break the obstacle. Entrance condition: {
"comeInJumping": {
"minTiles": 2,
"speedBooster": true
}
}
Requires: "h_canNavigateHeatRooms"
"HiJump"
"canTrickyDashJump"
"h_canUseMorphBombs"
{
"heatFrames": 200
}
Clears obstacles: A |
|
Entrance condition: {
"comeInWithGrappleTeleport": {
"blockPositions": [
[
2,
34
]
]
}
}
Bypasses door shell: true |
|
Entrance condition: {
"comeInWithGrappleTeleport": {
"blockPositions": [
[
2,
34
]
]
}
}
Exit condition: {
"leaveWithGrappleTeleport": {
"blockPositions": [
[
2,
34
]
]
}
}
Bypasses door shell: true |
|
Requires: "h_canNavigateHeatRooms"
{
"heatFrames": 200
}
{
"or": [
"ScrewAttack",
{
"obstaclesCleared": [
"A"
]
}
]
}
Clears obstacles: A |
|
Requires: "h_canNavigateHeatRooms"
"h_canUsePowerBombs"
{
"heatFrames": 300
}
Clears obstacles: A |
|
Requires: "h_canNavigateHeatRooms"
"h_canUseMorphBombs"
{
"heatFrames": 300
}
Clears obstacles: A |
|
Entrance condition: {
"comeInShinecharging": {
"length": 8,
"openEnd": 0
}
}
Requires: {
"heatFrames": 200
}
Clears obstacles: A |
|
From: 3
Top Right Door
To: 2
Middle Right Door
After teleporting, as Samus swings to the right, begin holding down to extend Grapple just as Samus is slightly right of vertical. Samus should swing back left and get stuck on the floor one tile to the right of the Grapple attachment point. Release Grapple and Samus will clip through the floor. Entrance condition: {
"comeInWithGrappleTeleport": {
"blockPositions": [
[
5,
3
]
]
}
}
Requires: {
"heatFrames": 250
}
{
"or": [
"canWalljump",
"h_canCrouchJumpDownGrab"
]
}
|
|
Moonfall to clip through the Bomb blocks Break spin with Shot or Angle Aim to avoid clipping all the way to the bottom of the room. Entrance condition: {
"comeInWithStoredFallSpeed": {
"fallSpeedInTiles": 1
}
}
Requires: "canPrepareForNextRoom"
"canMoonfall"
{
"or": [
"canWalljump",
"h_canCrouchJumpDownGrab"
]
}
{
"heatFrames": 170
}
|
|
From: 3
Top Right Door
To: 3
Top Right Door
Requires: {
"obstaclesCleared": [
"A"
]
}
Exit condition: {
"leaveWithRunway": {
"length": 4,
"openEnd": 1
}
}
|
|
From: 3
Top Right Door
To: 3
Top Right Door
Requires: {
"obstaclesNotCleared": [
"A"
]
}
Exit condition: {
"leaveWithRunway": {
"length": 13,
"openEnd": 1
}
}
|
|
Requires: "h_canHeatedCrystalFlash" Clears obstacles: A |
|
This expects the more controlled Temporary Blue to fall though the blocks, not storing a shinecharge on the first breakable block. Entrance condition: {
"comeInShinecharging": {
"length": 12,
"openEnd": 0
}
}
Requires: "canTemporaryBlue"
"canXRayTurnaround"
{
"heatFrames": 285
}
Clears obstacles: A, B |
|
This expects the more controlled Temporary Blue to fall though the blocks, not storing a shinecharge on the first breakable block. Entrance condition: {
"comeInShinecharging": {
"length": 3,
"openEnd": 0
}
}
Requires: "canTemporaryBlue"
{
"heatFrames": 240
}
Clears obstacles: A, B |
|
Screw Attack Room Temporary Blue Descent and Shinespark Escape Top Door Part 1 (Expert)
Screw Attack Room
From: 3
Top Right Door
To: 4
Item
Notable: true
Simultaneously store a shinespark and break through the bomb blocks down to the Screw Attack item location. Entrance condition: {
"comeInShinecharging": {
"length": 3,
"openEnd": 1
}
}
Requires: "canTemporaryBlue"
"canShinechargeMovementTricky"
{
"heatFrames": 130
}
Clears obstacles: A, B, C |
|
From: 3
Top Right Door
To: 4
Item
Notable: true
Store a shinespark then use screw to break through the bomb blocks down to the Screw Attack item location. Entrance condition: {
"comeInShinecharging": {
"length": 12,
"openEnd": 0
}
}
Requires: "ScrewAttack"
"canShinechargeMovement"
{
"heatFrames": 170
}
Clears obstacles: A, B, C |
|
Moonfall to clip through the Bomb blocks to the bottom of the room. Entrance condition: {
"comeInWithStoredFallSpeed": {
"fallSpeedInTiles": 1
}
}
Requires: "canPrepareForNextRoom"
"canMoonfall"
{
"heatFrames": 85
}
|
|
Requires: "h_canNavigateHeatRooms"
{
"heatFrames": 60
}
|
|
Requires: "h_canNavigateHeatRooms"
{
"heatFrames": 200
}
{
"obstaclesCleared": [
"B"
]
}
|
|
Requires: "h_canNavigateHeatRooms"
"ScrewAttack"
{
"heatFrames": 200
}
Clears obstacles: B |
|
Requires: "h_canNavigateHeatRooms"
"h_canUsePowerBombs"
{
"heatFrames": 300
}
Clears obstacles: B |
|
Requires: "h_canNavigateHeatRooms"
"h_canUseMorphBombs"
{
"heatFrames": 300
}
Clears obstacles: B |
|
From: 4
Item
To: 2
Middle Right Door
Notable: true
Diagonally shinespark towards the middle door. Requires: "canShinechargeMovement"
{
"obstaclesCleared": [
"C"
]
}
{
"canShineCharge": {
"usedTiles": 33,
"openEnd": 2
}
}
{
"heatFrames": 240
}
{
"shinespark": {
"frames": 31,
"excessFrames": 10
}
}
Clears obstacles: B |
|
From: 4
Item
To: 3
Top Right Door
Notable: true
Carry a shinecharge down though the bomb blocks and shinespark back up. Requires: "canShinechargeMovement"
{
"obstaclesCleared": [
"C"
]
}
{
"canShineCharge": {
"usedTiles": 33,
"openEnd": 2
}
}
{
"heatFrames": 270
}
{
"shinespark": {
"frames": 41,
"excessFrames": 4
}
}
Clears obstacles: A, B |
|
Requires: {
"obstaclesNotCleared": [
"C"
]
}
"h_canHeatedCrystalFlash"
Clears obstacles: B |
|
From: 5
Junction Above Bottom Blocks with Top Blocks Broken
To: 3
Top Right Door
Requires: "h_canNavigateHeatRooms"
"h_canIBJ"
{
"heatFrames": 1300
}
|
|
From: 5
Junction Above Bottom Blocks with Top Blocks Broken
To: 3
Top Right Door
Requires: "h_canNavigateHeatRooms"
"SpaceJump"
{
"heatFrames": 400
}
|
|
From: 5
Junction Above Bottom Blocks with Top Blocks Broken
To: 3
Top Right Door
Requires: "h_canNavigateHeatRooms"
"canSpringwall"
{
"heatFrames": 400
}
|
|
From: 5
Junction Above Bottom Blocks with Top Blocks Broken
To: 3
Top Right Door
Position yourself in the door way, then run and jump. Makes it possible to walljump up. Requires: "HiJump"
"SpeedBooster"
"canWalljump"
"canCarefulJump"
{
"doorUnlockedAtNode": 2
}
{
"heatFrames": 240
}
|
|
From: 5
Junction Above Bottom Blocks with Top Blocks Broken
To: 3
Top Right Door
Requires: "HiJump"
{
"doorUnlockedAtNode": 2
}
"canTrickySpringBallJump"
{
"heatFrames": 200
}
|
|
From: 5
Junction Above Bottom Blocks with Top Blocks Broken
To: 3
Top Right Door
Notable: true 
Position yourself in the door way a few pixels from the edge. Dashing stationary spinjump into a delayed CWJ and hopefully catch the upper ledge with a walljump. Requires: "h_heatProof"
"HiJump"
"canCWJ"
"canStationarySpinJump"
"canInsaneJump"
"canInsaneWalljump"
{
"doorUnlockedAtNode": 2
}
|
{
"$schema": "../../../schema/m3-room.schema.json",
"id": 151,
"name": "Screw Attack Room",
"area": "Norfair",
"subarea": "Lower",
"subsubarea": "West",
"playable": true,
"roomAddress": "0x7B6C1",
"roomEnvironments": [
{
"heated": true
}
],
"nodes": [
{
"id": 1,
"name": "Bottom Left Door",
"nodeType": "door",
"nodeSubType": "blue",
"nodeAddress": "0x0019a86",
"doorEnvironments": [
{
"physics": "air"
}
]
},
{
"id": 2,
"name": "Middle Right Door",
"nodeType": "door",
"nodeSubType": "blue",
"nodeAddress": "0x0019a7a",
"doorEnvironments": [
{
"physics": "air"
}
]
},
{
"id": 3,
"name": "Top Right Door",
"nodeType": "door",
"nodeSubType": "blue",
"nodeAddress": "0x0019a6e",
"doorEnvironments": [
{
"physics": "air"
}
]
},
{
"id": 4,
"name": "Item",
"nodeType": "item",
"nodeSubType": "chozo",
"nodeItem": "ScrewAttack",
"nodeAddress": "0x79110"
},
{
"id": 5,
"name": "Junction Above Bottom Blocks with Top Blocks Broken",
"nodeType": "junction",
"nodeSubType": "junction",
"note": "This exists because many strats for going up are somehwat independant from the strat for breaking the bomb blocks."
}
],
"obstacles": [
{
"id": "A",
"name": "Top Bomb Blocks",
"obstacleType": "inanimate"
},
{
"id": "B",
"name": "Bottom Bomb Blocks",
"obstacleType": "inanimate"
},
{
"id": "C",
"name": "Shinecharge from Above",
"obstacleType": "abstract"
}
],
"reusableRoomwideNotable": [
{
"name": "Screw Attack Room Descent and Shinespark Escape",
"note": [
"Store a shinespark and break the Screw Attack Room bomb blocks from above in order to collect the item and shinespark out.",
"Screw Attack is easier to excute but has fewer shinespark frames to work with.",
"Using Temporary Blue is difficult to initiate but moves through the room quickly."
]
},
{
"name": "Screw Attack Room Transition Screwjump",
"note": "Run through the doorway with enough momentum to break the bomb blocks with Screw."
},
{
"name": "Screw Attack Room Transition Speedjump with Bombs",
"note": "Run in the adjacent room and jump through the door, to place a Bomb to break the obstacle."
}
],
"enemies": [],
"links": [
{
"from": 1,
"to": [
{
"id": 1
},
{
"id": 2,
"note": "Shinespark and XRayClimb have a direct link. Other strats should go 1 -> 4 -> 2."
},
{
"id": 3,
"note": "Shinespark and XRayClimb have a direct link. Other strats should go 1 -> 4 -> 2 -> 3."
},
{
"id": 4
}
]
},
{
"from": 2,
"to": [
{
"id": 1
},
{
"id": 2
},
{
"id": 3
},
{
"id": 4
},
{
"id": 5,
"note": "The heat frames for these strats assumes you've already fallen from the door, because the cost is already baked into the subsequent 5-> 3 heat costs when relevant."
}
]
},
{
"from": 3,
"to": [
{
"id": 1
},
{
"id": 2
},
{
"id": 3
},
{
"id": 4
}
]
},
{
"from": 4,
"to": [
{
"id": 1
},
{
"id": 2
},
{
"id": 3
},
{
"id": 4
}
]
},
{
"from": 5,
"to": [
{
"id": 3,
"note": "Some of these strats expect that you to start from the platform below the door, while others are from the doorsill.",
"devNote": "Because getting to this node always requires breaking A, the strats here don't bother re-checking whether it's broken"
}
]
}
],
"strats": [
{
"link": [
1,
1
],
"name": "Leave With Runway",
"requires": [],
"exitCondition": {
"leaveWithRunway": {
"length": 1,
"openEnd": 1
}
}
},
{
"link": [
1,
1
],
"name": "Crystal Flash",
"requires": [
{
"obstaclesNotCleared": [
"C"
]
},
{
"heatFrames": 10
},
"h_canHeatedCrystalFlash",
{
"heatFrames": 10
}
],
"clearsObstacles": [
"B"
]
},
{
"link": [
1,
2
],
"name": "Shinespark",
"entranceCondition": {
"comeInShinecharged": {
"framesRequired": 25
}
},
"requires": [
"h_canNavigateHeatRooms",
{
"heatFrames": 200
},
{
"shinespark": {
"frames": 31,
"excessFrames": 10
}
}
],
"clearsObstacles": [
"B"
]
},
{
"link": [
1,
2
],
"name": "Screw Attack Room Left-Side X-Ray Climb (to Middle Door)",
"entranceCondition": {
"comeInWithDoorStuckSetup": {}
},
"requires": [
"canXRayClimb",
{
"heatFrames": 1000
}
],
"note": "Climb up half a screen.",
"devNote": "Heat frames split into the actual climb and the setup in the adjacent room."
},
{
"link": [
1,
3
],
"name": "Shinespark",
"entranceCondition": {
"comeInShinecharged": {
"framesRequired": 50
}
},
"requires": [
"h_canNavigateHeatRooms",
{
"heatFrames": 250
},
{
"shinespark": {
"frames": 41,
"excessFrames": 4
}
}
],
"clearsObstacles": [
"A",
"B"
]
},
{
"link": [
1,
3
],
"name": "Screw Attack Room Left-Side X-Ray Climb (to Top Door)",
"entranceCondition": {
"comeInWithDoorStuckSetup": {}
},
"requires": [
"canXRayClimb",
{
"heatFrames": 2800
}
],
"note": "Climb up 2 screens.",
"devNote": "Heat frames split into the actual climb and the setup in the adjacent room."
},
{
"link": [
1,
3
],
"name": "Grapple Teleport",
"entranceCondition": {
"comeInWithGrappleTeleport": {
"blockPositions": [
[
12,
12
],
[
12,
13
]
]
}
},
"requires": [],
"bypassesDoorShell": true
},
{
"link": [
1,
3
],
"name": "Carry Grapple Teleport (Top Position)",
"entranceCondition": {
"comeInWithGrappleTeleport": {
"blockPositions": [
[
12,
12
]
]
}
},
"requires": [],
"bypassesDoorShell": true,
"exitCondition": {
"leaveWithGrappleTeleport": {
"blockPositions": [
[
12,
12
]
]
}
}
},
{
"link": [
1,
3
],
"name": "Carry Grapple Teleport (Bottom Position)",
"entranceCondition": {
"comeInWithGrappleTeleport": {
"blockPositions": [
[
12,
13
]
]
}
},
"requires": [],
"bypassesDoorShell": true,
"exitCondition": {
"leaveWithGrappleTeleport": {
"blockPositions": [
[
12,
13
]
]
}
}
},
{
"link": [
1,
4
],
"name": "Base",
"requires": [
"h_canNavigateHeatRooms",
{
"heatFrames": 60
}
]
},
{
"link": [
2,
1
],
"name": "Grapple Teleport",
"entranceCondition": {
"comeInWithGrappleTeleport": {
"blockPositions": [
[
2,
34
]
]
}
},
"requires": [],
"bypassesDoorShell": true
},
{
"link": [
2,
1
],
"name": "Carry Grapple Teleport",
"entranceCondition": {
"comeInWithGrappleTeleport": {
"blockPositions": [
[
2,
34
]
]
}
},
"requires": [],
"bypassesDoorShell": true,
"exitCondition": {
"leaveWithGrappleTeleport": {
"blockPositions": [
[
2,
34
]
]
}
}
},
{
"link": [
2,
2
],
"name": "Leave With Runway",
"requires": [],
"exitCondition": {
"leaveWithRunway": {
"length": 1,
"openEnd": 1
}
}
},
{
"link": [
2,
2
],
"name": "Crystal Flash",
"requires": [
"canPrepareForNextRoom",
{
"heatFrames": 40
},
"h_canHeatedCrystalFlash"
],
"clearsObstacles": [
"B"
],
"devNote": [
"The extra requirements are in case this is used after coming through the door.",
"FIXME: This could be refined slightly by using a spawnAt."
]
},
{
"link": [
2,
3
],
"name": "Space Screw",
"requires": [
"h_canNavigateHeatRooms",
"SpaceJump",
"ScrewAttack",
{
"heatFrames": 400
}
],
"clearsObstacles": [
"A"
]
},
{
"link": [
2,
3
],
"name": "Screw Attack Room Transition Screwjump",
"notable": true,
"reusableRoomwideNotable": "Screw Attack Room Transition Screwjump",
"entranceCondition": {
"comeInRunning": {
"minTiles": 6,
"speedBooster": true
}
},
"requires": [
"h_canNavigateHeatRooms",
"ScrewAttack",
"HiJump",
{
"heatFrames": 150
}
],
"clearsObstacles": [
"A"
],
"note": "Run through the doorway with enough momentum to break the bomb blocks with Screw."
},
{
"link": [
2,
3
],
"name": "Screw Attack Room Transition Screwjump (Tricky Dash Jump)",
"notable": true,
"reusableRoomwideNotable": "Screw Attack Room Transition Screwjump",
"entranceCondition": {
"comeInRunning": {
"minTiles": 2,
"speedBooster": true
}
},
"requires": [
"h_canNavigateHeatRooms",
"ScrewAttack",
"HiJump",
"canTrickyDashJump",
{
"heatFrames": 150
}
],
"clearsObstacles": [
"A"
],
"note": "Run through the doorway with enough momentum to break the bomb blocks with Screw."
},
{
"link": [
2,
3
],
"name": "Shinespark",
"entranceCondition": {
"comeInShinecharged": {
"framesRequired": 50
}
},
"requires": [
"h_canNavigateHeatRooms",
{
"heatFrames": 250
},
{
"shinespark": {
"frames": 35,
"excessFrames": 4
}
}
],
"clearsObstacles": [
"A"
]
},
{
"link": [
2,
3
],
"name": "Jump into Room Shinespark",
"entranceCondition": {
"comeInShinecharged": {
"framesRequired": 15
}
},
"requires": [
"h_canNavigateHeatRooms",
"canMidairShinespark",
"canShinechargeMovement",
"canPrepareForNextRoom",
{
"heatFrames": 250
},
{
"shinespark": {
"frames": 18,
"excessFrames": 4
}
}
],
"clearsObstacles": [
"A"
],
"note": [
"Jump into Screw Attack Room and spark diagonally once above the center of the door vertically.",
"Or diagonally spark anywhere that is not the bottom of the door in the previous room."
],
"devNote": "TODO: Sparking diagonally through the door cannot be shown as an alternative."
},
{
"link": [
2,
3
],
"name": "X-Ray Climb",
"entranceCondition": {
"comeInWithDoorStuckSetup": {}
},
"requires": [
"canXRayClimb",
{
"heatFrames": 1600
}
],
"note": "Climb up 1 screen.",
"devNote": "Heat frames split into the actual climb and the setup in the adjacent room."
},
{
"link": [
2,
3
],
"name": "Very Deep Stuck X-Ray Climb",
"entranceCondition": {
"comeInWithGMode": {
"mode": "direct",
"morphed": false
}
},
"requires": [
"h_heatProof",
{
"or": [
"canWalljump",
"h_canCrouchJumpDownGrab",
"HiJump",
"h_canFly",
"canArtificialMorph"
]
},
"canXRayClimb"
],
"bypassesDoorShell": true,
"note": [
"Enter with G-mode direct, back up to between 1 and 6 pixels from the door transition, and activate X-ray to get very deep stuck in the door.",
"Climb up 1 screen, and perform a turnaround buffered spin-jump away from the door to trigger the transition, bypassing any lock on the door."
]
},
{
"link": [
2,
3
],
"name": "Grapple Teleport",
"entranceCondition": {
"comeInWithGrappleTeleport": {
"blockPositions": [
[
5,
3
],
[
7,
2
]
]
}
},
"requires": [
{
  "heatFrames": 65
}
]
},
{
"link": [
2,
3
],
"name": "Screw Attack Room Grapple Teleport Inside Wall",
"notable": true,
"entranceCondition": {
"comeInWithGrappleTeleport": {
"blockPositions": [
[
3,
12
]
]
}
},
"requires": [
"canOffScreenMovement",
"Morph",
{
"heatFrames": 200
}
],
"note": [
"After teleporting, Samus should be standing inside the wall.",
"Retract Grapple by pressing up, which will pull Samus down and right.",
"Hold right, and release Grapple while still holding right.",
"Perform a turn-around spin jump (to the left).",
"Then morph and roll out to the right."
]
},
{
"link": [
2,
4
],
"name": "Base",
"requires": [
"h_canNavigateHeatRooms",
{
"heatFrames": 90
},
{
"or": [
{
"obstaclesCleared": [
"B"
]
},
{
"and": [
"ScrewAttack",
{
"or": [
"canPrepareForNextRoom",
{
"heatFrames": 30
}
]
}
]
}
]
}
],
"clearsObstacles": [
"B"
]
},
{
"link": [
2,
4
],
"name": "Power Bomb",
"requires": [
"h_canNavigateHeatRooms",
"h_canUsePowerBombs",
{
"heatFrames": 190
}
],
"clearsObstacles": [
"B"
]
},
{
"link": [
2,
4
],
"name": "Bombs",
"requires": [
"h_canNavigateHeatRooms",
"h_canUseMorphBombs",
{
"heatFrames": 180
}
],
"clearsObstacles": [
"B"
]
},
{
"link": [
2,
4
],
"name": "Temporary Blue",
"entranceCondition": {
"comeInShinecharging": {
"length": 0,
"openEnd": 1
}
},
"requires": [
"canTemporaryBlue",
"canPrepareForNextRoom",
{
"heatFrames": 75
}
],
"clearsObstacles": [
"B"
],
"note": "This expects the more controlled Temporary Blue to fall though the blocks, not storing a shinecharge through the door."
},
{
"link": [
2,
4
],
"name": "Screw Attack Room Temporary Blue Descent and Shinespark Escape Middle Door Part 1",
"notable": true,
"reusableRoomwideNotable": "Screw Attack Room Descent and Shinespark Escape",
"entranceCondition": {
"comeInShinecharging": {
"length": 0,
"openEnd": 1
}
},
"requires": [
"canTemporaryBlue",
"canPrepareForNextRoom",
{
"heatFrames": 75
}
],
"clearsObstacles": [
"B",
"C"
],
"note": "Store the shinecharge while hitting the door transition to maintain the ability to break blocks."
},
{
"link": [
2,
4
],
"name": "Screw Attack Room Screw Descent and Shinespark Escape Middle Door Part 1",
"notable": true,
"entranceCondition": {
"comeInShinecharged": {
"framesRequired": 125
}
},
"requires": [
"ScrewAttack",
"canShinechargeMovement",
{
"heatFrames": 120
}
],
"clearsObstacles": [
"B",
"C"
],
"reusableRoomwideNotable": "Screw Attack Room Descent and Shinespark Escape",
"note": "Enter with a shinespark stored and screw attack down to the item."
},
{
"link": [
2,
5
],
"name": "Upper Bomb Blocks Already Broken",
"requires": [
{
  "obstaclesCleared": [
    "A"
  ]
}
]
},
{
"link": [
2,
5
],
"name": "Power Bombs",
"requires": [
"h_canNavigateHeatRooms",
"h_canUsePowerBombs",
{
  "heatFrames": 200
}
],
"clearsObstacles": [
"A"
]
},
{
"link": [
2,
5
],
"name": "Screw Attack Room IBJ to Break the Top Blocks",
"requires": [
"h_canNavigateHeatRooms",
"h_canIBJ",
{
"heatFrames": 1200
}
],
"clearsObstacles": [
"A"
],
"note": "Expects that you fall down afterwards."
},
{
"link": [
2,
5
],
"name": "Space Bombs",
"requires": [
"h_canNavigateHeatRooms",
"h_canUseMorphBombs",
"SpaceJump",
{
"heatFrames": 300
}
],
"clearsObstacles": [
"A"
]
},
{
"link": [
2,
5
],
"name": "Springwall with Bombs",
"requires": [
"h_canNavigateHeatRooms",
"h_canUseMorphBombs",
"canSpringwall",
"canTrickySpringBallJump",
{
"heatFrames": 300
}
],
"clearsObstacles": [
"A"
],
"note": "Use a Springwall to get up to the bomb blocks, to break them with a bomb."
},
{
"link": [
2,
5
],
"name": "Screw Attack Room Transition Speedjump with Bombs",
"notable": true,
"reusableRoomwideNotable": "Screw Attack Room Transition Speedjump with Bombs",
"entranceCondition": {
"comeInJumping": {
"minTiles": 6,
"speedBooster": true
}
},
"requires": [
"h_canNavigateHeatRooms",
"HiJump",
"h_canUseMorphBombs",
{
"heatFrames": 200
}
],
"clearsObstacles": [
"A"
],
"note": "Run in the adjacent room and jump through the door, to place a Bomb to break the obstacle."
},
{
"link": [
2,
5
],
"name": "Screw Attack Room Transition Speedjump with Bombs (Tricky Dash Jump)",
"notable": true,
"reusableRoomwideNotable": "Screw Attack Room Transition Speedjump with Bombs",
"entranceCondition": {
"comeInJumping": {
"minTiles": 2,
"speedBooster": true
}
},
"requires": [
"h_canNavigateHeatRooms",
"HiJump",
"canTrickyDashJump",
"h_canUseMorphBombs",
{
"heatFrames": 200
}
],
"clearsObstacles": [
"A"
],
"note": "Run in the adjacent room and jump through the door, to place a Bomb to break the obstacle."
},
{
"link": [
3,
1
],
"name": "Grapple Teleport",
"entranceCondition": {
"comeInWithGrappleTeleport": {
"blockPositions": [
[
2,
34
]
]
}
},
"requires": [],
"bypassesDoorShell": true
},
{
"link": [
3,
1
],
"name": "Carry Grapple Teleport",
"entranceCondition": {
"comeInWithGrappleTeleport": {
"blockPositions": [
[
2,
34
]
]
}
},
"requires": [],
"bypassesDoorShell": true,
"exitCondition": {
"leaveWithGrappleTeleport": {
"blockPositions": [
[
2,
34
]
]
}
}
},
{
"link": [
3,
2
],
"name": "Base",
"requires": [
"h_canNavigateHeatRooms",
{
"heatFrames": 200
},
{
"or": [
"ScrewAttack",
{
  "obstaclesCleared": [
    "A"
  ]
}
]
}
],
"clearsObstacles": [
"A"
]
},
{
"link": [
3,
2
],
"name": "Power Bombs",
"requires": [
"h_canNavigateHeatRooms",
"h_canUsePowerBombs",
{
"heatFrames": 300
}
],
"clearsObstacles": [
"A"
]
},
{
"link": [
3,
2
],
"name": "Bombs",
"requires": [
"h_canNavigateHeatRooms",
"h_canUseMorphBombs",
{
"heatFrames": 300
}
],
"clearsObstacles": [
"A"
]
},
{
"link": [
3,
2
],
"name": "SpeedBooster",
"entranceCondition": {
"comeInShinecharging": {
"length": 8,
"openEnd": 0
}
},
"requires": [
{
"heatFrames": 200
}
],
"clearsObstacles": [
"A"
],
"devNote": "FIXME: Running in is not required. Entering the room with canBlueSpaceJump could work, for example."
},
{
"link": [
3,
2
],
"name": "Grapple Teleport Extension Clip",
"entranceCondition": {
"comeInWithGrappleTeleport": {
"blockPositions": [
[
5,
3
]
]
}
},
"requires": [
{
"heatFrames": 250
},
{
"or": [
"canWalljump",
"h_canCrouchJumpDownGrab"
]
}
],
"note": [
"After teleporting, as Samus swings to the right, begin holding down to extend Grapple just as Samus is slightly right of vertical.",
"Samus should swing back left and get stuck on the floor one tile to the right of the Grapple attachment point.",
"Release Grapple and Samus will clip through the floor."
],
"devNote": "FIXME: The walljump or crouchjump are to reach the door which may not actually be required."
},
{
"link": [
3,
2
],
"name": "Stored Moonfall Clip",
"entranceCondition": {
"comeInWithStoredFallSpeed": {
"fallSpeedInTiles": 1
}
},
"requires": [
"canPrepareForNextRoom",
"canMoonfall",
{
"or": [
"canWalljump",
"h_canCrouchJumpDownGrab"
]
},
{
"heatFrames": 170
}
],
"note": [
"Moonfall to clip through the Bomb blocks",
"Break spin with Shot or Angle Aim to avoid clipping all the way to the bottom of the room."
]
},
{
"link": [
3,
3
],
"name": "Leave With Runway (Blocks Broken)",
"requires": [
{
"obstaclesCleared": [
"A"
]
}
],
"exitCondition": {
"leaveWithRunway": {
"length": 4,
"openEnd": 1
}
}
},
{
"link": [
3,
3
],
"name": "Leave With Runway (Blocks Intact)",
"requires": [
{
  "obstaclesNotCleared": [
    "A"
  ]
}
],
"exitCondition": {
"leaveWithRunway": {
"length": 13,
"openEnd": 1
}
}
},
{
"link": [
3,
3
],
"name": "Crystal Flash",
"requires": [
"h_canHeatedCrystalFlash"
],
"clearsObstacles": [
"A"
]
},
{
"link": [
3,
4
],
"name": "Temporary Blue (Full Runway)",
"entranceCondition": {
"comeInShinecharging": {
"length": 12,
"openEnd": 0
}
},
"requires": [
"canTemporaryBlue",
"canXRayTurnaround",
{
"heatFrames": 285
}
],
"clearsObstacles": [
"A",
"B"
],
"note": "This expects the more controlled Temporary Blue to fall though the blocks, not storing a shinecharge on the first breakable block."
},
{
"link": [
3,
4
],
"name": "Temporary Blue (Short Runway)",
"entranceCondition": {
"comeInShinecharging": {
"length": 3,
"openEnd": 0
}
},
"requires": [
"canTemporaryBlue",
{
"heatFrames": 240
}
],
"clearsObstacles": [
"A",
"B"
],
"note": "This expects the more controlled Temporary Blue to fall though the blocks, not storing a shinecharge on the first breakable block."
},
{
"link": [
3,
4
],
"name": "Screw Attack Room Temporary Blue Descent and Shinespark Escape Top Door Part 1",
"notable": true,
"entranceCondition": {
"comeInShinecharging": {
"length": 3,
"openEnd": 1
}
},
"requires": [
"canTemporaryBlue",
"canShinechargeMovementTricky",
{
"heatFrames": 130
}
],
"clearsObstacles": [
"A",
"B",
"C"
],
"reusableRoomwideNotable": "Screw Attack Room Descent and Shinespark Escape",
"note": "Simultaneously store a shinespark and break through the bomb blocks down to the Screw Attack item location.",
"devNote": "canShinechargeMovementTricky is to represent the difficulty of activating the shinecharge in a precise place near the edge."
},
{
"link": [
3,
4
],
"name": "Screw Attack Room Screw Descent and Shinespark Escape Top Door Part 1",
"notable": true,
"entranceCondition": {
"comeInShinecharging": {
"length": 12,
"openEnd": 0
}
},
"requires": [
"ScrewAttack",
"canShinechargeMovement",
{
"heatFrames": 170
}
],
"clearsObstacles": [
"A",
"B",
"C"
],
"reusableRoomwideNotable": "Screw Attack Room Descent and Shinespark Escape",
"note": "Store a shinespark then use screw to break through the bomb blocks down to the Screw Attack item location.",
"devNote": "Storing the spark on the left side of the runway takes fine control over shinecharge spacing, but that is ok at this difficulty."
},
{
"link": [
3,
4
],
"name": "Stored Moonfall Clip",
"entranceCondition": {
"comeInWithStoredFallSpeed": {
"fallSpeedInTiles": 1
}
},
"requires": [
"canPrepareForNextRoom",
"canMoonfall",
{
"heatFrames": 85
}
],
"note": [
"Moonfall to clip through the Bomb blocks to the bottom of the room."
]
},
{
"link": [
4,
1
],
"name": "Base",
"requires": [
"h_canNavigateHeatRooms",
{
"heatFrames": 60
}
]
},
{
"link": [
4,
2
],
"name": "Lower Bomb Blocks Already Broken",
"requires": [
"h_canNavigateHeatRooms",
{
"heatFrames": 200
},
{
"obstaclesCleared": [
"B"
]
}
]
},
{
"link": [
4,
2
],
"name": "Screw",
"requires": [
"h_canNavigateHeatRooms",
"ScrewAttack",
{
"heatFrames": 200
}
],
"clearsObstacles": [
"B"
]
},
{
"link": [
4,
2
],
"name": "Power Bomb",
"requires": [
"h_canNavigateHeatRooms",
"h_canUsePowerBombs",
{
"heatFrames": 300
}
],
"clearsObstacles": [
"B"
]
},
{
"link": [
4,
2
],
"name": "Bomb",
"requires": [
"h_canNavigateHeatRooms",
"h_canUseMorphBombs",
{
"heatFrames": 300
}
],
"clearsObstacles": [
"B"
]
},
{
"link": [
4,
2
],
"name": "Screw Attack Room Shinespark Escape Mid Door Part 2",
"notable": true,
"requires": [
"canShinechargeMovement",
{
"obstaclesCleared": [
"C"
]
},
{
"canShineCharge": {
"usedTiles": 33,
"openEnd": 2
}
},
{
"heatFrames": 240
},
{
"shinespark": {
"frames": 31,
"excessFrames": 10
}
}
],
"clearsObstacles": [
"B"
],
"reusableRoomwideNotable": "Screw Attack Room Descent and Shinespark Escape",
"note": "Diagonally shinespark towards the middle door.",
"devNote": [
"There is no actual runway. Obstacle C is indicating that Samus has a shinecharge ready to be used.",
"Useful only if you cannot reach the door at 2."
]
},
{
"link": [
4,
3
],
"name": "Screw Attack Room Shinespark Escape Top Door Part 2",
"notable": true,
"requires": [
"canShinechargeMovement",
{
"obstaclesCleared": [
"C"
]
},
{
"canShineCharge": {
"usedTiles": 33,
"openEnd": 2
}
},
{
"heatFrames": 270
},
{
"shinespark": {
"frames": 41,
"excessFrames": 4
}
}
],
"clearsObstacles": [
"A",
"B"
],
"reusableRoomwideNotable": "Screw Attack Room Descent and Shinespark Escape",
"note": "Carry a shinecharge down though the bomb blocks and shinespark back up.",
"devNote": "There is no actual runway. Obstacle C is indicating that Samus has a shinecharge ready to be used."
},
{
"link": [
4,
4
],
"name": "Crystal Flash",
"requires": [
{
"obstaclesNotCleared": [
"C"
]
},
"h_canHeatedCrystalFlash"
],
"clearsObstacles": [
"B"
]
},
{
"link": [
5,
3
],
"name": "Screw Attack Room IBJ",
"requires": [
"h_canNavigateHeatRooms",
"h_canIBJ",
{
"heatFrames": 1300
}
],
"devNote": [
"FIXME: This is a longer IBJ if B is broken with a power bomb (All the blocks are broken).",
"FIXME: Add more IBJ variations."
]
},
{
"link": [
5,
3
],
"name": "Space Jump",
"requires": [
"h_canNavigateHeatRooms",
"SpaceJump",
{
"heatFrames": 400
}
]
},
{
"link": [
5,
3
],
"name": "Springwall",
"requires": [
"h_canNavigateHeatRooms",
"canSpringwall",
{
"heatFrames": 400
}
]
},
{
"link": [
5,
3
],
"name": "Doorway Speedjump",
"requires": [
"HiJump",
"SpeedBooster",
"canWalljump",
"canCarefulJump",
{
"doorUnlockedAtNode": 2
},
{
"heatFrames": 240
}
],
"unlocksDoors": [
{
"nodeId": 2,
"types": [
"missiles"
],
"requires": [
{
"heatFrames": 50
}
]
},
{
"nodeId": 2,
"types": [
"super"
],
"requires": []
},
{
"nodeId": 2,
"types": [
"powerbomb"
],
"requires": [
{
"heatFrames": 110
}
]
}
],
"note": "Position yourself in the door way, then run and jump. Makes it possible to walljump up."
},
{
"link": [
5,
3
],
"name": "Doorway Spring Ball Jump",
"requires": [
"HiJump",
{
"doorUnlockedAtNode": 2
},
"canTrickySpringBallJump",
{
"heatFrames": 200
}
],
"unlocksDoors": [
{
"nodeId": 2,
"types": [
"missiles"
],
"requires": [
{
"heatFrames": 50
}
]
},
{
"nodeId": 2,
"types": [
"super"
],
"requires": []
},
{
"nodeId": 2,
"types": [
"powerbomb"
],
"requires": [
{
"heatFrames": 110
}
]
}
]
},
{
"link": [
5,
3
],
"name": "Screw Attack Room Doorway CWJ",
"notable": true,
"requires": [
"h_heatProof",
"HiJump",
"canCWJ",
"canStationarySpinJump",
"canInsaneJump",
"canInsaneWalljump",
{
"doorUnlockedAtNode": 2
}
],
"unlocksDoors": [
{
"nodeId": 2,
"types": [
"missiles"
],
"requires": [
{
"heatFrames": 50
}
]
},
{
"nodeId": 2,
"types": [
"super"
],
"requires": []
},
{
"nodeId": 2,
"types": [
"powerbomb"
],
"requires": [
{
"heatFrames": 110
}
]
}
],
"note": "Position yourself in the door way a few pixels from the edge. Dashing stationary spinjump into a delayed CWJ and hopefully catch the upper ledge with a walljump."
}
]
}