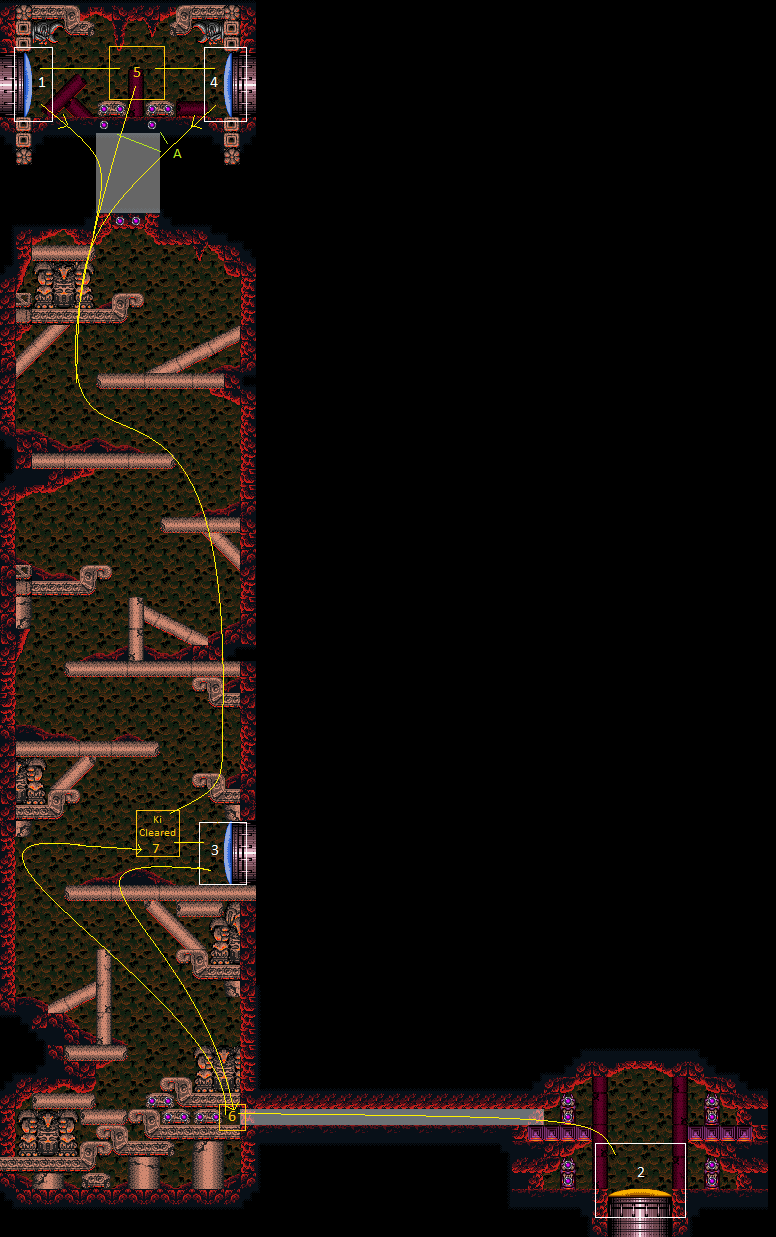
Red Kihunter Shaft
Room ID: 137
|
From: 1
Top Left Door
To: 1
Top Left Door
Exit condition: {
"leaveWithRunway": {
"length": 8,
"openEnd": 0
}
}
|
|
From: 1
Top Left Door
To: 1
Top Left Door
Requires: {
"heatFrames": 25
}
Exit condition: {
"leaveWithRunway": {
"length": 13,
"openEnd": 0
}
}
|
|
From: 1
Top Left Door
To: 1
Top Left Door
Enter the room aiming diagonally down, with a missile set to auto-deselect. Quickly fire the missile and a beam shot to break both shot blocks and open the full runway. Requires: "canPrepareForNextRoom"
"canAutoCancelWeapon"
{
"ammo": {
"type": "Missile",
"count": 1
}
}
Exit condition: {
"leaveWithRunway": {
"length": 13,
"openEnd": 0
}
}
|
|
From: 1
Top Left Door
To: 1
Top Left Door
Enter the room aiming diagonally down and quickly use two grapple shots to break the shot blocks. Requires: "canPrepareForNextRoom" "canPreciseGrapple" Exit condition: {
"leaveWithRunway": {
"length": 13,
"openEnd": 0
}
}
|
|
Requires: "h_canHeatedCrystalFlash" Clears obstacles: A |
|
Entrance condition: {
"comeInWithGrappleTeleport": {
"blockPositions": [
[
12,
12
],
[
12,
13
]
]
}
}
Bypasses door shell: true |
|
From: 1
Top Left Door
To: 4
Top Right Door
Entrance condition: {
"comeInWithGrappleTeleport": {
"blockPositions": [
[
12,
12
]
]
}
}
Exit condition: {
"leaveWithGrappleTeleport": {
"blockPositions": [
[
12,
12
]
]
}
}
Bypasses door shell: true |
|
From: 1
Top Left Door
To: 4
Top Right Door
Entrance condition: {
"comeInWithGrappleTeleport": {
"blockPositions": [
[
12,
13
]
]
}
}
Exit condition: {
"leaveWithGrappleTeleport": {
"blockPositions": [
[
12,
13
]
]
}
}
Bypasses door shell: true |
|
From: 1
Top Left Door
To: 4
Top Right Door
Entrance condition: {
"comeInWithStoredFallSpeed": {
"fallSpeedInTiles": 1
}
}
Requires: "canDisableEquipment"
{
"heatFrames": 90
}
Exit condition: {
"leaveWithStoredFallSpeed": {
"fallSpeedInTiles": 1
}
}
|
|
From: 1
Top Left Door
To: 4
Top Right Door
Entrance condition: {
"comeInWithStoredFallSpeed": {
"fallSpeedInTiles": 2
}
}
Requires: "canDisableEquipment"
{
"heatFrames": 90
}
Exit condition: {
"leaveWithStoredFallSpeed": {
"fallSpeedInTiles": 2
}
}
|
|
Requires: "h_canNavigateHeatRooms"
{
"heatFrames": 40
}
|
|
From: 1
Top Left Door
To: 7
Junction At Middle Right Door With Bottom KiHunter Cleared
By breaking the shot blocks and maneuvering through the room effeciently Samus will not have to spend much time waiting on KiHunters. Entrance condition: {
"comeInRunning": {
"minTiles": 1,
"speedBooster": "any"
}
}
Requires: "canDodgeWhileShooting"
"canCarefulJump"
{
"or": [
"canTrickyJump",
"canDownBack"
]
}
{
"or": [
"Charge",
"Spazer",
"Plasma",
"Wave",
"canInsaneJump"
]
}
{
"heatFrames": 540
}
|
|
From: 2
Bottom Right Vertical Door
To: 2
Bottom Right Vertical Door
Exit condition: {
"leaveNormally": {}
}
|
|
From: 2
Bottom Right Vertical Door
To: 2
Bottom Right Vertical Door
Entrance condition: {
"comeInWithSpark": {},
"comesThroughToilet": "any"
}
Requires: {
"shinespark": {
"frames": 4,
"excessFrames": 4
}
}
{
"heatFrames": 120
}
|
|
From: 2
Bottom Right Vertical Door
To: 2
Bottom Right Vertical Door
Requires: "h_canHeatedCrystalFlash" |
|
From: 2
Bottom Right Vertical Door
To: 6
Inside Morph Tunnel (Right of Left Bomb Blocks)
Requires: "h_canNavigateHeatRooms"
"h_canUseMorphBombs"
{
"heatFrames": 240
}
|
|
From: 2
Bottom Right Vertical Door
To: 6
Inside Morph Tunnel (Right of Left Bomb Blocks)
Requires: "h_canNavigateHeatRooms"
"h_canUsePowerBombs"
{
"heatFrames": 240
}
|
|
From: 2
Bottom Right Vertical Door
To: 6
Inside Morph Tunnel (Right of Left Bomb Blocks)
Requires: "h_canNavigateHeatRooms"
"Morph"
"ScrewAttack"
{
"heatFrames": 220
}
|
|
Entrance condition: {
"comeInWithGrappleTeleport": {
"blockPositions": [
[
5,
3
],
[
7,
2
]
]
}
}
Requires: {
"heatFrames": 45
}
|
|
From: 3
Middle Right Door
To: 1
Top Left Door
Entrance condition: {
"comeInWithGrappleTeleport": {
"blockPositions": [
[
3,
12
],
[
3,
13
]
]
}
}
Bypasses door shell: true |
|
From: 3
Middle Right Door
To: 1
Top Left Door
Entrance condition: {
"comeInWithGrappleTeleport": {
"blockPositions": [
[
3,
12
]
]
}
}
Exit condition: {
"leaveWithGrappleTeleport": {
"blockPositions": [
[
3,
12
]
]
}
}
Bypasses door shell: true |
|
From: 3
Middle Right Door
To: 1
Top Left Door
Entrance condition: {
"comeInWithGrappleTeleport": {
"blockPositions": [
[
3,
13
]
]
}
}
Exit condition: {
"leaveWithGrappleTeleport": {
"blockPositions": [
[
3,
13
]
]
}
}
Bypasses door shell: true |
|
Exit condition: {
"leaveWithRunway": {
"length": 11,
"openEnd": 1,
"gentleDownTiles": 2,
"gentleUpTiles": 2
}
}
|
|
Requires: "h_heatProof"
{
"or": [
"ScrewAttack",
{
"and": [
"Plasma",
"Wave",
"Ice"
]
}
]
}
{
"resetRoom": {
"nodes": [
1,
3,
4
],
"mustStayPut": false
}
}
{
"refill": [
"Energy",
"Super"
]
}
|
|
Perform the Crystal Flash to the left, away from the door, to prevent the Kihunter from coming down. Requires: {
"heatFrames": 20
}
"h_canHeatedCrystalFlash"
{
"heatFrames": 20
}
|
|
From: 3
Middle Right Door
To: 5
Top Junction Between Doors
Notable: true The grapple teleport skips past the Kihunters. With good semi-blind movement, this makes it possible to reach the top with minimal heat damage. Entrance condition: {
"comeInWithGrappleTeleport": {
"blockPositions": [
[
2,
18
],
[
2,
19
],
[
2,
29
]
]
}
}
Requires: "canOffScreenMovement"
{
"heatFrames": 330
}
|
|
From: 3
Middle Right Door
To: 6
Inside Morph Tunnel (Right of Left Bomb Blocks)
Requires: "h_canNavigateHeatRooms"
"h_canUseMorphBombs"
{
"heatFrames": 410
}
|
|
From: 3
Middle Right Door
To: 6
Inside Morph Tunnel (Right of Left Bomb Blocks)
Requires: "h_canNavigateHeatRooms"
"h_canUsePowerBombs"
{
"heatFrames": 250
}
|
|
From: 3
Middle Right Door
To: 7
Junction At Middle Right Door With Bottom KiHunter Cleared
Only Wave can safely clear the Kihunter. Requires: "h_heatProof"
"Wave"
{
"or": [
"Charge",
"Ice",
"Spazer"
]
}
|
|
From: 3
Middle Right Door
To: 7
Junction At Middle Right Door With Bottom KiHunter Cleared
Wait for the KiHunter to drop down on its own. Requires: "h_canNavigateHeatRooms"
{
"enemyDamage": {
"enemy": "Kihunter (red)",
"type": "contact",
"hits": 1
}
}
{
"heatFrames": 120
}
|
|
From: 3
Middle Right Door
To: 7
Junction At Middle Right Door With Bottom KiHunter Cleared
Requires: "h_canNavigateHeatRooms"
"Wave"
"Ice"
"Spazer"
{
"heatFrames": 420
}
|
|
From: 3
Middle Right Door
To: 7
Junction At Middle Right Door With Bottom KiHunter Cleared
Requires: "h_canNavigateHeatRooms"
"Wave"
"Plasma"
{
"heatFrames": 300
}
|
|
From: 3
Middle Right Door
To: 7
Junction At Middle Right Door With Bottom KiHunter Cleared
Requires: "ScrewAttack" |
|
From: 3
Middle Right Door
To: 7
Junction At Middle Right Door With Bottom KiHunter Cleared
Notable: true 
The KiHunter can be baited by jumping into the door then walking left. Requires: "h_canNavigateHeatRooms"
"canTrickyJump"
{
"heatFrames": 100
}
|
|
From: 3
Middle Right Door
To: 7
Junction At Middle Right Door With Bottom KiHunter Cleared
Notable: true 

Manipulate the Three KiHunters to avoid all of them when entering the room from the Save room door. Stop on a dime on entry for positioning, because it is precise. Wait 1 second then Morph and roll left, past the swooping kihunter. Quickly jump to the higher level and run into the left wall. Wait there for half a second; it helps to jump into the wall. The 2 KiHunters should be grouped above Samus and out of the way. Requires: "h_canNavigateHeatRooms"
"canStopOnADime"
"canCarefulJump"
"Morph"
{
"or": [
"HiJump",
"canWalljump"
]
}
{
"heatFrames": 80
}
|
|
From: 4
Top Right Door
To: 1
Top Left Door
Entrance condition: {
"comeInWithStoredFallSpeed": {
"fallSpeedInTiles": 1
}
}
Requires: "canDisableEquipment"
{
"heatFrames": 90
}
Exit condition: {
"leaveWithStoredFallSpeed": {
"fallSpeedInTiles": 1
}
}
|
|
From: 4
Top Right Door
To: 1
Top Left Door
Entrance condition: {
"comeInWithStoredFallSpeed": {
"fallSpeedInTiles": 2
}
}
Requires: "canDisableEquipment"
{
"heatFrames": 90
}
Exit condition: {
"leaveWithStoredFallSpeed": {
"fallSpeedInTiles": 2
}
}
|
|
Entrance condition: {
"comeInWithGrappleTeleport": {
"blockPositions": [
[
3,
12
],
[
3,
13
]
]
}
}
Bypasses door shell: true |
|
From: 4
Top Right Door
To: 1
Top Left Door
Entrance condition: {
"comeInWithGrappleTeleport": {
"blockPositions": [
[
3,
12
]
]
}
}
Exit condition: {
"leaveWithGrappleTeleport": {
"blockPositions": [
[
3,
12
]
]
}
}
Bypasses door shell: true |
|
From: 4
Top Right Door
To: 1
Top Left Door
Entrance condition: {
"comeInWithGrappleTeleport": {
"blockPositions": [
[
3,
13
]
]
}
}
Exit condition: {
"leaveWithGrappleTeleport": {
"blockPositions": [
[
3,
13
]
]
}
}
Bypasses door shell: true |
|
From: 4
Top Right Door
To: 4
Top Right Door
Exit condition: {
"leaveWithRunway": {
"length": 7,
"openEnd": 0
}
}
|
|
From: 4
Top Right Door
To: 4
Top Right Door
Requires: {
"heatFrames": 25
}
Exit condition: {
"leaveWithRunway": {
"length": 13,
"openEnd": 0
}
}
|
|
From: 4
Top Right Door
To: 4
Top Right Door
Enter the room aiming diagonally down, with a missile set to auto-deselect. Quickly fire the missile and a beam shot to break both shot blocks and open the full runway. Requires: "canPrepareForNextRoom"
"canAutoCancelWeapon"
{
"ammo": {
"type": "Missile",
"count": 1
}
}
Exit condition: {
"leaveWithRunway": {
"length": 13,
"openEnd": 0
}
}
|
|
From: 4
Top Right Door
To: 4
Top Right Door
Enter the room aiming diagonally down and quickly use two grapple shots to break the shot blocks. Requires: "canPrepareForNextRoom" "canPreciseGrapple" Exit condition: {
"leaveWithRunway": {
"length": 13,
"openEnd": 0
}
}
|
|
Requires: "h_canHeatedCrystalFlash" Clears obstacles: A |
|
Requires: "h_canNavigateHeatRooms"
{
"heatFrames": 40
}
|
|
From: 4
Top Right Door
To: 7
Junction At Middle Right Door With Bottom KiHunter Cleared
By breaking the shot blocks and maneuvering through the room effeciently Samus will not have to spend much time waiting on KiHunters. Entrance condition: {
"comeInRunning": {
"minTiles": 1,
"speedBooster": "any"
}
}
Requires: "canDodgeWhileShooting"
"canTrickyJump"
{
"or": [
"Charge",
"Spazer",
"Plasma",
"Wave",
{
"and": [
"canInsaneJump",
{
"or": [
"canDownBack",
"Morph"
]
}
]
}
]
}
{
"heatFrames": 540
}
|
|
Requires: "h_canNavigateHeatRooms"
{
"heatFrames": 40
}
|
|
Requires: "h_canNavigateHeatRooms"
{
"heatFrames": 40
}
|
|
From: 5
Top Junction Between Doors
To: 7
Junction At Middle Right Door With Bottom KiHunter Cleared
Requires: "h_canNavigateHeatRooms"
{
"or": [
{
"and": [
"ScrewAttack",
{
"heatFrames": 510
}
]
},
{
"and": [
"Charge",
"Wave",
"Ice",
"Plasma",
{
"heatFrames": 570
}
]
}
]
}
|
|
From: 5
Top Junction Between Doors
To: 7
Junction At Middle Right Door With Bottom KiHunter Cleared
By breaking the shot blocks and maneuvering through the room effeciently Samus will not have to spend much time waiting on KiHunters. Requires: "canDodgeWhileShooting"
"canTrickyJump"
{
"or": [
"Spazer",
"Wave"
]
}
{
"heatFrames": 500
}
|
|
From: 5
Top Junction Between Doors
To: 7
Junction At Middle Right Door With Bottom KiHunter Cleared
Requires: "h_canNavigateHeatRooms"
{
"heatFrames": 1160
}
|
|
From: 5
Top Junction Between Doors
To: 7
Junction At Middle Right Door With Bottom KiHunter Cleared
Very quickly move through the room to meet the bottom KiHunter in a position where it is possible to jump over it. Down back through the shot blocks. If coming through the right door, Morphing may be easier. Jump over the KiHunter where it dips while moving left. Additionally, build full run speed before jumping to land all the way next to the door. Requires: "canInsaneJump"
"canDodgeWhileShooting"
"canPrepareForNextRoom"
{
"or": [
"Charge",
"Spazer",
"Plasma",
"Wave"
]
}
"canDownBack"
{
"heatFrames": 420
}
|
|
From: 5
Top Junction Between Doors
To: 7
Junction At Middle Right Door With Bottom KiHunter Cleared
Use Plasma to run through Kihunters instead of waiting. Requires: "h_canNavigateHeatRooms"
"canHitbox"
"Plasma"
{
"or": [
"canDownBack",
{
"and": [
"canCarefulJump",
{
"heatFrames": 50
}
]
},
{
"heatFrames": 130
}
]
}
{
"heatFrames": 410
}
|
|
From: 6
Inside Morph Tunnel (Right of Left Bomb Blocks)
To: 2
Bottom Right Vertical Door
Requires: "h_canNavigateHeatRooms"
"h_canUseMorphBombs"
{
"heatFrames": 270
}
|
|
From: 6
Inside Morph Tunnel (Right of Left Bomb Blocks)
To: 2
Bottom Right Vertical Door
Requires: "h_canNavigateHeatRooms"
"h_canUsePowerBombs"
{
"heatFrames": 270
}
|
|
From: 6
Inside Morph Tunnel (Right of Left Bomb Blocks)
To: 6
Inside Morph Tunnel (Right of Left Bomb Blocks)
Requires: "h_canHeatedCrystalFlash" |
|
From: 6
Inside Morph Tunnel (Right of Left Bomb Blocks)
To: 7
Junction At Middle Right Door With Bottom KiHunter Cleared
Watch for the KiHunter to move right before jumping up to get a safe predicatable swoop. Requires: "h_canNavigateHeatRooms"
"h_canUseMorphBombs"
{
"or": [
"ScrewAttack",
{
"and": [
"canCarefulJump",
{
"heatFrames": 90
}
]
},
{
"enemyDamage": {
"enemy": "Kihunter (red)",
"type": "contact",
"hits": 1
}
}
]
}
{
"heatFrames": 500
}
|
|
From: 6
Inside Morph Tunnel (Right of Left Bomb Blocks)
To: 7
Junction At Middle Right Door With Bottom KiHunter Cleared
Watch for the KiHunter to move right before jumping up to get a safe predicatable swoop. Requires: "h_canNavigateHeatRooms"
"Morph"
{
"ammo": {
"type": "PowerBomb",
"count": 2
}
}
{
"or": [
"ScrewAttack",
{
"and": [
"canCarefulJump",
{
"heatFrames": 90
}
]
},
{
"enemyDamage": {
"enemy": "Kihunter (red)",
"type": "contact",
"hits": 1
}
}
]
}
{
"heatFrames": 400
}
|
|
From: 6
Inside Morph Tunnel (Right of Left Bomb Blocks)
To: 7
Junction At Middle Right Door With Bottom KiHunter Cleared
Use Xray to stand up. Jump to clip into the floor. Then another jump to clip through the ceiling block. Watch for the KiHunter to move right before jumping up to get a safe predicatable swoop. Requires: "h_canNavigateHeatRooms"
"h_canUsePowerBombs"
"canXRayStandUp"
"canPartialFloorClip"
"canCeilingClip"
{
"or": [
"ScrewAttack",
{
"and": [
"canCarefulJump",
{
"heatFrames": 90
}
]
},
{
"enemyDamage": {
"enemy": "Kihunter (red)",
"type": "contact",
"hits": 1
}
}
]
}
{
"heatFrames": 520
}
|
|
From: 6
Inside Morph Tunnel (Right of Left Bomb Blocks)
To: 7
Junction At Middle Right Door With Bottom KiHunter Cleared
Wait for the bomb blocks to reappear. Two crouches worth of height are needed before jumping through the rest of the blocks. Watch for the KiHunter to move right before jumping up to get a safe predicatable swoop. Requires: "h_canNavigateHeatRooms"
"h_canUsePowerBombs"
"canXRayClimb"
"canCeilingClip"
{
"or": [
"ScrewAttack",
{
"and": [
"canCarefulJump",
{
"heatFrames": 90
}
]
},
{
"enemyDamage": {
"enemy": "Kihunter (red)",
"type": "contact",
"hits": 1
}
}
]
}
{
"heatFrames": 810
}
|
|
From: 6
Inside Morph Tunnel (Right of Left Bomb Blocks)
To: 7
Junction At Middle Right Door With Bottom KiHunter Cleared
Watch for the KiHunter to move right before jumping up to get a safe predicatable swoop. Requires: "h_canNavigateHeatRooms"
"h_canUsePowerBombs"
"h_canUseSpringBall"
{
"or": [
"ScrewAttack",
{
"and": [
"canCarefulJump",
{
"heatFrames": 90
}
]
},
{
"enemyDamage": {
"enemy": "Kihunter (red)",
"type": "contact",
"hits": 1
}
}
]
}
{
"heatFrames": 350
}
|
|
From: 7
Junction At Middle Right Door With Bottom KiHunter Cleared
To: 3
Middle Right Door
|
|
From: 7
Junction At Middle Right Door With Bottom KiHunter Cleared
To: 5
Top Junction Between Doors
Requires: "h_heatProof"
"canBePatient"
{
"enemyKill": {
"enemies": [
[
"Kihunter (red)",
"Kihunter (red)"
]
]
}
}
|
|
From: 7
Junction At Middle Right Door With Bottom KiHunter Cleared
To: 5
Top Junction Between Doors
Most RNG patterns group the top 2 KiHunters allowing for 0 or 1 hits but sometimes 2 hits are required. Requires: "h_canNavigateHeatRooms"
{
"enemyDamage": {
"enemy": "Kihunter (red)",
"type": "contact",
"hits": 2
}
}
{
"heatFrames": 480
}
|
|
From: 7
Junction At Middle Right Door With Bottom KiHunter Cleared
To: 5
Top Junction Between Doors
Requires: "h_canNavigateHeatRooms"
{
"enemyKill": {
"enemies": [
[
"Kihunter (red)",
"Kihunter (red)"
]
],
"explicitWeapons": [
"Super"
]
}
}
{
"heatFrames": 840
}
|
|
From: 7
Junction At Middle Right Door With Bottom KiHunter Cleared
To: 5
Top Junction Between Doors
Requires: "h_canNavigateHeatRooms"
"Wave"
"Ice"
"Spazer"
{
"heatFrames": 1160
}
|
|
From: 7
Junction At Middle Right Door With Bottom KiHunter Cleared
To: 5
Top Junction Between Doors
Requires: "h_canNavigateHeatRooms"
"Wave"
"Plasma"
{
"heatFrames": 840
}
|
|
From: 7
Junction At Middle Right Door With Bottom KiHunter Cleared
To: 5
Top Junction Between Doors
Be careful when Walljumping because Screw Attack does not provide protection at that time. Requires: "h_canNavigateHeatRooms"
"ScrewAttack"
{
"heatFrames": 450
}
|
|
From: 7
Junction At Middle Right Door With Bottom KiHunter Cleared
To: 5
Top Junction Between Doors
Notable: true
The Middle KiHunter can be jumped past by waiting for the right timing, if it is in the way. Wait for the top KiHunter to exit the corridor and wait just below so that it will bonk the wall when it attempts to swoop, then jump past. It is possible the two KiHunters group up in the middle which may not be possible to pass without taking damage. Requires: "h_canNavigateHeatRooms"
"canTrickyJump"
{
"heatFrames": 710
}
|
|
From: 7
Junction At Middle Right Door With Bottom KiHunter Cleared
To: 5
Top Junction Between Doors
Notable: true
Manipulate the Three KiHunters to avoid all of them when entering the room from the Save room door. Stop on a dime on entry for positioning, because it is precise. Wait 1 second then Morph and roll left, past the swooping kihunter. Quickly jump to the higher level and run into the left wall. Wait there for half a second; it helps to jump into the wall. The 2 KiHunters should be grouped above Samus and out of the way. Requires: "h_canNavigateHeatRooms"
"canStopOnADime"
"canCarefulJump"
"Morph"
{
"or": [
"HiJump",
"canWalljump"
]
}
{
"heatFrames": 490
}
|
{
"$schema": "../../../schema/m3-room.schema.json",
"id": 137,
"name": "Red Kihunter Shaft",
"area": "Norfair",
"subarea": "Lower",
"subsubarea": "East",
"playable": true,
"roomAddress": "0x7B585",
"roomEnvironments": [
{
"heated": true
}
],
"nodes": [
{
"id": 1,
"name": "Top Left Door",
"nodeType": "door",
"nodeSubType": "blue",
"nodeAddress": "0x00199f6",
"doorEnvironments": [
{
"physics": "air"
}
]
},
{
"id": 2,
"name": "Bottom Right Vertical Door",
"nodeType": "door",
"nodeSubType": "yellow",
"nodeAddress": "0x00199ea",
"doorEnvironments": [
{
"physics": "air"
}
],
"locks": [
{
"name": "Red Kihunter Shaft Yellow Lock (to Wasteland)",
"lockType": "coloredDoor",
"unlockStrats": [
{
"name": "Base",
"notable": false,
"requires": [
"h_canOpenYellowDoors"
]
}
]
}
]
},
{
"id": 3,
"name": "Middle Right Door",
"nodeType": "door",
"nodeSubType": "blue",
"nodeAddress": "0x0019a0e",
"doorEnvironments": [
{
"physics": "air"
}
]
},
{
"id": 4,
"name": "Top Right Door",
"nodeType": "door",
"nodeSubType": "blue",
"nodeAddress": "0x0019a02",
"doorEnvironments": [
{
"physics": "air"
}
]
},
{
"id": 5,
"name": "Top Junction Between Doors",
"nodeType": "junction",
"nodeSubType": "junction"
},
{
"id": 6,
"name": "Inside Morph Tunnel (Right of Left Bomb Blocks)",
"nodeType": "junction",
"nodeSubType": "junction",
"note": "The inner left portion of the morph tunnel, just to the right of the bomb blocks."
},
{
"id": 7,
"name": "Junction At Middle Right Door With Bottom KiHunter Cleared",
"nodeType": "junction",
"nodeSubType": "junction",
"note": "Outside the Save Room door with the bottom KiHunter either killed or able to be ignored."
}
],
"enemies": [
{
"id": "e1",
"groupName": "Red Kihunter Shaft Bottom Kihunter",
"enemyName": "Kihunter (red)",
"quantity": 1,
"homeNodes": [
3
],
"dropRequires": [
"h_heatProof"
]
},
{
"id": "e2",
"groupName": "Red Kihunter Shaft Top Kihunters",
"enemyName": "Kihunter (red)",
"quantity": 2,
"betweenNodes": [
3,
5
],
"dropRequires": [
"h_heatProof"
]
}
],
"obstacles": [
{
"id": "A",
"name": "Pitfall Shot Blocks",
"obstacleType": "inanimate",
"note": "The two vertical shot blocks that can disrupt the runway when broken."
}
],
"reusableRoomwideNotable": [
{
"name": "KiHunter Shaft KiHunter Dodge",
"note": [
"When coming from the Save room door, the first KiHunter can be baited by jumping into the door then walking left.",
"The second KiHunter can be jumped past by waiting for the right timing, if it is in the way.",
"Wait for the top KiHunter to exit the corridor and wait just below so that it will bonk the wall when it attempts to swoop, then jump past.",
"It is possible the second and third KiHunters group up in the middle which may not be possible to pass without taking damage."
]
},
{
"name": "Kihunter Shaft Manipulation from Save Room",
"note": [
"Manipulate the Three KiHunters to avoid all of them when entering the room from the Save room door.",
"Stop on a dime on entry for positioning, because it is precise.",
"Wait 1 second then Morph and roll left, past the swooping kihunter.",
"Quickly jump to the higher level and run into the left wall.",
"Wait there for half a second; it helps to jump into the wall.",
"The 2 KiHunters should be grouped above Samus and out of the way."
]
}
],
"links": [
{
"from": 1,
"to": [
{
"id": 1
},
{
"id": 4
},
{
"id": 5
},
{
"id": 7
}
]
},
{
"from": 2,
"to": [
{
"id": 2
},
{
"id": 6,
"devNote": "FIXME: Add Speedbooster strat."
}
]
},
{
"from": 3,
"to": [
{
"id": 1
},
{
"id": 3
},
{
"id": 5
},
{
"id": 6
},
{
"id": 7
}
]
},
{
"from": 4,
"to": [
{
"id": 1
},
{
"id": 4
},
{
"id": 5
},
{
"id": 7
}
]
},
{
"from": 5,
"to": [
{
"id": 1
},
{
"id": 4
},
{
"id": 7
}
]
},
{
"from": 6,
"to": [
{
"id": 2
},
{
"id": 6
},
{
"id": 7
}
]
},
{
"from": 7,
"to": [
{
"id": 3
},
{
"id": 5
}
]
}
],
"strats": [
{
"link": [
1,
1
],
"name": "Leave With Runway (Short Runway)",
"requires": [],
"exitCondition": {
"leaveWithRunway": {
"length": 8,
"openEnd": 0
}
},
"devNote": "If coming from below, use the right path to leave the left part of the runway unbroken."
},
{
"link": [
1,
1
],
"name": "Leave With Runway (Full Runway, Break Blocks Slowly)",
"requires": [
{
  "heatFrames": 25
}
],
"exitCondition": {
"leaveWithRunway": {
"length": 13,
"openEnd": 0
}
}
},
{
"link": [
1,
1
],
"name": "Leave With Runway (Full Runway, Break Blocks With Missile)",
"requires": [
"canPrepareForNextRoom",
"canAutoCancelWeapon",
{
"ammo": {
"type": "Missile",
"count": 1
}
}
],
"exitCondition": {
"leaveWithRunway": {
"length": 13,
"openEnd": 0
}
},
"note": [
"Enter the room aiming diagonally down, with a missile set to auto-deselect.",
"Quickly fire the missile and a beam shot to break both shot blocks and open the full runway."
]
},
{
"link": [
1,
1
],
"name": "Leave With Runway (Full Runway, Break Blocks With Grapple)",
"requires": [
"canPrepareForNextRoom",
"canPreciseGrapple"
],
"exitCondition": {
"leaveWithRunway": {
"length": 13,
"openEnd": 0
}
},
"note": "Enter the room aiming diagonally down and quickly use two grapple shots to break the shot blocks."
},
{
"link": [
1,
1
],
"name": "Crystal Flash",
"requires": [
"h_canHeatedCrystalFlash"
],
"clearsObstacles": [
"A"
]
},
{
"link": [
1,
4
],
"name": "Grapple Teleport",
"entranceCondition": {
"comeInWithGrappleTeleport": {
"blockPositions": [
[
12,
12
],
[
12,
13
]
]
}
},
"requires": [],
"bypassesDoorShell": true
},
{
"link": [
1,
4
],
"name": "Carry Grapple Teleport (Top Position)",
"entranceCondition": {
"comeInWithGrappleTeleport": {
"blockPositions": [
[
12,
12
]
]
}
},
"requires": [],
"bypassesDoorShell": true,
"exitCondition": {
"leaveWithGrappleTeleport": {
"blockPositions": [
[
12,
12
]
]
}
}
},
{
"link": [
1,
4
],
"name": "Carry Grapple Teleport (Bottom Position)",
"entranceCondition": {
"comeInWithGrappleTeleport": {
"blockPositions": [
[
12,
13
]
]
}
},
"requires": [],
"bypassesDoorShell": true,
"exitCondition": {
"leaveWithGrappleTeleport": {
"blockPositions": [
[
12,
13
]
]
}
}
},
{
"link": [
1,
4
],
"name": "Transition with Stored Fall Speed",
"entranceCondition": {
"comeInWithStoredFallSpeed": {
"fallSpeedInTiles": 1
}
},
"requires": [
"canDisableEquipment",
{
"heatFrames": 90
}
],
"exitCondition": {
"leaveWithStoredFallSpeed": {
"fallSpeedInTiles": 1
}
},
"unlocksDoors": [
{
"types": [
"missiles",
"super"
],
"requires": []
},
{
"types": [
"powerbomb"
],
"requires": [
"never"
]
}
]
},
{
"link": [
1,
4
],
"name": "Transition with Stored Fall Speed (more speed)",
"entranceCondition": {
"comeInWithStoredFallSpeed": {
"fallSpeedInTiles": 2
}
},
"requires": [
"canDisableEquipment",
{
"heatFrames": 90
}
],
"exitCondition": {
"leaveWithStoredFallSpeed": {
"fallSpeedInTiles": 2
}
},
"unlocksDoors": [
{
"types": [
"missiles",
"super"
],
"requires": []
},
{
"types": [
"powerbomb"
],
"requires": [
"never"
]
}
]
},
{
"link": [
1,
5
],
"name": "Base",
"requires": [
"h_canNavigateHeatRooms",
{
"heatFrames": 40
}
]
},
{
"link": [
1,
7
],
"name": "Fast Descent",
"entranceCondition": {
"comeInRunning": {
"minTiles": 1,
"speedBooster": "any"
}
},
"requires": [
"canDodgeWhileShooting",
"canCarefulJump",
{
"or": [
"canTrickyJump",
"canDownBack"
]
},
{
"or": [
"Charge",
"Spazer",
"Plasma",
"Wave",
"canInsaneJump"
]
},
{
"heatFrames": 540
}
],
"note": "By breaking the shot blocks and maneuvering through the room effeciently Samus will not have to spend much time waiting on KiHunters."
},
{
"link": [
2,
2
],
"name": "Leave Normally",
"exitCondition": {
"leaveNormally": {}
},
"requires": []
},
{
"link": [
2,
2
],
"name": "Shinespark",
"entranceCondition": {
"comeInWithSpark": {},
"comesThroughToilet": "any"
},
"requires": [
{
"shinespark": {
"frames": 4,
"excessFrames": 4
}
},
{
"heatFrames": 120
}
],
"devNote": "This strat is not useful in-room, but can satisfy a strat in the room before with an exit shinespark."
},
{
"link": [
2,
2
],
"name": "Crystal Flash",
"requires": [
"h_canHeatedCrystalFlash"
]
},
{
"link": [
2,
6
],
"name": "Bombs",
"requires": [
"h_canNavigateHeatRooms",
"h_canUseMorphBombs",
{
"heatFrames": 240
}
]
},
{
"link": [
2,
6
],
"name": "Power Bombs",
"requires": [
"h_canNavigateHeatRooms",
"h_canUsePowerBombs",
{
"heatFrames": 240
}
]
},
{
"link": [
2,
6
],
"name": "Screw Attack",
"requires": [
"h_canNavigateHeatRooms",
"Morph",
"ScrewAttack",
{
"heatFrames": 220
}
]
},
{
"link": [
3,
1
],
"name": "Grapple Teleport",
"entranceCondition": {
"comeInWithGrappleTeleport": {
"blockPositions": [
[
5,
3
],
[
7,
2
]
]
}
},
"requires": [
{
  "heatFrames": 45
}
]
},
{
"link": [
3,
1
],
"name": "Grapple Teleport Door Lock Skip",
"entranceCondition": {
"comeInWithGrappleTeleport": {
"blockPositions": [
[
3,
12
],
[
3,
13
]
]
}
},
"requires": [],
"bypassesDoorShell": true
},
{
"link": [
3,
1
],
"name": "Carry Grapple Teleport (Top Position)",
"entranceCondition": {
"comeInWithGrappleTeleport": {
"blockPositions": [
[
3,
12
]
]
}
},
"requires": [],
"bypassesDoorShell": true,
"exitCondition": {
"leaveWithGrappleTeleport": {
"blockPositions": [
[
3,
12
]
]
}
}
},
{
"link": [
3,
1
],
"name": "Carry Grapple Teleport (Bottom Position)",
"entranceCondition": {
"comeInWithGrappleTeleport": {
"blockPositions": [
[
3,
13
]
]
}
},
"requires": [],
"bypassesDoorShell": true,
"exitCondition": {
"leaveWithGrappleTeleport": {
"blockPositions": [
[
3,
13
]
]
}
}
},
{
"link": [
3,
3
],
"name": "Leave With Runway",
"requires": [],
"exitCondition": {
"leaveWithRunway": {
"length": 11,
"openEnd": 1,
"gentleDownTiles": 2,
"gentleUpTiles": 2
}
}
},
{
"link": [
3,
3
],
"name": "Red Kihunter Farm",
"requires": [
"h_heatProof",
{
"or": [
"ScrewAttack",
{
"and": [
"Plasma",
"Wave",
"Ice"
]
}
]
},
{
"resetRoom": {
"nodes": [
1,
3,
4
],
"mustStayPut": false
}
},
{
"refill": [
"Energy",
"Super"
]
}
]
},
{
"link": [
3,
3
],
"name": "Crystal Flash",
"requires": [
{
"heatFrames": 20
},
"h_canHeatedCrystalFlash",
{
"heatFrames": 20
}
],
"note": "Perform the Crystal Flash to the left, away from the door, to prevent the Kihunter from coming down."
},
{
"link": [
3,
5
],
"name": "Kihunter Shaft Grapple Teleport Semi-Blind Movement",
"notable": true,
"entranceCondition": {
"comeInWithGrappleTeleport": {
"blockPositions": [
[
2,
18
],
[
2,
19
],
[
2,
29
]
]
}
},
"requires": [
"canOffScreenMovement",
{
"heatFrames": 330
}
],
"note": [
"The grapple teleport skips past the Kihunters.",
"With good semi-blind movement, this makes it possible to reach the top with minimal heat damage."
]
},
{
"link": [
3,
6
],
"name": "Bombs",
"requires": [
"h_canNavigateHeatRooms",
"h_canUseMorphBombs",
{
"heatFrames": 410
}
]
},
{
"link": [
3,
6
],
"name": "Power Bombs",
"requires": [
"h_canNavigateHeatRooms",
"h_canUsePowerBombs",
{
"heatFrames": 250
}
]
},
{
"link": [
3,
7
],
"name": "Slow Kihunter Kill",
"requires": [
"h_heatProof",
"Wave",
{
"or": [
"Charge",
"Ice",
"Spazer"
]
}
],
"note": "Only Wave can safely clear the Kihunter."
},
{
"link": [
3,
7
],
"name": "Tank the Damage",
"requires": [
"h_canNavigateHeatRooms",
{
"enemyDamage": {
"enemy": "Kihunter (red)",
"type": "contact",
"hits": 1
}
},
{
"heatFrames": 120
}
],
"note": "Wait for the KiHunter to drop down on its own."
},
{
"link": [
3,
7
],
"name": "Ice Wave Spazer Kill",
"requires": [
"h_canNavigateHeatRooms",
"Wave",
"Ice",
"Spazer",
{
"heatFrames": 420
}
]
},
{
"link": [
3,
7
],
"name": "Wave Plasma Kill",
"requires": [
"h_canNavigateHeatRooms",
"Wave",
"Plasma",
{
"heatFrames": 300
}
]
},
{
"link": [
3,
7
],
"name": "Screw Kill",
"requires": [
"ScrewAttack"
]
},
{
"link": [
3,
7
],
"name": "KiHunter Shaft KiHunter Dodge (Bottom)",
"notable": true,
"requires": [
"h_canNavigateHeatRooms",
"canTrickyJump",
{
"heatFrames": 100
}
],
"reusableRoomwideNotable": "KiHunter Shaft KiHunter Dodge",
"note": "The KiHunter can be baited by jumping into the door then walking left."
},
{
"link": [
3,
7
],
"name": "Kihunter Shaft Manipulation from Save Room (Bottom)",
"notable": true,
"requires": [
"h_canNavigateHeatRooms",
"canStopOnADime",
"canCarefulJump",
"Morph",
{
"or": [
"HiJump",
"canWalljump"
]
},
{
"heatFrames": 80
}
],
"reusableRoomwideNotable": "Kihunter Shaft Manipulation from Save Room",
"note": [
"Manipulate the Three KiHunters to avoid all of them when entering the room from the Save room door.",
"Stop on a dime on entry for positioning, because it is precise.",
"Wait 1 second then Morph and roll left, past the swooping kihunter.",
"Quickly jump to the higher level and run into the left wall.",
"Wait there for half a second; it helps to jump into the wall.",
"The 2 KiHunters should be grouped above Samus and out of the way."
]
},
{
"link": [
4,
1
],
"name": "Transition with Stored Fall Speed",
"entranceCondition": {
"comeInWithStoredFallSpeed": {
"fallSpeedInTiles": 1
}
},
"requires": [
"canDisableEquipment",
{
"heatFrames": 90
}
],
"exitCondition": {
"leaveWithStoredFallSpeed": {
"fallSpeedInTiles": 1
}
},
"unlocksDoors": [
{
"types": [
"missiles",
"super"
],
"requires": []
},
{
"types": [
"powerbomb"
],
"requires": [
"never"
]
}
]
},
{
"link": [
4,
1
],
"name": "Transition with Stored Fall Speed (more speed)",
"entranceCondition": {
"comeInWithStoredFallSpeed": {
"fallSpeedInTiles": 2
}
},
"requires": [
"canDisableEquipment",
{
"heatFrames": 90
}
],
"exitCondition": {
"leaveWithStoredFallSpeed": {
"fallSpeedInTiles": 2
}
},
"unlocksDoors": [
{
"types": [
"missiles",
"super"
],
"requires": []
},
{
"types": [
"powerbomb"
],
"requires": [
"never"
]
}
]
},
{
"link": [
4,
1
],
"name": "Grapple Teleport",
"entranceCondition": {
"comeInWithGrappleTeleport": {
"blockPositions": [
[
3,
12
],
[
3,
13
]
]
}
},
"requires": [],
"bypassesDoorShell": true
},
{
"link": [
4,
1
],
"name": "Carry Grapple Teleport (Top Position)",
"entranceCondition": {
"comeInWithGrappleTeleport": {
"blockPositions": [
[
3,
12
]
]
}
},
"requires": [],
"bypassesDoorShell": true,
"exitCondition": {
"leaveWithGrappleTeleport": {
"blockPositions": [
[
3,
12
]
]
}
}
},
{
"link": [
4,
1
],
"name": "Carry Grapple Teleport (Bottom Position)",
"entranceCondition": {
"comeInWithGrappleTeleport": {
"blockPositions": [
[
3,
13
]
]
}
},
"requires": [],
"bypassesDoorShell": true,
"exitCondition": {
"leaveWithGrappleTeleport": {
"blockPositions": [
[
3,
13
]
]
}
}
},
{
"link": [
4,
4
],
"name": "Leave With Runway (Short Runway)",
"requires": [],
"exitCondition": {
"leaveWithRunway": {
"length": 7,
"openEnd": 0
}
},
"devNote": "If coming from below, use the left path to leave the left part of the runway unbroken."
},
{
"link": [
4,
4
],
"name": "Leave With Runway (Full Runway, Break Blocks Slowly)",
"requires": [
{
  "heatFrames": 25
}
],
"exitCondition": {
"leaveWithRunway": {
"length": 13,
"openEnd": 0
}
}
},
{
"link": [
4,
4
],
"name": "Leave With Runway (Full Runway, Break Blocks With Missile)",
"requires": [
"canPrepareForNextRoom",
"canAutoCancelWeapon",
{
"ammo": {
"type": "Missile",
"count": 1
}
}
],
"exitCondition": {
"leaveWithRunway": {
"length": 13,
"openEnd": 0
}
},
"note": [
"Enter the room aiming diagonally down, with a missile set to auto-deselect.",
"Quickly fire the missile and a beam shot to break both shot blocks and open the full runway."
]
},
{
"link": [
4,
4
],
"name": "Leave With Runway (Full Runway, Break Blocks With Grapple)",
"requires": [
"canPrepareForNextRoom",
"canPreciseGrapple"
],
"exitCondition": {
"leaveWithRunway": {
"length": 13,
"openEnd": 0
}
},
"note": "Enter the room aiming diagonally down and quickly use two grapple shots to break the shot blocks."
},
{
"link": [
4,
4
],
"name": "Crystal Flash",
"requires": [
"h_canHeatedCrystalFlash"
],
"clearsObstacles": [
"A"
]
},
{
"link": [
4,
5
],
"name": "Base",
"requires": [
"h_canNavigateHeatRooms",
{
"heatFrames": 40
}
]
},
{
"link": [
4,
7
],
"name": "Fast Descent",
"entranceCondition": {
"comeInRunning": {
"minTiles": 1,
"speedBooster": "any"
}
},
"requires": [
"canDodgeWhileShooting",
"canTrickyJump",
{
"or": [
"Charge",
"Spazer",
"Plasma",
"Wave",
{
"and": [
"canInsaneJump",
{
"or": [
"canDownBack",
"Morph"
]
}
]
}
]
},
{
"heatFrames": 540
}
],
"note": "By breaking the shot blocks and maneuvering through the room effeciently Samus will not have to spend much time waiting on KiHunters."
},
{
"link": [
5,
1
],
"name": "Base",
"requires": [
"h_canNavigateHeatRooms",
{
"heatFrames": 40
}
]
},
{
"link": [
5,
4
],
"name": "Base",
"requires": [
"h_canNavigateHeatRooms",
{
"heatFrames": 40
}
]
},
{
"link": [
5,
7
],
"name": "Base",
"requires": [
"h_canNavigateHeatRooms",
{
"or": [
{
"and": [
"ScrewAttack",
{
"heatFrames": 510
}
]
},
{
"and": [
"Charge",
"Wave",
"Ice",
"Plasma",
{
"heatFrames": 570
}
]
}
]
}
]
},
{
"link": [
5,
7
],
"name": "Fast Descent",
"requires": [
"canDodgeWhileShooting",
"canTrickyJump",
{
"or": [
"Spazer",
"Wave"
]
},
{
"heatFrames": 500
}
],
"note": "By breaking the shot blocks and maneuvering through the room effeciently Samus will not have to spend much time waiting on KiHunters."
},
{
"link": [
5,
7
],
"name": "Wait For KiHunters",
"requires": [
"h_canNavigateHeatRooms",
{
"heatFrames": 1160
}
]
},
{
"link": [
5,
7
],
"name": "Jump the KiHunter",
"requires": [
"canInsaneJump",
"canDodgeWhileShooting",
"canPrepareForNextRoom",
{
"or": [
"Charge",
"Spazer",
"Plasma",
"Wave"
]
},
"canDownBack",
{
"heatFrames": 420
}
],
"note": [
"Very quickly move through the room to meet the bottom KiHunter in a position where it is possible to jump over it.",
"Down back through the shot blocks. If coming through the right door, Morphing may be easier.",
"Jump over the KiHunter where it dips while moving left.",
"Additionally, build full run speed before jumping to land all the way next to the door."
]
},
{
"link": [
5,
7
],
"name": "Plasma Run Through Enemies",
"requires": [
"h_canNavigateHeatRooms",
"canHitbox",
"Plasma",
{
"or": [
"canDownBack",
{
"and": [
"canCarefulJump",
{
"heatFrames": 50
}
]
},
{
"heatFrames": 130
}
]
},
{
"heatFrames": 410
}
],
"note": "Use Plasma to run through Kihunters instead of waiting."
},
{
"link": [
6,
2
],
"name": "Bombs",
"requires": [
"h_canNavigateHeatRooms",
"h_canUseMorphBombs",
{
"heatFrames": 270
}
]
},
{
"link": [
6,
2
],
"name": "Power Bombs",
"requires": [
"h_canNavigateHeatRooms",
"h_canUsePowerBombs",
{
"heatFrames": 270
}
],
"devNote": "FIXME This strat also unlocks node 2. Could add that in later?"
},
{
"link": [
6,
6
],
"name": "Crystal Flash",
"requires": [
"h_canHeatedCrystalFlash"
],
"devNote": [
"FIXME: This breaks the bomb blocks, but we don't have a way to represent this.",
"Note that the blocks respawn too fast for this to be useful unless you have Spring Ball."
]
},
{
"link": [
6,
7
],
"name": "Bombs",
"requires": [
"h_canNavigateHeatRooms",
"h_canUseMorphBombs",
{
"or": [
"ScrewAttack",
{
"and": [
"canCarefulJump",
{
"heatFrames": 90
}
]
},
{
"enemyDamage": {
"enemy": "Kihunter (red)",
"type": "contact",
"hits": 1
}
}
]
},
{
"heatFrames": 500
}
],
"note": "Watch for the KiHunter to move right before jumping up to get a safe predicatable swoop."
},
{
"link": [
6,
7
],
"name": "Power Bombs",
"requires": [
"h_canNavigateHeatRooms",
"Morph",
{
"ammo": {
"type": "PowerBomb",
"count": 2
}
},
{
"or": [
"ScrewAttack",
{
"and": [
"canCarefulJump",
{
"heatFrames": 90
}
]
},
{
"enemyDamage": {
"enemy": "Kihunter (red)",
"type": "contact",
"hits": 1
}
}
]
},
{
"heatFrames": 400
}
],
"note": "Watch for the KiHunter to move right before jumping up to get a safe predicatable swoop."
},
{
"link": [
6,
7
],
"name": "Red Kihunter Shaft X-Ray Clip",
"requires": [
"h_canNavigateHeatRooms",
"h_canUsePowerBombs",
"canXRayStandUp",
"canPartialFloorClip",
"canCeilingClip",
{
"or": [
"ScrewAttack",
{
"and": [
"canCarefulJump",
{
"heatFrames": 90
}
]
},
{
"enemyDamage": {
"enemy": "Kihunter (red)",
"type": "contact",
"hits": 1
}
}
]
},
{
"heatFrames": 520
}
],
"note": [
"Use Xray to stand up. Jump to clip into the floor. Then another jump to clip through the ceiling block.",
"Watch for the KiHunter to move right before jumping up to get a safe predicatable swoop."
],
"devNote": [
"This requires Power Bombs because it saves neither energy nor ammo using Bombs.",
"It's slower than Spring Ball mainly because X-Ray scope won't activate during the Power Bomb explosion."
]
},
{
"link": [
6,
7
],
"name": "Red Kihunter Shaft Bomb Block X-Ray Climb",
"requires": [
"h_canNavigateHeatRooms",
"h_canUsePowerBombs",
"canXRayClimb",
"canCeilingClip",
{
"or": [
"ScrewAttack",
{
"and": [
"canCarefulJump",
{
"heatFrames": 90
}
]
},
{
"enemyDamage": {
"enemy": "Kihunter (red)",
"type": "contact",
"hits": 1
}
}
]
},
{
"heatFrames": 810
}
],
"note": [
"Wait for the bomb blocks to reappear. Two crouches worth of height are needed before jumping through the rest of the blocks.",
"Watch for the KiHunter to move right before jumping up to get a safe predicatable swoop."
],
"devNote": "This requires Power Bombs because it saves neither energy nor ammo using Bombs."
},
{
"link": [
6,
7
],
"name": "Spring Power Bombs",
"requires": [
"h_canNavigateHeatRooms",
"h_canUsePowerBombs",
"h_canUseSpringBall",
{
"or": [
"ScrewAttack",
{
"and": [
"canCarefulJump",
{
"heatFrames": 90
}
]
},
{
"enemyDamage": {
"enemy": "Kihunter (red)",
"type": "contact",
"hits": 1
}
}
]
},
{
"heatFrames": 350
}
],
"note": "Watch for the KiHunter to move right before jumping up to get a safe predicatable swoop."
},
{
"link": [
7,
3
],
"name": "Base",
"requires": []
},
{
"link": [
7,
5
],
"name": "Slow Kihunter Kill",
"requires": [
"h_heatProof",
"canBePatient",
{
"enemyKill": {
"enemies": [
[
"Kihunter (red)",
"Kihunter (red)"
]
]
}
}
],
"devNote": "Charge, Spazer, Ice on their own is tedious."
},
{
"link": [
7,
5
],
"name": "Tank the Damage",
"requires": [
"h_canNavigateHeatRooms",
{
"enemyDamage": {
"enemy": "Kihunter (red)",
"type": "contact",
"hits": 2
}
},
{
"heatFrames": 480
}
],
"note": "Most RNG patterns group the top 2 KiHunters allowing for 0 or 1 hits but sometimes 2 hits are required."
},
{
"link": [
7,
5
],
"name": "Super Kill",
"requires": [
"h_canNavigateHeatRooms",
{
"enemyKill": {
"enemies": [
[
"Kihunter (red)",
"Kihunter (red)"
]
],
"explicitWeapons": [
"Super"
]
}
},
{
"heatFrames": 840
}
]
},
{
"link": [
7,
5
],
"name": "Ice Wave Spazer Kill",
"requires": [
"h_canNavigateHeatRooms",
"Wave",
"Ice",
"Spazer",
{
"heatFrames": 1160
}
]
},
{
"link": [
7,
5
],
"name": "Wave Plasma Kill",
"requires": [
"h_canNavigateHeatRooms",
"Wave",
"Plasma",
{
"heatFrames": 840
}
]
},
{
"link": [
7,
5
],
"name": "Screw Kill",
"requires": [
"h_canNavigateHeatRooms",
"ScrewAttack",
{
"heatFrames": 450
}
],
"note": "Be careful when Walljumping because Screw Attack does not provide protection at that time."
},
{
"link": [
7,
5
],
"name": "KiHunter Shaft KiHunter Dodge (Top)",
"notable": true,
"requires": [
"h_canNavigateHeatRooms",
"canTrickyJump",
{
"heatFrames": 710
}
],
"reusableRoomwideNotable": "KiHunter Shaft KiHunter Dodge",
"note": [
"The Middle KiHunter can be jumped past by waiting for the right timing, if it is in the way.",
"Wait for the top KiHunter to exit the corridor and wait just below so that it will bonk the wall when it attempts to swoop, then jump past.",
"It is possible the two KiHunters group up in the middle which may not be possible to pass without taking damage."
]
},
{
"link": [
7,
5
],
"name": "Kihunter Shaft Manipulation from Save Room (Top)",
"notable": true,
"requires": [
"h_canNavigateHeatRooms",
"canStopOnADime",
"canCarefulJump",
"Morph",
{
"or": [
"HiJump",
"canWalljump"
]
},
{
"heatFrames": 490
}
],
"reusableRoomwideNotable": "Kihunter Shaft Manipulation from Save Room",
"note": [
"Manipulate the Three KiHunters to avoid all of them when entering the room from the Save room door.",
"Stop on a dime on entry for positioning, because it is precise.",
"Wait 1 second then Morph and roll left, past the swooping kihunter.",
"Quickly jump to the higher level and run into the left wall.",
"Wait there for half a second; it helps to jump into the wall.",
"The 2 KiHunters should be grouped above Samus and out of the way."
]
}
]
}