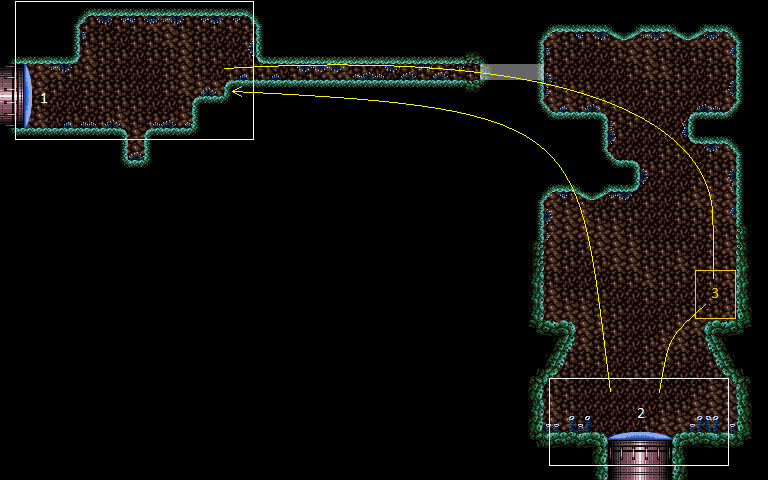
Red Fish Room
Room ID: 177
|
Exit condition: {
"leaveWithRunway": {
"length": 7,
"openEnd": 1
}
}
|
|
Requires a pixel-perfect freeze in order to run onto and off of the frozen Zeb. Requires: "h_canFrozenEnemyRunway" Exit condition: {
"leaveWithRunway": {
"length": 11,
"openEnd": 0
}
}
|
|
Requires: {
"refill": [
"Energy",
"Missile",
"Super"
]
}
|
|
Exit condition: {
"leaveWithGModeSetup": {}
}
|
|
Requires: "Morph" |
|
Use spring ball to cross the room, or use bombs to kill the Zebbos so they stop respawning. One PB can be placed at the first plant on the ground to bomb across the farm while killing the Zebbos. Entrance condition: {
"comeInWithGMode": {
"mode": "any",
"morphed": true
}
}
Requires: {
"or": [
"h_canArtificialMorphSpringBall",
"h_canArtificialMorphBombs",
{
"and": [
"h_canArtificialMorphBombHorizontally",
"h_additionalBomb",
"h_additionalBomb"
]
}
]
}
|
|
Requires: "Gravity" "h_canIBJ" |
|
Enter on the right side of the doorway to be able to get up out of the water and onto the top platform. Entrance condition: {
"comeInWithSpark": {},
"comesThroughToilet": "no"
}
Requires: "Morph"
{
"shinespark": {
"frames": 25,
"excessFrames": 6
}
}
|
|
Entrance condition: {
"comeInShinecharged": {
"framesRequired": 5
},
"comesThroughToilet": "any"
}
Requires: "Morph"
{
"shinespark": {
"frames": 25,
"excessFrames": 6
}
}
|
|
Enter the room on the far right or left side in order to not fall back through the open doorway. Entrance condition: {
"comeInWithGMode": {
"mode": "any",
"morphed": true
},
"comesThroughToilet": "any"
}
Requires: "Gravity"
{
"or": [
"h_canArtificialMorphIBJ",
{
"and": [
"h_canArtificialMorphSpringBall",
"HiJump"
]
}
]
}
|
|
Exit condition: {
"leaveNormally": {}
}
|
|
Enter on the left side of the doorway to reduce the amount of energy used. Entrance condition: {
"comeInWithSpark": {},
"comesThroughToilet": "any"
}
Requires: {
"shinespark": {
"frames": 14,
"excessFrames": 14
}
}
|
|
Requires: "h_canCrystalFlash" |
|
In order to not fall back into the room below, enter on the far left and face and hold left while getting hit, or enter on the far right side while facing left and turn around and hold right white getting hit. Requires: {
"enemyDamage": {
"enemy": "Skultera",
"type": "contact",
"hits": 1
}
}
|
|
Requires: "Gravity" |
|
Requires: "canSuitlessMaridia"
"HiJump"
{
"or": [
{
"and": [
"canWalljump",
"canCarefulJump"
]
},
"canSpringBallJumpMidAir"
]
}
|
|
Requires: "canSuitlessMaridia"
{
"or": [
{
"and": [
"canSpaceJumpWaterBounce",
"canWalljump"
]
},
{
"and": [
"canSpaceJumpWaterEscape",
"HiJump"
]
}
]
}
|
|
Requires: "canSuitlessMaridia"
"canUseFrozenEnemies"
{
"or": [
"canWalljump",
"canSpringBallJumpMidAir",
{
"and": [
"HiJump",
"canDownGrab"
]
},
"canBombJumpWaterEscape"
]
}
|
|
From: 2
Bottom Door
To: 3
Bottom Right Ledge
Notable: true 
Use a Space Jump water bounce followed by a tight mid-air morph, to get a mid-air Spring Ball jump out of the water. Requires: "canSpaceJumpWaterBounce" "canTrickySpringBallJump" "can4HighMidAirMorph" |
|
Notable: true 
Escape the water using a well-timed Space Jump water bounce followed by a frame-perfect Space jump just above the water, at a specific time when the tide is descending. Requires: "canSpaceJumpWaterEscape" "canInsaneJump" |
|
From: 2
Bottom Door
To: 3
Bottom Right Ledge
Entrance condition: {
"comeInShinecharged": {
"framesRequired": 5
},
"comesThroughToilet": "any"
}
Requires: {
"shinespark": {
"frames": 18,
"excessFrames": 11
}
}
|
|
Space Jump up through the door of the room below. Entrance condition: {
"comeInWithSpaceJumpBelow": {},
"comesThroughToilet": "any"
}
Requires: "canCrossRoomJumpIntoWater" |
|
Standing on the platform in the room below, jump up through the door. Entrance condition: {
"comeInWithPlatformBelow": {
"minHeight": 6,
"maxHeight": 6,
"maxLeftPosition": 1,
"minRightPosition": 0
},
"comesThroughToilet": "any"
}
Requires: "canCrossRoomJumpIntoWater" |
|
From: 2
Bottom Door
To: 3
Bottom Right Ledge
Standing on the platform in the room below, crouch jump up through the door transition, then down-grab onto the platform. Entrance condition: {
"comeInWithPlatformBelow": {
"minHeight": 7,
"maxHeight": 7,
"maxLeftPosition": 1,
"minRightPosition": -1.5
},
"comesThroughToilet": "any"
}
Requires: "canCrossRoomJumpIntoWater" "h_canCrouchJumpDownGrab" |
|
Standing on the platform in the room below, jump up through the door. Entrance condition: {
"comeInWithPlatformBelow": {
"minHeight": 8,
"maxHeight": 9,
"maxLeftPosition": 1,
"minRightPosition": 0
},
"comesThroughToilet": "any"
}
Requires: "canCrossRoomJumpIntoWater" "HiJump" |
|
From: 2
Bottom Door
To: 3
Bottom Right Ledge
Standing on the platform in the room below, jump up through the door. Either a crouch jump or a down grab (or both) must be used to make it onto the ledge. Entrance condition: {
"comeInWithPlatformBelow": {
"minHeight": 10,
"maxHeight": 10,
"maxLeftPosition": 1,
"minRightPosition": 0
},
"comesThroughToilet": "any"
}
Requires: "canCrossRoomJumpIntoWater"
"HiJump"
{
"or": [
"canCrouchJump",
"canDownGrab"
]
}
|
|
Wall jump up through the door of the room below, using either side of the door frame. Entrance condition: {
"comeInWithWallJumpBelow": {
"minHeight": 2
},
"comesThroughToilet": "any"
}
Requires: "canCrossRoomJumpIntoWater" |
|
Using SpeedBooster in the room below, run left-to-right and jump, pressing against the right side of the door frame through the transition. Entrance condition: {
"comeInWithPlatformBelow": {
"minHeight": 9,
"maxHeight": 10,
"maxLeftPosition": -34.5,
"minRightPosition": -7
},
"comesThroughToilet": "any"
}
Requires: "canCrossRoomJumpIntoWater" "SpeedBooster" |
|
From: 2
Bottom Door
To: 3
Bottom Right Ledge
Run left-to-right in the room below using SpeedBooster over a specific distance, and jump up through the door. Entrance condition: {
"comeInWithPlatformBelow": {
"minHeight": 8,
"maxHeight": 9,
"maxLeftPosition": -6,
"minRightPosition": 2
},
"comesThroughToilet": "any"
}
Requires: "canCrossRoomJumpIntoWater" "canTrickyDashJump" |
|
From: 2
Bottom Door
To: 3
Bottom Right Ledge
Run right-to-left in the room below using SpeedBooster over a very precise distance, jump, immediately turn back right, and break spin before reaching the transition. Entrance condition: {
"comeInWithPlatformBelow": {
"minHeight": 8,
"maxHeight": 9,
"maxLeftPosition": -2,
"minRightPosition": 6
},
"comesThroughToilet": "any"
}
Requires: "canCrossRoomJumpIntoWater" "canTrickyDashJump" |
|
From: 2
Bottom Door
To: 3
Bottom Right Ledge
Standing on the platform in the room below, perform a spring ball jump mid-air just before reaching the transition. Entrance condition: {
"comeInWithPlatformBelow": {
"maxHeight": 10,
"maxLeftPosition": 2,
"minRightPosition": -2
},
"comesThroughToilet": "any"
}
Requires: "canCrossRoomJumpIntoWater" "canTrickySpringBallJump" |
|
Requires: "Morph"
{
"or": [
"HiJump",
"canWalljump",
"SpaceJump",
{
"and": [
"h_canIBJ",
"h_canBombHorizontally"
]
},
"canSpringBallJumpMidAir"
]
}
|
|
|
{
"$schema": "../../../schema/m3-room.schema.json",
"id": 177,
"name": "Red Fish Room",
"area": "Maridia",
"subarea": "Outer",
"playable": true,
"roomAddress": "0x7D104",
"roomEnvironments": [
{
"heated": false
}
],
"nodes": [
{
"id": 1,
"name": "Top Left Door",
"nodeType": "door",
"nodeSubType": "blue",
"nodeAddress": "0x001a480",
"doorEnvironments": [
{
"physics": "air"
}
]
},
{
"id": 2,
"name": "Bottom Door",
"nodeType": "door",
"nodeSubType": "blue",
"nodeAddress": "0x001a474",
"doorEnvironments": [
{
"physics": "water"
}
]
},
{
"id": 3,
"name": "Bottom Right Ledge",
"nodeType": "junction",
"nodeSubType": "junction"
}
],
"enemies": [
{
"id": "e1",
"groupName": "Red Fish Room Zebbos",
"enemyName": "Zebbo",
"quantity": 3,
"homeNodes": [
1
],
"farmCycles": [
{
"name": "3 Zebbos power beam desync",
"cycleFrames": 260,
"requires": [],
"note": "Run back and forth from the door to the spawner, alternately spawning and killing 1 Zebbo then 2."
},
{
"name": "Screw attack same spawn 3 enemies",
"cycleFrames": 180,
"requires": [
"ScrewAttack"
]
},
{
"name": "Farm top of 3 Zebbos",
"cycleFrames": 180,
"requires": [
{
"or": [
"Wave",
"Spazer",
"Plasma",
"Grapple"
]
}
]
}
]
},
{
"id": "e2",
"groupName": "Red Fish",
"enemyName": "Skultera",
"quantity": 1,
"homeNodes": [
2
]
}
],
"links": [
{
"from": 1,
"to": [
{
"id": 1
},
{
"id": 3
}
]
},
{
"from": 2,
"to": [
{
"id": 1
},
{
"id": 2
},
{
"id": 3
}
]
},
{
"from": 3,
"to": [
{
"id": 1
},
{
"id": 2
}
]
}
],
"strats": [
{
"link": [
1,
1
],
"name": "Leave with Runway",
"requires": [],
"exitCondition": {
"leaveWithRunway": {
"length": 7,
"openEnd": 1
}
}
},
{
"link": [
1,
1
],
"name": "Leave With Runway - Frozen Zeb",
"requires": [
"h_canFrozenEnemyRunway"
],
"exitCondition": {
"leaveWithRunway": {
"length": 11,
"openEnd": 0
}
},
"note": "Requires a pixel-perfect freeze in order to run onto and off of the frozen Zeb."
},
{
"link": [
1,
1
],
"name": "Zebbo Farm",
"requires": [
{
  "refill": [
    "Energy",
    "Missile",
    "Super"
  ]
}
]
},
{
"link": [
1,
1
],
"name": "G-Mode Setup - Get Hit By Zebbo",
"notable": false,
"requires": [],
"exitCondition": {
"leaveWithGModeSetup": {}
}
},
{
"link": [
1,
3
],
"name": "Base",
"requires": [
"Morph"
]
},
{
"link": [
1,
3
],
"name": "G-Mode Morph",
"entranceCondition": {
"comeInWithGMode": {
"mode": "any",
"morphed": true
}
},
"requires": [
{
  "or": [
    "h_canArtificialMorphSpringBall",
    "h_canArtificialMorphBombs",
    {
      "and": [
        "h_canArtificialMorphBombHorizontally",
        "h_additionalBomb",
        "h_additionalBomb"
      ]
    }
  ]
}
],
"note": "Use spring ball to cross the room, or use bombs to kill the Zebbos so they stop respawning. One PB can be placed at the first plant on the ground to bomb across the farm while killing the Zebbos."
},
{
"link": [
2,
1
],
"name": "Gravity IBJ",
"requires": [
"Gravity",
"h_canIBJ"
]
},
{
"link": [
2,
1
],
"name": "Come In With Shinespark",
"entranceCondition": {
"comeInWithSpark": {},
"comesThroughToilet": "no"
},
"requires": [
"Morph",
{
"shinespark": {
"frames": 25,
"excessFrames": 6
}
}
],
"note": "Enter on the right side of the doorway to be able to get up out of the water and onto the top platform."
},
{
"link": [
2,
1
],
"name": "Come In Shinecharged",
"entranceCondition": {
"comeInShinecharged": {
"framesRequired": 5
},
"comesThroughToilet": "any"
},
"requires": [
"Morph",
{
"shinespark": {
"frames": 25,
"excessFrames": 6
}
}
]
},
{
"link": [
2,
1
],
"name": "G-Mode Morph",
"entranceCondition": {
"comeInWithGMode": {
"mode": "any",
"morphed": true
},
"comesThroughToilet": "any"
},
"requires": [
"Gravity",
{
"or": [
"h_canArtificialMorphIBJ",
{
"and": [
"h_canArtificialMorphSpringBall",
"HiJump"
]
}
]
}
],
"note": "Enter the room on the far right or left side in order to not fall back through the open doorway."
},
{
"link": [
2,
2
],
"name": "Leave Normally",
"exitCondition": {
"leaveNormally": {}
},
"requires": []
},
{
"link": [
2,
2
],
"name": "Shinespark",
"entranceCondition": {
"comeInWithSpark": {},
"comesThroughToilet": "any"
},
"requires": [
{
  "shinespark": {
    "frames": 14,
    "excessFrames": 14
  }
}
],
"note": "Enter on the left side of the doorway to reduce the amount of energy used.",
"devNote": "This strat is not useful in-room, but can satisfy a strat in the room before with an exit shinespark."
},
{
"link": [
2,
2
],
"name": "Crystal Flash",
"requires": [
"h_canCrystalFlash"
]
},
{
"link": [
2,
2
],
"name": "G-Mode Regain Mobility",
"requires": [
{
  "enemyDamage": {
    "enemy": "Skultera",
    "type": "contact",
    "hits": 1
  }
}
],
"gModeRegainMobility": {},
"note": "In order to not fall back into the room below, enter on the far left and face and hold left while getting hit, or enter on the far right side while facing left and turn around and hold right white getting hit."
},
{
"link": [
2,
3
],
"name": "Base",
"requires": [
"Gravity"
]
},
{
"link": [
2,
3
],
"name": "Suitless Jump Assists",
"requires": [
"canSuitlessMaridia",
"HiJump",
{
"or": [
{
"and": [
"canWalljump",
"canCarefulJump"
]
},
"canSpringBallJumpMidAir"
]
}
]
},
{
"link": [
2,
3
],
"name": "Suitless Space Jump",
"requires": [
"canSuitlessMaridia",
{
"or": [
{
"and": [
"canSpaceJumpWaterBounce",
"canWalljump"
]
},
{
"and": [
"canSpaceJumpWaterEscape",
"HiJump"
]
}
]
}
],
"devNote": "This is potentially possible without a wall jump or hijump, but it is extremely precise"
},
{
"link": [
2,
3
],
"name": "Suitless Frozen Skultera",
"requires": [
"canSuitlessMaridia",
"canUseFrozenEnemies",
{
"or": [
"canWalljump",
"canSpringBallJumpMidAir",
{
"and": [
"HiJump",
"canDownGrab"
]
},
"canBombJumpWaterEscape"
]
}
]
},
{
"link": [
2,
3
],
"name": "Red Fish Space Jump Spring Ball Jump",
"notable": true,
"requires": [
"canSpaceJumpWaterBounce",
"canTrickySpringBallJump",
"can4HighMidAirMorph"
],
"note": [
"Use a Space Jump water bounce followed by a tight mid-air morph, to get a mid-air Spring Ball jump out of the water."
]
},
{
"link": [
2,
3
],
"name": "Red Fish Space Jump Escape",
"notable": true,
"requires": [
"canSpaceJumpWaterEscape",
"canInsaneJump"
],
"note": [
"Escape the water using a well-timed Space Jump water bounce followed by a frame-perfect Space jump just above the water, at a specific time when the tide is descending."
]
},
{
"link": [
2,
3
],
"name": "Shinespark Diagonally to the Ledge",
"entranceCondition": {
"comeInShinecharged": {
"framesRequired": 5
},
"comesThroughToilet": "any"
},
"requires": [
{
  "shinespark": {
    "frames": 18,
    "excessFrames": 11
  }
}
]
},
{
"link": [
2,
3
],
"name": "Cross Room Jump - Space Jump",
"entranceCondition": {
"comeInWithSpaceJumpBelow": {},
"comesThroughToilet": "any"
},
"requires": [
"canCrossRoomJumpIntoWater"
],
"note": [
"Space Jump up through the door of the room below."
]
},
{
"link": [
2,
3
],
"name": "Cross Room Jump - Standing Jump",
"entranceCondition": {
"comeInWithPlatformBelow": {
"minHeight": 6,
"maxHeight": 6,
"maxLeftPosition": 1,
"minRightPosition": 0
},
"comesThroughToilet": "any"
},
"requires": [
"canCrossRoomJumpIntoWater"
],
"note": [
"Standing on the platform in the room below, jump up through the door."
]
},
{
"link": [
2,
3
],
"name": "Cross Room Jump - Crouch Jump Down Grab",
"entranceCondition": {
"comeInWithPlatformBelow": {
"minHeight": 7,
"maxHeight": 7,
"maxLeftPosition": 1,
"minRightPosition": -1.5
},
"comesThroughToilet": "any"
},
"requires": [
"canCrossRoomJumpIntoWater",
"h_canCrouchJumpDownGrab"
],
"note": [
"Standing on the platform in the room below, crouch jump up through the door transition, then down-grab onto the platform."
]
},
{
"link": [
2,
3
],
"name": "Cross Room Jump - HiJump",
"entranceCondition": {
"comeInWithPlatformBelow": {
"minHeight": 8,
"maxHeight": 9,
"maxLeftPosition": 1,
"minRightPosition": 0
},
"comesThroughToilet": "any"
},
"requires": [
"canCrossRoomJumpIntoWater",
"HiJump"
],
"note": [
"Standing on the platform in the room below, jump up through the door."
]
},
{
"link": [
2,
3
],
"name": "Cross Room Jump - HiJump Crouch Jump or Down Grab",
"entranceCondition": {
"comeInWithPlatformBelow": {
"minHeight": 10,
"maxHeight": 10,
"maxLeftPosition": 1,
"minRightPosition": 0
},
"comesThroughToilet": "any"
},
"requires": [
"canCrossRoomJumpIntoWater",
"HiJump",
{
"or": [
"canCrouchJump",
"canDownGrab"
]
}
],
"note": [
"Standing on the platform in the room below, jump up through the door.",
"Either a crouch jump or a down grab (or both) must be used to make it onto the ledge."
]
},
{
"link": [
2,
3
],
"name": "Cross Room Jump - Wall Jump",
"entranceCondition": {
"comeInWithWallJumpBelow": {
"minHeight": 2
},
"comesThroughToilet": "any"
},
"requires": [
"canCrossRoomJumpIntoWater"
],
"note": [
"Wall jump up through the door of the room below, using either side of the door frame."
]
},
{
"link": [
2,
3
],
"name": "Cross Room Jump - Speed Jump",
"entranceCondition": {
"comeInWithPlatformBelow": {
"minHeight": 9,
"maxHeight": 10,
"maxLeftPosition": -34.5,
"minRightPosition": -7
},
"comesThroughToilet": "any"
},
"requires": [
"canCrossRoomJumpIntoWater",
"SpeedBooster"
],
"note": [
"Using SpeedBooster in the room below, run left-to-right and jump, pressing against the right side of the door frame through the transition."
],
"devNote": [
"This strat is applicable in Crocomire's Room and the Post Crocomire Jump Room.",
"Sufficient vertical speed could be obtained with fewer tiles, but it would require jumping further to the right (i.e., increasing minRightPosition) which would not work in PCJR unless the PB blocks are broken;",
"since there doesn't yet appear to be any application, we don't add a separate case for that.",
"Speed jumps from the right side would also be possible, but again there don't yet appear to be any applications."
]
},
{
"link": [
2,
3
],
"name": "Cross Room Jump - Tricky Dash Jump (From Left)",
"entranceCondition": {
"comeInWithPlatformBelow": {
"minHeight": 8,
"maxHeight": 9,
"maxLeftPosition": -6,
"minRightPosition": 2
},
"comesThroughToilet": "any"
},
"requires": [
"canCrossRoomJumpIntoWater",
"canTrickyDashJump"
],
"note": [
"Run left-to-right in the room below using SpeedBooster over a specific distance, and jump up through the door."
],
"devNote": [
"This strat is applicable to Acid Snakes Tunnel, and to Lower Norfair Escape Power Bomb Room with the left pillar broken."
]
},
{
"link": [
2,
3
],
"name": "Cross Room Jump - Tricky Dash Jump (From Right)",
"entranceCondition": {
"comeInWithPlatformBelow": {
"minHeight": 8,
"maxHeight": 9,
"maxLeftPosition": -2,
"minRightPosition": 6
},
"comesThroughToilet": "any"
},
"requires": [
"canCrossRoomJumpIntoWater",
"canTrickyDashJump"
],
"note": [
"Run right-to-left in the room below using SpeedBooster over a very precise distance, jump, immediately turn back right, and break spin before reaching the transition."
],
"devNote": [
"This strat is applicable to Acid Snakes Tunnel and Spore Spawn Kihunter Room."
]
},
{
"link": [
2,
3
],
"name": "Cross Room Jump - Spring Ball Jump",
"entranceCondition": {
"comeInWithPlatformBelow": {
"maxHeight": 10,
"maxLeftPosition": 2,
"minRightPosition": -2
},
"comesThroughToilet": "any"
},
"requires": [
"canCrossRoomJumpIntoWater",
"canTrickySpringBallJump"
],
"note": [
"Standing on the platform in the room below, perform a spring ball jump mid-air just before reaching the transition."
],
"devNote": "Crouch jumping is not needed here."
},
{
"link": [
3,
1
],
"name": "Base",
"requires": [
"Morph",
{
"or": [
"HiJump",
"canWalljump",
"SpaceJump",
{
"and": [
"h_canIBJ",
"h_canBombHorizontally"
]
},
"canSpringBallJumpMidAir"
]
}
]
},
{
"link": [
3,
2
],
"name": "Base",
"requires": []
}
]
}