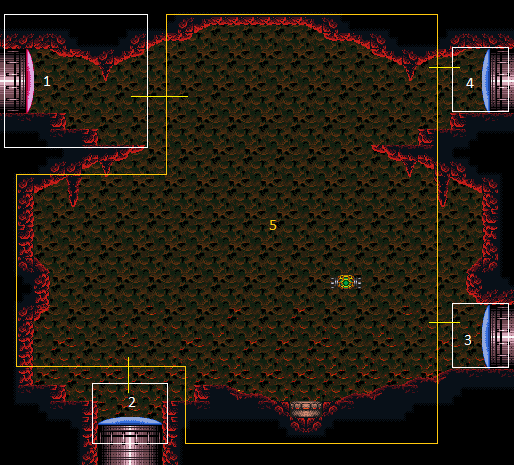
Post Crocomire Farming Room
Room ID: 123
|
Exit condition: {
"leaveWithRunway": {
"length": 3,
"openEnd": 1
}
}
|
|
From: 1
Top Left Door
To: 1
Top Left Door
Lure the Gamets up; it may be helpful to freeze them on the ascent to prevent them from separating and moving horizontally. Freeze a Gamet at the correct height, and then use it as a platform to reach the door. Positioning is much easier with Morph; simply morph on any of the stairs before they start separating. Finally, freeze a Gamet while there is a half-tile gap between it and the runway in order to extend it as much as possible. Requires: "SpaceJump"
{
"or": [
"h_canTrickyFrozenEnemyRunway",
{
"and": [
"h_canFrozenEnemyRunway",
"Morph"
]
}
]
}
Exit condition: {
"leaveWithRunway": {
"length": 5,
"openEnd": 0
}
}
|
|
Requires: "h_canCrystalFlash" |
|
Entrance condition: {
"comeInWithSpark": {}
}
Requires: {
"shinespark": {
"frames": 43,
"excessFrames": 8
}
}
|
|
Entrance condition: {
"comeInShinecharged": {
"framesRequired": 45
}
}
Requires: "canHorizontalShinespark"
{
"shinespark": {
"frames": 29,
"excessFrames": 5
}
}
|
|
From: 1
Top Left Door
To: 4
Top Right Door
Entrance condition: {
"comeInShinecharged": {
"framesRequired": 130
}
}
Requires: "SpaceJump"
"canShinechargeMovementComplex"
"canMidairShinespark"
{
"shinespark": {
"frames": 21
}
}
Exit condition: {
"leaveWithSpark": {}
}
|
|
|
|
Enter on the far right side of the doorway to reach the ledge above. Entrance condition: {
"comeInWithSpark": {},
"comesThroughToilet": "no"
}
Requires: {
"shinespark": {
"frames": 25,
"excessFrames": 5
}
}
|
|
Exit condition: {
"leaveNormally": {}
}
|
|
From: 2
Bottom Left Door
To: 2
Bottom Left Door
Stand next to the Gamet farm on the left side. Freeze the Gamets and destroy the second and third Gamet from the top. Allow the first and fourth Gamets from the top to move left, and refreeze them above the door. Perform a moonfall between them and aim down. After gaining enough speed, move forward to fall down and clip past the door shell below. Falling with too much speed can cause Samus to go out of bounds. Requires: "canEnemyStuckMoonfall" "canTrickyUseFrozenEnemies" Bypasses door shell: true |
|
Entrance condition: {
"comeInShinecharged": {
"framesRequired": 10
},
"comesThroughToilet": "any"
}
Requires: {
"shinespark": {
"frames": 25
}
}
|
|
|
|
Enter on the left side of the doorway to reduce the amount of energy used. Entrance condition: {
"comeInWithSpark": {},
"comesThroughToilet": "any"
}
Requires: {
"shinespark": {
"frames": 15,
"excessFrames": 15
}
}
|
|
Entrance condition: {
"comeInShinecharging": {
"length": 10,
"openEnd": 0,
"gentleDownTiles": 4
}
}
Requires: {
"shinespark": {
"frames": 25
}
}
|
|
From: 3
Bottom Right Door
To: 1
Top Left Door
Kill the Gamets with Wave Beam when entering the room. Entrance condition: {
"comeInShinecharging": {
"length": 18,
"openEnd": 1,
"gentleDownTiles": 4,
"gentleUpTiles": 2
}
}
Requires: "Wave"
"canDodgeWhileShooting"
{
"shinespark": {
"frames": 25,
"excessFrames": 5
}
}
|
|
From: 3
Bottom Right Door
To: 1
Top Left Door
Entrance condition: {
"comeInShinecharged": {
"framesRequired": 160
}
}
Requires: "SpaceJump"
"canShinechargeMovementComplex"
"canMidairShinespark"
{
"shinespark": {
"frames": 21
}
}
Exit condition: {
"leaveWithSpark": {}
}
|
|
From: 3
Bottom Right Door
To: 1
Top Left Door
Kill the Gamets with SpeedBooster and then jump directly up to the top left door. Entrance condition: {
"comeInShinecharging": {
"length": 10,
"openEnd": 0,
"gentleDownTiles": 4
}
}
Requires: "HiJump" "canShinechargeMovementComplex" "canTrickyDashJump" Exit condition: {
"leaveShinecharged": {
"framesRemaining": 20
}
}
|
|
From: 3
Bottom Right Door
To: 1
Top Left Door
Entrance condition: {
"comeInWithGrappleTeleport": {
"blockPositions": [
[
3,
12
],
[
3,
13
]
]
}
}
Bypasses door shell: true |
|
From: 3
Bottom Right Door
To: 1
Top Left Door
Entrance condition: {
"comeInWithGrappleTeleport": {
"blockPositions": [
[
3,
12
]
]
}
}
Exit condition: {
"leaveWithGrappleTeleport": {
"blockPositions": [
[
3,
12
]
]
}
}
Bypasses door shell: true |
|
From: 3
Bottom Right Door
To: 1
Top Left Door
Entrance condition: {
"comeInWithGrappleTeleport": {
"blockPositions": [
[
3,
13
]
]
}
}
Exit condition: {
"leaveWithGrappleTeleport": {
"blockPositions": [
[
3,
13
]
]
}
}
Bypasses door shell: true |
|
From: 3
Bottom Right Door
To: 1
Top Left Door
Exit the previous room with Samus in a standing pose (while grappled). After teleporting, press right to release Grapple while staying standing (not being forced into a crouch). Then X-ray climb to get up to the door transition, without needing to open the door. Entrance condition: {
"comeInWithGrappleTeleport": {
"blockPositions": [
[
2,
19
],
[
2,
28
],
[
2,
29
]
]
}
}
Requires: "canXRayClimb" Bypasses door shell: true |
|
From: 3
Bottom Right Door
To: 2
Bottom Left Door
Entrance condition: {
"comeInShinecharging": {
"length": 10,
"openEnd": 0,
"gentleDownTiles": 4
}
}
Exit condition: {
"leaveShinecharged": {
"framesRemaining": 120
}
}
|
|
From: 3
Bottom Right Door
To: 2
Bottom Left Door
Entrance condition: {
"comeInShinecharging": {
"length": 18,
"openEnd": 1,
"gentleDownTiles": 4,
"gentleUpTiles": 2
}
}
Requires: "Wave" "canDodgeWhileShooting" Exit condition: {
"leaveShinecharged": {
"framesRemaining": 120
}
}
|
|
Entrance condition: {
"comeInShinecharging": {
"length": 10,
"openEnd": 0,
"gentleDownTiles": 4
}
}
Requires: {
"shinespark": {
"frames": 25
}
}
|
|
From: 3
Bottom Right Door
To: 4
Top Right Door
Kill the Gamets with Wave Beam when entering the room. Entrance condition: {
"comeInShinecharging": {
"length": 18,
"openEnd": 1,
"gentleDownTiles": 4,
"gentleUpTiles": 2
}
}
Requires: "Wave"
"canDodgeWhileShooting"
{
"shinespark": {
"frames": 25
}
}
|
|
From: 3
Bottom Right Door
To: 4
Top Right Door
Entrance condition: {
"comeInShinecharging": {
"length": 7,
"openEnd": 1,
"gentleDownTiles": 3
}
}
Requires: "canWalljump" "canFastWalljumpClimb" "canShinechargeMovementComplex" Exit condition: {
"leaveShinecharged": {
"framesRemaining": 15
}
}
|
|
From: 3
Bottom Right Door
To: 4
Top Right Door
Entrance condition: {
"comeInShinecharging": {
"length": 7,
"openEnd": 1,
"gentleDownTiles": 3
}
}
Requires: "SpaceJump"
"canShinechargeMovementComplex"
"canMidairShinespark"
{
"shinespark": {
"frames": 15
}
}
Exit condition: {
"leaveWithSpark": {}
}
|
|
From: 3
Bottom Right Door
To: 4
Top Right Door
Entrance condition: {
"comeInShinecharging": {
"length": 10,
"openEnd": 0,
"gentleDownTiles": 4
}
}
Requires: "HiJump" "canShinechargeMovementComplex" Exit condition: {
"leaveShinecharged": {
"framesRemaining": 45
}
}
|
|
From: 3
Bottom Right Door
To: 4
Top Right Door
Shoot the Gamets while entering the room for more runway. Entrance condition: {
"comeInShinecharging": {
"length": 18,
"openEnd": 0,
"gentleDownTiles": 4,
"gentleUpTiles": 2
}
}
Requires: "HiJump" "Wave" "canDodgeWhileShooting" "canShinechargeMovementComplex" Exit condition: {
"leaveShinecharged": {
"framesRemaining": 15
}
}
|
|
From: 3
Bottom Right Door
To: 4
Top Right Door
Climb up 1 screen. Entrance condition: {
"comeInShinecharged": {
"framesRequired": 1
}
}
Requires: {
"shinespark": {
"frames": 1,
"excessFrames": 1
}
}
"canShinesparkDeepStuck"
"canXRayClimb"
|
|
From: 3
Bottom Right Door
To: 4
Top Right Door
Climb up 1 screen. Entrance condition: {
"comeInWithGMode": {
"mode": "direct",
"morphed": false
}
}
Requires: "canXRayClimb" |
|
From: 3
Bottom Right Door
To: 4
Top Right Door
Enter with G-mode direct, back up to between 1 and 6 pixels from the door transition, and activate X-ray to get very deep stuck in the door. Climb up 1 screen, and perform a turnaround buffered spin-jump away from the door to trigger the transition, bypassing any lock on the door. Entrance condition: {
"comeInWithGMode": {
"mode": "direct",
"morphed": false
}
}
Requires: "canXRayClimb" Bypasses door shell: true |
|
|
|
Entrance condition: {
"comeInWithSpark": {}
}
Requires: {
"shinespark": {
"frames": 43,
"excessFrames": 8
}
}
|
|
Entrance condition: {
"comeInShinecharged": {
"framesRequired": 45
}
}
Requires: "canHorizontalShinespark"
{
"shinespark": {
"frames": 29,
"excessFrames": 5
}
}
|
|
From: 4
Top Right Door
To: 1
Top Left Door
Entrance condition: {
"comeInShinecharged": {
"framesRequired": 130
}
}
Requires: "SpaceJump"
"canShinechargeMovementComplex"
"canMidairShinespark"
{
"shinespark": {
"frames": 21
}
}
Exit condition: {
"leaveWithSpark": {}
}
|
|
Entrance condition: {
"comeInWithGrappleTeleport": {
"blockPositions": [
[
3,
12
],
[
3,
13
]
]
}
}
Bypasses door shell: true |
|
From: 4
Top Right Door
To: 1
Top Left Door
Entrance condition: {
"comeInWithGrappleTeleport": {
"blockPositions": [
[
3,
12
]
]
}
}
Exit condition: {
"leaveWithGrappleTeleport": {
"blockPositions": [
[
3,
12
]
]
}
}
Bypasses door shell: true |
|
From: 4
Top Right Door
To: 1
Top Left Door
Entrance condition: {
"comeInWithGrappleTeleport": {
"blockPositions": [
[
3,
13
]
]
}
}
Exit condition: {
"leaveWithGrappleTeleport": {
"blockPositions": [
[
3,
13
]
]
}
}
Bypasses door shell: true |
|
From: 4
Top Right Door
To: 1
Top Left Door
Exit the previous room with Samus in a standing pose (while grappled). After teleporting, press right to release Grapple while staying standing (not being forced into a crouch). Then X-ray climb to get up to the door transition, without needing to open the door. Samus will not be visible during the climb. Entrance condition: {
"comeInWithGrappleTeleport": {
"blockPositions": [
[
2,
19
],
[
2,
28
],
[
2,
29
]
]
}
}
Requires: "canXRayClimb" Bypasses door shell: true |
|
Exit condition: {
"leaveWithRunway": {
"length": 3,
"openEnd": 1
}
}
|
|
From: 4
Top Right Door
To: 4
Top Right Door
Lure the Gamets up; it may be helpful to freeze them on the ascent to prevent them from separating and moving horizontally. At the top, freeze a Gamet while there is a half-tile gap between it and the runway in order to extend it as much as possible. Positioning is much easier with Morph; simply morph on any of the stairs before they start separating. Freezing one or two Gamets after they separate but before they start moving can help with dodging and avoiding damage. Requires: {
"or": [
"h_canTrickyFrozenEnemyRunway",
{
"and": [
"h_canFrozenEnemyRunway",
"Morph"
]
}
]
}
Exit condition: {
"leaveWithRunway": {
"length": 5,
"openEnd": 0
}
}
|
|
|
|
Requires: "h_canFly" |
|
Involves grappling off a Ripper 2. Requires: "canUseEnemies" "Grapple" |
|
Use the moving platform (Kamer) to elevate the Gamets and then freeze them. Requires: "canTrickyUseFrozenEnemies" |
|
From: 5
Main Junction
To: 1
Top Left Door
Run on the moving platform (Kamer). Requires: "HiJump" "canCarefulJump" |
|
From: 5
Main Junction
To: 1
Top Left Door
Notable: true 

Doesn't require opening the bottom right door. Just using the available space and jumping late enough. It does require killing the Gamets and leaving the drops there so they don't kill your momentum. Requires: "canTrickyDashJump" "canWalljump" |
|
From: 5
Main Junction
To: 1
Top Left Door
Run on the the moving platform into a midair spring ball jump as far horizontal as possible. Unmorph or spring fling to reset fall speed can help. Requires: "canTrickyJump" "canTrickySpringBallJump" |
|
Requires: {
"or": [
{
"canShineCharge": {
"usedTiles": 18,
"openEnd": 1,
"gentleUpTiles": 2,
"gentleDownTiles": 4
}
},
{
"and": [
{
"doorUnlockedAtNode": 3
},
{
"canShineCharge": {
"usedTiles": 19,
"openEnd": 1,
"gentleUpTiles": 2,
"gentleDownTiles": 4
}
}
]
}
]
}
{
"shinespark": {
"frames": 25,
"excessFrames": 5
}
}
|
|
From: 5
Main Junction
To: 1
Top Left Door
Notable: true 
Use the moving platform (Kamer) to elevate the Gamets. Requires: "canTrickyJump"
{
"or": [
"h_canCrouchJumpDownGrab",
"canWalljump"
]
}
"canHorizontalDamageBoost"
{
"enemyDamage": {
"enemy": "Gamet",
"type": "contact",
"hits": 1
}
}
|
|
In-room Speedy Jump up with HiJump and Leave while Shinecharged (Very Hard)
Post Crocomire Farming Room
From: 5
Main Junction
To: 1
Top Left Door
Shortcharge to the right and then jump from below the floating platform to reach the top left door. Requires: "HiJump"
"canShinechargeMovementComplex"
{
"or": [
"canWalljump",
"canTrickyDashJump"
]
}
{
"or": [
{
"canShineCharge": {
"usedTiles": 18,
"openEnd": 1,
"gentleUpTiles": 4,
"gentleDownTiles": 2
}
},
{
"and": [
{
"doorUnlockedAtNode": 3
},
{
"canShineCharge": {
"usedTiles": 19,
"openEnd": 1,
"gentleUpTiles": 4,
"gentleDownTiles": 2
}
}
]
}
]
}
Exit condition: {
"leaveShinecharged": {
"framesRemaining": 10
}
}
|
|
|
|
From: 5
Main Junction
To: 2
Bottom Left Door
Requires: {
"or": [
{
"canShineCharge": {
"usedTiles": 18,
"openEnd": 1,
"gentleUpTiles": 2,
"gentleDownTiles": 4
}
},
{
"and": [
{
"doorUnlockedAtNode": 3
},
{
"canShineCharge": {
"usedTiles": 19,
"openEnd": 1,
"gentleUpTiles": 2,
"gentleDownTiles": 4
}
}
]
}
]
}
Exit condition: {
"leaveShinecharged": {
"framesRemaining": 130
}
}
|
|
|
|
Leave some drops after killing the Gamets so they don't respawn. Exit condition: {
"leaveWithRunway": {
"length": 19,
"openEnd": 1,
"gentleUpTiles": 4,
"gentleDownTiles": 2
}
}
|
|
Requires: {
"or": [
"HiJump",
"SpaceJump",
"canWalljump"
]
}
|
|
Involves grappling off a Ripper 2. Requires: "canUseEnemies" "Grapple" |
|
Use the moving platform (Kamer) to elevate the Gamets and then freeze them. Requires: "canUseFrozenEnemies" |
|
Jump into an IBJ from the moving platform (Kamer). Although it is possible to do it without jumping, by starting next to the Gamet farm, it is harder and more obscure. Requires: "h_canJumpIntoIBJ" |
|
From: 5
Main Junction
To: 4
Top Right Door
Crouch jump then down grab starting from the moving platform. A very fast crouch jump is necessary in order to not have lowered the platform too low. Requires: "h_canCrouchJumpDownGrab" "canTrickyJump" |
|
Requires: {
"or": [
{
"canShineCharge": {
"usedTiles": 18,
"openEnd": 1,
"gentleUpTiles": 2,
"gentleDownTiles": 4
}
},
{
"and": [
{
"doorUnlockedAtNode": 3
},
{
"canShineCharge": {
"usedTiles": 19,
"openEnd": 1,
"gentleUpTiles": 2,
"gentleDownTiles": 4
}
}
]
}
]
}
{
"shinespark": {
"frames": 25
}
}
|
|
From: 5
Main Junction
To: 4
Top Right Door
Requires: "HiJump"
"canShinechargeMovementComplex"
{
"or": [
{
"canShineCharge": {
"usedTiles": 18,
"openEnd": 1,
"gentleUpTiles": 2,
"gentleDownTiles": 4
}
},
{
"and": [
{
"doorUnlockedAtNode": 3
},
{
"canShineCharge": {
"usedTiles": 19,
"openEnd": 0,
"gentleUpTiles": 2,
"gentleDownTiles": 4
}
}
]
}
]
}
Exit condition: {
"leaveShinecharged": {
"framesRemaining": 10
}
}
|
|
From: 5
Main Junction
To: 4
Top Right Door
Requires: "canWalljump"
"canShinechargeMovementComplex"
{
"or": [
{
"canShineCharge": {
"usedTiles": 18,
"openEnd": 1,
"gentleUpTiles": 2,
"gentleDownTiles": 4
}
},
{
"and": [
{
"doorUnlockedAtNode": 3
},
{
"canShineCharge": {
"usedTiles": 19,
"openEnd": 0,
"gentleUpTiles": 2,
"gentleDownTiles": 4
}
}
]
}
]
}
{
"shinespark": {
"frames": 15
}
}
Exit condition: {
"leaveWithSpark": {}
}
|
|
Requires: {
"refill": [
"Energy",
"Missile",
"Super",
"PowerBomb"
]
}
|
{
"$schema": "../../../schema/m3-room.schema.json",
"id": 123,
"name": "Post Crocomire Farming Room",
"area": "Norfair",
"subarea": "Upper",
"subsubarea": "Crocomire",
"playable": true,
"roomAddress": "0x7AA82",
"roomEnvironments": [
{
"heated": false
}
],
"nodes": [
{
"id": 1,
"name": "Top Left Door",
"nodeType": "door",
"nodeSubType": "red",
"nodeAddress": "0x001943e",
"doorEnvironments": [
{
"physics": "air"
}
],
"locks": [
{
"name": "Post Crocomire Farming Room Red Lock (to Power Bombs)",
"lockType": "coloredDoor",
"unlockStrats": [
{
"name": "Base",
"notable": false,
"requires": [
"h_canOpenRedDoors"
]
}
]
}
]
},
{
"id": 2,
"name": "Bottom Left Door",
"nodeType": "door",
"nodeSubType": "blue",
"nodeAddress": "0x001944a",
"doorEnvironments": [
{
"physics": "air"
}
]
},
{
"id": 3,
"name": "Bottom Right Door",
"nodeType": "door",
"nodeSubType": "blue",
"nodeAddress": "0x0019456",
"doorEnvironments": [
{
"physics": "air"
}
]
},
{
"id": 4,
"name": "Top Right Door",
"nodeType": "door",
"nodeSubType": "blue",
"nodeAddress": "0x0019432",
"doorEnvironments": [
{
"physics": "air"
}
]
},
{
"id": 5,
"name": "Main Junction",
"nodeType": "junction",
"nodeSubType": "junction"
}
],
"enemies": [
{
"id": "e1",
"groupName": "Post Crocomire Farming Room Ripper 2",
"enemyName": "Ripper 2 (green)",
"quantity": 1,
"homeNodes": [
5
]
},
{
"id": "e2",
"groupName": "Post Crocomire Farming Room Gamets",
"enemyName": "Gamet",
"quantity": 5,
"homeNodes": [
5
],
"farmCycles": [
{
"name": "Crouch over Gamets",
"cycleFrames": 120,
"requires": []
}
]
}
],
"links": [
{
"from": 1,
"to": [
{
"id": 1
},
{
"id": 4
},
{
"id": 5
}
]
},
{
"from": 2,
"to": [
{
"id": 1
},
{
"id": 2
},
{
"id": 4
},
{
"id": 5
}
]
},
{
"from": 3,
"to": [
{
"id": 1
},
{
"id": 2
},
{
"id": 4
},
{
"id": 5
}
]
},
{
"from": 4,
"to": [
{
"id": 1
},
{
"id": 4
},
{
"id": 5
}
]
},
{
"from": 5,
"to": [
{
"id": 1
},
{
"id": 2
},
{
"id": 3
},
{
"id": 4
},
{
"id": 5
}
]
}
],
"strats": [
{
"link": [
1,
1
],
"name": "Leave with Runway",
"requires": [],
"exitCondition": {
"leaveWithRunway": {
"length": 3,
"openEnd": 1
}
}
},
{
"link": [
1,
1
],
"name": "Leave With Runway - Frozen Gamet",
"requires": [
"SpaceJump",
{
"or": [
"h_canTrickyFrozenEnemyRunway",
{
"and": [
"h_canFrozenEnemyRunway",
"Morph"
]
}
]
}
],
"exitCondition": {
"leaveWithRunway": {
"length": 5,
"openEnd": 0
}
},
"note": [
"Lure the Gamets up; it may be helpful to freeze them on the ascent to prevent them from separating and moving horizontally.",
"Freeze a Gamet at the correct height, and then use it as a platform to reach the door.",
"Positioning is much easier with Morph; simply morph on any of the stairs before they start separating.",
"Finally, freeze a Gamet while there is a half-tile gap between it and the runway in order to extend it as much as possible."
]
},
{
"link": [
1,
1
],
"name": "Crystal Flash",
"requires": [
"h_canCrystalFlash"
]
},
{
"link": [
1,
4
],
"name": "Enter Shinesparking",
"entranceCondition": {
"comeInWithSpark": {}
},
"requires": [
{
  "shinespark": {
    "frames": 43,
    "excessFrames": 8
  }
}
]
},
{
"link": [
1,
4
],
"name": "Short Shinespark",
"entranceCondition": {
"comeInShinecharged": {
"framesRequired": 45
}
},
"requires": [
"canHorizontalShinespark",
{
"shinespark": {
"frames": 29,
"excessFrames": 5
}
}
]
},
{
"link": [
1,
4
],
"name": "SpaceJump across and Leave with Spark",
"entranceCondition": {
"comeInShinecharged": {
"framesRequired": 130
}
},
"requires": [
"SpaceJump",
"canShinechargeMovementComplex",
"canMidairShinespark",
{
"shinespark": {
"frames": 21
}
}
],
"exitCondition": {
"leaveWithSpark": {}
},
"unlocksDoors": [
{
"types": [
"super"
],
"requires": []
},
{
"types": [
"missiles",
"powerbomb"
],
"requires": [
"never"
]
}
]
},
{
"link": [
1,
5
],
"name": "Base",
"requires": []
},
{
"link": [
2,
1
],
"name": "Shinespark",
"entranceCondition": {
"comeInWithSpark": {},
"comesThroughToilet": "no"
},
"requires": [
{
  "shinespark": {
    "frames": 25,
    "excessFrames": 5
  }
}
],
"note": "Enter on the far right side of the doorway to reach the ledge above."
},
{
"link": [
2,
2
],
"name": "Leave Normally",
"exitCondition": {
"leaveNormally": {}
},
"requires": []
},
{
"link": [
2,
2
],
"name": "Gamet Ice Moonfall Door Lock Skip",
"requires": [
"canEnemyStuckMoonfall",
"canTrickyUseFrozenEnemies"
],
"bypassesDoorShell": true,
"note": [
"Stand next to the Gamet farm on the left side.",
"Freeze the Gamets and destroy the second and third Gamet from the top.",
"Allow the first and fourth Gamets from the top to move left, and refreeze them above the door.",
"Perform a moonfall between them and aim down.",
"After gaining enough speed, move forward to fall down and clip past the door shell below.",
"Falling with too much speed can cause Samus to go out of bounds."
]
},
{
"link": [
2,
4
],
"name": "Shinespark",
"entranceCondition": {
"comeInShinecharged": {
"framesRequired": 10
},
"comesThroughToilet": "any"
},
"requires": [
{
  "shinespark": {
    "frames": 25
  }
}
]
},
{
"link": [
2,
5
],
"name": "Base",
"requires": []
},
{
"link": [
2,
5
],
"name": "Shinespark",
"entranceCondition": {
"comeInWithSpark": {},
"comesThroughToilet": "any"
},
"requires": [
{
  "shinespark": {
    "frames": 15,
    "excessFrames": 15
  }
}
],
"note": "Enter on the left side of the doorway to reduce the amount of energy used.",
"devNote": "This strat is not useful in-room, but can satisfy a strat in the room before with an exit shinespark."
},
{
"link": [
3,
1
],
"name": "Shinespark",
"entranceCondition": {
"comeInShinecharging": {
"length": 10,
"openEnd": 0,
"gentleDownTiles": 4
}
},
"requires": [
{
  "shinespark": {
    "frames": 25
  }
}
]
},
{
"link": [
3,
1
],
"name": "Shinespark with Wave",
"entranceCondition": {
"comeInShinecharging": {
"length": 18,
"openEnd": 1,
"gentleDownTiles": 4,
"gentleUpTiles": 2
}
},
"requires": [
"Wave",
"canDodgeWhileShooting",
{
"shinespark": {
"frames": 25,
"excessFrames": 5
}
}
],
"note": "Kill the Gamets with Wave Beam when entering the room."
},
{
"link": [
3,
1
],
"name": "SpaceJump up and Leave with Spark",
"entranceCondition": {
"comeInShinecharged": {
"framesRequired": 160
}
},
"requires": [
"SpaceJump",
"canShinechargeMovementComplex",
"canMidairShinespark",
{
"shinespark": {
"frames": 21
}
}
],
"exitCondition": {
"leaveWithSpark": {}
},
"unlocksDoors": [
{
"types": [
"super"
],
"requires": []
},
{
"types": [
"missiles",
"powerbomb"
],
"requires": [
"never"
]
}
]
},
{
"link": [
3,
1
],
"name": "Speedy Jump up with HiJump and Leave while Shinecharged",
"entranceCondition": {
"comeInShinecharging": {
"length": 10,
"openEnd": 0,
"gentleDownTiles": 4
}
},
"requires": [
"HiJump",
"canShinechargeMovementComplex",
"canTrickyDashJump"
],
"exitCondition": {
"leaveShinecharged": {
"framesRemaining": 20
}
},
"unlocksDoors": [
{
"types": [
"super"
],
"requires": []
},
{
"types": [
"missiles",
"powerbomb"
],
"requires": [
"never"
]
}
],
"note": "Kill the Gamets with SpeedBooster and then jump directly up to the top left door."
},
{
"link": [
3,
1
],
"name": "Grapple Teleport",
"entranceCondition": {
"comeInWithGrappleTeleport": {
"blockPositions": [
[
3,
12
],
[
3,
13
]
]
}
},
"requires": [],
"bypassesDoorShell": true
},
{
"link": [
3,
1
],
"name": "Carry Grapple Teleport (Top Position)",
"entranceCondition": {
"comeInWithGrappleTeleport": {
"blockPositions": [
[
3,
12
]
]
}
},
"requires": [],
"bypassesDoorShell": true,
"exitCondition": {
"leaveWithGrappleTeleport": {
"blockPositions": [
[
3,
12
]
]
}
}
},
{
"link": [
3,
1
],
"name": "Carry Grapple Teleport (Bottom Position)",
"entranceCondition": {
"comeInWithGrappleTeleport": {
"blockPositions": [
[
3,
13
]
]
}
},
"requires": [],
"bypassesDoorShell": true,
"exitCondition": {
"leaveWithGrappleTeleport": {
"blockPositions": [
[
3,
13
]
]
}
}
},
{
"link": [
3,
1
],
"name": "Grapple Teleport X-Ray Climb",
"entranceCondition": {
"comeInWithGrappleTeleport": {
"blockPositions": [
[
2,
19
],
[
2,
28
],
[
2,
29
]
]
}
},
"requires": [
"canXRayClimb"
],
"bypassesDoorShell": true,
"note": [
"Exit the previous room with Samus in a standing pose (while grappled).",
"After teleporting, press right to release Grapple while staying standing (not being forced into a crouch).",
"Then X-ray climb to get up to the door transition, without needing to open the door."
]
},
{
"link": [
3,
2
],
"name": "Come in Shinecharging to Leave while Shinecharged",
"entranceCondition": {
"comeInShinecharging": {
"length": 10,
"openEnd": 0,
"gentleDownTiles": 4
}
},
"requires": [],
"exitCondition": {
"leaveShinecharged": {
"framesRemaining": 120
}
},
"unlocksDoors": [
{
"types": [
"super"
],
"requires": []
},
{
"types": [
"missiles",
"powerbomb"
],
"requires": [
"never"
]
}
],
"devNote": "The Gamets are killed with SpeedBooster"
},
{
"link": [
3,
2
],
"name": "Come in Shinecharging with Wave to Leave while Shinecharged",
"entranceCondition": {
"comeInShinecharging": {
"length": 18,
"openEnd": 1,
"gentleDownTiles": 4,
"gentleUpTiles": 2
}
},
"requires": [
"Wave",
"canDodgeWhileShooting"
],
"exitCondition": {
"leaveShinecharged": {
"framesRemaining": 120
}
},
"unlocksDoors": [
{
"types": [
"super"
],
"requires": []
},
{
"types": [
"missiles",
"powerbomb"
],
"requires": [
"never"
]
}
],
"devNote": "The Gamets are killed with SpeedBooster"
},
{
"link": [
3,
4
],
"name": "Shinespark",
"entranceCondition": {
"comeInShinecharging": {
"length": 10,
"openEnd": 0,
"gentleDownTiles": 4
}
},
"requires": [
{
  "shinespark": {
    "frames": 25
  }
}
]
},
{
"link": [
3,
4
],
"name": "Shinespark with Wave",
"entranceCondition": {
"comeInShinecharging": {
"length": 18,
"openEnd": 1,
"gentleDownTiles": 4,
"gentleUpTiles": 2
}
},
"requires": [
"Wave",
"canDodgeWhileShooting",
{
"shinespark": {
"frames": 25
}
}
],
"note": "Kill the Gamets with Wave Beam when entering the room."
},
{
"link": [
3,
4
],
"name": "Walljump up and Leave Shinecharged",
"entranceCondition": {
"comeInShinecharging": {
"length": 7,
"openEnd": 1,
"gentleDownTiles": 3
}
},
"requires": [
"canWalljump",
"canFastWalljumpClimb",
"canShinechargeMovementComplex"
],
"exitCondition": {
"leaveShinecharged": {
"framesRemaining": 15
}
},
"unlocksDoors": [
{
"types": [
"super"
],
"requires": []
},
{
"types": [
"missiles",
"powerbomb"
],
"requires": [
"never"
]
}
]
},
{
"link": [
3,
4
],
"name": "SpaceJump up and Leave with Spark",
"entranceCondition": {
"comeInShinecharging": {
"length": 7,
"openEnd": 1,
"gentleDownTiles": 3
}
},
"requires": [
"SpaceJump",
"canShinechargeMovementComplex",
"canMidairShinespark",
{
"shinespark": {
"frames": 15
}
}
],
"exitCondition": {
"leaveWithSpark": {}
},
"unlocksDoors": [
{
"types": [
"super"
],
"requires": []
},
{
"types": [
"missiles",
"powerbomb"
],
"requires": [
"never"
]
}
]
},
{
"link": [
3,
4
],
"name": "Jump up with HiJump and Leave while Shinecharged",
"entranceCondition": {
"comeInShinecharging": {
"length": 10,
"openEnd": 0,
"gentleDownTiles": 4
}
},
"requires": [
"HiJump",
"canShinechargeMovementComplex"
],
"exitCondition": {
"leaveShinecharged": {
"framesRemaining": 45
}
},
"unlocksDoors": [
{
"types": [
"super"
],
"requires": []
},
{
"types": [
"missiles",
"powerbomb"
],
"requires": [
"never"
]
}
]
},
{
"link": [
3,
4
],
"name": "Use HiJump and Wave to Leave while Shinecharged",
"entranceCondition": {
"comeInShinecharging": {
"length": 18,
"openEnd": 0,
"gentleDownTiles": 4,
"gentleUpTiles": 2
}
},
"requires": [
"HiJump",
"Wave",
"canDodgeWhileShooting",
"canShinechargeMovementComplex"
],
"exitCondition": {
"leaveShinecharged": {
"framesRemaining": 15
}
},
"unlocksDoors": [
{
"types": [
"super"
],
"requires": []
},
{
"types": [
"missiles",
"powerbomb"
],
"requires": [
"never"
]
}
],
"note": "Shoot the Gamets while entering the room for more runway."
},
{
"link": [
3,
4
],
"name": "Shinespark Deep Stuck X-Ray Climb",
"entranceCondition": {
"comeInShinecharged": {
"framesRequired": 1
}
},
"requires": [
{
"shinespark": {
"frames": 1,
"excessFrames": 1
}
},
"canShinesparkDeepStuck",
"canXRayClimb"
],
"note": "Climb up 1 screen."
},
{
"link": [
3,
4
],
"name": "G-Mode Deep Stuck X-Ray Climb",
"entranceCondition": {
"comeInWithGMode": {
"mode": "direct",
"morphed": false
}
},
"requires": [
"canXRayClimb"
],
"note": "Climb up 1 screen."
},
{
"link": [
3,
4
],
"name": "Very Deep Stuck X-Ray Climb",
"entranceCondition": {
"comeInWithGMode": {
"mode": "direct",
"morphed": false
}
},
"requires": [
"canXRayClimb"
],
"bypassesDoorShell": true,
"note": [
"Enter with G-mode direct, back up to between 1 and 6 pixels from the door transition, and activate X-ray to get very deep stuck in the door.",
"Climb up 1 screen, and perform a turnaround buffered spin-jump away from the door to trigger the transition, bypassing any lock on the door."
]
},
{
"link": [
3,
5
],
"name": "Base",
"requires": []
},
{
"link": [
4,
1
],
"name": "Enter Shinesparking",
"entranceCondition": {
"comeInWithSpark": {}
},
"requires": [
{
  "shinespark": {
    "frames": 43,
    "excessFrames": 8
  }
}
]
},
{
"link": [
4,
1
],
"name": "Short Shinespark",
"entranceCondition": {
"comeInShinecharged": {
"framesRequired": 45
}
},
"requires": [
"canHorizontalShinespark",
{
"shinespark": {
"frames": 29,
"excessFrames": 5
}
}
]
},
{
"link": [
4,
1
],
"name": "SpaceJump across and Leave with Spark",
"entranceCondition": {
"comeInShinecharged": {
"framesRequired": 130
}
},
"requires": [
"SpaceJump",
"canShinechargeMovementComplex",
"canMidairShinespark",
{
"shinespark": {
"frames": 21
}
}
],
"exitCondition": {
"leaveWithSpark": {}
},
"unlocksDoors": [
{
"types": [
"super"
],
"requires": []
},
{
"types": [
"missiles",
"powerbomb"
],
"requires": [
"never"
]
}
]
},
{
"link": [
4,
1
],
"name": "Grapple Teleport",
"entranceCondition": {
"comeInWithGrappleTeleport": {
"blockPositions": [
[
3,
12
],
[
3,
13
]
]
}
},
"requires": [],
"bypassesDoorShell": true
},
{
"link": [
4,
1
],
"name": "Carry Grapple Teleport (Top Position)",
"entranceCondition": {
"comeInWithGrappleTeleport": {
"blockPositions": [
[
3,
12
]
]
}
},
"requires": [],
"bypassesDoorShell": true,
"exitCondition": {
"leaveWithGrappleTeleport": {
"blockPositions": [
[
3,
12
]
]
}
}
},
{
"link": [
4,
1
],
"name": "Carry Grapple Teleport (Bottom Position)",
"entranceCondition": {
"comeInWithGrappleTeleport": {
"blockPositions": [
[
3,
13
]
]
}
},
"requires": [],
"bypassesDoorShell": true,
"exitCondition": {
"leaveWithGrappleTeleport": {
"blockPositions": [
[
3,
13
]
]
}
}
},
{
"link": [
4,
1
],
"name": "Grapple Teleport X-Ray Climb",
"entranceCondition": {
"comeInWithGrappleTeleport": {
"blockPositions": [
[
2,
19
],
[
2,
28
],
[
2,
29
]
]
}
},
"requires": [
"canXRayClimb"
],
"bypassesDoorShell": true,
"note": [
"Exit the previous room with Samus in a standing pose (while grappled).",
"After teleporting, press right to release Grapple while staying standing (not being forced into a crouch).",
"Then X-ray climb to get up to the door transition, without needing to open the door.",
"Samus will not be visible during the climb."
]
},
{
"link": [
4,
4
],
"name": "Leave with Runway",
"requires": [],
"exitCondition": {
"leaveWithRunway": {
"length": 3,
"openEnd": 1
}
}
},
{
"link": [
4,
4
],
"name": "Leave With Runway - Frozen Gamet",
"requires": [
{
  "or": [
    "h_canTrickyFrozenEnemyRunway",
    {
      "and": [
        "h_canFrozenEnemyRunway",
        "Morph"
      ]
    }
  ]
}
],
"exitCondition": {
"leaveWithRunway": {
"length": 5,
"openEnd": 0
}
},
"note": [
"Lure the Gamets up; it may be helpful to freeze them on the ascent to prevent them from separating and moving horizontally.",
"At the top, freeze a Gamet while there is a half-tile gap between it and the runway in order to extend it as much as possible.",
"Positioning is much easier with Morph; simply morph on any of the stairs before they start separating.",
"Freezing one or two Gamets after they separate but before they start moving can help with dodging and avoiding damage."
]
},
{
"link": [
4,
5
],
"name": "Base",
"requires": []
},
{
"link": [
5,
1
],
"name": "Base",
"requires": [
"h_canFly"
]
},
{
"link": [
5,
1
],
"name": "Ripper Grapple",
"requires": [
"canUseEnemies",
"Grapple"
],
"note": "Involves grappling off a Ripper 2."
},
{
"link": [
5,
1
],
"name": "Use Frozen Enemies",
"requires": [
"canTrickyUseFrozenEnemies"
],
"note": "Use the moving platform (Kamer) to elevate the Gamets and then freeze them."
},
{
"link": [
5,
1
],
"name": "Hi Jump from Moving Platform",
"requires": [
"HiJump",
"canCarefulJump"
],
"note": "Run on the moving platform (Kamer)."
},
{
"link": [
5,
1
],
"name": "Post Crocomire Farming Room Speed Jump",
"notable": true,
"requires": [
"canTrickyDashJump",
"canWalljump"
],
"note": [
"Doesn't require opening the bottom right door. Just using the available space and jumping late enough.",
"It does require killing the Gamets and leaving the drops there so they don't kill your momentum."
]
},
{
"link": [
5,
1
],
"name": "Tricky Spring Ball Jump from the Platform",
"requires": [
"canTrickyJump",
"canTrickySpringBallJump"
],
"note": [
"Run on the the moving platform into a midair spring ball jump as far horizontal as possible.",
"Unmorph or spring fling to reset fall speed can help."
]
},
{
"link": [
5,
1
],
"name": "Shinespark",
"requires": [
{
  "or": [
    {
      "canShineCharge": {
        "usedTiles": 18,
        "openEnd": 1,
        "gentleUpTiles": 2,
        "gentleDownTiles": 4
      }
    },
    {
      "and": [
        {
          "doorUnlockedAtNode": 3
        },
        {
          "canShineCharge": {
            "usedTiles": 19,
            "openEnd": 1,
            "gentleUpTiles": 2,
            "gentleDownTiles": 4
          }
        }
      ]
    }
  ]
},
{
"shinespark": {
"frames": 25,
"excessFrames": 5
}
}
],
"unlocksDoors": [
{
"nodeId": 3,
"types": [
"ammo"
],
"requires": []
}
]
},
{
"link": [
5,
1
],
"name": "Post Crocomire Farming Room Damage Boost",
"notable": true,
"requires": [
"canTrickyJump",
{
"or": [
"h_canCrouchJumpDownGrab",
"canWalljump"
]
},
"canHorizontalDamageBoost",
{
"enemyDamage": {
"enemy": "Gamet",
"type": "contact",
"hits": 1
}
}
],
"note": "Use the moving platform (Kamer) to elevate the Gamets."
},
{
"link": [
5,
1
],
"name": "In-room Speedy Jump up with HiJump and Leave while Shinecharged",
"requires": [
"HiJump",
"canShinechargeMovementComplex",
{
"or": [
"canWalljump",
"canTrickyDashJump"
]
},
{
"or": [
{
"canShineCharge": {
"usedTiles": 18,
"openEnd": 1,
"gentleUpTiles": 4,
"gentleDownTiles": 2
}
},
{
"and": [
{
"doorUnlockedAtNode": 3
},
{
"canShineCharge": {
"usedTiles": 19,
"openEnd": 1,
"gentleUpTiles": 4,
"gentleDownTiles": 2
}
}
]
}
]
}
],
"exitCondition": {
"leaveShinecharged": {
"framesRemaining": 10
}
},
"unlocksDoors": [
{
"nodeId": 3,
"types": [
"ammo"
],
"requires": []
},
{
"types": [
"ammo"
],
"requires": []
}
],
"note": "Shortcharge to the right and then jump from below the floating platform to reach the top left door."
},
{
"link": [
5,
2
],
"name": "Base",
"requires": []
},
{
"link": [
5,
2
],
"name": "Shortcharge to Leave with Shinecharge",
"requires": [
{
"or": [
{
"canShineCharge": {
"usedTiles": 18,
"openEnd": 1,
"gentleUpTiles": 2,
"gentleDownTiles": 4
}
},
{
"and": [
{
"doorUnlockedAtNode": 3
},
{
"canShineCharge": {
"usedTiles": 19,
"openEnd": 1,
"gentleUpTiles": 2,
"gentleDownTiles": 4
}
}
]
}
]
}
],
"exitCondition": {
"leaveShinecharged": {
"framesRemaining": 130
}
},
"unlocksDoors": [
{
"nodeId": 3,
"types": [
"ammo"
],
"requires": []
},
{
"types": [
"ammo"
],
"requires": []
}
]
},
{
"link": [
5,
3
],
"name": "Base",
"requires": []
},
{
"link": [
5,
3
],
"name": "Leave with Runway",
"requires": [],
"exitCondition": {
"leaveWithRunway": {
"length": 19,
"openEnd": 1,
"gentleUpTiles": 4,
"gentleDownTiles": 2
}
},
"unlocksDoors": [
{
"types": [
"ammo"
],
"requires": []
}
],
"note": "Leave some drops after killing the Gamets so they don't respawn."
},
{
"link": [
5,
4
],
"name": "Base",
"requires": [
{
  "or": [
    "HiJump",
    "SpaceJump",
    "canWalljump"
  ]
}
]
},
{
"link": [
5,
4
],
"name": "Ripper Grapple",
"requires": [
"canUseEnemies",
"Grapple"
],
"note": "Involves grappling off a Ripper 2."
},
{
"link": [
5,
4
],
"name": "Use Frozen Enemies",
"requires": [
"canUseFrozenEnemies"
],
"note": "Use the moving platform (Kamer) to elevate the Gamets and then freeze them."
},
{
"link": [
5,
4
],
"name": "Jump Into IBJ",
"requires": [
"h_canJumpIntoIBJ"
],
"note": [
"Jump into an IBJ from the moving platform (Kamer).",
"Although it is possible to do it without jumping, by starting next to the Gamet farm, it is harder and more obscure."
]
},
{
"link": [
5,
4
],
"name": "Crouch Jump Down Grab",
"requires": [
"h_canCrouchJumpDownGrab",
"canTrickyJump"
],
"note": [
"Crouch jump then down grab starting from the moving platform. A very fast crouch jump is necessary in order to not have lowered the platform too low."
]
},
{
"link": [
5,
4
],
"name": "Shinespark",
"requires": [
{
"or": [
{
"canShineCharge": {
"usedTiles": 18,
"openEnd": 1,
"gentleUpTiles": 2,
"gentleDownTiles": 4
}
},
{
"and": [
{
"doorUnlockedAtNode": 3
},
{
"canShineCharge": {
"usedTiles": 19,
"openEnd": 1,
"gentleUpTiles": 2,
"gentleDownTiles": 4
}
}
]
}
]
},
{
"shinespark": {
"frames": 25
}
}
],
"unlocksDoors": [
{
"nodeId": 3,
"types": [
"ammo"
],
"requires": []
}
]
},
{
"link": [
5,
4
],
"name": "Shortcharge with HiJump and Leave Shinecharged",
"requires": [
"HiJump",
"canShinechargeMovementComplex",
{
"or": [
{
"canShineCharge": {
"usedTiles": 18,
"openEnd": 1,
"gentleUpTiles": 2,
"gentleDownTiles": 4
}
},
{
"and": [
{
"doorUnlockedAtNode": 3
},
{
"canShineCharge": {
"usedTiles": 19,
"openEnd": 0,
"gentleUpTiles": 2,
"gentleDownTiles": 4
}
}
]
}
]
}
],
"exitCondition": {
"leaveShinecharged": {
"framesRemaining": 10
}
},
"unlocksDoors": [
{
"nodeId": 3,
"types": [
"ammo"
],
"requires": []
},
{
"types": [
"ammo"
],
"requires": []
}
]
},
{
"link": [
5,
4
],
"name": "Shortcharge with Walljump and Leave Sparking",
"requires": [
"canWalljump",
"canShinechargeMovementComplex",
{
"or": [
{
"canShineCharge": {
"usedTiles": 18,
"openEnd": 1,
"gentleUpTiles": 2,
"gentleDownTiles": 4
}
},
{
"and": [
{
"doorUnlockedAtNode": 3
},
{
"canShineCharge": {
"usedTiles": 19,
"openEnd": 0,
"gentleUpTiles": 2,
"gentleDownTiles": 4
}
}
]
}
]
},
{
"shinespark": {
"frames": 15
}
}
],
"exitCondition": {
"leaveWithSpark": {}
},
"unlocksDoors": [
{
"nodeId": 3,
"types": [
"ammo"
],
"requires": []
},
{
"types": [
"ammo"
],
"requires": []
}
]
},
{
"link": [
5,
5
],
"name": "Gamet Farm",
"requires": [
{
  "refill": [
    "Energy",
    "Missile",
    "Super",
    "PowerBomb"
  ]
}
]
}
]
}