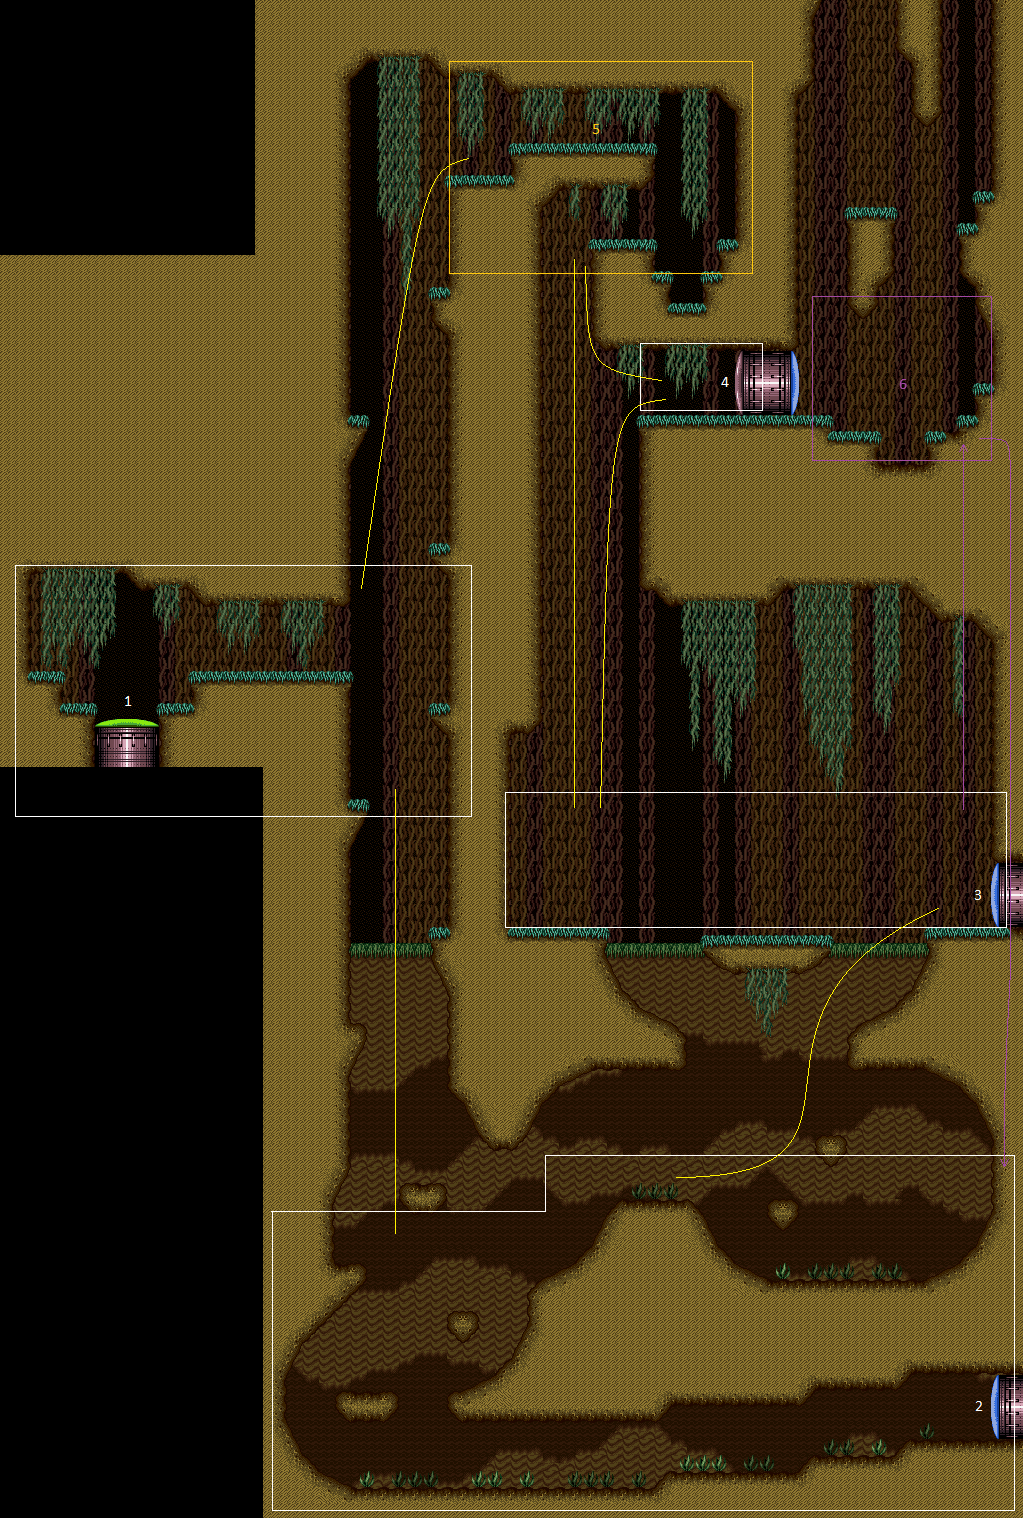
Plasma Spark Room
Room ID: 197
|
Exit condition: {
"leaveNormally": {}
}
|
|
Enter on the right side of the doorway to reduce the amount of energy used. Entrance condition: {
"comeInWithSpark": {},
"comesThroughToilet": "any"
}
Requires: {
"shinespark": {
"frames": 6,
"excessFrames": 6
}
}
|
|
Requires: "h_canCrystalFlash" |
|
|
|
Entrance condition: {
"comeInWithGMode": {
"mode": "any",
"morphed": true
},
"comesThroughToilet": "any"
}
Requires: "h_canArtificialMorphIBJ"
{
"or": [
"h_canArtificialMorphSpringBallBombJump",
"h_canArtificialMorphBombHorizontally"
]
}
|
|
Requires: {
"or": [
"HiJump",
"canWalljump",
"SpaceJump",
"canSpringBallJumpMidAir",
{
"and": [
"h_canIBJ",
{
"or": [
"canBombHorizontally",
"Gravity"
]
}
]
},
{
"and": [
"h_canSpringBallBombJump",
"h_additionalBomb",
"h_additionalBomb"
]
}
]
}
|
|
Spark vertically to avoid hitting the right ledge. Entrance condition: {
"comeInShinecharged": {
"framesRequired": 120
},
"comesThroughToilet": "any"
}
Requires: "canShinechargeMovementComplex"
"canMidairShinespark"
{
"shinespark": {
"frames": 37,
"excessFrames": 10
}
}
{
"or": [
{
"enemyDamage": {
"enemy": "Choot",
"type": "contact",
"hits": 1
}
},
{
"enemyKill": {
"enemies": [
[
"Choot"
]
],
"explicitWeapons": [
"Missile",
"Super",
"ScrewAttack",
"PseudoScrew",
"Plasma",
"Charge+Wave",
"Charge+Spazer"
]
}
}
]
}
|
|
Entrance condition: {
"comeInWithGMode": {
"mode": "any",
"morphed": true
},
"comesThroughToilet": "any"
}
Requires: {
"or": [
{
"and": [
"h_canArtificialMorphIBJ",
"h_canArtificialMorphBombHorizontally"
]
},
{
"and": [
"h_canArtificialMorphSpringBallBombJump",
"h_additionalBomb",
"h_additionalBomb",
"h_additionalBomb"
]
}
]
}
|
|
Requires: "Gravity"
{
"or": [
"canWalljump",
"HiJump",
"canSpringBallJumpMidAir",
"h_canFly"
]
}
|
|
Requires: "canSuitlessMaridia"
"HiJump"
"canSpringBallJumpMidAir"
{
"or": [
"h_canCrouchJumpDownGrab",
"canTrickySpringBallJump",
"canWalljump"
]
}
|
|
From: 2
Bottom Right Door
To: 1
Left Vertical Door
Requires: "canSuitlessMaridia" "HiJump" "canCarefulJump" "canTrickyUseFrozenEnemies" "h_canCrouchJumpDownGrab" |
|
Start the dash close to the door to help avoid getting hit by the first Owtch. Spark up while on the right side of the platform. To avoid the Owtch on the platform, it may help to jump on the left side of the platform then jump again and spark midair above the right side. Requires: "Gravity"
"SpeedBooster"
"canShinechargeMovement"
{
"shinespark": {
"frames": 90,
"excessFrames": 50
}
}
|
|
From: 2
Bottom Right Door
To: 1
Left Vertical Door
Start the dash as close to the door transition as possible to help avoid getting hit by the first Owtch. Store the shine charge while high up on the left slope. Spark up while on the right side of the platform. To avoid the Owtch on the platform, it may help to jump on the left side of the platform then jump again and spark midair above the right side. Entrance condition: {
"comeInRunning": {
"speedBooster": true,
"minTiles": 0.4375
}
}
Requires: "canWaterShineCharge"
"canShinechargeMovementComplex"
{
"or": [
{
"shinespark": {
"frames": 90,
"excessFrames": 50
}
},
{
"and": [
{
"shinespark": {
"frames": 90,
"excessFrames": 57
}
},
{
"or": [
"canWalljump",
"HiJump",
"canSpringBallJumpMidAir",
"h_canFly"
]
}
]
}
]
}
|
|
Entrance condition: {
"comeInWithGMode": {
"mode": "any",
"morphed": true
}
}
Requires: "Gravity" "h_canArtificialMorphIBJ" |
|
Exit condition: {
"leaveWithRunway": {
"length": 42,
"startingDownTiles": 2,
"gentleDownTiles": 2,
"steepUpTiles": 3,
"openEnd": 1
}
}
|
|
Requires: "h_canCrystalFlash" |
|
Requires: "Gravity" |
|
Requires: "canSuitlessMaridia"
{
"or": [
"HiJump",
"canSpringBallJumpMidAir"
]
}
|
|
From: 2
Bottom Right Door
To: 3
Middle Right Door
Notable: true 
Use the Skultera to get onto the top right platform. There are two distinct ways to get up using the top Skultera. 1. Freeze it at the bottom of its path to the left. Crouch jump and down grab to get onto it. The positioning is very precise. 2. Freeze it about a half-tile from the right wall and very quickly stationary spin jump and quickly walljump mash to get up before it thaws. This may be easier by jumping away from the wall, towards the fish, to gain height faster. Requires: "canSuitlessMaridia"
"canTrickyUseFrozenEnemies"
{
"or": [
{
"and": [
"canTrickyJump",
"h_canCrouchJumpDownGrab"
]
},
{
"and": [
"canStationarySpinJump",
"canSunkenTileWideWallClimb"
]
}
]
}
|
|
From: 2
Bottom Right Door
To: 3
Middle Right Door
Climb up 2 screens. Entrance condition: {
"comeInWithGMode": {
"mode": "direct",
"morphed": false
}
}
Requires: "canXRayClimb" |
|
From: 2
Bottom Right Door
To: 3
Middle Right Door
Climb up 2 screens. Entrance condition: {
"comeInShinecharged": {
"framesRequired": 1
}
}
Requires: {
"shinespark": {
"frames": 1,
"excessFrames": 1
}
}
"canShinesparkDeepStuck"
"canXRayClimb"
|
|
From: 2
Bottom Right Door
To: 3
Middle Right Door
Enter with G-mode direct, back up to between 1 and 6 pixels from the door transition, and activate X-ray to get very deep stuck in the door. Climb up 2 screens, and perform a turnaround buffered spin-jump away from the door to trigger the transition, bypassing any lock on the door. Entrance condition: {
"comeInWithGMode": {
"mode": "direct",
"morphed": false
}
}
Requires: "canXRayClimb" Bypasses door shell: true |
|
Gain a shinecharge by running right-to-left on the underwater runway on the right side of the room. Perform quick ledge-grabs to reach the platform in front of the door in time to spark out. Requires: "Gravity"
"SpeedBooster"
{
"enemyKill": {
"enemies": [
[
"Owtch",
"Owtch"
]
]
}
}
"canShinechargeMovementComplex"
{
"canShineCharge": {
"usedTiles": 16,
"openEnd": 2,
"gentleDownTiles": 2,
"gentleUpTiles": 2,
"steepDownTiles": 1,
"steepUpTiles": 1,
"startingDownTiles": 1
}
}
{
"shinespark": {
"frames": 10
}
}
Exit condition: {
"leaveWithSpark": {}
}
|
|
Gain a shinecharge by running right-to-left on the underwater runway on the right side of the room. Use HiJump or a Spring Ball jump to quickly exit the water to the left and spark up. Requires: "Gravity"
"SpeedBooster"
{
"or": [
"HiJump",
"canTrickySpringBallJump",
"canWalljump",
{
"and": [
"canGravityJump",
"canShinechargeMovementTricky"
]
}
]
}
{
"enemyKill": {
"enemies": [
[
"Owtch",
"Owtch"
]
]
}
}
"canShinechargeMovementComplex"
{
"canShineCharge": {
"usedTiles": 16,
"openEnd": 2,
"gentleDownTiles": 2,
"gentleUpTiles": 2,
"steepDownTiles": 1,
"steepUpTiles": 1,
"startingDownTiles": 1
}
}
{
"shinespark": {
"frames": 43,
"excessFrames": 3
}
}
|
|
Entrance condition: {
"comeInWithGMode": {
"mode": "any",
"morphed": true
}
}
Requires: {
"or": [
"Gravity",
{
"and": [
"canSuitlessMaridia",
"HiJump",
"h_canArtificialMorphSpringBall"
]
}
]
}
"h_canArtificialMorphIBJ"
|
|
Entrance condition: {
"comeInWithGMode": {
"mode": "any",
"morphed": true
}
}
Requires: {
"or": [
"Gravity",
{
"and": [
"canSuitlessMaridia",
"HiJump",
"h_canArtificialMorphSpringBall"
]
}
]
}
"h_canArtificialMorphIBJ"
|
|
Start the dash close to the door to help avoid getting hit by the first Owtch. Spark up while on the right side of the platform. To avoid the Owtch on the platform, it may help to jump on the left side of the platform then jump again and spark midair above the right side. Requires: "Gravity"
"SpeedBooster"
"canShinechargeMovement"
{
"shinespark": {
"frames": 90,
"excessFrames": 11
}
}
|
|
Start the dash as close to the door transition as possible to help avoid getting hit by the first Owtch. Store the shine charge while high up on the left slope. Spark up while on the right side of the platform. To avoid the Owtch on the platform, it may help to jump on the left side of the platform then jump again and spark midair above the right side. Entrance condition: {
"comeInRunning": {
"speedBooster": true,
"minTiles": 0.4375
}
}
Requires: "canWaterShineCharge"
"canShinechargeMovementComplex"
{
"shinespark": {
"frames": 90,
"excessFrames": 11
}
}
|
|
|
|
Exit condition: {
"leaveWithRunway": {
"length": 5,
"openEnd": 1
}
}
|
|
Requires: "canBePatient"
{
"resetRoom": {
"nodes": [
3
],
"mustStayPut": false
}
}
{
"refill": [
"Energy",
"Missile",
"Super"
]
}
|
|
Requires: "h_canCrystalFlash" |
|
Requires: {
"or": [
"canConsecutiveWalljump",
"h_canFly"
]
}
|
|
Requires: "canTrickyUseFrozenEnemies" "HiJump" "canWalljump" |
|
From: 3
Middle Right Door
To: 4
Top Right Door
Requires: "canTrickyUseFrozenEnemies" "HiJump" "SpeedBooster" "canTrickyJump" "canSpringBallJumpMidAir" |
|
From: 3
Middle Right Door
To: 4
Top Right Door
Requires: "canTrickyUseFrozenEnemies" "HiJump" "canSpringBallJumpMidAir" "canUnmorphBombBoost" |
|
Shinespark from the left side of the water, or the very edge of the land. It helps to face right before Shinesparking. Entrance condition: {
"comeInShinecharged": {
"framesRequired": 120
}
}
Requires: "canShinechargeMovementComplex"
{
"or": [
{
"shinespark": {
"frames": 43,
"excessFrames": 3
}
},
{
"and": [
"canMidairShinespark",
{
"shinespark": {
"frames": 30,
"excessFrames": 3
}
}
]
}
]
}
|
|
Entrance condition: {
"comeInWithGMode": {
"mode": "any",
"morphed": true
}
}
Requires: "h_canArtificialMorphIBJ" |
|
Requires: {
"or": [
"canConsecutiveWalljump",
"h_canFly"
]
}
{
"enemyDamage": {
"enemy": "Choot",
"type": "contact",
"hits": 1
}
}
|
|
Requires: {
"or": [
"canConsecutiveWalljump",
"SpaceJump"
]
}
{
"or": [
{
"enemyKill": {
"enemies": [
[
"Choot"
]
],
"explicitWeapons": [
"ScrewAttack"
]
}
},
{
"and": [
{
"or": [
"SpaceJump",
{
"and": [
"canConsecutiveWalljump",
"canWalljumpWithCharge"
]
}
]
},
{
"enemyKill": {
"enemies": [
[
"Choot"
]
],
"explicitWeapons": [
"PseudoScrew"
]
}
}
]
}
]
}
|
|
Shoot the Choot either before landing or from the safety of the ledge edge. If bomb jumping, there is a timing for rolling under the Choot. Requires: {
"or": [
"canConsecutiveWalljump",
"h_canFly"
]
}
{
"or": [
"canTrickyJump",
{
"and": [
"canCarefulJump",
{
"enemyKill": {
"enemies": [
[
"Choot"
]
],
"explicitWeapons": [
"Missile",
"Super"
]
}
}
]
}
]
}
|
|
To avoid damage, the Choot can be killed and then Samus can climb back up again. Requires: {
"or": [
"canConsecutiveWalljump",
"h_canFly"
]
}
{
"or": [
{
"enemyKill": {
"enemies": [
[
"Choot"
]
],
"explicitWeapons": [
"Wave",
"Spazer",
"PowerBomb"
]
}
},
{
"and": [
"canBeVeryPatient",
{
"enemyKill": {
"enemies": [
[
"Choot"
]
]
}
}
]
}
]
}
|
|
Shinespark from the tile to the right of the Choot. It helps to face right before Shinesparking. Entrance condition: {
"comeInShinecharged": {
"framesRequired": 145
}
}
Requires: "canShinechargeMovementComplex"
"canCarefulJump"
{
"shinespark": {
"frames": 49
}
}
|
|
Entrance condition: {
"comeInWithGMode": {
"mode": "any",
"morphed": true
}
}
Requires: "h_canArtificialMorphIBJ" |
|
From: 3
Middle Right Door
To: 6
Hidden Fake Kassiuz Room Junction
Notable: true 
Climb up 2 screens plus 2 tiles, to enter a normally inaccessible area behind the top right door, containing a copy of the bottom half of Kassiuz Room. There is a blue door on the other side of the top right door; you will not be able to see it as you will be off-camera, but shoot it open and touch the transition behind it. It will lead to the same place as the bottom right door of the room. Entrance condition: {
"comeInWithDoorStuckSetup": {}
}
Requires: "canXRayClimb" |
|
|
|
Exit condition: {
"leaveWithRunway": {
"length": 7,
"openEnd": 1
}
}
|
|
Requires: "h_canCrystalFlash" |
|
Climb less than 1 screen. Entrance condition: {
"comeInWithDoorStuckSetup": {}
}
Requires: "canXRayClimb" |
|
A diagonal spark may take damage from the Choot It helps to face right before Shinesparking. Entrance condition: {
"comeInShinecharged": {
"framesRequired": 45
}
}
Requires: "canShinechargeMovementComplex"
"canMidairShinespark"
{
"shinespark": {
"frames": 13
}
}
|
|
Entrance condition: {
"comeInWithGMode": {
"mode": "any",
"morphed": true
}
}
Requires: "h_canArtificialMorphIBJ" |
|
|
|
|
|
Requires: "canPreciseWalljump" |
|
From: 5
Top Junction
To: 4
Top Right Door
Notable: true 
Roll off the above ledge and use both the vertical speed resets from first (un)equipping SpringBall and then by unmorphing in order to reach the door. Pause shortly after rolling off the ledge, after falling for 1 tile. The timing is very precise. A downback helps by shrinking Samus' hitbox. Requires: "canInsaneJump" "h_canSpringFling" "canResetFallSpeed" "canDownBack" |
|
From: 6
Hidden Fake Kassiuz Room Junction
To: 2
Bottom Right Door
Shoot open and go through the blue door that is off camera to the left to transition into the same room as connects to the bottom right door of this room. Bypasses door shell: true |
{
"$schema": "../../../schema/m3-room.schema.json",
"id": 197,
"name": "Plasma Spark Room",
"area": "Maridia",
"subarea": "Inner",
"subsubarea": "Yellow",
"playable": true,
"roomAddress": "0x7D340",
"roomEnvironments": [
{
"heated": false
}
],
"nodes": [
{
"id": 1,
"name": "Left Vertical Door",
"nodeType": "door",
"nodeSubType": "green",
"nodeAddress": "0x001a5ac",
"doorEnvironments": [
{
"physics": "air"
}
],
"locks": [
{
"name": "Plasma Spark Room Green Lock (to Toilet)",
"lockType": "coloredDoor",
"unlockStrats": [
{
"name": "Base",
"notable": false,
"requires": [
"h_canOpenGreenDoors"
]
}
]
}
],
"devNote": "FIXME Check if G-Mode can be set up through the Toilet."
},
{
"id": 2,
"name": "Bottom Right Door",
"nodeType": "door",
"nodeSubType": "blue",
"nodeAddress": "0x001a5a0",
"doorEnvironments": [
{
"physics": "water"
}
]
},
{
"id": 3,
"name": "Middle Right Door",
"nodeType": "door",
"nodeSubType": "blue",
"nodeAddress": "0x001a5c4",
"doorEnvironments": [
{
"physics": "air"
}
]
},
{
"id": 4,
"name": "Top Right Door",
"nodeType": "door",
"nodeSubType": "grey",
"nodeAddress": "0x001a5b8",
"doorEnvironments": [
{
"physics": "air"
}
],
"locks": [
{
"name": "Plasma Spark Room Grey Lock (to Kassiuz Room)",
"lockType": "gameFlag",
"unlockStrats": [
{
"name": "Base",
"notable": false,
"requires": [
"f_DefeatedDraygon"
]
}
]
}
]
},
{
"id": 5,
"name": "Top Junction",
"nodeType": "junction",
"nodeSubType": "junction"
},
{
"id": 6,
"name": "Hidden Fake Kassiuz Room Junction",
"nodeType": "junction",
"nodeSubType": "junction"
}
],
"enemies": [
{
"id": "e1",
"groupName": "Plasma Spark Room Left Choot",
"enemyName": "Choot",
"quantity": 1,
"homeNodes": [
1
]
},
{
"id": "e2",
"groupName": "Plasma Spark Room Bottom Choots",
"enemyName": "Choot",
"quantity": 2,
"homeNodes": [
3
]
},
{
"id": "e3",
"groupName": "Plasma Spark Room Top Choots",
"enemyName": "Choot",
"quantity": 2,
"homeNodes": [
5
]
},
{
"id": "e4",
"groupName": "Plasma Spark Room Owtches",
"enemyName": "Owtch",
"quantity": 4,
"homeNodes": [
2
]
},
{
"id": "e5",
"groupName": "Plasma Spark Room Top Skulteras",
"enemyName": "Skultera",
"quantity": 2,
"homeNodes": [
2
]
}
],
"links": [
{
"from": 1,
"to": [
{
"id": 1
},
{
"id": 2
},
{
"id": 4
},
{
"id": 5
}
]
},
{
"from": 2,
"to": [
{
"id": 1
},
{
"id": 2
},
{
"id": 3,
"devNote": [
"It is possible to X-ray climb higher, into a normally inaccessible area behind the door to Kassiuz Room.",
"This doesn't appear to be useful: the door transition there, which appears to lead back to the normal part of Plasma Spark Room, instead transitions to the same room as the bottom right door (to Butterfly Room)."
]
},
{
"id": 4
},
{
"id": 5
}
]
},
{
"from": 3,
"to": [
{
"id": 2
},
{
"id": 3
},
{
"id": 4
},
{
"id": 5
},
{
"id": 6
}
]
},
{
"from": 4,
"to": [
{
"id": 3
},
{
"id": 4
},
{
"id": 5,
"devNote": "This link is only for shinesparking. All other strats should go 4 -> 3 -> 5."
}
]
},
{
"from": 5,
"to": [
{
"id": 1
},
{
"id": 3
},
{
"id": 4
}
]
},
{
"from": 6,
"to": [
{
"id": 2
}
]
}
],
"strats": [
{
"link": [
1,
1
],
"name": "Leave Normally",
"exitCondition": {
"leaveNormally": {}
},
"requires": []
},
{
"link": [
1,
1
],
"name": "Shinespark",
"entranceCondition": {
"comeInWithSpark": {},
"comesThroughToilet": "any"
},
"requires": [
{
  "shinespark": {
    "frames": 6,
    "excessFrames": 6
  }
}
],
"note": "Enter on the right side of the doorway to reduce the amount of energy used.",
"devNote": "This strat is not useful in-room, but can satisfy a strat in the room before with an exit shinespark."
},
{
"link": [
1,
1
],
"name": "Crystal Flash",
"requires": [
"h_canCrystalFlash"
]
},
{
"link": [
1,
2
],
"name": "Base",
"requires": []
},
{
"link": [
1,
4
],
"name": "G-Mode Morph",
"entranceCondition": {
"comeInWithGMode": {
"mode": "any",
"morphed": true
},
"comesThroughToilet": "any"
},
"requires": [
"h_canArtificialMorphIBJ",
{
"or": [
"h_canArtificialMorphSpringBallBombJump",
"h_canArtificialMorphBombHorizontally"
]
}
]
},
{
"link": [
1,
5
],
"name": "Base",
"requires": [
{
  "or": [
    "HiJump",
    "canWalljump",
    "SpaceJump",
    "canSpringBallJumpMidAir",
    {
      "and": [
        "h_canIBJ",
        {
          "or": [
            "canBombHorizontally",
            "Gravity"
          ]
        }
      ]
    },
    {
      "and": [
        "h_canSpringBallBombJump",
        "h_additionalBomb",
        "h_additionalBomb"
      ]
    }
  ]
}
]
},
{
"link": [
1,
5
],
"name": "Shinespark",
"entranceCondition": {
"comeInShinecharged": {
"framesRequired": 120
},
"comesThroughToilet": "any"
},
"requires": [
"canShinechargeMovementComplex",
"canMidairShinespark",
{
"shinespark": {
"frames": 37,
"excessFrames": 10
}
},
{
"or": [
{
"enemyDamage": {
"enemy": "Choot",
"type": "contact",
"hits": 1
}
},
{
"enemyKill": {
"enemies": [
[
"Choot"
]
],
"explicitWeapons": [
"Missile",
"Super",
"ScrewAttack",
"PseudoScrew",
"Plasma",
"Charge+Wave",
"Charge+Spazer"
]
}
}
]
}
],
"note": "Spark vertically to avoid hitting the right ledge."
},
{
"link": [
1,
5
],
"name": "G-Mode Morph",
"entranceCondition": {
"comeInWithGMode": {
"mode": "any",
"morphed": true
},
"comesThroughToilet": "any"
},
"requires": [
{
  "or": [
    {
      "and": [
        "h_canArtificialMorphIBJ",
        "h_canArtificialMorphBombHorizontally"
      ]
    },
    {
      "and": [
        "h_canArtificialMorphSpringBallBombJump",
        "h_additionalBomb",
        "h_additionalBomb",
        "h_additionalBomb"
      ]
    }
  ]
}
]
},
{
"link": [
2,
1
],
"name": "Base",
"requires": [
"Gravity",
{
"or": [
"canWalljump",
"HiJump",
"canSpringBallJumpMidAir",
"h_canFly"
]
}
]
},
{
"link": [
2,
1
],
"name": "Suitless Spring Ball",
"requires": [
"canSuitlessMaridia",
"HiJump",
"canSpringBallJumpMidAir",
{
"or": [
"h_canCrouchJumpDownGrab",
"canTrickySpringBallJump",
"canWalljump"
]
}
]
},
{
"link": [
2,
1
],
"name": "Suitless Frozen Skultera",
"requires": [
"canSuitlessMaridia",
"HiJump",
"canCarefulJump",
"canTrickyUseFrozenEnemies",
"h_canCrouchJumpDownGrab"
]
},
{
"link": [
2,
1
],
"name": "Shinespark",
"requires": [
"Gravity",
"SpeedBooster",
"canShinechargeMovement",
{
"shinespark": {
"frames": 90,
"excessFrames": 50
}
}
],
"note": [
"Start the dash close to the door to help avoid getting hit by the first Owtch.",
"Spark up while on the right side of the platform. To avoid the Owtch on the platform, it may help to jump on the left side of the platform then jump again and spark midair above the right side."
]
},
{
"link": [
2,
1
],
"name": "Suitless Shinespark",
"entranceCondition": {
"comeInRunning": {
"speedBooster": true,
"minTiles": 0.4375
}
},
"requires": [
"canWaterShineCharge",
"canShinechargeMovementComplex",
{
"or": [
{
"shinespark": {
"frames": 90,
"excessFrames": 50
}
},
{
"and": [
{
"shinespark": {
"frames": 90,
"excessFrames": 57
}
},
{
"or": [
"canWalljump",
"HiJump",
"canSpringBallJumpMidAir",
"h_canFly"
]
}
]
}
]
}
],
"note": [
"Start the dash as close to the door transition as possible to help avoid getting hit by the first Owtch. Store the shine charge while high up on the left slope.",
"Spark up while on the right side of the platform. To avoid the Owtch on the platform, it may help to jump on the left side of the platform then jump again and spark midair above the right side."
]
},
{
"link": [
2,
1
],
"name": "G-Mode Morph",
"entranceCondition": {
"comeInWithGMode": {
"mode": "any",
"morphed": true
}
},
"requires": [
"Gravity",
"h_canArtificialMorphIBJ"
]
},
{
"link": [
2,
2
],
"name": "Leave with Runway",
"requires": [],
"exitCondition": {
"leaveWithRunway": {
"length": 42,
"startingDownTiles": 2,
"gentleDownTiles": 2,
"steepUpTiles": 3,
"openEnd": 1
}
}
},
{
"link": [
2,
2
],
"name": "Crystal Flash",
"requires": [
"h_canCrystalFlash"
]
},
{
"link": [
2,
3
],
"name": "Base",
"requires": [
"Gravity"
]
},
{
"link": [
2,
3
],
"name": "Suitless Jump Assist",
"requires": [
"canSuitlessMaridia",
{
"or": [
"HiJump",
"canSpringBallJumpMidAir"
]
}
]
},
{
"link": [
2,
3
],
"name": "Plasma Spark Fish Climb",
"notable": true,
"requires": [
"canSuitlessMaridia",
"canTrickyUseFrozenEnemies",
{
"or": [
{
"and": [
"canTrickyJump",
"h_canCrouchJumpDownGrab"
]
},
{
"and": [
"canStationarySpinJump",
"canSunkenTileWideWallClimb"
]
}
]
}
],
"note": [
"Use the Skultera to get onto the top right platform. There are two distinct ways to get up using the top Skultera.",
"1. Freeze it at the bottom of its path to the left. Crouch jump and down grab to get onto it. The positioning is very precise.",
"2. Freeze it about a half-tile from the right wall and very quickly stationary spin jump and quickly walljump mash to get up before it thaws.",
"This may be easier by jumping away from the wall, towards the fish, to gain height faster."
]
},
{
"link": [
2,
3
],
"name": "G-Mode Deep Stuck X-Ray Climb",
"entranceCondition": {
"comeInWithGMode": {
"mode": "direct",
"morphed": false
}
},
"requires": [
"canXRayClimb"
],
"note": "Climb up 2 screens."
},
{
"link": [
2,
3
],
"name": "Shinespark Deep Stuck X-Ray Climb",
"entranceCondition": {
"comeInShinecharged": {
"framesRequired": 1
}
},
"requires": [
{
"shinespark": {
"frames": 1,
"excessFrames": 1
}
},
"canShinesparkDeepStuck",
"canXRayClimb"
],
"note": "Climb up 2 screens."
},
{
"link": [
2,
3
],
"name": "Very Deep Stuck X-Ray Climb",
"entranceCondition": {
"comeInWithGMode": {
"mode": "direct",
"morphed": false
}
},
"requires": [
"canXRayClimb"
],
"bypassesDoorShell": true,
"note": [
"Enter with G-mode direct, back up to between 1 and 6 pixels from the door transition, and activate X-ray to get very deep stuck in the door.",
"Climb up 2 screens, and perform a turnaround buffered spin-jump away from the door to trigger the transition, bypassing any lock on the door."
]
},
{
"link": [
2,
3
],
"name": "Leave with Spark",
"requires": [
"Gravity",
"SpeedBooster",
{
"enemyKill": {
"enemies": [
[
"Owtch",
"Owtch"
]
]
}
},
"canShinechargeMovementComplex",
{
"canShineCharge": {
"usedTiles": 16,
"openEnd": 2,
"gentleDownTiles": 2,
"gentleUpTiles": 2,
"steepDownTiles": 1,
"steepUpTiles": 1,
"startingDownTiles": 1
}
},
{
"shinespark": {
"frames": 10
}
}
],
"exitCondition": {
"leaveWithSpark": {}
},
"unlocksDoors": [
{
"types": [
"ammo"
],
"requires": []
}
],
"note": [
"Gain a shinecharge by running right-to-left on the underwater runway on the right side of the room.",
"Perform quick ledge-grabs to reach the platform in front of the door in time to spark out."
],
"devNote": "FIXME: It's technically possible to evade the Owtches without killing them, but it's unclear if this can be done reliably."
},
{
"link": [
2,
4
],
"name": "Shinespark",
"requires": [
"Gravity",
"SpeedBooster",
{
"or": [
"HiJump",
"canTrickySpringBallJump",
"canWalljump",
{
"and": [
"canGravityJump",
"canShinechargeMovementTricky"
]
}
]
},
{
"enemyKill": {
"enemies": [
[
"Owtch",
"Owtch"
]
]
}
},
"canShinechargeMovementComplex",
{
"canShineCharge": {
"usedTiles": 16,
"openEnd": 2,
"gentleDownTiles": 2,
"gentleUpTiles": 2,
"steepDownTiles": 1,
"steepUpTiles": 1,
"startingDownTiles": 1
}
},
{
"shinespark": {
"frames": 43,
"excessFrames": 3
}
}
],
"note": [
"Gain a shinecharge by running right-to-left on the underwater runway on the right side of the room.",
"Use HiJump or a Spring Ball jump to quickly exit the water to the left and spark up."
],
"devNote": "FIXME: It's technically possible to evade the Owtches without killing them, but it's unclear if this can be done reliably."
},
{
"link": [
2,
4
],
"name": "G-Mode Morph",
"entranceCondition": {
"comeInWithGMode": {
"mode": "any",
"morphed": true
}
},
"requires": [
{
"or": [
"Gravity",
{
"and": [
"canSuitlessMaridia",
"HiJump",
"h_canArtificialMorphSpringBall"
]
}
]
},
"h_canArtificialMorphIBJ"
]
},
{
"link": [
2,
5
],
"name": "G-Mode Morph",
"entranceCondition": {
"comeInWithGMode": {
"mode": "any",
"morphed": true
}
},
"requires": [
{
"or": [
"Gravity",
{
"and": [
"canSuitlessMaridia",
"HiJump",
"h_canArtificialMorphSpringBall"
]
}
]
},
"h_canArtificialMorphIBJ"
]
},
{
"link": [
2,
5
],
"name": "Shinespark",
"requires": [
"Gravity",
"SpeedBooster",
"canShinechargeMovement",
{
"shinespark": {
"frames": 90,
"excessFrames": 11
}
}
],
"note": [
"Start the dash close to the door to help avoid getting hit by the first Owtch.",
"Spark up while on the right side of the platform. To avoid the Owtch on the platform, it may help to jump on the left side of the platform then jump again and spark midair above the right side."
]
},
{
"link": [
2,
5
],
"name": "Suitless Shinespark",
"entranceCondition": {
"comeInRunning": {
"speedBooster": true,
"minTiles": 0.4375
}
},
"requires": [
"canWaterShineCharge",
"canShinechargeMovementComplex",
{
"shinespark": {
"frames": 90,
"excessFrames": 11
}
}
],
"note": [
"Start the dash as close to the door transition as possible to help avoid getting hit by the first Owtch. Store the shine charge while high up on the left slope.",
"Spark up while on the right side of the platform. To avoid the Owtch on the platform, it may help to jump on the left side of the platform then jump again and spark midair above the right side."
],
"devNote": [
"The excess frames are only low enough to get to the top right overhang, as it is free to jump to 5.",
"With other items or wall jumps and lower energy, it is possible to first spark to 1, as it has more excess frames."
]
},
{
"link": [
3,
2
],
"name": "Base",
"requires": []
},
{
"link": [
3,
3
],
"name": "Leave with Runway",
"requires": [],
"exitCondition": {
"leaveWithRunway": {
"length": 5,
"openEnd": 1
}
}
},
{
"link": [
3,
3
],
"name": "Choot Farm",
"requires": [
"canBePatient",
{
"resetRoom": {
"nodes": [
3
],
"mustStayPut": false
}
},
{
"refill": [
"Energy",
"Missile",
"Super"
]
}
]
},
{
"link": [
3,
3
],
"name": "Crystal Flash",
"requires": [
"h_canCrystalFlash"
]
},
{
"link": [
3,
4
],
"name": "Base",
"requires": [
{
  "or": [
    "canConsecutiveWalljump",
    "h_canFly"
  ]
}
]
},
{
"link": [
3,
4
],
"name": "Frozen Choot Wall Jump",
"requires": [
"canTrickyUseFrozenEnemies",
"HiJump",
"canWalljump"
]
},
{
"link": [
3,
4
],
"name": "Frozen Choot Speedy Spring Ball Jump",
"requires": [
"canTrickyUseFrozenEnemies",
"HiJump",
"SpeedBooster",
"canTrickyJump",
"canSpringBallJumpMidAir"
]
},
{
"link": [
3,
4
],
"name": "Frozen Choot Spring Ball Jump Unmorph Bomb Boost",
"requires": [
"canTrickyUseFrozenEnemies",
"HiJump",
"canSpringBallJumpMidAir",
"canUnmorphBombBoost"
]
},
{
"link": [
3,
4
],
"name": "Shinespark",
"entranceCondition": {
"comeInShinecharged": {
"framesRequired": 120
}
},
"requires": [
"canShinechargeMovementComplex",
{
"or": [
{
"shinespark": {
"frames": 43,
"excessFrames": 3
}
},
{
"and": [
"canMidairShinespark",
{
"shinespark": {
"frames": 30,
"excessFrames": 3
}
}
]
}
]
}
],
"note": [
"Shinespark from the left side of the water, or the very edge of the land.",
"It helps to face right before Shinesparking."
]
},
{
"link": [
3,
4
],
"name": "G-Mode Morph",
"entranceCondition": {
"comeInWithGMode": {
"mode": "any",
"morphed": true
}
},
"requires": [
"h_canArtificialMorphIBJ"
]
},
{
"link": [
3,
5
],
"name": "Base",
"requires": [
{
"or": [
"canConsecutiveWalljump",
"h_canFly"
]
},
{
"enemyDamage": {
"enemy": "Choot",
"type": "contact",
"hits": 1
}
}
]
},
{
"link": [
3,
5
],
"name": "Screw Kill",
"requires": [
{
"or": [
"canConsecutiveWalljump",
"SpaceJump"
]
},
{
"or": [
{
"enemyKill": {
"enemies": [
[
"Choot"
]
],
"explicitWeapons": [
"ScrewAttack"
]
}
},
{
"and": [
{
"or": [
"SpaceJump",
{
"and": [
"canConsecutiveWalljump",
"canWalljumpWithCharge"
]
}
]
},
{
"enemyKill": {
"enemies": [
[
"Choot"
]
],
"explicitWeapons": [
"PseudoScrew"
]
}
}
]
}
]
}
]
},
{
"link": [
3,
5
],
"name": "Carefully Kill Choot",
"requires": [
{
"or": [
"canConsecutiveWalljump",
"h_canFly"
]
},
{
"or": [
"canTrickyJump",
{
"and": [
"canCarefulJump",
{
"enemyKill": {
"enemies": [
[
"Choot"
]
],
"explicitWeapons": [
"Missile",
"Super"
]
}
}
]
}
]
}
],
"note": [
"Shoot the Choot either before landing or from the safety of the ledge edge.",
"If bomb jumping, there is a timing for rolling under the Choot."
]
},
{
"link": [
3,
5
],
"name": "Kill Choot and Reclimb",
"requires": [
{
"or": [
"canConsecutiveWalljump",
"h_canFly"
]
},
{
"or": [
{
"enemyKill": {
"enemies": [
[
"Choot"
]
],
"explicitWeapons": [
"Wave",
"Spazer",
"PowerBomb"
]
}
},
{
"and": [
"canBeVeryPatient",
{
"enemyKill": {
"enemies": [
[
"Choot"
]
]
}
}
]
}
]
}
],
"note": "To avoid damage, the Choot can be killed and then Samus can climb back up again.",
"devNote": "Missile kill strats could fit here with a reclimb or by landing on the ledge, with the same requirements."
},
{
"link": [
3,
5
],
"name": "Shinespark",
"entranceCondition": {
"comeInShinecharged": {
"framesRequired": 145
}
},
"requires": [
"canShinechargeMovementComplex",
"canCarefulJump",
{
"shinespark": {
"frames": 49
}
}
],
"note": [
"Shinespark from the tile to the right of the Choot.",
"It helps to face right before Shinesparking."
]
},
{
"link": [
3,
5
],
"name": "G-Mode Morph",
"entranceCondition": {
"comeInWithGMode": {
"mode": "any",
"morphed": true
}
},
"requires": [
"h_canArtificialMorphIBJ"
]
},
{
"link": [
3,
6
],
"name": "Plasma Spark X-Ray Climb Into Fake Kassiuz Room",
"notable": true,
"entranceCondition": {
"comeInWithDoorStuckSetup": {}
},
"requires": [
"canXRayClimb"
],
"note": [
"Climb up 2 screens plus 2 tiles, to enter a normally inaccessible area behind the top right door, containing a copy of the bottom half of Kassiuz Room.",
"There is a blue door on the other side of the top right door; you will not be able to see it as you will be off-camera, but shoot it open and touch the transition behind it.",
"It will lead to the same place as the bottom right door of the room."
]
},
{
"link": [
4,
3
],
"name": "Base",
"requires": []
},
{
"link": [
4,
4
],
"name": "Leave with Runway",
"requires": [],
"exitCondition": {
"leaveWithRunway": {
"length": 7,
"openEnd": 1
}
}
},
{
"link": [
4,
4
],
"name": "Crystal Flash",
"requires": [
"h_canCrystalFlash"
]
},
{
"link": [
4,
5
],
"name": "X-Ray Climb",
"entranceCondition": {
"comeInWithDoorStuckSetup": {}
},
"requires": [
"canXRayClimb"
],
"note": "Climb less than 1 screen."
},
{
"link": [
4,
5
],
"name": "Shinespark",
"entranceCondition": {
"comeInShinecharged": {
"framesRequired": 45
}
},
"requires": [
"canShinechargeMovementComplex",
"canMidairShinespark",
{
"shinespark": {
"frames": 13
}
}
],
"note": [
"A diagonal spark may take damage from the Choot",
"It helps to face right before Shinesparking."
]
},
{
"link": [
4,
5
],
"name": "G-Mode Morph",
"entranceCondition": {
"comeInWithGMode": {
"mode": "any",
"morphed": true
}
},
"requires": [
"h_canArtificialMorphIBJ"
]
},
{
"link": [
5,
1
],
"name": "Base",
"requires": []
},
{
"link": [
5,
3
],
"name": "Base",
"requires": []
},
{
"link": [
5,
4
],
"name": "Base",
"requires": [
"canPreciseWalljump"
]
},
{
"link": [
5,
4
],
"name": "Plasma Spark Room SpringFling into Top Right Door",
"notable": true,
"requires": [
"canInsaneJump",
"h_canSpringFling",
"canResetFallSpeed",
"canDownBack"
],
"note": [
"Roll off the above ledge and use both the vertical speed resets from first (un)equipping SpringBall and then by unmorphing in order to reach the door.",
"Pause shortly after rolling off the ledge, after falling for 1 tile. The timing is very precise.",
"A downback helps by shrinking Samus' hitbox."
]
},
{
"link": [
6,
2
],
"name": "Bottom Right Door Lock Skip",
"requires": [],
"bypassesDoorShell": true,
"note": "Shoot open and go through the blue door that is off camera to the left to transition into the same room as connects to the bottom right door of this room.",
"devNote": [
"FIXME: There may be some off camera strats that can utilize this runway, even though it goes the opposite direction as the door transition;",
"possibly a very low horizontal momentum cross room jump starting from a door check or bomb boost, or a door stuck or deep stuck setup."
]
}
]
}