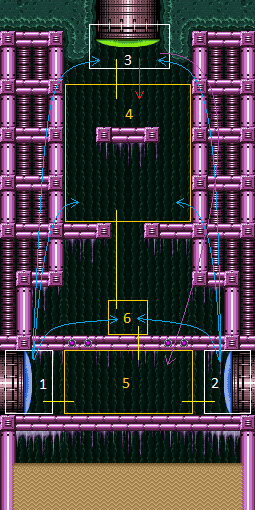
Oasis
Room ID: 198
|
Exit condition: {
"leaveWithRunway": {
"length": 13,
"openEnd": 0
}
}
|
|
Requires: {
"doorUnlockedAtNode": 2
}
Exit condition: {
"leaveWithRunway": {
"length": 14,
"openEnd": 0
}
}
Unlocks doors: {"nodeId":2,"types":["ammo"],"requires":[]}
|
|
Get the shinecharge then move towards and shinespark out the left door. Entrance condition: {
"comeInRunning": {
"speedBooster": true,
"minTiles": 2.4375
}
}
Requires: "canStutterWaterShineCharge"
"canShinechargeMovementComplex"
{
"canShineCharge": {
"usedTiles": 33,
"openEnd": 2
}
}
{
"or": [
{
"shinespark": {
"frames": 9
}
},
{
"and": [
"canShinechargeMovementTricky",
{
"shinespark": {
"frames": 2
}
}
]
}
]
}
Exit condition: {
"leaveWithSpark": {}
}
Unlocks doors: {"types":["super"],"requires":[]}
{"types":["missiles","powerbomb"],"requires":["never"]}
|
|
Entrance condition: {
"comeInShinecharging": {
"length": 13,
"openEnd": 0
}
}
Requires: "Gravity" Exit condition: {
"leaveShinecharged": {
"framesRemaining": 179
}
}
Unlocks doors: {"types":["super"],"requires":[]}
{"types":["missiles","powerbomb"],"requires":["never"]}
|
|
Entrance condition: {
"comeInRunning": {
"speedBooster": true,
"minTiles": 2
}
}
Requires: "canStutterWaterShineCharge"
{
"canShineCharge": {
"usedTiles": 33,
"openEnd": 2
}
}
Exit condition: {
"leaveShinecharged": {
"framesRemaining": 179
}
}
Unlocks doors: {"types":["missiles","super"],"requires":[]}
{"types":["powerbomb"],"requires":["never"]}
|
|
Entrance condition: {
"comeInShinecharged": {
"framesRequired": 25
}
}
Requires: {
"shinespark": {
"frames": 23
}
}
Exit condition: {
"leaveWithSpark": {}
}
Unlocks doors: {"types":["super"],"requires":[]}
{"types":["missiles","powerbomb"],"requires":["never"]}
|
|
Entrance condition: {
"comeInWithStoredFallSpeed": {
"fallSpeedInTiles": 1
}
}
Exit condition: {
"leaveWithStoredFallSpeed": {
"fallSpeedInTiles": 1
}
}
Unlocks doors: {"types":["missiles","super"],"requires":[]}
{"types":["powerbomb"],"requires":["never"]}
|
|
Entrance condition: {
"comeInWithStoredFallSpeed": {
"fallSpeedInTiles": 2
}
}
Exit condition: {
"leaveWithStoredFallSpeed": {
"fallSpeedInTiles": 2
}
}
Unlocks doors: {"types":["missiles","super"],"requires":[]}
{"types":["powerbomb"],"requires":["never"]}
|
|
Oasis Cross Room Jump with Screw Attack and Speed through the Top Door (From the Left) (Insane)
Oasis
From: 1
Left Door
To: 3
Top Door
Notable: true 
Use Screw Attack to break the bomb block by entering from a non-water room with a spin jump, and make it all the way through the top door. This uses exactly 14 tiles (with no open end) - more rises too fast to do the trick, less does not have the height needed to reach the door. Use angle to break spin, then a momentumConservingTurnaround as early as possible, right as you pass the above tile horizontally. Using the background for positioning may help. The second momentumConservingTurnaround is as late as possible, just before touching the above platform. A third momentumConservingTurnaround is used on the door as it is opening. Entrance condition: {
"comeInJumping": {
"speedBooster": true,
"minTiles": 13.4375
}
}
Requires: "canInsaneJump" "canCrossRoomJumpIntoWater" "ScrewAttack" "canMomentumConservingTurnaround" |
|
From: 1
Left Door
To: 4
Junction Below Top Door
The spark takes Samus directly to the top platform. Entrance condition: {
"comeInShinecharged": {
"framesRequired": 30
}
}
Requires: "h_canNavigateUnderwater"
{
"shinespark": {
"frames": 23,
"excessFrames": 10
}
}
|
|
From: 1
Left Door
To: 4
Junction Below Top Door
Spark diagonally through the bomb blocks. Entrance condition: {
"comeInRunning": {
"speedBooster": true,
"minTiles": 2.4375
}
}
Requires: "canStutterWaterShineCharge"
{
"canShineCharge": {
"usedTiles": 33,
"openEnd": 2
}
}
{
"shinespark": {
"frames": 23,
"excessFrames": 10
}
}
|
|
From: 1
Left Door
To: 4
Junction Below Top Door
Notable: true 
Use Screw Attack to break the bomb block by entering from a non-water room with a spin jump, and make it to the top. It helps to enter as low as possible and with as much horizontal speed as possible and with HiJump turned off. Entrance condition: {
"comeInJumping": {
"speedBooster": true,
"minTiles": 13
}
}
Requires: "canInsaneJump" "canCrossRoomJumpIntoWater" "ScrewAttack" "canMomentumConservingTurnaround" |
|
|
|
This is a short climb, only a few tiles. Entrance condition: {
"comeInWithDoorStuckSetup": {}
}
Requires: "canXRayClimb" |
|
From: 1
Left Door
To: 6
Junction Above Bomb Blocks
Notable: true
Use Screw Attack to break the bomb block by entering from a non-water room with a spin jump. It helps to enter as low as possible and with as much horizontal speed as possible and with HiJump turned off. Even if executed correctly, the trick can fail with 50% probability due to collision oscillation. Entrance condition: {
"comeInJumping": {
"speedBooster": "any",
"minTiles": 4.4375
}
}
Requires: "canTrickyJump" "canCrossRoomJumpIntoWater" "ScrewAttack" |
|
From: 1
Left Door
To: 6
Junction Above Bomb Blocks
Notable: true
Use Screw Attack to break the bomb block by entering from a non-water room with a spin jump. It helps to enter as low as possible and with as much horizontal speed as possible and with HiJump turned off. Even if executed correctly, the trick can fail with 50% probability due to collision oscillation. Entrance condition: {
"comeInJumping": {
"speedBooster": true,
"minTiles": 3
}
}
Requires: "canTrickyJump" "canCrossRoomJumpIntoWater" "ScrewAttack" |
|
Spark vertically through the bomb blocks. It is still possible to break the blocks while below 30 Energy by jumping before sparking. Entrance condition: {
"comeInShinecharged": {
"framesRequired": 40
}
}
Requires: "h_canNavigateUnderwater"
{
"or": [
{
"shinespark": {
"frames": 10,
"excessFrames": 8
}
},
{
"and": [
"canMidairShinespark",
{
"shinespark": {
"frames": 7,
"excessFrames": 7
}
}
]
}
]
}
|
|
From: 1
Left Door
To: 6
Junction Above Bomb Blocks
Spark vertically through the bomb blocks. It is still possible to break the blocks while below 30 Energy by jumping before sparking. Entrance condition: {
"comeInRunning": {
"speedBooster": true,
"minTiles": 2.4375
}
}
Requires: "canStutterWaterShineCharge"
{
"canShineCharge": {
"usedTiles": 33,
"openEnd": 2
}
}
{
"or": [
{
"shinespark": {
"frames": 10,
"excessFrames": 8
}
},
{
"and": [
"canMidairShinespark",
{
"shinespark": {
"frames": 7,
"excessFrames": 7
}
}
]
}
]
}
|
|
Entrance condition: {
"comeInWithGMode": {
"mode": "any",
"morphed": true
}
}
Requires: {
"or": [
"h_canArtificialMorphPowerBomb",
{
"and": [
"h_canArtificialMorphIBJ",
"Gravity"
]
}
]
}
|
|
Entrance condition: {
"comeInShinecharging": {
"length": 13,
"openEnd": 0
}
}
Requires: "Gravity" Exit condition: {
"leaveShinecharged": {
"framesRemaining": 179
}
}
Unlocks doors: {"types":["super"],"requires":[]}
{"types":["missiles","powerbomb"],"requires":["never"]}
|
|
Entrance condition: {
"comeInRunning": {
"speedBooster": true,
"minTiles": 2
}
}
Requires: "canStutterWaterShineCharge"
{
"canShineCharge": {
"usedTiles": 33,
"openEnd": 2
}
}
Exit condition: {
"leaveShinecharged": {
"framesRemaining": 179
}
}
Unlocks doors: {"types":["missiles","super"],"requires":[]}
{"types":["powerbomb"],"requires":["never"]}
|
|
Entrance condition: {
"comeInShinecharged": {
"framesRequired": 25
}
}
Requires: {
"shinespark": {
"frames": 23
}
}
Exit condition: {
"leaveWithSpark": {}
}
Unlocks doors: {"types":["super"],"requires":[]}
{"types":["missiles","powerbomb"],"requires":["never"]}
|
|
Entrance condition: {
"comeInWithStoredFallSpeed": {
"fallSpeedInTiles": 1
}
}
Exit condition: {
"leaveWithStoredFallSpeed": {
"fallSpeedInTiles": 1
}
}
Unlocks doors: {"types":["missiles","super"],"requires":[]}
{"types":["powerbomb"],"requires":["never"]}
|
|
Entrance condition: {
"comeInWithStoredFallSpeed": {
"fallSpeedInTiles": 2
}
}
Exit condition: {
"leaveWithStoredFallSpeed": {
"fallSpeedInTiles": 2
}
}
Unlocks doors: {"types":["missiles","super"],"requires":[]}
{"types":["powerbomb"],"requires":["never"]}
|
|
Exit condition: {
"leaveWithRunway": {
"length": 13,
"openEnd": 0
}
}
|
|
Requires: {
"doorUnlockedAtNode": 1
}
Exit condition: {
"leaveWithRunway": {
"length": 14,
"openEnd": 0
}
}
Unlocks doors: {"nodeId":1,"types":["ammo"],"requires":[]}
|
|
Get the shinecharge and move towards then shinespark out the right door. Entrance condition: {
"comeInRunning": {
"speedBooster": true,
"minTiles": 2.4375
}
}
Requires: "canStutterWaterShineCharge"
"canShinechargeMovementComplex"
{
"canShineCharge": {
"usedTiles": 33,
"openEnd": 2
}
}
{
"or": [
{
"shinespark": {
"frames": 9
}
},
{
"and": [
"canShinechargeMovementTricky",
{
"shinespark": {
"frames": 2
}
}
]
}
]
}
Exit condition: {
"leaveWithSpark": {}
}
Unlocks doors: {"types":["super"],"requires":[]}
{"types":["missiles","powerbomb"],"requires":["never"]}
|
|
Oasis Cross Room Jump with Screw Attack and Speed through the Top Door (From the Right) (Insane)
Oasis
From: 2
Right Door
To: 3
Top Door
Notable: true
Use Screw Attack to break the bomb block by entering from a non-water room with a spin jump, and make it all the way through the top door. This uses exactly 14 tiles (with no open end) - more rises too fast to do the trick, less does not have the height needed to reach the door. Use angle to break spin, then a momentumConservingTurnaround as early as possible, right as you pass the above tile horizontally. Using the background for positioning may help. The second momentumConservingTurnaround is as late as possible, just before touching the above platform. A third momentumConservingTurnaround is used on the door as it is opening. Entrance condition: {
"comeInJumping": {
"speedBooster": true,
"minTiles": 13.4375
}
}
Requires: "canInsaneJump" "canCrossRoomJumpIntoWater" "ScrewAttack" "canMomentumConservingTurnaround" |
|
From: 2
Right Door
To: 4
Junction Below Top Door
The spark takes Samus directly to the top platform. Entrance condition: {
"comeInShinecharged": {
"framesRequired": 30
}
}
Requires: "h_canNavigateUnderwater"
{
"shinespark": {
"frames": 23,
"excessFrames": 10
}
}
|
|
From: 2
Right Door
To: 4
Junction Below Top Door
Spark diagonally through the bomb blocks. Entrance condition: {
"comeInRunning": {
"speedBooster": true,
"minTiles": 2.4375
}
}
Requires: "canStutterWaterShineCharge"
{
"canShineCharge": {
"usedTiles": 33,
"openEnd": 2
}
}
{
"shinespark": {
"frames": 23,
"excessFrames": 10
}
}
|
|
From: 2
Right Door
To: 4
Junction Below Top Door
Notable: true
Use Screw Attack to break the bomb block by entering from a non-water room with a spin jump, and make it to the top. It helps to enter as low as possible and with as much horizontal speed as possible and with HiJump turned off. Entrance condition: {
"comeInJumping": {
"speedBooster": true,
"minTiles": 13
}
}
Requires: "canInsaneJump" "canCrossRoomJumpIntoWater" "ScrewAttack" "canMomentumConservingTurnaround" |
|
Immediately after teleporting, press down to retract Grapple to avoid getting stuck inside the wall (in case the top door is blue, causing it to open with Grapple on entry). Entrance condition: {
"comeInWithGrappleTeleport": {
"blockPositions": [
[
7,
2
]
]
}
}
Requires: "canOffScreenMovement" |
|
|
|
This is a short climb, only a few tiles. Entrance condition: {
"comeInWithDoorStuckSetup": {}
}
Requires: "canXRayClimb" |
|
From: 2
Right Door
To: 6
Junction Above Bomb Blocks
Notable: true
Use Screw Attack to break the bomb block by entering from a non-water room with a spin jump. It helps to enter as low as possible and with as much horizontal speed as possible and with HiJump turned off. Even if executed correctly, the trick can fail with 50% probability due to collision oscillation. Entrance condition: {
"comeInJumping": {
"speedBooster": "any",
"minTiles": 4
}
}
Requires: "canTrickyJump" "canCrossRoomJumpIntoWater" "ScrewAttack" |
|
From: 2
Right Door
To: 6
Junction Above Bomb Blocks
Notable: true
Use Screw Attack to break the bomb block by entering from a non-water room with a spin jump. It helps to enter as low as possible and with as much horizontal speed as possible and with HiJump turned off. Even if executed correctly, the trick can fail with 50% probability due to collision oscillation. Entrance condition: {
"comeInJumping": {
"speedBooster": true,
"minTiles": 3
}
}
Requires: "canTrickyJump" "canCrossRoomJumpIntoWater" "ScrewAttack" |
|
From: 2
Right Door
To: 6
Junction Above Bomb Blocks
Spark vertically through the bomb blocks. It is still possible to break the blocks while below 30 Energy by jumping before sparking. Entrance condition: {
"comeInRunning": {
"speedBooster": true,
"minTiles": 2.4375
}
}
Requires: "canStutterWaterShineCharge"
{
"canShineCharge": {
"usedTiles": 33,
"openEnd": 2
}
}
{
"or": [
{
"shinespark": {
"frames": 10,
"excessFrames": 8
}
},
{
"and": [
"canMidairShinespark",
{
"shinespark": {
"frames": 7,
"excessFrames": 7
}
}
]
}
]
}
|
|
Spark vertically through the bomb blocks. It is still possible to break the blocks while below 30 Energy by jumping before sparking. Entrance condition: {
"comeInShinecharged": {
"framesRequired": 40
}
}
Requires: "h_canNavigateUnderwater"
{
"or": [
{
"shinespark": {
"frames": 10,
"excessFrames": 8
}
},
{
"and": [
"canMidairShinespark",
{
"shinespark": {
"frames": 7,
"excessFrames": 7
}
}
]
}
]
}
|
|
Entrance condition: {
"comeInWithGMode": {
"mode": "any",
"morphed": true
}
}
Requires: {
"or": [
"h_canArtificialMorphPowerBomb",
{
"and": [
"h_canArtificialMorphIBJ",
"Gravity"
]
}
]
}
|
|
Entrance condition: {
"comeInWithGMode": {
"mode": "direct",
"morphed": false
},
"comesThroughToilet": "any"
}
Requires: {
"or": [
"Gravity",
"HiJump",
"canSpringBallJumpMidAir"
]
}
Exit condition: {
"leaveWithGMode": {
"morphed": false
}
}
Bypasses door shell: true |
|
Entrance condition: {
"comeInWithGMode": {
"mode": "direct",
"morphed": true
},
"comesThroughToilet": "any"
}
Requires: {
"or": [
{
"and": [
"Gravity",
"h_canArtificialMorphIBJ"
]
},
{
"and": [
"Gravity",
"h_canArtificialMorphSpringBall"
]
},
{
"and": [
"HiJump",
"h_canArtificialMorphSpringBall"
]
}
]
}
Exit condition: {
"leaveWithGMode": {
"morphed": true
}
}
Bypasses door shell: true |
|
|
|
Entrance condition: {
"comeInWithGMode": {
"mode": "any",
"morphed": true
},
"comesThroughToilet": "any"
}
Requires: "h_canArtificialMorphBombThings" |
|
Requires: "Gravity" |
|
Requires: {
"or": [
"HiJump",
"canSpringBallJumpMidAir"
]
}
|
|
Requires: "h_canCrystalFlash" |
|
|
|
|
|
|
|
Requires: "h_canCrystalFlash" |
|
Requires: "h_canNavigateUnderwater"
{
"or": [
"h_canUsePowerBombs",
{
"and": [
"Gravity",
"ScrewAttack"
]
},
{
"and": [
"Gravity",
"canIBJ"
]
},
{
"and": [
"h_canUseMorphBombs",
"h_canUseSpringBall"
]
},
{
"and": [
"h_canUseMorphBombs",
"canTrivialMidAirMorph",
"canDisableEquipment"
]
}
]
}
|
|
Requires: "Gravity" |
|
Requires: "canSuitlessMaridia"
{
"or": [
{
"and": [
"HiJump",
{
"or": [
"canDownGrab",
"canSpringBallJumpMidAir",
"canConsecutiveWalljump"
]
}
]
},
"h_canMaxHeightSpringBallJump"
]
}
|
|
Requires: "Gravity" "h_canDestroyBombWalls" |
|
Requires: "h_canBombThings" |
{
"$schema": "../../../schema/m3-room.schema.json",
"id": 198,
"name": "Oasis",
"area": "Maridia",
"subarea": "Inner",
"subsubarea": "Green",
"playable": true,
"roomAddress": "0x7D48E",
"roomEnvironments": [
{
"heated": false
}
],
"nodes": [
{
"id": 1,
"name": "Left Door",
"nodeType": "door",
"nodeSubType": "blue",
"nodeAddress": "0x001a660",
"doorOrientation": "left",
"doorEnvironments": [
{
"physics": "water"
}
]
},
{
"id": 2,
"name": "Right Door",
"nodeType": "door",
"nodeSubType": "blue",
"nodeAddress": "0x001a66c",
"doorOrientation": "right",
"doorEnvironments": [
{
"physics": "water"
}
]
},
{
"id": 3,
"name": "Top Door",
"nodeType": "door",
"nodeSubType": "green",
"nodeAddress": "0x001a678",
"doorOrientation": "up",
"doorEnvironments": [
{
"physics": "water"
}
],
"spawnAt": 4
},
{
"id": 4,
"name": "Junction Below Top Door",
"nodeType": "junction",
"nodeSubType": "junction"
},
{
"id": 5,
"name": "Bottom Junction",
"nodeType": "junction",
"nodeSubType": "junction"
},
{
"id": 6,
"name": "Junction Above Bomb Blocks",
"nodeType": "junction",
"nodeSubType": "junction"
}
],
"enemies": [],
"reusableRoomwideNotable": [
{
"name": "Oasis Cross Room Jump with Screw Attack",
"note": [
"Use Screw Attack to break the bomb block by entering from a non-water room with a spin jump.",
"It helps to enter as low as possible and with as much horizontal speed as possible and with HiJump turned off.",
"Depending on the setup, this may have collision oscillation, making only a 50% success when done correctly."
]
},
{
"name": "Oasis Cross Room Jump with Screw Attack and Speed through the Top Door",
"note": [
"Use Screw Attack to break the bomb block by entering from a non-water room with a spin jump, and make it all the way through the top door.",
"This uses exactly 14 tiles (with no open end) - more rises too fast to do the trick, less does not have the height needed to reach the door.",
"Use angle to break spin, then a momentumConservingTurnaround as early as possible, right as you pass the above tile horizontally. Using the background for positioning may help.",
"The second momentumConservingTurnaround is as late as possible, just before touching the above platform.",
"A third momentumConservingTurnaround is used on the door as it is opening."
]
}
],
"links": [
{
"from": 1,
"to": [
{
"id": 1
},
{
"id": 2
},
{
"id": 3
},
{
"id": 4
},
{
"id": 5
},
{
"id": 6
}
]
},
{
"from": 2,
"to": [
{
"id": 1
},
{
"id": 2
},
{
"id": 3
},
{
"id": 4
},
{
"id": 5
},
{
"id": 6
}
]
},
{
"from": 3,
"to": [
{
"id": 3
},
{
"id": 4
},
{
"id": 5
}
]
},
{
"from": 4,
"to": [
{
"id": 3
},
{
"id": 4
},
{
"id": 6
}
]
},
{
"from": 5,
"to": [
{
"id": 1
},
{
"id": 2
},
{
"id": 4,
"note": "One-way link for shinesparks and cross room gravity jumps. Other strats should go 5 -> 6 -> 4."
},
{
"id": 5
},
{
"id": 6
}
]
},
{
"from": 6,
"to": [
{
"id": 4
},
{
"id": 5
}
]
}
],
"strats": [
{
"link": [
1,
1
],
"name": "Leave with Runway",
"requires": [],
"exitCondition": {
"leaveWithRunway": {
"length": 13,
"openEnd": 0
}
}
},
{
"link": [
1,
1
],
"name": "Leave with Runway, Open Both Doors",
"requires": [
{
  "doorUnlockedAtNode": 2
}
],
"exitCondition": {
"leaveWithRunway": {
"length": 14,
"openEnd": 0
}
},
"unlocksDoors": [
{
"nodeId": 2,
"types": [
"ammo"
],
"requires": []
}
]
},
{
"link": [
1,
1
],
"name": "Suitless Water Shinecharge, Shinespark Return",
"entranceCondition": {
"comeInRunning": {
"speedBooster": true,
"minTiles": 2.4375
}
},
"requires": [
"canStutterWaterShineCharge",
"canShinechargeMovementComplex",
{
"canShineCharge": {
"usedTiles": 33,
"openEnd": 2
}
},
{
"or": [
{
"shinespark": {
"frames": 9
}
},
{
"and": [
"canShinechargeMovementTricky",
{
"shinespark": {
"frames": 2
}
}
]
}
]
}
],
"exitCondition": {
"leaveWithSpark": {}
},
"unlocksDoors": [
{
"types": [
"super"
],
"requires": []
},
{
"types": [
"missiles",
"powerbomb"
],
"requires": [
"never"
]
}
],
"note": "Get the shinecharge then move towards and shinespark out the left door."
},
{
"link": [
1,
2
],
"name": "Leave Shinecharged",
"entranceCondition": {
"comeInShinecharging": {
"length": 13,
"openEnd": 0
}
},
"requires": [
"Gravity"
],
"exitCondition": {
"leaveShinecharged": {
"framesRemaining": 179
}
},
"unlocksDoors": [
{
"types": [
"super"
],
"requires": []
},
{
"types": [
"missiles",
"powerbomb"
],
"requires": [
"never"
]
}
],
"flashSuitChecked": true
},
{
"link": [
1,
2
],
"name": "Suitless Water Shinecharge",
"entranceCondition": {
"comeInRunning": {
"speedBooster": true,
"minTiles": 2
}
},
"requires": [
"canStutterWaterShineCharge",
{
"canShineCharge": {
"usedTiles": 33,
"openEnd": 2
}
}
],
"exitCondition": {
"leaveShinecharged": {
"framesRemaining": 179
}
},
"unlocksDoors": [
{
"types": [
"missiles",
"super"
],
"requires": []
},
{
"types": [
"powerbomb"
],
"requires": [
"never"
]
}
],
"flashSuitChecked": true,
"devNote": "FIXME: This is a prime example for 3-room shinecharges, once the schema can model it."
},
{
"link": [
1,
2
],
"name": "Come In Shinecharged, Leave Sparking",
"entranceCondition": {
"comeInShinecharged": {
"framesRequired": 25
}
},
"requires": [
{
  "shinespark": {
    "frames": 23
  }
}
],
"exitCondition": {
"leaveWithSpark": {}
},
"unlocksDoors": [
{
"types": [
"super"
],
"requires": []
},
{
"types": [
"missiles",
"powerbomb"
],
"requires": [
"never"
]
}
],
"flashSuitChecked": true
},
{
"link": [
1,
2
],
"name": "Transition with Stored Fall Speed",
"entranceCondition": {
"comeInWithStoredFallSpeed": {
"fallSpeedInTiles": 1
}
},
"requires": [],
"exitCondition": {
"leaveWithStoredFallSpeed": {
"fallSpeedInTiles": 1
}
},
"unlocksDoors": [
{
"types": [
"missiles",
"super"
],
"requires": []
},
{
"types": [
"powerbomb"
],
"requires": [
"never"
]
}
],
"flashSuitChecked": true
},
{
"link": [
1,
2
],
"name": "Transition with Stored Fall Speed (more speed)",
"entranceCondition": {
"comeInWithStoredFallSpeed": {
"fallSpeedInTiles": 2
}
},
"requires": [],
"exitCondition": {
"leaveWithStoredFallSpeed": {
"fallSpeedInTiles": 2
}
},
"unlocksDoors": [
{
"types": [
"missiles",
"super"
],
"requires": []
},
{
"types": [
"powerbomb"
],
"requires": [
"never"
]
}
],
"flashSuitChecked": true
},
{
"link": [
1,
3
],
"name": "Oasis Cross Room Jump with Screw Attack and Speed through the Top Door (From the Left)",
"notable": true,
"entranceCondition": {
"comeInJumping": {
"speedBooster": true,
"minTiles": 13.4375
}
},
"requires": [
"canInsaneJump",
"canCrossRoomJumpIntoWater",
"ScrewAttack",
"canMomentumConservingTurnaround"
],
"reusableRoomwideNotable": "Oasis Cross Room Jump with Screw Attack and Speed through the Top Door",
"note": [
"Use Screw Attack to break the bomb block by entering from a non-water room with a spin jump, and make it all the way through the top door.",
"This uses exactly 14 tiles (with no open end) - more rises too fast to do the trick, less does not have the height needed to reach the door.",
"Use angle to break spin, then a momentumConservingTurnaround as early as possible, right as you pass the above tile horizontally. Using the background for positioning may help.",
"The second momentumConservingTurnaround is as late as possible, just before touching the above platform.",
"A third momentumConservingTurnaround is used on the door as it is opening."
],
"devNote": "This does not have collision oscillation. It is possible to do this without Screw Attack, but is extremely precise."
},
{
"link": [
1,
4
],
"name": "Diagonal Suitless Shinespark to the Top",
"entranceCondition": {
"comeInShinecharged": {
"framesRequired": 30
}
},
"requires": [
"h_canNavigateUnderwater",
{
"shinespark": {
"frames": 23,
"excessFrames": 10
}
}
],
"flashSuitChecked": true,
"note": "The spark takes Samus directly to the top platform.",
"devNote": [
"This does not require canWaterShineCharge, as you can store the shinecharge before entering the room.",
"With Gravity 1 -> 6 -> 4 would be used."
]
},
{
"link": [
1,
4
],
"name": "Suitless Water Shinecharge, Diagonal Shinespark to the Top",
"entranceCondition": {
"comeInRunning": {
"speedBooster": true,
"minTiles": 2.4375
}
},
"requires": [
"canStutterWaterShineCharge",
{
"canShineCharge": {
"usedTiles": 33,
"openEnd": 2
}
},
{
"shinespark": {
"frames": 23,
"excessFrames": 10
}
}
],
"note": "Spark diagonally through the bomb blocks."
},
{
"link": [
1,
4
],
"name": "Oasis Cross Room Jump with Screw Attack and Speed to the Top (From the Left)",
"notable": true,
"entranceCondition": {
"comeInJumping": {
"speedBooster": true,
"minTiles": 13
}
},
"requires": [
"canInsaneJump",
"canCrossRoomJumpIntoWater",
"ScrewAttack",
"canMomentumConservingTurnaround"
],
"reusableRoomwideNotable": "Oasis Cross Room Jump with Screw Attack",
"note": [
"Use Screw Attack to break the bomb block by entering from a non-water room with a spin jump, and make it to the top.",
"It helps to enter as low as possible and with as much horizontal speed as possible and with HiJump turned off."
],
"devNote": "This does not have collision oscillation"
},
{
"link": [
1,
5
],
"name": "Base",
"requires": []
},
{
"link": [
1,
6
],
"name": "Oasis Left-Side X-Ray Climb",
"entranceCondition": {
"comeInWithDoorStuckSetup": {}
},
"requires": [
"canXRayClimb"
],
"flashSuitChecked": true,
"note": "This is a short climb, only a few tiles."
},
{
"link": [
1,
6
],
"name": "Oasis Cross Room Jump with Screw Attack (From the Left)",
"notable": true,
"entranceCondition": {
"comeInJumping": {
"speedBooster": "any",
"minTiles": 4.4375
}
},
"requires": [
"canTrickyJump",
"canCrossRoomJumpIntoWater",
"ScrewAttack"
],
"reusableRoomwideNotable": "Oasis Cross Room Jump with Screw Attack",
"note": [
"Use Screw Attack to break the bomb block by entering from a non-water room with a spin jump.",
"It helps to enter as low as possible and with as much horizontal speed as possible and with HiJump turned off.",
"Even if executed correctly, the trick can fail with 50% probability due to collision oscillation."
],
"devNote": "This only breaks the bomb blocks but doesnt get up to 6. However the requirements from here to 6 are less than 6->4."
},
{
"link": [
1,
6
],
"name": "Oasis Cross Room Jump with Screw Attack and Speed (From the Left)",
"notable": true,
"entranceCondition": {
"comeInJumping": {
"speedBooster": true,
"minTiles": 3
}
},
"requires": [
"canTrickyJump",
"canCrossRoomJumpIntoWater",
"ScrewAttack"
],
"reusableRoomwideNotable": "Oasis Cross Room Jump with Screw Attack",
"note": [
"Use Screw Attack to break the bomb block by entering from a non-water room with a spin jump.",
"It helps to enter as low as possible and with as much horizontal speed as possible and with HiJump turned off.",
"Even if executed correctly, the trick can fail with 50% probability due to collision oscillation."
],
"devNote": "This only breaks the bomb blocks but doesnt get up to 6. However the requirements from here to 6 are less than 6->4."
},
{
"link": [
1,
6
],
"name": "Spark to Break the Blocks",
"entranceCondition": {
"comeInShinecharged": {
"framesRequired": 40
}
},
"requires": [
"h_canNavigateUnderwater",
{
"or": [
{
"shinespark": {
"frames": 10,
"excessFrames": 8
}
},
{
"and": [
"canMidairShinespark",
{
"shinespark": {
"frames": 7,
"excessFrames": 7
}
}
]
}
]
}
],
"flashSuitChecked": true,
"note": "Spark vertically through the bomb blocks. It is still possible to break the blocks while below 30 Energy by jumping before sparking.",
"devNote": [
"This does not require canWaterShineCharge, as you can store the shinecharge before entering the room.",
"Note that it is possible to spark into the ceiling to break the blocks without energy loss, but it has collision oscillation.",
"FIXME: Add temporary blue strats."
]
},
{
"link": [
1,
6
],
"name": "Suitless Water Shinecharge - Spark to Break the Blocks",
"entranceCondition": {
"comeInRunning": {
"speedBooster": true,
"minTiles": 2.4375
}
},
"requires": [
"canStutterWaterShineCharge",
{
"canShineCharge": {
"usedTiles": 33,
"openEnd": 2
}
},
{
"or": [
{
"shinespark": {
"frames": 10,
"excessFrames": 8
}
},
{
"and": [
"canMidairShinespark",
{
"shinespark": {
"frames": 7,
"excessFrames": 7
}
}
]
}
]
}
],
"note": "Spark vertically through the bomb blocks. It is still possible to break the blocks while below 30 Energy by jumping before sparking.",
"devNote": [
"It is possible to save some energy by sparking into the left wall, but it won't work with midair sparking, which saves the same amount and is easier.",
"Note that it is possible to spark into the ceiling to break the blocks without energy loss, but it has collision oscillation.",
"FIXME: Add temporary blue strats."
]
},
{
"link": [
1,
6
],
"name": "G-Mode Morph Bomb Blocks",
"entranceCondition": {
"comeInWithGMode": {
"mode": "any",
"morphed": true
}
},
"requires": [
{
  "or": [
    "h_canArtificialMorphPowerBomb",
    {
      "and": [
        "h_canArtificialMorphIBJ",
        "Gravity"
      ]
    }
  ]
}
],
"flashSuitChecked": true,
"devNote": "This only breaks the bomb blocks but doesnt get up to 6. However the requirements from here to 6 are less than 6->4."
},
{
"link": [
2,
1
],
"name": "Leave Shinecharged",
"entranceCondition": {
"comeInShinecharging": {
"length": 13,
"openEnd": 0
}
},
"requires": [
"Gravity"
],
"exitCondition": {
"leaveShinecharged": {
"framesRemaining": 179
}
},
"unlocksDoors": [
{
"types": [
"super"
],
"requires": []
},
{
"types": [
"missiles",
"powerbomb"
],
"requires": [
"never"
]
}
],
"flashSuitChecked": true
},
{
"link": [
2,
1
],
"name": "Suitless Water Shinecharge",
"entranceCondition": {
"comeInRunning": {
"speedBooster": true,
"minTiles": 2
}
},
"requires": [
"canStutterWaterShineCharge",
{
"canShineCharge": {
"usedTiles": 33,
"openEnd": 2
}
}
],
"exitCondition": {
"leaveShinecharged": {
"framesRemaining": 179
}
},
"unlocksDoors": [
{
"types": [
"missiles",
"super"
],
"requires": []
},
{
"types": [
"powerbomb"
],
"requires": [
"never"
]
}
],
"flashSuitChecked": true,
"devNote": "FIXME: This is a prime example for 3-room shinecharges, once the schema can model it."
},
{
"link": [
2,
1
],
"name": "Come In Shinecharged, Leave Sparking",
"entranceCondition": {
"comeInShinecharged": {
"framesRequired": 25
}
},
"requires": [
{
  "shinespark": {
    "frames": 23
  }
}
],
"exitCondition": {
"leaveWithSpark": {}
},
"unlocksDoors": [
{
"types": [
"super"
],
"requires": []
},
{
"types": [
"missiles",
"powerbomb"
],
"requires": [
"never"
]
}
],
"flashSuitChecked": true
},
{
"link": [
2,
1
],
"name": "Transition with Stored Fall Speed",
"entranceCondition": {
"comeInWithStoredFallSpeed": {
"fallSpeedInTiles": 1
}
},
"requires": [],
"exitCondition": {
"leaveWithStoredFallSpeed": {
"fallSpeedInTiles": 1
}
},
"unlocksDoors": [
{
"types": [
"missiles",
"super"
],
"requires": []
},
{
"types": [
"powerbomb"
],
"requires": [
"never"
]
}
],
"flashSuitChecked": true
},
{
"link": [
2,
1
],
"name": "Transition with Stored Fall Speed (more speed)",
"entranceCondition": {
"comeInWithStoredFallSpeed": {
"fallSpeedInTiles": 2
}
},
"requires": [],
"exitCondition": {
"leaveWithStoredFallSpeed": {
"fallSpeedInTiles": 2
}
},
"unlocksDoors": [
{
"types": [
"missiles",
"super"
],
"requires": []
},
{
"types": [
"powerbomb"
],
"requires": [
"never"
]
}
],
"flashSuitChecked": true
},
{
"link": [
2,
2
],
"name": "Leave with Runway",
"requires": [],
"exitCondition": {
"leaveWithRunway": {
"length": 13,
"openEnd": 0
}
}
},
{
"link": [
2,
2
],
"name": "Leave with Runway, Open Both Doors",
"requires": [
{
  "doorUnlockedAtNode": 1
}
],
"exitCondition": {
"leaveWithRunway": {
"length": 14,
"openEnd": 0
}
},
"unlocksDoors": [
{
"nodeId": 1,
"types": [
"ammo"
],
"requires": []
}
]
},
{
"link": [
2,
2
],
"name": "Suitless Water Shinecharge, Shinespark Return",
"entranceCondition": {
"comeInRunning": {
"speedBooster": true,
"minTiles": 2.4375
}
},
"requires": [
"canStutterWaterShineCharge",
"canShinechargeMovementComplex",
{
"canShineCharge": {
"usedTiles": 33,
"openEnd": 2
}
},
{
"or": [
{
"shinespark": {
"frames": 9
}
},
{
"and": [
"canShinechargeMovementTricky",
{
"shinespark": {
"frames": 2
}
}
]
}
]
}
],
"exitCondition": {
"leaveWithSpark": {}
},
"unlocksDoors": [
{
"types": [
"super"
],
"requires": []
},
{
"types": [
"missiles",
"powerbomb"
],
"requires": [
"never"
]
}
],
"note": "Get the shinecharge and move towards then shinespark out the right door."
},
{
"link": [
2,
3
],
"name": "Oasis Cross Room Jump with Screw Attack and Speed through the Top Door (From the Right)",
"notable": true,
"entranceCondition": {
"comeInJumping": {
"speedBooster": true,
"minTiles": 13.4375
}
},
"requires": [
"canInsaneJump",
"canCrossRoomJumpIntoWater",
"ScrewAttack",
"canMomentumConservingTurnaround"
],
"reusableRoomwideNotable": "Oasis Cross Room Jump with Screw Attack and Speed through the Top Door",
"note": [
"Use Screw Attack to break the bomb block by entering from a non-water room with a spin jump, and make it all the way through the top door.",
"This uses exactly 14 tiles (with no open end) - more rises too fast to do the trick, less does not have the height needed to reach the door.",
"Use angle to break spin, then a momentumConservingTurnaround as early as possible, right as you pass the above tile horizontally. Using the background for positioning may help.",
"The second momentumConservingTurnaround is as late as possible, just before touching the above platform.",
"A third momentumConservingTurnaround is used on the door as it is opening."
],
"devNote": "This does not have collision oscillation. It is possible to do this without Screw Attack, but is extremely precise."
},
{
"link": [
2,
4
],
"name": "Diagonal Suitless Shinespark to the Top",
"entranceCondition": {
"comeInShinecharged": {
"framesRequired": 30
}
},
"requires": [
"h_canNavigateUnderwater",
{
"shinespark": {
"frames": 23,
"excessFrames": 10
}
}
],
"flashSuitChecked": true,
"note": "The spark takes Samus directly to the top platform.",
"devNote": [
"This does not require canWaterShineCharge, as you can store the shinecharge before entering the room.",
"With Gravity 2 -> 6 -> 4 would be used."
]
},
{
"link": [
2,
4
],
"name": "Suitless Water Shinecharge, Diagonal Shinespark to the Top",
"entranceCondition": {
"comeInRunning": {
"speedBooster": true,
"minTiles": 2.4375
}
},
"requires": [
"canStutterWaterShineCharge",
{
"canShineCharge": {
"usedTiles": 33,
"openEnd": 2
}
},
{
"shinespark": {
"frames": 23,
"excessFrames": 10
}
}
],
"note": "Spark diagonally through the bomb blocks."
},
{
"link": [
2,
4
],
"name": "Oasis Cross Room Jump with Screw Attack and Speed to the Top (From the Right)",
"notable": true,
"entranceCondition": {
"comeInJumping": {
"speedBooster": true,
"minTiles": 13
}
},
"requires": [
"canInsaneJump",
"canCrossRoomJumpIntoWater",
"ScrewAttack",
"canMomentumConservingTurnaround"
],
"reusableRoomwideNotable": "Oasis Cross Room Jump with Screw Attack",
"note": [
"Use Screw Attack to break the bomb block by entering from a non-water room with a spin jump, and make it to the top.",
"It helps to enter as low as possible and with as much horizontal speed as possible and with HiJump turned off."
],
"devNote": "This does not have collision oscillation"
},
{
"link": [
2,
4
],
"name": "Grapple Teleport (from Moat)",
"entranceCondition": {
"comeInWithGrappleTeleport": {
"blockPositions": [
[
7,
2
]
]
}
},
"requires": [
"canOffScreenMovement"
],
"note": [
"Immediately after teleporting, press down to retract Grapple to avoid getting stuck inside the wall (in case the top door is blue, causing it to open with Grapple on entry)."
]
},
{
"link": [
2,
5
],
"name": "Base",
"requires": []
},
{
"link": [
2,
6
],
"name": "Oasis Right-Side X-Ray Climb",
"entranceCondition": {
"comeInWithDoorStuckSetup": {}
},
"requires": [
"canXRayClimb"
],
"flashSuitChecked": true,
"note": "This is a short climb, only a few tiles."
},
{
"link": [
2,
6
],
"name": "Oasis Cross Room Jump with Screw Attack (From the Right)",
"notable": true,
"entranceCondition": {
"comeInJumping": {
"speedBooster": "any",
"minTiles": 4
}
},
"requires": [
"canTrickyJump",
"canCrossRoomJumpIntoWater",
"ScrewAttack"
],
"reusableRoomwideNotable": "Oasis Cross Room Jump with Screw Attack",
"note": [
"Use Screw Attack to break the bomb block by entering from a non-water room with a spin jump.",
"It helps to enter as low as possible and with as much horizontal speed as possible and with HiJump turned off.",
"Even if executed correctly, the trick can fail with 50% probability due to collision oscillation."
],
"devNote": "This only breaks the bomb blocks but doesnt get up to 6. However the requirements from here to 6 are less than 6->4."
},
{
"link": [
2,
6
],
"name": "Oasis Cross Room Jump with Screw Attack and Speed (From the Right)",
"notable": true,
"entranceCondition": {
"comeInJumping": {
"speedBooster": true,
"minTiles": 3
}
},
"requires": [
"canTrickyJump",
"canCrossRoomJumpIntoWater",
"ScrewAttack"
],
"reusableRoomwideNotable": "Oasis Cross Room Jump with Screw Attack",
"note": [
"Use Screw Attack to break the bomb block by entering from a non-water room with a spin jump.",
"It helps to enter as low as possible and with as much horizontal speed as possible and with HiJump turned off.",
"Even if executed correctly, the trick can fail with 50% probability due to collision oscillation."
],
"devNote": "This only breaks the bomb blocks but doesnt get up to 6. However the requirements from here to 6 are less than 6->4."
},
{
"link": [
2,
6
],
"name": "Suitless Water Shinecharge - Spark to Break the Blocks",
"entranceCondition": {
"comeInRunning": {
"speedBooster": true,
"minTiles": 2.4375
}
},
"requires": [
"canStutterWaterShineCharge",
{
"canShineCharge": {
"usedTiles": 33,
"openEnd": 2
}
},
{
"or": [
{
"shinespark": {
"frames": 10,
"excessFrames": 8
}
},
{
"and": [
"canMidairShinespark",
{
"shinespark": {
"frames": 7,
"excessFrames": 7
}
}
]
}
]
}
],
"note": "Spark vertically through the bomb blocks. It is still possible to break the blocks while below 30 Energy by jumping before sparking.",
"devNote": [
"It is possible to save some energy by sparking into the left wall, but it won't work with midair sparking, which saves the same amount and is easier.",
"Note that it is possible to spark into the ceiling to break the blocks without energy loss, but it has collision oscillation.",
"FIXME: Add temporary blue strats."
]
},
{
"link": [
2,
6
],
"name": "Spark to Break the Blocks",
"entranceCondition": {
"comeInShinecharged": {
"framesRequired": 40
}
},
"requires": [
"h_canNavigateUnderwater",
{
"or": [
{
"shinespark": {
"frames": 10,
"excessFrames": 8
}
},
{
"and": [
"canMidairShinespark",
{
"shinespark": {
"frames": 7,
"excessFrames": 7
}
}
]
}
]
}
],
"flashSuitChecked": true,
"note": "Spark vertically through the bomb blocks. It is still possible to break the blocks while below 30 Energy by jumping before sparking.",
"devNote": [
"This does not require canWaterShineCharge, as you can store the shinecharge before entering the room.",
"Note that it is possible to spark into the ceiling to break the blocks without energy loss, but it has collision oscillation.",
"FIXME: Add temporary blue strats."
]
},
{
"link": [
2,
6
],
"name": "G-Mode Morph Bomb Blocks",
"entranceCondition": {
"comeInWithGMode": {
"mode": "any",
"morphed": true
}
},
"requires": [
{
  "or": [
    "h_canArtificialMorphPowerBomb",
    {
      "and": [
        "h_canArtificialMorphIBJ",
        "Gravity"
      ]
    }
  ]
}
],
"flashSuitChecked": true,
"devNote": "This only breaks the bomb blocks but doesnt get up to 6. However the requirements from here to 6 are less than 6->4."
},
{
"link": [
3,
3
],
"name": "Carry G-Mode Back Up",
"entranceCondition": {
"comeInWithGMode": {
"mode": "direct",
"morphed": false
},
"comesThroughToilet": "any"
},
"requires": [
{
  "or": [
    "Gravity",
    "HiJump",
    "canSpringBallJumpMidAir"
  ]
}
],
"exitCondition": {
"leaveWithGMode": {
"morphed": false
}
},
"bypassesDoorShell": true,
"flashSuitChecked": true
},
{
"link": [
3,
3
],
"name": "Carry G-Mode Morph Back Up",
"entranceCondition": {
"comeInWithGMode": {
"mode": "direct",
"morphed": true
},
"comesThroughToilet": "any"
},
"requires": [
{
  "or": [
    {
      "and": [
        "Gravity",
        "h_canArtificialMorphIBJ"
      ]
    },
    {
      "and": [
        "Gravity",
        "h_canArtificialMorphSpringBall"
      ]
    },
    {
      "and": [
        "HiJump",
        "h_canArtificialMorphSpringBall"
      ]
    }
  ]
}
],
"exitCondition": {
"leaveWithGMode": {
"morphed": true
}
},
"bypassesDoorShell": true,
"flashSuitChecked": true
},
{
"link": [
3,
4
],
"name": "Base",
"requires": []
},
{
"link": [
3,
5
],
"name": "G-Mode Morph Bomb Blocks",
"entranceCondition": {
"comeInWithGMode": {
"mode": "any",
"morphed": true
},
"comesThroughToilet": "any"
},
"requires": [
"h_canArtificialMorphBombThings"
],
"flashSuitChecked": true
},
{
"link": [
4,
3
],
"name": "Base",
"requires": [
"Gravity"
]
},
{
"link": [
4,
3
],
"name": "Suitless",
"requires": [
{
  "or": [
    "HiJump",
    "canSpringBallJumpMidAir"
  ]
}
],
"devNote": [
"This isn't requiring canSuitlessMaridia because it reduces the likelihood of entering from the top being a logical softlock.",
"Also it's not very elaborate suitless execution"
]
},
{
"link": [
4,
4
],
"name": "Crystal Flash",
"requires": [
"h_canCrystalFlash"
],
"flashSuitChecked": true
},
{
"link": [
4,
6
],
"name": "Base",
"requires": []
},
{
"link": [
5,
1
],
"name": "Base",
"requires": []
},
{
"link": [
5,
2
],
"name": "Base",
"requires": []
},
{
"link": [
5,
5
],
"name": "Crystal Flash",
"requires": [
"h_canCrystalFlash"
],
"flashSuitChecked": true
},
{
"link": [
5,
6
],
"name": "Base",
"requires": [
"h_canNavigateUnderwater",
{
"or": [
"h_canUsePowerBombs",
{
"and": [
"Gravity",
"ScrewAttack"
]
},
{
"and": [
"Gravity",
"canIBJ"
]
},
{
"and": [
"h_canUseMorphBombs",
"h_canUseSpringBall"
]
},
{
"and": [
"h_canUseMorphBombs",
"canTrivialMidAirMorph",
"canDisableEquipment"
]
}
]
}
],
"devNote": "Suitless, this only breaks the bomb blocks and doesnt get up to 6. However the requirements from here to 6 are less than 6->4."
},
{
"link": [
6,
4
],
"name": "Base",
"requires": [
"Gravity"
]
},
{
"link": [
6,
4
],
"name": "Suitless",
"requires": [
"canSuitlessMaridia",
{
"or": [
{
"and": [
"HiJump",
{
"or": [
"canDownGrab",
"canSpringBallJumpMidAir",
"canConsecutiveWalljump"
]
}
]
},
"h_canMaxHeightSpringBallJump"
]
}
]
},
{
"link": [
6,
5
],
"name": "Base",
"requires": [
"Gravity",
"h_canDestroyBombWalls"
]
},
{
"link": [
6,
5
],
"name": "Suitless",
"requires": [
"h_canBombThings"
],
"devNote": [
"Doesn't require canSuitlessMaridia because it's so straightforward.",
"It's only a separate strat because of how Screw Attack doesn't work."
]
},
{
"link": [
1,
1
],
"name": "Base (Unlock Door)",
"requires": [],
"unlocksDoors": [
{
"types": [
"ammo"
],
"requires": []
}
]
},
{
"link": [
1,
1
],
"name": "Base (Come In Normally)",
"entranceCondition": {
"comeInNormally": {}
},
"requires": []
},
{
"link": [
2,
2
],
"name": "Base (Unlock Door)",
"requires": [],
"unlocksDoors": [
{
"types": [
"ammo"
],
"requires": []
}
]
},
{
"link": [
2,
2
],
"name": "Base (Come In Normally)",
"entranceCondition": {
"comeInNormally": {}
},
"requires": []
},
{
"link": [
3,
3
],
"name": "Base (Unlock Door)",
"requires": [],
"unlocksDoors": [
{
"types": [
"ammo"
],
"requires": []
}
]
},
{
"link": [
3,
4
],
"name": "Base (Come In Normally)",
"entranceCondition": {
"comeInNormally": {}
},
"requires": []
}
]
}