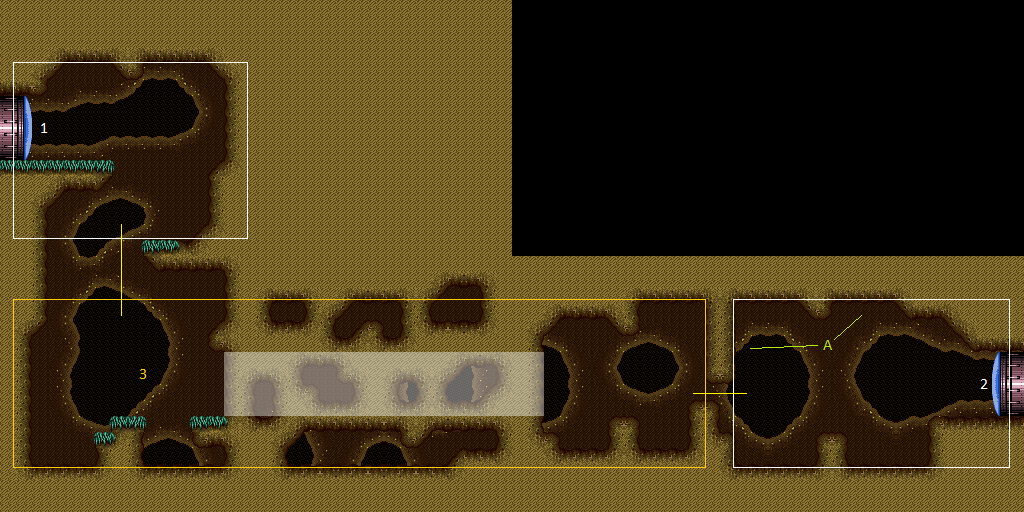
Northwest Maridia Bug Room
Room ID: 180
|
Exit condition: {
"leaveWithRunway": {
"length": 6,
"openEnd": 1
}
}
|
|
Requires: "h_canCrystalFlash" |
|
From: 1
Left Door
To: 1
Left Door
Requires: "canBeVeryPatient" "canManipulateMellas" Exit condition: {
"leaveWithGModeSetup": {}
}
|
|
The off screen portion can be simple with Spring Ball or two short IBJs. Entrance condition: {
"comeInWithGMode": {
"mode": "any",
"morphed": true
}
}
Requires: {
"or": [
"h_canArtificialMorphSpringBall",
{
"and": [
"h_canArtificialMorphIBJ",
"Gravity"
]
}
]
}
|
|
From: 1
Left Door
To: 2
Right Door
Use one bomb to get to the off-screen region. After going a full screen to the right, when Samus is partially visible in the left wall, bomb to the middle platform on the right. Bomb again to the right, note that these small platforms are one tile left of the ones that are on camera. Exit G-Mode and get to the right door. Entrance condition: {
"comeInWithGMode": {
"mode": "any",
"morphed": true
}
}
Requires: "canOffScreenMovement" "h_canArtificialMorphBombHorizontally" "h_canArtificialMorphBombThings" "h_additionalBomb" |
|
|
|
Entrance condition: {
"comeInWithGMode": {
"mode": "any",
"morphed": true
}
}
Requires: "canOffScreenMovement"
"h_canArtificialMorphIBJ"
{
"or": [
"h_canArtificialMorphSpringBall",
"Gravity"
]
}
|
|
Entrance condition: {
"comeInWithGrappleTeleport": {
"blockPositions": [
[
5,
3
],
[
7,
2
]
]
}
}
|
|
From: 2
Right Door
To: 1
Left Door
Entrance condition: {
"comeInWithGrappleTeleport": {
"blockPositions": [
[
3,
12
]
]
}
}
Bypasses door shell: true |
|
Entrance condition: {
"comeInWithGrappleTeleport": {
"blockPositions": [
[
3,
12
]
]
}
}
Exit condition: {
"leaveWithGrappleTeleport": {
"blockPositions": [
[
3,
12
]
]
}
}
Bypasses door shell: true |
|
From: 2
Right Door
To: 1
Left Door
Exit the previous room with Samus in a standing pose (while grappled). After teleporting, press right to release Grapple while staying standing (not being forced into a crouch). Then X-ray climb to get up to the door transition, without needing to open the door. Entrance condition: {
"comeInWithGrappleTeleport": {
"blockPositions": [
[
2,
18
],
[
2,
19
],
[
2,
29
]
]
}
}
Requires: "canXRayClimb" Bypasses door shell: true |
|
From: 2
Right Door
To: 2
Right Door
Enter the room slowly to not lure the Menu, then use the short runway to leave the room. Exit condition: {
"leaveWithRunway": {
"length": 1,
"openEnd": 1
}
}
|
|
From: 2
Right Door
To: 2
Right Door
Kill or tank the Menu to use the full runway. Requires: {
"or": [
{
"obstaclesCleared": [
"A"
]
},
{
"enemyDamage": {
"enemy": "Menu",
"type": "contact",
"hits": 1
}
}
]
}
Exit condition: {
"leaveWithRunway": {
"length": 5,
"openEnd": 1
}
}
|
|
Requires: {
"or": [
{
"and": [
"canDodgeWhileShooting",
{
"enemyKill": {
"enemies": [
[
"Menu",
"Menu"
]
]
}
}
]
},
{
"enemyKill": {
"enemies": [
[
"Menu",
"Menu"
]
],
"explicitWeapons": [
"PowerBomb",
"ScrewAttack",
"Wave",
"Spazer",
"Plasma",
"Missile",
"Super"
]
}
},
{
"and": [
"canPrepareForNextRoom",
{
"enemyKill": {
"enemies": [
[
"Menu",
"Menu"
]
],
"explicitWeapons": [
"PseudoScrew"
]
}
}
]
}
]
}
Clears obstacles: A |
|
Requires: {
"enemyDamage": {
"enemy": "Menu",
"type": "contact",
"hits": 1
}
}
Clears obstacles: A |
|
Requires: "h_canCrystalFlash" Clears obstacles: A |
|
From: 2
Right Door
To: 2
Right Door
Exit condition: {
"leaveWithGModeSetup": {}
}
|
|
Requires: "Morph"
{
"or": [
"h_canBombThings",
"h_canUseSpringBall"
]
}
{
"obstaclesCleared": [
"A"
]
}
|
|
From: 2
Right Door
To: 3
Junction Left of Morph Tunnel
With Gravity, it's possible to move forward and mid-air morph into the morph passage. The momentum can push Samus into the tunnel, no need to press forward while in mid-air. Requires: "Morph"
"Gravity"
"canTrickyJump"
{
"obstaclesCleared": [
"A"
]
}
|
|
From: 2
Right Door
To: 3
Junction Left of Morph Tunnel
Requires: "h_canThreeTileJumpMorph"
{
"obstaclesCleared": [
"A"
]
}
|
|
From: 2
Right Door
To: 3
Junction Left of Morph Tunnel
Notable: true 
Freeze one of the Menus (bugs) in a position where you can use it to get into the morph passage. One of the easier methods is with a damage boost. Stand in the water, take a hit for positioning, and freeze the bug near but left of Samus. Then morph on top and damage boost into the morph tunnel as it unfreezes. Requires: "Morph"
"h_canNavigateUnderwater"
"canTrickyUseFrozenEnemies"
"canNeutralDamageBoost"
{
"enemyDamage": {
"enemy": "Menu",
"type": "contact",
"hits": 2
}
}
|
|
From: 2
Right Door
To: 3
Junction Left of Morph Tunnel
Entrance condition: {
"comeInWithGMode": {
"mode": "any",
"morphed": true
}
}
Requires: {
"or": [
"h_canArtificialMorphSpringBall",
{
"and": [
"h_canArtificialMorphBombThings",
"h_additionalBomb",
{
"or": [
"h_canArtificialMorphBombHorizontally",
{
"and": [
"h_additionalBomb",
"Gravity"
]
}
]
}
]
}
]
}
|
|
Requires: {
"or": [
"HiJump",
"SpaceJump",
"canTrickyDashJump",
"canTrickyUseFrozenEnemies",
"canPreciseWalljump"
]
}
|
|
From: 3
Junction Left of Morph Tunnel
To: 1
Left Door
Requires: {
"or": [
"h_canIBJ",
"canWalljump",
"canSpringBallJumpMidAir"
]
}
{
"or": [
{
"enemyKill": {
"enemies": [
[
"Menu",
"Menu",
"Menu"
]
],
"explicitWeapons": [
"PowerBomb",
"ScrewAttack",
"Wave",
"Spazer",
"Plasma",
"Missile",
"Super"
]
}
},
{
"and": [
{
"enemyKill": {
"enemies": [
[
"Menu",
"Menu",
"Menu"
]
]
}
},
{
"or": [
{
"and": [
"canDodgeWhileShooting",
"canTrickyJump"
]
},
{
"and": [
"canDodgeWhileShooting",
{
"enemyDamage": {
"enemy": "Menu",
"type": "contact",
"hits": 1
}
}
]
},
{
"enemyDamage": {
"enemy": "Menu",
"type": "contact",
"hits": 2
}
}
]
}
]
}
]
}
|
|
From: 3
Junction Left of Morph Tunnel
To: 1
Left Door
Charge a spark below towards the right then run back and jump up and spark out of the left door. Requires: "canShinechargeMovementComplex"
"HiJump"
{
"canShineCharge": {
"usedTiles": 22,
"openEnd": 2
}
}
{
"shinespark": {
"frames": 15
}
}
Exit condition: {
"leaveWithSpark": {}
}
|
|
From: 3
Junction Left of Morph Tunnel
To: 1
Left Door
Notable: true 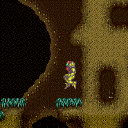
Charge a spark below towards the right then run back and jump up and spark out of the left door. Requires: "canShinechargeMovementComplex"
"canTrickyDashJump"
{
"canShineCharge": {
"usedTiles": 22,
"openEnd": 2
}
}
{
"shinespark": {
"frames": 15
}
}
Exit condition: {
"leaveWithSpark": {}
}
|
|
From: 3
Junction Left of Morph Tunnel
To: 1
Left Door
Charge a spark left and use the last bit of platform to jump up to the ledge above. Requires: "canShinechargeMovementComplex"
"HiJump"
"canWalljump"
{
"canShineCharge": {
"usedTiles": 20,
"openEnd": 2
}
}
Exit condition: {
"leaveShinecharged": {
"framesRemaining": 30
}
}
|
|
Requires: "Morph" |
|
From: 3
Junction Left of Morph Tunnel
To: 2
Right Door
Charge on the central runway then carry the spark through the morph tunnel and out the right door. The door can be shot just before initiating the spark. This is easier with Gravity because the tide won't interfere. Requires: "Gravity"
"canShinechargeMovementComplex"
"canCarefulJump"
"Morph"
{
"canShineCharge": {
"usedTiles": 22,
"openEnd": 2
}
}
{
"shinespark": {
"frames": 30
}
}
Exit condition: {
"leaveWithSpark": {}
}
|
|
From: 3
Junction Left of Morph Tunnel
To: 2
Right Door
Charge on the central runway then carry the spark through the morph tunnel and out the right door. This can be done by being careful not to fall off of the runway and into the water or timing the tide. The door can be shot just before initiating the spark. Requires: "canShinechargeMovementComplex"
"canCarefulJump"
"Morph"
{
"canShineCharge": {
"usedTiles": 22,
"openEnd": 1
}
}
{
"shinespark": {
"frames": 30
}
}
Exit condition: {
"leaveWithSpark": {}
}
|
{
"$schema": "../../../schema/m3-room.schema.json",
"id": 180,
"name": "Northwest Maridia Bug Room",
"area": "Maridia",
"subarea": "Inner",
"subsubarea": "Yellow",
"playable": true,
"roomAddress": "0x7D16D",
"roomEnvironments": [
{
"heated": false
}
],
"nodes": [
{
"id": 1,
"name": "Left Door",
"nodeType": "door",
"nodeSubType": "blue",
"nodeAddress": "0x001a498",
"doorEnvironments": [
{
"physics": "air"
}
]
},
{
"id": 2,
"name": "Right Door",
"nodeType": "door",
"nodeSubType": "blue",
"nodeAddress": "0x001a4a4",
"doorEnvironments": [
{
"physics": "air"
}
]
},
{
"id": 3,
"name": "Junction Left of Morph Tunnel",
"nodeType": "junction",
"nodeSubType": "junction"
}
],
"obstacles": [
{
"id": "A",
"name": "Right Door Menus",
"obstacleType": "enemies"
}
],
"enemies": [
{
"id": "e1",
"groupName": "Maridia Bug Room Left Owtches",
"enemyName": "Owtch",
"quantity": 4,
"homeNodes": [
1
]
},
{
"id": "e2",
"groupName": "Maridia Bug Room Left Menus",
"enemyName": "Menu",
"quantity": 3,
"homeNodes": [
1
]
},
{
"id": "e3",
"groupName": "Maridia Bug Room Right Owtches",
"enemyName": "Owtch",
"quantity": 3,
"homeNodes": [
2
]
},
{
"id": "e4",
"groupName": "Maridia Bug Room Right Menus",
"enemyName": "Menu",
"quantity": 2,
"homeNodes": [
2
]
}
],
"links": [
{
"from": 1,
"to": [
{
"id": 1
},
{
"id": 2
},
{
"id": 3
}
]
},
{
"from": 2,
"to": [
{
"id": 1
},
{
"id": 2
},
{
"id": 3
}
]
},
{
"from": 3,
"to": [
{
"id": 1
},
{
"id": 2
}
]
}
],
"strats": [
{
"link": [
1,
1
],
"name": "Leave with Runway",
"requires": [],
"exitCondition": {
"leaveWithRunway": {
"length": 6,
"openEnd": 1
}
}
},
{
"link": [
1,
1
],
"name": "Crystal Flash",
"requires": [
"h_canCrystalFlash"
]
},
{
"link": [
1,
1
],
"name": "G-Mode Setup - Get Hit By Menu",
"notable": false,
"requires": [
"canBeVeryPatient",
"canManipulateMellas"
],
"exitCondition": {
"leaveWithGModeSetup": {}
},
"devNote": [
"FIXME Add details on how this works and check if it actually requires canBeVeryPatient."
]
},
{
"link": [
1,
2
],
"name": "G-Mode Morph",
"entranceCondition": {
"comeInWithGMode": {
"mode": "any",
"morphed": true
}
},
"requires": [
{
  "or": [
    "h_canArtificialMorphSpringBall",
    {
      "and": [
        "h_canArtificialMorphIBJ",
        "Gravity"
      ]
    }
  ]
}
],
"note": "The off screen portion can be simple with Spring Ball or two short IBJs."
},
{
"link": [
1,
2
],
"name": "G-Mode Morph Blind Bomb Boost",
"entranceCondition": {
"comeInWithGMode": {
"mode": "any",
"morphed": true
}
},
"requires": [
"canOffScreenMovement",
"h_canArtificialMorphBombHorizontally",
"h_canArtificialMorphBombThings",
"h_additionalBomb"
],
"note": [
"Use one bomb to get to the off-screen region. After going a full screen to the right, when Samus is partially visible in the left wall, bomb to the middle platform on the right.",
"Bomb again to the right, note that these small platforms are one tile left of the ones that are on camera. Exit G-Mode and get to the right door."
]
},
{
"link": [
1,
3
],
"name": "Base",
"requires": []
},
{
"link": [
2,
1
],
"name": "G-Mode Morph",
"entranceCondition": {
"comeInWithGMode": {
"mode": "any",
"morphed": true
}
},
"requires": [
"canOffScreenMovement",
"h_canArtificialMorphIBJ",
{
"or": [
"h_canArtificialMorphSpringBall",
"Gravity"
]
}
],
"devNote": [
"Spring Ball and Gravity wouldn't be required with some risky off-screen horizontal bomb jumps.",
"This strat is only useful for avoiding a wall jump. A simpler variant exits G-Mode after the morph tunnel."
]
},
{
"link": [
2,
1
],
"name": "Grapple Teleport",
"entranceCondition": {
"comeInWithGrappleTeleport": {
"blockPositions": [
[
5,
3
],
[
7,
2
]
]
}
},
"requires": []
},
{
"link": [
2,
1
],
"name": "Grapple Teleport Door Lock Skip",
"entranceCondition": {
"comeInWithGrappleTeleport": {
"blockPositions": [
[
3,
12
]
]
}
},
"requires": [],
"bypassesDoorShell": true
},
{
"link": [
2,
1
],
"name": "Carry Grapple Teleport",
"entranceCondition": {
"comeInWithGrappleTeleport": {
"blockPositions": [
[
3,
12
]
]
}
},
"requires": [],
"bypassesDoorShell": true,
"exitCondition": {
"leaveWithGrappleTeleport": {
"blockPositions": [
[
3,
12
]
]
}
}
},
{
"link": [
2,
1
],
"name": "Grapple Teleport X-Ray Climb",
"entranceCondition": {
"comeInWithGrappleTeleport": {
"blockPositions": [
[
2,
18
],
[
2,
19
],
[
2,
29
]
]
}
},
"requires": [
"canXRayClimb"
],
"bypassesDoorShell": true,
"note": [
"Exit the previous room with Samus in a standing pose (while grappled).",
"After teleporting, press right to release Grapple while staying standing (not being forced into a crouch).",
"Then X-ray climb to get up to the door transition, without needing to open the door."
]
},
{
"link": [
2,
2
],
"name": "Leave with Runway, Short Runway without Menu",
"requires": [],
"exitCondition": {
"leaveWithRunway": {
"length": 1,
"openEnd": 1
}
},
"note": "Enter the room slowly to not lure the Menu, then use the short runway to leave the room."
},
{
"link": [
2,
2
],
"name": "Leave with Runway, Deal with Menu",
"requires": [
{
  "or": [
    {
      "obstaclesCleared": [
        "A"
      ]
    },
    {
      "enemyDamage": {
        "enemy": "Menu",
        "type": "contact",
        "hits": 1
      }
    }
  ]
}
],
"exitCondition": {
"leaveWithRunway": {
"length": 5,
"openEnd": 1
}
},
"note": "Kill or tank the Menu to use the full runway."
},
{
"link": [
2,
2
],
"name": "Kill the Menus",
"requires": [
{
  "or": [
    {
      "and": [
        "canDodgeWhileShooting",
        {
          "enemyKill": {
            "enemies": [
              [
                "Menu",
                "Menu"
              ]
            ]
          }
        }
      ]
    },
    {
      "enemyKill": {
        "enemies": [
          [
            "Menu",
            "Menu"
          ]
        ],
        "explicitWeapons": [
          "PowerBomb",
          "ScrewAttack",
          "Wave",
          "Spazer",
          "Plasma",
          "Missile",
          "Super"
        ]
      }
    },
    {
      "and": [
        "canPrepareForNextRoom",
        {
          "enemyKill": {
            "enemies": [
              [
                "Menu",
                "Menu"
              ]
            ],
            "explicitWeapons": [
              "PseudoScrew"
            ]
          }
        }
      ]
    }
  ]
}
],
"clearsObstacles": [
"A"
]
},
{
"link": [
2,
2
],
"name": "Tank the Menus",
"requires": [
{
  "enemyDamage": {
    "enemy": "Menu",
    "type": "contact",
    "hits": 1
  }
}
],
"clearsObstacles": [
"A"
]
},
{
"link": [
2,
2
],
"name": "Crystal Flash",
"requires": [
"h_canCrystalFlash"
],
"clearsObstacles": [
"A"
]
},
{
"link": [
2,
2
],
"name": "G-Mode Setup - Get Hit By Menu",
"notable": false,
"requires": [],
"exitCondition": {
"leaveWithGModeSetup": {}
}
},
{
"link": [
2,
3
],
"name": "Base",
"requires": [
"Morph",
{
"or": [
"h_canBombThings",
"h_canUseSpringBall"
]
},
{
"obstaclesCleared": [
"A"
]
}
]
},
{
"link": [
2,
3
],
"name": "Maridia Bug Room MidAir Morph with Gravity",
"requires": [
"Morph",
"Gravity",
"canTrickyJump",
{
"obstaclesCleared": [
"A"
]
}
],
"note": [
"With Gravity, it's possible to move forward and mid-air morph into the morph passage.",
"The momentum can push Samus into the tunnel, no need to press forward while in mid-air."
]
},
{
"link": [
2,
3
],
"name": "Maridia Bug Room Suitless MidAir Morph",
"requires": [
"h_canThreeTileJumpMorph",
{
"obstaclesCleared": [
"A"
]
}
]
},
{
"link": [
2,
3
],
"name": "Maridia Bug Room Frozen Menu Bridge",
"notable": true,
"requires": [
"Morph",
"h_canNavigateUnderwater",
"canTrickyUseFrozenEnemies",
"canNeutralDamageBoost",
{
"enemyDamage": {
"enemy": "Menu",
"type": "contact",
"hits": 2
}
}
],
"note": [
"Freeze one of the Menus (bugs) in a position where you can use it to get into the morph passage.",
"One of the easier methods is with a damage boost. Stand in the water, take a hit for positioning, and freeze the bug near but left of Samus.",
"Then morph on top and damage boost into the morph tunnel as it unfreezes."
],
"devNote": "FIXME: There is a damageless variant where Samus jumps high before morphing, giving a small bounce as she lands on the bug to get through the tunnel."
},
{
"link": [
2,
3
],
"name": "G-Mode Morph",
"entranceCondition": {
"comeInWithGMode": {
"mode": "any",
"morphed": true
}
},
"requires": [
{
  "or": [
    "h_canArtificialMorphSpringBall",
    {
      "and": [
        "h_canArtificialMorphBombThings",
        "h_additionalBomb",
        {
          "or": [
            "h_canArtificialMorphBombHorizontally",
            {
              "and": [
                "h_additionalBomb",
                "Gravity"
              ]
            }
          ]
        }
      ]
    }
  ]
}
]
},
{
"link": [
3,
1
],
"name": "Base",
"requires": [
{
  "or": [
    "HiJump",
    "SpaceJump",
    "canTrickyDashJump",
    "canTrickyUseFrozenEnemies",
    "canPreciseWalljump"
  ]
}
],
"devNote": "The menus don't really matter with these strats."
},
{
"link": [
3,
1
],
"name": "Kill the Menus",
"requires": [
{
"or": [
"h_canIBJ",
"canWalljump",
"canSpringBallJumpMidAir"
]
},
{
"or": [
{
"enemyKill": {
"enemies": [
[
"Menu",
"Menu",
"Menu"
]
],
"explicitWeapons": [
"PowerBomb",
"ScrewAttack",
"Wave",
"Spazer",
"Plasma",
"Missile",
"Super"
]
}
},
{
"and": [
{
"enemyKill": {
"enemies": [
[
"Menu",
"Menu",
"Menu"
]
]
}
},
{
"or": [
{
"and": [
"canDodgeWhileShooting",
"canTrickyJump"
]
},
{
"and": [
"canDodgeWhileShooting",
{
"enemyDamage": {
"enemy": "Menu",
"type": "contact",
"hits": 1
}
}
]
},
{
"enemyDamage": {
"enemy": "Menu",
"type": "contact",
"hits": 2
}
}
]
}
]
}
]
}
],
"devNote": "The Menus are relatively hard to dodge, and would end up with the same requirements as killing them with the Power Beam."
},
{
"link": [
3,
1
],
"name": "Shinespark Out Left with Hijump",
"requires": [
"canShinechargeMovementComplex",
"HiJump",
{
"canShineCharge": {
"usedTiles": 22,
"openEnd": 2
}
},
{
"shinespark": {
"frames": 15
}
}
],
"exitCondition": {
"leaveWithSpark": {}
},
"unlocksDoors": [
{
"types": [
"ammo"
],
"requires": []
}
],
"note": "Charge a spark below towards the right then run back and jump up and spark out of the left door."
},
{
"link": [
3,
1
],
"name": "Maridia Bug Room Spark Out Left HiJumpless",
"notable": true,
"requires": [
"canShinechargeMovementComplex",
"canTrickyDashJump",
{
"canShineCharge": {
"usedTiles": 22,
"openEnd": 2
}
},
{
"shinespark": {
"frames": 15
}
}
],
"exitCondition": {
"leaveWithSpark": {}
},
"unlocksDoors": [
{
"types": [
"ammo"
],
"requires": []
}
],
"note": "Charge a spark below towards the right then run back and jump up and spark out of the left door."
},
{
"link": [
3,
1
],
"name": "Shinecharge Out Left with Hijump",
"requires": [
"canShinechargeMovementComplex",
"HiJump",
"canWalljump",
{
"canShineCharge": {
"usedTiles": 20,
"openEnd": 2
}
}
],
"exitCondition": {
"leaveShinecharged": {
"framesRemaining": 30
}
},
"unlocksDoors": [
{
"types": [
"ammo"
],
"requires": []
}
],
"note": "Charge a spark left and use the last bit of platform to jump up to the ledge above."
},
{
"link": [
3,
2
],
"name": "Base",
"requires": [
"Morph"
]
},
{
"link": [
3,
2
],
"name": "Shinespark Out Right",
"requires": [
"Gravity",
"canShinechargeMovementComplex",
"canCarefulJump",
"Morph",
{
"canShineCharge": {
"usedTiles": 22,
"openEnd": 2
}
},
{
"shinespark": {
"frames": 30
}
}
],
"exitCondition": {
"leaveWithSpark": {}
},
"unlocksDoors": [
{
"types": [
"super"
],
"requires": []
},
{
"types": [
"missiles",
"powerbomb"
],
"requires": [
{
"or": [
"h_canUseSpringBall",
"h_canBombThings",
"h_canThreeTileJumpMorph"
]
}
]
}
],
"note": [
"Charge on the central runway then carry the spark through the morph tunnel and out the right door.",
"The door can be shot just before initiating the spark.",
"This is easier with Gravity because the tide won't interfere."
]
},
{
"link": [
3,
2
],
"name": "Suitless Shinespark Out Right",
"requires": [
"canShinechargeMovementComplex",
"canCarefulJump",
"Morph",
{
"canShineCharge": {
"usedTiles": 22,
"openEnd": 1
}
},
{
"shinespark": {
"frames": 30
}
}
],
"exitCondition": {
"leaveWithSpark": {}
},
"unlocksDoors": [
{
"types": [
"super"
],
"requires": []
},
{
"types": [
"missiles",
"powerbomb"
],
"requires": [
{
"or": [
"h_canUseSpringBall",
"h_canBombThings",
"h_canThreeTileJumpMorph"
]
}
]
}
],
"note": [
"Charge on the central runway then carry the spark through the morph tunnel and out the right door.",
"This can be done by being careful not to fall off of the runway and into the water or timing the tide.",
"The door can be shot just before initiating the spark."
]
}
]
}