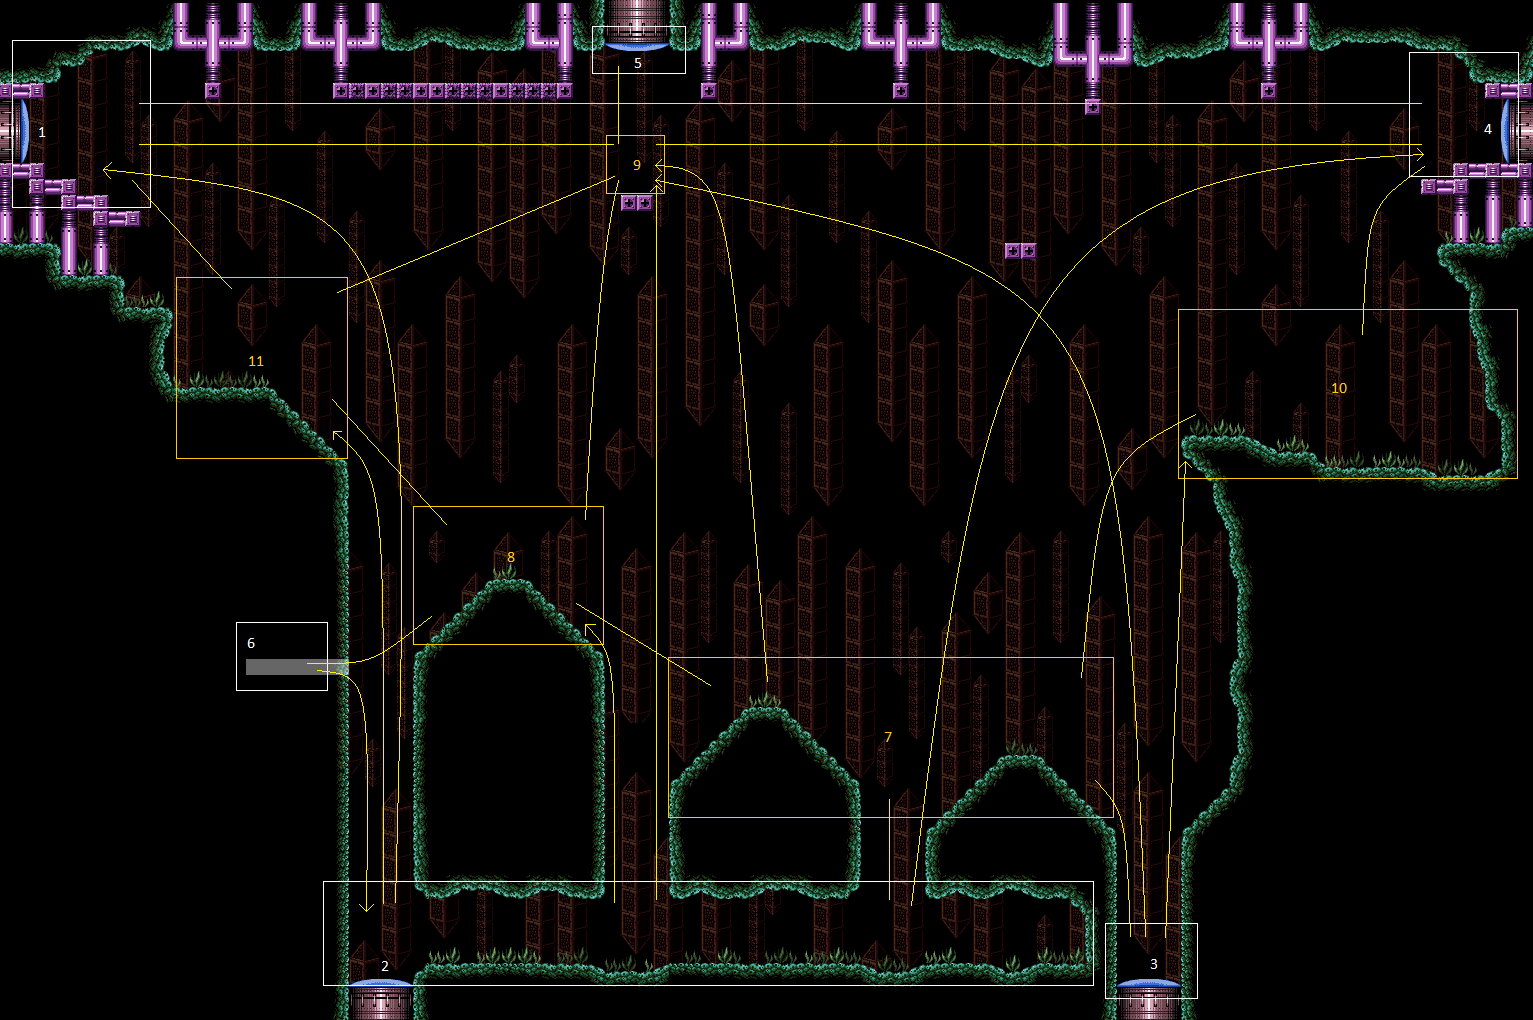
Mt. Everest
Room ID: 174
|
Exit condition: {
"leaveWithRunway": {
"length": 2,
"openEnd": 1
}
}
|
|
From: 1
Top Left Door
To: 1
Top Left Door
Follow the crab from the bottom right door to the top left door. This takes approximately 90 seconds. It is also possible to knock the crab off of the middle peak with a super and follow it to the left which may save time. Requires: "h_canFrozenEnemyRunway"
"Gravity"
"canBePatient"
{
  "or": [
    "SpaceJump",
    {
      "and": [
        {
          "ammo": {
            "type": "Super",
            "count": 1
          }
        },
        {
          "or": [
            "HiJump",
            "canSpringBallJumpMidAir",
            "canGravityJump",
            "canConsecutiveWalljump",
            "SpeedBooster"
          ]
        }
      ]
    }
  ]
}
Exit condition: {
"leaveWithRunway": {
"length": 4,
"openEnd": 0
}
}
|
|
From: 1
Top Left Door
To: 1
Top Left Door
Follow the crab from the bottom right door to the top left door. It is also possible to knock the crab off of the middle peak with a super and follow it. Requires: "h_canFrozenEnemyRunway"
"Gravity"
"canBeVeryPatient"
{
"or": [
"canGravityJump",
"canPreciseGrapple",
{
"ammo": {
"type": "Super",
"count": 1
}
}
]
}
Exit condition: {
"leaveWithRunway": {
"length": 4,
"openEnd": 0
}
}
|
|
Requires: "h_canCrystalFlash" |
|
From: 1
Top Left Door
To: 1
Top Left Door
Follow the crab from the bottom right door to the top left door. This takes approximately 90 seconds. It is also possible to knock the crab off of the middle peak with a super and follow it to the left which may save time. Requires: "Gravity"
"canBePatient"
{
"or": [
"SpaceJump",
{
"and": [
{
"ammo": {
"type": "Super",
"count": 1
}
},
{
"or": [
"HiJump",
"canSpringBallJumpMidAir",
"canGravityJump",
"canConsecutiveWalljump",
"SpeedBooster"
]
}
]
}
]
}
Exit condition: {
"leaveWithGModeSetup": {}
}
|
|
From: 1
Top Left Door
To: 1
Top Left Door
Follow the crab from the bottom right door to the top left door with Gravity or Grapple. It is also possible to knock the crab off of the middle peak with a super and follow it to the left with Ice or HiJump and Spring Ball. Requires: "canBeVeryPatient"
{
"or": [
"canGravityJump",
{
"and": [
"canPreciseGrapple",
{
"or": [
"HiJump",
"Gravity"
]
}
]
},
{
"and": [
{
"ammo": {
"type": "Super",
"count": 1
}
},
{
"or": [
"canTrickyUseFrozenEnemies",
{
"and": [
"HiJump",
"canSpringBallJumpMidAir"
]
}
]
}
]
}
]
}
Exit condition: {
"leaveWithGModeSetup": {}
}
|
|
Entrance condition: {
"comeInWithSpark": {
"position": "bottom"
}
}
Requires: "Gravity"
{
"shinespark": {
"frames": 112,
"excessFrames": 7
}
}
|
|
Entrance condition: {
"comeInWithSpark": {
"position": "bottom"
}
}
Requires: {
"shinespark": {
"frames": 143,
"excessFrames": 10
}
}
|
|
Entrance condition: {
"comeInWithGMode": {
"mode": "any",
"morphed": true
}
}
Requires: "h_canArtificialMorphIBJ" "Gravity" |
|
Requires: "h_canNavigateUnderwater" "Grapple" |
|
From: 1
Top Left Door
To: 9
Spawn At Junction Below Top Door
Notable: true .png)
.gif)
Crouch on the lowest stair, then shinespark horizontally to bonk at the top corner of the grapple block. Down grab to get onto it. Entrance condition: {
"comeInShinecharged": {
"framesRequired": 110
}
}
Requires: "canSuitlessMaridia"
"h_canCrouchJumpDownGrab"
"canHorizontalShinespark"
{
"shinespark": {
"frames": 56,
"excessFrames": 0
}
}
|
|
Entrance condition: {
"comeInWithGMode": {
"mode": "any",
"morphed": true
}
}
Requires: "h_canArtificialMorphIBJ" "Gravity" |
|
|
|
Entrance condition: {
"comeInWithGMode": {
"mode": "any",
"morphed": true
}
}
Requires: {
"or": [
"Morph",
"h_canArtificialMorphSpringBall",
{
"and": [
"Gravity",
"h_canArtificialMorphIBJ"
]
},
{
"and": [
"Gravity",
"h_canArtificialMorphBombHorizontally"
]
},
{
"and": [
{
"enemyDamage": {
"enemy": "Sciser",
"type": "contact",
"hits": 1
}
},
{
"or": [
"h_EverestMorphTunnelExpanded",
{
"enemyDamage": {
"enemy": "Sciser",
"type": "contact",
"hits": 1
}
}
]
}
]
}
]
}
|
|
From: 1
Top Left Door
To: 12
G-Mode Junction (In Morph Tunnel)
Bounce from the right peak into the morph tunnel. Samus can't bounce twice in a single fall, so start from the right ground, not the raised scaffolding by the door. Entrance condition: {
"comeInWithGMode": {
"mode": "any",
"morphed": true
}
}
Requires: "canSuitlessMaridia"
"canTrickyJump"
{
"or": [
"h_EverestMorphTunnelExpanded",
{
"enemyDamage": {
"enemy": "Sciser",
"type": "contact",
"hits": 1
}
}
]
}
|
|
Shinespark up left to get all the way up to the door. Entrance condition: {
"comeInShinecharged": {
"framesRequired": 5
},
"comesThroughToilet": "any"
}
Requires: "canSuitlessMaridia"
{
"shinespark": {
"frames": 62,
"excessFrames": 8
}
}
|
|
Near the bottom left door, there are three pathways upwards: one directly above the door and two to the right. Between the right pathways, is a crab moving to the right. Shooting a super against the wall will make it fall off and move left. Climb the crab up the left wall. Watch out for the crab above that is heading into the morph tunnel. Jump to the right platform before the upward crab goes into the tunnel. Lure the crab out of the hole by running to the right of the hill then back left or use moonwalk to scroll the camera. Near the end is particularly tricky. When the crab is on the underside of the metal blocks, freeze it and use it as a stepping platform. To do this, crouch jump and while moving upwards, hold left against the crab to get extra vertical movement. Down grabbing at the top is helpful. Requires: "canSuitlessMaridia"
"canTrickyJump"
"canTrickyUseFrozenEnemies"
{
"or": [
{
"and": [
"canCrazyCrabClimb",
"h_canCrouchJumpDownGrab"
]
},
"HiJump",
"canSpringBallJumpMidAir"
]
}
"canCameraManip"
{
"ammo": {
"type": "Super",
"count": 1
}
}
|
|
Exit condition: {
"leaveNormally": {}
}
|
|
Requires: "Gravity"
{
"canShineCharge": {
"usedTiles": 33,
"openEnd": 2
}
}
Exit condition: {
"leaveShinecharged": {
"framesRemaining": 160
}
}
|
|
Requires: "h_canNavigateUnderwater"
{
"resetRoom": {
"nodes": [
2
],
"mustStayPut": false
}
}
{
"refill": [
"PowerBomb"
]
}
|
|
Requires: "h_canCrystalFlash" |
|
Shinespark up right through the rightmost gap to land directly by the door. Requires: "Gravity"
{
"canShineCharge": {
"usedTiles": 33,
"openEnd": 2
}
}
{
"shinespark": {
"frames": 65
}
}
|
|
Entrance condition: {
"comeInWithGMode": {
"mode": "any",
"morphed": true
},
"comesThroughToilet": "any"
}
Requires: "h_canArtificialMorphIBJ" "Gravity" |
|
From: 2
Bottom Left Door
To: 5
Top Door
Notable: true 
Run and jump up through the door using SpeedBooster in the room below. Bonk the door frame as you pass through the transition, to cancel your horizontal momentum. You need a vertical speed of exactly 7.8800 when passing through the transition, which requires the jump to be frame perfect. After the transition, as you reach the wall, begin holding right. Begin holding angle up at any time before approaching the door (and you can continue holding it until the end of the strat). As you approach the door (an 8-frame window), while holding angle up, release right for exactly one frame. This will put Samus into a pose aiming diagonally up and to the right. Immediately fire a shot to open the door (within the same 8-frame window); if successful, you will just barely clear the grapple block and pass through the door. Several things can cause you to bonk the grapple block: 1) entering the room with too much vertical speed, 2) not pressing against the wall as you come up, 3) releasing right for more than one frame, 4) releasing right too early. As an alternative to releasing right for one frame, you can instead press shot for one frame: if successful, Samus' pose will change to aiming diagonally without a shot being fired; if shot is pressed for more than one frame, then a shot will be fired horizontally, and the cooldown will prevent you from firing diagonally in time. Entrance condition: {
"comeInWithPlatformBelow": {
"minHeight": 9,
"maxHeight": 9,
"maxLeftPosition": -38.5,
"minRightPosition": -2
},
"comesThroughToilet": "no"
}
Requires: "canCrossRoomJumpIntoWater" "SpeedBooster" "HiJump" "canInsaneJump" |
|
Requires: "Gravity"
{
"or": [
"HiJump",
"canWalljump",
"SpeedBooster",
"h_canFly",
"canSpringBallJumpMidAir",
"canSpringBallBombJump"
]
}
|
|
Requires: "canGravityJump" |
|
From: 2
Bottom Left Door
To: 7
Lower Hills Junction
Stand on higher ground on the right side and face left. Crouch jump and immediately press left (almost simultaneously) to avoid bonking the ceiling. Requires: "Gravity" "h_canCrouchJumpDownGrab" "canTrickyJump" |
|
Requires: "canSuitlessMaridia" "HiJump" "canSpringBallJumpMidAir" |
|
From: 2
Bottom Left Door
To: 7
Lower Hills Junction
Use the frozen crab as a platform. Requires: "canSuitlessMaridia"
"canUseFrozenEnemies"
{
"or": [
"HiJump",
"canSpringBallJumpMidAir"
]
}
|
|
Freeze the crab when it is hanging off the ledge then use it as a platform. Requires: "canSuitlessMaridia" "canTrickyUseFrozenEnemies" |
|
Requires: "canUnderwaterWalljump" |
|
From: 2
Bottom Left Door
To: 7
Lower Hills Junction
Notable: true 
Jump into a mid-air morph, lay a Bomb, unmorph, use grapple to kill a Scisor, to be able to get a second jump mid-air. Requires: "h_canNavigateUnderwater" "HiJump" "canBombGrappleJump" |
|
From: 2
Bottom Left Door
To: 7
Lower Hills Junction
Notable: true 
Position 2 Scisors so that they can each be used for a Bomb-Grapple-Jump, back to back. This gives a total of 3 jumps to climb from the bottom of Everest up to one of the lower peaks. In the likely event of failure, the room will need to be reset and the crabs repositioned for the next attempt. Requires: "h_canNavigateUnderwater" "canBombGrappleJump" "h_canCrouchJumpDownGrab" |
|
Entrance condition: {
"comeInWithGMode": {
"mode": "any",
"morphed": true
},
"comesThroughToilet": "any"
}
Requires: "h_canArtificialMorphIBJ" "Gravity" |
|
From: 2
Bottom Left Door
To: 7
Lower Hills Junction
This requires one spring ball bomb jump. Entrance condition: {
"comeInWithGMode": {
"mode": "any",
"morphed": true
},
"comesThroughToilet": "any"
}
Requires: "Gravity" "h_canArtificialMorphSpringBallBombJump" |
|
Use the rightmost crab to get up onto the lowest platform, while also damaging down the crab on the middle platform. Jump left onto the middle platform and freeze the crab just a bit left of the peak. Without any movement items, Spinjump from on top of the crab to the higher platform towards the left. A failure often requires resetting the room. Requires: "canSuitlessMaridia"
"canTrickyUseFrozenEnemies"
{
"or": [
"canTrickyJump",
"canTrickySpringBallJump",
"HiJump"
]
}
|
|
From: 2
Bottom Left Door
To: 8
Higher Hill Junction
Space Jump up through the door of the room below with HiJump equipped. Entrance condition: {
"comeInWithSpaceJumpBelow": {},
"comesThroughToilet": "any"
}
Requires: "canCrossRoomJumpIntoWater" "HiJump" |
|
From: 2
Bottom Left Door
To: 8
Higher Hill Junction
Standing on a platform in the room below, jump straight up through the door with HiJump equipped. Entrance condition: {
"comeInWithPlatformBelow": {
"minHeight": 6,
"maxHeight": 7,
"maxLeftPosition": 2,
"minRightPosition": -2
},
"comesThroughToilet": "any"
}
Requires: "canCrossRoomJumpIntoWater" "HiJump" |
|
From: 2
Bottom Left Door
To: 8
Higher Hill Junction
Run and jump up through the door using HiJump and SpeedBooster in the room below using at least 1 tile of runway. Entrance condition: {
"comeInWithPlatformBelow": {
"minHeight": 8,
"maxHeight": 9,
"maxLeftPosition": 2,
"minRightPosition": -2
},
"comesThroughToilet": "any"
}
Requires: "canCrossRoomJumpIntoWater" "HiJump" "SpeedBooster" |
|
Run and jump up through the door using SpeedBooster in the room below. Bonk the door frame or turn back left soon enough to cancel rightward momentum before passing through the transition. Entrance condition: {
"comeInWithPlatformBelow": {
"maxHeight": 10,
"maxLeftPosition": -38.5,
"minRightPosition": -7
},
"comesThroughToilet": "any"
}
Requires: "canCrossRoomJumpIntoWater" "SpeedBooster" |
|
Wall jump relatively high off either side of the door frame in the room below. Entrance condition: {
"comeInWithWallJumpBelow": {
"minHeight": 2
},
"comesThroughToilet": "any"
}
Requires: {
"or": [
"canTrickyJump",
"canTrickySpringBallJump",
"HiJump"
]
}
"canCrossRoomJumpIntoWater"
|
|
From: 2
Bottom Left Door
To: 8
Higher Hill Junction
Standing on the platform in the room below, perform a spring ball jump mid-air just before reaching the transition. Entrance condition: {
"comeInWithPlatformBelow": {
"maxHeight": 9,
"maxLeftPosition": 2,
"minRightPosition": -2
},
"comesThroughToilet": "any"
}
Requires: "canCrossRoomJumpIntoWater" "canSpringBallJumpMidAir" |
|
From: 2
Bottom Left Door
To: 8
Higher Hill Junction
Standing on the platform in the room below, crouch jump and perform a spring ball jump mid-air just before reaching the transition. Entrance condition: {
"comeInWithPlatformBelow": {
"minHeight": 10,
"maxHeight": 10,
"maxLeftPosition": 2,
"minRightPosition": -2
},
"comesThroughToilet": "any"
}
Requires: "canCrossRoomJumpIntoWater" "canCrouchJump" "canSpringBallJumpMidAir" |
|
Entrance condition: {
"comeInWithSpark": {},
"comesThroughToilet": "any"
}
Requires: {
"shinespark": {
"frames": 58,
"excessFrames": 29
}
}
|
|
Shinespark up in the middle of the three upward pathways near either the right or left wall. Requires: "Gravity"
{
"canShineCharge": {
"usedTiles": 33,
"openEnd": 2
}
}
{
"shinespark": {
"frames": 61
}
}
|
|
From: 2
Bottom Left Door
To: 9
Spawn At Junction Below Top Door
Run and jump using SpeedBooster in the room below, with HiJump equipped. Bonk the door frame before passing through the transition, to cancel your horizontal momentum. After the transition, as you reach the wall, begin holding right. Land on the small platform below the top door. Entrance condition: {
"comeInWithPlatformBelow": {
"minHeight": 9,
"maxHeight": 10,
"maxLeftPosition": -38.5,
"minRightPosition": -2
},
"comesThroughToilet": "any"
}
Requires: "canCrossRoomJumpIntoWater" "SpeedBooster" "HiJump" |
|
From: 2
Bottom Left Door
To: 9
Spawn At Junction Below Top Door
Entrance condition: {
"comeInWithGMode": {
"mode": "any",
"morphed": true
},
"comesThroughToilet": "any"
}
Requires: "h_canArtificialMorphIBJ" "Gravity" |
|
From: 2
Bottom Left Door
To: 11
Upper Left Ledge Junction
In the upward channel one right of the door, jump as high as possible to lure a fast crab moving down the tallest mountain. A crouch jump or breaking spin can be helpful. Damage down the crab while watching it loop around, then ride the crab up the left side. Freeze the crab at the top of the highest peak, stand on it to jump to the left. If you lose the fast crab, it is always possible to get it back by climbing the peak to the right. The crab there can be lured with HiJump alone. Requires: "canSuitlessMaridia" "HiJump" "canTrickyUseFrozenEnemies" |
|
From: 2
Bottom Left Door
To: 11
Upper Left Ledge Junction
Climb the crabs on the right and use them to bring down the center crab, who is already on the highest peak. Damage down the crab while watching it loop around, then ride the crab up the left side. Freeze the crab at the top of the highest peak, stand on it to jump to the left. Use a Stationary Lateral MidAir Morph to get enough momentum for the SpringBall jump to reach the left ledge. Requires: "canSuitlessMaridia" "canTrickySpringBallJump" "canStationaryLateralMidAirMorph" "canTrickyUseFrozenEnemies" |
|
From: 2
Bottom Left Door
To: 11
Upper Left Ledge Junction
Wall jump from a high position on either side of the door frame, pass through the Toilet, and down-grab onto the ledge. The Toilet affects Samus' vertical spawn position, making this jump possible. Entrance condition: {
"comeInWithWallJumpBelow": {
"minHeight": 2
},
"comesThroughToilet": "yes"
}
Requires: "canCrossRoomJumpIntoWater" "HiJump" "canPreciseWalljump" "canDownGrab" "canTrickyJump" |
|
From: 2
Bottom Left Door
To: 11
Upper Left Ledge Junction
Run and jump up through the door using HiJump and SpeedBooster in the room below using at least 1 tile of runway. Entrance condition: {
"comeInWithPlatformBelow": {
"maxHeight": 6,
"maxLeftPosition": 2.5,
"minRightPosition": -2.5
},
"comesThroughToilet": "any"
}
Requires: "canCrossRoomJumpIntoWater" "HiJump" "canTrickyDashJump" "canDownGrab" |
|
From: 2
Bottom Left Door
To: 11
Upper Left Ledge Junction
Run and jump up through the door using SpeedBooster in the room below. Turn to the left immediately after jumping, to allow running further and to cancel the rightward momentum before passing through the transition. Entrance condition: {
"comeInWithPlatformBelow": {
"maxHeight": 10,
"maxLeftPosition": -38.5,
"minRightPosition": 0
},
"comesThroughToilet": "any"
}
Requires: "canCrossRoomJumpIntoWater" "SpeedBooster" |
|
Entrance condition: {
"comeInWithSpark": {},
"comesThroughToilet": "any"
}
Requires: {
"shinespark": {
"frames": 58,
"excessFrames": 16
}
}
|
|
From: 2
Bottom Left Door
To: 12
G-Mode Junction (In Morph Tunnel)
Entrance condition: {
"comeInWithGMode": {
"mode": "any",
"morphed": true
},
"comesThroughToilet": "any"
}
Requires: "Gravity"
{
"or": [
"h_canArtificialMorphIBJ",
{
"and": [
"h_canArtificialMorphSpringBall",
{
"or": [
"canGravityJump",
"HiJump"
]
}
]
},
{
"and": [
"h_canArtificialMorphSpringBallBombJump",
"h_additionalBomb"
]
}
]
}
|
|
Exit condition: {
"leaveNormally": {}
}
|
|
Entrance condition: {
"comeInWithSpark": {},
"comesThroughToilet": "any"
}
Requires: {
"shinespark": {
"frames": 60,
"excessFrames": 60
}
}
|
|
Requires: "h_canCrystalFlash" |
|
Run and jump up through the door using SpeedBooster in the room below, with HiJump equipped. Immediately after jumping, break spin and turn left to avoid hitting the crab (alternatively, you can wiggle after the transition). It helps to use a little less than the full runway. Make it all the way up to the top right door. Entrance condition: {
"comeInWithPlatformBelow": {
"maxHeight": 10,
"maxLeftPosition": -38.5,
"minRightPosition": -2
},
"comesThroughToilet": "any"
}
Requires: "canCrossRoomJumpIntoWater" "SpeedBooster" "HiJump" "canTrickyJump" |
|
Requires: "Gravity"
{
"or": [
"HiJump",
"canWalljump",
"h_canFly",
"canSpringBallJumpMidAir"
]
}
|
|
Requires: "canGravityJump" |
|
Requires: "canSuitlessMaridia" "HiJump" "canSpringBallJumpMidAir" |
|
Knock the crab off the wall immediately and then freeze. Requires: "h_canNavigateUnderwater"
"canTrickyUseFrozenEnemies"
{
"or": [
{
"resetRoom": {
"nodes": [
3
],
"mustStayPut": true
}
},
"canPrepareForNextRoom"
]
}
{
"or": [
"canInsaneJump",
"Spazer",
"Wave",
"Plasma",
{
"and": [
"canDodgeWhileShooting",
{
"ammo": {
"type": "Super",
"count": 1
}
}
]
},
{
"and": [
"canDodgeWhileShooting",
"HiJump"
]
}
]
}
{
"ammo": {
"type": "Super",
"count": 1
}
}
|
|
Requires: "canUnderwaterWalljump" |
|
From: 3
Bottom Right Door
To: 7
Lower Hills Junction
Space Jump up through the door of the room below. Entrance condition: {
"comeInWithSpaceJumpBelow": {},
"comesThroughToilet": "any"
}
Requires: "canCrossRoomJumpIntoWater" |
|
From: 3
Bottom Right Door
To: 7
Lower Hills Junction
Standing on a platform in the room below, jump straight up through the door. Entrance condition: {
"comeInWithPlatformBelow": {
"maxHeight": 7,
"maxLeftPosition": 2,
"minRightPosition": -2
},
"comesThroughToilet": "any"
}
Requires: "canCrossRoomJumpIntoWater" |
|
From: 3
Bottom Right Door
To: 7
Lower Hills Junction
Standing on a platform in the room below, jump straight up through the door, with HiJump equipped. Entrance condition: {
"comeInWithPlatformBelow": {
"maxHeight": 10,
"maxLeftPosition": 2,
"minRightPosition": -2
},
"comesThroughToilet": "any"
}
Requires: "canCrossRoomJumpIntoWater" "HiJump" |
|
From: 3
Bottom Right Door
To: 7
Lower Hills Junction
Run left-to-right in the room below using SpeedBooster, and jump up through the door. Hold left through the transition to avoid hitting the crab. Entrance condition: {
"comeInWithPlatformBelow": {
"minHeight": 9,
"maxHeight": 10,
"maxLeftPosition": -38.5,
"minRightPosition": -7
},
"comesThroughToilet": "any"
}
Requires: "canCrossRoomJumpIntoWater" "SpeedBooster" |
|
From: 3
Bottom Right Door
To: 7
Lower Hills Junction
Run left-to-right in the room below using SpeedBooster over a specific distance, and jump up through the door. Hold left through the transition to avoid hitting the crab. Entrance condition: {
"comeInWithPlatformBelow": {
"minHeight": 9,
"maxHeight": 9,
"maxLeftPosition": -6,
"minRightPosition": 2
},
"comesThroughToilet": "any"
}
Requires: "canCrossRoomJumpIntoWater" "canTrickyDashJump" |
|
From: 3
Bottom Right Door
To: 7
Lower Hills Junction
Run right-to-left in the room below using SpeedBooster over a very precise distance, jump, immediately turn back right, and break spin before reaching the transition. Entrance condition: {
"comeInWithPlatformBelow": {
"minHeight": 8,
"maxHeight": 8,
"maxLeftPosition": -2,
"minRightPosition": 6
},
"comesThroughToilet": "any"
}
Requires: "canCrossRoomJumpIntoWater" "canTrickyDashJump" |
|
Wall jump off either side of the door frame in the room below. Entrance condition: {
"comeInWithWallJumpBelow": {
"minHeight": 2
},
"comesThroughToilet": "any"
}
Requires: "canCrossRoomJumpIntoWater" |
|
From: 3
Bottom Right Door
To: 7
Lower Hills Junction
Standing on the platform in the room below, perform a spring ball jump mid-air just before reaching the transition. Entrance condition: {
"comeInWithPlatformBelow": {
"maxHeight": 10,
"maxLeftPosition": 2,
"minRightPosition": -2
},
"comesThroughToilet": "any"
}
Requires: "canCrossRoomJumpIntoWater" "canSpringBallJumpMidAir" |
|
Entrance condition: {
"comeInWithSpark": {},
"comesThroughToilet": "any"
}
Requires: {
"shinespark": {
"frames": 60,
"excessFrames": 43
}
}
|
|
Shinespark up left to get onto the platform below the door. If gravity suit is on, hold right to land on the platform. Entrance condition: {
"comeInShinecharged": {
"framesRequired": 5
},
"comesThroughToilet": "any"
}
Requires: "Gravity"
{
"shinespark": {
"frames": 62,
"excessFrames": 8
}
}
|
|
From: 3
Bottom Right Door
To: 9
Spawn At Junction Below Top Door
Shinespark up left to get onto the platform below the door. If gravity suit is on, hold right to land on the platform. Entrance condition: {
"comeInShinecharged": {
"framesRequired": 5
},
"comesThroughToilet": "any"
}
Requires: "canSuitlessMaridia"
{
"shinespark": {
"frames": 62,
"excessFrames": 6
}
}
|
|
Entrance condition: {
"comeInWithSpark": {},
"comesThroughToilet": "any"
}
Requires: {
"shinespark": {
"frames": 60,
"excessFrames": 15
}
}
|
|
From: 3
Bottom Right Door
To: 10
Upper Right Ledge Junction
Wall jump off either side of the door frame in the room below and Springball Jump at the height of the jump. Entrance condition: {
"comeInWithWallJumpBelow": {
"minHeight": 2
},
"comesThroughToilet": "any"
}
Requires: "canCrossRoomJumpIntoWater" "HiJump" "canTrickySpringBallJump" "canTrickyJump" |
|
From: 3
Bottom Right Door
To: 10
Upper Right Ledge Junction
Run and jump up through the door using HiJump and SpeedBooster in the room below and Springball Jump at the top of the jump. Entrance condition: {
"comeInWithPlatformBelow": {
"maxHeight": 6,
"maxLeftPosition": 2.5,
"minRightPosition": -2.5
},
"comesThroughToilet": "any"
}
Requires: "canCrossRoomJumpIntoWater" "HiJump" "SpeedBooster" "canTrickySpringBallJump" |
|
From: 3
Bottom Right Door
To: 10
Upper Right Ledge Junction
Run and jump up through the door using HiJump and SpeedBooster in the room below and Springball Jump at the peak of the jump. Entrance condition: {
"comeInWithPlatformBelow": {
"maxHeight": 7,
"maxLeftPosition": 2.5,
"minRightPosition": -2.5
},
"comesThroughToilet": "any"
}
Requires: "canCrossRoomJumpIntoWater" "HiJump" "SpeedBooster" "canTrickySpringBallJump" "canTrickyJump" |
|
From: 3
Bottom Right Door
To: 10
Upper Right Ledge Junction
Run and jump up through the door using SpeedBooster in the room below, jumping during a spike in the speed-to-jumpHeight chart. Immediately after jumping, break spin and turn left to allow you to run longer and to avoid hitting the crab. Entrance condition: {
"comeInWithPlatformBelow": {
"maxHeight": 10,
"maxLeftPosition": -38.5,
"minRightPosition": -2
},
"comesThroughToilet": "any"
}
Requires: "canCrossRoomJumpIntoWater" "canTrickyDashJump" |
|
Entrance condition: {
"comeInWithSpark": {
"position": "bottom"
}
}
Requires: {
"shinespark": {
"frames": 127,
"excessFrames": 10
}
}
|
|
From: 4
Top Right Door
To: 1
Top Left Door
Notable: true .png)
.gif)
Requires running a very precise distance of 8 tiles in the adjacent room. Morph just before hitting the first ceiling grapple block, then bounce on both grapple block platforms. Entrance condition: {
"comeInJumping": {
"speedBooster": true,
"minTiles": 8
}
}
Requires: "canInsaneJump" "canTrickyDashJump" "canSpringBallBounce" "canCrossRoomJumpIntoWater" |
|
Entrance condition: {
"comeInWithGrappleTeleport": {
"blockPositions": [
[
5,
3
],
[
7,
2
]
]
}
}
|
|
Exit the previous room with Samus in a standing pose (while grappled). After teleporting, press right to release Grapple while staying standing (not being forced into a crouch). Then X-ray climb to get up to the door transition, without needing to open the door. Samus will not be visible during the climb. It is necessary to enter a horizontal position of 20 pixel or less, otherwise the climb will stop in the air pocket below the door. Entrance condition: {
"comeInWithGrappleTeleport": {
"blockPositions": [
[
2,
18
],
[
2,
19
],
[
2,
28
],
[
2,
29
]
]
}
}
Requires: "canXRayClimb" Bypasses door shell: true |
|
Exit condition: {
"leaveWithRunway": {
"length": 4,
"openEnd": 1
}
}
|
|
Follow the crab from the bottom right door to the top right door. Depending on the item setup, this takes 30-50 seconds. Keep a half-tile gap between the crab and the runway in order to extend it as much as possible. Requires: "h_canFrozenEnemyRunway"
"Gravity"
{
"or": [
"SpaceJump",
"canGravityJump",
"Grapple"
]
}
Exit condition: {
"leaveWithRunway": {
"length": 6,
"openEnd": 0
}
}
|
|
Requires: "h_canCrystalFlash" |
|
From: 4
Top Right Door
To: 4
Top Right Door
Follow the crab from the bottom right door to the top right door. Depending on the item setup, this takes 30-50 seconds. Requires: {
"or": [
{
"and": [
"Gravity",
"SpaceJump"
]
},
"canGravityJump",
{
"and": [
"Grapple",
{
"or": [
"HiJump",
"Gravity"
]
}
]
},
"h_canDoubleSpringBallJumpWithHiJump"
]
}
Exit condition: {
"leaveWithGModeSetup": {}
}
|
|
After teleporting, morph and roll to the right to touch the transition. Entrance condition: {
"comeInWithGrappleTeleport": {
"blockPositions": [
[
2,
34
]
]
}
}
Requires: "Morph" Bypasses door shell: true |
|
Requires: "h_canNavigateUnderwater" "Grapple" |
|
From: 4
Top Right Door
To: 9
Spawn At Junction Below Top Door
Notable: true .png)
.gif)
Requires running a very precise distance of 8 tiles in the adjacent room. Morph just before hitting the first ceiling grapple block, then bounce on the first grapple block platform. Entrance condition: {
"comeInJumping": {
"speedBooster": true,
"minTiles": 8
}
}
Requires: "canInsaneJump" "canTrickyDashJump" "canSpringBallBounce" "canCrossRoomJumpIntoWater" |
|
From: 4
Top Right Door
To: 9
Spawn At Junction Below Top Door
Notable: true .png)
.gif)
Requires running a very precise distance of 7 tiles with no open end in the adjacent room, as this is a peak in jump speed. Morph just before hitting the first ceiling grapple block, then turn on HiJump before bouncing on the first grapple block platform. Entrance condition: {
"comeInJumping": {
"speedBooster": true,
"minTiles": 6.4375
}
}
Requires: "HiJump" "canInsaneJump" "canTrickyDashJump" "canSpringBallBounce" "canCrossRoomJumpIntoWater" |
|
From: 4
Top Right Door
To: 9
Spawn At Junction Below Top Door
Entrance condition: {
"comeInWithGMode": {
"mode": "any",
"morphed": true
}
}
Requires: "h_canArtificialMorphIBJ" "Gravity" |
|
|
|
Entrance condition: {
"comeInWithSpark": {}
}
Requires: {
"shinespark": {
"frames": 127,
"excessFrames": 28
}
}
|
|
Entrance condition: {
"comeInWithGMode": {
"mode": "any",
"morphed": true
}
}
Requires: "Gravity"
{
"or": [
"Morph",
{
"and": [
"h_canArtificialMorphSpringBall",
{
"or": [
"canGravityJump",
"HiJump"
]
}
]
},
"h_canArtificialMorphIBJ",
"h_canArtificialMorphSpringBallBombJump"
]
}
|
|
Entrance condition: {
"comeInShinecharged": {
"framesRequired": 90
},
"comesThroughToilet": "any"
}
Requires: "canSuitlessMaridia"
"canHorizontalShinespark"
{
"shinespark": {
"frames": 61,
"excessFrames": 10
}
}
|
|
Entrance condition: {
"comeInShinecharged": {
"framesRequired": 15
},
"comesThroughToilet": "any"
}
Requires: "canSuitlessMaridia"
"canMidairShinespark"
"canPrepareForNextRoom"
{
"shinespark": {
"frames": 67,
"excessFrames": 10
}
}
|
|
Entrance condition: {
"comeInShinecharged": {
"framesRequired": 55
},
"comesThroughToilet": "any"
}
Requires: "Gravity"
"canMidairShinespark"
{
"shinespark": {
"frames": 69,
"excessFrames": 6
}
}
|
|
Entrance condition: {
"comeInShinecharged": {
"framesRequired": 15
},
"comesThroughToilet": "any"
}
Requires: "Gravity"
"canMidairShinespark"
"canPrepareForNextRoom"
{
"shinespark": {
"frames": 72,
"excessFrames": 6
}
}
|
|
Entrance condition: {
"comeInShinecharged": {
"framesRequired": 90
},
"comesThroughToilet": "any"
}
Requires: "canSuitlessMaridia"
"canMidairShinespark"
{
"shinespark": {
"frames": 86,
"excessFrames": 12
}
}
|
|
Entrance condition: {
"comeInShinecharged": {
"framesRequired": 20
},
"comesThroughToilet": "any"
}
Requires: "canSuitlessMaridia"
"canMidairShinespark"
"canPrepareForNextRoom"
{
"shinespark": {
"frames": 93,
"excessFrames": 12
}
}
|
|
Entrance condition: {
"comeInWithGMode": {
"mode": "any",
"morphed": true
},
"comesThroughToilet": "any"
}
Requires: "h_canArtificialMorphIBJ" "Gravity" |
|
Note that it is possible to get up with Grapple alone by using the Powamps. Fling from the Powamp into the side of the top platform to align horizontally. Entrance condition: {
"comeInWithGMode": {
"mode": "direct",
"morphed": false
},
"comesThroughToilet": "any"
}
Requires: "h_canNavigateUnderwater"
{
"or": [
{
"and": [
"Gravity",
{
"or": [
"HiJump",
"canSpringBallJumpMidAir",
"h_canFly",
"canGravityJump"
]
}
]
},
{
"and": [
"canUseEnemies",
"canPreciseGrapple"
]
},
{
"and": [
"HiJump",
"canSpringBallJumpMidAir"
]
}
]
}
Exit condition: {
"leaveWithGMode": {
"morphed": false
}
}
Bypasses door shell: true |
|
Entrance condition: {
"comeInWithGMode": {
"mode": "direct",
"morphed": true
},
"comesThroughToilet": "any"
}
Requires: "Gravity"
{
"or": [
"h_canArtificialMorphIBJ",
{
"and": [
"HiJump",
"h_canArtificialMorphSpringBall"
]
}
]
}
Exit condition: {
"leaveWithGMode": {
"morphed": true
}
}
Bypasses door shell: true |
|
Requires: {
"or": [
{
"and": [
"Gravity",
"SpaceJump"
]
},
{
"and": [
"HiJump",
"canPreciseGrapple",
{
"or": [
"Gravity",
"canSpringBallJumpMidAir"
]
}
]
},
{
"and": [
"HiJump",
"canGravityJump",
"canBeVeryPatient"
]
}
]
}
"canUpwardGModeSetup"
"canTrickyUseFrozenEnemies"
{
"or": [
"Morph",
"canTwoTileSqueeze"
]
}
Exit condition: {
"leaveWithGModeSetup": {}
}
|
|
|
|
Entrance condition: {
"comeInWithGMode": {
"mode": "any",
"morphed": true
},
"comesThroughToilet": "any"
}
Requires: {
"or": [
"Morph",
"h_canArtificialMorphSpringBall",
{
"and": [
"Gravity",
"h_canArtificialMorphIBJ"
]
},
{
"and": [
"Gravity",
"h_canArtificialMorphBombHorizontally"
]
}
]
}
|
|
From: 5
Top Door
To: 12
G-Mode Junction (In Morph Tunnel)
Bounce from the right peak into the morph tunnel. Samus can't bounce twice in a single fall, so come to a stop on the top platform or avoid it completely. Entrance condition: {
"comeInWithGMode": {
"mode": "any",
"morphed": true
},
"comesThroughToilet": "any"
}
Requires: "canSuitlessMaridia"
"canTrickyJump"
{
"enemyDamage": {
"enemy": "Sciser",
"type": "contact",
"hits": 1
}
}
{
"or": [
"h_EverestMorphTunnelExpanded",
{
"enemyDamage": {
"enemy": "Sciser",
"type": "contact",
"hits": 1
}
}
]
}
|
|
Requires: "Morph" |
|
After entering the room, quickly leave the morph tunnel in order to prevent getting hit by the crab. Entrance condition: {
"comeInWithGMode": {
"mode": "any",
"morphed": true
}
}
Requires: "h_EverestMorphTunnelExpanded" "h_canArtificialMorphIBJ" "Gravity" |
|
From: 6
Left Morph Passage Doorway
To: 4
Top Right Door
After entering the room, quickly leave the morph tunnel in order to prevent getting hit by the crab. Entrance condition: {
"comeInWithGMode": {
"mode": "indirect",
"morphed": true
}
}
Requires: "h_canArtificialMorphIBJ" "Gravity" |
|
From: 6
Left Morph Passage Doorway
To: 6
Left Morph Passage Doorway
Requires: "h_EverestMorphTunnelExpanded" Exit condition: {
"leaveWithRunway": {
"length": 2,
"openEnd": 0
}
}
|
|
From: 6
Left Morph Passage Doorway
To: 6
Left Morph Passage Doorway
Requires: "h_canCrystalFlash" |
|
From: 6
Left Morph Passage Doorway
To: 6
Left Morph Passage Doorway
Requires: "h_EverestMorphTunnelExpanded" Exit condition: {
"leaveWithGModeSetup": {}
}
|
|
From: 6
Left Morph Passage Doorway
To: 6
Left Morph Passage Doorway
Requires: "h_EverestMorphTunnelExpanded"
{
"enemyDamage": {
"enemy": "Sciser",
"type": "contact",
"hits": 1
}
}
|
|
From: 6
Left Morph Passage Doorway
To: 7
Lower Hills Junction
After entering the room, quickly leave the morph tunnel in order to prevent getting hit by the crab. Entrance condition: {
"comeInWithGMode": {
"mode": "any",
"morphed": true
}
}
Requires: "h_EverestMorphTunnelExpanded"
"Gravity"
{
"or": [
"h_canArtificialMorphIBJ",
"h_canArtificialMorphSpringBallBombJump"
]
}
|
|
From: 6
Left Morph Passage Doorway
To: 7
Lower Hills Junction
After entering the room, quickly leave the morph tunnel in order to prevent getting hit by the crab. Entrance condition: {
"comeInWithGMode": {
"mode": "indirect",
"morphed": true
}
}
Requires: "Gravity"
{
"or": [
"h_canArtificialMorphIBJ",
"h_canArtificialMorphSpringBallBombJump"
]
}
|
|
From: 6
Left Morph Passage Doorway
To: 8
Higher Hill Junction
Jump using Springball with the right timing leaving the Morph tunnel to avoid falling. Requires: "canInsaneJump" "h_canUseSpringBall" |
|
From: 6
Left Morph Passage Doorway
To: 8
Higher Hill Junction
Jump using Springball with the right timing leaving the Morph tunnel to avoid falling. Entrance condition: {
"comeInWithGMode": {
"mode": "any",
"morphed": true
}
}
Requires: "h_EverestMorphTunnelExpanded" "canInsaneJump" "h_canArtificialMorphSpringBall" |
|
From: 6
Left Morph Passage Doorway
To: 8
Higher Hill Junction
Jump using Springball with the right timing leaving the Morph tunnel to avoid falling. Entrance condition: {
"comeInWithGMode": {
"mode": "indirect",
"morphed": true
}
}
Requires: "canInsaneJump" "h_canArtificialMorphSpringBall" |
|
From: 6
Left Morph Passage Doorway
To: 9
Spawn At Junction Below Top Door
After entering the room, quickly leave the morph tunnel in order to prevent getting hit by the crab. Entrance condition: {
"comeInWithGMode": {
"mode": "any",
"morphed": true
}
}
Requires: "h_EverestMorphTunnelExpanded" "h_canArtificialMorphIBJ" "Gravity" |
|
From: 6
Left Morph Passage Doorway
To: 9
Spawn At Junction Below Top Door
After entering the room, quickly leave the morph tunnel in order to prevent getting hit by the crab. Entrance condition: {
"comeInWithGMode": {
"mode": "indirect",
"morphed": true
}
}
Requires: "h_canArtificialMorphIBJ" "Gravity" |
|
From: 6
Left Morph Passage Doorway
To: 11
Upper Left Ledge Junction
Perform a horizontal shinespark through the top of the door transition, from a horizontal position that triggers a deep door transition. Sparking from one or two pixels away from the door is an example position that works (if possible in the neighboring room). If successful, after the shinespark crash animation ends Samus should be standing inside the wall and be able to X-Ray climb. Entrance condition: {
"comeInWithSpark": {
"position": "top"
}
}
Requires: "canDeepTransition"
{
"shinespark": {
"frames": 2,
"excessFrames": 2
}
}
"canXRayClimb"
|
|
|
|
|
|
Requires: "Gravity"
{
"or": [
"HiJump",
"SpaceJump"
]
}
{
"resetRoom": {
"nodes": [
1,
2,
3
],
"mustStayPut": false
}
}
{
"refill": [
"Super"
]
}
|
|
Requires: "Gravity" |
|
Requires: "canSuitlessMaridia"
{
"or": [
"HiJump",
{
"and": [
"canTrickySpringBallJump",
{
"or": [
"canCrouchJump",
"canSpringFling",
"canStationaryLateralMidAirMorph"
]
}
]
}
]
}
|
|
There is a grappleable Powamp directly above each of the 3 peaks. Requires: "canSuitlessMaridia" "canUseEnemies" "Grapple" |
|
Requires: "Gravity" "h_canFly" |
|
From: 7
Lower Hills Junction
To: 9
Spawn At Junction Below Top Door
There is a grappleable Powamp directly above each of the 3 peaks. Requires: "h_canNavigateUnderwater" "canUseEnemies" "Grapple" |
|
Requires: "canGravityJump" Clears obstacles: A, B |
|
From: 7
Lower Hills Junction
To: 10
Upper Right Ledge Junction
There is a ridiculously precise, but possible, walljump to get up there. With and without HiJump is equally difficult. Requires: "Gravity" "canInsaneWalljump" Clears obstacles: A, B |
|
From: 7
Lower Hills Junction
To: 10
Upper Right Ledge Junction
The run and jump is done from the middle peak in the floor. Not the one closest to the bottom right door. Run from the left edge to just right of the peak, jump and wall jump on the overhang. It may be worthwhile to kill the Powamps and crabs first. Requires: "Gravity" "HiJump" "canTrickyDashJump" "canWalljump" Clears obstacles: A, B |
|
Requires: "Gravity" "h_canFly" Clears obstacles: A, B |
|
There is a grappleable Powamp directly above each of the 3 peaks. Requires: "h_canNavigateUnderwater" "canUseEnemies" "Grapple" Clears obstacles: B |
|
From: 7
Lower Hills Junction
To: 10
Upper Right Ledge Junction
Freeze the crab midway up the right wall and jump and spring ball jump up to the higher platform. Luring a second crab, which will make it to the upper platform, may be useful to avoid a tricky spring ball jump and flatley jump to get to the top right door. Requires: "canSuitlessMaridia" "HiJump" "canTrickySpringBallJump" "canTrickyUseFrozenEnemies" Clears obstacles: A, B |
|
From: 7
Lower Hills Junction
To: 10
Upper Right Ledge Junction
Start the springball jumps from the highest ledge on the wall. Requires: "canSuitlessMaridia" "h_canDoubleSpringBallJumpWithHiJump" Clears obstacles: A, B |
|
From: 7
Lower Hills Junction
To: 10
Upper Right Ledge Junction
Climbing the right side of Mt. Everest with two supers, ice, and HiJump. Requires luring 3 crabs; the third crab is from the morph tunnel to the left. Use a super to knock off and freeze a crab midair. Stand on it and let the other crab climb, then jump up and follow it. Be sure two crabs make it to the next section in order to crab climb further. Requires: "canSuitlessMaridia"
"canCrazyCrabClimb"
"HiJump"
{
"ammo": {
"type": "Super",
"count": 1
}
}
Clears obstacles: A, B |
|
From: 7
Lower Hills Junction
To: 10
Upper Right Ledge Junction
Climbing the right side of Mt. Everest with two supers, ice, and Spring Ball. Requires luring 3 crabs; the third crab is from the morph tunnel to the left. Use a super to knock off and freeze a crab midair. Stand on it and let the other crab climb, then jump up and follow it. Be sure two crabs make it to the next section in order to crab climb further. Requires: "canSuitlessMaridia"
"canCrazyCrabClimb"
"canTrickySpringBallJump"
{
"ammo": {
"type": "Super",
"count": 1
}
}
Clears obstacles: A, B |
|
From: 7
Lower Hills Junction
To: 10
Upper Right Ledge Junction
Notable: true 
Climbing the right side of Mt. Everest with only two supers and ice. (As used in 14% Icebooster) Requires luring 2 crabs. Use a super to knock off and freeze a crab midair. Be sure to lure a crab to the next section to crab climb further. If Samus has 2 supers, it is easier to bring 3 crabs; the third is from the morph tunnel to the left. Lure 2 crabs to the next section for a slightly easier crab climb. Note: The hardest part of this climb is the pixel precision when jumping around a ledge. Too many pixels: left is a fall, right you clip through the crab, low you miss the jump and fall, high is a bonk or crab clip. Requires: "canSuitlessMaridia"
"canCrazyCrabClimb"
"canTrickyJump"
"canBeVeryPatient"
{
"ammo": {
"type": "Super",
"count": 1
}
}
Clears obstacles: A, B |
|
From: 7
Lower Hills Junction
To: 10
Upper Right Ledge Junction
Notable: true 
Climbing the right side of Mt. Everest with only two supers and ice. (As used in 14% Icebooster) Requires luring 3 crabs; the third crab is from the morph tunnel to the left. Use a super to knock off and freeze a crab midair. Be sure two crabs make it to the next section in order to crab climb further. Note: The hardest part of this climb is the pixel precision when jumping around a ledge. Too many pixels: left is a fall, right you clip through the crab, low you miss the jump and fall, high is a bonk or crab clip. Requires: "canSuitlessMaridia"
"canCrazyCrabClimb"
"canTrickyJump"
"canBeVeryPatient"
{
"ammo": {
"type": "Super",
"count": 1
}
}
Clears obstacles: A, B |
|
From: 7
Lower Hills Junction
To: 10
Upper Right Ledge Junction
Notable: true 
Climb the bottom right wall of Mt. Everest with Ice and HiJump while also luring a crab to the next platform to be used to ascend the next wall. The trickiest part of the climb is getting past the final overhang. This can be done with an underwater wall jump if the crab is low, a precise crouch jump and down grab if it is higher, or a flatley jump off of the crab if it is higher still. Two crabs makes it significantly easier to lure one to the top - simply let one go ahead of Samus. For a faster setup, one crab may be used by perform the final jump as it is unfreezing so it starts moving upward. Then go to the lower ground a bit to the right, jump and aim down to lower the camera to lure the crab. Note: The hardest part of this climb is the pixel precision when jumping around a ledge. Too many pixels: left is a fall, right you clip through the crab, low you miss the jump and fall, high is a bonk or crab clip. Requires: "canSuitlessMaridia"
"canCrazyCrabClimb"
"HiJump"
"canTrickyJump"
"canCameraManip"
{
"or": [
"canUnderwaterWalljump",
"h_canCrouchJumpDownGrab",
"canFlatleyJump",
"canInsaneJump"
]
}
Clears obstacles: A, B |
|
From: 7
Lower Hills Junction
To: 10
Upper Right Ledge Junction
Notable: true
Use the crab near the bottom right door. Only one spring ball jump is needed, it is to get up onto the flat platform. After the spring ball jump, if the crab did not follow, go to the lower ground a bit to the right, jump and aim down to lower the camera to lure the crab. Note: The hardest part of this climb is the pixel precision when jumping around a ledge. Too many pixels: left is a fall, right you clip through the crab, low you miss the jump and fall, high is a bonk or crab clip. Requires: "canSuitlessMaridia" "canCrazyCrabClimb" "canTrickySpringBallJump" "canTrickyJump" "canCameraManip" Clears obstacles: A, B |
|
Requires: "h_canNavigateUnderwater"
{
"or": [
"h_canUseSpringBall",
"canMidAirMorph",
{
"and": [
"Gravity",
{
"or": [
"canIBJ",
"canBombHorizontally"
]
}
]
},
{
"and": [
"Gravity",
"canTrivialMidAirMorph",
{
"or": [
"SpaceJump",
"canUseFrozenEnemies"
]
}
]
},
{
"and": [
"canTrivialMidAirMorph",
"canDisableEquipment"
]
}
]
}
|
|
|
|
From: 8
Higher Hill Junction
To: 9
Spawn At Junction Below Top Door
Barely works without HiJump with a late gravity jump. Requires: "canGravityJump"
{
"or": [
"HiJump",
"canTrickyJump"
]
}
|
|
With a bit of a run, this requires no other movement tech or items. Requires: "Gravity" |
|
There is a grappleable Powamp directly above each of the 3 peaks. Requires: "h_canNavigateUnderwater" "canUseEnemies" "Grapple" |
|
From: 8
Higher Hill Junction
To: 11
Upper Left Ledge Junction
Requires: "canSuitlessMaridia" "HiJump" "canSpringBallJumpMidAir" |
|
From: 8
Higher Hill Junction
To: 11
Upper Left Ledge Junction
Requires: "canUnderwaterWalljump" |
|
Requires: "h_canNavigateUnderwater" "Grapple" |
|
Requires: "h_canNavigateUnderwater" "Grapple" |
|
Requires: "Gravity"
{
"or": [
"HiJump",
"canSpringBallJumpMidAir",
"h_canFly"
]
}
|
|
Use the grapple to fling Samus through the door. Requires: "h_canNavigateUnderwater" "Grapple" |
|
Requires: "canSuitlessMaridia" "HiJump" "canSpringBallJumpMidAir" |
|
Requires: "canGravityJump" |
|
Jump the first frame after running to gain just enough spinjump height. Requires: "Gravity" "canWalljump" "canTrickyDashJump" |
|
Requires: "Gravity"
{
"canShineCharge": {
"usedTiles": 33,
"openEnd": 2
}
}
{
"shinespark": {
"frames": 61
}
}
Exit condition: {
"leaveWithSpark": {}
}
Unlocks doors: {"types":["ammo"],"requires":[]}
|
|
|
|
From: 9
Spawn At Junction Below Top Door
To: 9
Spawn At Junction Below Top Door
Requires: "h_canCrystalFlash" |
|
From: 9
Spawn At Junction Below Top Door
To: 11
Upper Left Ledge Junction
Turn off Gravity and HiJump to jump directly here. Requires: "canSuitlessMaridia" "canDisableEquipment" |
|
From: 10
Upper Right Ledge Junction
To: 3
Bottom Right Door
Notable: true 
Charge on the upper right ledge, and store the spark as Samus walks off the ledge to drop down onto the door. Opening the door first and moonfalling can help but is not required. Requires: "Gravity"
{
"canShineCharge": {
"usedTiles": 20,
"gentleUpTiles": 3,
"gentleDownTiles": 1,
"steepUpTiles": 1,
"openEnd": 1
}
}
Exit condition: {
"leaveShinecharged": {
"framesRemaining": 30
}
}
Unlocks doors: {"types":["super"],"requires":[]}
{
"types": [
"missiles",
"powerbomb"
],
"requires": [
{
"or": [
"Grapple",
{
"shinespark": {
"frames": 59
}
},
{
"and": [
"HiJump",
"canSpringBallJumpMidAir"
]
},
{
"and": [
"HiJump",
"canTrickyDashJump",
"canWalljump"
]
},
"canGravityJump"
]
}
]
}
|
|
Requires: "canGravityJump" |
|
Requires: "Gravity" "h_canFly" |
|
Jump and grapple to the blocks to the top left of this region, then to the ceiling grapple blocks. Requires: "Gravity" "Grapple" |
|
From: 10
Upper Right Ledge Junction
To: 4
Top Right Door
Requires: "Gravity"
{
"or": [
"canDelayedWalljump",
{
"and": [
"HiJump",
"canPreciseWalljump"
]
},
{
"and": [
"HiJump",
"canWalljump",
"SpeedBooster"
]
}
]
}
|
|
From: 10
Upper Right Ledge Junction
To: 4
Top Right Door
Run from the left edge to just after the second downward slope. No wall jump needed. Requires: "Gravity" "HiJump" "canTrickyDashJump" |
|
This strat uses the grapple blocks at the top left, not the Powamp. Failure also doesn't usually allow a second try (assuming the Powamp is not there). Requires: "canSuitlessMaridia"
"Grapple"
{
"or": [
"HiJump",
"canSpringBallJumpMidAir"
]
}
|
|
From: 10
Upper Right Ledge Junction
To: 4
Top Right Door
Crouch at the edge of the overhang. Jump and just after the peak of the jump, grapple to the grapple blocks. This strat is finicky, and failure doesn't usually allow a second try (assuming the Powamp is not there). This is possible to do without a crouch jump, but it is much harder. Requires: "canSuitlessMaridia"
"canPreciseGrapple"
{
"or": [
"canCrouchJump",
"canTrickyJump"
]
}
|
|
From: 10
Upper Right Ledge Junction
To: 4
Top Right Door
There is a grappleable Powamp directly above each of the 3 peaks. Requires: "canSuitlessMaridia" "canUseEnemies" "Grapple" |
|
From: 10
Upper Right Ledge Junction
To: 4
Top Right Door
Start the jump from the higher ground to the left, specifically the right side of the second highest region. Requires: "canSuitlessMaridia" "HiJump" "canTrickySpringBallJump" "canFlatleyJump" |
|
From: 10
Upper Right Ledge Junction
To: 4
Top Right Door
Requires having already lured a crab, likely from above the bottom right door. Freeze the crab midway up the right wall and jump and spring ball jump up to the door. Requires: "canSuitlessMaridia"
"HiJump"
"canSpringBallJumpMidAir"
"canTrickyUseFrozenEnemies"
{
"obstaclesCleared": [
"B"
]
}
"canTrickyJump"
|
|
From: 10
Upper Right Ledge Junction
To: 4
Top Right Door
Requires: "canSuitlessMaridia" "h_canDoubleSpringBallJumpWithHiJump" |
|
From: 10
Upper Right Ledge Junction
To: 4
Top Right Door
Climbing the right side of Mt. Everest with only two supers, ice, and HiJump. Requires originally luring 3 crabs. Two crabs and one super are needed from this location. Use a super to knock off and freeze a crab midair. Jump on it and freeze the second as a platform to jump up to the door. Requires: "canSuitlessMaridia"
"HiJump"
"canTrickyUseFrozenEnemies"
{
"ammo": {
"type": "Super",
"count": 1
}
}
{
"obstaclesCleared": [
"A"
]
}
"canTrickyJump"
|
|
From: 10
Upper Right Ledge Junction
To: 4
Top Right Door
Climbing the right side of Mt. Everest with only two supers, ice, and Spring Ball. Requires originally luring 3 crabs. Two crabs and one super are needed from this location. Use a super to knock off and freeze a crab midair. Jump on it and freeze the second as a platform to jump up to the door. Requires: "canSuitlessMaridia"
"canTrickySpringBallJump"
"canCrazyCrabClimb"
{
"ammo": {
"type": "Super",
"count": 1
}
}
{
"obstaclesCleared": [
"A"
]
}
|
|
From: 10
Upper Right Ledge Junction
To: 4
Top Right Door
Notable: true
Climbing the right side of Mt. Everest with only two supers and ice. (As used in 14% Icebooster) Requires originally luring 3 crabs. Two crabs and one super are needed from this location. Use a super to knock off and freeze a crab midair. Once close to the upper platform, freeze the crab at knee height to stand on it to jump up. Note: The hardest part of this climb is the pixel precision when jumping around a ledge. Too many pixels: left is a fall, right you clip through the crab, low you miss the jump and fall, high is a bonk or crab clip. Requires: "canSuitlessMaridia"
"canCrazyCrabClimb"
"canTrickyJump"
"canBeVeryPatient"
{
"ammo": {
"type": "Super",
"count": 1
}
}
{
"obstaclesCleared": [
"A"
]
}
|
|
From: 10
Upper Right Ledge Junction
To: 4
Top Right Door
Notable: true
Climbing the right side of Mt. Everest with only one super and ice. (A trickier version than that used in 14% Icebooster) Requires having already lured a crab to this location, likely from above the bottom right door. Once close to the upper platform, freeze the crab at knee height to stand on it to jump up. Note: The hardest part of this climb is the pixel precision when jumping around a ledge. Too many pixels: left is a fall, right you clip through the crab, low you miss the jump and fall, high is a bonk or crab clip. Requires: "canSuitlessMaridia"
"canCrazyCrabClimb"
"canTrickyJump"
{
"obstaclesCleared": [
"B"
]
}
|
|
From: 10
Upper Right Ledge Junction
To: 4
Top Right Door
Notable: true
Requires having already lured a crab to this location, likely from above the bottom right door. Freeze the crab very high before going to the ledge on the right, delay jumping so it thaws and moves up a bit while on screen, jump aim down to lower the camera and lure it more. Alternatively, using moonwalk and a flatley jump at the top can prevent needing the crab again. Note: The hardest part of this climb is the pixel precision when jumping around a ledge. Too many pixels: left is a fall, right you clip through the crab, low you miss the jump and fall, high is a bonk or crab clip. Requires: "canSuitlessMaridia"
"canCrazyCrabClimb"
"HiJump"
"canTrickyJump"
"canCameraManip"
{
"obstaclesCleared": [
"B"
]
}
|
|
From: 10
Upper Right Ledge Junction
To: 4
Top Right Door
Notable: true
Requires having already lured a crab to this location, likely from above the bottom right door. Freeze the crab high before going to the ledge on the right, delay spring ball jumping so it thaws and moves up while on screen, jump aim down to lower the camera and lure it more. Freeze the crab again to use as a platform, approximately knee high. Jump on it and then jump to the platform above. Note: The hardest part of this climb is the pixel precision when jumping around a ledge. Too many pixels: left is a fall, right you clip through the crab, low you miss the jump and fall, high is a bonk or crab clip. Requires: "canSuitlessMaridia"
"canCrazyCrabClimb"
"canTrickySpringBallJump"
"canTrickyJump"
"canCameraManip"
{
"obstaclesCleared": [
"B"
]
}
|
|
Run right-to-left to gain a shinecharge on the upper right ledge. Use a gravity jump, Space Jump, or HiJump to approach the door above and spark out. Requires: "Gravity"
{
"or": [
"SpaceJump",
"canGravityJump",
{
"and": [
"HiJump",
{
"or": [
"canWalljump",
"canTrickyDashJump"
]
}
]
}
]
}
{
"canShineCharge": {
"usedTiles": 20,
"gentleUpTiles": 3,
"gentleDownTiles": 1,
"steepUpTiles": 1,
"openEnd": 0
}
}
"canShinechargeMovementComplex"
"canMidairShinespark"
{
"shinespark": {
"frames": 8
}
}
Exit condition: {
"leaveWithSpark": {}
}
Unlocks doors: {"types":["ammo"],"requires":[]}
|
|
From: 10
Upper Right Ledge Junction
To: 4
Top Right Door
Run right-to-left to gain a shinecharge on the upper right ledge. Requires: "Gravity"
"HiJump"
"SpaceJump"
{
"canShineCharge": {
"usedTiles": 20,
"gentleUpTiles": 3,
"gentleDownTiles": 1,
"steepUpTiles": 1,
"openEnd": 0
}
}
"canShinechargeMovementComplex"
Exit condition: {
"leaveShinecharged": {
"framesRemaining": 45
}
}
Unlocks doors: {"types":["ammo"],"requires":[]}
|
|
|
|
Requires: "Gravity" |
|
Requires: "canSuitlessMaridia"
{
"or": [
"HiJump",
"canSpringBallJumpMidAir"
]
}
|
|
From: 11
Upper Left Ledge Junction
To: 1
Top Left Door
Notable: true 
Run right-to-left to gain a shinecharge on the ledge near the top-left door, and perform tight ledge-grabs to make it through the door with shinecharge frames remaining. This is a very short runway, making it an exceptionally difficult short-charge. Requires: "Gravity"
{
"canShineCharge": {
"usedTiles": 11,
"steepUpTiles": 5,
"openEnd": 2
}
}
"canShinechargeMovementComplex"
Exit condition: {
"leaveShinecharged": {
"framesRemaining": 30
}
}
Unlocks doors: {"types":["ammo"],"requires":[]}
|
|
From: 11
Upper Left Ledge Junction
To: 5
Top Door
Notable: true
Run right-to-left to gain a shinecharge on the ledge near the top-left door, and Space Jump to the top center door with shinecharge frames remaining. This is a very short runway, making it an exceptionally difficult short-charge. Requires: "Gravity"
"SpaceJump"
"canTrickyDashJump"
{
"canShineCharge": {
"usedTiles": 11,
"steepUpTiles": 5,
"openEnd": 2
}
}
"canShinechargeMovementComplex"
Exit condition: {
"leaveShinecharged": {
"framesRemaining": 15
}
}
Unlocks doors: {"types":["ammo"],"requires":[]}
|
|
From: 11
Upper Left Ledge Junction
To: 5
Top Door
Notable: true
Run right-to-left to gain a shinecharge on the ledge near the top-left door, and Space Jump to the top center door with shinecharge frames remaining. This is a very short runway, making it an exceptionally difficult short-charge. Requires: "Gravity"
"HiJump"
"SpaceJump"
{
"canShineCharge": {
"usedTiles": 11,
"steepUpTiles": 5,
"openEnd": 2
}
}
"canShinechargeMovementComplex"
Exit condition: {
"leaveShinecharged": {
"framesRemaining": 40
}
}
Unlocks doors: {"types":["ammo"],"requires":[]}
|
|
|
|
From: 11
Upper Left Ledge Junction
To: 9
Spawn At Junction Below Top Door
Requires: "Gravity" "HiJump" "SpeedBooster" |
|
From: 11
Upper Left Ledge Junction
To: 9
Spawn At Junction Below Top Door
This is most easily done with a late jump at the bottom of the slope. It is a bit less precise with an air ball or turning gravity suit back on and wall jumping on the platform at the end. An alternate method is to airball simultaneously with the gravity jump pause. Requires: "canGravityJump"
{
"or": [
"canTrickyJump",
{
"and": [
"can4HighMidAirMorph",
"canCarefulJump",
"canLateralMidAirMorph"
]
}
]
}
|
|
From: 11
Upper Left Ledge Junction
To: 9
Spawn At Junction Below Top Door
Start the spring ball jumps from the bottom of the slope. Requires: "canSuitlessMaridia" "h_canDoubleSpringBallJumpWithHiJump" |
|
From: 12
G-Mode Junction (In Morph Tunnel)
To: 6
Left Morph Passage Doorway
Requires: "canEnterGMode" |
|
From: 12
G-Mode Junction (In Morph Tunnel)
To: 6
Left Morph Passage Doorway
Requires: "canEnterGMode" Exit condition: {
"leaveWithGMode": {
"morphed": true
}
}
|
{
"$schema": "../../../schema/m3-room.schema.json",
"id": 174,
"name": "Mt. Everest",
"area": "Maridia",
"subarea": "Outer",
"playable": true,
"roomAddress": "0x7D0B9",
"roomEnvironments": [
{
"heated": false
}
],
"nodes": [
{
"id": 1,
"name": "Top Left Door",
"nodeType": "door",
"nodeSubType": "blue",
"nodeAddress": "0x001a438",
"doorOrientation": "left",
"doorEnvironments": [
{
"physics": "water"
}
]
},
{
"id": 2,
"name": "Bottom Left Door",
"nodeType": "door",
"nodeSubType": "blue",
"nodeAddress": "0x001a444",
"doorOrientation": "down",
"doorEnvironments": [
{
"physics": "water"
}
]
},
{
"id": 3,
"name": "Bottom Right Door",
"nodeType": "door",
"nodeSubType": "blue",
"nodeAddress": "0x001a450",
"doorOrientation": "down",
"doorEnvironments": [
{
"physics": "water"
}
]
},
{
"id": 4,
"name": "Top Right Door",
"nodeType": "door",
"nodeSubType": "blue",
"nodeAddress": "0x001a468",
"doorOrientation": "right",
"doorEnvironments": [
{
"physics": "water"
}
]
},
{
"id": 5,
"name": "Top Door",
"nodeType": "door",
"nodeSubType": "blue",
"nodeAddress": "0x001a42c",
"doorOrientation": "up",
"doorEnvironments": [
{
"physics": "water"
}
],
"spawnAt": 9
},
{
"id": 6,
"name": "Left Morph Passage Doorway",
"nodeType": "door",
"nodeSubType": "passage",
"nodeAddress": "0x001a45c",
"doorOrientation": "left",
"doorEnvironments": [
{
"physics": "water"
}
],
"note": "It's not quite a door, but it is a morph passage transition to another room"
},
{
"id": 7,
"name": "Lower Hills Junction",
"nodeType": "junction",
"nodeSubType": "junction"
},
{
"id": 8,
"name": "Higher Hill Junction",
"nodeType": "junction",
"nodeSubType": "junction"
},
{
"id": 9,
"name": "Spawn At Junction Below Top Door",
"nodeType": "junction",
"nodeSubType": "junction"
},
{
"id": 10,
"name": "Upper Right Ledge Junction",
"nodeType": "junction",
"nodeSubType": "junction"
},
{
"id": 11,
"name": "Upper Left Ledge Junction",
"nodeType": "junction",
"nodeSubType": "junction"
},
{
"id": 12,
"name": "G-Mode Junction (In Morph Tunnel)",
"nodeType": "junction",
"nodeSubType": "g-mode",
"note": "Represents being in the morph tunnel with G-Mode and morph or artificial morph"
}
],
"obstacles": [
{
"id": "A",
"name": "Lure 2 crabs to the platform at 10",
"obstacleType": "abstract"
},
{
"id": "B",
"name": "Lure 1 crab to the platform at 10",
"obstacleType": "abstract"
}
],
"enemies": [
{
"id": "e1",
"groupName": "Mt. Everest Left Powamp",
"enemyName": "Powamp",
"quantity": 1,
"homeNodes": [
8
],
"dropRequires": [
"Gravity",
{
"or": [
"Grapple",
"HiJump",
"SpaceJump",
"canSpringBallJumpMidAir",
"canGravityJump"
]
}
]
},
{
"id": "e2",
"groupName": "Mt. Everest Right Powamps",
"enemyName": "Powamp",
"quantity": 2,
"homeNodes": [
7
],
"dropRequires": [
"Gravity",
{
"or": [
"Grapple",
"HiJump",
"SpaceJump",
"canSpringBallJumpMidAir",
"canGravityJump"
]
}
]
},
{
"id": "e3",
"groupName": "Mt. Everest Bottom Left Scisers",
"enemyName": "Sciser",
"quantity": 2,
"homeNodes": [
2
]
},
{
"id": "e4",
"groupName": "Mt. Everest Bottom Right Sciser",
"enemyName": "Sciser",
"quantity": 1,
"homeNodes": [
3
]
},
{
"id": "e5",
"groupName": "Mt. Everest Bottom Middle-Left Sciser",
"enemyName": "Sciser",
"quantity": 1,
"homeNodes": [
6
]
},
{
"id": "e6",
"groupName": "Mt. Everest Bottom Middle Sciser",
"enemyName": "Sciser",
"quantity": 1,
"homeNodes": [
8
],
"note": "It crawls around the tallest of the three hills."
}
],
"reusableRoomwideNotable": [
{
"name": "Mt. Everest Right Crab Climb with Only HiJump or Springball",
"note": [
"Using HiJump or SpringBallJumpMidAir and ice to freeze a crab and climb the right side of Mt. Everest.",
"Requires precise platforming to climb around protruding ledges while carefully manipulating and freezing crabs."
]
},
{
"name": "Mt. Everest Right Crab Climb with Only 2 Supers",
"note": [
"Climbing the right side of Mt. Everest with only two supers and ice. (As used in 14% Icebooster)",
"Requires very precise platforming to climb around protruding ledges while carefully manipulating and freezing crabs.",
"Requires luring 3 crabs; the third crab is from the morph tunnel to the left.",
"Use a super to knock off and freeze a crab midair twice in the climb."
]
},
{
"name": "Mt. Everest Right Crab Climb with Only 1 Super",
"note": [
"A harder version of 'Mt. Everest Right Crab Climb with Only 2 Supers'",
"Requires extremely precise platforming to climb around protruding ledges while carefully manipulating and freezing crabs.",
"Climbing the right side of Mt. Everest with only one super and ice. (A trickier version than that used in 14% Icebooster)",
"Requires only luring 2 crabs. Only one crab and no supers are useable for the second half of the climb."
]
},
{
"name": "Mt. Everest Top Left Shinecharge",
"note": [
"Gain a shinecharge on the ledge near the top-left door.",
"This is a very short runway, making it an exceptionally difficult short-charge."
]
}
],
"links": [
{
"from": 1,
"to": [
{
"id": 1
},
{
"id": 4,
"note": "Shinespark direct link"
},
{
"id": 9,
"devNote": [
"FIXME It is possible to spark 4->9 with precise positioning and a downgrab on the grapple blocks.",
"It is also possible to have a precise amount of energy to fall onto the blocks."
]
},
{
"id": 11
},
{
"id": 12
}
]
},
{
"from": 2,
"to": [
{
"id": 1,
"note": "One-way link for shinesparking and crab climb."
},
{
"id": 2
},
{
"id": 4,
"note": "One-way link for shinesparking"
},
{
"id": 5
},
{
"id": 7
},
{
"id": 8
},
{
"id": 9,
"devNote": "One-way link for shinesparking and cross room jump."
},
{
"id": 11,
"devNote": "One-way link for superless crab climb and cross-room jump."
},
{
"id": 12
}
]
},
{
"from": 3,
"to": [
{
"id": 3
},
{
"id": 4,
"note": "One-way link for cross-room jumps."
},
{
"id": 7
},
{
"id": 9,
"note": "One-way link for diagonal shinesparking."
},
{
"id": 10,
"note": "One-way link for shinesparking and cross-room jumps."
}
]
},
{
"from": 4,
"to": [
{
"id": 1,
"note": "This link is for shinespark and cross room jumps. All other strats should take other routes."
},
{
"id": 4
},
{
"id": 6
},
{
"id": 9,
"devNote": [
"FIXME It is possible to spark 4->9 with precise positioning and a downgrab on the grapple blocks.",
"It is also possible to have a precise amount of energy to fall onto the blocks."
]
},
{
"id": 10
},
{
"id": 11
},
{
"id": 12
}
]
},
{
"from": 5,
"to": [
{
"id": 1
},
{
"id": 4
},
{
"id": 5
},
{
"id": 9
},
{
"id": 12
}
]
},
{
"from": 6,
"to": [
{
"id": 2
},
{
"id": 4
},
{
"id": 6
},
{
"id": 7
},
{
"id": 8
},
{
"id": 9
},
{
"id": 11
}
]
},
{
"from": 7,
"to": [
{
"id": 2
},
{
"id": 3
},
{
"id": 7
},
{
"id": 8
},
{
"id": 9,
"devNote": "The strats in this link are doable from many nodes within the room, however this one is freely reachable from each of them."
},
{
"id": 10
}
]
},
{
"from": 8,
"to": [
{
"id": 6
},
{
"id": 7
},
{
"id": 9
},
{
"id": 11
}
]
},
{
"from": 9,
"to": [
{
"id": 1,
"devNote": "Direct link for shinespark and grapple"
},
{
"id": 4,
"note": "Direct link for shinespark and grapple"
},
{
"id": 5
},
{
"id": 8
},
{
"id": 9
},
{
"id": 11
}
]
},
{
"from": 10,
"to": [
{
"id": 3
},
{
"id": 4
},
{
"id": 7
}
]
},
{
"from": 11,
"to": [
{
"id": 1,
"devNote": "No Powamp grapple strat because that is covered by 11 -> 9 -> 1."
},
{
"id": 5
},
{
"id": 8
},
{
"id": 9
}
]
},
{
"from": 12,
"to": [
{
"id": 6
}
]
}
],
"strats": [
{
"link": [
1,
1
],
"name": "Leave with Runway",
"requires": [],
"exitCondition": {
"leaveWithRunway": {
"length": 2,
"openEnd": 1
}
}
},
{
"link": [
1,
1
],
"name": "Leave With Runway - Frozen Sciser - Long Lure",
"requires": [
"h_canFrozenEnemyRunway",
"Gravity",
"canBePatient",
{
"or": [
"SpaceJump",
{
"and": [
{
"ammo": {
"type": "Super",
"count": 1
}
},
{
"or": [
"HiJump",
"canSpringBallJumpMidAir",
"canGravityJump",
"canConsecutiveWalljump",
"SpeedBooster"
]
}
]
}
]
}
],
"exitCondition": {
"leaveWithRunway": {
"length": 4,
"openEnd": 0
}
},
"note": [
"Follow the crab from the bottom right door to the top left door. This takes approximately 90 seconds.",
"It is also possible to knock the crab off of the middle peak with a super and follow it to the left which may save time."
]
},
{
"link": [
1,
1
],
"name": "Leave With Runway - Frozen Sciser - Very Long Lure",
"requires": [
"h_canFrozenEnemyRunway",
"Gravity",
"canBeVeryPatient",
{
"or": [
"canGravityJump",
"canPreciseGrapple",
{
"ammo": {
"type": "Super",
"count": 1
}
}
]
}
],
"exitCondition": {
"leaveWithRunway": {
"length": 4,
"openEnd": 0
}
},
"note": [
"Follow the crab from the bottom right door to the top left door.",
"It is also possible to knock the crab off of the middle peak with a super and follow it."
],
"devNote": [
"These strats take approximately 2 minutes each, but because it is just for a 1.5 tile runway extension, canBeVeryPatient was added.",
"This could be done with many other sets of item combinations, but it would be very tedious for a runway extension."
]
},
{
"link": [
1,
1
],
"name": "Crystal Flash",
"requires": [
"h_canCrystalFlash"
],
"flashSuitChecked": true
},
{
"link": [
1,
1
],
"name": "G-Mode Setup - Get Hit By Sciser - Long Lure",
"notable": false,
"requires": [
"Gravity",
"canBePatient",
{
"or": [
"SpaceJump",
{
"and": [
{
"ammo": {
"type": "Super",
"count": 1
}
},
{
"or": [
"HiJump",
"canSpringBallJumpMidAir",
"canGravityJump",
"canConsecutiveWalljump",
"SpeedBooster"
]
}
]
}
]
}
],
"exitCondition": {
"leaveWithGModeSetup": {}
},
"flashSuitChecked": true,
"note": [
"Follow the crab from the bottom right door to the top left door. This takes approximately 90 seconds.",
"It is also possible to knock the crab off of the middle peak with a super and follow it to the left which may save time."
]
},
{
"link": [
1,
1
],
"name": "G-Mode Setup - Get Hit By Sciser - Very Long Lure",
"notable": false,
"requires": [
"canBeVeryPatient",
{
"or": [
"canGravityJump",
{
"and": [
"canPreciseGrapple",
{
"or": [
"HiJump",
"Gravity"
]
}
]
},
{
"and": [
{
"ammo": {
"type": "Super",
"count": 1
}
},
{
"or": [
"canTrickyUseFrozenEnemies",
{
"and": [
"HiJump",
"canSpringBallJumpMidAir"
]
}
]
}
]
}
]
}
],
"exitCondition": {
"leaveWithGModeSetup": {}
},
"flashSuitChecked": true,
"note": [
"Follow the crab from the bottom right door to the top left door with Gravity or Grapple.",
"It is also possible to knock the crab off of the middle peak with a super and follow it to the left with Ice or HiJump and Spring Ball."
],
"devNote": [
"These strats take approximately 2 minutes each, but because it is just for a G-Mode Setup, canBeVeryPatient was added.",
"This could be done with many other sets of item combinations, but it would be very tedious for a g-mode setup."
]
},
{
"link": [
1,
4
],
"name": "Shinespark",
"entranceCondition": {
"comeInWithSpark": {
"position": "bottom"
}
},
"requires": [
"Gravity",
{
"shinespark": {
"frames": 112,
"excessFrames": 7
}
}
]
},
{
"link": [
1,
4
],
"name": "Suitless Shinespark",
"entranceCondition": {
"comeInWithSpark": {
"position": "bottom"
}
},
"requires": [
{
  "shinespark": {
    "frames": 143,
    "excessFrames": 10
  }
}
]
},
{
"link": [
1,
4
],
"name": "G-Mode Morph IBJ",
"entranceCondition": {
"comeInWithGMode": {
"mode": "any",
"morphed": true
}
},
"requires": [
"h_canArtificialMorphIBJ",
"Gravity"
],
"flashSuitChecked": true
},
{
"link": [
1,
9
],
"name": "Grapple",
"requires": [
"h_canNavigateUnderwater",
"Grapple"
]
},
{
"link": [
1,
9
],
"name": "Mt. Everest Shinespark Down-Grab to the Grapple Blocks (Left to Top)",
"notable": true,
"entranceCondition": {
"comeInShinecharged": {
"framesRequired": 110
}
},
"requires": [
"canSuitlessMaridia",
"h_canCrouchJumpDownGrab",
"canHorizontalShinespark",
{
"shinespark": {
"frames": 56,
"excessFrames": 0
}
}
],
"flashSuitChecked": true,
"note": "Crouch on the lowest stair, then shinespark horizontally to bonk at the top corner of the grapple block. Down grab to get onto it.",
"devNote": [
"This is only done suitless, as with Gravity, you can gravity jump up there.",
"A similar strat can be done from the top right door, but it doesn't have a nice setup and has to be done midair."
]
},
{
"link": [
1,
9
],
"name": "G-Mode Morph IBJ",
"entranceCondition": {
"comeInWithGMode": {
"mode": "any",
"morphed": true
}
},
"requires": [
"h_canArtificialMorphIBJ",
"Gravity"
],
"flashSuitChecked": true
},
{
"link": [
1,
11
],
"name": "Base",
"requires": []
},
{
"link": [
1,
12
],
"name": "G-Mode Morph",
"entranceCondition": {
"comeInWithGMode": {
"mode": "any",
"morphed": true
}
},
"requires": [
{
  "or": [
    "Morph",
    "h_canArtificialMorphSpringBall",
    {
      "and": [
        "Gravity",
        "h_canArtificialMorphIBJ"
      ]
    },
    {
      "and": [
        "Gravity",
        "h_canArtificialMorphBombHorizontally"
      ]
    },
    {
      "and": [
        {
          "enemyDamage": {
            "enemy": "Sciser",
            "type": "contact",
            "hits": 1
          }
        },
        {
          "or": [
            "h_EverestMorphTunnelExpanded",
            {
              "enemyDamage": {
                "enemy": "Sciser",
                "type": "contact",
                "hits": 1
              }
            }
          ]
        }
      ]
    }
  ]
}
],
"flashSuitChecked": true
},
{
"link": [
1,
12
],
"name": "G-Mode Morph Suitless Bounce Into Tunnel",
"entranceCondition": {
"comeInWithGMode": {
"mode": "any",
"morphed": true
}
},
"requires": [
"canSuitlessMaridia",
"canTrickyJump",
{
"or": [
"h_EverestMorphTunnelExpanded",
{
"enemyDamage": {
"enemy": "Sciser",
"type": "contact",
"hits": 1
}
}
]
}
],
"flashSuitChecked": true,
"note": [
"Bounce from the right peak into the morph tunnel.",
"Samus can't bounce twice in a single fall, so start from the right ground, not the raised scaffolding by the door."
]
},
{
"link": [
2,
1
],
"name": "Suitless Shinespark",
"entranceCondition": {
"comeInShinecharged": {
"framesRequired": 5
},
"comesThroughToilet": "any"
},
"requires": [
"canSuitlessMaridia",
{
"shinespark": {
"frames": 62,
"excessFrames": 8
}
}
],
"flashSuitChecked": true,
"note": "Shinespark up left to get all the way up to the door.",
"devNote": "Coming in shinesparking can get Samus to 11. With Gravity, that has fewer requirements."
},
{
"link": [
2,
1
],
"name": "Mt. Everest Left Crab Climb",
"requires": [
"canSuitlessMaridia",
"canTrickyJump",
"canTrickyUseFrozenEnemies",
{
"or": [
{
"and": [
"canCrazyCrabClimb",
"h_canCrouchJumpDownGrab"
]
},
"HiJump",
"canSpringBallJumpMidAir"
]
},
"canCameraManip",
{
"ammo": {
"type": "Super",
"count": 1
}
}
],
"note": [
"Near the bottom left door, there are three pathways upwards: one directly above the door and two to the right.",
"Between the right pathways, is a crab moving to the right. Shooting a super against the wall will make it fall off and move left.",
"Climb the crab up the left wall. Watch out for the crab above that is heading into the morph tunnel.",
"Jump to the right platform before the upward crab goes into the tunnel.",
"Lure the crab out of the hole by running to the right of the hill then back left or use moonwalk to scroll the camera.",
"Near the end is particularly tricky. When the crab is on the underside of the metal blocks, freeze it and use it as a stepping platform.",
"To do this, crouch jump and while moving upwards, hold left against the crab to get extra vertical movement. Down grabbing at the top is helpful."
]
},
{
"link": [
2,
2
],
"name": "Leave Normally",
"exitCondition": {
"leaveNormally": {}
},
"requires": []
},
{
"link": [
2,
2
],
"name": "Leave Shinecharged",
"requires": [
"Gravity",
{
"canShineCharge": {
"usedTiles": 33,
"openEnd": 2
}
}
],
"exitCondition": {
"leaveShinecharged": {
"framesRemaining": 160
}
},
"flashSuitChecked": true
},
{
"link": [
2,
2
],
"name": "Sciser Farm",
"requires": [
"h_canNavigateUnderwater",
{
"resetRoom": {
"nodes": [
2
],
"mustStayPut": false
}
},
{
"refill": [
"PowerBomb"
]
}
]
},
{
"link": [
2,
2
],
"name": "Crystal Flash",
"requires": [
"h_canCrystalFlash"
],
"flashSuitChecked": true
},
{
"link": [
2,
4
],
"name": "Shinespark",
"requires": [
"Gravity",
{
"canShineCharge": {
"usedTiles": 33,
"openEnd": 2
}
},
{
"shinespark": {
"frames": 65
}
}
],
"note": "Shinespark up right through the rightmost gap to land directly by the door."
},
{
"link": [
2,
4
],
"name": "G-Mode Morph IBJ",
"entranceCondition": {
"comeInWithGMode": {
"mode": "any",
"morphed": true
},
"comesThroughToilet": "any"
},
"requires": [
"h_canArtificialMorphIBJ",
"Gravity"
],
"flashSuitChecked": true
},
{
"link": [
2,
5
],
"name": "Mt. Everest Cross Room Jump through Top Door",
"notable": true,
"entranceCondition": {
"comeInWithPlatformBelow": {
"minHeight": 9,
"maxHeight": 9,
"maxLeftPosition": -38.5,
"minRightPosition": -2
},
"comesThroughToilet": "no"
},
"requires": [
"canCrossRoomJumpIntoWater",
"SpeedBooster",
"HiJump",
"canInsaneJump"
],
"note": [
"Run and jump up through the door using SpeedBooster in the room below.",
"Bonk the door frame as you pass through the transition, to cancel your horizontal momentum.",
"You need a vertical speed of exactly 7.8800 when passing through the transition, which requires the jump to be frame perfect.",
"After the transition, as you reach the wall, begin holding right.",
"Begin holding angle up at any time before approaching the door (and you can continue holding it until the end of the strat).",
"As you approach the door (an 8-frame window), while holding angle up, release right for exactly one frame.",
"This will put Samus into a pose aiming diagonally up and to the right.",
"Immediately fire a shot to open the door (within the same 8-frame window); if successful, you will just barely clear the grapple block and pass through the door.",
"Several things can cause you to bonk the grapple block:",
"1) entering the room with too much vertical speed,",
"2) not pressing against the wall as you come up,",
"3) releasing right for more than one frame,",
"4) releasing right too early.",
"As an alternative to releasing right for one frame, you can instead press shot for one frame:",
"if successful, Samus' pose will change to aiming diagonally without a shot being fired;",
"if shot is pressed for more than one frame, then a shot will be fired horizontally, and the cooldown will prevent you from firing diagonally in time."
],
"devNote": [
"This strat applies only with Post Crocomire Jump Room below.",
"In Crocomire's Room, the different platform height affects which vertical speeds are obtainable, and apparently none of them work.",
"FIXME: Check if this strat works through Toilet (either from PCJR or Crocomire's Room)"
]
},
{
"link": [
2,
7
],
"name": "Base",
"requires": [
"Gravity",
{
"or": [
"HiJump",
"canWalljump",
"SpeedBooster",
"h_canFly",
"canSpringBallJumpMidAir",
"canSpringBallBombJump"
]
}
]
},
{
"link": [
2,
7
],
"name": "Gravity Jump",
"requires": [
"canGravityJump"
]
},
{
"link": [
2,
7
],
"name": "Tricky Crouch Jump Down Grab",
"requires": [
"Gravity",
"h_canCrouchJumpDownGrab",
"canTrickyJump"
],
"note": [
"Stand on higher ground on the right side and face left.",
"Crouch jump and immediately press left (almost simultaneously) to avoid bonking the ceiling."
]
},
{
"link": [
2,
7
],
"name": "Suitless Jump Assists",
"requires": [
"canSuitlessMaridia",
"HiJump",
"canSpringBallJumpMidAir"
]
},
{
"link": [
2,
7
],
"name": "Suitless Frozen Crab with Jump Assist",
"requires": [
"canSuitlessMaridia",
"canUseFrozenEnemies",
{
"or": [
"HiJump",
"canSpringBallJumpMidAir"
]
}
],
"note": "Use the frozen crab as a platform."
},
{
"link": [
2,
7
],
"name": "Suitless Frozen Crab",
"requires": [
"canSuitlessMaridia",
"canTrickyUseFrozenEnemies"
],
"note": "Freeze the crab when it is hanging off the ledge then use it as a platform."
},
{
"link": [
2,
7
],
"name": "Underwater Walljump",
"requires": [
"canUnderwaterWalljump"
]
},
{
"link": [
2,
7
],
"name": "Everest Crab HiJump Bomb-Grapple-Jump",
"notable": true,
"requires": [
"h_canNavigateUnderwater",
"HiJump",
"canBombGrappleJump"
],
"note": [
"Jump into a mid-air morph, lay a Bomb, unmorph, use grapple to kill a Scisor, to be able to get a second jump mid-air."
]
},
{
"link": [
2,
7
],
"name": "Everest Double Crab Bomb-Grapple-Jump",
"notable": true,
"requires": [
"h_canNavigateUnderwater",
"canBombGrappleJump",
"h_canCrouchJumpDownGrab"
],
"note": [
"Position 2 Scisors so that they can each be used for a Bomb-Grapple-Jump, back to back.",
"This gives a total of 3 jumps to climb from the bottom of Everest up to one of the lower peaks.",
"In the likely event of failure, the room will need to be reset and the crabs repositioned for the next attempt."
]
},
{
"link": [
2,
7
],
"name": "G-Mode Morph IBJ",
"entranceCondition": {
"comeInWithGMode": {
"mode": "any",
"morphed": true
},
"comesThroughToilet": "any"
},
"requires": [
"h_canArtificialMorphIBJ",
"Gravity"
],
"flashSuitChecked": true
},
{
"link": [
2,
7
],
"name": "G-Mode Morph SpringBall Bomb Jump",
"entranceCondition": {
"comeInWithGMode": {
"mode": "any",
"morphed": true
},
"comesThroughToilet": "any"
},
"requires": [
"Gravity",
"h_canArtificialMorphSpringBallBombJump"
],
"flashSuitChecked": true,
"note": "This requires one spring ball bomb jump."
},
{
"link": [
2,
8
],
"name": "Suitless Frozen Crab",
"requires": [
"canSuitlessMaridia",
"canTrickyUseFrozenEnemies",
{
"or": [
"canTrickyJump",
"canTrickySpringBallJump",
"HiJump"
]
}
],
"note": [
"Use the rightmost crab to get up onto the lowest platform, while also damaging down the crab on the middle platform.",
"Jump left onto the middle platform and freeze the crab just a bit left of the peak.",
"Without any movement items, Spinjump from on top of the crab to the higher platform towards the left. A failure often requires resetting the room."
],
"devNote": "Although this goes through 7, it requires starting at 2 to get the crab to move into position."
},
{
"link": [
2,
8
],
"name": "Cross Room Jump - HiJump Space Jump",
"entranceCondition": {
"comeInWithSpaceJumpBelow": {},
"comesThroughToilet": "any"
},
"requires": [
"canCrossRoomJumpIntoWater",
"HiJump"
],
"note": "Space Jump up through the door of the room below with HiJump equipped."
},
{
"link": [
2,
8
],
"name": "Cross Room Jump - HiJump Standing Jump",
"entranceCondition": {
"comeInWithPlatformBelow": {
"minHeight": 6,
"maxHeight": 7,
"maxLeftPosition": 2,
"minRightPosition": -2
},
"comesThroughToilet": "any"
},
"requires": [
"canCrossRoomJumpIntoWater",
"HiJump"
],
"note": "Standing on a platform in the room below, jump straight up through the door with HiJump equipped.",
"devNote": "A crouch jump can be used but is not required (and is not enough to make it work with height 8)."
},
{
"link": [
2,
8
],
"name": "Cross Room Jump - HiJump Speed Jump",
"entranceCondition": {
"comeInWithPlatformBelow": {
"minHeight": 8,
"maxHeight": 9,
"maxLeftPosition": 2,
"minRightPosition": -2
},
"comesThroughToilet": "any"
},
"requires": [
"canCrossRoomJumpIntoWater",
"HiJump",
"SpeedBooster"
],
"note": "Run and jump up through the door using HiJump and SpeedBooster in the room below using at least 1 tile of runway."
},
{
"link": [
2,
8
],
"name": "Cross Room Jump - Speed Jump",
"entranceCondition": {
"comeInWithPlatformBelow": {
"maxHeight": 10,
"maxLeftPosition": -38.5,
"minRightPosition": -7
},
"comesThroughToilet": "any"
},
"requires": [
"canCrossRoomJumpIntoWater",
"SpeedBooster"
],
"note": [
"Run and jump up through the door using SpeedBooster in the room below.",
"Bonk the door frame or turn back left soon enough to cancel rightward momentum before passing through the transition."
]
},
{
"link": [
2,
8
],
"name": "Cross Room Jump - Wall Jump",
"entranceCondition": {
"comeInWithWallJumpBelow": {
"minHeight": 2
},
"comesThroughToilet": "any"
},
"requires": [
{
"or": [
"canTrickyJump",
"canTrickySpringBallJump",
"HiJump"
]
},
"canCrossRoomJumpIntoWater"
],
"note": "Wall jump relatively high off either side of the door frame in the room below.",
"devNote": "The walljump is very disconnected from the springball jump, so it is not a springwall."
},
{
"link": [
2,
8
],
"name": "Cross Room Jump - Spring Ball Jump",
"entranceCondition": {
"comeInWithPlatformBelow": {
"maxHeight": 9,
"maxLeftPosition": 2,
"minRightPosition": -2
},
"comesThroughToilet": "any"
},
"requires": [
"canCrossRoomJumpIntoWater",
"canSpringBallJumpMidAir"
],
"note": [
"Standing on the platform in the room below, perform a spring ball jump mid-air just before reaching the transition."
]
},
{
"link": [
2,
8
],
"name": "Cross Room Jump - Crouch Jump Spring Ball Jump",
"entranceCondition": {
"comeInWithPlatformBelow": {
"minHeight": 10,
"maxHeight": 10,
"maxLeftPosition": 2,
"minRightPosition": -2
},
"comesThroughToilet": "any"
},
"requires": [
"canCrossRoomJumpIntoWater",
"canCrouchJump",
"canSpringBallJumpMidAir"
],
"note": [
"Standing on the platform in the room below, crouch jump and perform a spring ball jump mid-air just before reaching the transition."
],
"devNote": "This also works for platforms of height less than 10, but a crouch jump is not needed in that case."
},
{
"link": [
2,
8
],
"name": "Shinespark",
"entranceCondition": {
"comeInWithSpark": {},
"comesThroughToilet": "any"
},
"requires": [
{
  "shinespark": {
    "frames": 58,
    "excessFrames": 29
  }
}
]
},
{
"link": [
2,
9
],
"name": "Shinespark",
"requires": [
"Gravity",
{
"canShineCharge": {
"usedTiles": 33,
"openEnd": 2
}
},
{
"shinespark": {
"frames": 61
}
}
],
"note": "Shinespark up in the middle of the three upward pathways near either the right or left wall."
},
{
"link": [
2,
9
],
"name": "Cross Room Jump to Top",
"entranceCondition": {
"comeInWithPlatformBelow": {
"minHeight": 9,
"maxHeight": 10,
"maxLeftPosition": -38.5,
"minRightPosition": -2
},
"comesThroughToilet": "any"
},
"requires": [
"canCrossRoomJumpIntoWater",
"SpeedBooster",
"HiJump"
],
"note": [
"Run and jump using SpeedBooster in the room below, with HiJump equipped.",
"Bonk the door frame before passing through the transition, to cancel your horizontal momentum.",
"After the transition, as you reach the wall, begin holding right.",
"Land on the small platform below the top door."
],
"devNote": [
"This strat applies with Post Crocomire Jump Room or Crocomire's Room below."
]
},
{
"link": [
2,
9
],
"name": "G-Mode Morph IBJ",
"entranceCondition": {
"comeInWithGMode": {
"mode": "any",
"morphed": true
},
"comesThroughToilet": "any"
},
"requires": [
"h_canArtificialMorphIBJ",
"Gravity"
],
"flashSuitChecked": true
},
{
"link": [
2,
11
],
"name": "Suitless Frozen Crab with HiJump",
"requires": [
"canSuitlessMaridia",
"HiJump",
"canTrickyUseFrozenEnemies"
],
"note": [
"In the upward channel one right of the door, jump as high as possible to lure a fast crab moving down the tallest mountain. A crouch jump or breaking spin can be helpful.",
"Damage down the crab while watching it loop around, then ride the crab up the left side.",
"Freeze the crab at the top of the highest peak, stand on it to jump to the left.",
"If you lose the fast crab, it is always possible to get it back by climbing the peak to the right. The crab there can be lured with HiJump alone."
],
"devNote": "Requires following the crab through 2 to get the crab to move into position."
},
{
"link": [
2,
11
],
"name": "Suitless Frozen Crab with Springball",
"requires": [
"canSuitlessMaridia",
"canTrickySpringBallJump",
"canStationaryLateralMidAirMorph",
"canTrickyUseFrozenEnemies"
],
"note": [
"Climb the crabs on the right and use them to bring down the center crab, who is already on the highest peak.",
"Damage down the crab while watching it loop around, then ride the crab up the left side.",
"Freeze the crab at the top of the highest peak, stand on it to jump to the left.",
"Use a Stationary Lateral MidAir Morph to get enough momentum for the SpringBall jump to reach the left ledge."
],
"devNote": "Although this may go through 7 and 8, it requires starting at 2 to get the crab to move into position."
},
{
"link": [
2,
11
],
"name": "Cross Room Jump - HiJump Wall Jump through Toilet",
"entranceCondition": {
"comeInWithWallJumpBelow": {
"minHeight": 2
},
"comesThroughToilet": "yes"
},
"requires": [
"canCrossRoomJumpIntoWater",
"HiJump",
"canPreciseWalljump",
"canDownGrab",
"canTrickyJump"
],
"note": [
"Wall jump from a high position on either side of the door frame, pass through the Toilet, and down-grab onto the ledge.",
"The Toilet affects Samus' vertical spawn position, making this jump possible."
]
},
{
"link": [
2,
11
],
"name": "Cross Room Jump - Tricky Dash Jump",
"entranceCondition": {
"comeInWithPlatformBelow": {
"maxHeight": 6,
"maxLeftPosition": 2.5,
"minRightPosition": -2.5
},
"comesThroughToilet": "any"
},
"requires": [
"canCrossRoomJumpIntoWater",
"HiJump",
"canTrickyDashJump",
"canDownGrab"
],
"note": "Run and jump up through the door using HiJump and SpeedBooster in the room below using at least 1 tile of runway."
},
{
"link": [
2,
11
],
"name": "Cross Room Jump - Speed Jump",
"entranceCondition": {
"comeInWithPlatformBelow": {
"maxHeight": 10,
"maxLeftPosition": -38.5,
"minRightPosition": 0
},
"comesThroughToilet": "any"
},
"requires": [
"canCrossRoomJumpIntoWater",
"SpeedBooster"
],
"note": [
"Run and jump up through the door using SpeedBooster in the room below.",
"Turn to the left immediately after jumping, to allow running further and to cancel the rightward momentum before passing through the transition."
]
},
{
"link": [
2,
11
],
"name": "Shinespark",
"entranceCondition": {
"comeInWithSpark": {},
"comesThroughToilet": "any"
},
"requires": [
{
  "shinespark": {
    "frames": 58,
    "excessFrames": 16
  }
}
]
},
{
"link": [
2,
12
],
"name": "G-Mode Morph",
"entranceCondition": {
"comeInWithGMode": {
"mode": "any",
"morphed": true
},
"comesThroughToilet": "any"
},
"requires": [
"Gravity",
{
"or": [
"h_canArtificialMorphIBJ",
{
"and": [
"h_canArtificialMorphSpringBall",
{
"or": [
"canGravityJump",
"HiJump"
]
}
]
},
{
"and": [
"h_canArtificialMorphSpringBallBombJump",
"h_additionalBomb"
]
}
]
}
],
"flashSuitChecked": true,
"devNote": "FIXME: Add strats to get here with Morph."
},
{
"link": [
3,
3
],
"name": "Leave Normally",
"exitCondition": {
"leaveNormally": {}
},
"requires": []
},
{
"link": [
3,
3
],
"name": "Shinespark",
"entranceCondition": {
"comeInWithSpark": {},
"comesThroughToilet": "any"
},
"requires": [
{
  "shinespark": {
    "frames": 60,
    "excessFrames": 60
  }
}
],
"devNote": "This strat is not useful in-room, but can satisfy a strat in the room before with an exit shinespark."
},
{
"link": [
3,
3
],
"name": "Crystal Flash",
"requires": [
"h_canCrystalFlash"
],
"flashSuitChecked": true
},
{
"link": [
3,
4
],
"name": "Cross Room Jump - Speed Jump",
"entranceCondition": {
"comeInWithPlatformBelow": {
"maxHeight": 10,
"maxLeftPosition": -38.5,
"minRightPosition": -2
},
"comesThroughToilet": "any"
},
"requires": [
"canCrossRoomJumpIntoWater",
"SpeedBooster",
"HiJump",
"canTrickyJump"
],
"note": [
"Run and jump up through the door using SpeedBooster in the room below, with HiJump equipped.",
"Immediately after jumping, break spin and turn left to avoid hitting the crab (alternatively, you can wiggle after the transition).",
"It helps to use a little less than the full runway.",
"Make it all the way up to the top right door."
],
"devNote": [
"This strat is applicable in Crocomire's Room and the Post Crocomire Jump Room (with Power Bomb blocks broken)."
]
},
{
"link": [
3,
7
],
"name": "Base",
"requires": [
"Gravity",
{
"or": [
"HiJump",
"canWalljump",
"h_canFly",
"canSpringBallJumpMidAir"
]
}
]
},
{
"link": [
3,
7
],
"name": "Gravity Jump",
"requires": [
"canGravityJump"
]
},
{
"link": [
3,
7
],
"name": "Suitless Jump assists",
"requires": [
"canSuitlessMaridia",
"HiJump",
"canSpringBallJumpMidAir"
]
},
{
"link": [
3,
7
],
"name": "Short Crab Climb",
"requires": [
"h_canNavigateUnderwater",
"canTrickyUseFrozenEnemies",
{
"or": [
{
"resetRoom": {
"nodes": [
3
],
"mustStayPut": true
}
},
"canPrepareForNextRoom"
]
},
{
"or": [
"canInsaneJump",
"Spazer",
"Wave",
"Plasma",
{
"and": [
"canDodgeWhileShooting",
{
"ammo": {
"type": "Super",
"count": 1
}
}
]
},
{
"and": [
"canDodgeWhileShooting",
"HiJump"
]
}
]
},
{
"ammo": {
"type": "Super",
"count": 1
}
}
],
"note": "Knock the crab off the wall immediately and then freeze.",
"devNote": "Kinda tough with no other beam/missile/super/movement."
},
{
"link": [
3,
7
],
"name": "Underwater Walljump",
"requires": [
"canUnderwaterWalljump"
]
},
{
"link": [
3,
7
],
"name": "Cross Room Jump - Space Jump",
"entranceCondition": {
"comeInWithSpaceJumpBelow": {},
"comesThroughToilet": "any"
},
"requires": [
"canCrossRoomJumpIntoWater"
],
"note": "Space Jump up through the door of the room below."
},
{
"link": [
3,
7
],
"name": "Cross Room Jump - Standing Jump",
"entranceCondition": {
"comeInWithPlatformBelow": {
"maxHeight": 7,
"maxLeftPosition": 2,
"minRightPosition": -2
},
"comesThroughToilet": "any"
},
"requires": [
"canCrossRoomJumpIntoWater"
],
"note": "Standing on a platform in the room below, jump straight up through the door."
},
{
"link": [
3,
7
],
"name": "Cross Room Jump - HiJump Standing Jump",
"entranceCondition": {
"comeInWithPlatformBelow": {
"maxHeight": 10,
"maxLeftPosition": 2,
"minRightPosition": -2
},
"comesThroughToilet": "any"
},
"requires": [
"canCrossRoomJumpIntoWater",
"HiJump"
],
"note": "Standing on a platform in the room below, jump straight up through the door, with HiJump equipped.",
"devNote": "A crouch jump can be used but is not needed."
},
{
"link": [
3,
7
],
"name": "Cross Room Jump - Speed Jump",
"entranceCondition": {
"comeInWithPlatformBelow": {
"minHeight": 9,
"maxHeight": 10,
"maxLeftPosition": -38.5,
"minRightPosition": -7
},
"comesThroughToilet": "any"
},
"requires": [
"canCrossRoomJumpIntoWater",
"SpeedBooster"
],
"note": [
"Run left-to-right in the room below using SpeedBooster, and jump up through the door.",
"Hold left through the transition to avoid hitting the crab."
],
"devNote": [
"This strat is applicable in Crocomire's Room and the Post Crocomire Jump Room.",
"Sufficient vertical speed could be obtained with fewer tiles, but it would require jumping further to the right (i.e., increasing minRightPosition) which would not work in PCJR unless the PB blocks are broken."
]
},
{
"link": [
3,
7
],
"name": "Cross Room Jump - Tricky Dash Jump (From Left)",
"entranceCondition": {
"comeInWithPlatformBelow": {
"minHeight": 9,
"maxHeight": 9,
"maxLeftPosition": -6,
"minRightPosition": 2
},
"comesThroughToilet": "any"
},
"requires": [
"canCrossRoomJumpIntoWater",
"canTrickyDashJump"
],
"note": [
"Run left-to-right in the room below using SpeedBooster over a specific distance, and jump up through the door.",
"Hold left through the transition to avoid hitting the crab."
],
"devNote": [
"This strat is applicable to Lower Norfair Escape Power Bomb Room with the left pillar broken.",
"It is much easier to do if the right pillar is unbroken."
]
},
{
"link": [
3,
7
],
"name": "Cross Room Jump - Tricky Dash Jump (From Right)",
"entranceCondition": {
"comeInWithPlatformBelow": {
"minHeight": 8,
"maxHeight": 8,
"maxLeftPosition": -2,
"minRightPosition": 6
},
"comesThroughToilet": "any"
},
"requires": [
"canCrossRoomJumpIntoWater",
"canTrickyDashJump"
],
"note": [
"Run right-to-left in the room below using SpeedBooster over a very precise distance, jump, immediately turn back right, and break spin before reaching the transition."
],
"devNote": [
"This strat is applicable to Spore Spawn Kihunter Room."
]
},
{
"link": [
3,
7
],
"name": "Cross Room Jump - Wall Jump",
"entranceCondition": {
"comeInWithWallJumpBelow": {
"minHeight": 2
},
"comesThroughToilet": "any"
},
"requires": [
"canCrossRoomJumpIntoWater"
],
"note": "Wall jump off either side of the door frame in the room below."
},
{
"link": [
3,
7
],
"name": "Cross Room Jump - Spring Ball Jump",
"entranceCondition": {
"comeInWithPlatformBelow": {
"maxHeight": 10,
"maxLeftPosition": 2,
"minRightPosition": -2
},
"comesThroughToilet": "any"
},
"requires": [
"canCrossRoomJumpIntoWater",
"canSpringBallJumpMidAir"
],
"note": [
"Standing on the platform in the room below, perform a spring ball jump mid-air just before reaching the transition."
]
},
{
"link": [
3,
7
],
"name": "Shinespark",
"entranceCondition": {
"comeInWithSpark": {},
"comesThroughToilet": "any"
},
"requires": [
{
  "shinespark": {
    "frames": 60,
    "excessFrames": 43
  }
}
]
},
{
"link": [
3,
9
],
"name": "Shinespark",
"entranceCondition": {
"comeInShinecharged": {
"framesRequired": 5
},
"comesThroughToilet": "any"
},
"requires": [
"Gravity",
{
"shinespark": {
"frames": 62,
"excessFrames": 8
}
}
],
"flashSuitChecked": true,
"note": "Shinespark up left to get onto the platform below the door. If gravity suit is on, hold right to land on the platform.",
"devNote": "FIXME: It is possible to get to this from sparking through the door diagonally, but that is not something the logic can handle."
},
{
"link": [
3,
9
],
"name": "Suitless Shinespark",
"entranceCondition": {
"comeInShinecharged": {
"framesRequired": 5
},
"comesThroughToilet": "any"
},
"requires": [
"canSuitlessMaridia",
{
"shinespark": {
"frames": 62,
"excessFrames": 6
}
}
],
"flashSuitChecked": true,
"note": "Shinespark up left to get onto the platform below the door. If gravity suit is on, hold right to land on the platform.",
"devNote": "FIXME: It is possible to get to this from sparking through the door diagonally, but that is not something the logic can handle."
},
{
"link": [
3,
10
],
"name": "Shinespark",
"entranceCondition": {
"comeInWithSpark": {},
"comesThroughToilet": "any"
},
"requires": [
{
  "shinespark": {
    "frames": 60,
    "excessFrames": 15
  }
}
]
},
{
"link": [
3,
10
],
"name": "Cross Room Jump - Walljump into Springball Jump",
"entranceCondition": {
"comeInWithWallJumpBelow": {
"minHeight": 2
},
"comesThroughToilet": "any"
},
"requires": [
"canCrossRoomJumpIntoWater",
"HiJump",
"canTrickySpringBallJump",
"canTrickyJump"
],
"note": "Wall jump off either side of the door frame in the room below and Springball Jump at the height of the jump."
},
{
"link": [
3,
10
],
"name": "Cross Room Jump - Speedy HiJump Springball Jump",
"entranceCondition": {
"comeInWithPlatformBelow": {
"maxHeight": 6,
"maxLeftPosition": 2.5,
"minRightPosition": -2.5
},
"comesThroughToilet": "any"
},
"requires": [
"canCrossRoomJumpIntoWater",
"HiJump",
"SpeedBooster",
"canTrickySpringBallJump"
],
"note": "Run and jump up through the door using HiJump and SpeedBooster in the room below and Springball Jump at the top of the jump."
},
{
"link": [
3,
10
],
"name": "Cross Room Jump - Speedy HiJump Tricky Springball Jump",
"entranceCondition": {
"comeInWithPlatformBelow": {
"maxHeight": 7,
"maxLeftPosition": 2.5,
"minRightPosition": -2.5
},
"comesThroughToilet": "any"
},
"requires": [
"canCrossRoomJumpIntoWater",
"HiJump",
"SpeedBooster",
"canTrickySpringBallJump",
"canTrickyJump"
],
"note": "Run and jump up through the door using HiJump and SpeedBooster in the room below and Springball Jump at the peak of the jump."
},
{
"link": [
3,
10
],
"name": "Cross Room Jump - Tricky Dash Jump",
"entranceCondition": {
"comeInWithPlatformBelow": {
"maxHeight": 10,
"maxLeftPosition": -38.5,
"minRightPosition": -2
},
"comesThroughToilet": "any"
},
"requires": [
"canCrossRoomJumpIntoWater",
"canTrickyDashJump"
],
"note": [
"Run and jump up through the door using SpeedBooster in the room below, jumping during a spike in the speed-to-jumpHeight chart.",
"Immediately after jumping, break spin and turn left to allow you to run longer and to avoid hitting the crab."
],
"devNote": [
"This strat is applicable in Crocomire's Room and the Post Crocomire Jump Room (with Power Bomb blocks broken)."
]
},
{
"link": [
4,
1
],
"name": "Suitless Shinespark",
"entranceCondition": {
"comeInWithSpark": {
"position": "bottom"
}
},
"requires": [
{
  "shinespark": {
    "frames": 127,
    "excessFrames": 10
  }
}
],
"devNote": "This can be done with Gravity to save Energy, but crossing the room with Gravity and Speedbooster is free."
},
{
"link": [
4,
1
],
"name": "Everest Tricky Cross Room Jump (Right to Left)",
"notable": true,
"entranceCondition": {
"comeInJumping": {
"speedBooster": true,
"minTiles": 8
}
},
"requires": [
"canInsaneJump",
"canTrickyDashJump",
"canSpringBallBounce",
"canCrossRoomJumpIntoWater"
],
"note": [
"Requires running a very precise distance of 8 tiles in the adjacent room.",
"Morph just before hitting the first ceiling grapple block, then bounce on both grapple block platforms."
]
},
{
"link": [
4,
1
],
"name": "Grapple Teleport",
"entranceCondition": {
"comeInWithGrappleTeleport": {
"blockPositions": [
[
5,
3
],
[
7,
2
]
]
}
},
"requires": []
},
{
"link": [
4,
1
],
"name": "Grapple Teleport X-Ray Climb",
"entranceCondition": {
"comeInWithGrappleTeleport": {
"blockPositions": [
[
2,
18
],
[
2,
19
],
[
2,
28
],
[
2,
29
]
]
}
},
"requires": [
"canXRayClimb"
],
"bypassesDoorShell": true,
"flashSuitChecked": true,
"note": [
"Exit the previous room with Samus in a standing pose (while grappled).",
"After teleporting, press right to release Grapple while staying standing (not being forced into a crouch).",
"Then X-ray climb to get up to the door transition, without needing to open the door.",
"Samus will not be visible during the climb.",
"It is necessary to enter a horizontal position of 20 pixel or less, otherwise the climb will stop in the air pocket below the door."
]
},
{
"link": [
4,
4
],
"name": "Leave with Runway",
"requires": [],
"exitCondition": {
"leaveWithRunway": {
"length": 4,
"openEnd": 1
}
}
},
{
"link": [
4,
4
],
"name": "Leave With Runway - Frozen Sciser",
"requires": [
"h_canFrozenEnemyRunway",
"Gravity",
{
"or": [
"SpaceJump",
"canGravityJump",
"Grapple"
]
}
],
"exitCondition": {
"leaveWithRunway": {
"length": 6,
"openEnd": 0
}
},
"note": [
"Follow the crab from the bottom right door to the top right door. Depending on the item setup, this takes 30-50 seconds.",
"Keep a half-tile gap between the crab and the runway in order to extend it as much as possible."
],
"devNote": [
"This could be done with many other sets of item combinations, but it would be very tedious for a 1.5 tile runway extension."
]
},
{
"link": [
4,
4
],
"name": "Crystal Flash",
"requires": [
"h_canCrystalFlash"
],
"flashSuitChecked": true
},
{
"link": [
4,
4
],
"name": "G-Mode Setup - Get Hit By Sciser - Lure From Bottom Right",
"notable": false,
"requires": [
{
  "or": [
    {
      "and": [
        "Gravity",
        "SpaceJump"
      ]
    },
    "canGravityJump",
    {
      "and": [
        "Grapple",
        {
          "or": [
            "HiJump",
            "Gravity"
          ]
        }
      ]
    },
    "h_canDoubleSpringBallJumpWithHiJump"
  ]
}
],
"exitCondition": {
"leaveWithGModeSetup": {}
},
"flashSuitChecked": true,
"note": [
"Follow the crab from the bottom right door to the top right door. Depending on the item setup, this takes 30-50 seconds."
],
"devNote": [
"This could be done with many other sets of item combinations, but it would be very tedious for a g-mode setup."
]
},
{
"link": [
4,
6
],
"name": "Grapple Teleport",
"entranceCondition": {
"comeInWithGrappleTeleport": {
"blockPositions": [
[
2,
34
]
]
}
},
"requires": [
"Morph"
],
"bypassesDoorShell": true,
"note": [
"After teleporting, morph and roll to the right to touch the transition."
],
"devNote": [
"FIXME: put an exit condition (e.g. leaveNormally) here to express that there is no choice but to take the transition.",
"First we need matching entrance conditions (e.g. comeInNormally) to be defined everywhere."
]
},
{
"link": [
4,
9
],
"name": "Grapple",
"requires": [
"h_canNavigateUnderwater",
"Grapple"
]
},
{
"link": [
4,
9
],
"name": "Everest Tricky Cross Room Jump (Right to Top)",
"notable": true,
"entranceCondition": {
"comeInJumping": {
"speedBooster": true,
"minTiles": 8
}
},
"requires": [
"canInsaneJump",
"canTrickyDashJump",
"canSpringBallBounce",
"canCrossRoomJumpIntoWater"
],
"note": [
"Requires running a very precise distance of 8 tiles in the adjacent room.",
"Morph just before hitting the first ceiling grapple block, then bounce on the first grapple block platform."
]
},
{
"link": [
4,
9
],
"name": "Everest Tricky Cross Room Jump with HiJump (Right to Top)",
"notable": true,
"entranceCondition": {
"comeInJumping": {
"speedBooster": true,
"minTiles": 6.4375
}
},
"requires": [
"HiJump",
"canInsaneJump",
"canTrickyDashJump",
"canSpringBallBounce",
"canCrossRoomJumpIntoWater"
],
"note": [
"Requires running a very precise distance of 7 tiles with no open end in the adjacent room, as this is a peak in jump speed.",
"Morph just before hitting the first ceiling grapple block, then turn on HiJump before bouncing on the first grapple block platform."
]
},
{
"link": [
4,
9
],
"name": "G-Mode Morph IBJ",
"entranceCondition": {
"comeInWithGMode": {
"mode": "any",
"morphed": true
}
},
"requires": [
"h_canArtificialMorphIBJ",
"Gravity"
],
"flashSuitChecked": true
},
{
"link": [
4,
10
],
"name": "Base",
"requires": []
},
{
"link": [
4,
11
],
"name": "Suitless Shinespark",
"entranceCondition": {
"comeInWithSpark": {}
},
"requires": [
{
  "shinespark": {
    "frames": 127,
    "excessFrames": 28
  }
}
],
"devNote": "With enough energy, this goes all the way to 1, but with less it stops prematurely at 11."
},
{
"link": [
4,
12
],
"name": "G-Mode Morph",
"entranceCondition": {
"comeInWithGMode": {
"mode": "any",
"morphed": true
}
},
"requires": [
"Gravity",
{
"or": [
"Morph",
{
"and": [
"h_canArtificialMorphSpringBall",
{
"or": [
"canGravityJump",
"HiJump"
]
}
]
},
"h_canArtificialMorphIBJ",
"h_canArtificialMorphSpringBallBombJump"
]
}
],
"flashSuitChecked": true,
"devNote": "FIXME: Add strats to get here with Morph, suitless."
},
{
"link": [
5,
1
],
"name": "Suitless Shinespark",
"entranceCondition": {
"comeInShinecharged": {
"framesRequired": 90
},
"comesThroughToilet": "any"
},
"requires": [
"canSuitlessMaridia",
"canHorizontalShinespark",
{
"shinespark": {
"frames": 61,
"excessFrames": 10
}
}
],
"flashSuitChecked": true,
"devNote": "This could be done with Gravity to save Energy, but getting from 5 to 1 with Gravity and SpeedBooster is free."
},
{
"link": [
5,
1
],
"name": "Prepared Suitless Midair Shinespark",
"entranceCondition": {
"comeInShinecharged": {
"framesRequired": 15
},
"comesThroughToilet": "any"
},
"requires": [
"canSuitlessMaridia",
"canMidairShinespark",
"canPrepareForNextRoom",
{
"shinespark": {
"frames": 67,
"excessFrames": 10
}
}
],
"flashSuitChecked": true,
"devNote": "Frames assume you spark before landing on the Grapple blocks."
},
{
"link": [
5,
4
],
"name": "Midair Shinespark",
"entranceCondition": {
"comeInShinecharged": {
"framesRequired": 55
},
"comesThroughToilet": "any"
},
"requires": [
"Gravity",
"canMidairShinespark",
{
"shinespark": {
"frames": 69,
"excessFrames": 6
}
}
],
"flashSuitChecked": true,
"devNote": "Frames assume you land on the Grapple blocks before jumping and shinesparking."
},
{
"link": [
5,
4
],
"name": "Prepared Midair Shinespark",
"entranceCondition": {
"comeInShinecharged": {
"framesRequired": 15
},
"comesThroughToilet": "any"
},
"requires": [
"Gravity",
"canMidairShinespark",
"canPrepareForNextRoom",
{
"shinespark": {
"frames": 72,
"excessFrames": 6
}
}
],
"flashSuitChecked": true,
"devNote": "Frames assume you spark before landing on the Grapple blocks."
},
{
"link": [
5,
4
],
"name": "Suitless Midair Shinespark",
"entranceCondition": {
"comeInShinecharged": {
"framesRequired": 90
},
"comesThroughToilet": "any"
},
"requires": [
"canSuitlessMaridia",
"canMidairShinespark",
{
"shinespark": {
"frames": 86,
"excessFrames": 12
}
}
],
"flashSuitChecked": true,
"devNote": "Frames assume you land on the Grapple blocks before jumping and shinesparking."
},
{
"link": [
5,
4
],
"name": "Prepared Suitless Midair Shinespark",
"entranceCondition": {
"comeInShinecharged": {
"framesRequired": 20
},
"comesThroughToilet": "any"
},
"requires": [
"canSuitlessMaridia",
"canMidairShinespark",
"canPrepareForNextRoom",
{
"shinespark": {
"frames": 93,
"excessFrames": 12
}
}
],
"flashSuitChecked": true,
"devNote": "Frames assume you spark before landing on the Grapple blocks."
},
{
"link": [
5,
4
],
"name": "G-Mode Morph IBJ",
"entranceCondition": {
"comeInWithGMode": {
"mode": "any",
"morphed": true
},
"comesThroughToilet": "any"
},
"requires": [
"h_canArtificialMorphIBJ",
"Gravity"
],
"flashSuitChecked": true
},
{
"link": [
5,
5
],
"name": "Carry G-Mode Back Up",
"entranceCondition": {
"comeInWithGMode": {
"mode": "direct",
"morphed": false
},
"comesThroughToilet": "any"
},
"requires": [
"h_canNavigateUnderwater",
{
"or": [
{
"and": [
"Gravity",
{
"or": [
"HiJump",
"canSpringBallJumpMidAir",
"h_canFly",
"canGravityJump"
]
}
]
},
{
"and": [
"canUseEnemies",
"canPreciseGrapple"
]
},
{
"and": [
"HiJump",
"canSpringBallJumpMidAir"
]
}
]
}
],
"exitCondition": {
"leaveWithGMode": {
"morphed": false
}
},
"bypassesDoorShell": true,
"flashSuitChecked": true,
"note": "Note that it is possible to get up with Grapple alone by using the Powamps. Fling from the Powamp into the side of the top platform to align horizontally."
},
{
"link": [
5,
5
],
"name": "Carry G-Mode Morph Back Up",
"entranceCondition": {
"comeInWithGMode": {
"mode": "direct",
"morphed": true
},
"comesThroughToilet": "any"
},
"requires": [
"Gravity",
{
"or": [
"h_canArtificialMorphIBJ",
{
"and": [
"HiJump",
"h_canArtificialMorphSpringBall"
]
}
]
}
],
"exitCondition": {
"leaveWithGMode": {
"morphed": true
}
},
"bypassesDoorShell": true,
"flashSuitChecked": true
},
{
"link": [
5,
5
],
"name": "G-Mode Setup - Frozen Sciser",
"notable": false,
"requires": [
{
"or": [
{
"and": [
"Gravity",
"SpaceJump"
]
},
{
"and": [
"HiJump",
"canPreciseGrapple",
{
"or": [
"Gravity",
"canSpringBallJumpMidAir"
]
}
]
},
{
"and": [
"HiJump",
"canGravityJump",
"canBeVeryPatient"
]
}
]
},
"canUpwardGModeSetup",
"canTrickyUseFrozenEnemies",
{
"or": [
"Morph",
"canTwoTileSqueeze"
]
}
],
"exitCondition": {
"leaveWithGModeSetup": {}
},
"flashSuitChecked": true
},
{
"link": [
5,
9
],
"name": "Base",
"requires": []
},
{
"link": [
5,
12
],
"name": "G-Mode Morph",
"entranceCondition": {
"comeInWithGMode": {
"mode": "any",
"morphed": true
},
"comesThroughToilet": "any"
},
"requires": [
{
  "or": [
    "Morph",
    "h_canArtificialMorphSpringBall",
    {
      "and": [
        "Gravity",
        "h_canArtificialMorphIBJ"
      ]
    },
    {
      "and": [
        "Gravity",
        "h_canArtificialMorphBombHorizontally"
      ]
    }
  ]
}
],
"flashSuitChecked": true
},
{
"link": [
5,
12
],
"name": "G-Mode Morph Suitless Bounce Into Tunnel",
"entranceCondition": {
"comeInWithGMode": {
"mode": "any",
"morphed": true
},
"comesThroughToilet": "any"
},
"requires": [
"canSuitlessMaridia",
"canTrickyJump",
{
"enemyDamage": {
"enemy": "Sciser",
"type": "contact",
"hits": 1
}
},
{
"or": [
"h_EverestMorphTunnelExpanded",
{
"enemyDamage": {
"enemy": "Sciser",
"type": "contact",
"hits": 1
}
}
]
}
],
"flashSuitChecked": true,
"note": [
"Bounce from the right peak into the morph tunnel.",
"Samus can't bounce twice in a single fall, so come to a stop on the top platform or avoid it completely."
]
},
{
"link": [
6,
2
],
"name": "Base",
"requires": [
"Morph"
]
},
{
"link": [
6,
4
],
"name": "G-Mode Morph IBJ",
"entranceCondition": {
"comeInWithGMode": {
"mode": "any",
"morphed": true
}
},
"requires": [
"h_EverestMorphTunnelExpanded",
"h_canArtificialMorphIBJ",
"Gravity"
],
"flashSuitChecked": true,
"note": "After entering the room, quickly leave the morph tunnel in order to prevent getting hit by the crab."
},
{
"link": [
6,
4
],
"name": "G-Mode Morph Indirect IBJ",
"entranceCondition": {
"comeInWithGMode": {
"mode": "indirect",
"morphed": true
}
},
"requires": [
"h_canArtificialMorphIBJ",
"Gravity"
],
"flashSuitChecked": true,
"note": "After entering the room, quickly leave the morph tunnel in order to prevent getting hit by the crab."
},
{
"link": [
6,
6
],
"name": "Leave with Runway",
"requires": [
"h_EverestMorphTunnelExpanded"
],
"exitCondition": {
"leaveWithRunway": {
"length": 2,
"openEnd": 0
}
},
"devNote": "This depends on how far the Morph tunnel is expanded, but this is both the minimum distance and the distance Map Rando has expanded."
},
{
"link": [
6,
6
],
"name": "Crystal Flash",
"requires": [
"h_canCrystalFlash"
],
"flashSuitChecked": true
},
{
"link": [
6,
6
],
"name": "G-Mode Setup - Get Hit By Sciser",
"notable": false,
"requires": [
"h_EverestMorphTunnelExpanded"
],
"exitCondition": {
"leaveWithGModeSetup": {}
},
"flashSuitChecked": true
},
{
"link": [
6,
6
],
"name": "G-Mode Regain Mobility",
"requires": [
"h_EverestMorphTunnelExpanded",
{
"enemyDamage": {
"enemy": "Sciser",
"type": "contact",
"hits": 1
}
}
],
"gModeRegainMobility": {},
"flashSuitChecked": true
},
{
"link": [
6,
7
],
"name": "G-Mode Morph IBJ or SpringBall Bomb Jump",
"entranceCondition": {
"comeInWithGMode": {
"mode": "any",
"morphed": true
}
},
"requires": [
"h_EverestMorphTunnelExpanded",
"Gravity",
{
"or": [
"h_canArtificialMorphIBJ",
"h_canArtificialMorphSpringBallBombJump"
]
}
],
"flashSuitChecked": true,
"note": "After entering the room, quickly leave the morph tunnel in order to prevent getting hit by the crab."
},
{
"link": [
6,
7
],
"name": "G-Mode Morph Indirect IBJ or SpringBall Bomb Jump",
"entranceCondition": {
"comeInWithGMode": {
"mode": "indirect",
"morphed": true
}
},
"requires": [
"Gravity",
{
"or": [
"h_canArtificialMorphIBJ",
"h_canArtificialMorphSpringBallBombJump"
]
}
],
"flashSuitChecked": true,
"note": "After entering the room, quickly leave the morph tunnel in order to prevent getting hit by the crab."
},
{
"link": [
6,
8
],
"name": "SpringBall out of Morph Tunnel",
"requires": [
"canInsaneJump",
"h_canUseSpringBall"
],
"note": "Jump using Springball with the right timing leaving the Morph tunnel to avoid falling."
},
{
"link": [
6,
8
],
"name": "SpringBall out of Morph Tunnel (Artificial Morph)",
"entranceCondition": {
"comeInWithGMode": {
"mode": "any",
"morphed": true
}
},
"requires": [
"h_EverestMorphTunnelExpanded",
"canInsaneJump",
"h_canArtificialMorphSpringBall"
],
"flashSuitChecked": true,
"note": "Jump using Springball with the right timing leaving the Morph tunnel to avoid falling."
},
{
"link": [
6,
8
],
"name": "SpringBall out of Morph Tunnel (Artificial Morph, Indirect)",
"entranceCondition": {
"comeInWithGMode": {
"mode": "indirect",
"morphed": true
}
},
"requires": [
"canInsaneJump",
"h_canArtificialMorphSpringBall"
],
"flashSuitChecked": true,
"note": "Jump using Springball with the right timing leaving the Morph tunnel to avoid falling."
},
{
"link": [
6,
9
],
"name": "G-Mode Morph IBJ",
"entranceCondition": {
"comeInWithGMode": {
"mode": "any",
"morphed": true
}
},
"requires": [
"h_EverestMorphTunnelExpanded",
"h_canArtificialMorphIBJ",
"Gravity"
],
"flashSuitChecked": true,
"note": "After entering the room, quickly leave the morph tunnel in order to prevent getting hit by the crab."
},
{
"link": [
6,
9
],
"name": "G-Mode Morph Indirect IBJ",
"entranceCondition": {
"comeInWithGMode": {
"mode": "indirect",
"morphed": true
}
},
"requires": [
"h_canArtificialMorphIBJ",
"Gravity"
],
"flashSuitChecked": true,
"note": "After entering the room, quickly leave the morph tunnel in order to prevent getting hit by the crab."
},
{
"link": [
6,
11
],
"name": "Shinespark Deep Transition X-Ray Climb",
"entranceCondition": {
"comeInWithSpark": {
"position": "top"
}
},
"requires": [
"canDeepTransition",
{
"shinespark": {
"frames": 2,
"excessFrames": 2
}
},
"canXRayClimb"
],
"flashSuitChecked": true,
"note": [
"Perform a horizontal shinespark through the top of the door transition, from a horizontal position that triggers a deep door transition.",
"Sparking from one or two pixels away from the door is an example position that works (if possible in the neighboring room).",
"If successful, after the shinespark crash animation ends Samus should be standing inside the wall and be able to X-Ray climb."
],
"devNote": [
"If the morph tunnel is not expanded, then a deep transition is not necessary; any horizontal shinespark in top position would work."
]
},
{
"link": [
7,
2
],
"name": "Base",
"requires": []
},
{
"link": [
7,
3
],
"name": "Base",
"requires": []
},
{
"link": [
7,
7
],
"name": "Powamp Farm",
"requires": [
"Gravity",
{
"or": [
"HiJump",
"SpaceJump"
]
},
{
"resetRoom": {
"nodes": [
1,
2,
3
],
"mustStayPut": false
}
},
{
"refill": [
"Super"
]
}
]
},
{
"link": [
7,
8
],
"name": "Base",
"requires": [
"Gravity"
]
},
{
"link": [
7,
8
],
"name": "Suitless Jump Assist",
"requires": [
"canSuitlessMaridia",
{
"or": [
"HiJump",
{
"and": [
"canTrickySpringBallJump",
{
"or": [
"canCrouchJump",
"canSpringFling",
"canStationaryLateralMidAirMorph"
]
}
]
}
]
}
]
},
{
"link": [
7,
8
],
"name": "Grapple Powamp",
"requires": [
"canSuitlessMaridia",
"canUseEnemies",
"Grapple"
],
"note": "There is a grappleable Powamp directly above each of the 3 peaks."
},
{
"link": [
7,
9
],
"name": "CanFly",
"requires": [
"Gravity",
"h_canFly"
]
},
{
"link": [
7,
9
],
"name": "Powamp Grapple",
"requires": [
"h_canNavigateUnderwater",
"canUseEnemies",
"Grapple"
],
"note": "There is a grappleable Powamp directly above each of the 3 peaks."
},
{
"link": [
7,
10
],
"name": "Gravity Jump",
"requires": [
"canGravityJump"
],
"clearsObstacles": [
"A",
"B"
],
"devNote": "It is possible to bring 2 crabs with gravity jump alone, but is relatively pointless."
},
{
"link": [
7,
10
],
"name": "Mt. Everest Insane Walljump",
"requires": [
"Gravity",
"canInsaneWalljump"
],
"clearsObstacles": [
"A",
"B"
],
"note": "There is a ridiculously precise, but possible, walljump to get up there. With and without HiJump is equally difficult.",
"devNote": "It is possible to bring 2 crabs with gravity and a wall jump, but is relatively pointless."
},
{
"link": [
7,
10
],
"name": "Mt. Everest Dash Jump",
"requires": [
"Gravity",
"HiJump",
"canTrickyDashJump",
"canWalljump"
],
"clearsObstacles": [
"A",
"B"
],
"note": [
"The run and jump is done from the middle peak in the floor. Not the one closest to the bottom right door.",
"Run from the left edge to just right of the peak, jump and wall jump on the overhang.",
"It may be worthwhile to kill the Powamps and crabs first."
],
"devNote": "It is possible to bring 2 crabs with gravity and a wall jump, but is relatively pointless."
},
{
"link": [
7,
10
],
"name": "Base",
"requires": [
"Gravity",
"h_canFly"
],
"clearsObstacles": [
"A",
"B"
],
"devNote": "It is possible to bring 2 crabs with gravity and canFly, but is relatively pointless."
},
{
"link": [
7,
10
],
"name": "Grapple Powamp",
"requires": [
"h_canNavigateUnderwater",
"canUseEnemies",
"Grapple"
],
"clearsObstacles": [
"B"
],
"note": "There is a grappleable Powamp directly above each of the 3 peaks.",
"devNote": [
"This strat is only able to bring one crab up without dropping down to 2.",
"Adding a strat to do that is not worth adding, because with grapple, you can bypass the strats that need A."
]
},
{
"link": [
7,
10
],
"name": "Spring Ball Jump with HiJump off a Crab",
"requires": [
"canSuitlessMaridia",
"HiJump",
"canTrickySpringBallJump",
"canTrickyUseFrozenEnemies"
],
"clearsObstacles": [
"A",
"B"
],
"note": [
"Freeze the crab midway up the right wall and jump and spring ball jump up to the higher platform.",
"Luring a second crab, which will make it to the upper platform, may be useful to avoid a tricky spring ball jump and flatley jump to get to the top right door."
],
"devNote": "It is possible to bring 2 crabs with this method, but is relatively pointless."
},
{
"link": [
7,
10
],
"name": "Double Spring Ball Jump",
"requires": [
"canSuitlessMaridia",
"h_canDoubleSpringBallJumpWithHiJump"
],
"clearsObstacles": [
"A",
"B"
],
"note": "Start the springball jumps from the highest ledge on the wall.",
"devNote": "It is possible to bring 2 crabs with double spring ball jump, but is relatively pointless."
},
{
"link": [
7,
10
],
"name": "Mt. Everest Right Bottom Half Crab Climb with Supers and HiJump",
"requires": [
"canSuitlessMaridia",
"canCrazyCrabClimb",
"HiJump",
{
"ammo": {
"type": "Super",
"count": 1
}
}
],
"clearsObstacles": [
"A",
"B"
],
"note": [
"Climbing the right side of Mt. Everest with two supers, ice, and HiJump.",
"Requires luring 3 crabs; the third crab is from the morph tunnel to the left.",
"Use a super to knock off and freeze a crab midair. Stand on it and let the other crab climb, then jump up and follow it.",
"Be sure two crabs make it to the next section in order to crab climb further."
]
},
{
"link": [
7,
10
],
"name": "Mt. Everest Right Bottom Half Crab Climb with Supers and Spring Ball",
"requires": [
"canSuitlessMaridia",
"canCrazyCrabClimb",
"canTrickySpringBallJump",
{
"ammo": {
"type": "Super",
"count": 1
}
}
],
"clearsObstacles": [
"A",
"B"
],
"note": [
"Climbing the right side of Mt. Everest with two supers, ice, and Spring Ball.",
"Requires luring 3 crabs; the third crab is from the morph tunnel to the left.",
"Use a super to knock off and freeze a crab midair. Stand on it and let the other crab climb, then jump up and follow it.",
"Be sure two crabs make it to the next section in order to crab climb further."
]
},
{
"link": [
7,
10
],
"name": "Mt. Everest Right Bottom Half Crab Climb with 1 Super",
"notable": true,
"requires": [
"canSuitlessMaridia",
"canCrazyCrabClimb",
"canTrickyJump",
"canBeVeryPatient",
{
"ammo": {
"type": "Super",
"count": 1
}
}
],
"clearsObstacles": [
"A",
"B"
],
"reusableRoomwideNotable": "Mt. Everest Right Crab Climb with Only 1 Super",
"note": [
"Climbing the right side of Mt. Everest with only two supers and ice. (As used in 14% Icebooster)",
"Requires luring 2 crabs. Use a super to knock off and freeze a crab midair. Be sure to lure a crab to the next section to crab climb further.",
"If Samus has 2 supers, it is easier to bring 3 crabs; the third is from the morph tunnel to the left. Lure 2 crabs to the next section for a slightly easier crab climb.",
"Note: The hardest part of this climb is the pixel precision when jumping around a ledge.",
"Too many pixels: left is a fall, right you clip through the crab, low you miss the jump and fall, high is a bonk or crab clip."
],
"devNote": [
"This is a duplicate to the version with 2 supers, in case the player turned on this harder strat without the easier version.",
"This strat is listed before the other, so it will be selected first if both are in logic. It describes what to do for both options"
]
},
{
"link": [
7,
10
],
"name": "Mt. Everest Right Bottom Half Crab Climb with Supers",
"notable": true,
"requires": [
"canSuitlessMaridia",
"canCrazyCrabClimb",
"canTrickyJump",
"canBeVeryPatient",
{
"ammo": {
"type": "Super",
"count": 1
}
}
],
"clearsObstacles": [
"A",
"B"
],
"reusableRoomwideNotable": "Mt. Everest Right Crab Climb with Only 2 Supers",
"note": [
"Climbing the right side of Mt. Everest with only two supers and ice. (As used in 14% Icebooster)",
"Requires luring 3 crabs; the third crab is from the morph tunnel to the left.",
"Use a super to knock off and freeze a crab midair. Be sure two crabs make it to the next section in order to crab climb further.",
"Note: The hardest part of this climb is the pixel precision when jumping around a ledge.",
"Too many pixels: left is a fall, right you clip through the crab, low you miss the jump and fall, high is a bonk or crab clip."
]
},
{
"link": [
7,
10
],
"name": "Mt. Everest Right Bottom Half Crab Climb with HiJump",
"notable": true,
"requires": [
"canSuitlessMaridia",
"canCrazyCrabClimb",
"HiJump",
"canTrickyJump",
"canCameraManip",
{
"or": [
"canUnderwaterWalljump",
"h_canCrouchJumpDownGrab",
"canFlatleyJump",
"canInsaneJump"
]
}
],
"clearsObstacles": [
"A",
"B"
],
"reusableRoomwideNotable": "Mt. Everest Right Crab Climb with Only HiJump or Springball",
"note": [
"Climb the bottom right wall of Mt. Everest with Ice and HiJump while also luring a crab to the next platform to be used to ascend the next wall.",
"The trickiest part of the climb is getting past the final overhang.",
"This can be done with an underwater wall jump if the crab is low, a precise crouch jump and down grab if it is higher, or a flatley jump off of the crab if it is higher still.",
"Two crabs makes it significantly easier to lure one to the top - simply let one go ahead of Samus.",
"For a faster setup, one crab may be used by perform the final jump as it is unfreezing so it starts moving upward.",
"Then go to the lower ground a bit to the right, jump and aim down to lower the camera to lure the crab.",
"Note: The hardest part of this climb is the pixel precision when jumping around a ledge.",
"Too many pixels: left is a fall, right you clip through the crab, low you miss the jump and fall, high is a bonk or crab clip."
]
},
{
"link": [
7,
10
],
"name": "Mt. Everest Right Bottom Half Crab Climb with Spring Ball",
"notable": true,
"requires": [
"canSuitlessMaridia",
"canCrazyCrabClimb",
"canTrickySpringBallJump",
"canTrickyJump",
"canCameraManip"
],
"clearsObstacles": [
"A",
"B"
],
"reusableRoomwideNotable": "Mt. Everest Right Crab Climb with Only HiJump or Springball",
"note": [
"Use the crab near the bottom right door. Only one spring ball jump is needed, it is to get up onto the flat platform.",
"After the spring ball jump, if the crab did not follow, go to the lower ground a bit to the right, jump and aim down to lower the camera to lure the crab.",
"Note: The hardest part of this climb is the pixel precision when jumping around a ledge.",
"Too many pixels: left is a fall, right you clip through the crab, low you miss the jump and fall, high is a bonk or crab clip."
]
},
{
"link": [
8,
6
],
"name": "Base",
"requires": [
"h_canNavigateUnderwater",
{
"or": [
"h_canUseSpringBall",
"canMidAirMorph",
{
"and": [
"Gravity",
{
"or": [
"canIBJ",
"canBombHorizontally"
]
}
]
},
{
"and": [
"Gravity",
"canTrivialMidAirMorph",
{
"or": [
"SpaceJump",
"canUseFrozenEnemies"
]
}
]
},
{
"and": [
"canTrivialMidAirMorph",
"canDisableEquipment"
]
}
]
}
],
"devNote": [
"It's possible to get in without a mid-air morph by rolling off from above, but that requires disabling Gravity and/or crab hits and the crab not killed.",
"That's a lot of work to avoid something simple and barely reasonable at that level anyways."
]
},
{
"link": [
8,
7
],
"name": "Base",
"requires": []
},
{
"link": [
8,
9
],
"name": "Gravity Jump",
"requires": [
"canGravityJump",
{
"or": [
"HiJump",
"canTrickyJump"
]
}
],
"note": "Barely works without HiJump with a late gravity jump."
},
{
"link": [
8,
11
],
"name": "Base",
"requires": [
"Gravity"
],
"note": "With a bit of a run, this requires no other movement tech or items."
},
{
"link": [
8,
11
],
"name": "Grapple Powamp",
"requires": [
"h_canNavigateUnderwater",
"canUseEnemies",
"Grapple"
],
"note": "There is a grappleable Powamp directly above each of the 3 peaks."
},
{
"link": [
8,
11
],
"name": "Suitless Jump Assists",
"requires": [
"canSuitlessMaridia",
"HiJump",
"canSpringBallJumpMidAir"
]
},
{
"link": [
8,
11
],
"name": "Underwater Walljump",
"requires": [
"canUnderwaterWalljump"
]
},
{
"link": [
9,
1
],
"name": "Grapple",
"requires": [
"h_canNavigateUnderwater",
"Grapple"
]
},
{
"link": [
9,
4
],
"name": "Grapple",
"requires": [
"h_canNavigateUnderwater",
"Grapple"
]
},
{
"link": [
9,
5
],
"name": "Base",
"requires": [
"Gravity",
{
"or": [
"HiJump",
"canSpringBallJumpMidAir",
"h_canFly"
]
}
],
"devNote": "FIXME: It's possible to clip through the door with morph, xray, a super and a way to lure the crab, but its a precise and unforgiving freeze."
},
{
"link": [
9,
5
],
"name": "Grapple",
"requires": [
"h_canNavigateUnderwater",
"Grapple"
],
"note": "Use the grapple to fling Samus through the door."
},
{
"link": [
9,
5
],
"name": "Suitless Jump Assists",
"requires": [
"canSuitlessMaridia",
"HiJump",
"canSpringBallJumpMidAir"
]
},
{
"link": [
9,
5
],
"name": "Gravity Jump",
"requires": [
"canGravityJump"
]
},
{
"link": [
9,
5
],
"name": "Gravity TrickyDashJump",
"requires": [
"Gravity",
"canWalljump",
"canTrickyDashJump"
],
"note": "Jump the first frame after running to gain just enough spinjump height."
},
{
"link": [
9,
5
],
"name": "Shinespark",
"requires": [
"Gravity",
{
"canShineCharge": {
"usedTiles": 33,
"openEnd": 2
}
},
{
"shinespark": {
"frames": 61
}
}
],
"exitCondition": {
"leaveWithSpark": {}
},
"unlocksDoors": [
{
"types": [
"ammo"
],
"requires": []
}
],
"devNote": [
"Implicitly drops down to 2 first.",
"There is no link directly from 2 to 5 because the door must be opened first.",
"So, you'd shinespark from 2 to 9, open the door, drop down, and shinespark again.",
"In the model, that'll be represented by going 2 -> 9 -> 5 via two shinespark strats."
]
},
{
"link": [
9,
8
],
"name": "Base",
"requires": []
},
{
"link": [
9,
9
],
"name": "Crystal Flash",
"requires": [
"h_canCrystalFlash"
],
"flashSuitChecked": true
},
{
"link": [
9,
11
],
"name": "Suitless Bootless Jump",
"requires": [
"canSuitlessMaridia",
"canDisableEquipment"
],
"note": "Turn off Gravity and HiJump to jump directly here.",
"devNote": "Gravity can follow 8->11 with no equipment."
},
{
"link": [
10,
3
],
"name": "Mt. Everest Bottom Right Charged Drop",
"notable": true,
"requires": [
"Gravity",
{
"canShineCharge": {
"usedTiles": 20,
"gentleUpTiles": 3,
"gentleDownTiles": 1,
"steepUpTiles": 1,
"openEnd": 1
}
}
],
"exitCondition": {
"leaveShinecharged": {
"framesRemaining": 30
}
},
"unlocksDoors": [
{
"types": [
"super"
],
"requires": []
},
{
"types": [
"missiles",
"powerbomb"
],
"requires": [
{
"or": [
"Grapple",
{
"shinespark": {
"frames": 59
}
},
{
"and": [
"HiJump",
"canSpringBallJumpMidAir"
]
},
{
"and": [
"HiJump",
"canTrickyDashJump",
"canWalljump"
]
},
"canGravityJump"
]
}
]
}
],
"flashSuitChecked": true,
"note": [
"Charge on the upper right ledge, and store the spark as Samus walks off the ledge to drop down onto the door.",
"Opening the door first and moonfalling can help but is not required."
],
"devNote": [
"It's possible to get 40 frames remaining by opening the door first and dropping with a moonfall, but is it worth putting here?",
"A similar strat could be added from 7->3."
]
},
{
"link": [
10,
4
],
"name": "Gravity Jump",
"requires": [
"canGravityJump"
]
},
{
"link": [
10,
4
],
"name": "CanFly",
"requires": [
"Gravity",
"h_canFly"
]
},
{
"link": [
10,
4
],
"name": "Suited Grapple",
"requires": [
"Gravity",
"Grapple"
],
"note": "Jump and grapple to the blocks to the top left of this region, then to the ceiling grapple blocks."
},
{
"link": [
10,
4
],
"name": "Mt. Everest Top Walljump",
"requires": [
"Gravity",
{
"or": [
"canDelayedWalljump",
{
"and": [
"HiJump",
"canPreciseWalljump"
]
},
{
"and": [
"HiJump",
"canWalljump",
"SpeedBooster"
]
}
]
}
]
},
{
"link": [
10,
4
],
"name": "Mt. Everest Top Dash Jump",
"requires": [
"Gravity",
"HiJump",
"canTrickyDashJump"
],
"note": "Run from the left edge to just after the second downward slope. No wall jump needed."
},
{
"link": [
10,
4
],
"name": "Suitless Grapple",
"requires": [
"canSuitlessMaridia",
"Grapple",
{
"or": [
"HiJump",
"canSpringBallJumpMidAir"
]
}
],
"note": [
"This strat uses the grapple blocks at the top left, not the Powamp.",
"Failure also doesn't usually allow a second try (assuming the Powamp is not there)."
]
},
{
"link": [
10,
4
],
"name": "Suitless Precise Grapple",
"requires": [
"canSuitlessMaridia",
"canPreciseGrapple",
{
"or": [
"canCrouchJump",
"canTrickyJump"
]
}
],
"note": [
"Crouch at the edge of the overhang. Jump and just after the peak of the jump, grapple to the grapple blocks.",
"This strat is finicky, and failure doesn't usually allow a second try (assuming the Powamp is not there).",
"This is possible to do without a crouch jump, but it is much harder."
]
},
{
"link": [
10,
4
],
"name": "Suitless Powamp Grapple",
"requires": [
"canSuitlessMaridia",
"canUseEnemies",
"Grapple"
],
"note": "There is a grappleable Powamp directly above each of the 3 peaks."
},
{
"link": [
10,
4
],
"name": "Spring Ball Jump with HiJump",
"requires": [
"canSuitlessMaridia",
"HiJump",
"canTrickySpringBallJump",
"canFlatleyJump"
],
"note": "Start the jump from the higher ground to the left, specifically the right side of the second highest region."
},
{
"link": [
10,
4
],
"name": "Spring Ball Jump with HiJump off a Crab",
"requires": [
"canSuitlessMaridia",
"HiJump",
"canSpringBallJumpMidAir",
"canTrickyUseFrozenEnemies",
{
"obstaclesCleared": [
"B"
]
},
"canTrickyJump"
],
"note": [
"Requires having already lured a crab, likely from above the bottom right door.",
"Freeze the crab midway up the right wall and jump and spring ball jump up to the door."
],
"devNote": "The canTrickyJump is used to indicate the trickiness of bringing a crab from below."
},
{
"link": [
10,
4
],
"name": "Double Spring Ball Jump",
"requires": [
"canSuitlessMaridia",
"h_canDoubleSpringBallJumpWithHiJump"
]
},
{
"link": [
10,
4
],
"name": "Mt. Everest Right Top Half Crab Climb with Supers and HiJump",
"requires": [
"canSuitlessMaridia",
"HiJump",
"canTrickyUseFrozenEnemies",
{
"ammo": {
"type": "Super",
"count": 1
}
},
{
"obstaclesCleared": [
"A"
]
},
"canTrickyJump"
],
"note": [
"Climbing the right side of Mt. Everest with only two supers, ice, and HiJump.",
"Requires originally luring 3 crabs. Two crabs and one super are needed from this location.",
"Use a super to knock off and freeze a crab midair. Jump on it and freeze the second as a platform to jump up to the door."
],
"devNote": "The canTrickyJump is used to indicate the trickiness of bringing the crabs from below."
},
{
"link": [
10,
4
],
"name": "Mt. Everest Right Top Half Crab Climb with Supers and Spring Ball",
"requires": [
"canSuitlessMaridia",
"canTrickySpringBallJump",
"canCrazyCrabClimb",
{
"ammo": {
"type": "Super",
"count": 1
}
},
{
"obstaclesCleared": [
"A"
]
}
],
"note": [
"Climbing the right side of Mt. Everest with only two supers, ice, and Spring Ball.",
"Requires originally luring 3 crabs. Two crabs and one super are needed from this location.",
"Use a super to knock off and freeze a crab midair. Jump on it and freeze the second as a platform to jump up to the door."
]
},
{
"link": [
10,
4
],
"name": "Mt. Everest Right Top Half Crab Climb with Supers",
"notable": true,
"requires": [
"canSuitlessMaridia",
"canCrazyCrabClimb",
"canTrickyJump",
"canBeVeryPatient",
{
"ammo": {
"type": "Super",
"count": 1
}
},
{
"obstaclesCleared": [
"A"
]
}
],
"reusableRoomwideNotable": "Mt. Everest Right Crab Climb with Only 2 Supers",
"note": [
"Climbing the right side of Mt. Everest with only two supers and ice. (As used in 14% Icebooster)",
"Requires originally luring 3 crabs. Two crabs and one super are needed from this location.",
"Use a super to knock off and freeze a crab midair. Once close to the upper platform, freeze the crab at knee height to stand on it to jump up.",
"Note: The hardest part of this climb is the pixel precision when jumping around a ledge.",
"Too many pixels: left is a fall, right you clip through the crab, low you miss the jump and fall, high is a bonk or crab clip."
]
},
{
"link": [
10,
4
],
"name": "Mt. Everest Right Top Half Crab Climb with only Ice",
"notable": true,
"requires": [
"canSuitlessMaridia",
"canCrazyCrabClimb",
"canTrickyJump",
{
"obstaclesCleared": [
"B"
]
}
],
"reusableRoomwideNotable": "Mt. Everest Right Crab Climb with Only 1 Super",
"note": [
"Climbing the right side of Mt. Everest with only one super and ice. (A trickier version than that used in 14% Icebooster)",
"Requires having already lured a crab to this location, likely from above the bottom right door.",
"Once close to the upper platform, freeze the crab at knee height to stand on it to jump up.",
"Note: The hardest part of this climb is the pixel precision when jumping around a ledge.",
"Too many pixels: left is a fall, right you clip through the crab, low you miss the jump and fall, high is a bonk or crab clip."
]
},
{
"link": [
10,
4
],
"name": "Mt. Everest Right Top Half Crab Climb with HiJump",
"notable": true,
"requires": [
"canSuitlessMaridia",
"canCrazyCrabClimb",
"HiJump",
"canTrickyJump",
"canCameraManip",
{
"obstaclesCleared": [
"B"
]
}
],
"reusableRoomwideNotable": "Mt. Everest Right Crab Climb with Only HiJump or Springball",
"note": [
"Requires having already lured a crab to this location, likely from above the bottom right door.",
"Freeze the crab very high before going to the ledge on the right, delay jumping so it thaws and moves up a bit while on screen, jump aim down to lower the camera and lure it more.",
"Alternatively, using moonwalk and a flatley jump at the top can prevent needing the crab again.",
"Note: The hardest part of this climb is the pixel precision when jumping around a ledge.",
"Too many pixels: left is a fall, right you clip through the crab, low you miss the jump and fall, high is a bonk or crab clip."
]
},
{
"link": [
10,
4
],
"name": "Mt. Everest Right Top Half Crab Climb with Spring Ball",
"notable": true,
"requires": [
"canSuitlessMaridia",
"canCrazyCrabClimb",
"canTrickySpringBallJump",
"canTrickyJump",
"canCameraManip",
{
"obstaclesCleared": [
"B"
]
}
],
"reusableRoomwideNotable": "Mt. Everest Right Crab Climb with Only HiJump or Springball",
"note": [
"Requires having already lured a crab to this location, likely from above the bottom right door.",
"Freeze the crab high before going to the ledge on the right, delay spring ball jumping so it thaws and moves up while on screen, jump aim down to lower the camera and lure it more.",
"Freeze the crab again to use as a platform, approximately knee high. Jump on it and then jump to the platform above.",
"Note: The hardest part of this climb is the pixel precision when jumping around a ledge.",
"Too many pixels: left is a fall, right you clip through the crab, low you miss the jump and fall, high is a bonk or crab clip."
]
},
{
"link": [
10,
4
],
"name": "Leave With Spark",
"requires": [
"Gravity",
{
"or": [
"SpaceJump",
"canGravityJump",
{
"and": [
"HiJump",
{
"or": [
"canWalljump",
"canTrickyDashJump"
]
}
]
}
]
},
{
"canShineCharge": {
"usedTiles": 20,
"gentleUpTiles": 3,
"gentleDownTiles": 1,
"steepUpTiles": 1,
"openEnd": 0
}
},
"canShinechargeMovementComplex",
"canMidairShinespark",
{
"shinespark": {
"frames": 8
}
}
],
"exitCondition": {
"leaveWithSpark": {}
},
"unlocksDoors": [
{
"types": [
"ammo"
],
"requires": []
}
],
"note": [
"Run right-to-left to gain a shinecharge on the upper right ledge.",
"Use a gravity jump, Space Jump, or HiJump to approach the door above and spark out."
],
"devNote": [
"With some of these methods it is technically possible (but harder) to reach the door transition with a few frames remaining."
]
},
{
"link": [
10,
4
],
"name": "Leave Shinecharged (HiJump SpaceJump)",
"requires": [
"Gravity",
"HiJump",
"SpaceJump",
{
"canShineCharge": {
"usedTiles": 20,
"gentleUpTiles": 3,
"gentleDownTiles": 1,
"steepUpTiles": 1,
"openEnd": 0
}
},
"canShinechargeMovementComplex"
],
"exitCondition": {
"leaveShinecharged": {
"framesRemaining": 45
}
},
"unlocksDoors": [
{
"types": [
"ammo"
],
"requires": []
}
],
"flashSuitChecked": true,
"note": [
"Run right-to-left to gain a shinecharge on the upper right ledge."
]
},
{
"link": [
10,
7
],
"name": "Base",
"requires": []
},
{
"link": [
11,
1
],
"name": "Base",
"requires": [
"Gravity"
]
},
{
"link": [
11,
1
],
"name": "Suitless Jump Assist",
"requires": [
"canSuitlessMaridia",
{
"or": [
"HiJump",
"canSpringBallJumpMidAir"
]
}
]
},
{
"link": [
11,
1
],
"name": "Mt. Everest Top Left Shinecharge (to Top Left)",
"reusableRoomwideNotable": "Mt. Everest Top Left Shinecharge",
"notable": true,
"requires": [
"Gravity",
{
"canShineCharge": {
"usedTiles": 11,
"steepUpTiles": 5,
"openEnd": 2
}
},
"canShinechargeMovementComplex"
],
"exitCondition": {
"leaveShinecharged": {
"framesRemaining": 30
}
},
"unlocksDoors": [
{
"types": [
"ammo"
],
"requires": []
}
],
"flashSuitChecked": true,
"note": [
"Run right-to-left to gain a shinecharge on the ledge near the top-left door, and perform tight ledge-grabs to make it through the door with shinecharge frames remaining.",
"This is a very short runway, making it an exceptionally difficult short-charge."
]
},
{
"link": [
11,
5
],
"name": "Mt. Everest Top Left Shinecharge (to Top Center)",
"reusableRoomwideNotable": "Mt. Everest Top Left Shinecharge",
"notable": true,
"requires": [
"Gravity",
"SpaceJump",
"canTrickyDashJump",
{
"canShineCharge": {
"usedTiles": 11,
"steepUpTiles": 5,
"openEnd": 2
}
},
"canShinechargeMovementComplex"
],
"exitCondition": {
"leaveShinecharged": {
"framesRemaining": 15
}
},
"unlocksDoors": [
{
"types": [
"ammo"
],
"requires": []
}
],
"flashSuitChecked": true,
"note": [
"Run right-to-left to gain a shinecharge on the ledge near the top-left door, and Space Jump to the top center door with shinecharge frames remaining.",
"This is a very short runway, making it an exceptionally difficult short-charge."
]
},
{
"link": [
11,
5
],
"name": "Mt. Everest Top Left Shinecharge (to Top Center, with HiJump)",
"reusableRoomwideNotable": "Mt. Everest Top Left Shinecharge",
"notable": true,
"requires": [
"Gravity",
"HiJump",
"SpaceJump",
{
"canShineCharge": {
"usedTiles": 11,
"steepUpTiles": 5,
"openEnd": 2
}
},
"canShinechargeMovementComplex"
],
"exitCondition": {
"leaveShinecharged": {
"framesRemaining": 40
}
},
"unlocksDoors": [
{
"types": [
"ammo"
],
"requires": []
}
],
"flashSuitChecked": true,
"note": [
"Run right-to-left to gain a shinecharge on the ledge near the top-left door, and Space Jump to the top center door with shinecharge frames remaining.",
"This is a very short runway, making it an exceptionally difficult short-charge."
]
},
{
"link": [
11,
8
],
"name": "Base",
"requires": []
},
{
"link": [
11,
9
],
"name": "Speedjump",
"requires": [
"Gravity",
"HiJump",
"SpeedBooster"
]
},
{
"link": [
11,
9
],
"name": "Gravity Jump",
"requires": [
"canGravityJump",
{
"or": [
"canTrickyJump",
{
"and": [
"can4HighMidAirMorph",
"canCarefulJump",
"canLateralMidAirMorph"
]
}
]
}
],
"note": [
"This is most easily done with a late jump at the bottom of the slope.",
"It is a bit less precise with an air ball or turning gravity suit back on and wall jumping on the platform at the end.",
"An alternate method is to airball simultaneously with the gravity jump pause."
]
},
{
"link": [
11,
9
],
"name": "Double Spring Ball Jump",
"requires": [
"canSuitlessMaridia",
"h_canDoubleSpringBallJumpWithHiJump"
],
"note": "Start the spring ball jumps from the bottom of the slope."
},
{
"link": [
12,
6
],
"name": "Base",
"requires": [
"canEnterGMode"
],
"flashSuitChecked": true,
"devNote": "This technically requires h_EverestMorphTunnelExpanded or going through the transition while in G-Mode, but that shouldn't cause a problem."
},
{
"link": [
12,
6
],
"name": "Carry G-Mode Through the Tunnel",
"requires": [
"canEnterGMode"
],
"exitCondition": {
"leaveWithGMode": {
"morphed": true
}
},
"flashSuitChecked": true
},
{
"link": [
1,
1
],
"name": "Base (Unlock Door)",
"requires": [],
"unlocksDoors": [
{
"types": [
"ammo"
],
"requires": []
}
]
},
{
"link": [
1,
1
],
"name": "Base (Come In Normally)",
"entranceCondition": {
"comeInNormally": {}
},
"requires": []
},
{
"link": [
2,
2
],
"name": "Base (Unlock Door)",
"requires": [],
"unlocksDoors": [
{
"types": [
"ammo"
],
"requires": []
}
]
},
{
"link": [
2,
2
],
"name": "Base (Come In Normally)",
"entranceCondition": {
"comeInNormally": {}
},
"requires": []
},
{
"link": [
3,
3
],
"name": "Base (Unlock Door)",
"requires": [],
"unlocksDoors": [
{
"types": [
"ammo"
],
"requires": []
}
]
},
{
"link": [
3,
3
],
"name": "Base (Come In Normally)",
"entranceCondition": {
"comeInNormally": {}
},
"requires": []
},
{
"link": [
4,
4
],
"name": "Base (Unlock Door)",
"requires": [],
"unlocksDoors": [
{
"types": [
"ammo"
],
"requires": []
}
]
},
{
"link": [
4,
4
],
"name": "Base (Come In Normally)",
"entranceCondition": {
"comeInNormally": {}
},
"requires": []
},
{
"link": [
5,
5
],
"name": "Base (Unlock Door)",
"requires": [],
"unlocksDoors": [
{
"types": [
"ammo"
],
"requires": []
}
]
},
{
"link": [
5,
9
],
"name": "Base (Come In Normally)",
"entranceCondition": {
"comeInNormally": {}
},
"requires": []
},
{
"link": [
6,
6
],
"name": "Base (Unlock Door)",
"requires": [],
"unlocksDoors": [
{
"types": [
"ammo"
],
"requires": []
}
]
},
{
"link": [
6,
6
],
"name": "Base (Come In Normally)",
"entranceCondition": {
"comeInNormally": {}
},
"requires": []
}
],
"devNote": [
"FIXME: This room could have strats for using Ice to bypass vertical doors."
]
}