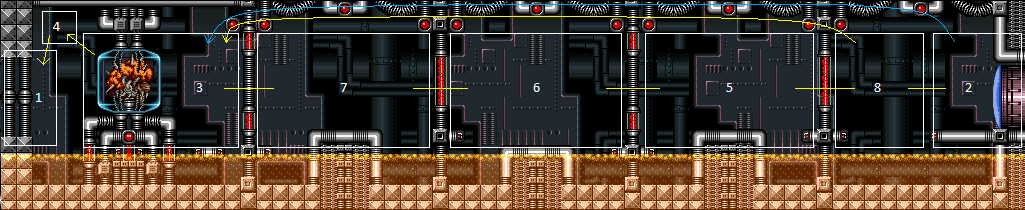
Mother Brain Room
Room ID: 238
|
Exit condition: {
"leaveWithRunway": {
"length": 1,
"openEnd": 1
}
}
|
|
From: 1
Left Blast Door
To: 1
Left Blast Door
Exit condition: {
"leaveWithGModeSetup": {}
}
|
|
Requires: {
"enemyDamage": {
"enemy": "Rinka",
"type": "contact",
"hits": 1
}
}
|
|
Entrance condition: {
"comeInWithGrappleTeleport": {
"blockPositions": [
[
12,
13
]
]
}
}
Requires: "h_BypassMotherBrainRoom" |
|
Carefully dodge the Rinkas, or take a hit, while carefully avoiding falling off, then use the I-Frames to use the runway. Requires: {
"or": [
"canTrickyJump",
{
"and": [
"canCarefulJump",
{
  "enemyDamage": {
    "enemy": "Rinka",
    "type": "contact",
    "hits": 1
  }
}
]
}
]
}
Exit condition: {
"leaveWithRunway": {
"length": 5,
"openEnd": 1
}
}
|
|
From: 2
Right Door
To: 2
Right Door
Exit condition: {
"leaveWithGModeSetup": {}
}
|
|
Requires: {
"enemyDamage": {
"enemy": "Rinka",
"type": "contact",
"hits": 1
}
}
|
|
From: 2
Right Door
To: 3
Mother Brain (locked)
Notable: true 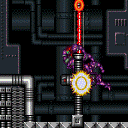

Shinespark diagonally into the lower Rinka Spawner while holding down, spamming jump, then pressing forward, in order to glitch through the first Mother Brain Zebetites during Samus' i-frames. The remaining Zebetites will not spawn. Entrance condition: {
"comeInShinecharging": {
"length": 4,
"openEnd": 1
}
}
Requires: {
"shinespark": {
"frames": 4
}
}
{
"enemyDamage": {
"enemy": "Rinka",
"type": "contact",
"hits": 1
}
}
"i_Objective1Complete"
"i_Objective2Complete"
"i_Objective3Complete"
"i_Objective4Complete"
|
|
From: 2
Right Door
To: 3
Mother Brain (locked)
Notable: true
Shinespark diagonally into the lower Rinka Spawner while holding down, spamming jump, then pressing forward, in order to glitch through the first Mother Brain Zebetites during Samus' i-frames. The remaining Zebetites will not spawn. Entrance condition: {
"comeInShinecharged": {
"framesRequired": 100
}
}
Requires: {
"shinespark": {
"frames": 4
}
}
{
"enemyDamage": {
"enemy": "Rinka",
"type": "contact",
"hits": 1
}
}
"i_Objective1Complete"
"i_Objective2Complete"
"i_Objective3Complete"
"i_Objective4Complete"
|
|
Requires: "i_Objective1Complete" "i_Objective2Complete" "i_Objective3Complete" "i_Objective4Complete" |
|
From: 3
Mother Brain (locked)
To: 4
Mother Brain (Phases 2 and 3) (locked)
Requires: "h_canPartiallyBreakMotherBrainGlass"
{
"ammo": {
"type": "Missile",
"count": 30
}
}
{
"or": [
"canTrickyUseFrozenEnemies",
{
"and": [
"canTrickyJump",
"canDodgeWhileShooting",
{
"enemyDamage": {
"enemy": "Rinka",
"type": "contact",
"hits": 1
}
}
]
},
{
"and": [
"canDodgeWhileShooting",
{
"enemyDamage": {
"enemy": "Rinka",
"type": "contact",
"hits": 2
}
}
]
},
{
"enemyDamage": {
"enemy": "Rinka",
"type": "contact",
"hits": 3
}
}
]
}
|
|
From: 3
Mother Brain (locked)
To: 4
Mother Brain (Phases 2 and 3) (locked)
Requires: "h_canPartiallyBreakMotherBrainGlass"
{
"or": [
{
"ammo": {
"type": "Super",
"count": 14
}
},
{
"and": [
"h_SupersDoubleDamageMotherBrain",
{
"ammo": {
"type": "Super",
"count": 12
}
}
]
}
]
}
{
"or": [
"canTrickyUseFrozenEnemies",
{
"and": [
"canDodgeWhileShooting",
{
"enemyDamage": {
"enemy": "Rinka",
"type": "contact",
"hits": 1
}
}
]
},
{
"enemyDamage": {
"enemy": "Rinka",
"type": "contact",
"hits": 2
}
}
]
}
|
|
From: 3
Mother Brain (locked)
To: 4
Mother Brain (Phases 2 and 3) (locked)
Requires: "h_canPartiallyBreakMotherBrainGlass"
{
"or": [
{
"and": [
{
"ammo": {
"type": "Super",
"count": 5
}
},
{
"ammo": {
"type": "Missile",
"count": 15
}
},
{
"or": [
"canTrickyUseFrozenEnemies",
"canTrickyJump",
{
"enemyDamage": {
"enemy": "Rinka",
"type": "contact",
"hits": 1
}
}
]
}
]
},
{
"and": [
{
"ammo": {
"type": "Super",
"count": 10
}
},
{
"ammo": {
"type": "Missile",
"count": 2
}
}
]
},
{
"and": [
"h_SupersDoubleDamageMotherBrain",
{
"ammo": {
"type": "Super",
"count": 4
}
},
{
"ammo": {
"type": "Missile",
"count": 8
}
}
]
},
{
"and": [
"h_SupersDoubleDamageMotherBrain",
{
"ammo": {
"type": "Super",
"count": 2
}
},
{
"ammo": {
"type": "Missile",
"count": 18
}
},
{
"or": [
"canTrickyUseFrozenEnemies",
"canTrickyJump",
{
"enemyDamage": {
"enemy": "Rinka",
"type": "contact",
"hits": 1
}
}
]
}
]
}
]
}
{
"or": [
"canTrickyUseFrozenEnemies",
{
"and": [
"canDodgeWhileShooting",
{
"enemyDamage": {
"enemy": "Rinka",
"type": "contact",
"hits": 1
}
}
]
},
{
"enemyDamage": {
"enemy": "Rinka",
"type": "contact",
"hits": 2
}
}
]
}
|
|
From: 3
Mother Brain (locked)
To: 4
Mother Brain (Phases 2 and 3) (locked)
Requires: "f_MotherBrainGlassBroken"
{
"or": [
{
"and": [
{
"ammo": {
"type": "Missile",
"count": 30
}
},
{
"or": [
"canTrickyUseFrozenEnemies",
"canTrickyJump",
{
"enemyDamage": {
"enemy": "Rinka",
"type": "contact",
"hits": 1
}
}
]
}
]
},
{
"and": [
{
"ammo": {
"type": "Super",
"count": 5
}
},
{
"ammo": {
"type": "Missile",
"count": 15
}
}
]
}
]
}
{
"or": [
"canTrickyUseFrozenEnemies",
{
"and": [
"canDodgeWhileShooting",
{
"enemyDamage": {
"enemy": "Rinka",
"type": "contact",
"hits": 1
}
}
]
},
{
"enemyDamage": {
"enemy": "Rinka",
"type": "contact",
"hits": 2
}
}
]
}
|
|
From: 3
Mother Brain (locked)
To: 4
Mother Brain (Phases 2 and 3) (locked)
Requires: "f_MotherBrainGlassBroken"
{
"or": [
{
"ammo": {
"type": "Super",
"count": 10
}
},
{
"and": [
"h_SupersDoubleDamageMotherBrain",
{
"ammo": {
"type": "Super",
"count": 5
}
}
]
}
]
}
{
"or": [
"canTrickyUseFrozenEnemies",
"canDodgeWhileShooting",
{
"enemyDamage": {
"enemy": "Rinka",
"type": "contact",
"hits": 1
}
}
]
}
|
|
From: 3
Mother Brain (locked)
To: 7
Between Third and Fourth Zebetite (locked)
Requires: "Morph"
"f_KilledZebetites4"
{
"or": [
"canTrickyJump",
{
"and": [
"canCarefulJump",
"h_canUseSpringBall"
]
},
{
"enemyDamage": {
"enemy": "Rinka",
"type": "contact",
"hits": 1
}
}
]
}
|
|
Requires: "f_DefeatedMotherBrain" |
|
From: 5
Between First and Second Zebetite (locked)
To: 6
Between Second and Third Zebetite (locked)
Requires: "Morph"
"f_KilledZebetites2"
{
"or": [
"canTrickyJump",
{
"and": [
"canCarefulJump",
"h_canUseSpringBall"
]
},
{
"enemyDamage": {
"enemy": "Rinka",
"type": "contact",
"hits": 1
}
}
]
}
{
"enemyDamage": {
"enemy": "Mother Brain 1",
"type": "turret",
"hits": 1
}
}
|
|
From: 5
Between First and Second Zebetite (locked)
To: 8
Before First Zebetite (locked)
Requires: "f_KilledZebetites1"
{
"or": [
"canCarefulJump",
{
"enemyDamage": {
"enemy": "Rinka",
"type": "contact",
"hits": 1
}
}
]
}
|
|
From: 6
Between Second and Third Zebetite (locked)
To: 5
Between First and Second Zebetite (locked)
Requires: "Morph"
"f_KilledZebetites2"
{
"or": [
"canTrickyJump",
{
"and": [
"canCarefulJump",
"h_canUseSpringBall"
]
},
{
"enemyDamage": {
"enemy": "Rinka",
"type": "contact",
"hits": 1
}
}
]
}
{
"enemyDamage": {
"enemy": "Mother Brain 1",
"type": "turret",
"hits": 1
}
}
|
|
From: 6
Between Second and Third Zebetite (locked)
To: 7
Between Third and Fourth Zebetite (locked)
Requires: "f_KilledZebetites3"
{
"or": [
"canCarefulJump",
{
"enemyDamage": {
"enemy": "Rinka",
"type": "contact",
"hits": 1
}
}
]
}
|
|
From: 7
Between Third and Fourth Zebetite (locked)
To: 3
Mother Brain (locked)
Requires: "Morph"
"f_KilledZebetites4"
{
"or": [
"canTrickyJump",
{
"and": [
"canCarefulJump",
"h_canUseSpringBall"
]
},
{
"enemyDamage": {
"enemy": "Rinka",
"type": "contact",
"hits": 1
}
}
]
}
|
|
From: 7
Between Third and Fourth Zebetite (locked)
To: 6
Between Second and Third Zebetite (locked)
Requires: "f_KilledZebetites3"
{
"or": [
"canCarefulJump",
{
"enemyDamage": {
"enemy": "Rinka",
"type": "contact",
"hits": 1
}
}
]
}
|
|
|
|
From: 8
Before First Zebetite (locked)
To: 3
Mother Brain (locked)
Notable: true 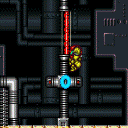
Glitch through the Mother Brain Zebetites by using a frozen Rinka and i-frames. Freeze the Rinka at its spawn location, then spinjump or Down-Back onto it after acquiring i-frames to clip inside of the Zebetite, then jump through. Note that Zebetites cause i-frames but deal no damage. Ice+Wave can freeze the Rinka from above. Ice+Plasma must freeze the Rinka from below while crouched. Requires: "canTrickyUseFrozenEnemies"
"Morph"
{
"or": [
"canTrickyJump",
{
"and": [
"canDownBack",
{
"enemyDamage": {
"enemy": "Rinka",
"type": "contact",
"hits": 1
}
}
]
}
]
}
{
"enemyDamage": {
"enemy": "Mother Brain 1",
"type": "turret",
"hits": 1
}
}
|
|
From: 8
Before First Zebetite (locked)
To: 5
Between First and Second Zebetite (locked)
Requires: "f_KilledZebetites1"
{
"or": [
"canCarefulJump",
{
"enemyDamage": {
"enemy": "Rinka",
"type": "contact",
"hits": 1
}
}
]
}
|
|
Requires: "h_canPartiallyBreakMotherBrainGlass" "h_canPartiallyBreakMotherBrainGlass" "h_canPartiallyBreakMotherBrainGlass" |
|
|
|
From: 4
Mother Brain (Phases 2 and 3) (locked)
To: 10
Mother Brain (Phases 2 and 3) (unlocked)
Requires: {
"enemyKill": {
"enemies": [
[
"Mother Brain 2"
]
]
}
}
|
|
From: 10
Mother Brain (Phases 2 and 3) (unlocked)
To: 4
Mother Brain (Phases 2 and 3) (locked)
|
|
From: 5
Between First and Second Zebetite (locked)
To: 11
Between First and Second Zebetite (unlocked)
Requires: "h_canOpenZebetites"
{
"or": [
{
"and": [
"canDodgeWhileShooting",
"canInsaneJump"
]
},
{
"enemyDamage": {
"enemy": "Rinka",
"type": "contact",
"hits": 1
}
}
]
}
|
|
From: 11
Between First and Second Zebetite (unlocked)
To: 5
Between First and Second Zebetite (locked)
|
|
From: 6
Between Second and Third Zebetite (locked)
To: 12
Between Second and Third Zebetite (unlocked)
Requires: "h_canOpenZebetites"
{
"or": [
{
"and": [
"canDodgeWhileShooting",
"canTrickyJump"
]
},
{
"enemyDamage": {
"enemy": "Rinka",
"type": "contact",
"hits": 1
}
}
]
}
|
|
From: 12
Between Second and Third Zebetite (unlocked)
To: 6
Between Second and Third Zebetite (locked)
|
|
From: 7
Between Third and Fourth Zebetite (locked)
To: 13
Between Third and Fourth Zebetite (unlocked)
Requires: "h_canOpenZebetites"
{
"enemyDamage": {
"enemy": "Rinka",
"type": "contact",
"hits": 1
}
}
|
|
From: 13
Between Third and Fourth Zebetite (unlocked)
To: 7
Between Third and Fourth Zebetite (locked)
|
|
From: 8
Before First Zebetite (locked)
To: 14
Before First Zebetite (unlocked)
Requires: "h_canOpenZebetites"
{
"or": [
"canDodgeWhileShooting",
{
"enemyDamage": {
"enemy": "Rinka",
"type": "contact",
"hits": 1
}
}
]
}
|
|
From: 14
Before First Zebetite (unlocked)
To: 8
Before First Zebetite (locked)
|
{
"$schema": "../../../schema/m3-room.schema.json",
"id": 238,
"name": "Mother Brain Room",
"area": "Tourian",
"subarea": "Main",
"playable": true,
"roomAddress": "0x7DD58",
"devNote": [
"FIXME: Maybe we can split MB into several events to properly indicate the ammo requirements?",
"FIXME: It is possible toGrapple teleport from Moat to the left of Mother Brain, through currently it has no known use."
],
"roomEnvironments": [
{
"heated": false
}
],
"nodes": [
{
"id": 1,
"name": "Left Blast Door",
"nodeType": "door",
"nodeSubType": "doorway",
"nodeAddress": "0x001aa8c",
"doorEnvironments": [
{
"physics": "air"
}
],
"locks": [
{
"name": "Mother Brain Room Escape Lock (to Escape Room 1)",
"lockType": "gameFlag",
"unlockStrats": [
{
"name": "Base",
"notable": false,
"requires": [
"f_DefeatedMotherBrain"
]
}
]
}
]
},
{
"id": 2,
"name": "Right Door",
"nodeType": "door",
"nodeSubType": "blue",
"nodeAddress": "0x001aa80",
"doorEnvironments": [
{
"physics": "air"
}
]
},
{
"id": 3,
"name": "Mother Brain (locked)",
"nodeType": "junction",
"nodeSubType": "flag",
"devNote": [
"Requires 18 ammo to fully break the glass, which will remain broken if Samus leaves.",
"Or, it takes 6 ammo to partially break the glass, and then 3000 damage is required to kill Mother Brain 1, but the glass also needs to be broken.",
"The requirements for finishing Mother Brain 1 is in the 3 to 4 link."
]
},
{
"id": 4,
"name": "Mother Brain (Phases 2 and 3) (locked)",
"nodeType": "junction",
"nodeSubType": "boss"
},
{
"id": 5,
"name": "Between First and Second Zebetite (locked)",
"nodeType": "junction",
"nodeSubType": "flag"
},
{
"id": 6,
"name": "Between Second and Third Zebetite (locked)",
"nodeType": "junction",
"nodeSubType": "flag"
},
{
"id": 7,
"name": "Between Third and Fourth Zebetite (locked)",
"nodeType": "junction",
"nodeSubType": "flag"
},
{
"id": 8,
"name": "Before First Zebetite (locked)",
"nodeType": "junction",
"nodeSubType": "flag"
},
{
"id": 9,
"name": "Mother Brain (unlocked)",
"nodeType": "event",
"nodeSubType": "flag",
"yields": [
"f_MotherBrainGlassBroken"
],
"devNote": [
"Requires 18 ammo to fully break the glass, which will remain broken if Samus leaves.",
"Or, it takes 6 ammo to partially break the glass, and then 3000 damage is required to kill Mother Brain 1, but the glass also needs to be broken.",
"The requirements for finishing Mother Brain 1 is in the 3 to 4 link."
]
},
{
"id": 10,
"name": "Mother Brain (Phases 2 and 3) (unlocked)",
"nodeType": "event",
"nodeSubType": "boss",
"yields": [
"f_ZebesSetAblaze",
"f_DefeatedMotherBrain"
]
},
{
"id": 11,
"name": "Between First and Second Zebetite (unlocked)",
"nodeType": "event",
"nodeSubType": "flag",
"yields": [
"f_KilledZebetites2"
]
},
{
"id": 12,
"name": "Between Second and Third Zebetite (unlocked)",
"nodeType": "event",
"nodeSubType": "flag",
"yields": [
"f_KilledZebetites3"
]
},
{
"id": 13,
"name": "Between Third and Fourth Zebetite (unlocked)",
"nodeType": "event",
"nodeSubType": "flag",
"yields": [
"f_KilledZebetites4"
]
},
{
"id": 14,
"name": "Before First Zebetite (unlocked)",
"nodeType": "event",
"nodeSubType": "flag",
"yields": [
"f_KilledZebetites1"
]
}
],
"enemies": [
{
"id": "e1",
"groupName": "Mother Brain Right Door Rinkas",
"enemyName": "Rinka",
"quantity": 2,
"homeNodes": [
2,
8
],
"note": "Only 3 Rinka Spawners function at a time, so one of these 2 soon stops working."
},
{
"id": "e2",
"groupName": "Zebetite 1 Rinkas",
"enemyName": "Rinka",
"quantity": 2,
"homeNodes": [
5,
8
]
},
{
"id": "e3",
"groupName": "Zebetite 2 Rinkas",
"enemyName": "Rinka",
"quantity": 2,
"homeNodes": [
5,
6
]
},
{
"id": "e4",
"groupName": "Zebetite 3 Rinkas",
"enemyName": "Rinka",
"quantity": 2,
"homeNodes": [
6,
7
]
},
{
"id": "e5",
"groupName": "Zebetite 4 Rinkas",
"enemyName": "Rinka",
"quantity": 2,
"homeNodes": [
7,
3
]
},
{
"id": "e6",
"groupName": "Mother Brain Rinka",
"enemyName": "Rinka",
"quantity": 1,
"homeNodes": [
3
]
},
{
"id": "e7",
"groupName": "Mother Brain 1",
"enemyName": "Mother Brain 1",
"quantity": 1,
"homeNodes": [
3
],
"stopSpawn": [
"f_ZebesSetAblaze"
]
},
{
"id": "e8",
"groupName": "Mother Brain 2",
"enemyName": "Mother Brain 2",
"quantity": 1,
"homeNodes": [
4
],
"stopSpawn": [
"f_ZebesSetAblaze"
]
},
{
"id": "e9",
"groupName": "Mother Brain 3",
"enemyName": "Mother Brain 3",
"quantity": 1,
"homeNodes": [
4
],
"stopSpawn": [
"f_ZebesSetAblaze"
]
}
],
"reusableRoomwideNotable": [
{
"name": "Mother Brain Speed Zebetite Skip",
"note": [
"Shinespark diagonally into the lower Rinka Spawner while holding down, spamming jump, then pressing forward,",
"in order to glitch through the first Mother Brain Zebetites during Samus' i-frames.",
"The remaining Zebetites will not spawn."
]
}
],
"links": [
{
"from": 1,
"to": [
{
"id": 1
},
{
"id": 3
}
]
},
{
"from": 2,
"to": [
{
"id": 2
},
{
"id": 3,
"note": "Direct link to Mother Brain 1 for the Speed Zebetite skip."
},
{
"id": 8
}
]
},
{
"from": 3,
"to": [
{
"id": 4,
"note": [
"Glass takes 18 hits of any missile and must be killed to win the fight while MB1 itself requires 3000 hp worth of ammo after the initial 6 hits opens the hole.",
"Each hit on MB also damages glass, counting for one of the 18 hits for that."
]
},
{
"id": 7
},
{
"id": 8
}
]
},
{
"from": 4,
"to": [
{
"id": 1,
"note": "This door appears only after Mother Brain is defeated. Because Mother Brain 3 requires practically nothing, events move directly from MB2 to defeat"
}
]
},
{
"from": 5,
"to": [
{
"id": 6
},
{
"id": 8
}
]
},
{
"from": 6,
"to": [
{
"id": 5
},
{
"id": 7
}
]
},
{
"from": 7,
"to": [
{
"id": 3
},
{
"id": 6
}
]
},
{
"from": 8,
"to": [
{
"id": 2
},
{
"id": 3,
"note": "Direct link to Mother Brain 1 for the Ice Zebetite skip."
},
{
"id": 5
}
]
}
],
"strats": [
{
"link": [
1,
1
],
"name": "Leave with Runway",
"requires": [],
"exitCondition": {
"leaveWithRunway": {
"length": 1,
"openEnd": 1
}
}
},
{
"link": [
1,
1
],
"name": "G-Mode Setup - Get Hit By Rinka",
"notable": false,
"requires": [],
"exitCondition": {
"leaveWithGModeSetup": {}
}
},
{
"link": [
1,
1
],
"name": "G-Mode Regain Mobility",
"requires": [
{
"enemyDamage": {
"enemy": "Rinka",
"type": "contact",
"hits": 1
}
}
],
"gModeRegainMobility": {}
},
{
"link": [
1,
3
],
"name": "Grapple Teleport",
"entranceCondition": {
"comeInWithGrappleTeleport": {
"blockPositions": [
[
12,
13
]
]
}
},
"requires": [
"h_BypassMotherBrainRoom"
]
},
{
"link": [
2,
2
],
"name": "Leave with Runway",
"requires": [
{
  "or": [
    "canTrickyJump",
    {
      "and": [
        "canCarefulJump",
        {
          "enemyDamage": {
            "enemy": "Rinka",
            "type": "contact",
            "hits": 1
          }
        }
      ]
    }
  ]
}
],
"exitCondition": {
"leaveWithRunway": {
"length": 5,
"openEnd": 1
}
},
"note": "Carefully dodge the Rinkas, or take a hit, while carefully avoiding falling off, then use the I-Frames to use the runway."
},
{
"link": [
2,
2
],
"name": "G-Mode Setup - Get Hit By Rinka or Turret Shot",
"notable": false,
"requires": [],
"exitCondition": {
"leaveWithGModeSetup": {}
}
},
{
"link": [
2,
2
],
"name": "G-Mode Regain Mobility",
"requires": [
{
  "enemyDamage": {
    "enemy": "Rinka",
    "type": "contact",
    "hits": 1
  }
}
],
"gModeRegainMobility": {}
},
{
"link": [
2,
3
],
"name": "Mother Brain Speed Zebetite Skip (Come in Shinecharging)",
"notable": true,
"entranceCondition": {
"comeInShinecharging": {
"length": 4,
"openEnd": 1
}
},
"requires": [
{
"shinespark": {
"frames": 4
}
},
{
"enemyDamage": {
"enemy": "Rinka",
"type": "contact",
"hits": 1
}
},
"i_Objective1Complete",
"i_Objective2Complete",
"i_Objective3Complete",
"i_Objective4Complete"
],
"reusableRoomwideNotable": "Mother Brain Speed Zebetite Skip",
"note": [
"Shinespark diagonally into the lower Rinka Spawner while holding down, spamming jump, then pressing forward,",
"in order to glitch through the first Mother Brain Zebetites during Samus' i-frames.",
"The remaining Zebetites will not spawn."
],
"devNote": "This technically requires f_KilledZebetites1 to not be set, but there is no loss of access, because there is no reason to kill any Zebs without being able to kill them all."
},
{
"link": [
2,
3
],
"name": "Mother Brain Speed Zebetite Skip (Come in Shinecharged)",
"notable": true,
"entranceCondition": {
"comeInShinecharged": {
"framesRequired": 100
}
},
"requires": [
{
"shinespark": {
"frames": 4
}
},
{
"enemyDamage": {
"enemy": "Rinka",
"type": "contact",
"hits": 1
}
},
"i_Objective1Complete",
"i_Objective2Complete",
"i_Objective3Complete",
"i_Objective4Complete"
],
"reusableRoomwideNotable": "Mother Brain Speed Zebetite Skip",
"note": [
"Shinespark diagonally into the lower Rinka Spawner while holding down, spamming jump, then pressing forward,",
"in order to glitch through the first Mother Brain Zebetites during Samus' i-frames.",
"The remaining Zebetites will not spawn."
],
"devNote": "This technically requires f_KilledZebetites1 to not be set, but there is no loss of access, because there is no reason to kill any Zebs without being able to kill them all."
},
{
"link": [
2,
8
],
"name": "Base",
"requires": [
"i_Objective1Complete",
"i_Objective2Complete",
"i_Objective3Complete",
"i_Objective4Complete"
]
},
{
"link": [
3,
4
],
"name": "Missiles",
"requires": [
"h_canPartiallyBreakMotherBrainGlass",
{
"ammo": {
"type": "Missile",
"count": 30
}
},
{
"or": [
"canTrickyUseFrozenEnemies",
{
"and": [
"canTrickyJump",
"canDodgeWhileShooting",
{
"enemyDamage": {
"enemy": "Rinka",
"type": "contact",
"hits": 1
}
}
]
},
{
"and": [
"canDodgeWhileShooting",
{
"enemyDamage": {
"enemy": "Rinka",
"type": "contact",
"hits": 2
}
}
]
},
{
"enemyDamage": {
"enemy": "Rinka",
"type": "contact",
"hits": 3
}
}
]
}
]
},
{
"link": [
3,
4
],
"name": "Supers",
"requires": [
"h_canPartiallyBreakMotherBrainGlass",
{
"or": [
{
"ammo": {
"type": "Super",
"count": 14
}
},
{
"and": [
"h_SupersDoubleDamageMotherBrain",
{
"ammo": {
"type": "Super",
"count": 12
}
}
]
}
]
},
{
"or": [
"canTrickyUseFrozenEnemies",
{
"and": [
"canDodgeWhileShooting",
{
"enemyDamage": {
"enemy": "Rinka",
"type": "contact",
"hits": 1
}
}
]
},
{
"enemyDamage": {
"enemy": "Rinka",
"type": "contact",
"hits": 2
}
}
]
}
]
},
{
"link": [
3,
4
],
"name": "Combined Ammo",
"requires": [
"h_canPartiallyBreakMotherBrainGlass",
{
"or": [
{
"and": [
{
"ammo": {
"type": "Super",
"count": 5
}
},
{
"ammo": {
"type": "Missile",
"count": 15
}
},
{
"or": [
"canTrickyUseFrozenEnemies",
"canTrickyJump",
{
"enemyDamage": {
"enemy": "Rinka",
"type": "contact",
"hits": 1
}
}
]
}
]
},
{
"and": [
{
"ammo": {
"type": "Super",
"count": 10
}
},
{
"ammo": {
"type": "Missile",
"count": 2
}
}
]
},
{
"and": [
"h_SupersDoubleDamageMotherBrain",
{
"ammo": {
"type": "Super",
"count": 4
}
},
{
"ammo": {
"type": "Missile",
"count": 8
}
}
]
},
{
"and": [
"h_SupersDoubleDamageMotherBrain",
{
"ammo": {
"type": "Super",
"count": 2
}
},
{
"ammo": {
"type": "Missile",
"count": 18
}
},
{
"or": [
"canTrickyUseFrozenEnemies",
"canTrickyJump",
{
"enemyDamage": {
"enemy": "Rinka",
"type": "contact",
"hits": 1
}
}
]
}
]
}
]
},
{
"or": [
"canTrickyUseFrozenEnemies",
{
"and": [
"canDodgeWhileShooting",
{
"enemyDamage": {
"enemy": "Rinka",
"type": "contact",
"hits": 1
}
}
]
},
{
"enemyDamage": {
"enemy": "Rinka",
"type": "contact",
"hits": 2
}
}
]
}
]
},
{
"link": [
3,
4
],
"name": "Glass Already Broken",
"requires": [
"f_MotherBrainGlassBroken",
{
"or": [
{
"and": [
{
"ammo": {
"type": "Missile",
"count": 30
}
},
{
"or": [
"canTrickyUseFrozenEnemies",
"canTrickyJump",
{
"enemyDamage": {
"enemy": "Rinka",
"type": "contact",
"hits": 1
}
}
]
}
]
},
{
"and": [
{
"ammo": {
"type": "Super",
"count": 5
}
},
{
"ammo": {
"type": "Missile",
"count": 15
}
}
]
}
]
},
{
"or": [
"canTrickyUseFrozenEnemies",
{
"and": [
"canDodgeWhileShooting",
{
"enemyDamage": {
"enemy": "Rinka",
"type": "contact",
"hits": 1
}
}
]
},
{
"enemyDamage": {
"enemy": "Rinka",
"type": "contact",
"hits": 2
}
}
]
}
]
},
{
"link": [
3,
4
],
"name": "Glass Already Broken - Super Kill",
"requires": [
"f_MotherBrainGlassBroken",
{
"or": [
{
"ammo": {
"type": "Super",
"count": 10
}
},
{
"and": [
"h_SupersDoubleDamageMotherBrain",
{
"ammo": {
"type": "Super",
"count": 5
}
}
]
}
]
},
{
"or": [
"canTrickyUseFrozenEnemies",
"canDodgeWhileShooting",
{
"enemyDamage": {
"enemy": "Rinka",
"type": "contact",
"hits": 1
}
}
]
}
]
},
{
"link": [
3,
7
],
"name": "Base",
"requires": [
"Morph",
"f_KilledZebetites4",
{
"or": [
"canTrickyJump",
{
"and": [
"canCarefulJump",
"h_canUseSpringBall"
]
},
{
"enemyDamage": {
"enemy": "Rinka",
"type": "contact",
"hits": 1
}
}
]
}
]
},
{
"link": [
4,
1
],
"name": "Base",
"requires": [
"f_DefeatedMotherBrain"
]
},
{
"link": [
5,
6
],
"name": "Base",
"requires": [
"Morph",
"f_KilledZebetites2",
{
"or": [
"canTrickyJump",
{
"and": [
"canCarefulJump",
"h_canUseSpringBall"
]
},
{
"enemyDamage": {
"enemy": "Rinka",
"type": "contact",
"hits": 1
}
}
]
},
{
"enemyDamage": {
"enemy": "Mother Brain 1",
"type": "turret",
"hits": 1
}
}
]
},
{
"link": [
5,
8
],
"name": "Base",
"requires": [
"f_KilledZebetites1",
{
"or": [
"canCarefulJump",
{
"enemyDamage": {
"enemy": "Rinka",
"type": "contact",
"hits": 1
}
}
]
}
]
},
{
"link": [
6,
5
],
"name": "Base",
"requires": [
"Morph",
"f_KilledZebetites2",
{
"or": [
"canTrickyJump",
{
"and": [
"canCarefulJump",
"h_canUseSpringBall"
]
},
{
"enemyDamage": {
"enemy": "Rinka",
"type": "contact",
"hits": 1
}
}
]
},
{
"enemyDamage": {
"enemy": "Mother Brain 1",
"type": "turret",
"hits": 1
}
}
]
},
{
"link": [
6,
7
],
"name": "Base",
"requires": [
"f_KilledZebetites3",
{
"or": [
"canCarefulJump",
{
"enemyDamage": {
"enemy": "Rinka",
"type": "contact",
"hits": 1
}
}
]
}
]
},
{
"link": [
7,
3
],
"name": "Base",
"requires": [
"Morph",
"f_KilledZebetites4",
{
"or": [
"canTrickyJump",
{
"and": [
"canCarefulJump",
"h_canUseSpringBall"
]
},
{
"enemyDamage": {
"enemy": "Rinka",
"type": "contact",
"hits": 1
}
}
]
}
]
},
{
"link": [
7,
6
],
"name": "Base",
"requires": [
"f_KilledZebetites3",
{
"or": [
"canCarefulJump",
{
"enemyDamage": {
"enemy": "Rinka",
"type": "contact",
"hits": 1
}
}
]
}
]
},
{
"link": [
8,
2
],
"name": "Base",
"requires": []
},
{
"link": [
8,
3
],
"name": "Mother Brain Ice Zebetite Skip",
"notable": true,
"requires": [
"canTrickyUseFrozenEnemies",
"Morph",
{
"or": [
"canTrickyJump",
{
"and": [
"canDownBack",
{
"enemyDamage": {
"enemy": "Rinka",
"type": "contact",
"hits": 1
}
}
]
}
]
},
{
"enemyDamage": {
"enemy": "Mother Brain 1",
"type": "turret",
"hits": 1
}
}
],
"note": [
"Glitch through the Mother Brain Zebetites by using a frozen Rinka and i-frames.",
"Freeze the Rinka at its spawn location, then spinjump or Down-Back onto it after acquiring i-frames to clip inside of the Zebetite, then jump through.",
"Note that Zebetites cause i-frames but deal no damage.",
"Ice+Wave can freeze the Rinka from above. Ice+Plasma must freeze the Rinka from below while crouched."
],
"devNote": [
"This technically requires f_KilledZebetites1 to not be set, but there is no loss of access, because there is no reason to kill any Zebs without being able to kill them all.",
"It is possible to Ice Zeb skip through the second Zeb with a morph/unmorph/remorph on a frozen Rinka.",
"This is known as a Remorph Zebetite Skip or a Spring Ball Zebetite Skip.",
"FIXME: It is possible to Ice Zeb Skip out, but it is much harder and would only be useful if getting here with canRiskPermanentLossOfAccess."
]
},
{
"link": [
8,
5
],
"name": "Base",
"requires": [
"f_KilledZebetites1",
{
"or": [
"canCarefulJump",
{
"enemyDamage": {
"enemy": "Rinka",
"type": "contact",
"hits": 1
}
}
]
}
]
},
{
"name": "Base",
"notable": false,
"requires": [
"h_canPartiallyBreakMotherBrainGlass",
"h_canPartiallyBreakMotherBrainGlass",
"h_canPartiallyBreakMotherBrainGlass"
],
"link": [
3,
9
]
},
{
"link": [
9,
3
],
"name": "Base",
"notable": false,
"requires": []
},
{
"name": "Base",
"notable": false,
"requires": [
{
  "enemyKill": {
    "enemies": [
      [
        "Mother Brain 2"
      ]
    ]
  }
}
],
"link": [
4,
10
]
},
{
"link": [
10,
4
],
"name": "Base",
"notable": false,
"requires": []
},
{
"name": "Base",
"notable": false,
"requires": [
"h_canOpenZebetites",
{
"or": [
{
"and": [
"canDodgeWhileShooting",
"canInsaneJump"
]
},
{
"enemyDamage": {
"enemy": "Rinka",
"type": "contact",
"hits": 1
}
}
]
}
],
"link": [
5,
11
]
},
{
"link": [
11,
5
],
"name": "Base",
"notable": false,
"requires": []
},
{
"name": "Base",
"notable": false,
"requires": [
"h_canOpenZebetites",
{
"or": [
{
"and": [
"canDodgeWhileShooting",
"canTrickyJump"
]
},
{
"enemyDamage": {
"enemy": "Rinka",
"type": "contact",
"hits": 1
}
}
]
}
],
"link": [
6,
12
]
},
{
"link": [
12,
6
],
"name": "Base",
"notable": false,
"requires": []
},
{
"name": "Base",
"notable": false,
"requires": [
"h_canOpenZebetites",
{
"enemyDamage": {
"enemy": "Rinka",
"type": "contact",
"hits": 1
}
}
],
"link": [
7,
13
]
},
{
"link": [
13,
7
],
"name": "Base",
"notable": false,
"requires": []
},
{
"name": "Base",
"notable": false,
"requires": [
"h_canOpenZebetites",
{
"or": [
"canDodgeWhileShooting",
{
"enemyDamage": {
"enemy": "Rinka",
"type": "contact",
"hits": 1
}
}
]
}
],
"link": [
8,
14
]
},
{
"link": [
14,
8
],
"name": "Base",
"notable": false,
"requires": []
}
]
}