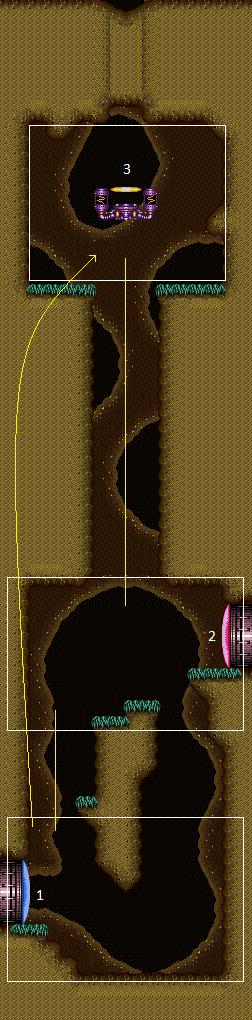
Maridia Elevator Room
Room ID: 215
|
Exit condition: {
"leaveWithRunway": {
"length": 2,
"openEnd": 1
}
}
|
|
Requires: "h_canCrystalFlash" |
|
Requires: {
"or": [
"HiJump",
"h_canFly",
"canWalljump",
"h_canCrouchJumpDownGrab",
"canSpringBallJumpMidAir"
]
}
|
|
Entrance condition: {
"comeInShinecharged": {
"framesRequired": 5
}
}
Requires: {
"shinespark": {
"frames": 21,
"excessFrames": 10
}
}
{
"enemyDamage": {
"enemy": "Ripper",
"type": "contact",
"hits": 1
}
}
|
|
Entrance condition: {
"comeInShinecharged": {
"framesRequired": 95
}
}
Requires: "canMidairShinespark"
"canShinechargeMovementComplex"
{
"or": [
"HiJump",
"canWalljump"
]
}
{
"shinespark": {
"frames": 17
}
}
Exit condition: {
"leaveWithSpark": {}
}
|
|
Entrance condition: {
"comeInWithGMode": {
"mode": "any",
"morphed": true
}
}
Requires: {
"or": [
{
"and": [
"h_canArtificialMorphIBJ",
{
"or": [
"Gravity",
"h_canArtificialMorphSpringBall",
"h_canArtificialMorphPowerBomb",
{
"enemyDamage": {
"enemy": "Ripper",
"type": "contact",
"hits": 1
}
}
]
}
]
},
"h_canArtificialMorphSpringBallBombJump"
]
}
|
|
Use Hijump or one walljump on the left before a diagonal spark. Entrance condition: {
"comeInShinecharged": {
"framesRequired": 60
}
}
Requires: "canMidairShinespark"
"canShinechargeMovement"
{
"or": [
"HiJump",
"canWalljump"
]
}
{
"shinespark": {
"frames": 45,
"excessFrames": 11
}
}
|
|
Climb up 2.5 screens. Entrance condition: {
"comeInWithDoorStuckSetup": {}
}
Requires: "canXRayClimb" "canBePatient" |
|
From: 1
Bottom Left Door
To: 4
G-Mode Junction (Top by Elevator)
Entrance condition: {
"comeInWithGMode": {
"mode": "any",
"morphed": false
}
}
Requires: {
"or": [
"canUseFrozenEnemies",
{
"and": [
"canPreciseWalljump",
"canStaggeredWalljump"
]
}
]
}
|
|
From: 1
Bottom Left Door
To: 4
G-Mode Junction (Top by Elevator)
It is possible to kill the Rippers with a single Power Bomb by placing it at least 2 tiles above the lowest Ripper inside the narrow section of the shaft. Entrance condition: {
"comeInWithGMode": {
"mode": "any",
"morphed": false
}
}
Requires: {
"or": [
{
"and": [
{
"enemyKill": {
"enemies": [
[
"Ripper",
"Ripper",
"Ripper"
]
]
}
},
{
"or": [
"canWalljump",
"SpaceJump"
]
}
]
},
{
"and": [
"h_canIBJ",
{
"ammo": {
"type": "Super",
"count": 3
}
}
]
},
{
"and": [
"h_canIBJ",
"h_canUsePowerBombs",
{
"or": [
"h_canUsePowerBombs",
"canStaggeredIBJ"
]
}
]
}
]
}
|
|
From: 1
Bottom Left Door
To: 4
G-Mode Junction (Top by Elevator)
The Rippers can be killed with two Power Bombs, or one carefully placed Power Bomb and a careful dodge of the top-most Ripper. With a single Power Bomb, use Spring Ball to avoid the first Ripper, then place the Power Bomb at least two tiles above the next. This can be achieved with a Staggered IBJ or a Spring Ball Bomb Boost. Then climb the right side of the shaft and dodge the top Ripper. Entrance condition: {
"comeInWithGMode": {
"mode": "any",
"morphed": true
}
}
Requires: "h_canArtificialMorphIBJ"
"h_canArtificialMorphSpringBallBombJump"
"h_canArtificialMorphPowerBomb"
{
"or": [
"h_canArtificialMorphStaggeredIBJ",
"h_canArtificialMorphPowerBomb",
{
"enemyDamage": {
"enemy": "Ripper",
"type": "contact",
"hits": 1
}
}
]
}
|
|
From: 1
Bottom Left Door
To: 4
G-Mode Junction (Top by Elevator)
The Rippers can be killed with three Power Bombs, or one carefully placed Power Bomb, Gravity, and a careful dodge of the top-most Ripper. With a single Power Bomb, IBJ from the water to avoid the first Ripper, then place the Power Bomb at least two tiles above the next. This can be achieved with a Staggered IBJ. Then climb the right side of the shaft and similarly dodge the top Ripper. Entrance condition: {
"comeInWithGMode": {
"mode": "any",
"morphed": true
}
}
Requires: "h_canArtificialMorphIBJ"
{
"or": [
"Gravity",
"h_canArtificialMorphPowerBomb",
{
"enemyDamage": {
"enemy": "Ripper",
"type": "contact",
"hits": 1
}
}
]
}
"h_canArtificialMorphPowerBomb"
{
"or": [
"h_canArtificialMorphStaggeredIBJ",
"h_canArtificialMorphPowerBomb",
{
"enemyDamage": {
"enemy": "Ripper",
"type": "contact",
"hits": 1
}
}
]
}
|
|
|
|
Entrance condition: {
"comeInShinecharging": {
"length": 2,
"openEnd": 0
}
}
Requires: "canShinechargeMovement" Exit condition: {
"leaveShinecharged": {
"framesRemaining": 35
}
}
|
|
Entrance condition: {
"comeInShinecharged": {
"framesRequired": 130
}
}
Requires: "canShinechargeMovement"
{
"shinespark": {
"frames": 2
}
}
Exit condition: {
"leaveWithSpark": {}
}
|
|
Exit condition: {
"leaveWithRunway": {
"length": 3,
"openEnd": 1
}
}
|
|
Requires: "h_canCrystalFlash" |
|
Requires: "canUseFrozenEnemies" |
|
Requires: {
"or": [
"canConsecutiveWalljump",
{
"and": [
"HiJump",
"canWalljump"
]
},
"SpaceJump"
]
}
{
"enemyKill": {
"enemies": [
[
"Ripper",
"Ripper",
"Ripper"
]
]
}
}
|
|
Only the lowest three Rippers that are above the right door need to be killed. The highest of the three can barely be reached with a Super and HiJump. Or a PB placed slightly higher than a standard max jump, done by jumping from the door ledge, from an IBJ while avoiding the Ripper, or using 2 PBs. Requires: "h_canIBJ"
{
"or": [
{
"and": [
{
"enemyKill": {
"enemies": [
[
"Ripper",
"Ripper",
"Ripper"
]
],
"explicitWeapons": [
"PowerBomb"
]
}
},
{
"or": [
"HiJump",
"canCarefulJump"
]
}
]
},
{
"enemyKill": {
"enemies": [
[
"Ripper",
"Ripper"
],
[
"Ripper"
]
],
"explicitWeapons": [
"PowerBomb"
]
}
},
{
"and": [
{
"enemyKill": {
"enemies": [
[
"Ripper",
"Ripper",
"Ripper"
]
],
"explicitWeapons": [
"Super"
]
}
},
"HiJump"
]
}
]
}
|
|
The walljumps are considered to require precision only if the Rippers are not killed Requires: "canPreciseWalljump" "canStaggeredWalljump" |
|
Entrance condition: {
"comeInShinecharging": {
"length": 2,
"openEnd": 1
}
}
Requires: {
"shinespark": {
"frames": 36,
"excessFrames": 10
}
}
|
|
Entrance condition: {
"comeInShinecharged": {
"framesRequired": 20
}
}
Requires: {
"shinespark": {
"frames": 36,
"excessFrames": 10
}
}
|
|
Climb up 1.5 screens. Entrance condition: {
"comeInWithDoorStuckSetup": {}
}
Requires: "canXRayClimb" |
|
Entrance condition: {
"comeInWithGMode": {
"mode": "any",
"morphed": false
}
}
Requires: {
"or": [
"canUseFrozenEnemies",
{
"and": [
"canPreciseWalljump",
"canStaggeredWalljump"
]
}
]
}
|
|
From: 2
Right Door
To: 4
G-Mode Junction (Top by Elevator)
It is possible to kill the Rippers with a single Power Bomb by placing it at least 2 tiles above the lowest Ripper inside the narrow section of the shaft. Entrance condition: {
"comeInWithGMode": {
"mode": "any",
"morphed": false
}
}
Requires: {
"or": [
{
"and": [
{
"enemyKill": {
"enemies": [
[
"Ripper",
"Ripper",
"Ripper"
]
]
}
},
{
"or": [
"canWalljump",
"SpaceJump"
]
}
]
},
{
"and": [
"h_canIBJ",
{
"ammo": {
"type": "Super",
"count": 3
}
}
]
},
{
"and": [
"h_canIBJ",
"h_canUsePowerBombs",
{
"or": [
"h_canUsePowerBombs",
"canStaggeredIBJ"
]
}
]
}
]
}
|
|
From: 2
Right Door
To: 4
G-Mode Junction (Top by Elevator)
The Rippers can be killed with two Power Bombs, or one carefully placed Power Bomb and a careful dodge of the top-most Ripper. With a single Power Bomb, place it at least two tiles above the first Ripper. This can be achieved with a Staggered IBJ or a Spring Ball Bomb Boost. Then climb the right side of the shaft and dodge the top Ripper. Entrance condition: {
"comeInWithGMode": {
"mode": "any",
"morphed": true
}
}
Requires: "h_canArtificialMorphIBJ"
"h_canArtificialMorphPowerBomb"
{
"or": [
"h_canArtificialMorphStaggeredIBJ",
"h_canArtificialMorphPowerBomb",
{
"enemyDamage": {
"enemy": "Ripper",
"type": "contact",
"hits": 1
}
}
]
}
|
|
|
|
Requires: "h_canCrystalFlash" |
|
|
|
From: 4
G-Mode Junction (Top by Elevator)
To: 3
Elevator
Exit condition: {
"leaveWithGMode": {
"morphed": false
}
}
|
{
"$schema": "../../../schema/m3-room.schema.json",
"id": 215,
"name": "Maridia Elevator Room",
"area": "Maridia",
"subarea": "Inner",
"subsubarea": "Yellow",
"playable": true,
"roomAddress": "0x7D30B",
"roomEnvironments": [
{
"heated": false
}
],
"nodes": [
{
"id": 1,
"name": "Bottom Left Door",
"nodeType": "door",
"nodeSubType": "blue",
"nodeAddress": "0x001a57c",
"doorEnvironments": [
{
"physics": "air"
}
]
},
{
"id": 2,
"name": "Right Door",
"nodeType": "door",
"nodeSubType": "red",
"nodeAddress": "0x001a588",
"doorEnvironments": [
{
"physics": "air"
}
],
"locks": [
{
"name": "Maridia Elevator Room Red Lock (to Save)",
"lockType": "coloredDoor",
"unlockStrats": [
{
"name": "Base",
"notable": false,
"requires": [
"h_canOpenRedDoors"
]
}
]
}
]
},
{
"id": 3,
"name": "Elevator",
"nodeType": "door",
"nodeSubType": "elevator",
"nodeAddress": "0x001a594"
},
{
"id": 4,
"name": "G-Mode Junction (Top by Elevator)",
"nodeType": "junction",
"nodeSubType": "g-mode",
"note": "Represents being at the top of the room while in G-Mode."
}
],
"enemies": [
{
"id": "e1",
"groupName": "Maridia Elevator Room Owtch",
"enemyName": "Owtch",
"quantity": 1,
"homeNodes": [
1
]
},
{
"id": "e2",
"groupName": "Maridia Elevator Room Bottom Rippers",
"enemyName": "Ripper",
"quantity": 2,
"homeNodes": [
2
]
},
{
"id": "e3",
"groupName": "Maridia Elevator Room Middle Rippers",
"enemyName": "Ripper",
"quantity": 2,
"betweenNodes": [
2,
3
]
},
{
"id": "e4",
"groupName": "Maridia Elevator Room Top Rippers",
"enemyName": "Ripper",
"quantity": 2,
"homeNodes": [
3
]
}
],
"links": [
{
"from": 1,
"to": [
{
"id": 1
},
{
"id": 2
},
{
"id": 3,
"note": "Only the the direct shinespark. Other strats should go 1 -> 2 -> 3."
},
{
"id": 4
}
]
},
{
"from": 2,
"to": [
{
"id": 1
},
{
"id": 2
},
{
"id": 3
},
{
"id": 4
}
]
},
{
"from": 3,
"to": [
{
"id": 2
},
{
"id": 3
}
]
},
{
"from": 4,
"to": [
{
"id": 3
}
]
}
],
"strats": [
{
"link": [
1,
1
],
"name": "Leave with Runway",
"requires": [],
"exitCondition": {
"leaveWithRunway": {
"length": 2,
"openEnd": 1
}
}
},
{
"link": [
1,
1
],
"name": "Crystal Flash",
"requires": [
"h_canCrystalFlash"
]
},
{
"link": [
1,
2
],
"name": "Base",
"requires": [
{
  "or": [
    "HiJump",
    "h_canFly",
    "canWalljump",
    "h_canCrouchJumpDownGrab",
    "canSpringBallJumpMidAir"
  ]
}
]
},
{
"link": [
1,
2
],
"name": "Shinespark",
"entranceCondition": {
"comeInShinecharged": {
"framesRequired": 5
}
},
"requires": [
{
"shinespark": {
"frames": 21,
"excessFrames": 10
}
},
{
"enemyDamage": {
"enemy": "Ripper",
"type": "contact",
"hits": 1
}
}
]
},
{
"link": [
1,
2
],
"name": "Leave Sparking",
"entranceCondition": {
"comeInShinecharged": {
"framesRequired": 95
}
},
"requires": [
"canMidairShinespark",
"canShinechargeMovementComplex",
{
"or": [
"HiJump",
"canWalljump"
]
},
{
"shinespark": {
"frames": 17
}
}
],
"exitCondition": {
"leaveWithSpark": {}
},
"unlocksDoors": [
{
"types": [
"super"
],
"requires": []
},
{
"types": [
"missiles",
"powerbomb"
],
"requires": [
"never"
]
}
]
},
{
"link": [
1,
2
],
"name": "G-Mode Morph",
"entranceCondition": {
"comeInWithGMode": {
"mode": "any",
"morphed": true
}
},
"requires": [
{
  "or": [
    {
      "and": [
        "h_canArtificialMorphIBJ",
        {
          "or": [
            "Gravity",
            "h_canArtificialMorphSpringBall",
            "h_canArtificialMorphPowerBomb",
            {
              "enemyDamage": {
                "enemy": "Ripper",
                "type": "contact",
                "hits": 1
              }
            }
          ]
        }
      ]
    },
    "h_canArtificialMorphSpringBallBombJump"
  ]
}
]
},
{
"link": [
1,
3
],
"name": "Shinespark",
"entranceCondition": {
"comeInShinecharged": {
"framesRequired": 60
}
},
"requires": [
"canMidairShinespark",
"canShinechargeMovement",
{
"or": [
"HiJump",
"canWalljump"
]
},
{
"shinespark": {
"frames": 45,
"excessFrames": 11
}
}
],
"note": "Use Hijump or one walljump on the left before a diagonal spark."
},
{
"link": [
1,
3
],
"name": "X-Ray Climb",
"entranceCondition": {
"comeInWithDoorStuckSetup": {}
},
"requires": [
"canXRayClimb",
"canBePatient"
],
"note": "Climb up 2.5 screens."
},
{
"link": [
1,
4
],
"name": "G-Mode",
"entranceCondition": {
"comeInWithGMode": {
"mode": "any",
"morphed": false
}
},
"requires": [
{
  "or": [
    "canUseFrozenEnemies",
    {
      "and": [
        "canPreciseWalljump",
        "canStaggeredWalljump"
      ]
    }
  ]
}
]
},
{
"link": [
1,
4
],
"name": "G-Mode Kill Rippers",
"entranceCondition": {
"comeInWithGMode": {
"mode": "any",
"morphed": false
}
},
"requires": [
{
  "or": [
    {
      "and": [
        {
          "enemyKill": {
            "enemies": [
              [
                "Ripper",
                "Ripper",
                "Ripper"
              ]
            ]
          }
        },
        {
          "or": [
            "canWalljump",
            "SpaceJump"
          ]
        }
      ]
    },
    {
      "and": [
        "h_canIBJ",
        {
          "ammo": {
            "type": "Super",
            "count": 3
          }
        }
      ]
    },
    {
      "and": [
        "h_canIBJ",
        "h_canUsePowerBombs",
        {
          "or": [
            "h_canUsePowerBombs",
            "canStaggeredIBJ"
          ]
        }
      ]
    }
  ]
}
],
"note": "It is possible to kill the Rippers with a single Power Bomb by placing it at least 2 tiles above the lowest Ripper inside the narrow section of the shaft."
},
{
"link": [
1,
4
],
"name": "G-Mode Morph IBJ, PB, Spring Ball",
"entranceCondition": {
"comeInWithGMode": {
"mode": "any",
"morphed": true
}
},
"requires": [
"h_canArtificialMorphIBJ",
"h_canArtificialMorphSpringBallBombJump",
"h_canArtificialMorphPowerBomb",
{
"or": [
"h_canArtificialMorphStaggeredIBJ",
"h_canArtificialMorphPowerBomb",
{
"enemyDamage": {
"enemy": "Ripper",
"type": "contact",
"hits": 1
}
}
]
}
],
"note": [
"The Rippers can be killed with two Power Bombs, or one carefully placed Power Bomb and a careful dodge of the top-most Ripper.",
"With a single Power Bomb, use Spring Ball to avoid the first Ripper, then place the Power Bomb at least two tiles above the next. This can be achieved with a Staggered IBJ or a Spring Ball Bomb Boost.",
"Then climb the right side of the shaft and dodge the top Ripper."
],
"devNote": "canSpringBallBombJump can be bypassed with SpringBall and other requirements, but that's being assumed with Bombs and SpringBall at this level."
},
{
"link": [
1,
4
],
"name": "G-Mode Morph IBJ, PB",
"entranceCondition": {
"comeInWithGMode": {
"mode": "any",
"morphed": true
}
},
"requires": [
"h_canArtificialMorphIBJ",
{
"or": [
"Gravity",
"h_canArtificialMorphPowerBomb",
{
"enemyDamage": {
"enemy": "Ripper",
"type": "contact",
"hits": 1
}
}
]
},
"h_canArtificialMorphPowerBomb",
{
"or": [
"h_canArtificialMorphStaggeredIBJ",
"h_canArtificialMorphPowerBomb",
{
"enemyDamage": {
"enemy": "Ripper",
"type": "contact",
"hits": 1
}
}
]
}
],
"note": [
"The Rippers can be killed with three Power Bombs, or one carefully placed Power Bomb, Gravity, and a careful dodge of the top-most Ripper.",
"With a single Power Bomb, IBJ from the water to avoid the first Ripper, then place the Power Bomb at least two tiles above the next. This can be achieved with a Staggered IBJ.",
"Then climb the right side of the shaft and similarly dodge the top Ripper."
]
},
{
"link": [
2,
1
],
"name": "Base",
"requires": []
},
{
"link": [
2,
1
],
"name": "Leave Shinecharged",
"entranceCondition": {
"comeInShinecharging": {
"length": 2,
"openEnd": 0
}
},
"requires": [
"canShinechargeMovement"
],
"exitCondition": {
"leaveShinecharged": {
"framesRemaining": 35
}
},
"unlocksDoors": [
{
"types": [
"super"
],
"requires": []
},
{
"types": [
"missiles",
"powerbomb"
],
"requires": [
"never"
]
}
]
},
{
"link": [
2,
1
],
"name": "Leave Shinesparking",
"entranceCondition": {
"comeInShinecharged": {
"framesRequired": 130
}
},
"requires": [
"canShinechargeMovement",
{
"shinespark": {
"frames": 2
}
}
],
"exitCondition": {
"leaveWithSpark": {}
},
"unlocksDoors": [
{
"types": [
"super"
],
"requires": []
},
{
"types": [
"missiles",
"powerbomb"
],
"requires": [
"never"
]
}
]
},
{
"link": [
2,
2
],
"name": "Leave with Runway",
"requires": [],
"exitCondition": {
"leaveWithRunway": {
"length": 3,
"openEnd": 1
}
}
},
{
"link": [
2,
2
],
"name": "Crystal Flash",
"requires": [
"h_canCrystalFlash"
]
},
{
"link": [
2,
3
],
"name": "Frozen Rippers",
"requires": [
"canUseFrozenEnemies"
]
},
{
"link": [
2,
3
],
"name": "Kill Rippers",
"requires": [
{
"or": [
"canConsecutiveWalljump",
{
"and": [
"HiJump",
"canWalljump"
]
},
"SpaceJump"
]
},
{
"enemyKill": {
"enemies": [
[
"Ripper",
"Ripper",
"Ripper"
]
]
}
}
]
},
{
"link": [
2,
3
],
"name": "Kill Rippers Then IBJ",
"requires": [
"h_canIBJ",
{
"or": [
{
"and": [
{
"enemyKill": {
"enemies": [
[
"Ripper",
"Ripper",
"Ripper"
]
],
"explicitWeapons": [
"PowerBomb"
]
}
},
{
"or": [
"HiJump",
"canCarefulJump"
]
}
]
},
{
"enemyKill": {
"enemies": [
[
"Ripper",
"Ripper"
],
[
"Ripper"
]
],
"explicitWeapons": [
"PowerBomb"
]
}
},
{
"and": [
{
"enemyKill": {
"enemies": [
[
"Ripper",
"Ripper",
"Ripper"
]
],
"explicitWeapons": [
"Super"
]
}
},
"HiJump"
]
}
]
}
],
"note": [
"Only the lowest three Rippers that are above the right door need to be killed. The highest of the three can barely be reached with a Super and HiJump.",
"Or a PB placed slightly higher than a standard max jump, done by jumping from the door ledge, from an IBJ while avoiding the Ripper, or using 2 PBs."
]
},
{
"link": [
2,
3
],
"name": "Maridia Elevator Room Wall Climb",
"requires": [
"canPreciseWalljump",
"canStaggeredWalljump"
],
"note": "The walljumps are considered to require precision only if the Rippers are not killed"
},
{
"link": [
2,
3
],
"name": "Shinespark",
"entranceCondition": {
"comeInShinecharging": {
"length": 2,
"openEnd": 1
}
},
"requires": [
{
  "shinespark": {
    "frames": 36,
    "excessFrames": 10
  }
}
]
},
{
"link": [
2,
3
],
"name": "Shinespark, Come in Shinecharged",
"entranceCondition": {
"comeInShinecharged": {
"framesRequired": 20
}
},
"requires": [
{
  "shinespark": {
    "frames": 36,
    "excessFrames": 10
  }
}
]
},
{
"link": [
2,
3
],
"name": "X-Ray Climb",
"entranceCondition": {
"comeInWithDoorStuckSetup": {}
},
"requires": [
"canXRayClimb"
],
"note": "Climb up 1.5 screens."
},
{
"link": [
2,
4
],
"name": "G-Mode",
"entranceCondition": {
"comeInWithGMode": {
"mode": "any",
"morphed": false
}
},
"requires": [
{
  "or": [
    "canUseFrozenEnemies",
    {
      "and": [
        "canPreciseWalljump",
        "canStaggeredWalljump"
      ]
    }
  ]
}
]
},
{
"link": [
2,
4
],
"name": "G-Mode Kill Rippers",
"entranceCondition": {
"comeInWithGMode": {
"mode": "any",
"morphed": false
}
},
"requires": [
{
  "or": [
    {
      "and": [
        {
          "enemyKill": {
            "enemies": [
              [
                "Ripper",
                "Ripper",
                "Ripper"
              ]
            ]
          }
        },
        {
          "or": [
            "canWalljump",
            "SpaceJump"
          ]
        }
      ]
    },
    {
      "and": [
        "h_canIBJ",
        {
          "ammo": {
            "type": "Super",
            "count": 3
          }
        }
      ]
    },
    {
      "and": [
        "h_canIBJ",
        "h_canUsePowerBombs",
        {
          "or": [
            "h_canUsePowerBombs",
            "canStaggeredIBJ"
          ]
        }
      ]
    }
  ]
}
],
"note": "It is possible to kill the Rippers with a single Power Bomb by placing it at least 2 tiles above the lowest Ripper inside the narrow section of the shaft."
},
{
"link": [
2,
4
],
"name": "G-Mode Morph IBJ, PB",
"entranceCondition": {
"comeInWithGMode": {
"mode": "any",
"morphed": true
}
},
"requires": [
"h_canArtificialMorphIBJ",
"h_canArtificialMorphPowerBomb",
{
"or": [
"h_canArtificialMorphStaggeredIBJ",
"h_canArtificialMorphPowerBomb",
{
"enemyDamage": {
"enemy": "Ripper",
"type": "contact",
"hits": 1
}
}
]
}
],
"note": [
"The Rippers can be killed with two Power Bombs, or one carefully placed Power Bomb and a careful dodge of the top-most Ripper.",
"With a single Power Bomb, place it at least two tiles above the first Ripper. This can be achieved with a Staggered IBJ or a Spring Ball Bomb Boost.",
"Then climb the right side of the shaft and dodge the top Ripper."
]
},
{
"link": [
3,
2
],
"name": "Base",
"requires": []
},
{
"link": [
3,
3
],
"name": "Crystal Flash",
"requires": [
"h_canCrystalFlash"
]
},
{
"link": [
4,
3
],
"name": "Base",
"requires": []
},
{
"link": [
4,
3
],
"name": "Carry G-Mode Up the Elevator",
"notable": false,
"requires": [],
"exitCondition": {
"leaveWithGMode": {
"morphed": false
}
}
}
]
}