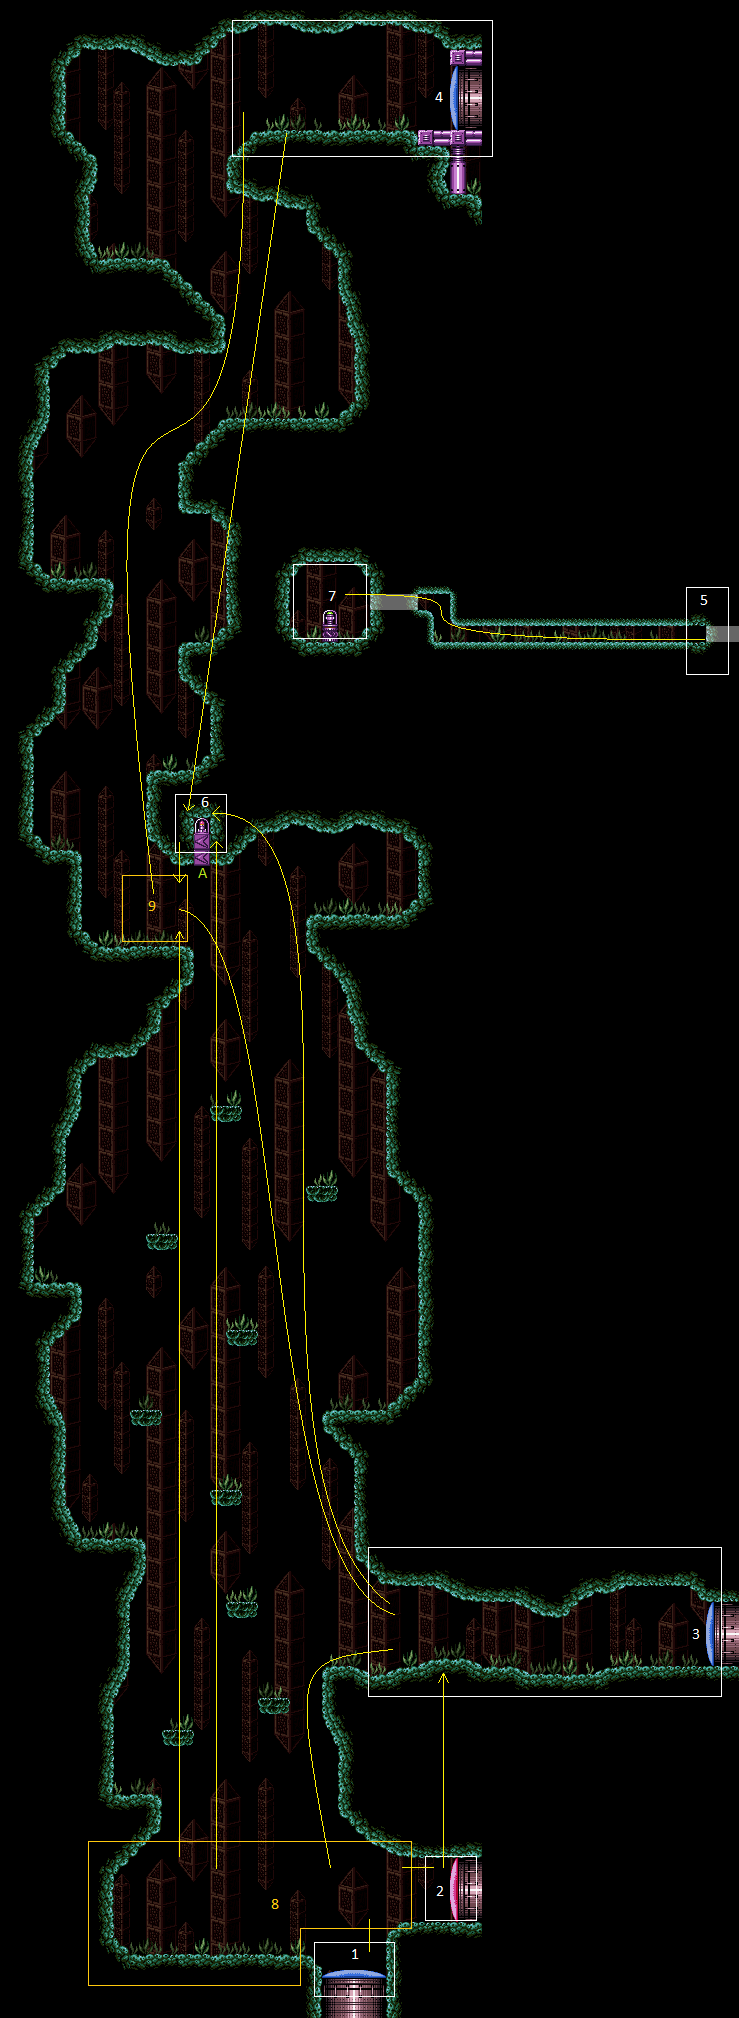
Main Street
Room ID: 172
|
From: 1
Bottom Door
To: 1
Bottom Door
Freeze the bottom Skulltera and a Sciser above the door, to set up a moonfall between them, and aim down. After gaining enough speed, press forward to fall down and clip past the door shell below. Falling with too much speed can cause Samus to go out of bounds. Gravity Suit is needed in order to gain enough fall speed before the enemies thaw. Requires: "Gravity"
{
"or": [
"canWalljump",
"canGravityJump",
"h_canFly",
"HiJump",
"canSpringBallJumpMidAir"
]
}
"canEnemyStuckMoonfall"
"canTrickyUseFrozenEnemies"
Bypasses door shell: true |
|
Enter on the right side of the doorway to reduce the amount of energy used. Entrance condition: {
"comeInWithSpark": {},
"comesThroughToilet": "any"
}
Requires: {
"shinespark": {
"frames": 6,
"excessFrames": 6
}
}
|
|
Start on the right side and carefully land on the right edge. If in artificial morph, use spring ball or quickly bomb or bomb over the crab to avoid a second hit. Requires: "never" |
|
Spin jump to the left through the transition. Bonking the left side of the door frame works but is not required. Hold left through the transition to avoid the fish and land on the platform to the left. Then reach the platform above either using a crouch-jump down-grab or by freezing the fish. Entrance condition: {
"comeInWithPlatformBelow": {
"maxHeight": 6,
"maxLeftPosition": 2,
"minRightPosition": -2
},
"comesThroughToilet": "no"
}
Requires: "canCrossRoomJumpIntoWater"
{
"or": [
"h_canCrouchJumpDownGrab",
"canUseFrozenEnemies"
]
}
|
|
From: 1
Bottom Door
To: 3
Middle Right Door
Run and spin jump to the left through the transition with as much horiziontal speed as possible, without bonking the door frame. Hold left through the transition to avoid the fish and land on the platform to the left. Then reach the platform above either using a crouch-jump down-grab or by freezing the fish. Entrance condition: {
"comeInWithPlatformBelow": {
"maxHeight": 6,
"maxLeftPosition": -0.5,
"minRightPosition": 4.5
},
"comesThroughToilet": "yes"
}
Requires: "canCrossRoomJumpIntoWater"
"canTrickyJump"
{
"or": [
"h_canCrouchJumpDownGrab",
"canUseFrozenEnemies"
]
}
|
|
From: 1
Bottom Door
To: 3
Middle Right Door
Run and spin jump to the left through the transition with as much horiziontal speed as possible, without bonking the door frame. Hold left through the transition to avoid the fish and land on the platform to the left. With limited runway, this may require a very precise jump. Then reach the platform above either using a crouch-jump down-grab or by freezing the fish. Entrance condition: {
"comeInWithPlatformBelow": {
"maxHeight": 6,
"maxLeftPosition": -0.5,
"minRightPosition": 2.5
},
"comesThroughToilet": "yes"
}
Requires: "canCrossRoomJumpIntoWater"
"canInsaneJump"
{
"or": [
"h_canCrouchJumpDownGrab",
"canUseFrozenEnemies"
]
}
|
|
Spin jump against the left side of the door frame, then use Space Jump to jump straight up through the door. Stay to the right of the fish as you go up. Entrance condition: {
"comeInWithSpaceJumpBelow": {},
"comesThroughToilet": "any"
}
Requires: "canCrossRoomJumpIntoWater" |
|
From: 1
Bottom Door
To: 3
Middle Right Door
Jump straight up through the door with HiJump equipped, aligning with the left side of the door frame. Stay to the right of the fish as you go up. Entrance condition: {
"comeInWithPlatformBelow": {
"maxHeight": 8,
"maxLeftPosition": -1,
"minRightPosition": -1.5
},
"comesThroughToilet": "any"
}
Requires: "canCrossRoomJumpIntoWater" "HiJump" |
|
Crouch jump up through the door with HiJump equipped, aligning with the left side of the door frame. Stay to the right of the fish as you go up. Entrance condition: {
"comeInWithPlatformBelow": {
"maxHeight": 8.5,
"maxLeftPosition": -1,
"minRightPosition": -1
},
"comesThroughToilet": "any"
}
Requires: "canCrossRoomJumpIntoWater" "canCrouchJump" "HiJump" |
|
From: 1
Bottom Door
To: 3
Middle Right Door
Jump straight up through the door with HiJump equipped, passing through the Toilet. Stay to the right of the fish as you go up. Entrance condition: {
"comeInWithPlatformBelow": {
"maxHeight": 8.5,
"maxLeftPosition": -1,
"minRightPosition": -1
},
"comesThroughToilet": "yes"
}
Requires: "canCrossRoomJumpIntoWater" "HiJump" |
|
Run and jump up through the door using HiJump and SpeedBooster in the room below using at least 1 tile of runway. Stay to the right of the fish as you go up. Entrance condition: {
"comeInWithPlatformBelow": {
"maxHeight": 9,
"maxLeftPosition": 2,
"minRightPosition": -2
},
"comesThroughToilet": "any"
}
Requires: "canCrossRoomJumpIntoWater" "SpeedBooster" "HiJump" |
|
Wall jump relatively low off the right side of the door frame of the room below. Stay to the right of the fish as you go up. Entrance condition: {
"comeInWithWallJumpBelow": {
"minHeight": 2
},
"comesThroughToilet": "any"
}
Requires: "canCrossRoomJumpIntoWater" "canMidairWiggle" |
|
From: 1
Bottom Door
To: 3
Middle Right Door
Run from right with Speedbooster in the room below, and jump against the left side of the door frame to cancel horizontal momentum before passing through the transition. Stay to the right of the fish as you go up. Entrance condition: {
"comeInWithPlatformBelow": {
"minHeight": 9,
"maxHeight": 10,
"maxLeftPosition": 7,
"minRightPosition": 39
},
"comesThroughToilet": "any"
}
Requires: "canCrossRoomJumpIntoWater" "SpeedBooster" |
|
From: 1
Bottom Door
To: 3
Middle Right Door
Run from left with Speedbooster in the room below and jump up through the door. Perform a snap turnaround to the left to cancel horizontal momentum before passing through the transition. This is done by turning around and then canceling spin, e.g. by shooting. Stay to the right of the fish as you go up. Entrance condition: {
"comeInWithPlatformBelow": {
"minHeight": 9,
"maxHeight": 10,
"maxLeftPosition": -38.5,
"minRightPosition": -7
},
"comesThroughToilet": "any"
}
Requires: "canCrossRoomJumpIntoWater" "SpeedBooster" "canMidairWiggle" |
|
Run from right with Speedbooster in the room below, and jump during a spike in the speed-to-jumpHeight chart. Jump against the left side of the door frame to cancel horizontal momentum before passing through the transition. Stay to the right of the fish as you go up. Entrance condition: {
"comeInWithPlatformBelow": {
"minHeight": 9,
"maxHeight": 9,
"maxLeftPosition": 7,
"minRightPosition": 21
},
"comesThroughToilet": "any"
}
Requires: "canCrossRoomJumpIntoWater" "canTrickyDashJump" |
|
From: 1
Bottom Door
To: 3
Middle Right Door
Crouch jump up through the left side of the door transition. Angle up and shoot the fish twice on the way up, then aim down and shoot three more times as needed until it is frozen. Land on the fish, wait until it is flashing, then jump and freeze it again further to left as needed, until you can spin jump to the left to reach the platforms. Entrance condition: {
"comeInWithPlatformBelow": {
"maxHeight": 7,
"maxLeftPosition": 2,
"minRightPosition": -2
},
"comesThroughToilet": "any"
}
Requires: "canCrossRoomJumpIntoWater"
"canCrouchJump"
"canTrickyUseFrozenEnemies"
{
"or": [
"Wave",
"Spazer",
"Plasma"
]
}
|
|
Standing on the platform in the room below, crouch jump and perform a spring ball jump mid-air just before reaching the transition. Entrance condition: {
"comeInWithPlatformBelow": {
"maxHeight": 10,
"maxLeftPosition": -1,
"minRightPosition": -1
},
"comesThroughToilet": "any"
}
Requires: "canCrossRoomJumpIntoWater" "canCrouchJump" "canTrickySpringBallJump" |
|
Entrance condition: {
"comeInWithGMode": {
"mode": "any",
"morphed": true
},
"comesThroughToilet": "any"
}
Requires: "h_canArtificialMorphIBJ" "Gravity" |
|
Entrance condition: {
"comeInShinecharged": {
"framesRequired": 80
},
"comesThroughToilet": "any"
}
Requires: "Gravity"
{
"or": [
{
"shinespark": {
"frames": 77,
"excessFrames": 3
}
},
{
"and": [
"canMidairShinespark",
{
"shinespark": {
"frames": 69,
"excessFrames": 3
}
}
]
}
]
}
Clears obstacles: A |
|
Entrance condition: {
"comeInShinecharged": {
"framesRequired": 120
},
"comesThroughToilet": "any"
}
Requires: "canSuitlessMaridia"
{
"shinespark": {
"frames": 77,
"excessFrames": 2
}
}
Clears obstacles: A |
|
From: 1
Bottom Door
To: 6
Speed Blocked Item
Notable: true 
This is a long climb, and getting around the fish under the missiles can be tricky or slow. Place bombs against the speed blocks until they are overloaded. Afterwards, freeze a crab on the edge of the speed blocks, such that Samus can jump inside and stand on the crab. Exit G-Mode and rotate to obtain the item, then kill the crab with Wave Beam to fall back down. Entrance condition: {
"comeInWithGMode": {
"mode": "any",
"morphed": true
},
"comesThroughToilet": "any"
}
Requires: "h_canArtificialMorphIBJ"
"Gravity"
"canTrickyUseFrozenEnemies"
"Wave"
{
"or": [
"h_canArtificialMorphJumpIntoIBJ",
{
"and": [
"h_canArtificialMorphSpringBall",
"HiJump"
]
},
{
"and": [
"h_canArtificialMorphSpringBall",
"canGravityJump"
]
},
"canDoubleBombJump",
"canStaggeredIBJ",
"canBeVeryPatient",
{
"enemyKill": {
"enemies": [
[
"Skultera"
]
],
"explicitWeapons": [
"PowerBomb"
]
}
}
]
}
{
"or": [
"h_canArtificialMorphSpringBall",
"h_canArtificialMorphCeilingBombJump",
"canBeVeryPatient"
]
}
|
|
From: 1
Bottom Door
To: 6
Speed Blocked Item
Notable: true
Place bombs against the speed blocks until they are overloaded. Afterwards, freeze a crab on the edge of the speed blocks, such that Samus can jump inside and stand on the crab. Exit G-Mode and rotate to obtain the item, then kill the crab with Wave Beam to fall back down. Entrance condition: {
"comeInWithGMode": {
"mode": "any",
"morphed": false
},
"comesThroughToilet": "any"
}
Requires: "canTrickyUseFrozenEnemies"
"Wave"
"h_canUseMorphBombs"
{
"or": [
"Gravity",
{
"and": [
"canSuitlessMaridia",
"HiJump"
]
}
]
}
{
"or": [
"h_canUseSpringBall",
"canBeVeryPatient",
{
"and": [
"Gravity",
"h_canCeilingBombJump",
"h_canIBJ"
]
}
]
}
|
|
From: 1
Bottom Door
To: 6
Speed Blocked Item
Notable: true
This is a long climb, and getting around the fish under the missiles can be tricky or slow. Overloading the PLMs can be done with as few as 2 PBs if they are placed precisely. Place them two ledges above the item - to the left of the morph tunnel item. It is important that they are placed on either of the flat tiles, not the sloped tile on the right. Afterwards, freeze a crab on the edge of the speed blocks, such that Samus can jump inside and stand on the crab. Exit G-Mode and rotate to obtain the item, then kill the crab with Wave Beam to fall back down. Entrance condition: {
"comeInWithGMode": {
"mode": "direct",
"morphed": true
},
"comesThroughToilet": "no"
}
Requires: "h_canArtificialMorphIBJ"
"Gravity"
"canTrickyUseFrozenEnemies"
"Wave"
{
"or": [
"h_canArtificialMorphJumpIntoIBJ",
"canDoubleBombJump",
"canStaggeredIBJ",
"canBeVeryPatient",
{
"enemyKill": {
"enemies": [
[
"Skultera"
]
],
"explicitWeapons": [
"PowerBomb"
]
}
}
]
}
{
"ammo": {
"type": "PowerBomb",
"count": 2
}
}
|
|
From: 1
Bottom Door
To: 6
Speed Blocked Item
Notable: true
Overloading the PLMs can be done with as few as 2 PBs if they are placed precisely. Place them two ledges above the item - to the left of the morph tunnel item. It is important that they are placed on either of the flat tiles, not the sloped tile on the right. Afterwards, freeze a crab on the edge of the speed blocks, such that Samus can jump inside and stand on the crab. Exit G-Mode and rotate to obtain the item, then kill the crab with Wave Beam to fall back down. Entrance condition: {
"comeInWithGMode": {
"mode": "direct",
"morphed": false
},
"comesThroughToilet": "no"
}
Requires: "canTrickyUseFrozenEnemies"
"Wave"
{
"or": [
"Gravity",
{
"and": [
"canSuitlessMaridia",
"HiJump"
]
}
]
}
"h_canUsePowerBombs"
"h_canUsePowerBombs"
|
|
|
|
To avoid breaking the speed blocks, align Samus on the first plant, just to the left of the door. Entrance condition: {
"comeInShinecharged": {
"framesRequired": 40
},
"comesThroughToilet": "any"
}
Requires: "Gravity"
{
"shinespark": {
"frames": 76,
"excessFrames": 3
}
}
|
|
To avoid breaking the speed blocks, align Samus on the first plant, just to the left of the door. Entrance condition: {
"comeInShinecharged": {
"framesRequired": 60
},
"comesThroughToilet": "any"
}
Requires: "Gravity"
"canMidairShinespark"
{
"shinespark": {
"frames": 71,
"excessFrames": 3
}
}
|
|
Entrance condition: {
"comeInShinecharged": {
"framesRequired": 60
},
"comesThroughToilet": "any"
}
Requires: "canSuitlessMaridia"
{
"shinespark": {
"frames": 76,
"excessFrames": 3
}
}
|
|
Entrance condition: {
"comeInShinecharged": {
"framesRequired": 100
},
"comesThroughToilet": "any"
}
Requires: "canSuitlessMaridia"
"canMidairShinespark"
{
"shinespark": {
"frames": 73,
"excessFrames": 3
}
}
|
|
Precisely Moonfall along the wall to land on top of the door shell without losing the stored fall speed. Then moonfall again to clip through the door. Entrance condition: {
"comeInWithStoredFallSpeed": {
"fallSpeedInTiles": 2
}
}
Requires: "Gravity" "canMoonfall" Bypasses door shell: true |
|
Exit condition: {
"leaveNormally": {}
}
|
|
Exit condition: {
"leaveWithRunway": {
"length": 5,
"steepUpTiles": 1,
"openEnd": 1
}
}
|
|
From: 2
Bottom Right Door
To: 2
Bottom Right Door
Requires: "h_canFrozenEnemyRunway" Exit condition: {
"leaveWithRunway": {
"length": 6,
"steepUpTiles": 1,
"openEnd": 1
}
}
|
|
From: 2
Bottom Right Door
To: 2
Bottom Right Door
Exit condition: {
"leaveWithGModeSetup": {}
}
|
|
Requires: {
"enemyDamage": {
"enemy": "Sciser",
"type": "contact",
"hits": 1
}
}
|
|
From: 2
Bottom Right Door
To: 3
Middle Right Door
Only requires a runway of one tile in the adjacent room. Bomb boost through the doorway, then use spring ball to get to the bottom left ledge. To avoid hitting the Skultera, place the bomb a few pixels from the doorway. One way to setup the positioning of the bomb is to place it, unmorph, rotate, and remorph Entrance condition: {
"comeInWithBombBoost": {}
}
Requires: "canSpringBallBombJump"
"canCrossRoomJumpIntoWater"
{
"or": [
"Gravity",
"HiJump",
"canSpringBallJumpMidAir",
"h_canCrouchJumpDownGrab"
]
}
|
|
From: 2
Bottom Right Door
To: 3
Middle Right Door
Run with enough speed to jump (after the transition) to reach the far left ledge. Entrance condition: {
"comeInRunning": {
"minTiles": 12.4375,
"speedBooster": true
}
}
Requires: "canCrossRoomJumpIntoWater" "canCarefulJump" |
|
From: 2
Bottom Right Door
To: 3
Middle Right Door
Run with enough speed to jump (after the transition) to reach the far left ledge. Either kill or Kago through the Fish enemy. At slightly higher run speeds, Samus can jump from the bottom of the slope and avoid the fish. Entrance condition: {
"comeInRunning": {
"minTiles": 7,
"speedBooster": true
}
}
Requires: "HiJump"
"canCrossRoomJumpIntoWater"
"canTrickyJump"
"canDodgeWhileShooting"
{
"or": [
{
"ammo": {
"type": "Super",
"count": 1
}
},
{
"and": [
"Charge",
"Plasma"
]
},
{
"and": [
"Plasma",
"canHitbox"
]
},
{
"and": [
"canKago",
"canLateralMidAirMorph",
{
"enemyDamage": {
"enemy": "Skultera",
"type": "contact",
"hits": 1
}
}
]
}
]
}
|
|
Run with 7 tiles (no openend) of speed to jump (after the transition) to reach the far left ledge. Either kill or Kago through the Fish enemy. Entrance condition: {
"comeInRunning": {
"minTiles": 6.4375,
"speedBooster": true
}
}
Requires: "canCrossRoomJumpIntoWater"
"canTrickyDashJump"
"canDodgeWhileShooting"
{
"or": [
{
"ammo": {
"type": "Super",
"count": 1
}
},
{
"and": [
"Charge",
"Plasma"
]
},
{
"and": [
"Plasma",
"canHitbox"
]
},
{
"and": [
"canKago",
"canLateralMidAirMorph",
{
"enemyDamage": {
"enemy": "Skultera",
"type": "contact",
"hits": 1
}
}
]
}
]
}
|
|
From: 2
Bottom Right Door
To: 3
Middle Right Door
Bring 4 full tiles of run speed from the adjacent room in order to jump (after the transition) up to the far left ledge. Either kill the Fish enemy, or jump from the bottom of the slope to pass underneath it. Entrance condition: {
"comeInRunning": {
"minTiles": 4,
"speedBooster": true
}
}
Requires: "HiJump" "canCrossRoomJumpIntoWater" "canTrickyDashJump" |
|
Climb up 1 screen. Entrance condition: {
"comeInWithDoorStuckSetup": {}
}
Requires: "canXRayClimb" |
|
Entrance condition: {
"comeInWithGMode": {
"mode": "any",
"morphed": true
}
}
Requires: "h_canArtificialMorphIBJ" "Gravity" |
|
Entrance condition: {
"comeInShinecharging": {
"length": 4,
"steepDownTiles": 1,
"openEnd": 1
}
}
Requires: "Gravity"
{
"or": [
{
"shinespark": {
"frames": 77,
"excessFrames": 3
}
},
{
"and": [
"canMidairShinespark",
{
"shinespark": {
"frames": 69,
"excessFrames": 3
}
}
]
}
]
}
Clears obstacles: A |
|
From: 2
Bottom Right Door
To: 6
Speed Blocked Item
Entrance condition: {
"comeInShinecharged": {
"framesRequired": 120
}
}
Requires: "Gravity"
{
"or": [
{
"shinespark": {
"frames": 77,
"excessFrames": 3
}
},
{
"and": [
"canMidairShinespark",
{
"shinespark": {
"frames": 69,
"excessFrames": 3
}
}
]
}
]
}
Clears obstacles: A |
|
Entrance condition: {
"comeInShinecharging": {
"length": 1,
"openEnd": 1
}
}
Requires: "canSuitlessMaridia"
{
"shinespark": {
"frames": 77,
"excessFrames": 2
}
}
Clears obstacles: A |
|
From: 2
Bottom Right Door
To: 6
Speed Blocked Item
Notable: true
This is a long climb, and getting around the fish under the missiles can be tricky or slow. Place bombs against the speed blocks until they are overloaded. Afterwards, freeze a crab on the edge of the speed blocks, such that Samus can jump inside and stand on the crab. Exit G-Mode and rotate to obtain the item, then kill the crab with Wave Beam to fall back down. Entrance condition: {
"comeInWithGMode": {
"mode": "any",
"morphed": true
}
}
Requires: "h_canArtificialMorphIBJ"
"Gravity"
"canTrickyUseFrozenEnemies"
"Wave"
{
"or": [
"h_canArtificialMorphJumpIntoIBJ",
{
"and": [
"h_canArtificialMorphSpringBall",
"HiJump"
]
},
{
"and": [
"h_canArtificialMorphSpringBall",
"canGravityJump"
]
},
"canDoubleBombJump",
"canStaggeredIBJ",
"canBeVeryPatient",
{
"enemyKill": {
"enemies": [
[
"Skultera"
]
],
"explicitWeapons": [
"PowerBomb"
]
}
}
]
}
{
"or": [
"h_canArtificialMorphSpringBall",
"h_canArtificialMorphCeilingBombJump",
"canBeVeryPatient"
]
}
|
|
From: 2
Bottom Right Door
To: 6
Speed Blocked Item
Notable: true
Place bombs against the speed blocks until they are overloaded. Afterwards, freeze a crab on the edge of the speed blocks, such that Samus can jump inside and stand on the crab. Exit G-Mode and rotate to obtain the item, then kill the crab with Wave Beam to fall back down. Entrance condition: {
"comeInWithGMode": {
"mode": "any",
"morphed": false
}
}
Requires: "canTrickyUseFrozenEnemies"
"Wave"
"h_canUseMorphBombs"
{
"or": [
"Gravity",
{
"and": [
"canSuitlessMaridia",
"HiJump"
]
}
]
}
{
"or": [
"h_canUseSpringBall",
"canBeVeryPatient",
{
"and": [
"Gravity",
"h_canCeilingBombJump",
"h_canIBJ"
]
}
]
}
|
|
From: 2
Bottom Right Door
To: 6
Speed Blocked Item
Notable: true
This is a long climb, and getting around the fish under the missiles can be tricky or slow. Overloading the PLMs can be done with as few as 2 PBs if they are placed precisely. Place them two ledges above the item - to the left of the morph tunnel item. It is important that they are placed on either of the flat tiles, not the sloped tile on the right. Afterwards, freeze a crab on the edge of the speed blocks, such that Samus can jump inside and stand on the crab. Exit G-Mode and rotate to obtain the item, then kill the crab with Wave Beam to fall back down. Entrance condition: {
"comeInWithGMode": {
"mode": "direct",
"morphed": true
}
}
Requires: "h_canArtificialMorphIBJ"
"Gravity"
"canTrickyUseFrozenEnemies"
"Wave"
{
"or": [
"h_canArtificialMorphJumpIntoIBJ",
"h_canArtificialMorphDoubleBombJump",
"h_canArtificialMorphStaggeredIBJ",
"canBeVeryPatient",
{
"enemyKill": {
"enemies": [
[
"Skultera"
]
],
"explicitWeapons": [
"PowerBomb"
]
}
}
]
}
"h_canArtificialMorphPowerBomb"
"h_canArtificialMorphPowerBomb"
|
|
From: 2
Bottom Right Door
To: 6
Speed Blocked Item
Notable: true
Overloading the PLMs can be done with as few as 2 PBs if they are placed precisely. Place them two ledges above the item - to the left of the morph tunnel item. It is important that they are placed on either of the flat tiles, not the sloped tile on the right. Afterwards, freeze a crab on the edge of the speed blocks, such that Samus can jump inside and stand on the crab. Exit G-Mode and rotate to obtain the item, then kill the crab with Wave Beam to fall back down. Entrance condition: {
"comeInWithGMode": {
"mode": "direct",
"morphed": false
}
}
Requires: "canTrickyUseFrozenEnemies"
"Wave"
{
"or": [
"Gravity",
{
"and": [
"canSuitlessMaridia",
"HiJump"
]
}
]
}
"h_canUsePowerBombs"
"h_canUsePowerBombs"
|
|
|
|
To avoid breaking the speed blocks, align Samus on the first plant, just to the left of the door. Entrance condition: {
"comeInShinecharging": {
"length": 4,
"steepDownTiles": 1,
"openEnd": 1
}
}
Requires: "Gravity"
{
"or": [
{
"shinespark": {
"frames": 76,
"excessFrames": 3
}
},
{
"and": [
"canMidairShinespark",
{
"shinespark": {
"frames": 71,
"excessFrames": 3
}
}
]
}
]
}
|
|
From: 2
Bottom Right Door
To: 9
Junction Below Speed Blocks
To avoid breaking the speed blocks, align Samus on the first plant, just to the left of the door. Entrance condition: {
"comeInShinecharged": {
"framesRequired": 70
}
}
Requires: "Gravity"
{
"or": [
{
"shinespark": {
"frames": 76,
"excessFrames": 3
}
},
{
"and": [
"canMidairShinespark",
{
"shinespark": {
"frames": 71,
"excessFrames": 3
}
}
]
}
]
}
|
|
From: 2
Bottom Right Door
To: 9
Junction Below Speed Blocks
Entrance condition: {
"comeInShinecharging": {
"length": 1,
"openEnd": 1
}
}
Requires: "canSuitlessMaridia"
{
"or": [
{
"shinespark": {
"frames": 76,
"excessFrames": 3
}
},
{
"and": [
"canMidairShinespark",
{
"shinespark": {
"frames": 71,
"excessFrames": 3
}
}
]
}
]
}
|
|
From: 2
Bottom Right Door
To: 9
Junction Below Speed Blocks
Entrance condition: {
"comeInShinecharged": {
"framesRequired": 100
}
}
Requires: "canSuitlessMaridia"
"canShinechargeMovement"
{
"or": [
{
"shinespark": {
"frames": 76,
"excessFrames": 3
}
},
{
"and": [
"canMidairShinespark",
{
"shinespark": {
"frames": 71,
"excessFrames": 3
}
}
]
}
]
}
|
|
Requires: "Gravity"
"canShinechargeMovement"
{
"or": [
{
"canShineCharge": {
"usedTiles": 24,
"gentleUpTiles": 3,
"gentleDownTiles": 3,
"openEnd": 1
}
},
{
"and": [
{
"doorUnlockedAtNode": 3
},
{
"canShineCharge": {
"usedTiles": 25,
"gentleUpTiles": 3,
"gentleDownTiles": 3,
"openEnd": 1
}
}
]
}
]
}
Exit condition: {
"leaveShinecharged": {
"framesRemaining": 76
}
}
|
|
Requires: "Gravity"
"canShinechargeMovement"
{
"or": [
{
"canShineCharge": {
"usedTiles": 24,
"gentleUpTiles": 3,
"gentleDownTiles": 3,
"openEnd": 1
}
},
{
"and": [
{
"doorUnlockedAtNode": 3
},
{
"canShineCharge": {
"usedTiles": 25,
"gentleUpTiles": 3,
"gentleDownTiles": 3,
"openEnd": 1
}
}
]
}
]
}
Exit condition: {
"leaveShinecharged": {
"framesRemaining": 40
}
}
|
|
Exit condition: {
"leaveWithRunway": {
"length": 25,
"gentleUpTiles": 3,
"gentleDownTiles": 3,
"openEnd": 1
}
}
|
|
From: 3
Middle Right Door
To: 3
Middle Right Door
Wait about 25 seconds for the global crab. Position Samus on the first floating platform to shoot the crab as quickly and early as possible. Requires: "h_canFrozenEnemyRunway" Exit condition: {
"leaveWithRunway": {
"length": 26,
"gentleUpTiles": 3,
"gentleDownTiles": 3,
"openEnd": 1
}
}
|
|
From: 3
Middle Right Door
To: 3
Middle Right Door
Entrance condition: {
"comeInRunning": {
"speedBooster": true,
"minTiles": 1
}
}
Requires: "canStutterWaterShineCharge"
"canShinechargeMovementComplex"
{
"canShineCharge": {
"usedTiles": 33,
"openEnd": 2
}
}
{
"shinespark": {
"frames": 19
}
}
Exit condition: {
"leaveWithSpark": {
"position": "bottom"
}
}
|
|
From: 3
Middle Right Door
To: 3
Middle Right Door
Entrance condition: {
"comeInRunning": {
"speedBooster": true,
"minTiles": 1
}
}
Requires: "canStutterWaterShineCharge"
"canShinechargeMovementTricky"
{
"canShineCharge": {
"usedTiles": 33,
"openEnd": 2
}
}
{
"shinespark": {
"frames": 11
}
}
Exit condition: {
"leaveWithSpark": {}
}
|
|
From: 3
Middle Right Door
To: 3
Middle Right Door
Entrance condition: {
"comeInRunning": {
"speedBooster": true,
"minTiles": 2
}
}
Requires: "canStutterWaterShineCharge"
"canShinechargeMovementComplex"
{
"canShineCharge": {
"usedTiles": 33,
"openEnd": 2
}
}
{
"or": [
{
"shinespark": {
"frames": 9
}
},
{
"and": [
"canShinechargeMovementTricky",
{
"shinespark": {
"frames": 2
}
}
]
}
]
}
Exit condition: {
"leaveWithSpark": {}
}
|
|
Requires: "h_canNavigateUnderwater"
{
"resetRoom": {
"nodes": [
3
],
"mustStayPut": false
}
}
{
"refill": [
"PowerBomb"
]
}
|
|
Requires: "h_canCrystalFlash" |
|
From: 3
Middle Right Door
To: 3
Middle Right Door
Exit condition: {
"leaveWithGModeSetup": {}
}
|
|
The global crab takes 37 seconds to get to Samus. Requires: {
"enemyDamage": {
"enemy": "Sciser",
"type": "contact",
"hits": 1
}
}
|
|
This is a long climb, and getting around the fish under the missiles can be tricky or slow. Entrance condition: {
"comeInWithGMode": {
"mode": "any",
"morphed": true
}
}
Requires: "h_canArtificialMorphIBJ"
"Gravity"
{
"or": [
"h_canArtificialMorphJumpIntoIBJ",
"h_canArtificialMorphDoubleBombJump",
"h_canArtificialMorphStaggeredIBJ",
"canBeVeryPatient"
]
}
|
|
Requires: "Gravity"
{
"or": [
{
"canShineCharge": {
"usedTiles": 24,
"gentleUpTiles": 3,
"gentleDownTiles": 3,
"openEnd": 1
}
},
{
"and": [
{
"doorUnlockedAtNode": 3
},
{
"canShineCharge": {
"usedTiles": 25,
"gentleUpTiles": 3,
"gentleDownTiles": 3,
"openEnd": 1
}
}
]
}
]
}
{
"or": [
{
"shinespark": {
"frames": 77,
"excessFrames": 2
}
},
{
"and": [
"canMidairShinespark",
{
"shinespark": {
"frames": 50,
"excessFrames": 2
}
}
]
}
]
}
Clears obstacles: A |
|
Entrance condition: {
"comeInShinecharging": {
"length": 24,
"gentleUpTiles": 3,
"gentleDownTiles": 3,
"openEnd": 1
}
}
Requires: "Gravity"
{
"or": [
{
"shinespark": {
"frames": 77,
"excessFrames": 2
}
},
{
"and": [
"canMidairShinespark",
{
"shinespark": {
"frames": 50,
"excessFrames": 2
}
}
]
}
]
}
Clears obstacles: A |
|
From: 3
Middle Right Door
To: 6
Speed Blocked Item
Entrance condition: {
"comeInShinecharged": {
"framesRequired": 150
}
}
Requires: "Gravity"
"canMidairShinespark"
"canCarefulJump"
"canShinechargeMovement"
{
"shinespark": {
"frames": 50,
"excessFrames": 2
}
}
Clears obstacles: A |
|
Entrance condition: {
"comeInShinecharging": {
"length": 7,
"openEnd": 1
}
}
Requires: "canWaterShineCharge"
"canMidairShinespark"
"canCarefulJump"
"canShinechargeMovement"
{
"canShineCharge": {
"usedTiles": 33,
"openEnd": 2
}
}
{
"shinespark": {
"frames": 62,
"excessFrames": 2
}
}
Clears obstacles: A |
|
From: 3
Middle Right Door
To: 6
Speed Blocked Item
This can be done with only a door-frame runway in the adjacent room. Entrance condition: {
"comeInRunning": {
"speedBooster": true,
"minTiles": 1
}
}
Requires: "canStutterWaterShineCharge"
"canMidairShinespark"
{
"canShineCharge": {
"usedTiles": 33,
"openEnd": 2
}
}
{
"shinespark": {
"frames": 62,
"excessFrames": 2
}
}
Clears obstacles: A |
|
From: 3
Middle Right Door
To: 6
Speed Blocked Item
Notable: true
This is a long climb, and getting around the fish under the missiles can be tricky or slow. Place bombs against the speed blocks until they are overloaded. Afterwards, freeze a crab on the edge of the speed blocks, such that Samus can jump inside and stand on the crab. Exit G-Mode and rotate to obtain the item, then kill the crab with Wave Beam to fall back down. Entrance condition: {
"comeInWithGMode": {
"mode": "any",
"morphed": true
}
}
Requires: "h_canArtificialMorphIBJ"
"Gravity"
"canTrickyUseFrozenEnemies"
"Wave"
{
"or": [
"h_canArtificialMorphJumpIntoIBJ",
{
"and": [
"h_canArtificialMorphSpringBall",
"HiJump"
]
},
{
"and": [
"h_canArtificialMorphSpringBall",
"canGravityJump"
]
},
"h_canArtificialMorphDoubleBombJump",
"h_canArtificialMorphStaggeredIBJ",
"canBeVeryPatient",
{
"enemyKill": {
"enemies": [
[
"Skultera"
]
],
"explicitWeapons": [
"PowerBomb"
]
}
}
]
}
{
"or": [
"h_canArtificialMorphSpringBall",
"h_canArtificialMorphCeilingBombJump",
"canBeVeryPatient"
]
}
|
|
From: 3
Middle Right Door
To: 6
Speed Blocked Item
Notable: true
Place bombs against the speed blocks until they are overloaded. Afterwards, freeze a crab on the edge of the speed blocks, such that Samus can jump inside and stand on the crab. Exit G-Mode and rotate to obtain the item, then kill the crab with Wave Beam to fall back down. Entrance condition: {
"comeInWithGMode": {
"mode": "any",
"morphed": false
}
}
Requires: "canTrickyUseFrozenEnemies"
"Wave"
"h_canUseMorphBombs"
{
"or": [
"Gravity",
{
"and": [
"canSuitlessMaridia",
"HiJump"
]
}
]
}
{
"or": [
"h_canUseSpringBall",
"canBeVeryPatient",
{
"and": [
"Gravity",
"h_canCeilingBombJump",
"h_canIBJ"
]
}
]
}
|
|
From: 3
Middle Right Door
To: 6
Speed Blocked Item
Notable: true
This is a long climb, and getting around the fish under the missiles can be tricky or slow. Overloading the PLMs can be done with as few as 2 PBs if they are placed precisely. Place them two ledges above the item - to the left of the morph tunnel item. It is important that they are placed on either of the flat tiles, not the sloped tile on the right. Afterwards, freeze a crab on the edge of the speed blocks, such that Samus can jump inside and stand on the crab. Exit G-Mode and rotate to obtain the item, then kill the crab with Wave Beam to fall back down. Entrance condition: {
"comeInWithGMode": {
"mode": "direct",
"morphed": true
}
}
Requires: "h_canArtificialMorphIBJ"
"Gravity"
"canTrickyUseFrozenEnemies"
"Wave"
{
"or": [
"h_canArtificialMorphJumpIntoIBJ",
"h_canArtificialMorphDoubleBombJump",
"h_canArtificialMorphStaggeredIBJ",
"canBeVeryPatient",
{
"enemyKill": {
"enemies": [
[
"Skultera"
]
],
"explicitWeapons": [
"PowerBomb"
]
}
}
]
}
"h_canArtificialMorphPowerBomb"
"h_canArtificialMorphPowerBomb"
|
|
From: 3
Middle Right Door
To: 6
Speed Blocked Item
Notable: true
Overloading the PLMs can be done with as few as 2 PBs if they are placed precisely. Place them two ledges above the item - to the left of the morph tunnel item. It is important that they are placed on either of the flat tiles, not the sloped tile on the right. Afterwards, freeze a crab on the edge of the speed blocks, such that Samus can jump inside and stand on the crab. Exit G-Mode and rotate to obtain the item, then kill the crab with Wave Beam to fall back down. Entrance condition: {
"comeInWithGMode": {
"mode": "direct",
"morphed": false
}
}
Requires: "canTrickyUseFrozenEnemies"
"Wave"
{
"or": [
"Gravity",
{
"and": [
"canSuitlessMaridia",
"HiJump"
]
}
]
}
"h_canUsePowerBombs"
"h_canUsePowerBombs"
|
|
|
|
Requires: "Gravity"
{
"or": [
"HiJump",
"canWalljump",
"h_canFly",
"canUseFrozenEnemies",
"canSpringBallJumpMidAir",
"canGravityJump"
]
}
|
|
From: 3
Middle Right Door
To: 9
Junction Below Speed Blocks
Requires: "canSuitlessMaridia" "HiJump" "canSpringBallJumpMidAir" |
|
From: 3
Middle Right Door
To: 9
Junction Below Speed Blocks
Requires: "canSuitlessMaridia" "HiJump" "canTrickyUseFrozenEnemies" |
|
From: 3
Middle Right Door
To: 9
Junction Below Speed Blocks
Notable: true 
The tricky part is getting to the ledge below the missiles. There are two ways to do this: 1. Stand on a frozen crab with a frozen fish at the lowest height of its cycle to the right. Further to the right is better as long as it can be stood upon without the ledge above. Perform a stationary lateral midair morph into a max height spring ball jump to get onto the fish before it thaws. Press against the fish for the maximum amount of time possible while moving upwards in order to gain more height in order to get on top of it. 2. Freeze the global crab on the right wall, get onto it and up and onto the frozen fish before it thaws. Be careful not to fall through the crab. A fail will require Samus to reset the room, or wait a very long time in order for the crab to circle the room. Using a Super may make the crab fall on a floating platform, and it still takes more than a minute to return. Note that it is possible to turn off ice beam to immediately thaw any frozen enemies; this can help get the crab and fish in a good cycle with each other. Requires: "canSuitlessMaridia" "canTrickySpringBallJump" "canTrickyUseFrozenEnemies" "canTrickyJump" |
|
From: 3
Middle Right Door
To: 9
Junction Below Speed Blocks
Notable: true 
This underwater walljump is relatively long. Requires: "canUnderwaterWalljump" |
|
From: 3
Middle Right Door
To: 9
Junction Below Speed Blocks
Notable: true 
Use the slow global crab and Skulteras to get up. The last part, just below the item is the hardest. Wait for the global crab to be on vertical portion the ledge jutting out on the right or left - any other locations and it will fall on a platform and get stuck. Shoot a super and freeze it mid air. Using the frozen crab on the platform, the mid air crab, and the fish, jump up to the solid ground. Freeze the Skultera at the left, near its minimum and jump to it, then the solid ground. Note that the fish will be pushed down slightly over time because of the sloped tiles, but it will be at its minimum by the time the global crab has arrived. Requires: "canSuitlessMaridia"
"canCrazyCrabClimb"
"canBeVeryPatient"
{
"ammo": {
"type": "Super",
"count": 1
}
}
|
|
From: 3
Middle Right Door
To: 9
Junction Below Speed Blocks
Notable: true 
Use the slow global crab and Skulteras to get up. The last part, just below the item is the hardest. Get onto the global crab on the right wall. Either freeze the Skultera close to the wall and wall jump between them. or, a harder option without wall jumps is to refreeze the crab again, higher on the wall, while being careful not to clip through it. Freeze the Skultera at the left, near its minimum and jump to it, then the solid ground. Note that the fish will be pushed down slightly over time because of the sloped tiles, but it will be at its minimum by the time the global crab has arrived. Requires: "canSuitlessMaridia"
"canCrazyCrabClimb"
"canBeVeryPatient"
{
"or": [
"canSunkenTileWideWallClimb",
"canTrickyJump"
]
}
|
|
Requires: "Gravity"
{
"or": [
{
"canShineCharge": {
"usedTiles": 24,
"gentleUpTiles": 3,
"gentleDownTiles": 3,
"openEnd": 1
}
},
{
"and": [
{
"doorUnlockedAtNode": 3
},
{
"canShineCharge": {
"usedTiles": 25,
"gentleUpTiles": 3,
"gentleDownTiles": 3,
"openEnd": 1
}
}
]
}
]
}
{
"or": [
{
"shinespark": {
"frames": 76,
"excessFrames": 3
}
},
{
"and": [
"canMidairShinespark",
{
"shinespark": {
"frames": 50,
"excessFrames": 3
}
}
]
}
]
}
|
|
Entrance condition: {
"comeInShinecharging": {
"length": 24,
"gentleUpTiles": 3,
"gentleDownTiles": 3,
"openEnd": 1
}
}
Requires: "Gravity"
{
"or": [
{
"shinespark": {
"frames": 76,
"excessFrames": 3
}
},
{
"and": [
"canMidairShinespark",
{
"shinespark": {
"frames": 50,
"excessFrames": 3
}
}
]
}
]
}
|
|
From: 3
Middle Right Door
To: 9
Junction Below Speed Blocks
Entrance condition: {
"comeInShinecharged": {
"framesRequired": 100
}
}
Requires: "Gravity"
{
"shinespark": {
"frames": 58,
"excessFrames": 3
}
}
|
|
Entrance condition: {
"comeInShinecharged": {
"framesRequired": 80
}
}
Requires: "Gravity"
"canShinechargeMovement"
"canMidairShinespark"
{
"shinespark": {
"frames": 50,
"excessFrames": 3
}
}
|
|
Entrance condition: {
"comeInShinecharged": {
"framesRequired": 145
}
}
Requires: "canSuitlessMaridia"
"canShinechargeMovement"
"canMidairShinespark"
{
"shinespark": {
"frames": 55,
"excessFrames": 3
}
}
|
|
From: 3
Middle Right Door
To: 9
Junction Below Speed Blocks
Entrance condition: {
"comeInShinecharging": {
"length": 7,
"openEnd": 1
}
}
Requires: "canWaterShineCharge"
"canMidairShinespark"
{
"canShineCharge": {
"usedTiles": 33,
"openEnd": 2
}
}
{
"shinespark": {
"frames": 35,
"excessFrames": 3
}
}
|
|
From: 3
Middle Right Door
To: 9
Junction Below Speed Blocks
This can be done with only a door-frame runway in the adjacent room. Entrance condition: {
"comeInRunning": {
"speedBooster": true,
"minTiles": 1
}
}
Requires: "canStutterWaterShineCharge"
"canMidairShinespark"
{
"canShineCharge": {
"usedTiles": 33,
"openEnd": 2
}
}
{
"shinespark": {
"frames": 35,
"excessFrames": 3
}
}
|
|
Exit condition: {
"leaveWithRunway": {
"length": 15,
"steepUpTiles": 2,
"openEnd": 1
}
}
|
|
Requires: "h_canFrozenEnemyRunway" Exit condition: {
"leaveWithRunway": {
"length": 16,
"steepUpTiles": 2,
"openEnd": 1
}
}
|
|
Requires: "h_canNavigateUnderwater"
{
"resetRoom": {
"nodes": [
4
],
"mustStayPut": false
}
}
{
"refill": [
"PowerBomb"
]
}
|
|
Requires: "h_canCrystalFlash" |
|
Exit condition: {
"leaveWithGModeSetup": {}
}
|
|
Requires: {
"enemyDamage": {
"enemy": "Sciser",
"type": "contact",
"hits": 1
}
}
|
|
Bring a Shinecharge from the top door to the speed blocks below the Missile item location. Be especially mindfull of the aquatic life during the descent. Line up directly below the speed blocks when jumping up. Entrance condition: {
"comeInShinecharging": {
"length": 14,
"steepDownTiles": 2,
"openEnd": 0
}
}
Requires: "Gravity" "canChainTemporaryBlue" "canXRayTurnaround" |
|
From: 4
Top Right Door
To: 6
Speed Blocked Item
Bring a Shinecharge from the top door to the speed blocks below the Missile item location. Be especially mindfull of the aquatic life during the descent. Line up directly below the speed blocks when jumping up, especially if using a SpringBall jump. Entrance condition: {
"comeInRunning": {
"speedBooster": true,
"minTiles": 1.4375
}
}
Requires: "canChainTemporaryBlue"
"canXRayTurnaround"
"canStutterWaterShineCharge"
{
"or": [
"Gravity",
{
"and": [
"canSuitlessMaridia",
"HiJump"
]
},
{
"and": [
"canSuitlessMaridia",
"canSpringBallJumpMidAir"
]
}
]
}
|
|
From: 4
Top Right Door
To: 6
Speed Blocked Item
Notable: true
Place bombs against the speed blocks until they are overloaded. Afterwards, freeze a crab on the edge of the speed blocks, such that Samus can jump inside and stand on the crab. Exit G-Mode and rotate to obtain the item, then kill the crab with Wave Beam to fall back down. Entrance condition: {
"comeInWithGMode": {
"mode": "any",
"morphed": true
}
}
Requires: {
"or": [
"Gravity",
{
"and": [
"canSuitlessMaridia",
"HiJump"
]
}
]
}
"canTrickyUseFrozenEnemies"
"Wave"
"h_canArtificialMorphBombs"
{
"or": [
"h_canArtificialMorphSpringBall",
{
"and": [
"Morph",
"canBeVeryPatient"
]
},
{
"and": [
"Gravity",
"h_canArtificialMorphIBJ",
"h_canArtificialMorphCeilingBombJump"
]
},
{
"and": [
"Gravity",
"h_canArtificialMorphIBJ",
"canBeVeryPatient"
]
}
]
}
|
|
From: 4
Top Right Door
To: 6
Speed Blocked Item
Notable: true
Overloading the PLMs can be done with as few as 2 PBs if they are placed precisely. Place them two ledges above the item - to the left of the morph tunnel item. It is important that they are placed on either of the flat tiles, not the sloped tile on the right. Afterwards, freeze a crab on the edge of the speed blocks, such that Samus can jump inside and stand on the crab. Exit G-Mode and rotate to obtain the item, then kill the crab with Wave Beam to fall back down. Entrance condition: {
"comeInWithGMode": {
"mode": "direct",
"morphed": true
}
}
Requires: {
"or": [
"Gravity",
{
"and": [
"canSuitlessMaridia",
"canCrouchJump"
]
}
]
}
"canTrickyUseFrozenEnemies"
"Wave"
"h_canArtificialMorphPowerBomb"
"h_canArtificialMorphPowerBomb"
|
|
|
|
Requires: "h_EverestMorphTunnelExpanded" Exit condition: {
"leaveWithRunway": {
"length": 2,
"openEnd": 0
}
}
|
|
Requires: "h_canCrystalFlash" |
|
From: 5
Morph Passage Doorway
To: 5
Morph Passage Doorway
Get to the item while avoiding the crab, note that it doesn't go all the way through the tunnel. Use a super to knock it off, while it is on the right wall, in order to knock it off so it will go down the morph tunnel. Requires: "h_EverestMorphTunnelExpanded"
"Morph"
{
"ammo": {
"type": "Super",
"count": 1
}
}
Exit condition: {
"leaveWithGModeSetup": {}
}
|
|
The crab will not come through the whole tunnel. Retreat to the right to avoid taking a hit. Requires: "Morph"
{
"or": [
"h_canUseSpringBall",
{
"and": [
"Gravity",
"h_canBombThings"
]
}
]
}
|
|
From: 5
Morph Passage Doorway
To: 7
Morph Tunnel Item
Turn HiJump and Gravity suit off before jumping and morphing into the tunnel. The crab will not come through the whole tunnel. Retreat to the right to avoid taking a hit. Requires: "canSuitlessMaridia" "canDisableEquipment" |
|
From: 5
Morph Passage Doorway
To: 7
Morph Tunnel Item
There is a camera scroll block inside of the morph tunnel, so it is best to go through the tunnel quickly and not backtrack. The crab will not come through the whole tunnel, so as Samus gets close to the vertical portion, wait for the crab to pass. After touching the item, retreat to the doorway before exiting g-mode. Entrance condition: {
"comeInWithGMode": {
"mode": "direct",
"morphed": true
}
}
Requires: "h_EverestMorphTunnelExpanded"
{
"or": [
"h_canArtificialMorphSpringBall",
{
"and": [
"Gravity",
"h_canArtificialMorphBombs"
]
}
]
}
Clears obstacles: B |
|
The crab will not come through the whole tunnel, so wait for it to pass before going through the vertical portion. Entrance condition: {
"comeInWithGMode": {
"mode": "any",
"morphed": true
}
}
Requires: {
"or": [
"h_canArtificialMorphSpringBall",
{
"and": [
"Gravity",
"h_canArtificialMorphBombThings"
]
}
]
}
|
|
The crab will not come through the whole tunnel, so wait for it to pass before going through the vertical portion. Entrance condition: {
"comeInWithGMode": {
"mode": "direct",
"morphed": true
}
}
Requires: "h_EverestMorphTunnelExpanded"
{
"or": [
"h_canArtificialMorphSpringBall",
{
"and": [
"Gravity",
"h_canArtificialMorphBombThings"
]
}
]
}
|
|
|
|
Requires: "Morph" |
|
Requires: {
"obstaclesCleared": [
"B"
]
}
{
"or": [
"h_canArtificialMorphSpringBall",
{
"and": [
"Gravity",
"h_canArtificialMorphBombThings"
]
}
]
}
|
|
|
|
Requires: "Gravity"
{
"canShineCharge": {
"usedTiles": 17,
"startingDownTiles": 1,
"steepDownTiles": 2,
"openEnd": 0
}
}
Exit condition: {
"leaveShinecharged": {
"framesRemaining": 110
}
}
|
|
|
|
Requires: "Gravity"
"canShinechargeMovement"
{
"canShineCharge": {
"usedTiles": 17,
"startingDownTiles": 1,
"steepDownTiles": 2,
"openEnd": 0
}
}
Exit condition: {
"leaveShinecharged": {
"framesRemaining": 80
}
}
|
|
Requires: "Gravity"
{
"or": [
"HiJump",
"canWalljump",
"h_canFly",
"canSpringBallJumpMidAir",
"canGravityJump"
]
}
|
|
Requires: "canSuitlessMaridia" "HiJump" "canSpringBallJumpMidAir" |
|
From: 8
Bottom Junction
To: 3
Middle Right Door
Freeze the crab on the corner of the ledge and the fish near the wall but with enough space for Samus to fit through and jump up using HiJump or a midair spring ball jump. Possible backups include: knocking the Scisor off the wall and freezing it midair, or with HiJump: freezing the Skultera near a wall and walljumping into it repeatedly, or freezing the Scisor on the ground and crouch jumping up to the Skultera, rubbing into the frozen enemy to gain extra height before downgrabbing. Requires: "canSuitlessMaridia"
{
"or": [
"HiJump",
"canTrickySpringBallJump"
]
}
"canTrickyUseFrozenEnemies"
|
|
From: 8
Bottom Junction
To: 3
Middle Right Door
Notable: true
Jump from the bottom left slope for a bit of extra height to start. Requires: "canUnderwaterWalljump" |
|
From: 8
Bottom Junction
To: 3
Middle Right Door
Notable: true
Wait a long time for the slow global crab. Freeze it when it comes around on the left, one tile above the bottom slope. Freeze the fish, get on the frozen crab, and wall jump between the fish and the wall and the wall. Wall jump towards the fish to gain height faster. Requires: "canSuitlessMaridia"
"canCrazyCrabClimb"
"canSunkenTileWideWallClimb"
"canBeVeryPatient"
"canMidairWiggle"
{
"obstaclesNotCleared": [
"A"
]
}
|
|
Requires: "Gravity"
{
"canShineCharge": {
"usedTiles": 17,
"steepUpTiles": 1,
"openEnd": 0
}
}
{
"or": [
{
"shinespark": {
"frames": 77,
"excessFrames": 3
}
},
{
"and": [
"canMidairShinespark",
{
"shinespark": {
"frames": 69,
"excessFrames": 3
}
}
]
}
]
}
Clears obstacles: A |
|
Requires: "h_canNavigateUnderwater"
{
"resetRoom": {
"nodes": [
1,
2
],
"mustStayPut": false
}
}
{
"refill": [
"PowerBomb"
]
}
|
|
Requires: "h_canCrystalFlash" |
|
From: 8
Bottom Junction
To: 9
Junction Below Speed Blocks
To avoid breaking the speed blocks, align Samus on the first plant, just to the left of the door. Requires: "Gravity"
{
"canShineCharge": {
"usedTiles": 17,
"steepUpTiles": 1,
"openEnd": 0
}
}
{
"or": [
{
"shinespark": {
"frames": 76,
"excessFrames": 3
}
},
{
"and": [
"canMidairShinespark",
{
"shinespark": {
"frames": 69,
"excessFrames": 3
}
}
]
}
]
}
|
|
|
|
Requires: "Gravity"
{
"or": [
"HiJump",
"canWalljump",
"h_canFly",
"canSpringBallJumpMidAir",
"h_canCrouchJumpDownGrab",
"canGravityJump"
]
}
|
|
Requires: "canSuitlessMaridia" "HiJump" "canSpringBallJumpMidAir" |
|
From: 9
Junction Below Speed Blocks
To: 4
Top Right Door
Notable: true
Jump from the slope for a bit of extra height to start. Requires: "canUnderwaterWalljump" |
|
From: 9
Junction Below Speed Blocks
To: 4
Top Right Door
The first crab, coming down, is a bit tricky to freeze fast enough without any other beams or a missile. Prevent it from coming on screen until Samus is in position to hit it accurately. The global crab coming up can be used as a backup if the speed blocks are not broken. Requires: "canSuitlessMaridia"
"HiJump"
"canTrickyUseFrozenEnemies"
{
"or": [
"h_canCrouchJumpDownGrab",
{
"obstaclesNotCleared": [
"A"
]
}
]
}
|
|
From: 9
Junction Below Speed Blocks
To: 4
Top Right Door
Be sure not to get the first downward moving crab on screen until Samus is in position to quickly and accurately shoot and freeze it. This is much tighter with spring ball relative to HiJump. Performing a max height spring ball jump from the frozen crab can get Samus to the next ledge. Getting to the ledge with the fish is particularly precise. Either stand at the very edge of the platform and perform a very precise max heigh spring ball jump, or stand against the left wall and and perform a slightly less tight stationary lateral morph into spring ball jump. Requires: "canSuitlessMaridia"
"canTrickyUseFrozenEnemies"
"canTrickySpringBallJump"
"canDodgeWhileShooting"
{
"or": [
"canInsaneJump",
{
"and": [
"Spazer",
"Wave"
]
},
"h_canMaxHeightSpringBallJump",
"Plasma"
]
}
{
"or": [
"h_canMaxHeightSpringBallJump",
"canStationaryLateralMidAirMorph"
]
}
|
|
From: 9
Junction Below Speed Blocks
To: 4
Top Right Door
Using the slow global crab to ascend the top section of Main Street requires the speed blocks to not be broken. If they are broken, the local fast crab can be used instead by letting it fall and climb the left wall. The trickiest part is getting to the second ledge. Freeze the crab when it is overhead and spring ball jump up onto it. Follow the crab up while using it as a platform multiple times. Requires: "canSuitlessMaridia"
"canSpringBallJumpMidAir"
"canTrickyUseFrozenEnemies"
"canTrickyJump"
{
"or": [
{
"obstaclesNotCleared": [
"A"
]
},
"canCrazyCrabClimb"
]
}
|
|
From: 9
Junction Below Speed Blocks
To: 4
Top Right Door
Notable: true
After the global crab passes and starts climbing up, use a super and freeze it mid air to get to the left platform. Jump and a quick crab will start moving down the right wall. Quickly shoot it and freeze it to get over to the right. Wait a long while for the global crab to return. Let it pass, then use a super to freeze it mid air and get to the next platform. Follow the global crab the rest of the way up to the door while using it and the fish as platforms on the way. For a faster but tighter strat, knock off the first downward moving crab with a super and follow it up while freezing it and performing precise platforming. Requires: "canBeVeryPatient"
"canSuitlessMaridia"
"canCrazyCrabClimb"
{
"ammo": {
"type": "Super",
"count": 2
}
}
{
"obstaclesNotCleared": [
"A"
]
}
|
|
From: 9
Junction Below Speed Blocks
To: 4
Top Right Door
Notable: true
Be sure not to lure the first crab on the right wall until the slow global crab is near. Freeze the crab coming down as a platform to stand on to jump onto the frozen global crab on the right. Near the end, use the global crab to get onto the top left corner of the room, then jump towards the walkway leading to the door. Requires: "canBeExtremelyPatient"
"canSuitlessMaridia"
"canCrazyCrabClimb"
"canTrickyJump"
{
"obstaclesNotCleared": [
"A"
]
}
|
{
"$schema": "../../../schema/m3-room.schema.json",
"id": 172,
"name": "Main Street",
"area": "Maridia",
"subarea": "Outer",
"playable": true,
"roomAddress": "0x7CFC9",
"roomEnvironments": [
{
"heated": false
}
],
"nodes": [
{
"id": 1,
"name": "Bottom Door",
"nodeType": "door",
"nodeSubType": "blue",
"nodeAddress": "0x001a39c",
"doorEnvironments": [
{
"physics": "water"
}
]
},
{
"id": 2,
"name": "Bottom Right Door",
"nodeType": "door",
"nodeSubType": "red",
"nodeAddress": "0x001a3a8",
"doorEnvironments": [
{
"physics": "water"
}
],
"locks": [
{
"name": "Main Street Red Lock (to Crab Tunnel)",
"lockType": "coloredDoor",
"unlockStrats": [
{
"name": "Base",
"notable": false,
"requires": [
"h_canOpenRedDoors"
]
}
]
}
]
},
{
"id": 3,
"name": "Middle Right Door",
"nodeType": "door",
"nodeSubType": "blue",
"nodeAddress": "0x001a3b4",
"doorEnvironments": [
{
"physics": "water"
}
]
},
{
"id": 4,
"name": "Top Right Door",
"nodeType": "door",
"nodeSubType": "blue",
"nodeAddress": "0x001a3c0",
"doorEnvironments": [
{
"physics": "water"
}
]
},
{
"id": 5,
"name": "Morph Passage Doorway",
"nodeType": "door",
"nodeSubType": "passage",
"nodeAddress": "0x001a3cc",
"doorEnvironments": [
{
"physics": "water"
}
],
"note": "It's not quite a door, but it is a morph passage transition to another room"
},
{
"id": 6,
"name": "Speed Blocked Item",
"nodeType": "item",
"nodeSubType": "visible",
"nodeItem": "Missile",
"nodeAddress": "0x7C437"
},
{
"id": 7,
"name": "Morph Tunnel Item",
"nodeType": "item",
"nodeSubType": "visible",
"nodeItem": "Super",
"nodeAddress": "0x7C43D"
},
{
"id": 8,
"name": "Bottom Junction",
"nodeType": "junction",
"nodeSubType": "junction"
},
{
"id": 9,
"name": "Junction Below Speed Blocks",
"nodeType": "junction",
"nodeSubType": "junction"
}
],
"obstacles": [
{
"id": "A",
"name": "Speed Blocks",
"obstacleType": "inanimate"
},
{
"id": "B",
"name": "Morph Tunnel Remain in Artificial Morph",
"obstacleType": "abstract"
}
],
"enemies": [
{
"id": "e1",
"groupName": "Main Street Bottom Sciser",
"enemyName": "Sciser",
"quantity": 1,
"homeNodes": [
8
]
},
{
"id": "e2",
"groupName": "Main Street Bottom Skulteras",
"enemyName": "Skultera",
"quantity": 4,
"betweenNodes": [
3,
9
]
},
{
"id": "e3",
"groupName": "Main Street Bottom-Middle Sciser",
"enemyName": "Sciser",
"quantity": 2,
"betweenNodes": [
3,
9
]
},
{
"id": "e4",
"groupName": "Main Street Top Skultera",
"enemyName": "Skultera",
"quantity": 1,
"betweenNodes": [
4,
9
]
},
{
"id": "e5",
"groupName": "Main Street Top Sciser",
"enemyName": "Sciser",
"quantity": 1,
"homeNodes": [
4
]
},
{
"id": "e6",
"groupName": "Main Street Top-Middle Scisers",
"enemyName": "Sciser",
"quantity": 2,
"betweenNodes": [
4,
9
]
},
{
"id": "e7",
"groupName": "Main Street Crab Supers Sciser",
"enemyName": "Sciser",
"quantity": 1,
"homeNodes": [
5,
7
]
}
],
"reusableRoomwideNotable": [
{
"name": "Main Street Underwater Walljumps",
"note": "Climbing all of Main Street with only HiJump and Underwater Walljumps."
},
{
"name": "Main Street Crab Climb with Only Ice and Supers",
"note": [
"Climbing Main Street from the door to the Fish Tank Room to the top with only three supers and ice.",
"Requires very precise platforming to climb around protruding ledges while carefully manipulating and freezing crabs.",
"Requires patience while waiting for the global crab."
]
},
{
"name": "Main Street Crab Climb with Only Ice",
"note": [
"Climbing Main Street from the very bottom to the top with only ice.",
"Requires very precise platforming to climb around protruding ledges while carefully manipulating and freezing crabs.",
"Requires a lot of patience while waiting for the global crab."
]
},
{
"name": "Main Street G-Mode Overload Speed Blocks then use Frozen Crab",
"note": [
"Overload the speed blocks. Afterwards, freeze a crab on the edge of the speed blocks, such that Samus can jump inside and stand on the crab.",
"Exit G-Mode and rotate to obtain the item, then kill the crab with Wave Beam to fall back down.",
"Overloading the PLMs can be done by placing many bombs against the bottom of the speed blocks,",
"or by placing 2 PBs on the flat tiles two ledges above the item, to the left of the morph tunnel item."
]
}
],
"links": [
{
"from": 1,
"to": [
{
"id": 1
},
{
"id": 3
},
{
"id": 6
},
{
"id": 8
},
{
"id": 9
}
]
},
{
"from": 2,
"to": [
{
"id": 1
},
{
"id": 2
},
{
"id": 3,
"note": "This link is only for the cross room jump and X-ray climb. Other strats should go 2 -> 8 -> 3."
},
{
"id": 6
},
{
"id": 8
},
{
"id": 9
}
]
},
{
"from": 3,
"to": [
{
"id": 1
},
{
"id": 2
},
{
"id": 3
},
{
"id": 4
},
{
"id": 6
},
{
"id": 8
},
{
"id": 9
}
]
},
{
"from": 4,
"to": [
{
"id": 4
},
{
"id": 6
},
{
"id": 9
}
]
},
{
"from": 5,
"to": [
{
"id": 5
},
{
"id": 7
}
]
},
{
"from": 6,
"to": [
{
"id": 9
}
]
},
{
"from": 7,
"to": [
{
"id": 5
}
]
},
{
"from": 8,
"to": [
{
"id": 1
},
{
"id": 2
},
{
"id": 3
},
{
"id": 6
},
{
"id": 8
},
{
"id": 9
}
]
},
{
"from": 9,
"to": [
{
"id": 3
},
{
"id": 4
}
]
}
],
"strats": [
{
"link": [
1,
1
],
"name": "Sciser Skulltera Ice Moonfall Door Lock Skip",
"requires": [
"Gravity",
{
"or": [
"canWalljump",
"canGravityJump",
"h_canFly",
"HiJump",
"canSpringBallJumpMidAir"
]
},
"canEnemyStuckMoonfall",
"canTrickyUseFrozenEnemies"
],
"bypassesDoorShell": true,
"note": [
"Freeze the bottom Skulltera and a Sciser above the door, to set up a moonfall between them, and aim down.",
"After gaining enough speed, press forward to fall down and clip past the door shell below.",
"Falling with too much speed can cause Samus to go out of bounds.",
"Gravity Suit is needed in order to gain enough fall speed before the enemies thaw."
]
},
{
"link": [
1,
1
],
"name": "Shinespark",
"entranceCondition": {
"comeInWithSpark": {},
"comesThroughToilet": "any"
},
"requires": [
{
  "shinespark": {
    "frames": 6,
    "excessFrames": 6
  }
}
],
"note": "Enter on the right side of the doorway to reduce the amount of energy used.",
"devNote": "This strat is not useful in-room, but can satisfy a strat in the room before with an exit shinespark."
},
{
"link": [
1,
1
],
"name": "G-Mode Regain Mobility",
"requires": [
"never"
],
"gModeRegainMobility": {},
"note": "Start on the right side and carefully land on the right edge. If in artificial morph, use spring ball or quickly bomb or bomb over the crab to avoid a second hit.",
"devNote": "FIXME: It may be possible to get hit on the left side, but it would be dependent on the strats coming in, sometimes you're immobilized too high to get hit."
},
{
"link": [
1,
3
],
"name": "Cross Room Jump - Spin Jump",
"entranceCondition": {
"comeInWithPlatformBelow": {
"maxHeight": 6,
"maxLeftPosition": 2,
"minRightPosition": -2
},
"comesThroughToilet": "no"
},
"requires": [
"canCrossRoomJumpIntoWater",
{
"or": [
"h_canCrouchJumpDownGrab",
"canUseFrozenEnemies"
]
}
],
"note": [
"Spin jump to the left through the transition.",
"Bonking the left side of the door frame works but is not required.",
"Hold left through the transition to avoid the fish and land on the platform to the left.",
"Then reach the platform above either using a crouch-jump down-grab or by freezing the fish."
],
"devNote": [
"This doesn't work with passing through the Toilet (e.g. from Climb) because you would spawn higher and not be able to avoid the fish, given that no horiziontal speed is carried through the transition here."
]
},
{
"link": [
1,
3
],
"name": "Cross Room Jump - Tricky Spin Jump through Toilet",
"entranceCondition": {
"comeInWithPlatformBelow": {
"maxHeight": 6,
"maxLeftPosition": -0.5,
"minRightPosition": 4.5
},
"comesThroughToilet": "yes"
},
"requires": [
"canCrossRoomJumpIntoWater",
"canTrickyJump",
{
"or": [
"h_canCrouchJumpDownGrab",
"canUseFrozenEnemies"
]
}
],
"note": [
"Run and spin jump to the left through the transition with as much horiziontal speed as possible, without bonking the door frame.",
"Hold left through the transition to avoid the fish and land on the platform to the left.",
"Then reach the platform above either using a crouch-jump down-grab or by freezing the fish."
],
"devNote": [
"This applies to Basement and Wrecked Ship Main Shaft."
]
},
{
"link": [
1,
3
],
"name": "Cross Room Jump - Insane Spin Jump through Toilet",
"entranceCondition": {
"comeInWithPlatformBelow": {
"maxHeight": 6,
"maxLeftPosition": -0.5,
"minRightPosition": 2.5
},
"comesThroughToilet": "yes"
},
"requires": [
"canCrossRoomJumpIntoWater",
"canInsaneJump",
{
"or": [
"h_canCrouchJumpDownGrab",
"canUseFrozenEnemies"
]
}
],
"note": [
"Run and spin jump to the left through the transition with as much horiziontal speed as possible, without bonking the door frame.",
"Hold left through the transition to avoid the fish and land on the platform to the left.",
"With limited runway, this may require a very precise jump.",
"Then reach the platform above either using a crouch-jump down-grab or by freezing the fish."
],
"devNote": [
"This applies to Crab Maze, Forgotten Highway Elevator, and Red Brinstar Elevator Room."
]
},
{
"link": [
1,
3
],
"name": "Cross Room Jump - Space Jump",
"entranceCondition": {
"comeInWithSpaceJumpBelow": {},
"comesThroughToilet": "any"
},
"requires": [
"canCrossRoomJumpIntoWater"
],
"note": [
"Spin jump against the left side of the door frame, then use Space Jump to jump straight up through the door.",
"Stay to the right of the fish as you go up."
]
},
{
"link": [
1,
3
],
"name": "Cross Room Jump - HiJump Standing Jump",
"entranceCondition": {
"comeInWithPlatformBelow": {
"maxHeight": 8,
"maxLeftPosition": -1,
"minRightPosition": -1.5
},
"comesThroughToilet": "any"
},
"requires": [
"canCrossRoomJumpIntoWater",
"HiJump"
],
"note": [
"Jump straight up through the door with HiJump equipped, aligning with the left side of the door frame.",
"Stay to the right of the fish as you go up."
],
"devNote": [
"Spin jumping does not work (at least not at height 8)."
]
},
{
"link": [
1,
3
],
"name": "Cross Room Jump - HiJump Crouch Jump",
"entranceCondition": {
"comeInWithPlatformBelow": {
"maxHeight": 8.5,
"maxLeftPosition": -1,
"minRightPosition": -1
},
"comesThroughToilet": "any"
},
"requires": [
"canCrossRoomJumpIntoWater",
"canCrouchJump",
"HiJump"
],
"note": [
"Crouch jump up through the door with HiJump equipped, aligning with the left side of the door frame.",
"Stay to the right of the fish as you go up."
],
"devNote": "A crouch jump is not required if passing through the Toilet."
},
{
"link": [
1,
3
],
"name": "Cross Room Jump - HiJump through Toilet",
"entranceCondition": {
"comeInWithPlatformBelow": {
"maxHeight": 8.5,
"maxLeftPosition": -1,
"minRightPosition": -1
},
"comesThroughToilet": "yes"
},
"requires": [
"canCrossRoomJumpIntoWater",
"HiJump"
],
"note": [
"Jump straight up through the door with HiJump equipped, passing through the Toilet.",
"Stay to the right of the fish as you go up."
]
},
{
"link": [
1,
3
],
"name": "Cross Room Jump - HiJump Speed Jump",
"entranceCondition": {
"comeInWithPlatformBelow": {
"maxHeight": 9,
"maxLeftPosition": 2,
"minRightPosition": -2
},
"comesThroughToilet": "any"
},
"requires": [
"canCrossRoomJumpIntoWater",
"SpeedBooster",
"HiJump"
],
"note": [
"Run and jump up through the door using HiJump and SpeedBooster in the room below using at least 1 tile of runway.",
"Stay to the right of the fish as you go up."
]
},
{
"link": [
1,
3
],
"name": "Cross Room Jump - Wall Jump",
"entranceCondition": {
"comeInWithWallJumpBelow": {
"minHeight": 2
},
"comesThroughToilet": "any"
},
"requires": [
"canCrossRoomJumpIntoWater",
"canMidairWiggle"
],
"note": [
"Wall jump relatively low off the right side of the door frame of the room below.",
"Stay to the right of the fish as you go up."
]
},
{
"link": [
1,
3
],
"name": "Cross Room Jump - Speed Jump (From Right)",
"entranceCondition": {
"comeInWithPlatformBelow": {
"minHeight": 9,
"maxHeight": 10,
"maxLeftPosition": 7,
"minRightPosition": 39
},
"comesThroughToilet": "any"
},
"requires": [
"canCrossRoomJumpIntoWater",
"SpeedBooster"
],
"note": [
"Run from right with Speedbooster in the room below, and jump against the left side of the door frame to cancel horizontal momentum before passing through the transition.",
"Stay to the right of the fish as you go up."
],
"devNote": "This strat is applicable only with Crocomire's Room."
},
{
"link": [
1,
3
],
"name": "Cross Room Jump - Speed Jump (From Left)",
"entranceCondition": {
"comeInWithPlatformBelow": {
"minHeight": 9,
"maxHeight": 10,
"maxLeftPosition": -38.5,
"minRightPosition": -7
},
"comesThroughToilet": "any"
},
"requires": [
"canCrossRoomJumpIntoWater",
"SpeedBooster",
"canMidairWiggle"
],
"note": [
"Run from left with Speedbooster in the room below and jump up through the door.",
"Perform a snap turnaround to the left to cancel horizontal momentum before passing through the transition.",
"This is done by turning around and then canceling spin, e.g. by shooting.",
"Stay to the right of the fish as you go up."
],
"devNote": "This strat is applicable with Crocomire's Room and Post Crocomire Jump Room."
},
{
"link": [
1,
3
],
"name": "Cross Room Jump - Tricky Dash Jump",
"entranceCondition": {
"comeInWithPlatformBelow": {
"minHeight": 9,
"maxHeight": 9,
"maxLeftPosition": 7,
"minRightPosition": 21
},
"comesThroughToilet": "any"
},
"requires": [
"canCrossRoomJumpIntoWater",
"canTrickyDashJump"
],
"note": [
"Run from right with Speedbooster in the room below, and jump during a spike in the speed-to-jumpHeight chart.",
"Jump against the left side of the door frame to cancel horizontal momentum before passing through the transition.",
"Stay to the right of the fish as you go up."
],
"devNote": "This strat is applicable only with Post Crocomire Jump Room (after clearing the Power Bomb blocks)."
},
{
"link": [
1,
3
],
"name": "Cross Room Jump - Frozen Fish (Crouch Jump)",
"entranceCondition": {
"comeInWithPlatformBelow": {
"maxHeight": 7,
"maxLeftPosition": 2,
"minRightPosition": -2
},
"comesThroughToilet": "any"
},
"requires": [
"canCrossRoomJumpIntoWater",
"canCrouchJump",
"canTrickyUseFrozenEnemies",
{
"or": [
"Wave",
"Spazer",
"Plasma"
]
}
],
"note": [
"Crouch jump up through the left side of the door transition.",
"Angle up and shoot the fish twice on the way up, then aim down and shoot three more times as needed until it is frozen.",
"Land on the fish, wait until it is flashing, then jump and freeze it again further to left as needed, until you can spin jump to the left to reach the platforms."
]
},
{
"link": [
1,
3
],
"name": "Cross Room Jump - Spring Ball Jump",
"entranceCondition": {
"comeInWithPlatformBelow": {
"maxHeight": 10,
"maxLeftPosition": -1,
"minRightPosition": -1
},
"comesThroughToilet": "any"
},
"requires": [
"canCrossRoomJumpIntoWater",
"canCrouchJump",
"canTrickySpringBallJump"
],
"note": [
"Standing on the platform in the room below, crouch jump and perform a spring ball jump mid-air just before reaching the transition."
]
},
{
"link": [
1,
3
],
"name": "G-Mode Morph IBJ",
"entranceCondition": {
"comeInWithGMode": {
"mode": "any",
"morphed": true
},
"comesThroughToilet": "any"
},
"requires": [
"h_canArtificialMorphIBJ",
"Gravity"
]
},
{
"link": [
1,
6
],
"name": "Shinespark",
"entranceCondition": {
"comeInShinecharged": {
"framesRequired": 80
},
"comesThroughToilet": "any"
},
"requires": [
"Gravity",
{
"or": [
{
"shinespark": {
"frames": 77,
"excessFrames": 3
}
},
{
"and": [
"canMidairShinespark",
{
"shinespark": {
"frames": 69,
"excessFrames": 3
}
}
]
}
]
}
],
"clearsObstacles": [
"A"
]
},
{
"link": [
1,
6
],
"name": "Suitless Shinespark",
"entranceCondition": {
"comeInShinecharged": {
"framesRequired": 120
},
"comesThroughToilet": "any"
},
"requires": [
"canSuitlessMaridia",
{
"shinespark": {
"frames": 77,
"excessFrames": 2
}
}
],
"clearsObstacles": [
"A"
],
"devNote": "FIXME: Add a midair version requiring 0 tanks"
},
{
"link": [
1,
6
],
"name": "G-Mode Morph IBJ Overload Speed Blocks Frozen Crab (From the Bottom)",
"notable": true,
"entranceCondition": {
"comeInWithGMode": {
"mode": "any",
"morphed": true
},
"comesThroughToilet": "any"
},
"requires": [
"h_canArtificialMorphIBJ",
"Gravity",
"canTrickyUseFrozenEnemies",
"Wave",
{
"or": [
"h_canArtificialMorphJumpIntoIBJ",
{
"and": [
"h_canArtificialMorphSpringBall",
"HiJump"
]
},
{
"and": [
"h_canArtificialMorphSpringBall",
"canGravityJump"
]
},
"canDoubleBombJump",
"canStaggeredIBJ",
"canBeVeryPatient",
{
"enemyKill": {
"enemies": [
[
"Skultera"
]
],
"explicitWeapons": [
"PowerBomb"
]
}
}
]
},
{
"or": [
"h_canArtificialMorphSpringBall",
"h_canArtificialMorphCeilingBombJump",
"canBeVeryPatient"
]
}
],
"reusableRoomwideNotable": "Main Street G-Mode Overload Speed Blocks then use Frozen Crab",
"note": [
"This is a long climb, and getting around the fish under the missiles can be tricky or slow.",
"Place bombs against the speed blocks until they are overloaded. Afterwards, freeze a crab on the edge of the speed blocks, such that Samus can jump inside and stand on the crab.",
"Exit G-Mode and rotate to obtain the item, then kill the crab with Wave Beam to fall back down."
]
},
{
"link": [
1,
6
],
"name": "G-Mode Overload Speed Blocks Frozen Crab (From the Bottom)",
"notable": true,
"entranceCondition": {
"comeInWithGMode": {
"mode": "any",
"morphed": false
},
"comesThroughToilet": "any"
},
"requires": [
"canTrickyUseFrozenEnemies",
"Wave",
"h_canUseMorphBombs",
{
"or": [
"Gravity",
{
"and": [
"canSuitlessMaridia",
"HiJump"
]
}
]
},
{
"or": [
"h_canUseSpringBall",
"canBeVeryPatient",
{
"and": [
"Gravity",
"h_canCeilingBombJump",
"h_canIBJ"
]
}
]
}
],
"reusableRoomwideNotable": "Main Street G-Mode Overload Speed Blocks then use Frozen Crab",
"note": [
"Place bombs against the speed blocks until they are overloaded. Afterwards, freeze a crab on the edge of the speed blocks, such that Samus can jump inside and stand on the crab.",
"Exit G-Mode and rotate to obtain the item, then kill the crab with Wave Beam to fall back down."
]
},
{
"link": [
1,
6
],
"name": "G-Mode Morph IBJ PB Overload Speed Blocks Frozen Crab (From the Bottom)",
"notable": true,
"entranceCondition": {
"comeInWithGMode": {
"mode": "direct",
"morphed": true
},
"comesThroughToilet": "no"
},
"requires": [
"h_canArtificialMorphIBJ",
"Gravity",
"canTrickyUseFrozenEnemies",
"Wave",
{
"or": [
"h_canArtificialMorphJumpIntoIBJ",
"canDoubleBombJump",
"canStaggeredIBJ",
"canBeVeryPatient",
{
"enemyKill": {
"enemies": [
[
"Skultera"
]
],
"explicitWeapons": [
"PowerBomb"
]
}
}
]
},
{
"ammo": {
"type": "PowerBomb",
"count": 2
}
}
],
"reusableRoomwideNotable": "Main Street G-Mode Overload Speed Blocks then use Frozen Crab",
"note": [
"This is a long climb, and getting around the fish under the missiles can be tricky or slow.",
"Overloading the PLMs can be done with as few as 2 PBs if they are placed precisely.",
"Place them two ledges above the item - to the left of the morph tunnel item. It is important that they are placed on either of the flat tiles, not the sloped tile on the right.",
"Afterwards, freeze a crab on the edge of the speed blocks, such that Samus can jump inside and stand on the crab.",
"Exit G-Mode and rotate to obtain the item, then kill the crab with Wave Beam to fall back down."
]
},
{
"link": [
1,
6
],
"name": "G-Mode PB Overload Speed Blocks Frozen Crab (From the Bottom)",
"notable": true,
"entranceCondition": {
"comeInWithGMode": {
"mode": "direct",
"morphed": false
},
"comesThroughToilet": "no"
},
"requires": [
"canTrickyUseFrozenEnemies",
"Wave",
{
"or": [
"Gravity",
{
"and": [
"canSuitlessMaridia",
"HiJump"
]
}
]
},
"h_canUsePowerBombs",
"h_canUsePowerBombs"
],
"reusableRoomwideNotable": "Main Street G-Mode Overload Speed Blocks then use Frozen Crab",
"note": [
"Overloading the PLMs can be done with as few as 2 PBs if they are placed precisely.",
"Place them two ledges above the item - to the left of the morph tunnel item. It is important that they are placed on either of the flat tiles, not the sloped tile on the right.",
"Afterwards, freeze a crab on the edge of the speed blocks, such that Samus can jump inside and stand on the crab.",
"Exit G-Mode and rotate to obtain the item, then kill the crab with Wave Beam to fall back down."
]
},
{
"link": [
1,
8
],
"name": "Base",
"requires": []
},
{
"link": [
1,
9
],
"name": "Shinespark",
"entranceCondition": {
"comeInShinecharged": {
"framesRequired": 40
},
"comesThroughToilet": "any"
},
"requires": [
"Gravity",
{
"shinespark": {
"frames": 76,
"excessFrames": 3
}
}
],
"note": "To avoid breaking the speed blocks, align Samus on the first plant, just to the left of the door."
},
{
"link": [
1,
9
],
"name": "Midair Shinespark",
"entranceCondition": {
"comeInShinecharged": {
"framesRequired": 60
},
"comesThroughToilet": "any"
},
"requires": [
"Gravity",
"canMidairShinespark",
{
"shinespark": {
"frames": 71,
"excessFrames": 3
}
}
],
"note": "To avoid breaking the speed blocks, align Samus on the first plant, just to the left of the door."
},
{
"link": [
1,
9
],
"name": "Suitless Shinespark",
"entranceCondition": {
"comeInShinecharged": {
"framesRequired": 60
},
"comesThroughToilet": "any"
},
"requires": [
"canSuitlessMaridia",
{
"shinespark": {
"frames": 76,
"excessFrames": 3
}
}
]
},
{
"link": [
1,
9
],
"name": "Suitless Shinespark Midair",
"entranceCondition": {
"comeInShinecharged": {
"framesRequired": 100
},
"comesThroughToilet": "any"
},
"requires": [
"canSuitlessMaridia",
"canMidairShinespark",
{
"shinespark": {
"frames": 73,
"excessFrames": 3
}
}
]
},
{
"link": [
2,
1
],
"name": "Stored Moonfall Clip",
"entranceCondition": {
"comeInWithStoredFallSpeed": {
"fallSpeedInTiles": 2
}
},
"requires": [
"Gravity",
"canMoonfall"
],
"bypassesDoorShell": true,
"note": [
"Precisely Moonfall along the wall to land on top of the door shell without losing the stored fall speed.",
"Then moonfall again to clip through the door."
]
},
{
"link": [
2,
2
],
"name": "Leave Normally",
"exitCondition": {
"leaveNormally": {}
},
"requires": []
},
{
"link": [
2,
2
],
"name": "Leave with Runway",
"requires": [],
"exitCondition": {
"leaveWithRunway": {
"length": 5,
"steepUpTiles": 1,
"openEnd": 1
}
}
},
{
"link": [
2,
2
],
"name": "Leave With Runway - Frozen Sciser",
"requires": [
"h_canFrozenEnemyRunway"
],
"exitCondition": {
"leaveWithRunway": {
"length": 6,
"steepUpTiles": 1,
"openEnd": 1
}
}
},
{
"link": [
2,
2
],
"name": "G-Mode Setup - Get Hit By Sciser",
"notable": false,
"requires": [],
"exitCondition": {
"leaveWithGModeSetup": {}
}
},
{
"link": [
2,
2
],
"name": "G-Mode Regain Mobility",
"requires": [
{
  "enemyDamage": {
    "enemy": "Sciser",
    "type": "contact",
    "hits": 1
  }
}
],
"gModeRegainMobility": {}
},
{
"link": [
2,
3
],
"name": "Cross Room Jump with Bomb Boost and Spring Ball",
"entranceCondition": {
"comeInWithBombBoost": {}
},
"requires": [
"canSpringBallBombJump",
"canCrossRoomJumpIntoWater",
{
"or": [
"Gravity",
"HiJump",
"canSpringBallJumpMidAir",
"h_canCrouchJumpDownGrab"
]
}
],
"note": [
"Only requires a runway of one tile in the adjacent room.",
"Bomb boost through the doorway, then use spring ball to get to the bottom left ledge.",
"To avoid hitting the Skultera, place the bomb a few pixels from the doorway.",
"One way to setup the positioning of the bomb is to place it, unmorph, rotate, and remorph"
]
},
{
"link": [
2,
3
],
"name": "Cross Room Jump with SpeedBooster",
"entranceCondition": {
"comeInRunning": {
"minTiles": 12.4375,
"speedBooster": true
}
},
"requires": [
"canCrossRoomJumpIntoWater",
"canCarefulJump"
],
"note": "Run with enough speed to jump (after the transition) to reach the far left ledge."
},
{
"link": [
2,
3
],
"name": "Cross Room Jump with HiJump",
"entranceCondition": {
"comeInRunning": {
"minTiles": 7,
"speedBooster": true
}
},
"requires": [
"HiJump",
"canCrossRoomJumpIntoWater",
"canTrickyJump",
"canDodgeWhileShooting",
{
"or": [
{
"ammo": {
"type": "Super",
"count": 1
}
},
{
"and": [
"Charge",
"Plasma"
]
},
{
"and": [
"Plasma",
"canHitbox"
]
},
{
"and": [
"canKago",
"canLateralMidAirMorph",
{
"enemyDamage": {
"enemy": "Skultera",
"type": "contact",
"hits": 1
}
}
]
}
]
}
],
"note": [
"Run with enough speed to jump (after the transition) to reach the far left ledge.",
"Either kill or Kago through the Fish enemy.",
"At slightly higher run speeds, Samus can jump from the bottom of the slope and avoid the fish."
]
},
{
"link": [
2,
3
],
"name": "Cross Room TrickyDashJump",
"entranceCondition": {
"comeInRunning": {
"minTiles": 6.4375,
"speedBooster": true
}
},
"requires": [
"canCrossRoomJumpIntoWater",
"canTrickyDashJump",
"canDodgeWhileShooting",
{
"or": [
{
"ammo": {
"type": "Super",
"count": 1
}
},
{
"and": [
"Charge",
"Plasma"
]
},
{
"and": [
"Plasma",
"canHitbox"
]
},
{
"and": [
"canKago",
"canLateralMidAirMorph",
{
"enemyDamage": {
"enemy": "Skultera",
"type": "contact",
"hits": 1
}
}
]
}
]
}
],
"note": [
"Run with 7 tiles (no openend) of speed to jump (after the transition) to reach the far left ledge.",
"Either kill or Kago through the Fish enemy."
]
},
{
"link": [
2,
3
],
"name": "Cross Room TrickyDashJump with HiJump",
"entranceCondition": {
"comeInRunning": {
"minTiles": 4,
"speedBooster": true
}
},
"requires": [
"HiJump",
"canCrossRoomJumpIntoWater",
"canTrickyDashJump"
],
"note": [
"Bring 4 full tiles of run speed from the adjacent room in order to jump (after the transition) up to the far left ledge.",
"Either kill the Fish enemy, or jump from the bottom of the slope to pass underneath it."
]
},
{
"link": [
2,
3
],
"name": "X-Ray Climb",
"entranceCondition": {
"comeInWithDoorStuckSetup": {}
},
"requires": [
"canXRayClimb"
],
"note": "Climb up 1 screen."
},
{
"link": [
2,
3
],
"name": "G-Mode Morph IBJ",
"entranceCondition": {
"comeInWithGMode": {
"mode": "any",
"morphed": true
}
},
"requires": [
"h_canArtificialMorphIBJ",
"Gravity"
]
},
{
"link": [
2,
6
],
"name": "Shinespark",
"entranceCondition": {
"comeInShinecharging": {
"length": 4,
"steepDownTiles": 1,
"openEnd": 1
}
},
"requires": [
"Gravity",
{
"or": [
{
"shinespark": {
"frames": 77,
"excessFrames": 3
}
},
{
"and": [
"canMidairShinespark",
{
"shinespark": {
"frames": 69,
"excessFrames": 3
}
}
]
}
]
}
],
"clearsObstacles": [
"A"
]
},
{
"link": [
2,
6
],
"name": "Shinespark, Come in Shinecharged",
"entranceCondition": {
"comeInShinecharged": {
"framesRequired": 120
}
},
"requires": [
"Gravity",
{
"or": [
{
"shinespark": {
"frames": 77,
"excessFrames": 3
}
},
{
"and": [
"canMidairShinespark",
{
"shinespark": {
"frames": 69,
"excessFrames": 3
}
}
]
}
]
}
],
"clearsObstacles": [
"A"
]
},
{
"link": [
2,
6
],
"name": "Suitless Shinespark",
"entranceCondition": {
"comeInShinecharging": {
"length": 1,
"openEnd": 1
}
},
"requires": [
"canSuitlessMaridia",
{
"shinespark": {
"frames": 77,
"excessFrames": 2
}
}
],
"clearsObstacles": [
"A"
],
"devNote": "FIXME: Add a midair version requiring 0 tanks"
},
{
"link": [
2,
6
],
"name": "G-Mode Morph IBJ Overload Speed Blocks Frozen Crab (From the Bottom)",
"notable": true,
"entranceCondition": {
"comeInWithGMode": {
"mode": "any",
"morphed": true
}
},
"requires": [
"h_canArtificialMorphIBJ",
"Gravity",
"canTrickyUseFrozenEnemies",
"Wave",
{
"or": [
"h_canArtificialMorphJumpIntoIBJ",
{
"and": [
"h_canArtificialMorphSpringBall",
"HiJump"
]
},
{
"and": [
"h_canArtificialMorphSpringBall",
"canGravityJump"
]
},
"canDoubleBombJump",
"canStaggeredIBJ",
"canBeVeryPatient",
{
"enemyKill": {
"enemies": [
[
"Skultera"
]
],
"explicitWeapons": [
"PowerBomb"
]
}
}
]
},
{
"or": [
"h_canArtificialMorphSpringBall",
"h_canArtificialMorphCeilingBombJump",
"canBeVeryPatient"
]
}
],
"reusableRoomwideNotable": "Main Street G-Mode Overload Speed Blocks then use Frozen Crab",
"note": [
"This is a long climb, and getting around the fish under the missiles can be tricky or slow.",
"Place bombs against the speed blocks until they are overloaded. Afterwards, freeze a crab on the edge of the speed blocks, such that Samus can jump inside and stand on the crab.",
"Exit G-Mode and rotate to obtain the item, then kill the crab with Wave Beam to fall back down."
]
},
{
"link": [
2,
6
],
"name": "G-Mode Overload Speed Blocks Frozen Crab (From the Bottom)",
"notable": true,
"entranceCondition": {
"comeInWithGMode": {
"mode": "any",
"morphed": false
}
},
"requires": [
"canTrickyUseFrozenEnemies",
"Wave",
"h_canUseMorphBombs",
{
"or": [
"Gravity",
{
"and": [
"canSuitlessMaridia",
"HiJump"
]
}
]
},
{
"or": [
"h_canUseSpringBall",
"canBeVeryPatient",
{
"and": [
"Gravity",
"h_canCeilingBombJump",
"h_canIBJ"
]
}
]
}
],
"reusableRoomwideNotable": "Main Street G-Mode Overload Speed Blocks then use Frozen Crab",
"note": [
"Place bombs against the speed blocks until they are overloaded. Afterwards, freeze a crab on the edge of the speed blocks, such that Samus can jump inside and stand on the crab.",
"Exit G-Mode and rotate to obtain the item, then kill the crab with Wave Beam to fall back down."
]
},
{
"link": [
2,
6
],
"name": "G-Mode Morph IBJ PB Overload Speed Blocks Frozen Crab (From the Bottom)",
"notable": true,
"entranceCondition": {
"comeInWithGMode": {
"mode": "direct",
"morphed": true
}
},
"requires": [
"h_canArtificialMorphIBJ",
"Gravity",
"canTrickyUseFrozenEnemies",
"Wave",
{
"or": [
"h_canArtificialMorphJumpIntoIBJ",
"h_canArtificialMorphDoubleBombJump",
"h_canArtificialMorphStaggeredIBJ",
"canBeVeryPatient",
{
"enemyKill": {
"enemies": [
[
"Skultera"
]
],
"explicitWeapons": [
"PowerBomb"
]
}
}
]
},
"h_canArtificialMorphPowerBomb",
"h_canArtificialMorphPowerBomb"
],
"reusableRoomwideNotable": "Main Street G-Mode Overload Speed Blocks then use Frozen Crab",
"note": [
"This is a long climb, and getting around the fish under the missiles can be tricky or slow.",
"Overloading the PLMs can be done with as few as 2 PBs if they are placed precisely.",
"Place them two ledges above the item - to the left of the morph tunnel item. It is important that they are placed on either of the flat tiles, not the sloped tile on the right.",
"Afterwards, freeze a crab on the edge of the speed blocks, such that Samus can jump inside and stand on the crab.",
"Exit G-Mode and rotate to obtain the item, then kill the crab with Wave Beam to fall back down."
]
},
{
"link": [
2,
6
],
"name": "G-Mode PB Overload Speed Blocks Frozen Crab (From the Bottom)",
"notable": true,
"entranceCondition": {
"comeInWithGMode": {
"mode": "direct",
"morphed": false
}
},
"requires": [
"canTrickyUseFrozenEnemies",
"Wave",
{
"or": [
"Gravity",
{
"and": [
"canSuitlessMaridia",
"HiJump"
]
}
]
},
"h_canUsePowerBombs",
"h_canUsePowerBombs"
],
"reusableRoomwideNotable": "Main Street G-Mode Overload Speed Blocks then use Frozen Crab",
"note": [
"Overloading the PLMs can be done with as few as 2 PBs if they are placed precisely.",
"Place them two ledges above the item - to the left of the morph tunnel item. It is important that they are placed on either of the flat tiles, not the sloped tile on the right.",
"Afterwards, freeze a crab on the edge of the speed blocks, such that Samus can jump inside and stand on the crab.",
"Exit G-Mode and rotate to obtain the item, then kill the crab with Wave Beam to fall back down."
]
},
{
"link": [
2,
8
],
"name": "Base",
"requires": []
},
{
"link": [
2,
9
],
"name": "Shinespark",
"entranceCondition": {
"comeInShinecharging": {
"length": 4,
"steepDownTiles": 1,
"openEnd": 1
}
},
"requires": [
"Gravity",
{
"or": [
{
"shinespark": {
"frames": 76,
"excessFrames": 3
}
},
{
"and": [
"canMidairShinespark",
{
"shinespark": {
"frames": 71,
"excessFrames": 3
}
}
]
}
]
}
],
"note": "To avoid breaking the speed blocks, align Samus on the first plant, just to the left of the door."
},
{
"link": [
2,
9
],
"name": "Shinespark, Come in Shinecharged",
"entranceCondition": {
"comeInShinecharged": {
"framesRequired": 70
}
},
"requires": [
"Gravity",
{
"or": [
{
"shinespark": {
"frames": 76,
"excessFrames": 3
}
},
{
"and": [
"canMidairShinespark",
{
"shinespark": {
"frames": 71,
"excessFrames": 3
}
}
]
}
]
}
],
"note": "To avoid breaking the speed blocks, align Samus on the first plant, just to the left of the door."
},
{
"link": [
2,
9
],
"name": "Suitless Shinespark",
"entranceCondition": {
"comeInShinecharging": {
"length": 1,
"openEnd": 1
}
},
"requires": [
"canSuitlessMaridia",
{
"or": [
{
"shinespark": {
"frames": 76,
"excessFrames": 3
}
},
{
"and": [
"canMidairShinespark",
{
"shinespark": {
"frames": 71,
"excessFrames": 3
}
}
]
}
]
}
]
},
{
"link": [
2,
9
],
"name": "Suitless Shinespark, Come in Shinecharged",
"entranceCondition": {
"comeInShinecharged": {
"framesRequired": 100
}
},
"requires": [
"canSuitlessMaridia",
"canShinechargeMovement",
{
"or": [
{
"shinespark": {
"frames": 76,
"excessFrames": 3
}
},
{
"and": [
"canMidairShinespark",
{
"shinespark": {
"frames": 71,
"excessFrames": 3
}
}
]
}
]
}
],
"devNote": "This also requires coming in with a small amount of momentum. Even running less than the distance of a door frame is enough, but isn't able to be modeled currently."
},
{
"link": [
3,
1
],
"name": "Leave Shinecharged",
"requires": [
"Gravity",
"canShinechargeMovement",
{
"or": [
{
"canShineCharge": {
"usedTiles": 24,
"gentleUpTiles": 3,
"gentleDownTiles": 3,
"openEnd": 1
}
},
{
"and": [
{
"doorUnlockedAtNode": 3
},
{
"canShineCharge": {
"usedTiles": 25,
"gentleUpTiles": 3,
"gentleDownTiles": 3,
"openEnd": 1
}
}
]
}
]
}
],
"exitCondition": {
"leaveShinecharged": {
"framesRemaining": 76
}
},
"unlocksDoors": [
{
"nodeId": 3,
"types": [
"ammo"
],
"requires": []
},
{
"types": [
"super"
],
"requires": []
},
{
"types": [
"missiles",
"powerbomb"
],
"requires": [
{
"or": [
"canWalljump",
"canGravityJump"
]
}
]
}
]
},
{
"link": [
3,
2
],
"name": "Leave Shinecharged",
"requires": [
"Gravity",
"canShinechargeMovement",
{
"or": [
{
"canShineCharge": {
"usedTiles": 24,
"gentleUpTiles": 3,
"gentleDownTiles": 3,
"openEnd": 1
}
},
{
"and": [
{
"doorUnlockedAtNode": 3
},
{
"canShineCharge": {
"usedTiles": 25,
"gentleUpTiles": 3,
"gentleDownTiles": 3,
"openEnd": 1
}
}
]
}
]
}
],
"exitCondition": {
"leaveShinecharged": {
"framesRemaining": 40
}
},
"unlocksDoors": [
{
"nodeId": 3,
"types": [
"ammo"
],
"requires": []
},
{
"types": [
"super"
],
"requires": []
},
{
"types": [
"missiles",
"powerbomb"
],
"requires": [
{
"or": [
"canWalljump",
"canGravityJump"
]
}
]
}
]
},
{
"link": [
3,
3
],
"name": "Leave with Runway",
"requires": [],
"exitCondition": {
"leaveWithRunway": {
"length": 25,
"gentleUpTiles": 3,
"gentleDownTiles": 3,
"openEnd": 1
}
}
},
{
"link": [
3,
3
],
"name": "Leave With Runway - Frozen Sciser",
"requires": [
"h_canFrozenEnemyRunway"
],
"exitCondition": {
"leaveWithRunway": {
"length": 26,
"gentleUpTiles": 3,
"gentleDownTiles": 3,
"openEnd": 1
}
},
"note": "Wait about 25 seconds for the global crab. Position Samus on the first floating platform to shoot the crab as quickly and early as possible."
},
{
"link": [
3,
3
],
"name": "Suitless Stutter Water Shinecharge, Return (Bottom)",
"entranceCondition": {
"comeInRunning": {
"speedBooster": true,
"minTiles": 1
}
},
"requires": [
"canStutterWaterShineCharge",
"canShinechargeMovementComplex",
{
"canShineCharge": {
"usedTiles": 33,
"openEnd": 2
}
},
{
"shinespark": {
"frames": 19
}
}
],
"exitCondition": {
"leaveWithSpark": {
"position": "bottom"
}
},
"unlocksDoors": [
{
"types": [
"super"
],
"requires": []
},
{
"types": [
"missiles",
"powerbomb"
],
"requires": [
"never"
]
}
]
},
{
"link": [
3,
3
],
"name": "Suitless Stutter Water Shinecharge, Return (Top)",
"entranceCondition": {
"comeInRunning": {
"speedBooster": true,
"minTiles": 1
}
},
"requires": [
"canStutterWaterShineCharge",
"canShinechargeMovementTricky",
{
"canShineCharge": {
"usedTiles": 33,
"openEnd": 2
}
},
{
"shinespark": {
"frames": 11
}
}
],
"exitCondition": {
"leaveWithSpark": {}
},
"unlocksDoors": [
{
"types": [
"super"
],
"requires": []
},
{
"types": [
"missiles",
"powerbomb"
],
"requires": [
"never"
]
}
]
},
{
"link": [
3,
3
],
"name": "Suitless Stutter Water Shinecharge, Return (Long Stutter)",
"entranceCondition": {
"comeInRunning": {
"speedBooster": true,
"minTiles": 2
}
},
"requires": [
"canStutterWaterShineCharge",
"canShinechargeMovementComplex",
{
"canShineCharge": {
"usedTiles": 33,
"openEnd": 2
}
},
{
"or": [
{
"shinespark": {
"frames": 9
}
},
{
"and": [
"canShinechargeMovementTricky",
{
"shinespark": {
"frames": 2
}
}
]
}
]
}
],
"exitCondition": {
"leaveWithSpark": {}
},
"unlocksDoors": [
{
"types": [
"super"
],
"requires": []
},
{
"types": [
"missiles",
"powerbomb"
],
"requires": [
"never"
]
}
]
},
{
"link": [
3,
3
],
"name": "Sciser Farm",
"requires": [
"h_canNavigateUnderwater",
{
"resetRoom": {
"nodes": [
3
],
"mustStayPut": false
}
},
{
"refill": [
"PowerBomb"
]
}
]
},
{
"link": [
3,
3
],
"name": "Crystal Flash",
"requires": [
"h_canCrystalFlash"
]
},
{
"link": [
3,
3
],
"name": "G-Mode Setup - Get Hit By Sciser",
"notable": false,
"requires": [],
"exitCondition": {
"leaveWithGModeSetup": {}
}
},
{
"link": [
3,
3
],
"name": "G-Mode Regain Mobility",
"requires": [
{
  "enemyDamage": {
    "enemy": "Sciser",
    "type": "contact",
    "hits": 1
  }
}
],
"gModeRegainMobility": {},
"note": "The global crab takes 37 seconds to get to Samus."
},
{
"link": [
3,
4
],
"name": "G-Mode Morph IBJ",
"entranceCondition": {
"comeInWithGMode": {
"mode": "any",
"morphed": true
}
},
"requires": [
"h_canArtificialMorphIBJ",
"Gravity",
{
"or": [
"h_canArtificialMorphJumpIntoIBJ",
"h_canArtificialMorphDoubleBombJump",
"h_canArtificialMorphStaggeredIBJ",
"canBeVeryPatient"
]
}
],
"note": "This is a long climb, and getting around the fish under the missiles can be tricky or slow."
},
{
"link": [
3,
6
],
"name": "In-Room Shinespark",
"requires": [
"Gravity",
{
"or": [
{
"canShineCharge": {
"usedTiles": 24,
"gentleUpTiles": 3,
"gentleDownTiles": 3,
"openEnd": 1
}
},
{
"and": [
{
"doorUnlockedAtNode": 3
},
{
"canShineCharge": {
"usedTiles": 25,
"gentleUpTiles": 3,
"gentleDownTiles": 3,
"openEnd": 1
}
}
]
}
]
},
{
"or": [
{
"shinespark": {
"frames": 77,
"excessFrames": 2
}
},
{
"and": [
"canMidairShinespark",
{
"shinespark": {
"frames": 50,
"excessFrames": 2
}
}
]
}
]
}
],
"clearsObstacles": [
"A"
]
},
{
"link": [
3,
6
],
"name": "Shinespark",
"entranceCondition": {
"comeInShinecharging": {
"length": 24,
"gentleUpTiles": 3,
"gentleDownTiles": 3,
"openEnd": 1
}
},
"requires": [
"Gravity",
{
"or": [
{
"shinespark": {
"frames": 77,
"excessFrames": 2
}
},
{
"and": [
"canMidairShinespark",
{
"shinespark": {
"frames": 50,
"excessFrames": 2
}
}
]
}
]
}
],
"clearsObstacles": [
"A"
]
},
{
"link": [
3,
6
],
"name": "Shinespark, Come in Shinecharged",
"entranceCondition": {
"comeInShinecharged": {
"framesRequired": 150
}
},
"requires": [
"Gravity",
"canMidairShinespark",
"canCarefulJump",
"canShinechargeMovement",
{
"shinespark": {
"frames": 50,
"excessFrames": 2
}
}
],
"clearsObstacles": [
"A"
]
},
{
"link": [
3,
6
],
"name": "Suitless Water Shinecharge",
"entranceCondition": {
"comeInShinecharging": {
"length": 7,
"openEnd": 1
}
},
"requires": [
"canWaterShineCharge",
"canMidairShinespark",
"canCarefulJump",
"canShinechargeMovement",
{
"canShineCharge": {
"usedTiles": 33,
"openEnd": 2
}
},
{
"shinespark": {
"frames": 62,
"excessFrames": 2
}
}
],
"clearsObstacles": [
"A"
],
"devNote": "This runway length is just an estimate of the worst case scenario for difficulties that can't use canStutterWaterShineCharge."
},
{
"link": [
3,
6
],
"name": "Suitless Stutter Water Shinecharge",
"entranceCondition": {
"comeInRunning": {
"speedBooster": true,
"minTiles": 1
}
},
"requires": [
"canStutterWaterShineCharge",
"canMidairShinespark",
{
"canShineCharge": {
"usedTiles": 33,
"openEnd": 2
}
},
{
"shinespark": {
"frames": 62,
"excessFrames": 2
}
}
],
"clearsObstacles": [
"A"
],
"note": "This can be done with only a door-frame runway in the adjacent room.",
"devNote": "It can technically be done without a stutter, but it's not really easier."
},
{
"link": [
3,
6
],
"name": "G-Mode Morph IBJ Overload Speed Blocks Frozen Crab (From the Middle)",
"notable": true,
"entranceCondition": {
"comeInWithGMode": {
"mode": "any",
"morphed": true
}
},
"requires": [
"h_canArtificialMorphIBJ",
"Gravity",
"canTrickyUseFrozenEnemies",
"Wave",
{
"or": [
"h_canArtificialMorphJumpIntoIBJ",
{
"and": [
"h_canArtificialMorphSpringBall",
"HiJump"
]
},
{
"and": [
"h_canArtificialMorphSpringBall",
"canGravityJump"
]
},
"h_canArtificialMorphDoubleBombJump",
"h_canArtificialMorphStaggeredIBJ",
"canBeVeryPatient",
{
"enemyKill": {
"enemies": [
[
"Skultera"
]
],
"explicitWeapons": [
"PowerBomb"
]
}
}
]
},
{
"or": [
"h_canArtificialMorphSpringBall",
"h_canArtificialMorphCeilingBombJump",
"canBeVeryPatient"
]
}
],
"reusableRoomwideNotable": "Main Street G-Mode Overload Speed Blocks then use Frozen Crab",
"note": [
"This is a long climb, and getting around the fish under the missiles can be tricky or slow.",
"Place bombs against the speed blocks until they are overloaded. Afterwards, freeze a crab on the edge of the speed blocks, such that Samus can jump inside and stand on the crab.",
"Exit G-Mode and rotate to obtain the item, then kill the crab with Wave Beam to fall back down."
]
},
{
"link": [
3,
6
],
"name": "G-Mode Overload Speed Blocks Frozen Crab (From the Middle)",
"notable": true,
"entranceCondition": {
"comeInWithGMode": {
"mode": "any",
"morphed": false
}
},
"requires": [
"canTrickyUseFrozenEnemies",
"Wave",
"h_canUseMorphBombs",
{
"or": [
"Gravity",
{
"and": [
"canSuitlessMaridia",
"HiJump"
]
}
]
},
{
"or": [
"h_canUseSpringBall",
"canBeVeryPatient",
{
"and": [
"Gravity",
"h_canCeilingBombJump",
"h_canIBJ"
]
}
]
}
],
"reusableRoomwideNotable": "Main Street G-Mode Overload Speed Blocks then use Frozen Crab",
"note": [
"Place bombs against the speed blocks until they are overloaded. Afterwards, freeze a crab on the edge of the speed blocks, such that Samus can jump inside and stand on the crab.",
"Exit G-Mode and rotate to obtain the item, then kill the crab with Wave Beam to fall back down."
]
},
{
"link": [
3,
6
],
"name": "G-Mode Morph IBJ PB Overload Speed Blocks Frozen Crab (From the Middle)",
"notable": true,
"entranceCondition": {
"comeInWithGMode": {
"mode": "direct",
"morphed": true
}
},
"requires": [
"h_canArtificialMorphIBJ",
"Gravity",
"canTrickyUseFrozenEnemies",
"Wave",
{
"or": [
"h_canArtificialMorphJumpIntoIBJ",
"h_canArtificialMorphDoubleBombJump",
"h_canArtificialMorphStaggeredIBJ",
"canBeVeryPatient",
{
"enemyKill": {
"enemies": [
[
"Skultera"
]
],
"explicitWeapons": [
"PowerBomb"
]
}
}
]
},
"h_canArtificialMorphPowerBomb",
"h_canArtificialMorphPowerBomb"
],
"reusableRoomwideNotable": "Main Street G-Mode Overload Speed Blocks then use Frozen Crab",
"note": [
"This is a long climb, and getting around the fish under the missiles can be tricky or slow.",
"Overloading the PLMs can be done with as few as 2 PBs if they are placed precisely.",
"Place them two ledges above the item - to the left of the morph tunnel item. It is important that they are placed on either of the flat tiles, not the sloped tile on the right.",
"Afterwards, freeze a crab on the edge of the speed blocks, such that Samus can jump inside and stand on the crab.",
"Exit G-Mode and rotate to obtain the item, then kill the crab with Wave Beam to fall back down."
]
},
{
"link": [
3,
6
],
"name": "G-Mode PB Overload Speed Blocks Frozen Crab (From the Middle)",
"notable": true,
"entranceCondition": {
"comeInWithGMode": {
"mode": "direct",
"morphed": false
}
},
"requires": [
"canTrickyUseFrozenEnemies",
"Wave",
{
"or": [
"Gravity",
{
"and": [
"canSuitlessMaridia",
"HiJump"
]
}
]
},
"h_canUsePowerBombs",
"h_canUsePowerBombs"
],
"reusableRoomwideNotable": "Main Street G-Mode Overload Speed Blocks then use Frozen Crab",
"note": [
"Overloading the PLMs can be done with as few as 2 PBs if they are placed precisely.",
"Place them two ledges above the item - to the left of the morph tunnel item. It is important that they are placed on either of the flat tiles, not the sloped tile on the right.",
"Afterwards, freeze a crab on the edge of the speed blocks, such that Samus can jump inside and stand on the crab.",
"Exit G-Mode and rotate to obtain the item, then kill the crab with Wave Beam to fall back down."
]
},
{
"link": [
3,
8
],
"name": "Base",
"requires": []
},
{
"link": [
3,
9
],
"name": "Base",
"requires": [
"Gravity",
{
"or": [
"HiJump",
"canWalljump",
"h_canFly",
"canUseFrozenEnemies",
"canSpringBallJumpMidAir",
"canGravityJump"
]
}
]
},
{
"link": [
3,
9
],
"name": "Suitless Jump Assists",
"requires": [
"canSuitlessMaridia",
"HiJump",
"canSpringBallJumpMidAir"
]
},
{
"link": [
3,
9
],
"name": "Suitless Frozen Enemies",
"requires": [
"canSuitlessMaridia",
"HiJump",
"canTrickyUseFrozenEnemies"
]
},
{
"link": [
3,
9
],
"name": "Main Street Climb with Ice and Spring Ball",
"notable": true,
"requires": [
"canSuitlessMaridia",
"canTrickySpringBallJump",
"canTrickyUseFrozenEnemies",
"canTrickyJump"
],
"note": [
"The tricky part is getting to the ledge below the missiles. There are two ways to do this:",
"1. Stand on a frozen crab with a frozen fish at the lowest height of its cycle to the right. Further to the right is better as long as it can be stood upon without the ledge above.",
"Perform a stationary lateral midair morph into a max height spring ball jump to get onto the fish before it thaws.",
"Press against the fish for the maximum amount of time possible while moving upwards in order to gain more height in order to get on top of it.",
"2. Freeze the global crab on the right wall, get onto it and up and onto the frozen fish before it thaws. Be careful not to fall through the crab.",
"A fail will require Samus to reset the room, or wait a very long time in order for the crab to circle the room.",
"Using a Super may make the crab fall on a floating platform, and it still takes more than a minute to return.",
"Note that it is possible to turn off ice beam to immediately thaw any frozen enemies; this can help get the crab and fish in a good cycle with each other."
]
},
{
"link": [
3,
9
],
"name": "Main Street Underwater Walljumps (Middle)",
"notable": true,
"requires": [
"canUnderwaterWalljump"
],
"reusableRoomwideNotable": "Main Street Underwater Walljumps",
"note": "This underwater walljump is relatively long."
},
{
"link": [
3,
9
],
"name": "Main Street Mid Crab Climb with Only Ice and Supers",
"notable": true,
"requires": [
"canSuitlessMaridia",
"canCrazyCrabClimb",
"canBeVeryPatient",
{
"ammo": {
"type": "Super",
"count": 1
}
}
],
"reusableRoomwideNotable": "Main Street Crab Climb with Only Ice and Supers",
"note": [
"Use the slow global crab and Skulteras to get up. The last part, just below the item is the hardest.",
"Wait for the global crab to be on vertical portion the ledge jutting out on the right or left - any other locations and it will fall on a platform and get stuck.",
"Shoot a super and freeze it mid air. Using the frozen crab on the platform, the mid air crab, and the fish, jump up to the solid ground.",
"Freeze the Skultera at the left, near its minimum and jump to it, then the solid ground.",
"Note that the fish will be pushed down slightly over time because of the sloped tiles, but it will be at its minimum by the time the global crab has arrived."
]
},
{
"link": [
3,
9
],
"name": "Main Street Ice Only Mid Crab Climb",
"notable": true,
"requires": [
"canSuitlessMaridia",
"canCrazyCrabClimb",
"canBeVeryPatient",
{
"or": [
"canSunkenTileWideWallClimb",
"canTrickyJump"
]
}
],
"reusableRoomwideNotable": "Main Street Crab Climb with Only Ice",
"note": [
"Use the slow global crab and Skulteras to get up. The last part, just below the item is the hardest.",
"Get onto the global crab on the right wall. Either freeze the Skultera close to the wall and wall jump between them.",
"or, a harder option without wall jumps is to refreeze the crab again, higher on the wall, while being careful not to clip through it.",
"Freeze the Skultera at the left, near its minimum and jump to it, then the solid ground.",
"Note that the fish will be pushed down slightly over time because of the sloped tiles, but it will be at its minimum by the time the global crab has arrived."
]
},
{
"link": [
3,
9
],
"name": "In-Room Shinespark",
"requires": [
"Gravity",
{
"or": [
{
"canShineCharge": {
"usedTiles": 24,
"gentleUpTiles": 3,
"gentleDownTiles": 3,
"openEnd": 1
}
},
{
"and": [
{
"doorUnlockedAtNode": 3
},
{
"canShineCharge": {
"usedTiles": 25,
"gentleUpTiles": 3,
"gentleDownTiles": 3,
"openEnd": 1
}
}
]
}
]
},
{
"or": [
{
"shinespark": {
"frames": 76,
"excessFrames": 3
}
},
{
"and": [
"canMidairShinespark",
{
"shinespark": {
"frames": 50,
"excessFrames": 3
}
}
]
}
]
}
]
},
{
"link": [
3,
9
],
"name": "Shinespark",
"entranceCondition": {
"comeInShinecharging": {
"length": 24,
"gentleUpTiles": 3,
"gentleDownTiles": 3,
"openEnd": 1
}
},
"requires": [
"Gravity",
{
"or": [
{
"shinespark": {
"frames": 76,
"excessFrames": 3
}
},
{
"and": [
"canMidairShinespark",
{
"shinespark": {
"frames": 50,
"excessFrames": 3
}
}
]
}
]
}
]
},
{
"link": [
3,
9
],
"name": "Shinespark, Come in Shinecharged",
"entranceCondition": {
"comeInShinecharged": {
"framesRequired": 100
}
},
"requires": [
"Gravity",
{
"shinespark": {
"frames": 58,
"excessFrames": 3
}
}
]
},
{
"link": [
3,
9
],
"name": "Midair Shinespark",
"entranceCondition": {
"comeInShinecharged": {
"framesRequired": 80
}
},
"requires": [
"Gravity",
"canShinechargeMovement",
"canMidairShinespark",
{
"shinespark": {
"frames": 50,
"excessFrames": 3
}
}
]
},
{
"link": [
3,
9
],
"name": "Suitless Shinespark",
"entranceCondition": {
"comeInShinecharged": {
"framesRequired": 145
}
},
"requires": [
"canSuitlessMaridia",
"canShinechargeMovement",
"canMidairShinespark",
{
"shinespark": {
"frames": 55,
"excessFrames": 3
}
}
],
"devNote": "This also requires coming in with a small amount of momentum. Even running less than the distance of a door frame is enough, but isn't able to be modeled currently."
},
{
"link": [
3,
9
],
"name": "Suitless Water Shinecharge",
"entranceCondition": {
"comeInShinecharging": {
"length": 7,
"openEnd": 1
}
},
"requires": [
"canWaterShineCharge",
"canMidairShinespark",
{
"canShineCharge": {
"usedTiles": 33,
"openEnd": 2
}
},
{
"shinespark": {
"frames": 35,
"excessFrames": 3
}
}
],
"devNote": "This runway length is just an estimate of the worst case scenario for difficulties that can't use canStutterWaterShineCharge."
},
{
"link": [
3,
9
],
"name": "Suitless Stutter Water Shinecharge",
"entranceCondition": {
"comeInRunning": {
"speedBooster": true,
"minTiles": 1
}
},
"requires": [
"canStutterWaterShineCharge",
"canMidairShinespark",
{
"canShineCharge": {
"usedTiles": 33,
"openEnd": 2
}
},
{
"shinespark": {
"frames": 35,
"excessFrames": 3
}
}
],
"note": "This can be done with only a door-frame runway in the adjacent room.",
"devNote": "This can technically be done without a stutter, but it's not really easier."
},
{
"link": [
4,
4
],
"name": "Leave with Runway",
"requires": [],
"exitCondition": {
"leaveWithRunway": {
"length": 15,
"steepUpTiles": 2,
"openEnd": 1
}
}
},
{
"link": [
4,
4
],
"name": "Leave With Runway - Frozen Sciser",
"requires": [
"h_canFrozenEnemyRunway"
],
"exitCondition": {
"leaveWithRunway": {
"length": 16,
"steepUpTiles": 2,
"openEnd": 1
}
}
},
{
"link": [
4,
4
],
"name": "Sciser Farm",
"requires": [
"h_canNavigateUnderwater",
{
"resetRoom": {
"nodes": [
4
],
"mustStayPut": false
}
},
{
"refill": [
"PowerBomb"
]
}
]
},
{
"link": [
4,
4
],
"name": "Crystal Flash",
"requires": [
"h_canCrystalFlash"
]
},
{
"link": [
4,
4
],
"name": "G-Mode Setup - Get Hit By Sciser",
"notable": false,
"requires": [],
"exitCondition": {
"leaveWithGModeSetup": {}
}
},
{
"link": [
4,
4
],
"name": "G-Mode Regain Mobility",
"requires": [
{
  "enemyDamage": {
    "enemy": "Sciser",
    "type": "contact",
    "hits": 1
  }
}
],
"gModeRegainMobility": {}
},
{
"link": [
4,
6
],
"name": "Temporary Blue Chain",
"entranceCondition": {
"comeInShinecharging": {
"length": 14,
"steepDownTiles": 2,
"openEnd": 0
}
},
"requires": [
"Gravity",
"canChainTemporaryBlue",
"canXRayTurnaround"
],
"note": [
"Bring a Shinecharge from the top door to the speed blocks below the Missile item location.",
"Be especially mindfull of the aquatic life during the descent.",
"Line up directly below the speed blocks when jumping up."
],
"devNote": "For other doors, a shinespark is more reasonable than a complex Temporary Blue Chain. And the enemies here are farmable for energy."
},
{
"link": [
4,
6
],
"name": "Temporary Blue Chain, Suitless Stutter Water Shinecharge",
"entranceCondition": {
"comeInRunning": {
"speedBooster": true,
"minTiles": 1.4375
}
},
"requires": [
"canChainTemporaryBlue",
"canXRayTurnaround",
"canStutterWaterShineCharge",
{
"or": [
"Gravity",
{
"and": [
"canSuitlessMaridia",
"HiJump"
]
},
{
"and": [
"canSuitlessMaridia",
"canSpringBallJumpMidAir"
]
}
]
}
],
"note": [
"Bring a Shinecharge from the top door to the speed blocks below the Missile item location.",
"Be especially mindfull of the aquatic life during the descent.",
"Line up directly below the speed blocks when jumping up, especially if using a SpringBall jump."
],
"devNote": "For other doors, a shinespark is more reasonable than a complex Temporary Blue Chain. And the enemies here are farmable for energy."
},
{
"link": [
4,
6
],
"name": "G-Mode Morph Overload Speed Blocks Frozen Crab (From the Top)",
"notable": true,
"entranceCondition": {
"comeInWithGMode": {
"mode": "any",
"morphed": true
}
},
"requires": [
{
"or": [
"Gravity",
{
"and": [
"canSuitlessMaridia",
"HiJump"
]
}
]
},
"canTrickyUseFrozenEnemies",
"Wave",
"h_canArtificialMorphBombs",
{
"or": [
"h_canArtificialMorphSpringBall",
{
"and": [
"Morph",
"canBeVeryPatient"
]
},
{
"and": [
"Gravity",
"h_canArtificialMorphIBJ",
"h_canArtificialMorphCeilingBombJump"
]
},
{
"and": [
"Gravity",
"h_canArtificialMorphIBJ",
"canBeVeryPatient"
]
}
]
}
],
"reusableRoomwideNotable": "Main Street G-Mode Overload Speed Blocks then use Frozen Crab",
"note": [
"Place bombs against the speed blocks until they are overloaded. Afterwards, freeze a crab on the edge of the speed blocks, such that Samus can jump inside and stand on the crab.",
"Exit G-Mode and rotate to obtain the item, then kill the crab with Wave Beam to fall back down."
]
},
{
"link": [
4,
6
],
"name": "G-Mode Morph PB Overload Speed Blocks Frozen Crab (From the Top)",
"notable": true,
"entranceCondition": {
"comeInWithGMode": {
"mode": "direct",
"morphed": true
}
},
"requires": [
{
"or": [
"Gravity",
{
"and": [
"canSuitlessMaridia",
"canCrouchJump"
]
}
]
},
"canTrickyUseFrozenEnemies",
"Wave",
"h_canArtificialMorphPowerBomb",
"h_canArtificialMorphPowerBomb"
],
"reusableRoomwideNotable": "Main Street G-Mode Overload Speed Blocks then use Frozen Crab",
"note": [
"Overloading the PLMs can be done with as few as 2 PBs if they are placed precisely.",
"Place them two ledges above the item - to the left of the morph tunnel item. It is important that they are placed on either of the flat tiles, not the sloped tile on the right.",
"Afterwards, freeze a crab on the edge of the speed blocks, such that Samus can jump inside and stand on the crab.",
"Exit G-Mode and rotate to obtain the item, then kill the crab with Wave Beam to fall back down."
]
},
{
"link": [
4,
9
],
"name": "Base",
"requires": []
},
{
"link": [
5,
5
],
"name": "Leave with Runway",
"requires": [
"h_EverestMorphTunnelExpanded"
],
"exitCondition": {
"leaveWithRunway": {
"length": 2,
"openEnd": 0
}
},
"devNote": "This depends on how far the Morph tunnel is expanded, but this is both the minimum distance and the distance Map Rando has expanded."
},
{
"link": [
5,
5
],
"name": "Crystal Flash",
"requires": [
"h_canCrystalFlash"
]
},
{
"link": [
5,
5
],
"name": "G-Mode Setup - Get Hit By Sciser",
"notable": false,
"requires": [
"h_EverestMorphTunnelExpanded",
"Morph",
{
"ammo": {
"type": "Super",
"count": 1
}
}
],
"exitCondition": {
"leaveWithGModeSetup": {}
},
"note": [
"Get to the item while avoiding the crab, note that it doesn't go all the way through the tunnel.",
"Use a super to knock it off, while it is on the right wall, in order to knock it off so it will go down the morph tunnel."
]
},
{
"link": [
5,
7
],
"name": "Base",
"requires": [
"Morph",
{
"or": [
"h_canUseSpringBall",
{
"and": [
"Gravity",
"h_canBombThings"
]
}
]
}
],
"note": "The crab will not come through the whole tunnel. Retreat to the right to avoid taking a hit."
},
{
"link": [
5,
7
],
"name": "Suitless Bootless Mid-Air Morph",
"requires": [
"canSuitlessMaridia",
"canDisableEquipment"
],
"note": [
"Turn HiJump and Gravity suit off before jumping and morphing into the tunnel.",
"The crab will not come through the whole tunnel. Retreat to the right to avoid taking a hit."
]
},
{
"link": [
5,
7
],
"name": "Direct G-Mode Morph Get Item and Return",
"entranceCondition": {
"comeInWithGMode": {
"mode": "direct",
"morphed": true
}
},
"requires": [
"h_EverestMorphTunnelExpanded",
{
"or": [
"h_canArtificialMorphSpringBall",
{
"and": [
"Gravity",
"h_canArtificialMorphBombs"
]
}
]
}
],
"clearsObstacles": [
"B"
],
"note": [
"There is a camera scroll block inside of the morph tunnel, so it is best to go through the tunnel quickly and not backtrack.",
"The crab will not come through the whole tunnel, so as Samus gets close to the vertical portion, wait for the crab to pass.",
"After touching the item, retreat to the doorway before exiting g-mode."
],
"devNote": "A PB will overload PLMs."
},
{
"link": [
5,
7
],
"name": "G-Mode Morph",
"entranceCondition": {
"comeInWithGMode": {
"mode": "any",
"morphed": true
}
},
"requires": [
{
  "or": [
    "h_canArtificialMorphSpringBall",
    {
      "and": [
        "Gravity",
        "h_canArtificialMorphBombThings"
      ]
    }
  ]
}
],
"note": "The crab will not come through the whole tunnel, so wait for it to pass before going through the vertical portion."
},
{
"link": [
5,
7
],
"name": "Direct G-Mode Morph",
"entranceCondition": {
"comeInWithGMode": {
"mode": "direct",
"morphed": true
}
},
"requires": [
"h_EverestMorphTunnelExpanded",
{
"or": [
"h_canArtificialMorphSpringBall",
{
"and": [
"Gravity",
"h_canArtificialMorphBombThings"
]
}
]
}
],
"note": "The crab will not come through the whole tunnel, so wait for it to pass before going through the vertical portion."
},
{
"link": [
6,
9
],
"name": "Base",
"requires": []
},
{
"link": [
7,
5
],
"name": "Base",
"requires": [
"Morph"
]
},
{
"link": [
7,
5
],
"name": "G-Mode Morph Return",
"requires": [
{
"obstaclesCleared": [
"B"
]
},
{
"or": [
"h_canArtificialMorphSpringBall",
{
"and": [
"Gravity",
"h_canArtificialMorphBombThings"
]
}
]
}
]
},
{
"link": [
8,
1
],
"name": "Base",
"requires": []
},
{
"link": [
8,
1
],
"name": "Leave Shinecharged",
"requires": [
"Gravity",
{
"canShineCharge": {
"usedTiles": 17,
"startingDownTiles": 1,
"steepDownTiles": 2,
"openEnd": 0
}
}
],
"exitCondition": {
"leaveShinecharged": {
"framesRemaining": 110
}
},
"unlocksDoors": [
{
"types": [
"ammo"
],
"requires": []
}
]
},
{
"link": [
8,
2
],
"name": "Base",
"requires": []
},
{
"link": [
8,
2
],
"name": "Leave Shinecharged",
"requires": [
"Gravity",
"canShinechargeMovement",
{
"canShineCharge": {
"usedTiles": 17,
"startingDownTiles": 1,
"steepDownTiles": 2,
"openEnd": 0
}
}
],
"exitCondition": {
"leaveShinecharged": {
"framesRemaining": 80
}
},
"unlocksDoors": [
{
"types": [
"ammo"
],
"requires": []
}
]
},
{
"link": [
8,
3
],
"name": "Base",
"requires": [
"Gravity",
{
"or": [
"HiJump",
"canWalljump",
"h_canFly",
"canSpringBallJumpMidAir",
"canGravityJump"
]
}
]
},
{
"link": [
8,
3
],
"name": "Suitless Jump Assists",
"requires": [
"canSuitlessMaridia",
"HiJump",
"canSpringBallJumpMidAir"
]
},
{
"link": [
8,
3
],
"name": "Suitless Frozen Fish with Jump Assist",
"requires": [
"canSuitlessMaridia",
{
"or": [
"HiJump",
"canTrickySpringBallJump"
]
},
"canTrickyUseFrozenEnemies"
],
"note": [
"Freeze the crab on the corner of the ledge and the fish near the wall but with enough space for Samus to fit through and jump up using HiJump or a midair spring ball jump.",
"Possible backups include: knocking the Scisor off the wall and freezing it midair, ",
"or with HiJump: freezing the Skultera near a wall and walljumping into it repeatedly, ",
"or freezing the Scisor on the ground and crouch jumping up to the Skultera, rubbing into the frozen enemy to gain extra height before downgrabbing."
]
},
{
"link": [
8,
3
],
"name": "Main Street Underwater Walljumps (Bottom)",
"notable": true,
"requires": [
"canUnderwaterWalljump"
],
"reusableRoomwideNotable": "Main Street Underwater Walljumps",
"note": "Jump from the bottom left slope for a bit of extra height to start."
},
{
"link": [
8,
3
],
"name": "Main Street Ice Only Bottom Crab Climb",
"notable": true,
"requires": [
"canSuitlessMaridia",
"canCrazyCrabClimb",
"canSunkenTileWideWallClimb",
"canBeVeryPatient",
"canMidairWiggle",
{
"obstaclesNotCleared": [
"A"
]
}
],
"reusableRoomwideNotable": "Main Street Crab Climb with Only Ice",
"note": [
"Wait a long time for the slow global crab. Freeze it when it comes around on the left, one tile above the bottom slope.",
"Freeze the fish, get on the frozen crab, and wall jump between the fish and the wall and the wall. Wall jump towards the fish to gain height faster."
],
"devNote": "The global crab will fall if the speed blocks are broken, although it is a relatively useless consideration for this link."
},
{
"link": [
8,
6
],
"name": "In-Room Shinespark",
"requires": [
"Gravity",
{
"canShineCharge": {
"usedTiles": 17,
"steepUpTiles": 1,
"openEnd": 0
}
},
{
"or": [
{
"shinespark": {
"frames": 77,
"excessFrames": 3
}
},
{
"and": [
"canMidairShinespark",
{
"shinespark": {
"frames": 69,
"excessFrames": 3
}
}
]
}
]
}
],
"clearsObstacles": [
"A"
],
"devNote": "The short charge actually has 2 steep up tiles, but one is against a wall so it was excluded."
},
{
"link": [
8,
8
],
"name": "Sciser Farm",
"requires": [
"h_canNavigateUnderwater",
{
"resetRoom": {
"nodes": [
1,
2
],
"mustStayPut": false
}
},
{
"refill": [
"PowerBomb"
]
}
]
},
{
"link": [
8,
8
],
"name": "Crystal Flash",
"requires": [
"h_canCrystalFlash"
]
},
{
"link": [
8,
9
],
"name": "In-Room Shinespark",
"requires": [
"Gravity",
{
"canShineCharge": {
"usedTiles": 17,
"steepUpTiles": 1,
"openEnd": 0
}
},
{
"or": [
{
"shinespark": {
"frames": 76,
"excessFrames": 3
}
},
{
"and": [
"canMidairShinespark",
{
"shinespark": {
"frames": 69,
"excessFrames": 3
}
}
]
}
]
}
],
"note": "To avoid breaking the speed blocks, align Samus on the first plant, just to the left of the door.",
"devNote": "The short charge actually has 2 steep up tiles, but one is against a wall so it was excluded."
},
{
"link": [
9,
3
],
"name": "Base",
"requires": []
},
{
"link": [
9,
4
],
"name": "Base",
"requires": [
"Gravity",
{
"or": [
"HiJump",
"canWalljump",
"h_canFly",
"canSpringBallJumpMidAir",
"h_canCrouchJumpDownGrab",
"canGravityJump"
]
}
],
"devNote": "There is a frozen crab strat too, but it's generally a lot harder than the crouch jump and down grab."
},
{
"link": [
9,
4
],
"name": "Suitless Jump Assists",
"requires": [
"canSuitlessMaridia",
"HiJump",
"canSpringBallJumpMidAir"
]
},
{
"link": [
9,
4
],
"name": "Main Street Underwater Walljumps (Top)",
"notable": true,
"requires": [
"canUnderwaterWalljump"
],
"reusableRoomwideNotable": "Main Street Underwater Walljumps",
"note": "Jump from the slope for a bit of extra height to start."
},
{
"link": [
9,
4
],
"name": "Suitless Frozen Crab with HiJump",
"requires": [
"canSuitlessMaridia",
"HiJump",
"canTrickyUseFrozenEnemies",
{
"or": [
"h_canCrouchJumpDownGrab",
{
"obstaclesNotCleared": [
"A"
]
}
]
}
],
"note": [
"The first crab, coming down, is a bit tricky to freeze fast enough without any other beams or a missile.",
"Prevent it from coming on screen until Samus is in position to hit it accurately.",
"The global crab coming up can be used as a backup if the speed blocks are not broken."
],
"devNote": "Using these same items to get up from the lower portions before the global crab gets there should be reasonable."
},
{
"link": [
9,
4
],
"name": "Suitless Fast Crab Freeze with Spring Ball",
"requires": [
"canSuitlessMaridia",
"canTrickyUseFrozenEnemies",
"canTrickySpringBallJump",
"canDodgeWhileShooting",
{
"or": [
"canInsaneJump",
{
"and": [
"Spazer",
"Wave"
]
},
"h_canMaxHeightSpringBallJump",
"Plasma"
]
},
{
"or": [
"h_canMaxHeightSpringBallJump",
"canStationaryLateralMidAirMorph"
]
}
],
"note": [
"Be sure not to get the first downward moving crab on screen until Samus is in position to quickly and accurately shoot and freeze it. This is much tighter with spring ball relative to HiJump.",
"Performing a max height spring ball jump from the frozen crab can get Samus to the next ledge.",
"Getting to the ledge with the fish is particularly precise. Either stand at the very edge of the platform and perform a very precise max heigh spring ball jump,",
"or stand against the left wall and and perform a slightly less tight stationary lateral morph into spring ball jump."
]
},
{
"link": [
9,
4
],
"name": "Suitless Frozen Crab Climb with Spring Ball",
"requires": [
"canSuitlessMaridia",
"canSpringBallJumpMidAir",
"canTrickyUseFrozenEnemies",
"canTrickyJump",
{
"or": [
{
"obstaclesNotCleared": [
"A"
]
},
"canCrazyCrabClimb"
]
}
],
"note": [
"Using the slow global crab to ascend the top section of Main Street requires the speed blocks to not be broken.",
"If they are broken, the local fast crab can be used instead by letting it fall and climb the left wall.",
"The trickiest part is getting to the second ledge. Freeze the crab when it is overhead and spring ball jump up onto it.",
"Follow the crab up while using it as a platform multiple times."
],
"devNote": "Waiting for global crab takes more than 90 seconds but gives an easier way of climbing the room."
},
{
"link": [
9,
4
],
"name": "Main Street Top Crab Climb with Supers",
"notable": true,
"requires": [
"canBeVeryPatient",
"canSuitlessMaridia",
"canCrazyCrabClimb",
{
"ammo": {
"type": "Super",
"count": 2
}
},
{
"obstaclesNotCleared": [
"A"
]
}
],
"reusableRoomwideNotable": "Main Street Crab Climb with Only Ice and Supers",
"note": [
"After the global crab passes and starts climbing up, use a super and freeze it mid air to get to the left platform.",
"Jump and a quick crab will start moving down the right wall. Quickly shoot it and freeze it to get over to the right.",
"Wait a long while for the global crab to return. Let it pass, then use a super to freeze it mid air and get to the next platform.",
"Follow the global crab the rest of the way up to the door while using it and the fish as platforms on the way.",
"For a faster but tighter strat, knock off the first downward moving crab with a super and follow it up while freezing it and performing precise platforming."
],
"devNote": "The global crab will fall if the speed blocks are broken."
},
{
"link": [
9,
4
],
"name": "Main Street Ice Only Top Crab Climb",
"notable": true,
"requires": [
"canBeExtremelyPatient",
"canSuitlessMaridia",
"canCrazyCrabClimb",
"canTrickyJump",
{
"obstaclesNotCleared": [
"A"
]
}
],
"reusableRoomwideNotable": "Main Street Crab Climb with Only Ice",
"note": [
"Be sure not to lure the first crab on the right wall until the slow global crab is near.",
"Freeze the crab coming down as a platform to stand on to jump onto the frozen global crab on the right.",
"Near the end, use the global crab to get onto the top left corner of the room, then jump towards the walkway leading to the door."
],
"devNote": "The global crab will fall if the speed blocks are broken."
}
]
}