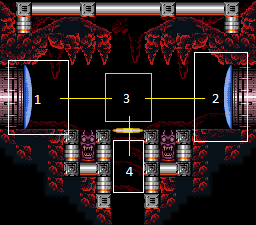
Lower Norfair Elevator
Room ID: 309
|
Exit condition: {
"leaveWithRunway": {
"length": 13,
"openEnd": 0
}
}
|
|
Requires: {
"doorUnlockedAtNode": 2
}
Exit condition: {
"leaveWithRunway": {
"length": 14,
"openEnd": 0
}
}
|
|
Requires: "h_canHeatedCrystalFlash" |
|
Entrance condition: {
"comeInShinecharged": {
"framesRequired": 55
}
}
Requires: {
"heatFrames": 55
}
Exit condition: {
"leaveShinecharged": {
"framesRemaining": "auto"
}
}
|
|
From: 1
Left Door
To: 2
Right Door
Entrance condition: {
"comeInShinecharging": {
"length": 13,
"openEnd": 0
}
}
Requires: {
"heatFrames": 55
}
Exit condition: {
"leaveShinecharged": {
"framesRemaining": 160
}
}
|
|
From: 1
Left Door
To: 2
Right Door
Entrance condition: {
"comeInShinecharged": {
"framesRequired": 10
}
}
Requires: {
"shinespark": {
"frames": 21
}
}
{
"heatFrames": 55
}
Exit condition: {
"leaveWithSpark": {}
}
|
|
Entrance condition: {
"comeInWithGrappleTeleport": {
"blockPositions": [
[
12,
12
],
[
12,
13
]
]
}
}
Bypasses door shell: true |
|
From: 1
Left Door
To: 2
Right Door
Entrance condition: {
"comeInWithGrappleTeleport": {
"blockPositions": [
[
12,
12
]
]
}
}
Exit condition: {
"leaveWithGrappleTeleport": {
"blockPositions": [
[
12,
12
]
]
}
}
Bypasses door shell: true |
|
From: 1
Left Door
To: 2
Right Door
Entrance condition: {
"comeInWithGrappleTeleport": {
"blockPositions": [
[
12,
13
]
]
}
}
Exit condition: {
"leaveWithGrappleTeleport": {
"blockPositions": [
[
12,
13
]
]
}
}
Bypasses door shell: true |
|
Entrance condition: {
"comeInWithStoredFallSpeed": {
"fallSpeedInTiles": 1
}
}
Requires: {
"heatFrames": 55
}
Exit condition: {
"leaveWithStoredFallSpeed": {
"fallSpeedInTiles": 1
}
}
|
|
From: 1
Left Door
To: 2
Right Door
Entrance condition: {
"comeInWithStoredFallSpeed": {
"fallSpeedInTiles": 2
}
}
Requires: {
"heatFrames": 55
}
Exit condition: {
"leaveWithStoredFallSpeed": {
"fallSpeedInTiles": 2
}
}
|
|
Requires: {
"heatFrames": 30
}
|
|
From: 1
Left Door
To: 4
Bottom of Elevator Ride
Entrance condition: {
"comeInShinecharged": {
"framesRequired": 30
}
}
Requires: "canShinechargeMovementComplex"
"h_LowerNorfairElevatorDownwardFrames"
{
"heatFrames": 30
}
Exit condition: {
"leaveShinecharged": {
"framesRemaining": "auto"
}
}
|
|
From: 1
Left Door
To: 4
Bottom of Elevator Ride
Entrance condition: {
"comeInShinecharging": {
"length": 13,
"openEnd": 0
}
}
Requires: "h_LowerNorfairElevatorDownwardFrames"
{
"heatFrames": 90
}
Exit condition: {
"leaveShinecharged": {
"framesRemaining": 130
}
}
|
|
From: 1
Left Door
To: 4
Bottom of Elevator Ride
Entrance condition: {
"comeInShinecharging": {
"length": 6,
"openEnd": 0
}
}
Requires: "h_LowerNorfairElevatorDownwardFrames"
{
"heatFrames": 40
}
Exit condition: {
"leaveShinecharged": {
"framesRemaining": 165
}
}
|
|
Entrance condition: {
"comeInShinecharged": {
"framesRequired": 55
}
}
Requires: {
"heatFrames": 55
}
Exit condition: {
"leaveShinecharged": {
"framesRemaining": "auto"
}
}
|
|
From: 2
Right Door
To: 1
Left Door
Entrance condition: {
"comeInShinecharging": {
"length": 13,
"openEnd": 0
}
}
Requires: {
"heatFrames": 55
}
Exit condition: {
"leaveShinecharged": {
"framesRemaining": 155
}
}
|
|
From: 2
Right Door
To: 1
Left Door
Entrance condition: {
"comeInShinecharged": {
"framesRequired": 10
}
}
Requires: {
"shinespark": {
"frames": 21
}
}
{
"heatFrames": 55
}
Exit condition: {
"leaveWithSpark": {}
}
|
|
Entrance condition: {
"comeInWithStoredFallSpeed": {
"fallSpeedInTiles": 1
}
}
Requires: {
"heatFrames": 55
}
Exit condition: {
"leaveWithStoredFallSpeed": {
"fallSpeedInTiles": 1
}
}
|
|
From: 2
Right Door
To: 1
Left Door
Entrance condition: {
"comeInWithStoredFallSpeed": {
"fallSpeedInTiles": 2
}
}
Requires: {
"heatFrames": 55
}
Exit condition: {
"leaveWithStoredFallSpeed": {
"fallSpeedInTiles": 2
}
}
|
|
Entrance condition: {
"comeInWithGrappleTeleport": {
"blockPositions": [
[
3,
12
],
[
3,
13
]
]
}
}
Bypasses door shell: true |
|
From: 2
Right Door
To: 1
Left Door
Entrance condition: {
"comeInWithGrappleTeleport": {
"blockPositions": [
[
3,
12
]
]
}
}
Exit condition: {
"leaveWithGrappleTeleport": {
"blockPositions": [
[
3,
12
]
]
}
}
Bypasses door shell: true |
|
From: 2
Right Door
To: 1
Left Door
Entrance condition: {
"comeInWithGrappleTeleport": {
"blockPositions": [
[
3,
13
]
]
}
}
Exit condition: {
"leaveWithGrappleTeleport": {
"blockPositions": [
[
3,
13
]
]
}
}
Bypasses door shell: true |
|
Exit condition: {
"leaveWithRunway": {
"length": 13,
"openEnd": 0
}
}
|
|
Requires: {
"doorUnlockedAtNode": 1
}
Exit condition: {
"leaveWithRunway": {
"length": 14,
"openEnd": 0
}
}
|
|
Requires: "h_canHeatedCrystalFlash" |
|
Requires: {
"heatFrames": 30
}
|
|
From: 2
Right Door
To: 4
Bottom of Elevator Ride
Entrance condition: {
"comeInShinecharged": {
"framesRequired": 30
}
}
Requires: "canShinechargeMovementComplex"
"h_LowerNorfairElevatorDownwardFrames"
{
"heatFrames": 30
}
Exit condition: {
"leaveShinecharged": {
"framesRemaining": "auto"
}
}
|
|
From: 2
Right Door
To: 4
Bottom of Elevator Ride
Entrance condition: {
"comeInShinecharging": {
"length": 13,
"openEnd": 0
}
}
Requires: "h_LowerNorfairElevatorDownwardFrames"
{
"heatFrames": 90
}
Exit condition: {
"leaveShinecharged": {
"framesRemaining": 130
}
}
|
|
From: 2
Right Door
To: 4
Bottom of Elevator Ride
Entrance condition: {
"comeInShinecharging": {
"length": 6,
"openEnd": 0
}
}
Requires: "h_LowerNorfairElevatorDownwardFrames"
{
"heatFrames": 40
}
Exit condition: {
"leaveShinecharged": {
"framesRemaining": 165
}
}
|
|
Requires: {
"heatFrames": 30
}
|
|
Requires: {
"heatFrames": 30
}
|
|
Requires: "h_LowerNorfairElevatorDownwardFrames"
{
"heatFrames": 10
}
|
|
From: 3
Elevator Platform
To: 4
Bottom of Elevator Ride
Riding the elevator without enough energy will cause a reserve trigger in the next room, reducing the total heat damage dealt. Requires: "canManageReserves"
{
"autoReserveTrigger": {}
}
|
|
From: 3
Elevator Platform
To: 4
Bottom of Elevator Ride
Requires: {
"or": [
{
"and": [
{
"doorUnlockedAtNode": 1
},
{
  "doorUnlockedAtNode": 2
},
{
"canShineCharge": {
"usedTiles": 14,
"openEnd": 0
}
}
]
},
{
"and": [
{
"or": [
{
"doorUnlockedAtNode": 1
},
{
"doorUnlockedAtNode": 2
}
]
},
{
"canShineCharge": {
"usedTiles": 13,
"openEnd": 0
}
}
]
},
{
"canShineCharge": {
"usedTiles": 12,
"openEnd": 0
}
}
]
}
{
"heatFrames": 240
}
"h_LowerNorfairElevatorDownwardFrames"
Exit condition: {
"leaveShinecharged": {
"framesRemaining": 130
}
}
|
|
From: 4
Bottom of Elevator Ride
To: 1
Left Door
Entrance condition: {
"comeInShinecharged": {
"framesRequired": 50
}
}
Requires: "canShinechargeMovementComplex"
"h_LowerNorfairElevatorUpwardFrames"
{
"heatFrames": 50
}
Exit condition: {
"leaveShinecharged": {
"framesRemaining": "auto"
}
}
|
|
From: 4
Bottom of Elevator Ride
To: 1
Left Door
Entrance condition: {
"comeInShinecharged": {
"framesRequired": 20
}
}
Requires: "h_LowerNorfairElevatorUpwardFrames"
{
"shinespark": {
"frames": 6
}
}
{
"heatFrames": 50
}
Exit condition: {
"leaveWithSpark": {}
}
|
|
From: 4
Bottom of Elevator Ride
To: 2
Right Door
Entrance condition: {
"comeInShinecharged": {
"framesRequired": 50
}
}
Requires: "canShinechargeMovementComplex"
"h_LowerNorfairElevatorUpwardFrames"
{
"heatFrames": 50
}
Exit condition: {
"leaveShinecharged": {
"framesRemaining": "auto"
}
}
|
|
From: 4
Bottom of Elevator Ride
To: 2
Right Door
Entrance condition: {
"comeInShinecharged": {
"framesRequired": 20
}
}
Requires: "h_LowerNorfairElevatorUpwardFrames"
{
"shinespark": {
"frames": 6
}
}
{
"heatFrames": 50
}
Exit condition: {
"leaveWithSpark": {}
}
|
|
Requires: "h_LowerNorfairElevatorUpwardFrames"
{
"heatFrames": 10
}
|
|
From: 4
Bottom of Elevator Ride
To: 3
Elevator Platform
Riding the elevator without enough energy will cause a reserve trigger in the next room, reducing the total heat damage dealt. Requires: "canManageReserves"
{
"autoReserveTrigger": {}
}
|
{
"$schema": "../../../schema/m3-room.schema.json",
"id": 309,
"name": "Lower Norfair Elevator",
"area": "Norfair",
"subarea": "Upper",
"subsubarea": "East",
"playable": true,
"roomAddress": "0x7AF3F",
"roomEnvironments": [
{
"heated": true
}
],
"nodes": [
{
"id": 1,
"name": "Left Door",
"nodeType": "door",
"nodeSubType": "blue",
"nodeAddress": "0x0019702",
"doorEnvironments": [
{
"physics": "air"
}
]
},
{
"id": 2,
"name": "Right Door",
"nodeType": "door",
"nodeSubType": "blue",
"nodeAddress": "0x00196ea",
"doorEnvironments": [
{
"physics": "air"
}
]
},
{
"id": 3,
"name": "Elevator Platform",
"nodeType": "junction",
"nodeSubType": "junction"
},
{
"id": 4,
"name": "Bottom of Elevator Ride",
"nodeType": "door",
"nodeSubType": "elevator",
"nodeAddress": "0x00196f6"
}
],
"enemies": [],
"links": [
{
"from": 1,
"to": [
{
"id": 1
},
{
"id": 2
},
{
"id": 3
},
{
"id": 4
}
]
},
{
"from": 2,
"to": [
{
"id": 1
},
{
"id": 2
},
{
"id": 3
},
{
"id": 4
}
]
},
{
"from": 3,
"to": [
{
"id": 1
},
{
"id": 2
},
{
"id": 4,
"note": "This link exists because of how Samus takes heatdamage while riding the elevator.",
"devNote": "The extra heat frames are included because it is faster to run through the room than 2x the value it would tak to run half way."
}
]
},
{
"from": 4,
"to": [
{
"id": 1
},
{
"id": 2
},
{
"id": 3,
"note": "This link exists because of how Samus takes heatdamage while riding the elevator.",
"devNote": "The extra heat frames are included because it is faster to run through the room than 2x the value it would tak to run half way."
}
]
}
],
"strats": [
{
"link": [
1,
1
],
"name": "Leave with Runway",
"requires": [],
"exitCondition": {
"leaveWithRunway": {
"length": 13,
"openEnd": 0
}
}
},
{
"link": [
1,
1
],
"name": "Leave with Runway (Open Door)",
"requires": [
{
"doorUnlockedAtNode": 2
}
],
"exitCondition": {
"leaveWithRunway": {
"length": 14,
"openEnd": 0
}
},
"unlocksDoors": [
{
"nodeId": 2,
"types": [
"missiles"
],
"requires": [
{
"heatFrames": 50
}
]
},
{
"nodeId": 2,
"types": [
"super"
],
"requires": []
},
{
"nodeId": 2,
"types": [
"powerbomb"
],
"requires": [
{
"heatFrames": 110
}
]
}
]
},
{
"link": [
1,
1
],
"name": "Crystal Flash",
"requires": [
"h_canHeatedCrystalFlash"
]
},
{
"link": [
1,
2
],
"name": "Carry Shinecharge",
"entranceCondition": {
"comeInShinecharged": {
"framesRequired": 55
}
},
"requires": [
{
  "heatFrames": 55
}
],
"exitCondition": {
"leaveShinecharged": {
"framesRemaining": "auto"
}
},
"unlocksDoors": [
{
"types": [
"super"
],
"requires": []
},
{
"types": [
"missiles",
"powerbomb"
],
"requires": [
"never"
]
}
]
},
{
"link": [
1,
2
],
"name": "Come In Shinecharging, Leave Shinecharged",
"entranceCondition": {
"comeInShinecharging": {
"length": 13,
"openEnd": 0
}
},
"requires": [
{
  "heatFrames": 55
}
],
"exitCondition": {
"leaveShinecharged": {
"framesRemaining": 160
}
},
"unlocksDoors": [
{
"types": [
"super"
],
"requires": []
},
{
"types": [
"missiles",
"powerbomb"
],
"requires": [
"never"
]
}
]
},
{
"link": [
1,
2
],
"name": "Come In Shinecharged, Leave Sparking",
"entranceCondition": {
"comeInShinecharged": {
"framesRequired": 10
}
},
"requires": [
{
"shinespark": {
"frames": 21
}
},
{
  "heatFrames": 55
}
],
"exitCondition": {
"leaveWithSpark": {}
},
"unlocksDoors": [
{
"types": [
"super"
],
"requires": []
},
{
"types": [
"missiles",
"powerbomb"
],
"requires": [
"never"
]
}
]
},
{
"link": [
1,
2
],
"name": "Grapple Teleport",
"entranceCondition": {
"comeInWithGrappleTeleport": {
"blockPositions": [
[
12,
12
],
[
12,
13
]
]
}
},
"requires": [],
"bypassesDoorShell": true
},
{
"link": [
1,
2
],
"name": "Carry Grapple Teleport (Top Position)",
"entranceCondition": {
"comeInWithGrappleTeleport": {
"blockPositions": [
[
12,
12
]
]
}
},
"requires": [],
"bypassesDoorShell": true,
"exitCondition": {
"leaveWithGrappleTeleport": {
"blockPositions": [
[
12,
12
]
]
}
}
},
{
"link": [
1,
2
],
"name": "Carry Grapple Teleport (Bottom Position)",
"entranceCondition": {
"comeInWithGrappleTeleport": {
"blockPositions": [
[
12,
13
]
]
}
},
"requires": [],
"bypassesDoorShell": true,
"exitCondition": {
"leaveWithGrappleTeleport": {
"blockPositions": [
[
12,
13
]
]
}
}
},
{
"link": [
1,
2
],
"name": "Transition with Stored Fall Speed",
"entranceCondition": {
"comeInWithStoredFallSpeed": {
"fallSpeedInTiles": 1
}
},
"requires": [
{
  "heatFrames": 55
}
],
"exitCondition": {
"leaveWithStoredFallSpeed": {
"fallSpeedInTiles": 1
}
},
"unlocksDoors": [
{
"types": [
"missiles",
"super"
],
"requires": []
},
{
"types": [
"powerbomb"
],
"requires": [
"never"
]
}
]
},
{
"link": [
1,
2
],
"name": "Transition with Stored Fall Speed (more speed)",
"entranceCondition": {
"comeInWithStoredFallSpeed": {
"fallSpeedInTiles": 2
}
},
"requires": [
{
"heatFrames": 55
}
],
"exitCondition": {
"leaveWithStoredFallSpeed": {
"fallSpeedInTiles": 2
}
},
"unlocksDoors": [
{
"types": [
"missiles",
"super"
],
"requires": []
},
{
"types": [
"powerbomb"
],
"requires": [
"never"
]
}
]
},
{
"link": [
1,
3
],
"name": "Base",
"requires": [
{
  "heatFrames": 30
}
],
"devNote": "60 frames to cross the room, but 40 to and from the elevator, so the other 10 frames are listed in 3->4."
},
{
"link": [
1,
4
],
"name": "Carry Shinecharge",
"entranceCondition": {
"comeInShinecharged": {
"framesRequired": 30
}
},
"requires": [
"canShinechargeMovementComplex",
"h_LowerNorfairElevatorDownwardFrames",
{
"heatFrames": 30
}
],
"exitCondition": {
"leaveShinecharged": {
"framesRemaining": "auto"
}
}
},
{
"link": [
1,
4
],
"name": "Come In Shinecharging",
"entranceCondition": {
"comeInShinecharging": {
"length": 13,
"openEnd": 0
}
},
"requires": [
"h_LowerNorfairElevatorDownwardFrames",
{
"heatFrames": 90
}
],
"exitCondition": {
"leaveShinecharged": {
"framesRemaining": 130
}
}
},
{
"link": [
1,
4
],
"name": "Come In Shinecharging (Short Runway)",
"entranceCondition": {
"comeInShinecharging": {
"length": 6,
"openEnd": 0
}
},
"requires": [
"h_LowerNorfairElevatorDownwardFrames",
{
"heatFrames": 40
}
],
"exitCondition": {
"leaveShinecharged": {
"framesRemaining": 165
}
}
},
{
"link": [
2,
1
],
"name": "Carry Shinecharge",
"entranceCondition": {
"comeInShinecharged": {
"framesRequired": 55
}
},
"requires": [
{
  "heatFrames": 55
}
],
"exitCondition": {
"leaveShinecharged": {
"framesRemaining": "auto"
}
},
"unlocksDoors": [
{
"types": [
"super"
],
"requires": []
},
{
"types": [
"missiles",
"powerbomb"
],
"requires": [
"never"
]
}
]
},
{
"link": [
2,
1
],
"name": "Come In Shinecharging, Leave Shinecharged",
"entranceCondition": {
"comeInShinecharging": {
"length": 13,
"openEnd": 0
}
},
"requires": [
{
  "heatFrames": 55
}
],
"exitCondition": {
"leaveShinecharged": {
"framesRemaining": 155
}
},
"unlocksDoors": [
{
"types": [
"super"
],
"requires": []
},
{
"types": [
"missiles",
"powerbomb"
],
"requires": [
"never"
]
}
]
},
{
"link": [
2,
1
],
"name": "Come In Shinecharged, Leave Sparking",
"entranceCondition": {
"comeInShinecharged": {
"framesRequired": 10
}
},
"requires": [
{
"shinespark": {
"frames": 21
}
},
{
  "heatFrames": 55
}
],
"exitCondition": {
"leaveWithSpark": {}
},
"unlocksDoors": [
{
"types": [
"super"
],
"requires": []
},
{
"types": [
"missiles",
"powerbomb"
],
"requires": [
"never"
]
}
]
},
{
"link": [
2,
1
],
"name": "Transition with Stored Fall Speed",
"entranceCondition": {
"comeInWithStoredFallSpeed": {
"fallSpeedInTiles": 1
}
},
"requires": [
{
  "heatFrames": 55
}
],
"exitCondition": {
"leaveWithStoredFallSpeed": {
"fallSpeedInTiles": 1
}
},
"unlocksDoors": [
{
"types": [
"missiles",
"super"
],
"requires": []
},
{
"types": [
"powerbomb"
],
"requires": [
"never"
]
}
]
},
{
"link": [
2,
1
],
"name": "Transition with Stored Fall Speed (more speed)",
"entranceCondition": {
"comeInWithStoredFallSpeed": {
"fallSpeedInTiles": 2
}
},
"requires": [
{
"heatFrames": 55
}
],
"exitCondition": {
"leaveWithStoredFallSpeed": {
"fallSpeedInTiles": 2
}
},
"unlocksDoors": [
{
"types": [
"missiles",
"super"
],
"requires": []
},
{
"types": [
"powerbomb"
],
"requires": [
"never"
]
}
]
},
{
"link": [
2,
1
],
"name": "Grapple Teleport Door Lock Skip",
"entranceCondition": {
"comeInWithGrappleTeleport": {
"blockPositions": [
[
3,
12
],
[
3,
13
]
]
}
},
"requires": [],
"bypassesDoorShell": true
},
{
"link": [
2,
1
],
"name": "Carry Grapple Teleport (Top Position)",
"entranceCondition": {
"comeInWithGrappleTeleport": {
"blockPositions": [
[
3,
12
]
]
}
},
"requires": [],
"bypassesDoorShell": true,
"exitCondition": {
"leaveWithGrappleTeleport": {
"blockPositions": [
[
3,
12
]
]
}
}
},
{
"link": [
2,
1
],
"name": "Carry Grapple Teleport (Bottom Position)",
"entranceCondition": {
"comeInWithGrappleTeleport": {
"blockPositions": [
[
3,
13
]
]
}
},
"requires": [],
"bypassesDoorShell": true,
"exitCondition": {
"leaveWithGrappleTeleport": {
"blockPositions": [
[
3,
13
]
]
}
}
},
{
"link": [
2,
2
],
"name": "Leave with Runway",
"requires": [],
"exitCondition": {
"leaveWithRunway": {
"length": 13,
"openEnd": 0
}
}
},
{
"link": [
2,
2
],
"name": "Leave with Runway (Open Door)",
"requires": [
{
  "doorUnlockedAtNode": 1
}
],
"exitCondition": {
"leaveWithRunway": {
"length": 14,
"openEnd": 0
}
},
"unlocksDoors": [
{
"nodeId": 1,
"types": [
"missiles"
],
"requires": [
{
"heatFrames": 50
}
]
},
{
"nodeId": 1,
"types": [
"super"
],
"requires": []
},
{
"nodeId": 1,
"types": [
"powerbomb"
],
"requires": [
{
"heatFrames": 110
}
]
}
]
},
{
"link": [
2,
2
],
"name": "Crystal Flash",
"requires": [
"h_canHeatedCrystalFlash"
]
},
{
"link": [
2,
3
],
"name": "Base",
"requires": [
{
  "heatFrames": 30
}
],
"devNote": "60 frames to cross the room, but 40 to and from the elevator, so the other 10 frames are listed in 3->4."
},
{
"link": [
2,
4
],
"name": "Carry Shinecharge",
"entranceCondition": {
"comeInShinecharged": {
"framesRequired": 30
}
},
"requires": [
"canShinechargeMovementComplex",
"h_LowerNorfairElevatorDownwardFrames",
{
  "heatFrames": 30
}
],
"exitCondition": {
"leaveShinecharged": {
"framesRemaining": "auto"
}
}
},
{
"link": [
2,
4
],
"name": "Come In Shinecharging",
"entranceCondition": {
"comeInShinecharging": {
"length": 13,
"openEnd": 0
}
},
"requires": [
"h_LowerNorfairElevatorDownwardFrames",
{
"heatFrames": 90
}
],
"exitCondition": {
"leaveShinecharged": {
"framesRemaining": 130
}
}
},
{
"link": [
2,
4
],
"name": "Come In Shinecharging (Short Runway)",
"entranceCondition": {
"comeInShinecharging": {
"length": 6,
"openEnd": 0
}
},
"requires": [
"h_LowerNorfairElevatorDownwardFrames",
{
"heatFrames": 40
}
],
"exitCondition": {
"leaveShinecharged": {
"framesRemaining": 165
}
}
},
{
"link": [
3,
1
],
"name": "Base",
"requires": [
{
  "heatFrames": 30
}
],
"unlocksDoors": [
{
"types": [
"missiles"
],
"requires": [
{
"heatFrames": 30
}
]
}
],
"devNote": "60 frames to cross the room, but 40 to and from the elevator, so the other 10 frames are listed in 4->3."
},
{
"link": [
3,
2
],
"name": "Base",
"requires": [
{
"heatFrames": 30
}
],
"unlocksDoors": [
{
"types": [
"missiles"
],
"requires": [
{
"heatFrames": 30
}
]
}
],
"devNote": "60 frames to cross the room, but 40 to and from the elevator, so the other 10 frames are listed in 4->3."
},
{
"link": [
3,
4
],
"name": "Base",
"requires": [
"h_LowerNorfairElevatorDownwardFrames",
{
"heatFrames": 10
}
]
},
{
"link": [
3,
4
],
"name": "Reserve Trigger",
"requires": [
"canManageReserves",
{
"autoReserveTrigger": {}
}
],
"note": "Riding the elevator without enough energy will cause a reserve trigger in the next room, reducing the total heat damage dealt.",
"devNote": "FIXME: If the next room is also heated, the reserve won't trigger until after that elevator ride as well, but then the reserve will trigger during heat damage."
},
{
"link": [
3,
4
],
"name": "In-Room Shortcharge",
"requires": [
{
"or": [
{
"and": [
{
"doorUnlockedAtNode": 1
},
{
"doorUnlockedAtNode": 2
},
{
"canShineCharge": {
"usedTiles": 14,
"openEnd": 0
}
}
]
},
{
"and": [
{
"or": [
{
"doorUnlockedAtNode": 1
},
{
"doorUnlockedAtNode": 2
}
]
},
{
"canShineCharge": {
"usedTiles": 13,
"openEnd": 0
}
}
]
},
{
"canShineCharge": {
"usedTiles": 12,
"openEnd": 0
}
}
]
},
{
"heatFrames": 240
},
"h_LowerNorfairElevatorDownwardFrames"
],
"exitCondition": {
"leaveShinecharged": {
"framesRemaining": 130
}
},
"unlocksDoors": [
{
"nodeId": 1,
"types": [
"missiles"
],
"requires": [
{
"heatFrames": 50
}
]
},
{
"nodeId": 1,
"types": [
"super"
],
"requires": []
},
{
"nodeId": 1,
"types": [
"powerbomb"
],
"requires": [
{
"heatFrames": 110
}
]
},
{
"nodeId": 2,
"types": [
"missiles"
],
"requires": [
{
"heatFrames": 50
}
]
},
{
"nodeId": 2,
"types": [
"super"
],
"requires": []
},
{
"nodeId": 2,
"types": [
"powerbomb"
],
"requires": [
{
"heatFrames": 110
}
]
}
]
},
{
"link": [
4,
1
],
"name": "Carry Shinecharge",
"entranceCondition": {
"comeInShinecharged": {
"framesRequired": 50
}
},
"requires": [
"canShinechargeMovementComplex",
"h_LowerNorfairElevatorUpwardFrames",
{
"heatFrames": 50
}
],
"exitCondition": {
"leaveShinecharged": {
"framesRemaining": "auto"
}
},
"unlocksDoors": [
{
"types": [
"super"
],
"requires": []
},
{
"types": [
"missiles",
"powerbomb"
],
"requires": [
"never"
]
}
]
},
{
"link": [
4,
1
],
"name": "Come In Shinecharged, Leave Sparking",
"entranceCondition": {
"comeInShinecharged": {
"framesRequired": 20
}
},
"requires": [
"h_LowerNorfairElevatorUpwardFrames",
{
"shinespark": {
"frames": 6
}
},
{
"heatFrames": 50
}
],
"exitCondition": {
"leaveWithSpark": {}
},
"unlocksDoors": [
{
"types": [
"super"
],
"requires": []
},
{
"types": [
"missiles",
"powerbomb"
],
"requires": [
"never"
]
}
]
},
{
"link": [
4,
2
],
"name": "Carry Shinecharge",
"entranceCondition": {
"comeInShinecharged": {
"framesRequired": 50
}
},
"requires": [
"canShinechargeMovementComplex",
"h_LowerNorfairElevatorUpwardFrames",
{
"heatFrames": 50
}
],
"exitCondition": {
"leaveShinecharged": {
"framesRemaining": "auto"
}
},
"unlocksDoors": [
{
"types": [
"super"
],
"requires": []
},
{
"types": [
"missiles",
"powerbomb"
],
"requires": [
"never"
]
}
]
},
{
"link": [
4,
2
],
"name": "Come In Shinecharged, Leave Sparking",
"entranceCondition": {
"comeInShinecharged": {
"framesRequired": 20
}
},
"requires": [
"h_LowerNorfairElevatorUpwardFrames",
{
"shinespark": {
"frames": 6
}
},
{
"heatFrames": 50
}
],
"exitCondition": {
"leaveWithSpark": {}
},
"unlocksDoors": [
{
"types": [
"super"
],
"requires": []
},
{
"types": [
"missiles",
"powerbomb"
],
"requires": [
"never"
]
}
]
},
{
"link": [
4,
3
],
"name": "Base",
"requires": [
"h_LowerNorfairElevatorUpwardFrames",
{
"heatFrames": 10
}
]
},
{
"link": [
4,
3
],
"name": "Reserve Trigger",
"requires": [
"canManageReserves",
{
"autoReserveTrigger": {}
}
],
"note": "Riding the elevator without enough energy will cause a reserve trigger in the next room, reducing the total heat damage dealt.",
"devNote": "FIXME: If the previous room is also heated, the reserve won't trigger until after this elevator ride as well, but it will trigger during heat damage."
}
]
}