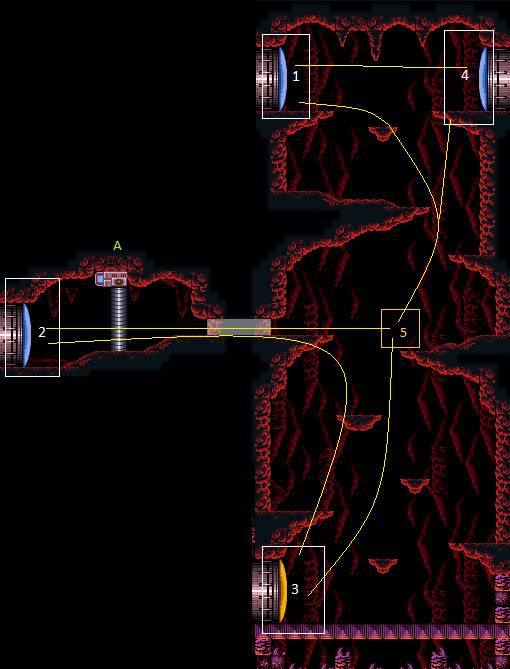
Kronic Boost Room
Room ID: 113
|
Exit condition: {
"leaveWithRunway": {
"length": 4,
"openEnd": 1
}
}
|
|
Requires: "h_canHeatedCrystalFlash" |
|
Lay a Power Bomb immediately after killing the Viola, in order to get a Power Bomb drop even if full on Power Bombs. Jump straight up to collect the drop, then remorph and hold the Crystal Flash inputs. Requires: {
"heatFrames": 260
}
"h_can10PowerBombCrystalFlash"
{
"heatFrames": 80
}
|
|
Requires: {
"heatFrames": 100
}
|
|
Entrance condition: {
"comeInShinecharged": {
"framesRequired": 85
}
}
Requires: {
"heatFrames": 85
}
Exit condition: {
"leaveShinecharged": {
"framesRemaining": "auto"
}
}
|
|
From: 1
Top Left Door
To: 4
Top Right Door
Entrance condition: {
"comeInShinecharged": {
"framesRequired": 10
}
}
Requires: {
"shinespark": {
"frames": 21
}
}
{
"heatFrames": 60
}
Exit condition: {
"leaveWithSpark": {}
}
|
|
From: 1
Top Left Door
To: 4
Top Right Door
Entrance condition: {
"comeInShinecharging": {
"length": 3,
"openEnd": 0
}
}
Requires: {
"heatFrames": 100
}
Exit condition: {
"leaveShinecharged": {
"framesRemaining": 90
}
}
|
|
From: 1
Top Left Door
To: 4
Top Right Door
Entrance condition: {
"comeInShinecharging": {
"length": 3,
"openEnd": 0
}
}
Requires: {
"heatFrames": 60
}
{
"shinespark": {
"frames": 17,
"excessFrames": 0
}
}
Exit condition: {
"leaveWithSpark": {}
}
|
|
From: 1
Top Left Door
To: 5
Middle Junction (Ledge Right of Morph Tunnel)
Requires: {
"heatFrames": 110
}
|
|
From: 2
Middle Left Door
To: 2
Middle Left Door
Exit condition: {
"leaveWithRunway": {
"length": 6,
"openEnd": 0,
"gentleDownTiles": 2
}
}
|
|
From: 2
Middle Left Door
To: 2
Middle Left Door
Exit condition: {
"leaveWithRunway": {
"length": 11,
"openEnd": 0,
"gentleDownTiles": 4
}
}
|
|
Requires: "h_canHeatedCrystalFlash" |
|
Requires: "Morph"
{
"heatFrames": 225
}
{
"or": [
{
"heatFrames": 10
},
"canMockball",
{
"obstaclesCleared": [
"A"
]
}
]
}
Clears obstacles: A |
|
From: 2
Middle Left Door
To: 5
Middle Junction (Ledge Right of Morph Tunnel)
Requires: "Morph"
{
"heatFrames": 165
}
{
"or": [
{
"heatFrames": 10
},
"canMockball",
{
"obstaclesCleared": [
"A"
]
}
]
}
Clears obstacles: A |
|
Requires: "Morph"
{
"heatFrames": 260
}
{
"or": [
{
"and": [
"Wave",
{
"heatFrames": 30
}
]
},
{
"obstaclesCleared": [
"A"
]
}
]
}
Clears obstacles: A |
|
Requires: "Morph"
{
"heatFrames": 260
}
"h_canHeatedBlueGateGlitch"
Clears obstacles: A |
|
Exit condition: {
"leaveWithRunway": {
"length": 14,
"openEnd": 0
}
}
|
|
Requires: "h_heatProof"
{
"resetRoom": {
"nodes": [
1,
3,
4
],
"mustStayPut": false
}
}
{
"refill": [
"PowerBomb"
]
}
|
|
Requires: "h_canHeatedCrystalFlash" |
|
From: 3
Bottom Left Door
To: 3
Bottom Left Door
Lay a Power Bomb immediately after killing the Viola, in order to get a Power Bomb drop even if full on Power Bombs. Jump straight up to collect the drop, then remorph and hold the Crystal Flash inputs. Requires: {
"heatFrames": 240
}
"h_can10PowerBombCrystalFlash"
{
"heatFrames": 70
}
|
|
From: 3
Bottom Left Door
To: 5
Middle Junction (Ledge Right of Morph Tunnel)
Requires: {
"heatFrames": 130
}
|
|
Requires: {
"heatFrames": 100
}
|
|
Entrance condition: {
"comeInShinecharged": {
"framesRequired": 85
}
}
Requires: {
"heatFrames": 85
}
Exit condition: {
"leaveShinecharged": {
"framesRemaining": "auto"
}
}
|
|
From: 4
Top Right Door
To: 1
Top Left Door
Entrance condition: {
"comeInShinecharged": {
"framesRequired": 10
}
}
Requires: {
"shinespark": {
"frames": 21
}
}
{
"heatFrames": 60
}
Exit condition: {
"leaveWithSpark": {}
}
|
|
From: 4
Top Right Door
To: 1
Top Left Door
Entrance condition: {
"comeInShinecharging": {
"length": 3,
"openEnd": 1
}
}
Requires: {
"heatFrames": 100
}
Exit condition: {
"leaveShinecharged": {
"framesRemaining": 90
}
}
|
|
From: 4
Top Right Door
To: 1
Top Left Door
Entrance condition: {
"comeInShinecharging": {
"length": 3,
"openEnd": 0
}
}
Requires: {
"heatFrames": 60
}
{
"shinespark": {
"frames": 17,
"excessFrames": 0
}
}
Exit condition: {
"leaveWithSpark": {}
}
|
|
Entrance condition: {
"comeInWithGrappleTeleport": {
"blockPositions": [
[
2,
18
],
[
2,
19
],
[
2,
28
],
[
2,
29
]
]
}
}
Bypasses door shell: true |
|
From: 4
Top Right Door
To: 2
Middle Left Door
Entrance condition: {
"comeInWithGrappleTeleport": {
"blockPositions": [
[
2,
18
]
]
}
}
Exit condition: {
"leaveWithGrappleTeleport": {
"blockPositions": [
[
2,
18
]
]
}
}
Bypasses door shell: true |
|
From: 4
Top Right Door
To: 2
Middle Left Door
Entrance condition: {
"comeInWithGrappleTeleport": {
"blockPositions": [
[
2,
19
]
]
}
}
Exit condition: {
"leaveWithGrappleTeleport": {
"blockPositions": [
[
2,
19
]
]
}
}
Bypasses door shell: true |
|
From: 4
Top Right Door
To: 2
Middle Left Door
Entrance condition: {
"comeInWithGrappleTeleport": {
"blockPositions": [
[
2,
28
]
]
}
}
Exit condition: {
"leaveWithGrappleTeleport": {
"blockPositions": [
[
2,
28
]
]
}
}
Bypasses door shell: true |
|
From: 4
Top Right Door
To: 2
Middle Left Door
Entrance condition: {
"comeInWithGrappleTeleport": {
"blockPositions": [
[
2,
29
]
]
}
}
Exit condition: {
"leaveWithGrappleTeleport": {
"blockPositions": [
[
2,
29
]
]
}
}
Bypasses door shell: true |
|
From: 4
Top Right Door
To: 2
Middle Left Door
Exit the previous room with Samus in a standing pose (while grappled). After teleporting, press right to release Grapple while staying standing (not being forced into a crouch). Then X-ray climb to get up to the door transition, without needing to open the door. Entrance condition: {
"comeInWithGrappleTeleport": {
"blockPositions": [
[
2,
34
]
]
}
}
Requires: "canXRayClimb"
{
"heatFrames": 1600
}
Bypasses door shell: true |
|
Exit condition: {
"leaveWithRunway": {
"length": 4,
"openEnd": 1
}
}
|
|
Requires: "h_canHeatedCrystalFlash" |
|
Lay a Power Bomb immediately after killing the Viola, in order to get a Power Bomb drop even if full on Power Bombs. Jump straight up to collect the drop, then remorph and hold the Crystal Flash inputs. Requires: {
"heatFrames": 270
}
"h_can10PowerBombCrystalFlash"
{
"heatFrames": 90
}
|
|
From: 4
Top Right Door
To: 5
Middle Junction (Ledge Right of Morph Tunnel)
Requires: {
"heatFrames": 100
}
|
|
From: 5
Middle Junction (Ledge Right of Morph Tunnel)
To: 1
Top Left Door
Requires: {
"heatFrames": 150
}
|
|
From: 5
Middle Junction (Ledge Right of Morph Tunnel)
To: 2
Middle Left Door
Requires: "Morph"
{
"heatFrames": 150
}
{
"or": [
{
"and": [
"Wave",
{
"heatFrames": 30
}
]
},
{
"obstaclesCleared": [
"A"
]
}
]
}
Clears obstacles: A |
|
From: 5
Middle Junction (Ledge Right of Morph Tunnel)
To: 2
Middle Left Door
Requires: "Morph"
{
"heatFrames": 150
}
"h_canHeatedBlueGateGlitch"
Clears obstacles: A |
|
From: 5
Middle Junction (Ledge Right of Morph Tunnel)
To: 2
Middle Left Door
Requires: "Morph"
{
"heatFrames": 150
}
{
"or": [
{
"and": [
"Wave",
{
"heatFrames": 30
}
]
},
{
"obstaclesCleared": [
"A"
]
}
]
}
Exit condition: {
"leaveWithRunway": {
"length": 11,
"openEnd": 0,
"gentleDownTiles": 4
}
}
Clears obstacles: A |
|
From: 5
Middle Junction (Ledge Right of Morph Tunnel)
To: 2
Middle Left Door
Requires: "Morph"
{
"heatFrames": 150
}
"h_canHeatedBlueGateGlitch"
Exit condition: {
"leaveWithRunway": {
"length": 11,
"openEnd": 0,
"gentleDownTiles": 4
}
}
Clears obstacles: A |
|
From: 5
Middle Junction (Ledge Right of Morph Tunnel)
To: 3
Bottom Left Door
Requires: {
"heatFrames": 130
}
|
|
From: 5
Middle Junction (Ledge Right of Morph Tunnel)
To: 3
Bottom Left Door
Requires: {
"heatFrames": 160
}
Exit condition: {
"leaveWithRunway": {
"length": 14,
"openEnd": 0
}
}
|
|
From: 5
Middle Junction (Ledge Right of Morph Tunnel)
To: 4
Top Right Door
Requires: {
"heatFrames": 150
}
|
|
From: 5
Middle Junction (Ledge Right of Morph Tunnel)
To: 5
Middle Junction (Ledge Right of Morph Tunnel)
Requires: "h_canHeatedCrystalFlash" |
{
"$schema": "../../../schema/m3-room.schema.json",
"id": 113,
"name": "Kronic Boost Room",
"area": "Norfair",
"subarea": "Upper",
"subsubarea": "East",
"playable": true,
"roomAddress": "0x7AE74",
"roomEnvironments": [
{
"heated": true
}
],
"nodes": [
{
"id": 1,
"name": "Top Left Door",
"nodeType": "door",
"nodeSubType": "blue",
"nodeAddress": "0x0019666",
"doorEnvironments": [
{
"physics": "air"
}
]
},
{
"id": 2,
"name": "Middle Left Door",
"nodeType": "door",
"nodeSubType": "blue",
"nodeAddress": "0x001968a",
"doorEnvironments": [
{
"physics": "air"
}
]
},
{
"id": 3,
"name": "Bottom Left Door",
"nodeType": "door",
"nodeSubType": "yellow",
"nodeAddress": "0x001967e",
"doorEnvironments": [
{
"physics": "air"
}
],
"locks": [
{
"name": "Kronic Boost Room Yellow Lock (to Lava Dive)",
"lockType": "coloredDoor",
"unlockStrats": [
{
"name": "Base",
"notable": false,
"requires": [
"h_canOpenYellowDoors"
]
}
]
}
]
},
{
"id": 4,
"name": "Top Right Door",
"nodeType": "door",
"nodeSubType": "blue",
"nodeAddress": "0x0019672",
"doorEnvironments": [
{
"physics": "air"
}
]
},
{
"id": 5,
"name": "Middle Junction (Ledge Right of Morph Tunnel)",
"nodeType": "junction",
"nodeSubType": "junction"
}
],
"obstacles": [
{
"id": "A",
"name": "Blue Gate",
"obstacleType": "inanimate"
}
],
"enemies": [
{
"id": "e1",
"groupName": "Kronic Boost Room Bottom Violas",
"enemyName": "Viola",
"quantity": 3,
"homeNodes": [
3
],
"dropRequires": [
"h_heatProof"
]
},
{
"id": "e2",
"groupName": "Kronic Boost Room Top Viola",
"enemyName": "Viola",
"quantity": 1,
"homeNodes": [
1,
4
],
"dropRequires": [
"h_heatProof"
]
}
],
"links": [
{
"from": 1,
"to": [
{
"id": 1
},
{
"id": 4
},
{
"id": 5
}
]
},
{
"from": 2,
"to": [
{
"id": 2
},
{
"id": 3
},
{
"id": 5
}
]
},
{
"from": 3,
"to": [
{
"id": 2
},
{
"id": 3
},
{
"id": 5
}
]
},
{
"from": 4,
"to": [
{
"id": 1
},
{
"id": 2
},
{
"id": 4
},
{
"id": 5
}
]
},
{
"from": 5,
"to": [
{
"id": 1
},
{
"id": 2
},
{
"id": 3
},
{
"id": 4
},
{
"id": 5
}
]
}
],
"strats": [
{
"link": [
1,
1
],
"name": "Leave with Runway",
"requires": [],
"exitCondition": {
"leaveWithRunway": {
"length": 4,
"openEnd": 1
}
}
},
{
"link": [
1,
1
],
"name": "Crystal Flash",
"requires": [
"h_canHeatedCrystalFlash"
]
},
{
"link": [
1,
1
],
"name": "10 Power Bomb Crystal Flash",
"requires": [
{
"heatFrames": 260
},
"h_can10PowerBombCrystalFlash",
{
"heatFrames": 80
}
],
"note": [
"Lay a Power Bomb immediately after killing the Viola, in order to get a Power Bomb drop even if full on Power Bombs.",
"Jump straight up to collect the drop, then remorph and hold the Crystal Flash inputs."
],
"devNote": "The heat frames here could be tightened by adding another node."
},
{
"link": [
1,
4
],
"name": "Base",
"requires": [
{
  "heatFrames": 100
}
],
"unlocksDoors": [
{
"types": [
"missiles"
],
"requires": [
{
"heatFrames": 20
}
]
}
]
},
{
"link": [
1,
4
],
"name": "Carry Shinecharge",
"entranceCondition": {
"comeInShinecharged": {
"framesRequired": 85
}
},
"requires": [
{
  "heatFrames": 85
}
],
"exitCondition": {
"leaveShinecharged": {
"framesRemaining": "auto"
}
},
"unlocksDoors": [
{
"types": [
"super"
],
"requires": []
},
{
"types": [
"missiles",
"powerbomb"
],
"requires": [
"never"
]
}
]
},
{
"link": [
1,
4
],
"name": "Come In Shinecharged, Leave Sparking",
"entranceCondition": {
"comeInShinecharged": {
"framesRequired": 10
}
},
"requires": [
{
"shinespark": {
"frames": 21
}
},
{
"heatFrames": 60
}
],
"exitCondition": {
"leaveWithSpark": {}
},
"unlocksDoors": [
{
"types": [
"super"
],
"requires": []
},
{
"types": [
"missiles",
"powerbomb"
],
"requires": [
"never"
]
}
]
},
{
"link": [
1,
4
],
"name": "Come In Shinecharging, Leave Shinecharged",
"entranceCondition": {
"comeInShinecharging": {
"length": 3,
"openEnd": 0
}
},
"requires": [
{
  "heatFrames": 100
}
],
"exitCondition": {
"leaveShinecharged": {
"framesRemaining": 90
}
},
"unlocksDoors": [
{
"types": [
"super"
],
"requires": []
},
{
"types": [
"missiles",
"powerbomb"
],
"requires": [
"never"
]
}
]
},
{
"link": [
1,
4
],
"name": "Come In Shinecharging, Leave With Spark",
"entranceCondition": {
"comeInShinecharging": {
"length": 3,
"openEnd": 0
}
},
"requires": [
{
"heatFrames": 60
},
{
"shinespark": {
"frames": 17,
"excessFrames": 0
}
}
],
"exitCondition": {
"leaveWithSpark": {}
},
"unlocksDoors": [
{
"types": [
"super"
],
"requires": []
},
{
"types": [
"missiles",
"powerbomb"
],
"requires": [
"never"
]
}
],
"devNote": "This strat is probably only useful if shinesparks are modified to not cost energy."
},
{
"link": [
1,
5
],
"name": "Base",
"requires": [
{
  "heatFrames": 110
}
]
},
{
"link": [
2,
2
],
"name": "Leave with Runway Closed Gate",
"requires": [],
"exitCondition": {
"leaveWithRunway": {
"length": 6,
"openEnd": 0,
"gentleDownTiles": 2
}
}
},
{
"link": [
2,
2
],
"name": "Leave with Runway Open Gate",
"requires": [],
"exitCondition": {
"leaveWithRunway": {
"length": 11,
"openEnd": 0,
"gentleDownTiles": 4
}
}
},
{
"link": [
2,
2
],
"name": "Crystal Flash",
"requires": [
"h_canHeatedCrystalFlash"
]
},
{
"link": [
2,
3
],
"name": "Base",
"requires": [
"Morph",
{
"heatFrames": 225
},
{
"or": [
{
"heatFrames": 10
},
"canMockball",
{
"obstaclesCleared": [
"A"
]
}
]
}
],
"clearsObstacles": [
"A"
],
"unlocksDoors": [
{
"types": [
"powerbomb"
],
"requires": [
{
"heatFrames": 60
}
]
}
]
},
{
"link": [
2,
5
],
"name": "Base",
"requires": [
"Morph",
{
"heatFrames": 165
},
{
"or": [
{
"heatFrames": 10
},
"canMockball",
{
"obstaclesCleared": [
"A"
]
}
]
}
],
"clearsObstacles": [
"A"
]
},
{
"link": [
3,
2
],
"name": "Base",
"requires": [
"Morph",
{
"heatFrames": 260
},
{
"or": [
{
"and": [
"Wave",
{
"heatFrames": 30
}
]
},
{
"obstaclesCleared": [
"A"
]
}
]
}
],
"clearsObstacles": [
"A"
]
},
{
"link": [
3,
2
],
"name": "Gate Glitch",
"requires": [
"Morph",
{
"heatFrames": 260
},
"h_canHeatedBlueGateGlitch"
],
"clearsObstacles": [
"A"
]
},
{
"link": [
3,
3
],
"name": "Leave with Runway",
"requires": [],
"exitCondition": {
"leaveWithRunway": {
"length": 14,
"openEnd": 0
}
}
},
{
"link": [
3,
3
],
"name": "Viola Farm",
"requires": [
"h_heatProof",
{
"resetRoom": {
"nodes": [
1,
3,
4
],
"mustStayPut": false
}
},
{
"refill": [
"PowerBomb"
]
}
],
"devNote": "FIXME: Resetting the room using door node 2 would also be possible if the obstacle is cleared."
},
{
"link": [
3,
3
],
"name": "Crystal Flash",
"requires": [
"h_canHeatedCrystalFlash"
]
},
{
"link": [
3,
3
],
"name": "10 Power Bomb Crystal Flash",
"requires": [
{
"heatFrames": 240
},
"h_can10PowerBombCrystalFlash",
{
"heatFrames": 70
}
],
"note": [
"Lay a Power Bomb immediately after killing the Viola, in order to get a Power Bomb drop even if full on Power Bombs.",
"Jump straight up to collect the drop, then remorph and hold the Crystal Flash inputs."
]
},
{
"link": [
3,
5
],
"name": "Base",
"requires": [
{
  "heatFrames": 130
}
]
},
{
"link": [
4,
1
],
"name": "Base",
"requires": [
{
  "heatFrames": 100
}
],
"unlocksDoors": [
{
"types": [
"missiles"
],
"requires": [
{
"heatFrames": 20
}
]
}
]
},
{
"link": [
4,
1
],
"name": "Carry Shinecharge",
"entranceCondition": {
"comeInShinecharged": {
"framesRequired": 85
}
},
"requires": [
{
  "heatFrames": 85
}
],
"exitCondition": {
"leaveShinecharged": {
"framesRemaining": "auto"
}
},
"unlocksDoors": [
{
"types": [
"super"
],
"requires": []
},
{
"types": [
"missiles",
"powerbomb"
],
"requires": [
"never"
]
}
]
},
{
"link": [
4,
1
],
"name": "Come In Shinecharged, Leave Sparking",
"entranceCondition": {
"comeInShinecharged": {
"framesRequired": 10
}
},
"requires": [
{
"shinespark": {
"frames": 21
}
},
{
"heatFrames": 60
}
],
"exitCondition": {
"leaveWithSpark": {}
},
"unlocksDoors": [
{
"types": [
"super"
],
"requires": []
},
{
"types": [
"missiles",
"powerbomb"
],
"requires": [
"never"
]
}
]
},
{
"link": [
4,
1
],
"name": "Come In Shinecharging, Leave Shinecharged",
"entranceCondition": {
"comeInShinecharging": {
"length": 3,
"openEnd": 1
}
},
"requires": [
{
  "heatFrames": 100
}
],
"exitCondition": {
"leaveShinecharged": {
"framesRemaining": 90
}
},
"unlocksDoors": [
{
"types": [
"super"
],
"requires": []
},
{
"types": [
"missiles",
"powerbomb"
],
"requires": [
"never"
]
}
]
},
{
"link": [
4,
1
],
"name": "Come In Shinecharging, Leave With Spark",
"entranceCondition": {
"comeInShinecharging": {
"length": 3,
"openEnd": 0
}
},
"requires": [
{
"heatFrames": 60
},
{
"shinespark": {
"frames": 17,
"excessFrames": 0
}
}
],
"exitCondition": {
"leaveWithSpark": {}
},
"unlocksDoors": [
{
"types": [
"super"
],
"requires": []
},
{
"types": [
"missiles",
"powerbomb"
],
"requires": [
"never"
]
}
],
"devNote": "This strat is probably only useful if shinesparks are modified to not cost energy."
},
{
"link": [
4,
2
],
"name": "Grapple Teleport",
"entranceCondition": {
"comeInWithGrappleTeleport": {
"blockPositions": [
[
2,
18
],
[
2,
19
],
[
2,
28
],
[
2,
29
]
]
}
},
"requires": [],
"bypassesDoorShell": true
},
{
"link": [
4,
2
],
"name": "Carry Grapple Teleport (Top Position)",
"entranceCondition": {
"comeInWithGrappleTeleport": {
"blockPositions": [
[
2,
18
]
]
}
},
"requires": [],
"bypassesDoorShell": true,
"exitCondition": {
"leaveWithGrappleTeleport": {
"blockPositions": [
[
2,
18
]
]
}
}
},
{
"link": [
4,
2
],
"name": "Carry Grapple Teleport (Upper Middle Position)",
"entranceCondition": {
"comeInWithGrappleTeleport": {
"blockPositions": [
[
2,
19
]
]
}
},
"requires": [],
"bypassesDoorShell": true,
"exitCondition": {
"leaveWithGrappleTeleport": {
"blockPositions": [
[
2,
19
]
]
}
}
},
{
"link": [
4,
2
],
"name": "Carry Grapple Teleport (Lower Middle Position)",
"entranceCondition": {
"comeInWithGrappleTeleport": {
"blockPositions": [
[
2,
28
]
]
}
},
"requires": [],
"bypassesDoorShell": true,
"exitCondition": {
"leaveWithGrappleTeleport": {
"blockPositions": [
[
2,
28
]
]
}
}
},
{
"link": [
4,
2
],
"name": "Carry Grapple Teleport (Bottom Position)",
"entranceCondition": {
"comeInWithGrappleTeleport": {
"blockPositions": [
[
2,
29
]
]
}
},
"requires": [],
"bypassesDoorShell": true,
"exitCondition": {
"leaveWithGrappleTeleport": {
"blockPositions": [
[
2,
29
]
]
}
}
},
{
"link": [
4,
2
],
"name": "Grapple Teleport X-Ray Climb",
"entranceCondition": {
"comeInWithGrappleTeleport": {
"blockPositions": [
[
2,
34
]
]
}
},
"requires": [
"canXRayClimb",
{
"heatFrames": 1600
}
],
"bypassesDoorShell": true,
"note": [
"Exit the previous room with Samus in a standing pose (while grappled).",
"After teleporting, press right to release Grapple while staying standing (not being forced into a crouch).",
"Then X-ray climb to get up to the door transition, without needing to open the door."
]
},
{
"link": [
4,
4
],
"name": "Leave with Runway",
"requires": [],
"exitCondition": {
"leaveWithRunway": {
"length": 4,
"openEnd": 1
}
}
},
{
"link": [
4,
4
],
"name": "Crystal Flash",
"requires": [
"h_canHeatedCrystalFlash"
]
},
{
"link": [
4,
4
],
"name": "10 Power Bomb Crystal Flash",
"requires": [
{
"heatFrames": 270
},
"h_can10PowerBombCrystalFlash",
{
"heatFrames": 90
}
],
"note": [
"Lay a Power Bomb immediately after killing the Viola, in order to get a Power Bomb drop even if full on Power Bombs.",
"Jump straight up to collect the drop, then remorph and hold the Crystal Flash inputs."
],
"devNote": "The heat frames here could be tightened by adding another node."
},
{
"link": [
4,
5
],
"name": "Base",
"requires": [
{
  "heatFrames": 100
}
]
},
{
"link": [
5,
1
],
"name": "Base",
"requires": [
{
  "heatFrames": 150
}
]
},
{
"link": [
5,
2
],
"name": "Base",
"requires": [
"Morph",
{
"heatFrames": 150
},
{
"or": [
{
"and": [
"Wave",
{
"heatFrames": 30
}
]
},
{
"obstaclesCleared": [
"A"
]
}
]
}
],
"clearsObstacles": [
"A"
]
},
{
"link": [
5,
2
],
"name": "Gate Glitch",
"requires": [
"Morph",
{
"heatFrames": 150
},
"h_canHeatedBlueGateGlitch"
],
"clearsObstacles": [
"A"
]
},
{
"link": [
5,
2
],
"name": "Leave with Runway",
"requires": [
"Morph",
{
"heatFrames": 150
},
{
"or": [
{
"and": [
"Wave",
{
"heatFrames": 30
}
]
},
{
"obstaclesCleared": [
"A"
]
}
]
}
],
"exitCondition": {
"leaveWithRunway": {
"length": 11,
"openEnd": 0,
"gentleDownTiles": 4
}
},
"clearsObstacles": [
"A"
],
"unlocksDoors": [
{
"types": [
"missiles"
],
"requires": [
{
"heatFrames": 70
}
]
},
{
"types": [
"super"
],
"requires": []
},
{
"types": [
"powerbomb"
],
"requires": [
{
"heatFrames": 110
}
]
}
]
},
{
"link": [
5,
2
],
"name": "Leave with Runway (Gate Glitch)",
"requires": [
"Morph",
{
"heatFrames": 150
},
"h_canHeatedBlueGateGlitch"
],
"exitCondition": {
"leaveWithRunway": {
"length": 11,
"openEnd": 0,
"gentleDownTiles": 4
}
},
"clearsObstacles": [
"A"
],
"unlocksDoors": [
{
"types": [
"missiles"
],
"requires": [
{
"heatFrames": 90
}
]
},
{
"types": [
"super"
],
"requires": []
},
{
"types": [
"powerbomb"
],
"requires": [
{
"heatFrames": 110
}
]
}
]
},
{
"link": [
5,
3
],
"name": "Base",
"requires": [
{
  "heatFrames": 130
}
],
"unlocksDoors": [
{
"types": [
"missiles"
],
"requires": [
{
"heatFrames": 50
}
]
},
{
"types": [
"super"
],
"requires": []
},
{
"types": [
"powerbomb"
],
"requires": [
{
"heatFrames": 60
}
]
}
]
},
{
"link": [
5,
3
],
"name": "Leave with Runway",
"requires": [
{
  "heatFrames": 160
}
],
"exitCondition": {
"leaveWithRunway": {
"length": 14,
"openEnd": 0
}
},
"unlocksDoors": [
{
"types": [
"missiles"
],
"requires": [
{
"heatFrames": 50
}
]
},
{
"types": [
"super"
],
"requires": []
},
{
"types": [
"powerbomb"
],
"requires": [
{
"heatFrames": 60
}
]
}
]
},
{
"link": [
5,
4
],
"name": "Base",
"requires": [
{
  "heatFrames": 150
}
]
},
{
"link": [
5,
5
],
"name": "Crystal Flash",
"requires": [
"h_canHeatedCrystalFlash"
]
}
]
}