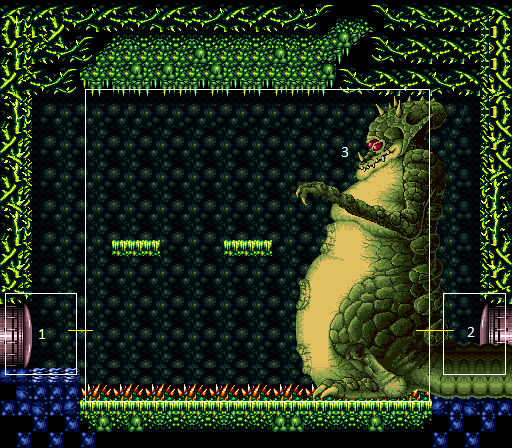
Kraid Room
Room ID: 84
|
Exit condition: {
"leaveWithRunway": {
"length": 4,
"openEnd": 1
}
}
|
|
Requires: {
"canShineCharge": {
"usedTiles": 22,
"openEnd": 0
}
}
"canShinechargeMovement"
"f_DefeatedKraid"
Exit condition: {
"leaveShinecharged": {
"framesRemaining": 135
}
}
|
|
Requires: "h_canCrystalFlash" |
|
From: 1
Left Door (locked)
To: 1
Left Door (locked)
The only projectiles that Kraid can hit Samus with through the transition are the spinning talons after he stands up. This requires Kraid to not be defeated and the door to be open during the second phase. Requires: {
"not": "f_DefeatedKraid"
}
"canRiskPermanentLossOfAccess"
{
"or": [
"Charge",
{
"ammo": {
"type": "Missile",
"count": 2
}
},
{
"ammo": {
"type": "Super",
"count": 1
}
}
]
}
Exit condition: {
"leaveWithGModeSetup": {}
}
|
|
|
|
Entrance condition: {
"comeInWithGrappleTeleport": {
"blockPositions": [
[
2,
28
],
[
2,
29
]
]
}
}
Bypasses door shell: true |
|
From: 2
Right Door (locked)
To: 1
Left Door (locked)
Entrance condition: {
"comeInWithGrappleTeleport": {
"blockPositions": [
[
2,
18
]
]
}
}
Requires: {
"not": "f_DefeatedKraid"
}
"canRiskPermanentLossOfAccess"
Bypasses door shell: true |
|
From: 2
Right Door (locked)
To: 1
Left Door (locked)
Entrance condition: {
"comeInWithGrappleTeleport": {
"blockPositions": [
[
2,
18
]
]
}
}
Requires: {
"not": "f_DefeatedKraid"
}
"canRiskPermanentLossOfAccess"
Exit condition: {
"leaveWithGrappleTeleport": {
"blockPositions": [
[
2,
18
]
]
}
}
Bypasses door shell: true |
|
From: 2
Right Door (locked)
To: 1
Left Door (locked)
Entrance condition: {
"comeInWithGrappleTeleport": {
"blockPositions": [
[
2,
28
]
]
}
}
Exit condition: {
"leaveWithGrappleTeleport": {
"blockPositions": [
[
2,
28
]
]
}
}
Bypasses door shell: true |
|
From: 2
Right Door (locked)
To: 1
Left Door (locked)
Entrance condition: {
"comeInWithGrappleTeleport": {
"blockPositions": [
[
2,
29
]
]
}
}
Exit condition: {
"leaveWithGrappleTeleport": {
"blockPositions": [
[
2,
29
]
]
}
}
Bypasses door shell: true |
|
Exit condition: {
"leaveWithRunway": {
"length": 4,
"openEnd": 1
}
}
|
|
Requires: {
"canShineCharge": {
"usedTiles": 22,
"openEnd": 0
}
}
"canShinechargeMovement"
"f_DefeatedKraid"
Exit condition: {
"leaveShinecharged": {
"framesRemaining": 135
}
}
|
|
Requires: "h_canCrystalFlash" |
|
Requires: "f_DefeatedKraid" |
|
You can actually do the Kraid fight normally if entering from the right door, but it will put Samus into the thorns. Requires: {
"thornHits": 1
}
|
|
Being prepared and space jumping through the room can prevent a thorn hit. Requires: {
"or": [
"canPrepareForNextRoom",
"h_KraidCameraFix"
]
}
"SpaceJump"
|
|
Door is reachable mid-fight but locked |
|
Door is not reachable mid-fight Requires: "f_DefeatedKraid" |
|
Requires: "f_DefeatedKraid" |
|
|
|
Requires: "f_DefeatedKraid" |
|
|
|
Getting up during Phase 2 can be done by jumping on Kraid's projectile platforms or a well timed crouch jump + down grab. Requires: "Charge"
{
"or": [
"Wave",
"Spazer",
"Plasma",
"canBePatient"
]
}
{
"or": [
"HiJump",
"canWalljump",
"SpaceJump",
"canSpringBallJumpMidAir",
{
"and": [
"canDodgeWhileShooting",
{
"or": [
"canCarefulJump",
"h_canCrouchJumpDownGrab"
]
}
]
}
]
}
Clears obstacles: f_DefeatedKraid |
|
Only 2 Missiles are needed to get Kraid to stand up, after which they are farmable. Getting up during Phase 2 can be done by jumping on Kraid's projectile platforms or a well timed crouch jump + down grab. Requires: {
"ammo": {
"type": "Missile",
"count": 2
}
}
{
"or": [
"HiJump",
"canWalljump",
"SpaceJump",
"canSpringBallJumpMidAir",
{
"and": [
"canDodgeWhileShooting",
{
"or": [
"canCarefulJump",
"h_canCrouchJumpDownGrab"
]
}
]
}
]
}
Clears obstacles: f_DefeatedKraid |
|
4 supers are required to kill Kraid. Only 1 is needed to get him to stand up, after which they are farmable, even though the drop rate is low. Getting up during Phase 2 can be done by jumping on Kraid's projectile platforms or a well timed crouch jump + down grab. Requires: {
"or": [
{
"ammo": {
"type": "Super",
"count": 5
}
},
{
"and": [
{
"ammo": {
"type": "Super",
"count": 4
}
},
"canDodgeWhileShooting"
]
},
{
"and": [
{
"ammo": {
"type": "Super",
"count": 3
}
},
"canDodgeWhileShooting",
"canBePatient"
]
},
{
"and": [
{
"ammo": {
"type": "Super",
"count": 1
}
},
"canDodgeWhileShooting",
"canBeVeryPatient"
]
}
]
}
{
"or": [
"HiJump",
"canWalljump",
"SpaceJump",
"canSpringBallJumpMidAir",
{
"and": [
"canDodgeWhileShooting",
{
"or": [
"canCarefulJump",
"h_canCrouchJumpDownGrab"
]
}
]
}
]
}
Clears obstacles: f_DefeatedKraid |
|
|
|
Requires: {
"canShineCharge": {
"usedTiles": 22,
"openEnd": 0
}
}
"canShinechargeMovement"
{
"obstaclesCleared": [
"f_DefeatedKraid"
]
}
Exit condition: {
"leaveShinecharged": {
"framesRemaining": 135
}
}
|
|
Requires: {
"canShineCharge": {
"usedTiles": 22,
"openEnd": 0
}
}
"canShinechargeMovement"
{
"obstaclesCleared": [
"f_DefeatedKraid"
]
}
Exit condition: {
"leaveShinecharged": {
"framesRemaining": 135
}
}
|
|
Requires: {
"obstaclesCleared": [
"f_DefeatedKraid"
]
}
|
|
Door is not reachable mid-fight Requires: {
"obstaclesCleared": [
"f_DefeatedKraid"
]
}
|
|
Requires: {
"obstaclesCleared": [
"f_DefeatedKraid"
]
}
|
|
Requires: {
"obstaclesCleared": [
"f_DefeatedKraid"
]
}
|
{
"$schema": "../../../schema/m3-room.schema.json",
"id": 84,
"name": "Kraid Room",
"area": "Brinstar",
"subarea": "Kraid",
"playable": true,
"roomAddress": "0x7A59F",
"roomEnvironments": [
{
"heated": false
}
],
"nodes": [
{
"id": 1,
"name": "Left Door (locked)",
"nodeType": "junction",
"nodeSubType": "grey",
"nodeAddress": "0x00191ce",
"doorEnvironments": [
{
"physics": "air"
}
]
},
{
"id": 2,
"name": "Right Door (locked)",
"nodeType": "junction",
"nodeSubType": "grey",
"nodeAddress": "0x00191da",
"doorEnvironments": [
{
"physics": "air"
}
]
},
{
"id": 3,
"name": "Kraid (locked)",
"nodeType": "junction",
"nodeSubType": "boss"
},
{
"id": 4,
"name": "Left Door (unlocked)",
"nodeType": "door",
"nodeSubType": "grey",
"nodeAddress": "0x00191ce",
"doorEnvironments": [
{
"physics": "air"
}
]
},
{
"id": 5,
"name": "Right Door (unlocked)",
"nodeType": "door",
"nodeSubType": "grey",
"nodeAddress": "0x00191da",
"doorEnvironments": [
{
"physics": "air"
}
]
},
{
"id": 6,
"name": "Kraid (unlocked)",
"nodeType": "event",
"nodeSubType": "boss",
"yields": [
"f_DefeatedKraid"
]
}
],
"enemies": [
{
"id": "e1",
"groupName": "Kraid",
"enemyName": "Kraid",
"quantity": 1,
"homeNodes": [
3
],
"stopSpawn": [
"f_DefeatedKraid"
]
}
],
"links": [
{
"from": 1,
"to": [
{
"id": 1
},
{
"id": 3
}
]
},
{
"from": 2,
"to": [
{
"id": 1
},
{
"id": 2
},
{
"id": 3
}
]
},
{
"from": 3,
"to": [
{
"id": 1
},
{
"id": 2
}
]
}
],
"strats": [
{
"link": [
1,
1
],
"name": "Leave With Runway",
"requires": [],
"exitCondition": {
"leaveWithRunway": {
"length": 4,
"openEnd": 1
}
}
},
{
"link": [
1,
1
],
"name": "Leave Shinecharged",
"requires": [
{
"canShineCharge": {
"usedTiles": 22,
"openEnd": 0
}
},
"canShinechargeMovement",
"f_DefeatedKraid"
],
"exitCondition": {
"leaveShinecharged": {
"framesRemaining": 135
}
},
"devNote": "An X-Mode strat is likely possible but not included. It would require the doors unlocked and canRiskPermanentLossOfAccess."
},
{
"link": [
1,
1
],
"name": "Crystal Flash",
"requires": [
"h_canCrystalFlash"
]
},
{
"link": [
1,
1
],
"name": "G-Mode Setup - Get Hit By Kraid's Talons",
"requires": [
{
"not": "f_DefeatedKraid"
},
"canRiskPermanentLossOfAccess",
{
"or": [
"Charge",
{
"ammo": {
"type": "Missile",
"count": 2
}
},
{
"ammo": {
"type": "Super",
"count": 1
}
}
]
}
],
"exitCondition": {
"leaveWithGModeSetup": {}
},
"note": [
"The only projectiles that Kraid can hit Samus with through the transition are the spinning talons after he stands up.",
"This requires Kraid to not be defeated and the door to be open during the second phase."
]
},
{
"link": [
1,
3
],
"name": "Base",
"requires": []
},
{
"link": [
2,
1
],
"name": "Grapple Teleport",
"entranceCondition": {
"comeInWithGrappleTeleport": {
"blockPositions": [
[
2,
28
],
[
2,
29
]
]
}
},
"requires": [],
"bypassesDoorShell": true
},
{
"link": [
2,
1
],
"name": "Grapple Teleport (Kraid Alive)",
"entranceCondition": {
"comeInWithGrappleTeleport": {
"blockPositions": [
[
2,
18
]
]
}
},
"requires": [
{
"not": "f_DefeatedKraid"
},
"canRiskPermanentLossOfAccess"
],
"bypassesDoorShell": true
},
{
"link": [
2,
1
],
"name": "Carry Grapple Teleport (Top Position, Kraid Alive)",
"entranceCondition": {
"comeInWithGrappleTeleport": {
"blockPositions": [
[
2,
18
]
]
}
},
"requires": [
{
"not": "f_DefeatedKraid"
},
"canRiskPermanentLossOfAccess"
],
"bypassesDoorShell": true,
"exitCondition": {
"leaveWithGrappleTeleport": {
"blockPositions": [
[
2,
18
]
]
}
}
},
{
"link": [
2,
1
],
"name": "Carry Grapple Teleport (Middle Position)",
"entranceCondition": {
"comeInWithGrappleTeleport": {
"blockPositions": [
[
2,
28
]
]
}
},
"requires": [],
"bypassesDoorShell": true,
"exitCondition": {
"leaveWithGrappleTeleport": {
"blockPositions": [
[
2,
28
]
]
}
}
},
{
"link": [
2,
1
],
"name": "Carry Grapple Teleport (Bottom Position)",
"entranceCondition": {
"comeInWithGrappleTeleport": {
"blockPositions": [
[
2,
29
]
]
}
},
"requires": [],
"bypassesDoorShell": true,
"exitCondition": {
"leaveWithGrappleTeleport": {
"blockPositions": [
[
2,
29
]
]
}
}
},
{
"link": [
2,
2
],
"name": "Leave With Runway",
"requires": [],
"exitCondition": {
"leaveWithRunway": {
"length": 4,
"openEnd": 1
}
}
},
{
"link": [
2,
2
],
"name": "Leave Shinecharged",
"requires": [
{
"canShineCharge": {
"usedTiles": 22,
"openEnd": 0
}
},
"canShinechargeMovement",
"f_DefeatedKraid"
],
"exitCondition": {
"leaveShinecharged": {
"framesRemaining": 135
}
},
"devNote": "An X-Mode strat is likely possible but not included. It would require the doors unlocked and canRiskPermanentLossOfAccess."
},
{
"link": [
2,
2
],
"name": "Crystal Flash",
"requires": [
"h_canCrystalFlash"
]
},
{
"link": [
2,
3
],
"name": "Kraid is Dead",
"requires": [
"f_DefeatedKraid"
]
},
{
"link": [
2,
3
],
"name": "Base",
"requires": [
{
  "thornHits": 1
}
],
"note": "You can actually do the Kraid fight normally if entering from the right door, but it will put Samus into the thorns."
},
{
"link": [
2,
3
],
"name": "Prepared with Space Jump",
"requires": [
{
"or": [
"canPrepareForNextRoom",
"h_KraidCameraFix"
]
},
"SpaceJump"
],
"note": "Being prepared and space jumping through the room can prevent a thorn hit."
},
{
"link": [
3,
1
],
"name": "Base",
"requires": [],
"note": "Door is reachable mid-fight but locked"
},
{
"link": [
3,
2
],
"name": "Base",
"requires": [
"f_DefeatedKraid"
],
"note": "Door is not reachable mid-fight"
},
{
"name": "Base",
"notable": false,
"requires": [
"f_DefeatedKraid"
],
"link": [
1,
4
]
},
{
"link": [
4,
1
],
"name": "Base",
"notable": false,
"requires": []
},
{
"name": "Base",
"notable": false,
"requires": [
"f_DefeatedKraid"
],
"link": [
2,
5
]
},
{
"link": [
5,
2
],
"name": "Base",
"notable": false,
"requires": []
},
{
"name": "Charge",
"notable": false,
"requires": [
"Charge",
{
"or": [
"Wave",
"Spazer",
"Plasma",
"canBePatient"
]
},
{
"or": [
"HiJump",
"canWalljump",
"SpaceJump",
"canSpringBallJumpMidAir",
{
"and": [
"canDodgeWhileShooting",
{
"or": [
"canCarefulJump",
"h_canCrouchJumpDownGrab"
]
}
]
}
]
}
],
"note": "Getting up during Phase 2 can be done by jumping on Kraid's projectile platforms or a well timed crouch jump + down grab.",
"link": [
3,
6
],
"clearsObstacles": [
"f_DefeatedKraid"
]
},
{
"name": "Missiles",
"notable": false,
"requires": [
{
"ammo": {
"type": "Missile",
"count": 2
}
},
{
"or": [
"HiJump",
"canWalljump",
"SpaceJump",
"canSpringBallJumpMidAir",
{
"and": [
"canDodgeWhileShooting",
{
"or": [
"canCarefulJump",
"h_canCrouchJumpDownGrab"
]
}
]
}
]
}
],
"note": [
"Only 2 Missiles are needed to get Kraid to stand up, after which they are farmable.",
"Getting up during Phase 2 can be done by jumping on Kraid's projectile platforms or a well timed crouch jump + down grab."
],
"link": [
3,
6
],
"clearsObstacles": [
"f_DefeatedKraid"
]
},
{
"name": "Supers",
"notable": false,
"requires": [
{
"or": [
{
"ammo": {
"type": "Super",
"count": 5
}
},
{
"and": [
{
"ammo": {
"type": "Super",
"count": 4
}
},
"canDodgeWhileShooting"
]
},
{
"and": [
{
"ammo": {
"type": "Super",
"count": 3
}
},
"canDodgeWhileShooting",
"canBePatient"
]
},
{
"and": [
{
"ammo": {
"type": "Super",
"count": 1
}
},
"canDodgeWhileShooting",
"canBeVeryPatient"
]
}
]
},
{
"or": [
"HiJump",
"canWalljump",
"SpaceJump",
"canSpringBallJumpMidAir",
{
"and": [
"canDodgeWhileShooting",
{
"or": [
"canCarefulJump",
"h_canCrouchJumpDownGrab"
]
}
]
}
]
}
],
"note": [
"4 supers are required to kill Kraid. Only 1 is needed to get him to stand up, after which they are farmable, even though the drop rate is low.",
"Getting up during Phase 2 can be done by jumping on Kraid's projectile platforms or a well timed crouch jump + down grab."
],
"link": [
3,
6
],
"clearsObstacles": [
"f_DefeatedKraid"
]
},
{
"link": [
6,
3
],
"name": "Base",
"notable": false,
"requires": []
},
{
"link": [
1,
1
],
"name": "Leave Shinecharged",
"requires": [
{
"canShineCharge": {
"usedTiles": 22,
"openEnd": 0
}
},
"canShinechargeMovement",
{
  "obstaclesCleared": [
    "f_DefeatedKraid"
  ]
}
],
"exitCondition": {
"leaveShinecharged": {
"framesRemaining": 135
}
},
"devNote": "An X-Mode strat is likely possible but not included. It would require the doors unlocked and canRiskPermanentLossOfAccess."
},
{
"link": [
2,
2
],
"name": "Leave Shinecharged",
"requires": [
{
"canShineCharge": {
"usedTiles": 22,
"openEnd": 0
}
},
"canShinechargeMovement",
{
  "obstaclesCleared": [
    "f_DefeatedKraid"
  ]
}
],
"exitCondition": {
"leaveShinecharged": {
"framesRemaining": 135
}
},
"devNote": "An X-Mode strat is likely possible but not included. It would require the doors unlocked and canRiskPermanentLossOfAccess."
},
{
"link": [
2,
3
],
"name": "Kraid is Dead",
"requires": [
{
  "obstaclesCleared": [
    "f_DefeatedKraid"
  ]
}
]
},
{
"link": [
3,
2
],
"name": "Base",
"requires": [
{
  "obstaclesCleared": [
    "f_DefeatedKraid"
  ]
}
],
"note": "Door is not reachable mid-fight"
},
{
"name": "Base",
"notable": false,
"requires": [
{
"obstaclesCleared": [
"f_DefeatedKraid"
]
}
],
"link": [
1,
4
]
},
{
"name": "Base",
"notable": false,
"requires": [
{
"obstaclesCleared": [
"f_DefeatedKraid"
]
}
],
"link": [
2,
5
]
}
],
"obstacles": [
{
"id": "f_DefeatedKraid",
"name": "f_DefeatedKraid"
}
]
}