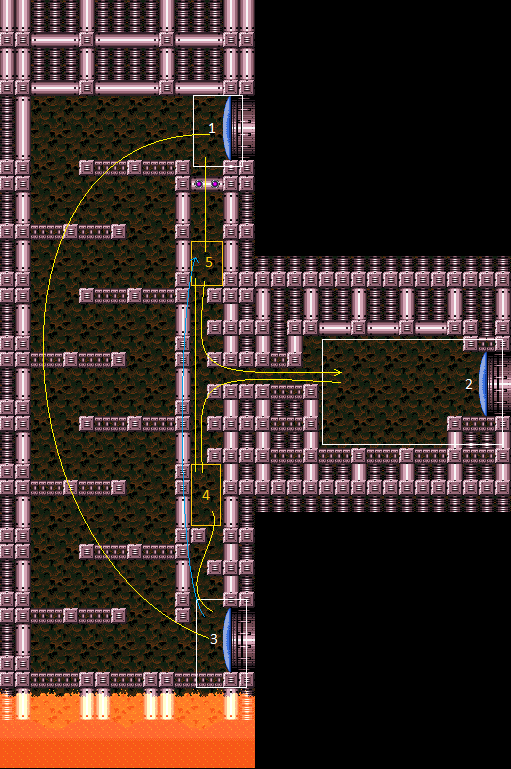
Ice Beam Snake Room
Room ID: 108
|
Requires: {
"heatFrames": 5
}
Exit condition: {
"leaveWithRunway": {
"length": 1,
"openEnd": 1
}
}
|
|
From: 1
Top Right Door
To: 1
Top Right Door
Wait 80 seconds for the Sova to get into position, then freeze it to bridge the gap and significantly extend the runway. The other Sovas can be farmed or used as a backup. Requires: "h_canFrozenEnemyRunway"
"canBePatient"
{
"heatFrames": 4800
}
Exit condition: {
"leaveWithRunway": {
"length": 10,
"openEnd": 1
}
}
|
|
Requires: {
"heatFrames": 40
}
"h_canHeatedCrystalFlash"
|
|
Requires: {
"heatFrames": 750
}
|
|
Requires: "ScrewAttack"
{
"heatFrames": 525
}
|
|
Requires: "canPseudoScrew"
{
"heatFrames": 540
}
|
|
Requires: "Wave"
"Ice"
{
"heatFrames": 530
}
|
|
From: 1
Top Right Door
To: 3
Bottom Right Door
Requires: "Wave"
"Ice"
{
"heatFrames": 525
}
Exit condition: {
"leaveWithRunway": {
"length": 12,
"openEnd": 0
}
}
|
|
From: 1
Top Right Door
To: 3
Bottom Right Door
Requires: "Wave"
"Ice"
{
"ammo": {
"type": "Super",
"count": 1
}
}
{
"heatFrames": 545
}
Exit condition: {
"leaveWithRunway": {
"length": 13,
"openEnd": 0
}
}
|
|
Requires: {
"heatFrames": 100
}
|
|
To minimize heat damage, immediately after landing use Grapple to open the door while running towards it, then jump over the gap and through the door. If the door is grappled too late, it may interfere with the jump. Entrance condition: {
"comeInWithGrappleTeleport": {
"blockPositions": [
[
5,
3
],
[
7,
2
]
]
}
}
Requires: {
"heatFrames": 75
}
|
|
Exit condition: {
"leaveWithRunway": {
"length": 3,
"openEnd": 1
}
}
|
|
From: 2
Middle Right Door
To: 2
Middle Right Door
Wait 3 minutes for the Sova to get into position, or 100 seconds with Morph by going ahead of them to break the shot blocks as they get there. This can be further reduced to 45 seconds with a Super by knocking a Sova off after it exits the morph tunnel. The other Sovas can be farmed or used as a backup. Requires: "h_canFrozenEnemyRunway"
{
"or": [
{
"and": [
"h_heatProof",
"canBeVeryPatient"
]
},
{
"and": [
"h_heatProof",
"canBePatient",
"Morph"
]
},
{
"and": [
{
"ammo": {
"type": "Super",
"count": 1
}
},
{
"heatFrames": 2600
}
]
}
]
}
Exit condition: {
"leaveWithRunway": {
"length": 4,
"openEnd": 1
}
}
|
|
Requires: "h_heatProof"
{
"resetRoom": {
"nodes": [
2
],
"mustStayPut": false
}
}
{
"refill": [
"Energy",
"Missile",
"Super"
]
}
|
|
Requires: "h_canHeatedCrystalFlash" |
|
Requires: "Morph"
{
"heatFrames": 200
}
|
|
Requires: {
"heatFrames": 330
}
|
|
To minimize heat damage, immediately after landing use Grapple to open the door while running towards it, then jump over the gap and through the door. If the door is grappled too late, it may interfere with the jump. Entrance condition: {
"comeInWithGrappleTeleport": {
"blockPositions": [
[
5,
3
],
[
7,
2
]
]
}
}
Requires: {
"heatFrames": 75
}
|
|
From: 3
Bottom Right Door
To: 3
Bottom Right Door
Exit condition: {
"leaveWithRunway": {
"length": 12,
"openEnd": 0
}
}
|
|
From: 3
Bottom Right Door
To: 3
Bottom Right Door
Requires: {
"or": [
{
"ammo": {
"type": "Super",
"count": 1
}
},
{
"and": [
"h_canUsePowerBombs",
{
"heatFrames": 190
}
]
}
]
}
Exit condition: {
"leaveWithRunway": {
"length": 13,
"openEnd": 0
}
}
|
|
Kill the Fune before Crystal Flashing. Requires: {
"ammo": {
"type": "Super",
"count": 1
}
}
{
"heatFrames": 20
}
"h_canHeatedCrystalFlash"
|
|
Requires: "Morph"
{
"heatFrames": 80
}
|
|
From: 3
Bottom Right Door
To: 5
Junction Above Morph Tunnel
Reaching the Morph hole can be tricky with SpeedBooster but no HiJump. Entrance condition: {
"comeInShinecharged": {
"framesRequired": 70
}
}
Requires: "canMidAirMorph"
"canShinechargeMovementComplex"
{
"heatFrames": 210
}
{
"shinespark": {
"frames": 23,
"excessFrames": 3
}
}
|
|
Requires: "Morph"
{
"or": [
"HiJump",
{
"and": [
"SpaceJump",
{
"heatFrames": 40
}
]
},
"canWalljump",
"canSpringBallJumpMidAir",
{
"and": [
"h_canJumpIntoIBJ",
{
"heatFrames": 240
}
]
},
{
"and": [
"h_canJumpIntoIBJ",
"h_canDoubleBombJump",
{
"heatFrames": 120
}
]
},
{
"and": [
"h_canDoubleBombJump",
{
"heatFrames": 300
}
]
}
]
}
{
"heatFrames": 260
}
{
"enemyDamage": {
"enemy": "Sova",
"type": "contact",
"hits": 1
}
}
|
|
Requires: "Morph"
{
"or": [
"HiJump",
{
"and": [
"SpaceJump",
{
"heatFrames": 40
}
]
},
"canWalljump",
"canSpringBallJumpMidAir",
{
"and": [
"h_canIBJ",
{
"heatFrames": 900
}
]
},
{
"and": [
"h_canJumpIntoIBJ",
{
"heatFrames": 240
}
]
},
{
"and": [
"h_canJumpIntoIBJ",
"h_canDoubleBombJump",
{
"heatFrames": 120
}
]
},
{
"and": [
"h_canDoubleBombJump",
{
"heatFrames": 300
}
]
}
]
}
{
"or": [
"h_heatProof",
{
"and": [
"Wave",
"Plasma"
]
},
"h_canUsePowerBombs"
]
}
{
"heatFrames": 260
}
|
|
From: 4
Junction Below Morph Tunnel
To: 2
Middle Right Door
Smoothly jump into the morph tunnel while killing the Sovas. Unmorph at the end of the tunnel to clear more Sovas is needed. Requires: "Morph"
"canTrickyJump"
{
"or": [
"canPreciseWalljump",
"HiJump"
]
}
{
"or": [
{
"enemyKill": {
"enemies": [
[
"Sova"
]
],
"explicitWeapons": [
"Wave",
"Spazer",
"Plasma",
"PowerBomb"
]
}
},
{
"enemyDamage": {
"enemy": "Sova",
"type": "contact",
"hits": 1
}
}
]
}
{
"heatFrames": 230
}
|
|
From: 4
Junction Below Morph Tunnel
To: 2
Middle Right Door
Wait for the Sova to leave the tunnel and jump morph into them to bounce up into the hole. Requires: "canCrouchJump"
"Morph"
"canNeutralDamageBoost"
{
"enemyDamage": {
"enemy": "Sova",
"type": "contact",
"hits": 1
}
}
{
"heatFrames": 420
}
|
|
Freeze a Sova once it enters one of the slots on the wall and then use it as a platform. Requires: "Morph"
"canUseFrozenEnemies"
{
"heatFrames": 840
}
|
|
Requires: "Morph"
{
"heatFrames": 100
}
|
|
From: 4
Junction Below Morph Tunnel
To: 3
Bottom Right Door
Requires: "Morph"
{
"heatFrames": 140
}
Exit condition: {
"leaveWithRunway": {
"length": 12,
"openEnd": 0
}
}
|
|
From: 4
Junction Below Morph Tunnel
To: 3
Bottom Right Door
Requires: "Morph"
{
"or": [
{
"and": [
{
"ammo": {
"type": "Super",
"count": 1
}
},
{
"heatFrames": 145
}
]
},
{
"and": [
{
"ammo": {
"type": "PowerBomb",
"count": 1
}
},
{
"heatFrames": 180
}
]
}
]
}
Exit condition: {
"leaveWithRunway": {
"length": 13,
"openEnd": 0
}
}
|
|
From: 4
Junction Below Morph Tunnel
To: 4
Junction Below Morph Tunnel
Requires: "h_canHeatedCrystalFlash" |
|
From: 4
Junction Below Morph Tunnel
To: 5
Junction Above Morph Tunnel
Requires: {
"or": [
{
"and": [
"canWalljump",
{
"heatFrames": 100
}
]
},
{
"and": [
"HiJump",
"canSpringBallJumpMidAir",
{
"heatFrames": 160
}
]
},
{
"and": [
"SpaceJump",
{
"heatFrames": 180
}
]
},
{
"and": [
"SpaceJump",
"HiJump",
{
"heatFrames": 120
}
]
}
]
}
|
|
Requires: {
"heatFrames": 150
}
|
|
The Sovas should be killed if you are heat proof. Requires: "Morph"
{
"heatFrames": 150
}
{
"or": [
"h_heatProof",
{
"enemyDamage": {
"enemy": "Sova",
"type": "contact",
"hits": 1
}
}
]
}
|
|
Requires: "h_canUsePowerBombs"
{
"heatFrames": 200
}
|
|
From: 5
Junction Above Morph Tunnel
To: 4
Junction Below Morph Tunnel
Requires: {
"heatFrames": 50
}
|
{
"$schema": "../../../schema/m3-room.schema.json",
"id": 108,
"name": "Ice Beam Snake Room",
"area": "Norfair",
"subarea": "Upper",
"subsubarea": "West",
"playable": true,
"roomAddress": "0x7A8B9",
"roomEnvironments": [
{
"heated": true
}
],
"nodes": [
{
"id": 1,
"name": "Top Right Door",
"nodeType": "door",
"nodeSubType": "blue",
"nodeAddress": "0x0019372",
"doorEnvironments": [
{
"physics": "air"
}
]
},
{
"id": 2,
"name": "Middle Right Door",
"nodeType": "door",
"nodeSubType": "blue",
"nodeAddress": "0x001937e",
"doorEnvironments": [
{
"physics": "air"
}
]
},
{
"id": 3,
"name": "Bottom Right Door",
"nodeType": "door",
"nodeSubType": "blue",
"nodeAddress": "0x0019366",
"doorEnvironments": [
{
"physics": "air"
}
]
},
{
"id": 4,
"name": "Junction Below Morph Tunnel",
"nodeType": "junction",
"nodeSubType": "junction"
},
{
"id": 5,
"name": "Junction Above Morph Tunnel",
"nodeType": "junction",
"nodeSubType": "junction"
}
],
"enemies": [
{
"id": "e1",
"groupName": "Ice Beam Snake Room Funes",
"enemyName": "Fune",
"quantity": 4,
"betweenNodes": [
1,
3
],
"dropRequires": [
"h_heatProof"
]
},
{
"id": "e2",
"groupName": "Ice Beam Snake Room Sovas",
"enemyName": "Sova",
"quantity": 3,
"homeNodes": [
2,
3,
4
],
"dropRequires": [
"h_heatProof"
]
}
],
"links": [
{
"from": 1,
"to": [
{
"id": 1
},
{
"id": 3
},
{
"id": 5
}
]
},
{
"from": 2,
"to": [
{
"id": 1
},
{
"id": 2
},
{
"id": 4
}
]
},
{
"from": 3,
"to": [
{
"id": 1
},
{
"id": 3
},
{
"id": 4
},
{
"id": 5
}
]
},
{
"from": 4,
"to": [
{
"id": 2
},
{
"id": 3
},
{
"id": 4
},
{
"id": 5
}
]
},
{
"from": 5,
"to": [
{
"id": 1
},
{
"id": 2,
"devNote": "This is considered one-way even though technically you can get from 2 to 5 without falling to 5 with a tight jump using Spring Ball. This won't be expected for heat run times"
},
{
"id": 4
},
{
"id": 5
}
]
}
],
"strats": [
{
"link": [
1,
1
],
"name": "Leave with Runway",
"requires": [
{
  "heatFrames": 5
}
],
"exitCondition": {
"leaveWithRunway": {
"length": 1,
"openEnd": 1
}
}
},
{
"link": [
1,
1
],
"name": "Leave With Runway - Frozen Sova",
"requires": [
"h_canFrozenEnemyRunway",
"canBePatient",
{
"heatFrames": 4800
}
],
"exitCondition": {
"leaveWithRunway": {
"length": 10,
"openEnd": 1
}
},
"note": [
"Wait 80 seconds for the Sova to get into position, then freeze it to bridge the gap and significantly extend the runway.",
"The other Sovas can be farmed or used as a backup."
],
"devNote": "Because the Sovas are global, strats could be added that start from the other doors to tighten the total frame count, but it will typically require heatProof either way."
},
{
"link": [
1,
1
],
"name": "Crystal Flash",
"requires": [
{
"heatFrames": 40
},
"h_canHeatedCrystalFlash"
]
},
{
"link": [
1,
3
],
"name": "Base",
"requires": [
{
  "heatFrames": 750
}
],
"unlocksDoors": [
{
"types": [
"powerbomb"
],
"requires": []
}
]
},
{
"link": [
1,
3
],
"name": "Screw Attack",
"requires": [
"ScrewAttack",
{
"heatFrames": 525
}
],
"unlocksDoors": [
{
"types": [
"powerbomb"
],
"requires": []
}
],
"devNote": "The bottom Fune shoots a fireball which wastes all of the time save of a Leave with Runway strat."
},
{
"link": [
1,
3
],
"name": "Pseudo Screw",
"requires": [
"canPseudoScrew",
{
"heatFrames": 540
}
],
"unlocksDoors": [
{
"types": [
"powerbomb"
],
"requires": []
}
]
},
{
"link": [
1,
3
],
"name": "Frozen Funes",
"requires": [
"Wave",
"Ice",
{
"heatFrames": 530
}
],
"unlocksDoors": [
{
"types": [
"powerbomb"
],
"requires": []
}
]
},
{
"link": [
1,
3
],
"name": "Frozen Funes Leave with Runway",
"requires": [
"Wave",
"Ice",
{
"heatFrames": 525
}
],
"exitCondition": {
"leaveWithRunway": {
"length": 12,
"openEnd": 0
}
},
"unlocksDoors": [
{
"types": [
"missiles"
],
"requires": [
{
"heatFrames": 50
}
]
},
{
"types": [
"super"
],
"requires": []
},
{
"types": [
"powerbomb"
],
"requires": [
"never"
]
}
]
},
{
"link": [
1,
3
],
"name": "Frozen Funes Leave with Runway - Kill Fune",
"requires": [
"Wave",
"Ice",
{
"ammo": {
"type": "Super",
"count": 1
}
},
{
"heatFrames": 545
}
],
"exitCondition": {
"leaveWithRunway": {
"length": 13,
"openEnd": 0
}
},
"unlocksDoors": [
{
"types": [
"missiles"
],
"requires": [
{
"heatFrames": 50
}
]
},
{
"types": [
"super",
"powerbomb"
],
"requires": []
}
]
},
{
"link": [
1,
5
],
"name": "Base",
"requires": [
{
  "heatFrames": 100
}
]
},
{
"link": [
2,
1
],
"name": "Grapple Teleport",
"entranceCondition": {
"comeInWithGrappleTeleport": {
"blockPositions": [
[
5,
3
],
[
7,
2
]
]
}
},
"requires": [
{
  "heatFrames": 75
}
],
"note": [
"To minimize heat damage, immediately after landing use Grapple to open the door while running towards it, then jump over the gap and through the door.",
"If the door is grappled too late, it may interfere with the jump."
]
},
{
"link": [
2,
2
],
"name": "Leave with Runway",
"requires": [],
"exitCondition": {
"leaveWithRunway": {
"length": 3,
"openEnd": 1
}
}
},
{
"link": [
2,
2
],
"name": "Leave With Runway - Frozen Sova",
"requires": [
"h_canFrozenEnemyRunway",
{
"or": [
{
"and": [
"h_heatProof",
"canBeVeryPatient"
]
},
{
"and": [
"h_heatProof",
"canBePatient",
"Morph"
]
},
{
"and": [
{
"ammo": {
"type": "Super",
"count": 1
}
},
{
"heatFrames": 2600
}
]
}
]
}
],
"exitCondition": {
"leaveWithRunway": {
"length": 4,
"openEnd": 1
}
},
"note": [
"Wait 3 minutes for the Sova to get into position, or 100 seconds with Morph by going ahead of them to break the shot blocks as they get there.",
"This can be further reduced to 45 seconds with a Super by knocking a Sova off after it exits the morph tunnel.",
"The other Sovas can be farmed or used as a backup."
],
"devNote": "Because the Sovas are global, strats could be added that start from the other doors to tighten the total frame count, but it will typically require heatProof either way."
},
{
"link": [
2,
2
],
"name": "Sova Farm",
"requires": [
"h_heatProof",
{
"resetRoom": {
"nodes": [
2
],
"mustStayPut": false
}
},
{
"refill": [
"Energy",
"Missile",
"Super"
]
}
]
},
{
"link": [
2,
2
],
"name": "Crystal Flash",
"requires": [
"h_canHeatedCrystalFlash"
]
},
{
"link": [
2,
4
],
"name": "Base",
"requires": [
"Morph",
{
"heatFrames": 200
}
]
},
{
"link": [
3,
1
],
"name": "Base",
"requires": [
{
  "heatFrames": 330
}
],
"unlocksDoors": [
{
"types": [
"missiles"
],
"requires": [
{
"heatFrames": 25
}
]
},
{
"types": [
"super"
],
"requires": []
},
{
"types": [
"powerbomb"
],
"requires": [
{
"heatFrames": 40
}
]
}
]
},
{
"link": [
3,
1
],
"name": "Grapple Teleport",
"entranceCondition": {
"comeInWithGrappleTeleport": {
"blockPositions": [
[
5,
3
],
[
7,
2
]
]
}
},
"requires": [
{
  "heatFrames": 75
}
],
"note": [
"To minimize heat damage, immediately after landing use Grapple to open the door while running towards it, then jump over the gap and through the door.",
"If the door is grappled too late, it may interfere with the jump."
]
},
{
"link": [
3,
3
],
"name": "Leave with Runway - Fune Alive",
"requires": [],
"exitCondition": {
"leaveWithRunway": {
"length": 12,
"openEnd": 0
}
}
},
{
"link": [
3,
3
],
"name": "Leave with Runway - Fune Killed",
"requires": [
{
  "or": [
    {
      "ammo": {
        "type": "Super",
        "count": 1
      }
    },
    {
      "and": [
        "h_canUsePowerBombs",
        {
          "heatFrames": 190
        }
      ]
    }
  ]
}
],
"exitCondition": {
"leaveWithRunway": {
"length": 13,
"openEnd": 0
}
}
},
{
"link": [
3,
3
],
"name": "Crystal Flash",
"requires": [
{
"ammo": {
"type": "Super",
"count": 1
}
},
{
"heatFrames": 20
},
"h_canHeatedCrystalFlash"
],
"note": "Kill the Fune before Crystal Flashing."
},
{
"link": [
3,
4
],
"name": "Base",
"requires": [
"Morph",
{
"heatFrames": 80
}
]
},
{
"link": [
3,
5
],
"name": "Come in Shinecharged",
"entranceCondition": {
"comeInShinecharged": {
"framesRequired": 70
}
},
"requires": [
"canMidAirMorph",
"canShinechargeMovementComplex",
{
"heatFrames": 210
},
{
"shinespark": {
"frames": 23,
"excessFrames": 3
}
}
],
"note": "Reaching the Morph hole can be tricky with SpeedBooster but no HiJump."
},
{
"link": [
4,
2
],
"name": "Tank Damage",
"requires": [
"Morph",
{
"or": [
"HiJump",
{
"and": [
"SpaceJump",
{
"heatFrames": 40
}
]
},
"canWalljump",
"canSpringBallJumpMidAir",
{
"and": [
"h_canJumpIntoIBJ",
{
"heatFrames": 240
}
]
},
{
"and": [
"h_canJumpIntoIBJ",
"h_canDoubleBombJump",
{
"heatFrames": 120
}
]
},
{
"and": [
"h_canDoubleBombJump",
{
"heatFrames": 300
}
]
}
]
},
{
"heatFrames": 260
},
{
"enemyDamage": {
"enemy": "Sova",
"type": "contact",
"hits": 1
}
}
],
"devNote": "Base IBJ should kill the Sovas or go around."
},
{
"link": [
4,
2
],
"name": "Kill Sovas",
"requires": [
"Morph",
{
"or": [
"HiJump",
{
"and": [
"SpaceJump",
{
"heatFrames": 40
}
]
},
"canWalljump",
"canSpringBallJumpMidAir",
{
"and": [
"h_canIBJ",
{
"heatFrames": 900
}
]
},
{
"and": [
"h_canJumpIntoIBJ",
{
"heatFrames": 240
}
]
},
{
"and": [
"h_canJumpIntoIBJ",
"h_canDoubleBombJump",
{
"heatFrames": 120
}
]
},
{
"and": [
"h_canDoubleBombJump",
{
"heatFrames": 300
}
]
}
]
},
{
"or": [
"h_heatProof",
{
"and": [
"Wave",
"Plasma"
]
},
"h_canUsePowerBombs"
]
},
{
"heatFrames": 260
}
]
},
{
"link": [
4,
2
],
"name": "Speedrun Ice Beam Entry",
"requires": [
"Morph",
"canTrickyJump",
{
"or": [
"canPreciseWalljump",
"HiJump"
]
},
{
"or": [
{
"enemyKill": {
"enemies": [
[
"Sova"
]
],
"explicitWeapons": [
"Wave",
"Spazer",
"Plasma",
"PowerBomb"
]
}
},
{
"enemyDamage": {
"enemy": "Sova",
"type": "contact",
"hits": 1
}
}
]
},
{
"heatFrames": 230
}
],
"note": [
"Smoothly jump into the morph tunnel while killing the Sovas.",
"Unmorph at the end of the tunnel to clear more Sovas is needed."
]
},
{
"link": [
4,
2
],
"name": "Damage Boost",
"requires": [
"canCrouchJump",
"Morph",
"canNeutralDamageBoost",
{
"enemyDamage": {
"enemy": "Sova",
"type": "contact",
"hits": 1
}
},
{
"heatFrames": 420
}
],
"note": "Wait for the Sova to leave the tunnel and jump morph into them to bounce up into the hole."
},
{
"link": [
4,
2
],
"name": "Sova Freeze",
"requires": [
"Morph",
"canUseFrozenEnemies",
{
"heatFrames": 840
}
],
"note": "Freeze a Sova once it enters one of the slots on the wall and then use it as a platform."
},
{
"link": [
4,
3
],
"name": "Base",
"requires": [
"Morph",
{
"heatFrames": 100
}
],
"unlocksDoors": [
{
"types": [
"powerbomb"
],
"requires": [
{
"heatFrames": 50
}
]
}
]
},
{
"link": [
4,
3
],
"name": "Leave with Runway",
"requires": [
"Morph",
{
"heatFrames": 140
}
],
"exitCondition": {
"leaveWithRunway": {
"length": 12,
"openEnd": 0
}
},
"unlocksDoors": [
{
"types": [
"missiles"
],
"requires": [
{
"heatFrames": 50
}
]
},
{
"types": [
"super"
],
"requires": []
},
{
"types": [
"powerbomb"
],
"requires": [
{
"heatFrames": 30
}
]
}
]
},
{
"link": [
4,
3
],
"name": "Leave with Runway - Dead Fune",
"requires": [
"Morph",
{
"or": [
{
"and": [
{
"ammo": {
"type": "Super",
"count": 1
}
},
{
"heatFrames": 145
}
]
},
{
"and": [
{
"ammo": {
"type": "PowerBomb",
"count": 1
}
},
{
"heatFrames": 180
}
]
}
]
}
],
"exitCondition": {
"leaveWithRunway": {
"length": 13,
"openEnd": 0
}
},
"unlocksDoors": [
{
"types": [
"missiles"
],
"requires": [
{
"heatFrames": 50
}
]
},
{
"types": [
"super"
],
"requires": []
},
{
"types": [
"powerbomb"
],
"requires": []
}
],
"devNote": "FIXME: unlocksDoors: powerbomb would not have an ammo cost as one is used as part of the strat."
},
{
"link": [
4,
4
],
"name": "Crystal Flash",
"requires": [
"h_canHeatedCrystalFlash"
]
},
{
"link": [
4,
5
],
"name": "Base",
"requires": [
{
  "or": [
    {
      "and": [
        "canWalljump",
        {
          "heatFrames": 100
        }
      ]
    },
    {
      "and": [
        "HiJump",
        "canSpringBallJumpMidAir",
        {
          "heatFrames": 160
        }
      ]
    },
    {
      "and": [
        "SpaceJump",
        {
          "heatFrames": 180
        }
      ]
    },
    {
      "and": [
        "SpaceJump",
        "HiJump",
        {
          "heatFrames": 120
        }
      ]
    }
  ]
}
],
"devNote": "It is faster to go around than to climb with Ice."
},
{
"link": [
5,
1
],
"name": "Base",
"requires": [
{
  "heatFrames": 150
}
]
},
{
"link": [
5,
2
],
"name": "Tank Damage",
"requires": [
"Morph",
{
"heatFrames": 150
},
{
"or": [
"h_heatProof",
{
"enemyDamage": {
"enemy": "Sova",
"type": "contact",
"hits": 1
}
}
]
}
],
"note": "The Sovas should be killed if you are heat proof."
},
{
"link": [
5,
2
],
"name": "Power Bombs",
"requires": [
"h_canUsePowerBombs",
{
"heatFrames": 200
}
]
},
{
"link": [
5,
4
],
"name": "Base",
"requires": [
{
  "heatFrames": 50
}
]
}
]
}