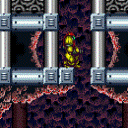
Ice Beam Gate Room
Room ID: 106
|
Exit condition: {
"leaveWithRunway": {
"length": 1,
"openEnd": 1
}
}
|
|
Requires: "h_canCrystalFlash" |
|
From: 1
Top Left Door
To: 6
Top Left Door Spawn At Junction (Above Crumble Blocks)
|
|
From: 2
Middle Left Door
To: 1
Top Left Door
Climb up 2 screens. Entrance condition: {
"comeInWithDoorStuckSetup": {}
}
Requires: "canXRayClimb" |
|
From: 2
Middle Left Door
To: 1
Top Left Door
Enter with G-mode direct, back up to between 1 and 6 pixels from the door transition, and activate X-ray to get very deep stuck in the door. Climb up 2 screens, and perform a turnaround buffered spin-jump away from the door to trigger the transition, bypassing any lock on the door. Entrance condition: {
"comeInWithGMode": {
"mode": "direct",
"morphed": false
}
}
Requires: "canXRayClimb" Bypasses door shell: true |
|
Requires: {
"obstaclesNotCleared": [
"C"
]
}
Exit condition: {
"leaveWithRunway": {
"length": 15,
"openEnd": 0
}
}
|
|
From: 2
Middle Left Door
To: 2
Middle Left Door
Exit condition: {
"leaveWithRunway": {
"length": 6,
"openEnd": 1
}
}
|
|
From: 2
Middle Left Door
To: 2
Middle Left Door
If the Power Bomb blocks are broken and the room cannot be reset, the runway can be extended by waiting for the slow global Sova. Be careful to prevent killing the Sova when breaking the Power Bomb blocks, while still ensuring breaking the ceiling Bomb blocks. Using a Super to knock off the Sova once it is near the gates will save approximately 30 seconds. Requires: "h_canFrozenEnemyRunway"
{
"obstaclesCleared": [
"A",
"B",
"C"
]
}
{
"or": [
"canBeVeryPatient",
{
"and": [
"canBePatient",
{
"ammo": {
"type": "Super",
"count": 1
}
}
]
}
]
}
Exit condition: {
"leaveWithRunway": {
"length": 7,
"openEnd": 1
}
}
|
|
Requires: "h_canUsePowerBombs" Clears obstacles: A, B, C |
|
Requires: "h_canCrystalFlash" Clears obstacles: A, B, C |
|
From: 2
Middle Left Door
To: 2
Middle Left Door
Release the ceiling Sova while being careful not to kill it if using Power Bombs. The Sova takes 90 seconds to get to the door if the Power Bomb blocks are broken and 45 seconds if they are not. Using a Super when the Sova is exiting the ceiling takes only 12 seconds. Requires: {
"obstaclesCleared": [
"A"
]
}
{
"obstaclesCleared": [
"B"
]
}
{
"or": [
"canBePatient",
{
"ammo": {
"type": "Super",
"count": 1
}
},
{
  "obstaclesNotCleared": [
    "C"
  ]
}
]
}
Exit condition: {
"leaveWithGModeSetup": {}
}
|
|
Entrance condition: {
"comeInRunning": {
"minTiles": 11,
"speedBooster": "any"
}
}
Requires: "canMockball" |
|
From: 2
Middle Left Door
To: 4
Right Door
Release the ceiling Sova while being careful not to kill it if using Power Bombs. Go through the ceiling morph tunnel and wait for the Sova on the other side. Requires: {
"obstaclesCleared": [
"A",
"B"
]
}
"Morph"
Exit condition: {
"leaveWithGModeSetup": {}
}
|
|
Requires: {
"or": [
"h_canUseMorphBombs",
"ScrewAttack",
{
"obstaclesCleared": [
"A"
]
}
]
}
Clears obstacles: A |
|
From: 2
Middle Left Door
To: 5
Junction Below Top Crumble Blocks
Requires: "h_canUsePowerBombs" Clears obstacles: A, B, C |
|
Requires: {
"obstaclesCleared": [
"C"
]
}
|
|
From: 2
Middle Left Door
To: 7
Junction Below Power Bomb Blocks
Moonfall twice to clip through the Bomb and Power Bomb blocks. Entrance condition: {
"comeInWithStoredFallSpeed": {
"fallSpeedInTiles": 2
}
}
Requires: "canMoonfall" |
|
Requires: {
"obstaclesCleared": [
"D"
]
}
Exit condition: {
"leaveWithRunway": {
"length": 45,
"openEnd": 1
}
}
|
|
From: 3
Bottom Left Door
To: 3
Bottom Left Door
Requires: {
"or": [
"ScrewAttack",
"Wave",
"Spazer",
"Plasma"
]
}
{
"refill": [
"Energy",
"Missile",
"Super",
"PowerBomb"
]
}
|
|
Kill some or all of the enemies before Crystal Flashing. Requires: {
"or": [
{
"obstaclesCleared": [
"D"
]
},
{
"enemyDamage": {
"enemy": "Sm. Dessgeega",
"type": "contact",
"hits": 1
}
},
{
"enemyKill": {
"enemies": [
[
"Sm. Dessgeega"
]
],
"explicitWeapons": [
"Missile",
"Super"
]
}
}
]
}
"h_canCrystalFlash"
|
|
From: 3
Bottom Left Door
To: 3
Bottom Left Door
Either enemy type can be used, so it may be best to kill one and use the other. Exit condition: {
"leaveWithGModeSetup": {}
}
|
|
Requires: {
"enemyDamage": {
"enemy": "Sm. Dessgeega",
"type": "contact",
"hits": 1
}
}
|
|
From: 3
Bottom Left Door
To: 7
Junction Below Power Bomb Blocks
Requires: {
"obstaclesCleared": [
"D"
]
}
|
|
From: 3
Bottom Left Door
To: 7
Junction Below Power Bomb Blocks
Requires: {
"or": [
"Spazer",
"Plasma",
"ScrewAttack",
"Wave",
{
"and": [
"canDodgeWhileShooting",
"h_canUsePowerBombs"
]
},
{
"enemyKill": {
"enemies": [
[
"Sm. Dessgeega"
],
[
"Sm. Dessgeega"
]
],
"explicitWeapons": [
"Missile",
"Super"
]
}
},
{
"and": [
"canDodgeWhileShooting",
{
"enemyDamage": {
"enemy": "Sm. Dessgeega",
"type": "contact",
"hits": 1
}
}
]
},
{
"enemyDamage": {
"enemy": "Sm. Dessgeega",
"type": "contact",
"hits": 2
}
}
]
}
Clears obstacles: D |
|
From: 3
Bottom Left Door
To: 7
Junction Below Power Bomb Blocks
Avoiding damage from all enemies with just Power Beam is tricky, but doable. Enter the room holding angle to remove momentum and avoid getting hit by the Dessgeega. Requires: "canDodgeWhileShooting" "canTrickyJump" "canPrepareForNextRoom" "canStopOnADime" Clears obstacles: D |
|
From: 3
Bottom Left Door
To: 7
Junction Below Power Bomb Blocks
Requires: {
"enemyDamage": {
"enemy": "Mella",
"type": "contact",
"hits": 1
}
}
{
"enemyDamage": {
"enemy": "Sm. Dessgeega",
"type": "contact",
"hits": 1
}
}
|
|
From: 3
Bottom Left Door
To: 7
Junction Below Power Bomb Blocks
Entrance condition: {
"comeInShinecharging": {
"length": 6,
"openEnd": 0,
"steepDownTiles": 2
}
}
Clears obstacles: D |
|
Requires: "SpeedBooster" |
|
From: 4
Right Door
To: 2
Middle Left Door
Store the Shinespark after the second shutter to avoid breaking the Bomb Blocks in the floor. Requires: {
"canShineCharge": {
"usedTiles": 33,
"openEnd": 2
}
}
Exit condition: {
"leaveShinecharged": {
"framesRemaining": 130
}
}
|
|
Requires: "canMockball" |
|
From: 4
Right Door
To: 2
Middle Left Door
Entrance condition: {
"comeInWithStoredFallSpeed": {
"fallSpeedInTiles": 1
}
}
Requires: "SpeedBooster" Exit condition: {
"leaveWithStoredFallSpeed": {
"fallSpeedInTiles": 1
}
}
|
|
From: 4
Right Door
To: 2
Middle Left Door
Entrance condition: {
"comeInWithStoredFallSpeed": {
"fallSpeedInTiles": 2
}
}
Requires: "SpeedBooster" Exit condition: {
"leaveWithStoredFallSpeed": {
"fallSpeedInTiles": 2
}
}
|
|
Exit condition: {
"leaveWithRunway": {
"length": 14,
"openEnd": 0
}
}
|
|
Requires: "h_canCrystalFlash" |
|
From: 4
Right Door
To: 7
Junction Below Power Bomb Blocks
Run under the gates with SpeedBooster but do not break the Bomb Blocks. Moonfall twice to clip through the Power Bomb blocks. Entrance condition: {
"comeInWithStoredFallSpeed": {
"fallSpeedInTiles": 2
}
}
Requires: "SpeedBooster" "canMoonfall" |
|
From: 5
Junction Below Top Crumble Blocks
To: 2
Middle Left Door
Requires: {
"or": [
"h_canUseMorphBombs",
"ScrewAttack",
{
"obstaclesCleared": [
"A"
]
}
]
}
Clears obstacles: A |
|
From: 5
Junction Below Top Crumble Blocks
To: 2
Middle Left Door
Requires: "h_canUsePowerBombs" Clears obstacles: A, B, C |
|
Requires: {
"or": [
"h_canUseMorphBombs",
{
"obstaclesCleared": [
"B"
]
}
]
}
Clears obstacles: B |
|
Requires: "h_canUsePowerBombs" Clears obstacles: A, B, C |
|
From: 6
Top Left Door Spawn At Junction (Above Crumble Blocks)
To: 1
Top Left Door
Requires: "canPrepareForNextRoom" "SpaceJump" |
|
From: 6
Top Left Door Spawn At Junction (Above Crumble Blocks)
To: 1
Top Left Door
Requires: "canPrepareForNextRoom" "canWalljump" |
|
From: 6
Top Left Door Spawn At Junction (Above Crumble Blocks)
To: 1
Top Left Door
Requires: "canCrumbleJump" |
|
From: 6
Top Left Door Spawn At Junction (Above Crumble Blocks)
To: 1
Top Left Door
Use SpringBall to bounce on the crumble blocks, the unmorph and shoot the door open. Requires: "h_canUseSpringBall" |
|
From: 6
Top Left Door Spawn At Junction (Above Crumble Blocks)
To: 5
Junction Below Top Crumble Blocks
|
|
Requires: {
"obstaclesCleared": [
"C"
]
}
{
"or": [
"canWalljump",
"HiJump",
"h_canFly",
"canSpringBallJumpMidAir"
]
}
|
|
From: 7
Junction Below Power Bomb Blocks
To: 2
Middle Left Door
Requires: {
"obstaclesCleared": [
"C",
"D"
]
}
"SpeedBooster"
"canShinechargeMovement"
{
"or": [
{
"shinespark": {
"frames": 19,
"excessFrames": 4
}
},
{
"and": [
"canShinechargeMovementComplex",
"canMidairShinespark",
{
"shinespark": {
"frames": 6,
"excessFrames": 4
}
}
]
}
]
}
|
|
From: 7
Junction Below Power Bomb Blocks
To: 2
Middle Left Door
Notable: true 
Place a Power Bomb to break the Power Bomb blocks and the bomb blocks, without killing the global Sova. Wait 30-50 seconds for the Sova to get into position to be used as a platform. Requires: "h_canUsePowerBombs" "canTrickyUseFrozenEnemies" Clears obstacles: A, B, C |
|
From: 7
Junction Below Power Bomb Blocks
To: 2
Middle Left Door
Notable: true 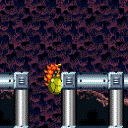
Place a Power Bomb to break the Power Bomb blocks and the bomb blocks, without killing the global Sova. Wait 30-50 seconds for the Sova to get into position. Crouch jump, morph, and hold right against the wall, hitting the Sova from below while near the peak of Samus's jump. Continue holding right to pass through the Sova and onto the ledge above. Requires: "h_canUsePowerBombs"
"canCrouchJump"
"canCarefulJump"
"canNeutralDamageBoost"
{
"enemyDamage": {
"enemy": "Sova",
"hits": 1,
"type": "contact"
}
}
Clears obstacles: A, B, C |
|
From: 7
Junction Below Power Bomb Blocks
To: 3
Bottom Left Door
Requires: {
"obstaclesCleared": [
"D"
]
}
|
|
From: 7
Junction Below Power Bomb Blocks
To: 3
Bottom Left Door
Requires: {
"or": [
"Spazer",
"Plasma",
"ScrewAttack",
"Wave",
{
"and": [
"canDodgeWhileShooting",
"h_canUsePowerBombs"
]
},
{
"enemyKill": {
"enemies": [
[
"Sm. Dessgeega"
],
[
"Sm. Dessgeega"
]
],
"explicitWeapons": [
"Missile",
"Super"
]
}
},
{
"and": [
"canDodgeWhileShooting",
{
"enemyDamage": {
"enemy": "Sm. Dessgeega",
"type": "contact",
"hits": 1
}
}
]
},
{
"enemyDamage": {
"enemy": "Sm. Dessgeega",
"type": "contact",
"hits": 2
}
}
]
}
Clears obstacles: D |
|
From: 7
Junction Below Power Bomb Blocks
To: 3
Bottom Left Door
Avoiding damage from all enemies with just Power Beam is tricky, but doable. Requires: "canDodgeWhileShooting" "canCarefulJump" Clears obstacles: D |
|
From: 7
Junction Below Power Bomb Blocks
To: 3
Bottom Left Door
Requires: {
"enemyDamage": {
"enemy": "Mella",
"type": "contact",
"hits": 1
}
}
{
"enemyDamage": {
"enemy": "Sm. Dessgeega",
"type": "contact",
"hits": 1
}
}
|
|
From: 7
Junction Below Power Bomb Blocks
To: 3
Bottom Left Door
Requires: {
"canShineCharge": {
"usedTiles": 18,
"openEnd": 0,
"gentleDownTiles": 3,
"gentleUpTiles": 2
}
}
|
|
With a fast mockball, it is possible to roll under all of the enemies. Requires: "canMockball" "canCarefulJump" |
|
From: 7
Junction Below Power Bomb Blocks
To: 7
Junction Below Power Bomb Blocks
Placing the Power Bomb high enough will also break the bomb blocks in the ceiling. Requires: "h_canUsePowerBombs" Clears obstacles: A, B, C |
|
From: 7
Junction Below Power Bomb Blocks
To: 7
Junction Below Power Bomb Blocks
Requires: "h_canCrystalFlash" Clears obstacles: C |
{
"$schema": "../../../schema/m3-room.schema.json",
"id": 106,
"name": "Ice Beam Gate Room",
"area": "Norfair",
"subarea": "Upper",
"subsubarea": "West",
"playable": true,
"roomAddress": "0x7A815",
"roomEnvironments": [
{
"heated": false
}
],
"nodes": [
{
"id": 1,
"name": "Top Left Door",
"nodeType": "door",
"nodeSubType": "blue",
"nodeAddress": "0x0019312",
"doorEnvironments": [
{
"physics": "air"
}
],
"spawnAt": 6,
"note": "Samus is considered to spawn at 6 because of the crumble blocks"
},
{
"id": 2,
"name": "Middle Left Door",
"nodeType": "door",
"nodeSubType": "blue",
"nodeAddress": "0x001931e",
"doorEnvironments": [
{
"physics": "air"
}
]
},
{
"id": 3,
"name": "Bottom Left Door",
"nodeType": "door",
"nodeSubType": "blue",
"nodeAddress": "0x0019336",
"doorEnvironments": [
{
"physics": "air"
}
]
},
{
"id": 4,
"name": "Right Door",
"nodeType": "door",
"nodeSubType": "blue",
"nodeAddress": "0x001932a",
"doorEnvironments": [
{
"physics": "air"
}
]
},
{
"id": 5,
"name": "Junction Below Top Crumble Blocks",
"nodeType": "junction",
"nodeSubType": "junction"
},
{
"id": 6,
"name": "Top Left Door Spawn At Junction (Above Crumble Blocks)",
"nodeType": "junction",
"nodeSubType": "junction"
},
{
"id": 7,
"name": "Junction Below Power Bomb Blocks",
"nodeType": "junction",
"nodeSubType": "junction"
}
],
"obstacles": [
{
"id": "A",
"name": "Ceiling bomb blocks",
"obstacleType": "inanimate"
},
{
"id": "B",
"name": "Morph path bomb blocks",
"obstacleType": "inanimate"
},
{
"id": "C",
"name": "Power Bomb blocks",
"obstacleType": "inanimate"
},
{
"id": "D",
"name": "Lower enemies",
"obstacleType": "enemies"
}
],
"enemies": [
{
"id": "e1",
"groupName": "Ice Beam Gate Room Sova",
"enemyName": "Sova",
"quantity": 1,
"homeNodes": [
5
]
},
{
"id": "e2",
"groupName": "Ice Beam Gate Room Small Dessgeegas",
"enemyName": "Sm. Dessgeega",
"quantity": 3,
"homeNodes": [
3
]
},
{
"id": "e3",
"groupName": "Ice Beam Gate Room Mellas",
"enemyName": "Mella",
"quantity": 6,
"homeNodes": [
3
]
}
],
"links": [
{
"from": 1,
"to": [
{
"id": 1
},
{
"id": 6
}
]
},
{
"from": 2,
"to": [
{
"id": 1
},
{
"id": 2
},
{
"id": 4
},
{
"id": 5
},
{
"id": 7
}
]
},
{
"from": 3,
"to": [
{
"id": 3
},
{
"id": 7
}
]
},
{
"from": 4,
"to": [
{
"id": 2
},
{
"id": 4
},
{
"id": 7
}
]
},
{
"from": 5,
"to": [
{
"id": 2
},
{
"id": 4
}
]
},
{
"from": 6,
"to": [
{
"id": 1
},
{
"id": 5
}
]
},
{
"from": 7,
"to": [
{
"id": 2
},
{
"id": 3
},
{
"id": 7
}
]
}
],
"strats": [
{
"link": [
1,
1
],
"name": "Leave with Runway",
"requires": [],
"exitCondition": {
"leaveWithRunway": {
"length": 1,
"openEnd": 1
}
}
},
{
"link": [
1,
1
],
"name": "Crystal Flash",
"requires": [
"h_canCrystalFlash"
]
},
{
"link": [
1,
6
],
"name": "Base",
"requires": []
},
{
"link": [
2,
1
],
"name": "Ice Beam Gate Room X-Ray Climb",
"entranceCondition": {
"comeInWithDoorStuckSetup": {}
},
"requires": [
"canXRayClimb"
],
"note": "Climb up 2 screens."
},
{
"link": [
2,
1
],
"name": "Very Deep Stuck X-Ray Climb",
"entranceCondition": {
"comeInWithGMode": {
"mode": "direct",
"morphed": false
}
},
"requires": [
"canXRayClimb"
],
"bypassesDoorShell": true,
"note": [
"Enter with G-mode direct, back up to between 1 and 6 pixels from the door transition, and activate X-ray to get very deep stuck in the door.",
"Climb up 2 screens, and perform a turnaround buffered spin-jump away from the door to trigger the transition, bypassing any lock on the door."
]
},
{
"link": [
2,
2
],
"name": "Leave with Runway",
"requires": [
{
"obstaclesNotCleared": [
"C"
]
}
],
"exitCondition": {
"leaveWithRunway": {
"length": 15,
"openEnd": 0
}
},
"devNote": "FIXME: It is possible to run through the room and leave with runway with a longer runway by antitapping to avoid gaining Blue, and shooting the door open with precise timing."
},
{
"link": [
2,
2
],
"name": "Leave with Runway Floor Blocks Destroyed",
"requires": [],
"exitCondition": {
"leaveWithRunway": {
"length": 6,
"openEnd": 1
}
}
},
{
"link": [
2,
2
],
"name": "Leave With Runway - Slow Frozen Sova",
"requires": [
"h_canFrozenEnemyRunway",
{
"obstaclesCleared": [
"A",
"B",
"C"
]
},
{
"or": [
"canBeVeryPatient",
{
"and": [
"canBePatient",
{
"ammo": {
"type": "Super",
"count": 1
}
}
]
}
]
}
],
"exitCondition": {
"leaveWithRunway": {
"length": 7,
"openEnd": 1
}
},
"note": [
"If the Power Bomb blocks are broken and the room cannot be reset, the runway can be extended by waiting for the slow global Sova.",
"Be careful to prevent killing the Sova when breaking the Power Bomb blocks, while still ensuring breaking the ceiling Bomb blocks.",
"Using a Super to knock off the Sova once it is near the gates will save approximately 30 seconds."
],
"devNote": "This strat only takes 60-90 seconds, but could be much longer if Samus has to wait for the Sova to move out of the Power Bomb area."
},
{
"link": [
2,
2
],
"name": "Power Bomb the Blocks",
"requires": [
"h_canUsePowerBombs"
],
"clearsObstacles": [
"A",
"B",
"C"
]
},
{
"link": [
2,
2
],
"name": "Crystal Flash",
"requires": [
"h_canCrystalFlash"
],
"clearsObstacles": [
"A",
"B",
"C"
]
},
{
"link": [
2,
2
],
"name": "G-Mode Setup - Get Hit By Sova",
"notable": false,
"requires": [
{
"obstaclesCleared": [
"A"
]
},
{
"obstaclesCleared": [
"B"
]
},
{
"or": [
"canBePatient",
{
"ammo": {
"type": "Super",
"count": 1
}
},
{
"obstaclesNotCleared": [
"C"
]
}
]
}
],
"exitCondition": {
"leaveWithGModeSetup": {}
},
"note": [
"Release the ceiling Sova while being careful not to kill it if using Power Bombs.",
"The Sova takes 90 seconds to get to the door if the Power Bomb blocks are broken and 45 seconds if they are not.",
"Using a Super when the Sova is exiting the ceiling takes only 12 seconds."
]
},
{
"link": [
2,
4
],
"name": "Mockball",
"entranceCondition": {
"comeInRunning": {
"minTiles": 11,
"speedBooster": "any"
}
},
"requires": [
"canMockball"
],
"devNote": "FIXME Mockballing from the next room can also be done with smaller runways (like in the vanilla strat). See issue #63."
},
{
"link": [
2,
4
],
"name": "G-Mode Setup - Get Hit By Sova",
"notable": false,
"requires": [
{
"obstaclesCleared": [
"A",
"B"
]
},
"Morph"
],
"exitCondition": {
"leaveWithGModeSetup": {}
},
"note": [
"Release the ceiling Sova while being careful not to kill it if using Power Bombs.",
"Go through the ceiling morph tunnel and wait for the Sova on the other side."
],
"unlocksDoors": [
{
"types": [
"ammo"
],
"requires": []
}
]
},
{
"link": [
2,
5
],
"name": "Base",
"requires": [
{
  "or": [
    "h_canUseMorphBombs",
    "ScrewAttack",
    {
      "obstaclesCleared": [
        "A"
      ]
    }
  ]
}
],
"clearsObstacles": [
"A"
]
},
{
"link": [
2,
5
],
"name": "Power Bomb",
"requires": [
"h_canUsePowerBombs"
],
"clearsObstacles": [
"A",
"B",
"C"
]
},
{
"link": [
2,
7
],
"name": "Base",
"requires": [
{
  "obstaclesCleared": [
    "C"
  ]
}
]
},
{
"link": [
2,
7
],
"name": "Stored Moonfall Clip",
"entranceCondition": {
"comeInWithStoredFallSpeed": {
"fallSpeedInTiles": 2
}
},
"requires": [
"canMoonfall"
],
"note": "Moonfall twice to clip through the Bomb and Power Bomb blocks."
},
{
"link": [
3,
3
],
"name": "Leave with Runway",
"requires": [
{
  "obstaclesCleared": [
    "D"
  ]
}
],
"exitCondition": {
"leaveWithRunway": {
"length": 45,
"openEnd": 1
}
}
},
{
"link": [
3,
3
],
"name": "Sova, Mella, and Sm. Dessgeega Farm",
"requires": [
{
"or": [
"ScrewAttack",
"Wave",
"Spazer",
"Plasma"
]
},
{
"refill": [
"Energy",
"Missile",
"Super",
"PowerBomb"
]
}
]
},
{
"link": [
3,
3
],
"name": "Crystal Flash",
"requires": [
{
"or": [
{
"obstaclesCleared": [
"D"
]
},
{
  "enemyDamage": {
    "enemy": "Sm. Dessgeega",
    "type": "contact",
    "hits": 1
  }
},
{
"enemyKill": {
"enemies": [
[
"Sm. Dessgeega"
]
],
"explicitWeapons": [
"Missile",
"Super"
]
}
}
]
},
"h_canCrystalFlash"
],
"note": "Kill some or all of the enemies before Crystal Flashing."
},
{
"link": [
3,
3
],
"name": "G-Mode Setup - Get Hit By Mella or Small Dessgeega",
"notable": false,
"requires": [],
"exitCondition": {
"leaveWithGModeSetup": {}
},
"note": "Either enemy type can be used, so it may be best to kill one and use the other."
},
{
"link": [
3,
3
],
"name": "G-Mode Regain Mobility",
"requires": [
{
"enemyDamage": {
"enemy": "Sm. Dessgeega",
"type": "contact",
"hits": 1
}
}
],
"gModeRegainMobility": {}
},
{
"link": [
3,
7
],
"name": "Enemies Already Killed",
"requires": [
{
  "obstaclesCleared": [
    "D"
  ]
}
]
},
{
"link": [
3,
7
],
"name": "Enemy Kill",
"requires": [
{
  "or": [
    "Spazer",
    "Plasma",
    "ScrewAttack",
    "Wave",
    {
      "and": [
        "canDodgeWhileShooting",
        "h_canUsePowerBombs"
      ]
    },
    {
      "enemyKill": {
        "enemies": [
          [
            "Sm. Dessgeega"
          ],
          [
            "Sm. Dessgeega"
          ]
        ],
        "explicitWeapons": [
          "Missile",
          "Super"
        ]
      }
    },
    {
      "and": [
        "canDodgeWhileShooting",
        {
          "enemyDamage": {
            "enemy": "Sm. Dessgeega",
            "type": "contact",
            "hits": 1
          }
        }
      ]
    },
    {
      "enemyDamage": {
        "enemy": "Sm. Dessgeega",
        "type": "contact",
        "hits": 2
      }
    }
  ]
}
],
"clearsObstacles": [
"D"
]
},
{
"link": [
3,
7
],
"name": "Careful Kill",
"requires": [
"canDodgeWhileShooting",
"canTrickyJump",
"canPrepareForNextRoom",
"canStopOnADime"
],
"clearsObstacles": [
"D"
],
"note": [
"Avoiding damage from all enemies with just Power Beam is tricky, but doable.",
"Enter the room holding angle to remove momentum and avoid getting hit by the Dessgeega."
]
},
{
"link": [
3,
7
],
"name": "Tank Enemy Damage",
"requires": [
{
"enemyDamage": {
"enemy": "Mella",
"type": "contact",
"hits": 1
}
},
{
"enemyDamage": {
"enemy": "Sm. Dessgeega",
"type": "contact",
"hits": 1
}
}
]
},
{
"link": [
3,
7
],
"name": "Come in Shinecharging",
"entranceCondition": {
"comeInShinecharging": {
"length": 6,
"openEnd": 0,
"steepDownTiles": 2
}
},
"requires": [],
"clearsObstacles": [
"D"
]
},
{
"link": [
4,
2
],
"name": "Speed Through",
"requires": [
"SpeedBooster"
]
},
{
"link": [
4,
2
],
"name": "Speed Through and Leave Shinecharged",
"requires": [
{
  "canShineCharge": {
    "usedTiles": 33,
    "openEnd": 2
  }
}
],
"exitCondition": {
"leaveShinecharged": {
"framesRemaining": 130
}
},
"unlocksDoors": [
{
"types": [
"super"
],
"requires": []
},
{
"types": [
"missiles",
"powerbomb"
],
"requires": [
"never"
]
}
],
"note": "Store the Shinespark after the second shutter to avoid breaking the Bomb Blocks in the floor."
},
{
"link": [
4,
2
],
"name": "Ice Beam Mockball",
"requires": [
"canMockball"
]
},
{
"link": [
4,
2
],
"name": "Transition with Stored Fall Speed",
"entranceCondition": {
"comeInWithStoredFallSpeed": {
"fallSpeedInTiles": 1
}
},
"requires": [
"SpeedBooster"
],
"exitCondition": {
"leaveWithStoredFallSpeed": {
"fallSpeedInTiles": 1
}
},
"unlocksDoors": [
{
"types": [
"missiles",
"super"
],
"requires": []
},
{
"types": [
"powerbomb"
],
"requires": [
"never"
]
}
]
},
{
"link": [
4,
2
],
"name": "Transition with Stored Fall Speed (more speed)",
"entranceCondition": {
"comeInWithStoredFallSpeed": {
"fallSpeedInTiles": 2
}
},
"requires": [
"SpeedBooster"
],
"exitCondition": {
"leaveWithStoredFallSpeed": {
"fallSpeedInTiles": 2
}
},
"unlocksDoors": [
{
"types": [
"missiles",
"super"
],
"requires": []
},
{
"types": [
"powerbomb"
],
"requires": [
"never"
]
}
]
},
{
"link": [
4,
4
],
"name": "Leave with Runway",
"requires": [],
"exitCondition": {
"leaveWithRunway": {
"length": 14,
"openEnd": 0
}
}
},
{
"link": [
4,
4
],
"name": "Crystal Flash",
"requires": [
"h_canCrystalFlash"
]
},
{
"link": [
4,
7
],
"name": "Stored Moonfall Clip",
"entranceCondition": {
"comeInWithStoredFallSpeed": {
"fallSpeedInTiles": 2
}
},
"requires": [
"SpeedBooster",
"canMoonfall"
],
"note": [
"Run under the gates with SpeedBooster but do not break the Bomb Blocks.",
"Moonfall twice to clip through the Power Bomb blocks."
]
},
{
"link": [
5,
2
],
"name": "Screw or Bombs",
"requires": [
{
  "or": [
    "h_canUseMorphBombs",
    "ScrewAttack",
    {
      "obstaclesCleared": [
        "A"
      ]
    }
  ]
}
],
"clearsObstacles": [
"A"
]
},
{
"link": [
5,
2
],
"name": "Power Bomb",
"requires": [
"h_canUsePowerBombs"
],
"clearsObstacles": [
"A",
"B",
"C"
]
},
{
"link": [
5,
4
],
"name": "Base",
"requires": [
{
  "or": [
    "h_canUseMorphBombs",
    {
      "obstaclesCleared": [
        "B"
      ]
    }
  ]
}
],
"clearsObstacles": [
"B"
]
},
{
"link": [
5,
4
],
"name": "Power Bombs",
"requires": [
"h_canUsePowerBombs"
],
"clearsObstacles": [
"A",
"B",
"C"
]
},
{
"link": [
6,
1
],
"name": "Space Jump Retreat",
"requires": [
"canPrepareForNextRoom",
"SpaceJump"
]
},
{
"link": [
6,
1
],
"name": "WallJump Retreat",
"requires": [
"canPrepareForNextRoom",
"canWalljump"
]
},
{
"link": [
6,
1
],
"name": "Crumble Jump Retreat",
"requires": [
"canCrumbleJump"
]
},
{
"link": [
6,
1
],
"name": "SpringBall Retreat",
"requires": [
"h_canUseSpringBall"
],
"note": "Use SpringBall to bounce on the crumble blocks, the unmorph and shoot the door open."
},
{
"link": [
6,
5
],
"name": "Base",
"requires": []
},
{
"link": [
7,
2
],
"name": "Base",
"requires": [
{
"obstaclesCleared": [
"C"
]
},
{
"or": [
"canWalljump",
"HiJump",
"h_canFly",
"canSpringBallJumpMidAir"
]
}
]
},
{
"link": [
7,
2
],
"name": "Shinespark",
"requires": [
{
"obstaclesCleared": [
"C",
"D"
]
},
"SpeedBooster",
"canShinechargeMovement",
{
"or": [
{
"shinespark": {
"frames": 19,
"excessFrames": 4
}
},
{
"and": [
"canShinechargeMovementComplex",
"canMidairShinespark",
{
"shinespark": {
"frames": 6,
"excessFrames": 4
}
}
]
}
]
}
]
},
{
"link": [
7,
2
],
"name": "Ice Beam Gate Room Frozen Sova Platform",
"notable": true,
"requires": [
"h_canUsePowerBombs",
"canTrickyUseFrozenEnemies"
],
"clearsObstacles": [
"A",
"B",
"C"
],
"note": [
"Place a Power Bomb to break the Power Bomb blocks and the bomb blocks, without killing the global Sova.",
"Wait 30-50 seconds for the Sova to get into position to be used as a platform."
],
"devNote": "This is only notable with wall jumps disabled."
},
{
"link": [
7,
2
],
"name": "Ice Beam Gate Room Sova Boost",
"notable": true,
"requires": [
"h_canUsePowerBombs",
"canCrouchJump",
"canCarefulJump",
"canNeutralDamageBoost",
{
"enemyDamage": {
"enemy": "Sova",
"hits": 1,
"type": "contact"
}
}
],
"clearsObstacles": [
"A",
"B",
"C"
],
"note": [
"Place a Power Bomb to break the Power Bomb blocks and the bomb blocks, without killing the global Sova.",
"Wait 30-50 seconds for the Sova to get into position.",
"Crouch jump, morph, and hold right against the wall, hitting the Sova from below while near the peak of Samus's jump.",
"Continue holding right to pass through the Sova and onto the ledge above."
],
"devNote": [
"This is only notable with wall jumps disabled.",
"FIXME: Consider also adding a Mella version of this strat. It takes longer to setup but allows retrying.",
"The Mella version does slightly less damage.",
"With either the Mella or Sova, you could kill it and collect its drop after getting onto the ledge; for the Sova you'd have to wait for it to come back around."
]
},
{
"link": [
7,
3
],
"name": "Enemies Already Killed",
"requires": [
{
  "obstaclesCleared": [
    "D"
  ]
}
]
},
{
"link": [
7,
3
],
"name": "Enemy Kill",
"requires": [
{
  "or": [
    "Spazer",
    "Plasma",
    "ScrewAttack",
    "Wave",
    {
      "and": [
        "canDodgeWhileShooting",
        "h_canUsePowerBombs"
      ]
    },
    {
      "enemyKill": {
        "enemies": [
          [
            "Sm. Dessgeega"
          ],
          [
            "Sm. Dessgeega"
          ]
        ],
        "explicitWeapons": [
          "Missile",
          "Super"
        ]
      }
    },
    {
      "and": [
        "canDodgeWhileShooting",
        {
          "enemyDamage": {
            "enemy": "Sm. Dessgeega",
            "type": "contact",
            "hits": 1
          }
        }
      ]
    },
    {
      "enemyDamage": {
        "enemy": "Sm. Dessgeega",
        "type": "contact",
        "hits": 2
      }
    }
  ]
}
],
"clearsObstacles": [
"D"
]
},
{
"link": [
7,
3
],
"name": "Careful Kill",
"requires": [
"canDodgeWhileShooting",
"canCarefulJump"
],
"clearsObstacles": [
"D"
],
"note": "Avoiding damage from all enemies with just Power Beam is tricky, but doable."
},
{
"link": [
7,
3
],
"name": "Tank Enemy Damage",
"requires": [
{
"enemyDamage": {
"enemy": "Mella",
"type": "contact",
"hits": 1
}
},
{
"enemyDamage": {
"enemy": "Sm. Dessgeega",
"type": "contact",
"hits": 1
}
}
]
},
{
"link": [
7,
3
],
"name": "Shortcharge Kill",
"requires": [
{
  "canShineCharge": {
    "usedTiles": 18,
    "openEnd": 0,
    "gentleDownTiles": 3,
    "gentleUpTiles": 2
  }
}
]
},
{
"link": [
7,
3
],
"name": "Mockball",
"requires": [
"canMockball",
"canCarefulJump"
],
"note": "With a fast mockball, it is possible to roll under all of the enemies."
},
{
"link": [
7,
7
],
"name": "Power Bomb",
"requires": [
"h_canUsePowerBombs"
],
"clearsObstacles": [
"A",
"B",
"C"
],
"note": "Placing the Power Bomb high enough will also break the bomb blocks in the ceiling."
},
{
"link": [
7,
7
],
"name": "Crystal Flash",
"requires": [
"h_canCrystalFlash"
],
"clearsObstacles": [
"C"
]
}
]
}