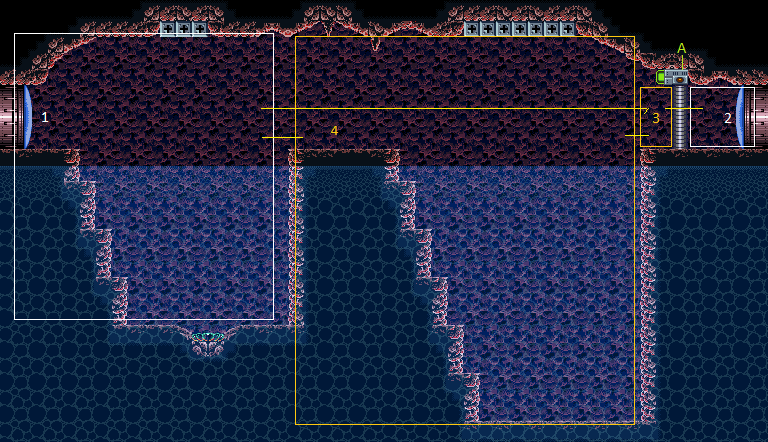
Grapple Tutorial Room 3
Room ID: 131
|
Exit condition: {
"leaveWithRunway": {
"length": 4,
"openEnd": 1
}
}
|
|
Lure the Gamets up out of the water. It may be helpful to freeze them on the ascent to prevent them from separating and moving horizontally. Positioning is much easier with Morph; simply morph on the runway before they start separating. Freeze a Gamet while there is a half-tile gap between it and the runway in order to extend it as much as possible. Requires: "h_canNavigateUnderwater"
{
"or": [
"h_canTrickyFrozenEnemyRunway",
{
"and": [
"h_canFrozenEnemyRunway",
"Morph"
]
}
]
}
Exit condition: {
"leaveWithRunway": {
"length": 6,
"openEnd": 0
}
}
|
|
Requires: {
"refill": [
"Energy",
"Missile",
"Super",
"PowerBomb"
]
}
|
|
From: 1
Left Door
To: 2
Right Door
Lure the Geemers up out of the water. It may be helpful to freeze them on the ascent to prevent them from separating and moving horizontally. At the top, position a Gamet flush with the central runway. Positioning is much easier with Morph; simply morph on the runway before they start separating. Freeze the Gamet before it begins moving horizontally, and it will be able to turn to the right. Use it as a frozen platform to cross both bodies of water. Lure the Gamet to the right and freeze it while there is a half-tile gap between it and the runway in order to extend it as much as possible. Requires: "h_canNavigateUnderwater"
"canTrickyJump"
{
"or": [
"h_canTrickyFrozenEnemyRunway",
{
"and": [
"h_canFrozenEnemyRunway",
"Morph"
]
}
]
}
{
"or": [
{
"ammo": {
"type": "Super",
"count": 1
}
},
{
"obstaclesCleared": [
"A"
]
}
]
}
Exit condition: {
"leaveWithRunway": {
"length": 9,
"openEnd": 0
}
}
|
|
From: 1
Left Door
To: 3
Junction Left of Green Gate
Entrance condition: {
"comeInWithSpark": {}
}
Requires: {
"shinespark": {
"frames": 56,
"excessFrames": 1
}
}
|
|
From: 1
Left Door
To: 3
Junction Left of Green Gate
Entrance condition: {
"comeInShinecharging": {
"length": 3,
"openEnd": 1
}
}
Requires: "canHorizontalShinespark"
{
"shinespark": {
"frames": 54,
"excessFrames": 1
}
}
|
|
From: 1
Left Door
To: 3
Junction Left of Green Gate
Notable: true 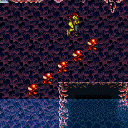
Lead a Gamet up through the water and freeze it to cross the first moat. Freeze the Gamet before it starts moving left. Wait for it to thaw and fly over the second moat where it can be frozen again. Requires: "canTrickyUseFrozenEnemies" |
|
From: 1
Left Door
To: 3
Junction Left of Green Gate
Notable: true 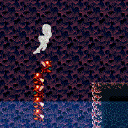
1- Stand near the farm point, on the edge of where you make Gamets spawn. 2- Wait for the water position to be high. 3- Move to make the Gamets spawn. Moonwalk is useful here. 4- Quickly climb up to the last ledge before the door. 5- Run, jump, dboost off a Gamet. 6- Dboost a second time off the Gamet to cross the second moat. Requires: "h_canNavigateUnderwater"
"canTrickyJump"
"canHorizontalDamageBoost"
{
"enemyDamage": {
"enemy": "Gamet",
"type": "contact",
"hits": 2
}
}
|
|
From: 1
Left Door
To: 3
Junction Left of Green Gate
With enough run speed, jump over the first moat and MockBall into a regular springball jump over the second moat. Entrance condition: {
"comeInRunning": {
"minTiles": 4,
"speedBooster": "any"
}
}
Requires: "canCarefulJump" "canMockball" "canSpringBallBounce" |
|
From: 1
Left Door
To: 3
Junction Left of Green Gate
With enough run speed, jump over the first moat and MockBall into a regular springball jump over the second moat. Entrance condition: {
"comeInRunning": {
"minTiles": 2,
"speedBooster": "any"
}
}
Requires: "canTrickyJump" "canMockball" "canSpringBallBounce" |
|
Requires: {
"or": [
"Grapple",
"SpaceJump"
]
}
|
|
Requires: "Gravity"
{
"or": [
"canWalljump",
"HiJump",
"canSpringBallJumpMidAir",
"h_canFly",
"canUseFrozenEnemies",
"canGravityJump"
]
}
|
|
Requires: "SpeedBooster"
"canTrickyJump"
{
"or": [
"canWalljump",
"canLateralMidAirMorph"
]
}
|
|
From: 1
Left Door
To: 4
Center Platform Junction
Entrance condition: {
"comeInRunning": {
"minTiles": 2,
"speedBooster": "any"
}
}
Requires: "canTrickyJump"
{
"or": [
"canWalljump",
"canLateralMidAirMorph"
]
}
|
|
From: 1
Left Door
To: 4
Center Platform Junction
Entrance condition: {
"comeInRunning": {
"minTiles": 4,
"speedBooster": "any"
}
}
Requires: "canCarefulJump" |
|
From: 1
Left Door
To: 4
Center Platform Junction
1- Stand near the farm point, on the edge of where you make Gamets spawn. 2- Wait for the water position to be high. 3- Move to make the Gamets spawn. Moonwalk is useful here. 4- Quickly climb up to the last ledge before the door. 5- Run, jump, dboost off a Gamet. Requires: "h_canNavigateUnderwater"
"canHorizontalDamageBoost"
"canCarefulJump"
{
"enemyDamage": {
"enemy": "Gamet",
"type": "contact",
"hits": 1
}
}
|
|
From: 1
Left Door
To: 4
Center Platform Junction
Wait for the water to be rising and perform a max height SpringBall Jump. Requires: "canSuitlessMaridia" "HiJump" "h_canMaxHeightSpringBallJump" |
|
Entrance condition: {
"comeInWithGrappleTeleport": {
"blockPositions": [
[
5,
3
],
[
7,
2
]
]
}
}
|
|
From: 2
Right Door
To: 1
Left Door
Entrance condition: {
"comeInWithGrappleTeleport": {
"blockPositions": [
[
3,
12
],
[
3,
13
]
]
}
}
Bypasses door shell: true |
|
From: 2
Right Door
To: 1
Left Door
Entrance condition: {
"comeInWithGrappleTeleport": {
"blockPositions": [
[
3,
12
]
]
}
}
Exit condition: {
"leaveWithGrappleTeleport": {
"blockPositions": [
[
3,
12
]
]
}
}
Bypasses door shell: true |
|
From: 2
Right Door
To: 1
Left Door
Entrance condition: {
"comeInWithGrappleTeleport": {
"blockPositions": [
[
3,
13
]
]
}
}
Exit condition: {
"leaveWithGrappleTeleport": {
"blockPositions": [
[
3,
13
]
]
}
}
Bypasses door shell: true |
|
Exit the previous room with Samus in a standing pose (while grappled). After teleporting, press right to release Grapple while staying standing (not being forced into a crouch). Then X-ray climb to get up to the door transition, without needing to open the door. Entrance condition: {
"comeInWithGrappleTeleport": {
"blockPositions": [
[
2,
18
],
[
2,
19
],
[
2,
28
],
[
2,
29
]
]
}
}
Requires: "canXRayClimb" Bypasses door shell: true |
|
Exit condition: {
"leaveWithRunway": {
"length": 4,
"openEnd": 0
}
}
|
|
Requires: {
"obstaclesCleared": [
"A"
]
}
Exit condition: {
"leaveWithRunway": {
"length": 7,
"openEnd": 1
}
}
|
|
Requires: "h_canCrystalFlash" |
|
Requires: {
"or": [
"h_canGreenGateGlitch",
{
"obstaclesCleared": [
"A"
]
}
]
}
Clears obstacles: A |
|
Requires: {
"or": [
{
"ammo": {
"type": "Super",
"count": 1
}
},
{
"obstaclesCleared": [
"A"
]
}
]
}
Clears obstacles: A |
|
From: 3
Junction Left of Green Gate
To: 4
Center Platform Junction
Requires: {
"obstaclesCleared": [
"A"
]
}
|
|
From: 3
Junction Left of Green Gate
To: 4
Center Platform Junction
Requires: {
"or": [
"Grapple",
"SpaceJump",
"canResetFallSpeed",
{
"and": [
"canTrickyJump",
"canLateralMidAirMorph"
]
},
{
"and": [
"Gravity",
"canStaggeredWalljump"
]
}
]
}
|
|
From: 3
Junction Left of Green Gate
To: 4
Center Platform Junction
Kill either the leftmost puyo or jump into the right side of the water and fight all the puyos. Requires: {
"or": [
{
"enemyKill": {
"enemies": [
[
"Puyo"
]
],
"explicitWeapons": [
"Wave",
"Ice+Spazer",
"Plasma",
"Missile",
"Super",
"Charge+Spazer"
]
}
},
{
"and": [
"Gravity",
{
"enemyKill": {
"enemies": [
[
"Puyo"
]
],
"explicitWeapons": [
"ScrewAttack",
"PseudoScrew"
]
}
}
]
},
{
"enemyDamage": {
"enemy": "Puyo",
"type": "contact",
"hits": 1
}
}
]
}
|
|
|
|
From: 4
Center Platform Junction
To: 3
Junction Left of Green Gate
Requires: {
"or": [
"Grapple",
"SpaceJump"
]
}
|
|
From: 4
Center Platform Junction
To: 3
Junction Left of Green Gate
Requires: "Gravity"
{
"or": [
"canWalljump",
"canGravityJump",
"h_canFly",
{
"and": [
"HiJump",
"SpeedBooster"
]
}
]
}
|
|
From: 4
Center Platform Junction
To: 3
Junction Left of Green Gate
Either freeze the Puyos immediately on the stairs, or at the highest part of their jump to barely jump up to the ledge with HiJump. Requires: "Gravity"
"HiJump"
"canTrickyUseFrozenEnemies"
{
"or": [
"h_canCrouchJumpDownGrab",
"Spazer",
"Wave",
"Plasma"
]
}
|
|
From: 4
Center Platform Junction
To: 3
Junction Left of Green Gate
Run and jump at the very edge of the center platform. Wait for the water level to begin lowering to walljump on the far edge. An airball may be a little easier. Requires: "canTrickyJump"
{
"or": [
"canLateralMidAirMorph",
"canInsaneWalljump",
{
"and": [
"SpeedBooster",
"canPreciseWalljump"
]
}
]
}
|
|
From: 4
Center Platform Junction
To: 3
Junction Left of Green Gate
Requires: "canCarefulJump" "canLateralMidAirMorph" "canSpringFling" "SpeedBooster" |
|
From: 4
Center Platform Junction
To: 3
Junction Left of Green Gate
Jump when the water level is at its lowest. Requires: "canSuitlessMaridia" "canTrickyJump" "h_canDoubleSpringBallJumpWithHiJump" |
{
"$schema": "../../../schema/m3-room.schema.json",
"id": 131,
"name": "Grapple Tutorial Room 3",
"area": "Norfair",
"subarea": "Upper",
"subsubarea": "Crocomire",
"playable": true,
"roomAddress": "0x7AB64",
"roomEnvironments": [
{
"heated": false
}
],
"nodes": [
{
"id": 1,
"name": "Left Door",
"nodeType": "door",
"nodeSubType": "blue",
"nodeAddress": "0x00194b6",
"doorEnvironments": [
{
"physics": "air"
}
]
},
{
"id": 2,
"name": "Right Door",
"nodeType": "door",
"nodeSubType": "blue",
"nodeAddress": "0x00194c2",
"doorEnvironments": [
{
"physics": "air"
}
]
},
{
"id": 3,
"name": "Junction Left of Green Gate",
"nodeType": "junction",
"nodeSubType": "junction"
},
{
"id": 4,
"name": "Center Platform Junction",
"nodeType": "junction",
"nodeSubType": "junction"
}
],
"enemies": [
{
"id": "e1",
"groupName": "Grapple Tutorial Room 3 Gamets",
"enemyName": "Gamet",
"quantity": 5,
"homeNodes": [
1
],
"farmCycles": [
{
"name": "Crouch over Gamets",
"cycleFrames": 120,
"requires": []
}
]
},
{
"id": "e2",
"groupName": "Grapple Tutorial Room 3 Puyos",
"enemyName": "Puyo",
"quantity": 5,
"homeNodes": [
4
]
}
],
"obstacles": [
{
"id": "A",
"name": "Green Gate",
"obstacleType": "inanimate"
}
],
"links": [
{
"from": 1,
"to": [
{
"id": 1
},
{
"id": 2
},
{
"id": 3
},
{
"id": 4
}
]
},
{
"from": 2,
"to": [
{
"id": 1
},
{
"id": 2
},
{
"id": 3
}
]
},
{
"from": 3,
"to": [
{
"id": 2
},
{
"id": 4
}
]
},
{
"from": 4,
"to": [
{
"id": 1
},
{
"id": 3
}
]
}
],
"strats": [
{
"link": [
1,
1
],
"name": "Leave with Runway",
"requires": [],
"exitCondition": {
"leaveWithRunway": {
"length": 4,
"openEnd": 1
}
}
},
{
"link": [
1,
1
],
"name": "Leave With Runway - Frozen Gamet",
"requires": [
"h_canNavigateUnderwater",
{
"or": [
"h_canTrickyFrozenEnemyRunway",
{
"and": [
"h_canFrozenEnemyRunway",
"Morph"
]
}
]
}
],
"exitCondition": {
"leaveWithRunway": {
"length": 6,
"openEnd": 0
}
},
"note": [
"Lure the Gamets up out of the water. It may be helpful to freeze them on the ascent to prevent them from separating and moving horizontally.",
"Positioning is much easier with Morph; simply morph on the runway before they start separating.",
"Freeze a Gamet while there is a half-tile gap between it and the runway in order to extend it as much as possible."
]
},
{
"link": [
1,
1
],
"name": "Gamet Farm",
"requires": [
{
  "refill": [
    "Energy",
    "Missile",
    "Super",
    "PowerBomb"
  ]
}
]
},
{
"link": [
1,
2
],
"name": "Leave With Runway - Frozen Gamet",
"requires": [
"h_canNavigateUnderwater",
"canTrickyJump",
{
"or": [
"h_canTrickyFrozenEnemyRunway",
{
"and": [
"h_canFrozenEnemyRunway",
"Morph"
]
}
]
},
{
"or": [
{
"ammo": {
"type": "Super",
"count": 1
}
},
{
"obstaclesCleared": [
"A"
]
}
]
}
],
"exitCondition": {
"leaveWithRunway": {
"length": 9,
"openEnd": 0
}
},
"unlocksDoors": [
{
"types": [
"ammo"
],
"requires": []
}
],
"note": [
"Lure the Geemers up out of the water. It may be helpful to freeze them on the ascent to prevent them from separating and moving horizontally.",
"At the top, position a Gamet flush with the central runway. Positioning is much easier with Morph; simply morph on the runway before they start separating.",
"Freeze the Gamet before it begins moving horizontally, and it will be able to turn to the right.",
"Use it as a frozen platform to cross both bodies of water.",
"Lure the Gamet to the right and freeze it while there is a half-tile gap between it and the runway in order to extend it as much as possible."
]
},
{
"link": [
1,
3
],
"name": "Enter Shinesparking",
"entranceCondition": {
"comeInWithSpark": {}
},
"requires": [
{
  "shinespark": {
    "frames": 56,
    "excessFrames": 1
  }
}
]
},
{
"link": [
1,
3
],
"name": "Shinespark, Come in Shinecharging",
"entranceCondition": {
"comeInShinecharging": {
"length": 3,
"openEnd": 1
}
},
"requires": [
"canHorizontalShinespark",
{
"shinespark": {
"frames": 54,
"excessFrames": 1
}
}
]
},
{
"link": [
1,
3
],
"name": "Grapple Tutorial 3 Frozen Gamet Bridge",
"notable": true,
"requires": [
"canTrickyUseFrozenEnemies"
],
"note": [
"Lead a Gamet up through the water and freeze it to cross the first moat.",
"Freeze the Gamet before it starts moving left.",
"Wait for it to thaw and fly over the second moat where it can be frozen again."
]
},
{
"link": [
1,
3
],
"name": "Grapple Tutorial 3 Double Gamet Boost",
"notable": true,
"requires": [
"h_canNavigateUnderwater",
"canTrickyJump",
"canHorizontalDamageBoost",
{
"enemyDamage": {
"enemy": "Gamet",
"type": "contact",
"hits": 2
}
}
],
"note": [
"1- Stand near the farm point, on the edge of where you make Gamets spawn.",
"2- Wait for the water position to be high.",
"3- Move to make the Gamets spawn. Moonwalk is useful here.",
"4- Quickly climb up to the last ledge before the door.",
"5- Run, jump, dboost off a Gamet.",
"6- Dboost a second time off the Gamet to cross the second moat."
]
},
{
"link": [
1,
3
],
"name": "Careful SpringBall Bounce",
"entranceCondition": {
"comeInRunning": {
"minTiles": 4,
"speedBooster": "any"
}
},
"requires": [
"canCarefulJump",
"canMockball",
"canSpringBallBounce"
],
"note": "With enough run speed, jump over the first moat and MockBall into a regular springball jump over the second moat."
},
{
"link": [
1,
3
],
"name": "Tricky SpringBall Bounce",
"entranceCondition": {
"comeInRunning": {
"minTiles": 2,
"speedBooster": "any"
}
},
"requires": [
"canTrickyJump",
"canMockball",
"canSpringBallBounce"
],
"note": "With enough run speed, jump over the first moat and MockBall into a regular springball jump over the second moat."
},
{
"link": [
1,
4
],
"name": "Base",
"requires": [
{
  "or": [
    "Grapple",
    "SpaceJump"
  ]
}
]
},
{
"link": [
1,
4
],
"name": "Gravity",
"requires": [
"Gravity",
{
"or": [
"canWalljump",
"HiJump",
"canSpringBallJumpMidAir",
"h_canFly",
"canUseFrozenEnemies",
"canGravityJump"
]
}
]
},
{
"link": [
1,
4
],
"name": "Speed Jump",
"requires": [
"SpeedBooster",
"canTrickyJump",
{
"or": [
"canWalljump",
"canLateralMidAirMorph"
]
}
]
},
{
"link": [
1,
4
],
"name": "Little Run Speed Jump",
"entranceCondition": {
"comeInRunning": {
"minTiles": 2,
"speedBooster": "any"
}
},
"requires": [
"canTrickyJump",
{
"or": [
"canWalljump",
"canLateralMidAirMorph"
]
}
]
},
{
"link": [
1,
4
],
"name": "Full Run Speed Jump",
"entranceCondition": {
"comeInRunning": {
"minTiles": 4,
"speedBooster": "any"
}
},
"requires": [
"canCarefulJump"
]
},
{
"link": [
1,
4
],
"name": "Grapple Tutorial Gamet Boost",
"requires": [
"h_canNavigateUnderwater",
"canHorizontalDamageBoost",
"canCarefulJump",
{
"enemyDamage": {
"enemy": "Gamet",
"type": "contact",
"hits": 1
}
}
],
"note": [
"1- Stand near the farm point, on the edge of where you make Gamets spawn.",
"2- Wait for the water position to be high.",
"3- Move to make the Gamets spawn. Moonwalk is useful here.",
"4- Quickly climb up to the last ledge before the door.",
"5- Run, jump, dboost off a Gamet."
]
},
{
"link": [
1,
4
],
"name": "Suitless SpringBall Jump",
"requires": [
"canSuitlessMaridia",
"HiJump",
"h_canMaxHeightSpringBallJump"
],
"note": "Wait for the water to be rising and perform a max height SpringBall Jump."
},
{
"link": [
2,
1
],
"name": "Grapple Teleport",
"entranceCondition": {
"comeInWithGrappleTeleport": {
"blockPositions": [
[
5,
3
],
[
7,
2
]
]
}
},
"requires": []
},
{
"link": [
2,
1
],
"name": "Grapple Teleport Door Lock Skip",
"entranceCondition": {
"comeInWithGrappleTeleport": {
"blockPositions": [
[
3,
12
],
[
3,
13
]
]
}
},
"requires": [],
"bypassesDoorShell": true
},
{
"link": [
2,
1
],
"name": "Carry Grapple Teleport (Top Position)",
"entranceCondition": {
"comeInWithGrappleTeleport": {
"blockPositions": [
[
3,
12
]
]
}
},
"requires": [],
"bypassesDoorShell": true,
"exitCondition": {
"leaveWithGrappleTeleport": {
"blockPositions": [
[
3,
12
]
]
}
}
},
{
"link": [
2,
1
],
"name": "Carry Grapple Teleport (Bottom Position)",
"entranceCondition": {
"comeInWithGrappleTeleport": {
"blockPositions": [
[
3,
13
]
]
}
},
"requires": [],
"bypassesDoorShell": true,
"exitCondition": {
"leaveWithGrappleTeleport": {
"blockPositions": [
[
3,
13
]
]
}
}
},
{
"link": [
2,
1
],
"name": "Grapple Teleport X-Ray Climb",
"entranceCondition": {
"comeInWithGrappleTeleport": {
"blockPositions": [
[
2,
18
],
[
2,
19
],
[
2,
28
],
[
2,
29
]
]
}
},
"requires": [
"canXRayClimb"
],
"bypassesDoorShell": true,
"note": [
"Exit the previous room with Samus in a standing pose (while grappled).",
"After teleporting, press right to release Grapple while staying standing (not being forced into a crouch).",
"Then X-ray climb to get up to the door transition, without needing to open the door."
]
},
{
"link": [
2,
2
],
"name": "Leave with Limited Runway",
"requires": [],
"exitCondition": {
"leaveWithRunway": {
"length": 4,
"openEnd": 0
}
}
},
{
"link": [
2,
2
],
"name": "Leave with Full Runway",
"requires": [
{
  "obstaclesCleared": [
    "A"
  ]
}
],
"exitCondition": {
"leaveWithRunway": {
"length": 7,
"openEnd": 1
}
}
},
{
"link": [
2,
2
],
"name": "Crystal Flash",
"requires": [
"h_canCrystalFlash"
]
},
{
"link": [
2,
3
],
"name": "Base",
"requires": [
{
  "or": [
    "h_canGreenGateGlitch",
    {
      "obstaclesCleared": [
        "A"
      ]
    }
  ]
}
],
"clearsObstacles": [
"A"
]
},
{
"link": [
3,
2
],
"name": "Base",
"requires": [
{
  "or": [
    {
      "ammo": {
        "type": "Super",
        "count": 1
      }
    },
    {
      "obstaclesCleared": [
        "A"
      ]
    }
  ]
}
],
"clearsObstacles": [
"A"
]
},
{
"link": [
3,
4
],
"name": "Base",
"requires": [
{
  "obstaclesCleared": [
    "A"
  ]
}
]
},
{
"link": [
3,
4
],
"name": "Avoid Puyo",
"requires": [
{
  "or": [
    "Grapple",
    "SpaceJump",
    "canResetFallSpeed",
    {
      "and": [
        "canTrickyJump",
        "canLateralMidAirMorph"
      ]
    },
    {
      "and": [
        "Gravity",
        "canStaggeredWalljump"
      ]
    }
  ]
}
]
},
{
"link": [
3,
4
],
"name": "Fight Puyo",
"requires": [
{
  "or": [
    {
      "enemyKill": {
        "enemies": [
          [
            "Puyo"
          ]
        ],
        "explicitWeapons": [
          "Wave",
          "Ice+Spazer",
          "Plasma",
          "Missile",
          "Super",
          "Charge+Spazer"
        ]
      }
    },
    {
      "and": [
        "Gravity",
        {
          "enemyKill": {
            "enemies": [
              [
                "Puyo"
              ]
            ],
            "explicitWeapons": [
              "ScrewAttack",
              "PseudoScrew"
            ]
          }
        }
      ]
    },
    {
      "enemyDamage": {
        "enemy": "Puyo",
        "type": "contact",
        "hits": 1
      }
    }
  ]
}
],
"note": "Kill either the leftmost puyo or jump into the right side of the water and fight all the puyos."
},
{
"link": [
4,
1
],
"name": "Base",
"requires": []
},
{
"link": [
4,
3
],
"name": "Base",
"requires": [
{
  "or": [
    "Grapple",
    "SpaceJump"
  ]
}
]
},
{
"link": [
4,
3
],
"name": "Gravity",
"requires": [
"Gravity",
{
"or": [
"canWalljump",
"canGravityJump",
"h_canFly",
{
"and": [
"HiJump",
"SpeedBooster"
]
}
]
}
]
},
{
"link": [
4,
3
],
"name": "Gravity and Ice",
"requires": [
"Gravity",
"HiJump",
"canTrickyUseFrozenEnemies",
{
"or": [
"h_canCrouchJumpDownGrab",
"Spazer",
"Wave",
"Plasma"
]
}
],
"note": "Either freeze the Puyos immediately on the stairs, or at the highest part of their jump to barely jump up to the ledge with HiJump."
},
{
"link": [
4,
3
],
"name": "Tricky Jump",
"requires": [
"canTrickyJump",
{
"or": [
"canLateralMidAirMorph",
"canInsaneWalljump",
{
"and": [
"SpeedBooster",
"canPreciseWalljump"
]
}
]
}
],
"note": [
"Run and jump at the very edge of the center platform.",
"Wait for the water level to begin lowering to walljump on the far edge.",
"An airball may be a little easier."
]
},
{
"link": [
4,
3
],
"name": "SpringFling",
"requires": [
"canCarefulJump",
"canLateralMidAirMorph",
"canSpringFling",
"SpeedBooster"
]
},
{
"link": [
4,
3
],
"name": "Suitless Double SpringBall Jump",
"requires": [
"canSuitlessMaridia",
"canTrickyJump",
"h_canDoubleSpringBallJumpWithHiJump"
],
"note": "Jump when the water level is at its lowest."
}
]
}