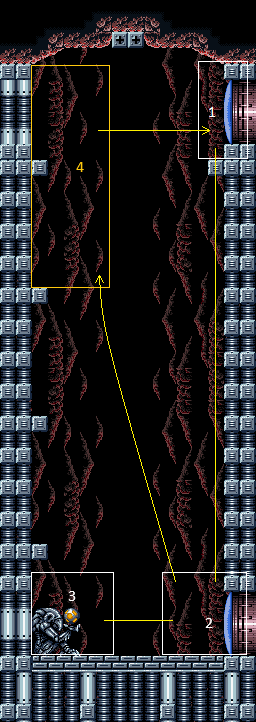
Grapple Beam Room
Room ID: 128
|
Exit condition: {
"leaveWithRunway": {
"length": 1,
"openEnd": 1
}
}
|
|
Requires: "h_canCrystalFlash" |
|
|
|
From: 1
Top Right Door
To: 2
Bottom Right Door
Entrance condition: {
"comeInShinecharged": {
"framesRequired": 165
}
}
Requires: "canShinechargeMovementComplex" Clears obstacles: A |
|
Requires: {
"or": [
"canConsecutiveWalljump",
"h_canFly"
]
}
|
|
Entrance condition: {
"comeInShinecharging": {
"length": 9,
"openEnd": 0
}
}
Requires: {
"shinespark": {
"frames": 40
}
}
|
|
From: 2
Bottom Right Door
To: 1
Top Right Door
Entrance condition: {
"comeInShinecharged": {
"framesRequired": 13
}
}
Requires: {
"shinespark": {
"frames": 40
}
}
|
|
Requires: {
"obstaclesCleared": [
"A"
]
}
{
"shinespark": {
"frames": 40
}
}
|
|
Climb up 2 screens. Entrance condition: {
"comeInWithDoorStuckSetup": {}
}
Requires: "canXRayClimb" |
|
From: 2
Bottom Right Door
To: 1
Top Right Door
Enter with G-mode direct, back up to between 1 and 6 pixels from the door transition, and activate X-ray to get very deep stuck in the door. Climb up 2 screens, and perform a turnaround buffered spin-jump away from the door to trigger the transition, bypassing any lock on the door. Entrance condition: {
"comeInWithGMode": {
"mode": "direct",
"morphed": false
}
}
Requires: "canXRayClimb" Bypasses door shell: true |
|
Exit condition: {
"leaveWithRunway": {
"length": 10,
"openEnd": 0
}
}
|
|
Requires: {
"obstaclesNotCleared": [
"A"
]
}
"h_canCrystalFlash"
|
|
From: 2
Bottom Right Door
To: 2
Bottom Right Door
Entrance condition: {
"comeInShinecharged": {
"framesRequired": 60
}
}
Requires: "canShinechargeMovementComplex" Clears obstacles: A |
|
From: 2
Bottom Right Door
To: 2
Bottom Right Door
Entrance condition: {
"comeInShinecharging": {
"length": 9,
"openEnd": 0
}
}
Requires: "canShinechargeMovementComplex" Clears obstacles: A |
|
Requires: {
"obstaclesCleared": [
"A"
]
}
{
"shinespark": {
"frames": 6
}
}
Exit condition: {
"leaveWithSpark": {}
}
|
|
|
|
Requires: {
"or": [
"HiJump",
"canWalljump",
"h_canCrouchJumpDownGrab",
"canSpringBallJumpMidAir"
]
}
|
|
Entrance condition: {
"comeInWithGrappleTeleport": {
"blockPositions": [
[
5,
3
],
[
7,
2
]
]
}
}
|
|
|
|
Requires: {
"or": [
"Grapple",
"canPreciseWalljump"
]
}
|
|
Run and jump from the second-highest platform on the left. Requires: "HiJump" "canCarefulJump" |
|
Starting from the second-highest platform on the left, run and jump into a mid-air Spring Ball jump. It helps but is not required to then unmorph to reset fall speed. Requires: "canTrickySpringBallJump" |
|
With SpeedBooster equipped, run from the top left platform and jump into an airball to reach the top right platform. It helps but is not required to moonwalk against the wall to maximize the available runway. Requires: "SpeedBooster" "canTrickyJump" "canLateralMidAirMorph" |
{
"$schema": "../../../schema/m3-room.schema.json",
"id": 128,
"name": "Grapple Beam Room",
"area": "Norfair",
"subarea": "Upper",
"subsubarea": "Crocomire",
"playable": true,
"roomAddress": "0x7AC2B",
"roomEnvironments": [
{
"heated": false
}
],
"nodes": [
{
"id": 1,
"name": "Top Right Door",
"nodeType": "door",
"nodeSubType": "blue",
"nodeAddress": "0x0019522",
"doorEnvironments": [
{
"physics": "air"
}
]
},
{
"id": 2,
"name": "Bottom Right Door",
"nodeType": "door",
"nodeSubType": "blue",
"nodeAddress": "0x0019516",
"doorEnvironments": [
{
"physics": "air"
}
]
},
{
"id": 3,
"name": "Item",
"nodeType": "item",
"nodeSubType": "chozo",
"nodeItem": "Grapple",
"nodeAddress": "0x78C36"
},
{
"id": 4,
"name": "Junction at Top Left",
"nodeType": "junction",
"nodeSubType": "junction"
}
],
"obstacles": [
{
"id": "A",
"name": "Enter Shinecharged for Item Grab and Escape",
"obstacleType": "abstract"
}
],
"enemies": [],
"links": [
{
"from": 1,
"to": [
{
"id": 1
},
{
"id": 2
}
]
},
{
"from": 2,
"to": [
{
"id": 1
},
{
"id": 2
},
{
"id": 3
},
{
"id": 4
}
]
},
{
"from": 3,
"to": [
{
"id": 2
}
]
},
{
"from": 4,
"to": [
{
"id": 1
}
]
}
],
"strats": [
{
"link": [
1,
1
],
"name": "Leave with Runway",
"requires": [],
"exitCondition": {
"leaveWithRunway": {
"length": 1,
"openEnd": 1
}
}
},
{
"link": [
1,
1
],
"name": "Crystal Flash",
"requires": [
"h_canCrystalFlash"
]
},
{
"link": [
1,
2
],
"name": "Base",
"requires": []
},
{
"link": [
1,
2
],
"name": "Come In Shinecharged for Item Grab and Escape",
"entranceCondition": {
"comeInShinecharged": {
"framesRequired": 165
}
},
"requires": [
"canShinechargeMovementComplex"
],
"clearsObstacles": [
"A"
]
},
{
"link": [
2,
1
],
"name": "Base",
"requires": [
{
  "or": [
    "canConsecutiveWalljump",
    "h_canFly"
  ]
}
]
},
{
"link": [
2,
1
],
"name": "Shinespark",
"entranceCondition": {
"comeInShinecharging": {
"length": 9,
"openEnd": 0
}
},
"requires": [
{
  "shinespark": {
    "frames": 40
  }
}
]
},
{
"link": [
2,
1
],
"name": "Enter Shinecharged Shinespark",
"entranceCondition": {
"comeInShinecharged": {
"framesRequired": 13
}
},
"requires": [
{
  "shinespark": {
    "frames": 40
  }
}
]
},
{
"link": [
2,
1
],
"name": "Shinespark Escape",
"requires": [
{
"obstaclesCleared": [
"A"
]
},
{
"shinespark": {
"frames": 40
}
}
]
},
{
"link": [
2,
1
],
"name": "X-Ray Climb",
"entranceCondition": {
"comeInWithDoorStuckSetup": {}
},
"requires": [
"canXRayClimb"
],
"note": "Climb up 2 screens."
},
{
"link": [
2,
1
],
"name": "Very Deep Stuck X-Ray Climb",
"entranceCondition": {
"comeInWithGMode": {
"mode": "direct",
"morphed": false
}
},
"requires": [
"canXRayClimb"
],
"bypassesDoorShell": true,
"note": [
"Enter with G-mode direct, back up to between 1 and 6 pixels from the door transition, and activate X-ray to get very deep stuck in the door.",
"Climb up 2 screens, and perform a turnaround buffered spin-jump away from the door to trigger the transition, bypassing any lock on the door."
]
},
{
"link": [
2,
2
],
"name": "Leave with Runway",
"requires": [],
"exitCondition": {
"leaveWithRunway": {
"length": 10,
"openEnd": 0
}
}
},
{
"link": [
2,
2
],
"name": "Crystal Flash",
"requires": [
{
"obstaclesNotCleared": [
"A"
]
},
"h_canCrystalFlash"
]
},
{
"link": [
2,
2
],
"name": "Come In Shinecharged for Item Grab and Escape",
"entranceCondition": {
"comeInShinecharged": {
"framesRequired": 60
}
},
"requires": [
"canShinechargeMovementComplex"
],
"clearsObstacles": [
"A"
]
},
{
"link": [
2,
2
],
"name": "Come In Shinecharging for Item Grab and Escape",
"entranceCondition": {
"comeInShinecharging": {
"length": 9,
"openEnd": 0
}
},
"requires": [
"canShinechargeMovementComplex"
],
"clearsObstacles": [
"A"
]
},
{
"link": [
2,
2
],
"name": "Shinespark Escape",
"requires": [
{
"obstaclesCleared": [
"A"
]
},
{
"shinespark": {
"frames": 6
}
}
],
"exitCondition": {
"leaveWithSpark": {}
}
},
{
"link": [
2,
3
],
"name": "Base",
"requires": []
},
{
"link": [
2,
4
],
"name": "Base",
"requires": [
{
  "or": [
    "HiJump",
    "canWalljump",
    "h_canCrouchJumpDownGrab",
    "canSpringBallJumpMidAir"
  ]
}
]
},
{
"link": [
2,
4
],
"name": "Grapple Teleport",
"entranceCondition": {
"comeInWithGrappleTeleport": {
"blockPositions": [
[
5,
3
],
[
7,
2
]
]
}
},
"requires": [],
"devNote": [
"This gets to the top left of the room without walljump or crouch jump.",
"Avoiding a crouch jump could be useful for preserving a flash suit.",
"FIXME: When we have a way to represent grapple teleporting with a shinecharge, that can also be useful here."
]
},
{
"link": [
3,
2
],
"name": "Base",
"requires": []
},
{
"link": [
4,
1
],
"name": "Base",
"requires": [
{
  "or": [
    "Grapple",
    "canPreciseWalljump"
  ]
}
]
},
{
"link": [
4,
1
],
"name": "HiJump",
"requires": [
"HiJump",
"canCarefulJump"
],
"note": "Run and jump from the second-highest platform on the left."
},
{
"link": [
4,
1
],
"name": "Spring Ball Jump",
"requires": [
"canTrickySpringBallJump"
],
"note": [
"Starting from the second-highest platform on the left, run and jump into a mid-air Spring Ball jump.",
"It helps but is not required to then unmorph to reset fall speed."
]
},
{
"link": [
4,
1
],
"name": "Speedy Airball",
"requires": [
"SpeedBooster",
"canTrickyJump",
"canLateralMidAirMorph"
],
"note": [
"With SpeedBooster equipped, run from the top left platform and jump into an airball to reach the top right platform.",
"It helps but is not required to moonwalk against the wall to maximize the available runway."
]
}
]
}