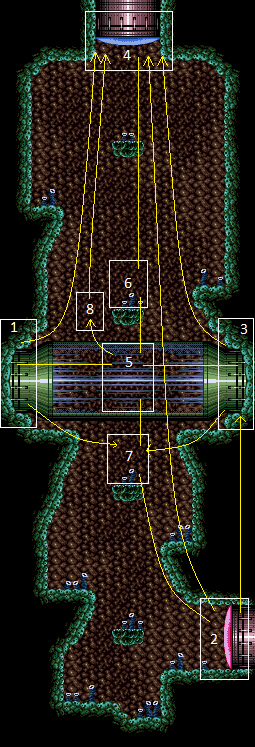
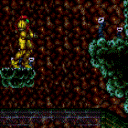
Glass Tunnel
Room ID: 170
|
Exit condition: {
"leaveWithRunway": {
"length": 3,
"openEnd": 1
}
}
|
|
Requires: "h_canCrystalFlash" |
|
Requires: {
"not": "f_MaridiaTubeBroken"
}
"canRiskPermanentLossOfAccess"
Exit condition: {
"leaveWithRunway": {
"length": 14,
"openEnd": 0
}
}
|
|
Entrance condition: {
"comeInWithSpark": {}
}
Requires: {
"or": [
{
"shinespark": {
"frames": 24
}
},
{
"and": [
"Gravity",
{
"shinespark": {
"frames": 21
}
}
]
},
{
"and": [
{
"not": "f_MaridiaTubeBroken"
},
"canRiskPermanentLossOfAccess",
{
"shinespark": {
"frames": 21
}
}
]
}
]
}
Exit condition: {
"leaveWithSpark": {}
}
|
|
From: 1
Left Doorway
To: 3
Top Right Doorway
Entrance condition: {
"comeInShinecharging": {
"length": 13,
"openEnd": 0
}
}
Requires: {
"not": "f_MaridiaTubeBroken"
}
"canRiskPermanentLossOfAccess"
Exit condition: {
"leaveShinecharged": {
"framesRemaining": 179
}
}
|
|
From: 1
Left Doorway
To: 3
Top Right Doorway
Entrance condition: {
"comeInWithGMode": {
"mode": "any",
"morphed": false
}
}
Exit condition: {
"leaveWithGMode": {
"morphed": false
}
}
|
|
From: 1
Left Doorway
To: 3
Top Right Doorway
Entrance condition: {
"comeInWithGMode": {
"mode": "any",
"morphed": true
}
}
Requires: {
"or": [
"Morph",
"h_canArtificialMorphSpringBall",
{
"and": [
"Gravity",
"h_canArtificialMorphIBJ"
]
},
{
"and": [
"Gravity",
"h_canArtificialMorphBombHorizontally",
"h_canArtificialMorphBombThings"
]
},
{
"and": [
{
"not": "f_MaridiaTubeBroken"
},
"canRiskPermanentLossOfAccess"
]
}
]
}
Exit condition: {
"leaveWithGMode": {
"morphed": true
}
}
|
|
From: 1
Left Doorway
To: 3
Top Right Doorway
Entrance condition: {
"comeInWithStoredFallSpeed": {
"fallSpeedInTiles": 1
}
}
Requires: {
"not": "f_MaridiaTubeBroken"
}
"canRiskPermanentLossOfAccess"
Exit condition: {
"leaveWithStoredFallSpeed": {
"fallSpeedInTiles": 1
}
}
|
|
From: 1
Left Doorway
To: 3
Top Right Doorway
Entrance condition: {
"comeInWithStoredFallSpeed": {
"fallSpeedInTiles": 2
}
}
Requires: {
"not": "f_MaridiaTubeBroken"
}
"canRiskPermanentLossOfAccess"
Exit condition: {
"leaveWithStoredFallSpeed": {
"fallSpeedInTiles": 2
}
}
|
|
Only requires a runway of 1 tile in the adjacent room. This strat is slightly easier on the right side at low run speeds, but the same otherwise. Entrance condition: {
"comeInJumping": {
"speedBooster": false,
"minTiles": 0.4375
}
}
Requires: "f_MaridiaTubeBroken" "canCrossRoomJumpIntoWater" "canTrickyJump" |
|
Only requires a runway of 7 tiles in the adjacent room, but an extra tile makes for an easier jump. Entrance condition: {
"comeInJumping": {
"speedBooster": true,
"minTiles": 7.4375
}
}
Requires: "f_MaridiaTubeBroken" "canCrossRoomJumpIntoWater" |
|
|
|
From: 1
Left Doorway
To: 5
Inside Maridia Tube (locked)
The tube will break when exiting G-Mode or when the Power Bomb finishes detonating, whichever is later. Entrance condition: {
"comeInWithGMode": {
"mode": "any",
"morphed": true
}
}
Requires: {
"not": "f_MaridiaTubeBroken"
}
"h_canArtificialMorphPowerBomb"
Clears obstacles: A |
|
From: 1
Left Doorway
To: 7
Below Maridia Tube (locked)
Entrance condition: {
"comeInWithStoredFallSpeed": {
"fallSpeedInTiles": 1
}
}
Requires: "canMoonfall" |
|
From: 2
Bottom Right Door
To: 1
Left Doorway
Entrance condition: {
"comeInWithGMode": {
"mode": "any",
"morphed": false
}
}
Requires: "f_MaridiaTubeBroken" Exit condition: {
"leaveWithGMode": {
"morphed": false
}
}
|
|
From: 2
Bottom Right Door
To: 1
Left Doorway
Entrance condition: {
"comeInWithGMode": {
"mode": "any",
"morphed": true
}
}
Requires: "f_MaridiaTubeBroken"
{
"or": [
{
"and": [
"Gravity",
"h_canArtificialMorphMovement"
]
},
{
"and": [
"canSuitlessMaridia",
"h_canArtificialMorphSpringBall",
"HiJump"
]
}
]
}
Exit condition: {
"leaveWithGMode": {
"morphed": true
}
}
|
|
Entrance condition: {
"comeInWithGrappleTeleport": {
"blockPositions": [
[
2,
18
],
[
2,
19
],
[
2,
28
],
[
2,
29
]
]
}
}
Bypasses door shell: true |
|
From: 2
Bottom Right Door
To: 1
Left Doorway
Entrance condition: {
"comeInWithGrappleTeleport": {
"blockPositions": [
[
2,
18
]
]
}
}
Exit condition: {
"leaveWithGrappleTeleport": {
"blockPositions": [
[
2,
18
]
]
}
}
Bypasses door shell: true |
|
From: 2
Bottom Right Door
To: 1
Left Doorway
Entrance condition: {
"comeInWithGrappleTeleport": {
"blockPositions": [
[
2,
19
]
]
}
}
Exit condition: {
"leaveWithGrappleTeleport": {
"blockPositions": [
[
2,
19
]
]
}
}
Bypasses door shell: true |
|
From: 2
Bottom Right Door
To: 1
Left Doorway
Entrance condition: {
"comeInWithGrappleTeleport": {
"blockPositions": [
[
2,
28
]
]
}
}
Exit condition: {
"leaveWithGrappleTeleport": {
"blockPositions": [
[
2,
28
]
]
}
}
Bypasses door shell: true |
|
From: 2
Bottom Right Door
To: 1
Left Doorway
Entrance condition: {
"comeInWithGrappleTeleport": {
"blockPositions": [
[
2,
29
]
]
}
}
Exit condition: {
"leaveWithGrappleTeleport": {
"blockPositions": [
[
2,
29
]
]
}
}
Bypasses door shell: true |
|
Exit the previous room with Samus in a standing pose (while grappled). After teleporting, press right to release Grapple while staying standing (not being forced into a crouch). Then X-ray climb to get up to the door transition, without needing to open the door. Entrance condition: {
"comeInWithGrappleTeleport": {
"blockPositions": [
[
2,
34
]
]
}
}
Requires: "canXRayClimb" Bypasses door shell: true |
|
Exit condition: {
"leaveWithRunway": {
"length": 5,
"openEnd": 1
}
}
|
|
From: 2
Bottom Right Door
To: 2
Bottom Right Door
Requires: {
"not": "f_MaridiaTubeBroken"
}
"canRiskPermanentLossOfAccess"
Exit condition: {
"leaveWithRunway": {
"length": 5,
"openEnd": 1
}
}
|
|
From: 2
Bottom Right Door
To: 3
Top Right Doorway
Climb up 1 screen. Entrance condition: {
"comeInWithGMode": {
"mode": "direct",
"morphed": false
}
}
Requires: "canXRayClimb" |
|
From: 2
Bottom Right Door
To: 3
Top Right Doorway
Climb up 1 screen. Entrance condition: {
"comeInShinecharged": {
"framesRequired": 1
}
}
Requires: {
"shinespark": {
"frames": 1,
"excessFrames": 1
}
}
"canShinesparkDeepStuck"
"canXRayClimb"
|
|
From: 2
Bottom Right Door
To: 3
Top Right Doorway
Entrance condition: {
"comeInWithGMode": {
"mode": "any",
"morphed": false
}
}
Requires: "f_MaridiaTubeBroken" Exit condition: {
"leaveWithGMode": {
"morphed": false
}
}
|
|
From: 2
Bottom Right Door
To: 3
Top Right Doorway
Entrance condition: {
"comeInWithGMode": {
"mode": "any",
"morphed": true
}
}
Requires: "f_MaridiaTubeBroken"
{
"or": [
{
"and": [
"Gravity",
"h_canArtificialMorphMovement"
]
},
{
"and": [
"canSuitlessMaridia",
"h_canArtificialMorphSpringBall",
"HiJump"
]
}
]
}
Exit condition: {
"leaveWithGMode": {
"morphed": true
}
}
|
|
From: 2
Bottom Right Door
To: 4
Top Door
Notable: true 
Requires a runway of at least 18 tiles in the adjacent room. Ride up the right wall just above the doorway, then turnaround before and after hitting the platform following the doorway slope. Continue up the rest of the way to reach the door. Entrance condition: {
"comeInJumping": {
"speedBooster": true,
"minTiles": 18
}
}
Requires: "f_MaridiaTubeBroken" "canCrossRoomJumpIntoWater" "canMomentumConservingTurnaround" "canTrickyDashJump" "canInsaneJump" |
|
Assumes a runway of at least 21 tiles in the adjacent room. End Samus' momentum where no platforms are over head. Shoot the door while rising to pass through. Entrance condition: {
"comeInJumping": {
"speedBooster": true,
"minTiles": 21
}
}
Requires: "f_MaridiaTubeBroken" "canCrossRoomJumpIntoWater" "canMidairWiggle" "canTrickyJump" |
|
Glass Tunnel Grapple Teleport into Grapple Jump or Tube Intact (Lower Entrance) (Insane)
Glass Tunnel
From: 2
Bottom Right Door
To: 4
Top Door
Notable: true .png)
.gif)
Swing to the right, shoot open the door above, and grapple jump through it. The grapple beam will need to be retracted while swinging to the right, to avoid bonking on the small platform. Entrance condition: {
"comeInWithGrappleTeleport": {
"blockPositions": [
[
5,
3
]
]
}
}
Requires: {
"doorUnlockedAtNode": 4
}
{
"or": [
{
"and": [
"canMidairWiggle",
"canTrickyGrappleJump",
"canInsaneJump"
]
},
{
"and": [
{
"not": "f_MaridiaTubeBroken"
},
"canRiskPermanentLossOfAccess"
]
}
]
}
|
|
Entrance condition: {
"comeInWithGrappleTeleport": {
"blockPositions": [
[
5,
3
],
[
7,
2
]
]
}
}
|
|
From: 2
Bottom Right Door
To: 6
Above Maridia Tube (locked)
After teleporting, retract Grapple by pressing up. Then if necessary, wiggle right out of the wall by turning around a few times. Entrance condition: {
"comeInWithGrappleTeleport": {
"blockPositions": [
[
3,
12
],
[
3,
13
]
]
}
}
|
|
|
|
From: 2
Bottom Right Door
To: 7
Below Maridia Tube (locked)
The tube will break when exiting G-Mode or when the Power Bomb finishes detonating, whichever is later. Entrance condition: {
"comeInWithGMode": {
"mode": "any",
"morphed": true
}
}
Requires: {
"not": "f_MaridiaTubeBroken"
}
"h_canArtificialMorphPowerBomb"
"h_canArtificialMorphMovement"
Clears obstacles: A |
|
Entrance condition: {
"comeInWithSpark": {}
}
Requires: {
"or": [
{
"shinespark": {
"frames": 24
}
},
{
"and": [
"Gravity",
{
"shinespark": {
"frames": 21
}
}
]
},
{
"and": [
{
"not": "f_MaridiaTubeBroken"
},
"canRiskPermanentLossOfAccess",
{
"shinespark": {
"frames": 21
}
}
]
}
]
}
Exit condition: {
"leaveWithSpark": {}
}
|
|
From: 3
Top Right Doorway
To: 1
Left Doorway
Entrance condition: {
"comeInShinecharging": {
"length": 13,
"openEnd": 0
}
}
Requires: {
"not": "f_MaridiaTubeBroken"
}
"canRiskPermanentLossOfAccess"
Exit condition: {
"leaveShinecharged": {
"framesRemaining": 179
}
}
|
|
From: 3
Top Right Doorway
To: 1
Left Doorway
Entrance condition: {
"comeInWithGMode": {
"mode": "any",
"morphed": false
}
}
Exit condition: {
"leaveWithGMode": {
"morphed": false
}
}
|
|
From: 3
Top Right Doorway
To: 1
Left Doorway
Entrance condition: {
"comeInWithGMode": {
"mode": "any",
"morphed": true
}
}
Requires: {
"or": [
"Morph",
"h_canArtificialMorphSpringBall",
{
"and": [
"Gravity",
"h_canArtificialMorphIBJ"
]
},
{
"and": [
"Gravity",
"h_canArtificialMorphBombHorizontally",
"h_additionalBomb"
]
},
{
"and": [
{
"not": "f_MaridiaTubeBroken"
},
"canRiskPermanentLossOfAccess"
]
}
]
}
Exit condition: {
"leaveWithGMode": {
"morphed": true
}
}
|
|
From: 3
Top Right Doorway
To: 1
Left Doorway
Entrance condition: {
"comeInWithStoredFallSpeed": {
"fallSpeedInTiles": 1
}
}
Requires: {
"not": "f_MaridiaTubeBroken"
}
"canRiskPermanentLossOfAccess"
Exit condition: {
"leaveWithStoredFallSpeed": {
"fallSpeedInTiles": 1
}
}
|
|
From: 3
Top Right Doorway
To: 1
Left Doorway
Entrance condition: {
"comeInWithStoredFallSpeed": {
"fallSpeedInTiles": 2
}
}
Requires: {
"not": "f_MaridiaTubeBroken"
}
"canRiskPermanentLossOfAccess"
Exit condition: {
"leaveWithStoredFallSpeed": {
"fallSpeedInTiles": 2
}
}
|
|
Entrance condition: {
"comeInWithGrappleTeleport": {
"blockPositions": [
[
2,
18
],
[
2,
19
],
[
2,
28
],
[
2,
29
]
]
}
}
Bypasses door shell: true |
|
From: 3
Top Right Doorway
To: 1
Left Doorway
Entrance condition: {
"comeInWithGrappleTeleport": {
"blockPositions": [
[
2,
18
]
]
}
}
Exit condition: {
"leaveWithGrappleTeleport": {
"blockPositions": [
[
2,
18
]
]
}
}
Bypasses door shell: true |
|
From: 3
Top Right Doorway
To: 1
Left Doorway
Entrance condition: {
"comeInWithGrappleTeleport": {
"blockPositions": [
[
2,
19
]
]
}
}
Exit condition: {
"leaveWithGrappleTeleport": {
"blockPositions": [
[
2,
19
]
]
}
}
Bypasses door shell: true |
|
From: 3
Top Right Doorway
To: 1
Left Doorway
Entrance condition: {
"comeInWithGrappleTeleport": {
"blockPositions": [
[
2,
28
]
]
}
}
Exit condition: {
"leaveWithGrappleTeleport": {
"blockPositions": [
[
2,
28
]
]
}
}
Bypasses door shell: true |
|
From: 3
Top Right Doorway
To: 1
Left Doorway
Entrance condition: {
"comeInWithGrappleTeleport": {
"blockPositions": [
[
2,
29
]
]
}
}
Exit condition: {
"leaveWithGrappleTeleport": {
"blockPositions": [
[
2,
29
]
]
}
}
Bypasses door shell: true |
|
Exit the previous room with Samus in a standing pose (while grappled). After teleporting, press right to release Grapple while staying standing (not being forced into a crouch). Then X-ray climb to get up to the door transition, without needing to open the door. Entrance condition: {
"comeInWithGrappleTeleport": {
"blockPositions": [
[
2,
34
]
]
}
}
Requires: "canXRayClimb" Bypasses door shell: true |
|
Exit condition: {
"leaveWithRunway": {
"length": 3,
"openEnd": 1
}
}
|
|
From: 3
Top Right Doorway
To: 3
Top Right Doorway
Requires: {
"not": "f_MaridiaTubeBroken"
}
"canRiskPermanentLossOfAccess"
Exit condition: {
"leaveWithRunway": {
"length": 14,
"openEnd": 0
}
}
|
|
Only requires a runway of one tile in the adjacent room. This strat is slightly easier on the right side at low run speeds, but the same otherwise. Entrance condition: {
"comeInJumping": {
"speedBooster": false,
"minTiles": 0.4375
}
}
Requires: "f_MaridiaTubeBroken" "canCrossRoomJumpIntoWater" "canTrickyJump" |
|
Only requires a runway of 7 tiles in the adjacent room, but an extra tile makes for an easier jump. Entrance condition: {
"comeInJumping": {
"speedBooster": true,
"minTiles": 7.4375
}
}
Requires: "f_MaridiaTubeBroken" "canCrossRoomJumpIntoWater" |
|
Glass Tunnel Grapple Teleport into Grapple Jump or Tube Intact (Right Entrance) (Insane)
Glass Tunnel
From: 3
Top Right Doorway
To: 4
Top Door
Notable: true
Swing to the right, shoot open the door above, and grapple jump through it. The grapple beam will need to be retracted while swinging to the right, to avoid bonking on the small platform. Entrance condition: {
"comeInWithGrappleTeleport": {
"blockPositions": [
[
5,
3
]
]
}
}
Requires: {
"doorUnlockedAtNode": 4
}
{
"or": [
{
"and": [
"canMidairWiggle",
"canTrickyGrappleJump",
"canInsaneJump"
]
},
{
"and": [
{
"not": "f_MaridiaTubeBroken"
},
"canRiskPermanentLossOfAccess"
]
}
]
}
|
|
|
|
From: 3
Top Right Doorway
To: 5
Inside Maridia Tube (locked)
The tube will break when exiting G-Mode or when the Power Bomb finishes detonating, whichever is later. Entrance condition: {
"comeInWithGMode": {
"mode": "any",
"morphed": true
}
}
Requires: {
"not": "f_MaridiaTubeBroken"
}
"h_canArtificialMorphPowerBomb"
Clears obstacles: A |
|
Entrance condition: {
"comeInWithGrappleTeleport": {
"blockPositions": [
[
5,
3
],
[
2,
7
]
]
}
}
|
|
From: 3
Top Right Doorway
To: 6
Above Maridia Tube (locked)
After teleporting, retract Grapple by pressing up. Then if necessary, wiggle right out of the wall by turning around a few times. Entrance condition: {
"comeInWithGrappleTeleport": {
"blockPositions": [
[
3,
12
],
[
3,
13
]
]
}
}
|
|
From: 3
Top Right Doorway
To: 7
Below Maridia Tube (locked)
Entrance condition: {
"comeInWithStoredFallSpeed": {
"fallSpeedInTiles": 1
}
}
Requires: "canMoonfall" |
|
Entrance condition: {
"comeInWithGMode": {
"mode": "any",
"morphed": false
},
"comesThroughToilet": "any"
}
Requires: "f_MaridiaTubeBroken" Exit condition: {
"leaveWithGMode": {
"morphed": false
}
}
|
|
From: 4
Top Door
To: 1
Left Doorway
Entrance condition: {
"comeInWithGMode": {
"mode": "any",
"morphed": true
},
"comesThroughToilet": "any"
}
Requires: "f_MaridiaTubeBroken" Exit condition: {
"leaveWithGMode": {
"morphed": true
}
}
|
|
From: 4
Top Door
To: 3
Top Right Doorway
Entrance condition: {
"comeInWithGMode": {
"mode": "any",
"morphed": false
},
"comesThroughToilet": "any"
}
Requires: "f_MaridiaTubeBroken" Exit condition: {
"leaveWithGMode": {
"morphed": false
}
}
|
|
From: 4
Top Door
To: 3
Top Right Doorway
Entrance condition: {
"comeInWithGMode": {
"mode": "any",
"morphed": true
},
"comesThroughToilet": "any"
}
Requires: "f_MaridiaTubeBroken" Exit condition: {
"leaveWithGMode": {
"morphed": true
}
}
|
|
|
|
The tube will break when exiting G-Mode or when the Power Bomb finishes detonating, whichever is later. Be sure not to overload PLMs with the camera scroll blocks which are next to the tube. It is possible to exit G-Mode before the Power Bomb goes off to be safe. Entrance condition: {
"comeInWithGMode": {
"mode": "any",
"morphed": true
},
"comesThroughToilet": "any"
}
Requires: {
"not": "f_MaridiaTubeBroken"
}
"h_canArtificialMorphPowerBomb"
Clears obstacles: A |
|
|
|
|
|
From: 5
Inside Maridia Tube (locked)
To: 4
Top Door
Jump as the first action after breaking the tube to gravity jump to the top of the room. Open the door and go through it during the ascent. This can only be attempted once. Requires: "f_MaridiaTubeBroken"
{
"obstaclesCleared": [
"A"
]
}
"canRiskPermanentLossOfAccess"
"canSuitlessMaridia"
"canTrickyJump"
|
|
From: 5
Inside Maridia Tube (locked)
To: 5
Inside Maridia Tube (locked)
Requires: {
"not": "f_MaridiaTubeBroken"
}
"h_canUsePowerBombs"
Clears obstacles: A |
|
Requires: "f_MaridiaTubeBroken" "Gravity" |
|
From: 5
Inside Maridia Tube (locked)
To: 6
Above Maridia Tube (locked)
Doesn't require canSuitlessMaridia because there is no risk, nor anything tricky whatsoever. Requires: "f_MaridiaTubeBroken" "HiJump" |
|
From: 5
Inside Maridia Tube (locked)
To: 6
Above Maridia Tube (locked)
Requires: "f_MaridiaTubeBroken" "canSuitlessMaridia" "canSpringBallJumpMidAir" |
|
Requires: "f_MaridiaTubeBroken" |
|
Requires: "Gravity" |
|
Doesn't require canSuitlessMaridia because there is no risk, nor anything tricky whatsoever. Requires: "HiJump" |
|
Requires: "canSuitlessMaridia" "canSpringBallJumpMidAir" |
|
Until the tube is broken there is no water in this room. Requires: {
"not": "f_MaridiaTubeBroken"
}
"canRiskPermanentLossOfAccess"
|
|
Requires: "f_MaridiaTubeBroken" |
|
From: 6
Above Maridia Tube (locked)
To: 5
Inside Maridia Tube (locked)
Notable: true 
Unmorph once fully underneath the rightside slope to clip. Requires: "Morph" |
|
From: 6
Above Maridia Tube (locked)
To: 5
Inside Maridia Tube (locked)
Notable: true
Wedge Samus under the right side slope with either a very clean low jump or tunnel crawl movements. Once deep enough, the clip will happen automatically. Requires: "canTunnelCrawl" |
|
From: 6
Above Maridia Tube (locked)
To: 6
Above Maridia Tube (locked)
Requires: {
"not": "f_MaridiaTubeBroken"
}
"h_canUsePowerBombs"
Clears obstacles: A |
|
|
|
Requires: "f_MaridiaTubeBroken" Resets obstacles: A |
|
Requires: {
"obstaclesCleared": [
"A"
]
}
Clears obstacles: f_MaridiaTubeBroken |
|
|
|
Requires: {
"obstaclesCleared": [
"A"
]
}
Clears obstacles: f_MaridiaTubeBroken |
|
|
|
Requires: {
"or": [
"h_canUsePowerBombs",
{
"obstaclesCleared": [
"A"
]
}
]
}
Clears obstacles: f_MaridiaTubeBroken |
|
|
|
Only requires a runway of 1 tile in the adjacent room. This strat is slightly easier on the right side at low run speeds, but the same otherwise. Entrance condition: {
"comeInJumping": {
"speedBooster": false,
"minTiles": 0.4375
}
}
Requires: {
"obstaclesCleared": [
"f_MaridiaTubeBroken"
]
}
"canCrossRoomJumpIntoWater"
"canTrickyJump"
|
|
Only requires a runway of 7 tiles in the adjacent room, but an extra tile makes for an easier jump. Entrance condition: {
"comeInJumping": {
"speedBooster": true,
"minTiles": 7.4375
}
}
Requires: {
"obstaclesCleared": [
"f_MaridiaTubeBroken"
]
}
"canCrossRoomJumpIntoWater"
|
|
From: 2
Bottom Right Door
To: 1
Left Doorway
Entrance condition: {
"comeInWithGMode": {
"mode": "any",
"morphed": false
}
}
Requires: {
"obstaclesCleared": [
"f_MaridiaTubeBroken"
]
}
Exit condition: {
"leaveWithGMode": {
"morphed": false
}
}
|
|
From: 2
Bottom Right Door
To: 1
Left Doorway
Entrance condition: {
"comeInWithGMode": {
"mode": "any",
"morphed": true
}
}
Requires: {
"obstaclesCleared": [
"f_MaridiaTubeBroken"
]
}
{
"or": [
{
"and": [
"Gravity",
"h_canArtificialMorphMovement"
]
},
{
"and": [
"canSuitlessMaridia",
"h_canArtificialMorphSpringBall",
"HiJump"
]
}
]
}
Exit condition: {
"leaveWithGMode": {
"morphed": true
}
}
|
|
From: 2
Bottom Right Door
To: 3
Top Right Doorway
Entrance condition: {
"comeInWithGMode": {
"mode": "any",
"morphed": false
}
}
Requires: {
"obstaclesCleared": [
"f_MaridiaTubeBroken"
]
}
Exit condition: {
"leaveWithGMode": {
"morphed": false
}
}
|
|
From: 2
Bottom Right Door
To: 3
Top Right Doorway
Entrance condition: {
"comeInWithGMode": {
"mode": "any",
"morphed": true
}
}
Requires: {
"obstaclesCleared": [
"f_MaridiaTubeBroken"
]
}
{
"or": [
{
"and": [
"Gravity",
"h_canArtificialMorphMovement"
]
},
{
"and": [
"canSuitlessMaridia",
"h_canArtificialMorphSpringBall",
"HiJump"
]
}
]
}
Exit condition: {
"leaveWithGMode": {
"morphed": true
}
}
|
|
From: 2
Bottom Right Door
To: 4
Top Door
Notable: true
Requires a runway of at least 18 tiles in the adjacent room. Ride up the right wall just above the doorway, then turnaround before and after hitting the platform following the doorway slope. Continue up the rest of the way to reach the door. Entrance condition: {
"comeInJumping": {
"speedBooster": true,
"minTiles": 18
}
}
Requires: {
"obstaclesCleared": [
"f_MaridiaTubeBroken"
]
}
"canCrossRoomJumpIntoWater"
"canMomentumConservingTurnaround"
"canTrickyDashJump"
"canInsaneJump"
|
|
Assumes a runway of at least 21 tiles in the adjacent room. End Samus' momentum where no platforms are over head. Shoot the door while rising to pass through. Entrance condition: {
"comeInJumping": {
"speedBooster": true,
"minTiles": 21
}
}
Requires: {
"obstaclesCleared": [
"f_MaridiaTubeBroken"
]
}
"canCrossRoomJumpIntoWater"
"canMidairWiggle"
"canTrickyJump"
|
|
Only requires a runway of one tile in the adjacent room. This strat is slightly easier on the right side at low run speeds, but the same otherwise. Entrance condition: {
"comeInJumping": {
"speedBooster": false,
"minTiles": 0.4375
}
}
Requires: {
"obstaclesCleared": [
"f_MaridiaTubeBroken"
]
}
"canCrossRoomJumpIntoWater"
"canTrickyJump"
|
|
Only requires a runway of 7 tiles in the adjacent room, but an extra tile makes for an easier jump. Entrance condition: {
"comeInJumping": {
"speedBooster": true,
"minTiles": 7.4375
}
}
Requires: {
"obstaclesCleared": [
"f_MaridiaTubeBroken"
]
}
"canCrossRoomJumpIntoWater"
|
|
Entrance condition: {
"comeInWithGMode": {
"mode": "any",
"morphed": false
},
"comesThroughToilet": "any"
}
Requires: {
"obstaclesCleared": [
"f_MaridiaTubeBroken"
]
}
Exit condition: {
"leaveWithGMode": {
"morphed": false
}
}
|
|
From: 4
Top Door
To: 1
Left Doorway
Entrance condition: {
"comeInWithGMode": {
"mode": "any",
"morphed": true
},
"comesThroughToilet": "any"
}
Requires: {
"obstaclesCleared": [
"f_MaridiaTubeBroken"
]
}
Exit condition: {
"leaveWithGMode": {
"morphed": true
}
}
|
|
From: 4
Top Door
To: 3
Top Right Doorway
Entrance condition: {
"comeInWithGMode": {
"mode": "any",
"morphed": false
},
"comesThroughToilet": "any"
}
Requires: {
"obstaclesCleared": [
"f_MaridiaTubeBroken"
]
}
Exit condition: {
"leaveWithGMode": {
"morphed": false
}
}
|
|
From: 4
Top Door
To: 3
Top Right Doorway
Entrance condition: {
"comeInWithGMode": {
"mode": "any",
"morphed": true
},
"comesThroughToilet": "any"
}
Requires: {
"obstaclesCleared": [
"f_MaridiaTubeBroken"
]
}
Exit condition: {
"leaveWithGMode": {
"morphed": true
}
}
|
|
From: 5
Inside Maridia Tube (locked)
To: 4
Top Door
Jump as the first action after breaking the tube to gravity jump to the top of the room. Open the door and go through it during the ascent. This can only be attempted once. Requires: {
"obstaclesCleared": [
"f_MaridiaTubeBroken"
]
}
{
"obstaclesCleared": [
"A"
]
}
"canRiskPermanentLossOfAccess"
"canSuitlessMaridia"
"canTrickyJump"
|
|
Requires: {
"obstaclesCleared": [
"f_MaridiaTubeBroken"
]
}
"Gravity"
|
|
From: 5
Inside Maridia Tube (locked)
To: 6
Above Maridia Tube (locked)
Doesn't require canSuitlessMaridia because there is no risk, nor anything tricky whatsoever. Requires: {
"obstaclesCleared": [
"f_MaridiaTubeBroken"
]
}
"HiJump"
|
|
From: 5
Inside Maridia Tube (locked)
To: 6
Above Maridia Tube (locked)
Requires: {
"obstaclesCleared": [
"f_MaridiaTubeBroken"
]
}
"canSuitlessMaridia"
"canSpringBallJumpMidAir"
|
|
Requires: {
"obstaclesCleared": [
"f_MaridiaTubeBroken"
]
}
|
|
Requires: {
"obstaclesCleared": [
"f_MaridiaTubeBroken"
]
}
|
|
Requires: {
"obstaclesCleared": [
"f_MaridiaTubeBroken"
]
}
Resets obstacles: A |
{
"$schema": "../../../schema/m3-room.schema.json",
"id": 170,
"name": "Glass Tunnel",
"area": "Maridia",
"subarea": "Outer",
"playable": true,
"roomAddress": "0x7CEFB",
"roomEnvironments": [
{
"heated": false
}
],
"nodes": [
{
"id": 1,
"name": "Left Doorway",
"nodeType": "door",
"nodeSubType": "doorway",
"nodeAddress": "0x001a33c",
"doorEnvironments": [
{
"physics": "water",
"note": "It has normal physics before the tube is broken, but that can be lost forever."
}
]
},
{
"id": 2,
"name": "Bottom Right Door",
"nodeType": "door",
"nodeSubType": "red",
"nodeAddress": "0x001a354",
"doorEnvironments": [
{
"physics": "water",
"note": "It has normal physics before the tube is broken, but that can be lost forever."
}
],
"locks": [
{
"name": "Glass Tunnel Red Lock (to Save)",
"lockType": "coloredDoor",
"unlockStrats": [
{
"name": "Base",
"notable": false,
"requires": [
"h_canOpenRedDoors"
]
}
]
}
]
},
{
"id": 3,
"name": "Top Right Doorway",
"nodeType": "door",
"nodeSubType": "doorway",
"nodeAddress": "0x001a348",
"doorEnvironments": [
{
"physics": "water",
"note": "It has normal physics before the tube is broken, but that can be lost forever."
}
]
},
{
"id": 4,
"name": "Top Door",
"nodeType": "door",
"nodeSubType": "blue",
"nodeAddress": "0x001a330",
"doorEnvironments": [
{
"physics": "water",
"note": "It has normal physics before the tube is broken, but that can be lost forever."
}
],
"spawnAt": 6
},
{
"id": 5,
"name": "Inside Maridia Tube (locked)",
"nodeType": "junction",
"nodeSubType": "flag",
"note": "Represents the inside of the tube; unlocking this node breaks the tube"
},
{
"id": 6,
"name": "Above Maridia Tube (locked)",
"nodeType": "junction",
"nodeSubType": "flag",
"note": "Represents the area just above the tube; unlocking this node breaks the tube"
},
{
"id": 7,
"name": "Below Maridia Tube (locked)",
"nodeType": "junction",
"nodeSubType": "flag",
"note": "Represents the area just below the tube; unlocking this node breaks the tube"
},
{
"id": 8,
"name": "Inside Maridia Tube (unlocked)",
"nodeType": "event",
"nodeSubType": "flag",
"yields": [
"f_MaridiaTubeBroken"
],
"note": "Represents the inside of the tube; unlocking this node breaks the tube"
},
{
"id": 9,
"name": "Above Maridia Tube (unlocked)",
"nodeType": "event",
"nodeSubType": "flag",
"yields": [
"f_MaridiaTubeBroken"
],
"note": "Represents the area just above the tube; unlocking this node breaks the tube"
},
{
"id": 10,
"name": "Below Maridia Tube (unlocked)",
"nodeType": "event",
"nodeSubType": "flag",
"yields": [
"f_MaridiaTubeBroken"
],
"note": "Represents the area just below the tube; unlocking this node breaks the tube"
}
],
"enemies": [],
"obstacles": [
{
"id": "A",
"obstacleType": "abstract",
"name": "Breaking the Tube"
},
{
"id": "f_MaridiaTubeBroken",
"name": "f_MaridiaTubeBroken"
}
],
"reusableRoomwideNotable": [
{
"name": "Glass Tunnel Maridia Tube Clip",
"note": [
"Clip into the Maridia Tube from above without needing to break the tube.",
"This can be done with morph by unmorphing under the sloped tiles on the right, or with canTunnelCrawl by wedging Samus under them with a precise low jump and then performing a tunnel crawl."
]
},
{
"name": "Glass Tunnel Grapple Teleport into Grapple Jump (or Tube Intact)",
"note": [
"Swing to the right, shoot open the door above, and grapple jump through it.",
"The grapple beam will need to be retracted while swinging to the right, to avoid bonking on the small platform."
]
}
],
"links": [
{
"from": 1,
"to": [
{
"id": 1
},
{
"id": 3
},
{
"id": 4,
"note": "This link is only for the cross room jump. Other strats should go 1 -> 5 -> 6 -> 4."
},
{
"id": 5
},
{
"id": 7
}
]
},
{
"from": 2,
"to": [
{
"id": 1
},
{
"id": 2
},
{
"id": 3
},
{
"id": 4,
"note": "This link is only for the cross room jump. Other strats should go 2 -> 7 -> 5 -> 6 -> 4."
},
{
"id": 6
},
{
"id": 7
}
]
},
{
"from": 3,
"to": [
{
"id": 1
},
{
"id": 3
},
{
"id": 4,
"note": "This link is only for the cross room jump. Other strats should go 3 -> 5 -> 6 -> 4."
},
{
"id": 5
},
{
"id": 6
},
{
"id": 7
}
]
},
{
"from": 4,
"to": [
{
"id": 1
},
{
"id": 3
},
{
"id": 6
}
]
},
{
"from": 5,
"to": [
{
"id": 1
},
{
"id": 3
},
{
"id": 4
},
{
"id": 5
},
{
"id": 6
},
{
"id": 7
}
]
},
{
"from": 6,
"to": [
{
"id": 4
},
{
"id": 5
},
{
"id": 6
}
]
},
{
"from": 7,
"to": [
{
"id": 2
},
{
"id": 5
}
]
}
],
"strats": [
{
"link": [
1,
1
],
"name": "Leave with Runway",
"requires": [],
"exitCondition": {
"leaveWithRunway": {
"length": 3,
"openEnd": 1
}
}
},
{
"link": [
1,
1
],
"name": "Crystal Flash",
"requires": [
"h_canCrystalFlash"
]
},
{
"link": [
1,
1
],
"name": "Leave with Runway, Tube Not Broken",
"requires": [
{
"not": "f_MaridiaTubeBroken"
},
"canRiskPermanentLossOfAccess"
],
"exitCondition": {
"leaveWithRunway": {
"length": 14,
"openEnd": 0
}
},
"devNote": "FIXME: Needs a way to represent that this runway has an 'air' environment."
},
{
"link": [
1,
3
],
"name": "Shinespark Through Room",
"entranceCondition": {
"comeInWithSpark": {}
},
"requires": [
{
  "or": [
    {
      "shinespark": {
        "frames": 24
      }
    },
    {
      "and": [
        "Gravity",
        {
          "shinespark": {
            "frames": 21
          }
        }
      ]
    },
    {
      "and": [
        {
          "not": "f_MaridiaTubeBroken"
        },
        "canRiskPermanentLossOfAccess",
        {
          "shinespark": {
            "frames": 21
          }
        }
      ]
    }
  ]
}
],
"exitCondition": {
"leaveWithSpark": {}
}
},
{
"link": [
1,
3
],
"name": "Come In Shinecharging, Leave Shinecharged, Tube Not Broken",
"entranceCondition": {
"comeInShinecharging": {
"length": 13,
"openEnd": 0
}
},
"requires": [
{
"not": "f_MaridiaTubeBroken"
},
"canRiskPermanentLossOfAccess"
],
"exitCondition": {
"leaveShinecharged": {
"framesRemaining": 179
}
}
},
{
"link": [
1,
3
],
"name": "Carry G-Mode Through Tube (Left to Right)",
"notable": false,
"entranceCondition": {
"comeInWithGMode": {
"mode": "any",
"morphed": false
}
},
"requires": [],
"exitCondition": {
"leaveWithGMode": {
"morphed": false
}
}
},
{
"link": [
1,
3
],
"name": "Carry G-Mode Morph Through Tube (Left to Right)",
"notable": false,
"entranceCondition": {
"comeInWithGMode": {
"mode": "any",
"morphed": true
}
},
"requires": [
{
  "or": [
    "Morph",
    "h_canArtificialMorphSpringBall",
    {
      "and": [
        "Gravity",
        "h_canArtificialMorphIBJ"
      ]
    },
    {
      "and": [
        "Gravity",
        "h_canArtificialMorphBombHorizontally",
        "h_canArtificialMorphBombThings"
      ]
    },
    {
      "and": [
        {
          "not": "f_MaridiaTubeBroken"
        },
        "canRiskPermanentLossOfAccess"
      ]
    }
  ]
}
],
"exitCondition": {
"leaveWithGMode": {
"morphed": true
}
},
"devNote": [
"Bomb jumping across the broken tube uses a second bomb to climb up to the tube.",
"FIXME: Moving before the bomb explodes gives enough momentum to only need one power bomb."
]
},
{
"link": [
1,
3
],
"name": "Transition with Stored Fall Speed",
"entranceCondition": {
"comeInWithStoredFallSpeed": {
"fallSpeedInTiles": 1
}
},
"requires": [
{
"not": "f_MaridiaTubeBroken"
},
"canRiskPermanentLossOfAccess"
],
"exitCondition": {
"leaveWithStoredFallSpeed": {
"fallSpeedInTiles": 1
}
},
"unlocksDoors": [
{
"types": [
"missiles",
"super"
],
"requires": []
},
{
"types": [
"powerbomb"
],
"requires": [
"never"
]
}
]
},
{
"link": [
1,
3
],
"name": "Transition with Stored Fall Speed (more speed)",
"entranceCondition": {
"comeInWithStoredFallSpeed": {
"fallSpeedInTiles": 2
}
},
"requires": [
{
"not": "f_MaridiaTubeBroken"
},
"canRiskPermanentLossOfAccess"
],
"exitCondition": {
"leaveWithStoredFallSpeed": {
"fallSpeedInTiles": 2
}
},
"unlocksDoors": [
{
"types": [
"missiles",
"super"
],
"requires": []
},
{
"types": [
"powerbomb"
],
"requires": [
"never"
]
}
]
},
{
"link": [
1,
4
],
"name": "Tricky Cross Room Jump",
"entranceCondition": {
"comeInJumping": {
"speedBooster": false,
"minTiles": 0.4375
}
},
"requires": [
"f_MaridiaTubeBroken",
"canCrossRoomJumpIntoWater",
"canTrickyJump"
],
"note": [
"Only requires a runway of 1 tile in the adjacent room.",
"This strat is slightly easier on the right side at low run speeds, but the same otherwise."
]
},
{
"link": [
1,
4
],
"name": "Cross Room Speedy Jump",
"entranceCondition": {
"comeInJumping": {
"speedBooster": true,
"minTiles": 7.4375
}
},
"requires": [
"f_MaridiaTubeBroken",
"canCrossRoomJumpIntoWater"
],
"note": [
"Only requires a runway of 7 tiles in the adjacent room, but an extra tile makes for an easier jump."
]
},
{
"link": [
1,
5
],
"name": "Base",
"requires": []
},
{
"link": [
1,
5
],
"name": "G-Mode Morph Power Bomb",
"entranceCondition": {
"comeInWithGMode": {
"mode": "any",
"morphed": true
}
},
"requires": [
{
"not": "f_MaridiaTubeBroken"
},
"h_canArtificialMorphPowerBomb"
],
"clearsObstacles": [
"A"
],
"note": "The tube will break when exiting G-Mode or when the Power Bomb finishes detonating, whichever is later."
},
{
"link": [
1,
7
],
"name": "Stored Moonfall Clip",
"entranceCondition": {
"comeInWithStoredFallSpeed": {
"fallSpeedInTiles": 1
}
},
"requires": [
"canMoonfall"
]
},
{
"link": [
2,
1
],
"name": "Carry G-Mode Through Tube (Bottom to Left)",
"notable": false,
"entranceCondition": {
"comeInWithGMode": {
"mode": "any",
"morphed": false
}
},
"requires": [
"f_MaridiaTubeBroken"
],
"exitCondition": {
"leaveWithGMode": {
"morphed": false
}
}
},
{
"link": [
2,
1
],
"name": "Carry G-Mode Morph Through Tube (Bottom to Left)",
"notable": false,
"entranceCondition": {
"comeInWithGMode": {
"mode": "any",
"morphed": true
}
},
"requires": [
"f_MaridiaTubeBroken",
{
"or": [
{
"and": [
"Gravity",
"h_canArtificialMorphMovement"
]
},
{
"and": [
"canSuitlessMaridia",
"h_canArtificialMorphSpringBall",
"HiJump"
]
}
]
}
],
"exitCondition": {
"leaveWithGMode": {
"morphed": true
}
}
},
{
"link": [
2,
1
],
"name": "Grapple Teleport",
"entranceCondition": {
"comeInWithGrappleTeleport": {
"blockPositions": [
[
2,
18
],
[
2,
19
],
[
2,
28
],
[
2,
29
]
]
}
},
"requires": [],
"bypassesDoorShell": true,
"devNote": [
"Though there is no door shell here, this strat is included for completeness in case a randomizer adds a door shell where bypassing it could be useful."
]
},
{
"link": [
2,
1
],
"name": "Carry Grapple Teleport (Top Position)",
"entranceCondition": {
"comeInWithGrappleTeleport": {
"blockPositions": [
[
2,
18
]
]
}
},
"requires": [],
"bypassesDoorShell": true,
"exitCondition": {
"leaveWithGrappleTeleport": {
"blockPositions": [
[
2,
18
]
]
}
}
},
{
"link": [
2,
1
],
"name": "Carry Grapple Teleport (Upper Middle Position)",
"entranceCondition": {
"comeInWithGrappleTeleport": {
"blockPositions": [
[
2,
19
]
]
}
},
"requires": [],
"bypassesDoorShell": true,
"exitCondition": {
"leaveWithGrappleTeleport": {
"blockPositions": [
[
2,
19
]
]
}
}
},
{
"link": [
2,
1
],
"name": "Carry Grapple Teleport (Lower Middle Position)",
"entranceCondition": {
"comeInWithGrappleTeleport": {
"blockPositions": [
[
2,
28
]
]
}
},
"requires": [],
"bypassesDoorShell": true,
"exitCondition": {
"leaveWithGrappleTeleport": {
"blockPositions": [
[
2,
28
]
]
}
}
},
{
"link": [
2,
1
],
"name": "Carry Grapple Teleport (Bottom Position)",
"entranceCondition": {
"comeInWithGrappleTeleport": {
"blockPositions": [
[
2,
29
]
]
}
},
"requires": [],
"bypassesDoorShell": true,
"exitCondition": {
"leaveWithGrappleTeleport": {
"blockPositions": [
[
2,
29
]
]
}
}
},
{
"link": [
2,
1
],
"name": "Grapple Teleport X-Ray Climb",
"entranceCondition": {
"comeInWithGrappleTeleport": {
"blockPositions": [
[
2,
34
]
]
}
},
"requires": [
"canXRayClimb"
],
"bypassesDoorShell": true,
"note": [
"Exit the previous room with Samus in a standing pose (while grappled).",
"After teleporting, press right to release Grapple while staying standing (not being forced into a crouch).",
"Then X-ray climb to get up to the door transition, without needing to open the door."
]
},
{
"link": [
2,
2
],
"name": "Leave with Runway",
"requires": [],
"exitCondition": {
"leaveWithRunway": {
"length": 5,
"openEnd": 1
}
}
},
{
"link": [
2,
2
],
"name": "Leave with Runway, Tube Not Broken",
"requires": [
{
"not": "f_MaridiaTubeBroken"
},
"canRiskPermanentLossOfAccess"
],
"exitCondition": {
"leaveWithRunway": {
"length": 5,
"openEnd": 1
}
},
"devNote": "FIXME: Needs a way to represent that this runway has an 'air' environment."
},
{
"link": [
2,
3
],
"name": "G-Mode Deep Stuck X-Ray Climb",
"entranceCondition": {
"comeInWithGMode": {
"mode": "direct",
"morphed": false
}
},
"requires": [
"canXRayClimb"
],
"note": "Climb up 1 screen."
},
{
"link": [
2,
3
],
"name": "Shinespark Deep Stuck X-Ray Climb",
"entranceCondition": {
"comeInShinecharged": {
"framesRequired": 1
}
},
"requires": [
{
"shinespark": {
"frames": 1,
"excessFrames": 1
}
},
"canShinesparkDeepStuck",
"canXRayClimb"
],
"note": "Climb up 1 screen."
},
{
"link": [
2,
3
],
"name": "Carry G-Mode Through Tube (Bottom to Right)",
"notable": false,
"entranceCondition": {
"comeInWithGMode": {
"mode": "any",
"morphed": false
}
},
"requires": [
"f_MaridiaTubeBroken"
],
"exitCondition": {
"leaveWithGMode": {
"morphed": false
}
}
},
{
"link": [
2,
3
],
"name": "Carry G-Mode Morph Through Tube (Bottom to Right)",
"notable": false,
"entranceCondition": {
"comeInWithGMode": {
"mode": "any",
"morphed": true
}
},
"requires": [
"f_MaridiaTubeBroken",
{
"or": [
{
"and": [
"Gravity",
"h_canArtificialMorphMovement"
]
},
{
"and": [
"canSuitlessMaridia",
"h_canArtificialMorphSpringBall",
"HiJump"
]
}
]
}
],
"exitCondition": {
"leaveWithGMode": {
"morphed": true
}
}
},
{
"link": [
2,
4
],
"name": "Glass Tunnel Cross Room Platform Stuck Wiggle to Top Door",
"notable": true,
"entranceCondition": {
"comeInJumping": {
"speedBooster": true,
"minTiles": 18
}
},
"requires": [
"f_MaridiaTubeBroken",
"canCrossRoomJumpIntoWater",
"canMomentumConservingTurnaround",
"canTrickyDashJump",
"canInsaneJump"
],
"note": [
"Requires a runway of at least 18 tiles in the adjacent room.",
"Ride up the right wall just above the doorway, then turnaround before and after hitting the platform following the doorway slope.",
"Continue up the rest of the way to reach the door."
],
"unlocksDoors": [
{
"types": [
"super"
],
"requires": []
},
{
"types": [
"missiles",
"powerbomb"
],
"requires": [
"never"
]
}
]
},
{
"link": [
2,
4
],
"name": "Cross Room Jump with Speedbooster",
"entranceCondition": {
"comeInJumping": {
"speedBooster": true,
"minTiles": 21
}
},
"requires": [
"f_MaridiaTubeBroken",
"canCrossRoomJumpIntoWater",
"canMidairWiggle",
"canTrickyJump"
],
"note": [
"Assumes a runway of at least 21 tiles in the adjacent room.",
"End Samus' momentum where no platforms are over head.",
"Shoot the door while rising to pass through."
],
"unlocksDoors": [
{
"types": [
"super"
],
"requires": []
},
{
"types": [
"missiles",
"powerbomb"
],
"requires": [
"never"
]
}
]
},
{
"link": [
2,
4
],
"name": "Glass Tunnel Grapple Teleport into Grapple Jump or Tube Intact (Lower Entrance)",
"notable": true,
"entranceCondition": {
"comeInWithGrappleTeleport": {
"blockPositions": [
[
5,
3
]
]
}
},
"requires": [
{
"doorUnlockedAtNode": 4
},
{
"or": [
{
"and": [
"canMidairWiggle",
"canTrickyGrappleJump",
"canInsaneJump"
]
},
{
"and": [
{
"not": "f_MaridiaTubeBroken"
},
"canRiskPermanentLossOfAccess"
]
}
]
}
],
"unlocksDoors": [
{
"types": [
"super"
],
"requires": []
},
{
"types": [
"missiles",
"powerbomb"
],
"requires": [
"never"
]
}
],
"reusableRoomwideNotable": "Glass Tunnel Grapple Teleport into Grapple Jump (or Tube Intact)",
"note": [
"Swing to the right, shoot open the door above, and grapple jump through it.",
"The grapple beam will need to be retracted while swinging to the right, to avoid bonking on the small platform."
],
"devNote": [
"FIXME: Add a version of this with an exit condition for grapple jumping through the transition.",
"FIXME: Add a canRiskPermanentLossOfAccess variation coming from Moat, which only works if door is not blue."
]
},
{
"link": [
2,
6
],
"name": "Grapple Teleport",
"entranceCondition": {
"comeInWithGrappleTeleport": {
"blockPositions": [
[
5,
3
],
[
7,
2
]
]
}
},
"requires": []
},
{
"link": [
2,
6
],
"name": "Grapple Teleport Inside Wall",
"entranceCondition": {
"comeInWithGrappleTeleport": {
"blockPositions": [
[
3,
12
],
[
3,
13
]
]
}
},
"requires": [],
"note": [
"After teleporting, retract Grapple by pressing up.",
"Then if necessary, wiggle right out of the wall by turning around a few times."
]
},
{
"link": [
2,
7
],
"name": "Base",
"requires": []
},
{
"link": [
2,
7
],
"name": "G-Mode Morph Power Bomb",
"entranceCondition": {
"comeInWithGMode": {
"mode": "any",
"morphed": true
}
},
"requires": [
{
"not": "f_MaridiaTubeBroken"
},
"h_canArtificialMorphPowerBomb",
"h_canArtificialMorphMovement"
],
"clearsObstacles": [
"A"
],
"note": "The tube will break when exiting G-Mode or when the Power Bomb finishes detonating, whichever is later."
},
{
"link": [
3,
1
],
"name": "Shinespark Through Room",
"entranceCondition": {
"comeInWithSpark": {}
},
"requires": [
{
  "or": [
    {
      "shinespark": {
        "frames": 24
      }
    },
    {
      "and": [
        "Gravity",
        {
          "shinespark": {
            "frames": 21
          }
        }
      ]
    },
    {
      "and": [
        {
          "not": "f_MaridiaTubeBroken"
        },
        "canRiskPermanentLossOfAccess",
        {
          "shinespark": {
            "frames": 21
          }
        }
      ]
    }
  ]
}
],
"exitCondition": {
"leaveWithSpark": {}
}
},
{
"link": [
3,
1
],
"name": "Come In Shinecharging, Leave Shinecharged, Tube Not Broken",
"entranceCondition": {
"comeInShinecharging": {
"length": 13,
"openEnd": 0
}
},
"requires": [
{
"not": "f_MaridiaTubeBroken"
},
"canRiskPermanentLossOfAccess"
],
"exitCondition": {
"leaveShinecharged": {
"framesRemaining": 179
}
}
},
{
"link": [
3,
1
],
"name": "Carry G-Mode Through Tube (Right to Left)",
"notable": false,
"entranceCondition": {
"comeInWithGMode": {
"mode": "any",
"morphed": false
}
},
"requires": [],
"exitCondition": {
"leaveWithGMode": {
"morphed": false
}
}
},
{
"link": [
3,
1
],
"name": "Carry G-Mode Morph Through Tube (Right to Left)",
"notable": false,
"entranceCondition": {
"comeInWithGMode": {
"mode": "any",
"morphed": true
}
},
"requires": [
{
  "or": [
    "Morph",
    "h_canArtificialMorphSpringBall",
    {
      "and": [
        "Gravity",
        "h_canArtificialMorphIBJ"
      ]
    },
    {
      "and": [
        "Gravity",
        "h_canArtificialMorphBombHorizontally",
        "h_additionalBomb"
      ]
    },
    {
      "and": [
        {
          "not": "f_MaridiaTubeBroken"
        },
        "canRiskPermanentLossOfAccess"
      ]
    }
  ]
}
],
"exitCondition": {
"leaveWithGMode": {
"morphed": true
}
},
"devNote": [
"Bomb jumping across the broken tube uses a second bomb to climb up to the tube.",
"FIXME: Moving before the bomb explodes gives enough momentum to only need one power bomb."
]
},
{
"link": [
3,
1
],
"name": "Transition with Stored Fall Speed",
"entranceCondition": {
"comeInWithStoredFallSpeed": {
"fallSpeedInTiles": 1
}
},
"requires": [
{
"not": "f_MaridiaTubeBroken"
},
"canRiskPermanentLossOfAccess"
],
"exitCondition": {
"leaveWithStoredFallSpeed": {
"fallSpeedInTiles": 1
}
},
"unlocksDoors": [
{
"types": [
"missiles",
"super"
],
"requires": []
},
{
"types": [
"powerbomb"
],
"requires": [
"never"
]
}
]
},
{
"link": [
3,
1
],
"name": "Transition with Stored Fall Speed (more speed)",
"entranceCondition": {
"comeInWithStoredFallSpeed": {
"fallSpeedInTiles": 2
}
},
"requires": [
{
"not": "f_MaridiaTubeBroken"
},
"canRiskPermanentLossOfAccess"
],
"exitCondition": {
"leaveWithStoredFallSpeed": {
"fallSpeedInTiles": 2
}
},
"unlocksDoors": [
{
"types": [
"missiles",
"super"
],
"requires": []
},
{
"types": [
"powerbomb"
],
"requires": [
"never"
]
}
]
},
{
"link": [
3,
1
],
"name": "Grapple Teleport",
"entranceCondition": {
"comeInWithGrappleTeleport": {
"blockPositions": [
[
2,
18
],
[
2,
19
],
[
2,
28
],
[
2,
29
]
]
}
},
"requires": [],
"bypassesDoorShell": true,
"devNote": [
"Though there is no door shell here, this strat is included for completeness in case a randomizer adds a door shell where bypassing it could be useful."
]
},
{
"link": [
3,
1
],
"name": "Carry Grapple Teleport (Top Position)",
"entranceCondition": {
"comeInWithGrappleTeleport": {
"blockPositions": [
[
2,
18
]
]
}
},
"requires": [],
"bypassesDoorShell": true,
"exitCondition": {
"leaveWithGrappleTeleport": {
"blockPositions": [
[
2,
18
]
]
}
}
},
{
"link": [
3,
1
],
"name": "Carry Grapple Teleport (Upper Middle Position)",
"entranceCondition": {
"comeInWithGrappleTeleport": {
"blockPositions": [
[
2,
19
]
]
}
},
"requires": [],
"bypassesDoorShell": true,
"exitCondition": {
"leaveWithGrappleTeleport": {
"blockPositions": [
[
2,
19
]
]
}
}
},
{
"link": [
3,
1
],
"name": "Carry Grapple Teleport (Lower Middle Position)",
"entranceCondition": {
"comeInWithGrappleTeleport": {
"blockPositions": [
[
2,
28
]
]
}
},
"requires": [],
"bypassesDoorShell": true,
"exitCondition": {
"leaveWithGrappleTeleport": {
"blockPositions": [
[
2,
28
]
]
}
}
},
{
"link": [
3,
1
],
"name": "Carry Grapple Teleport (Bottom Position)",
"entranceCondition": {
"comeInWithGrappleTeleport": {
"blockPositions": [
[
2,
29
]
]
}
},
"requires": [],
"bypassesDoorShell": true,
"exitCondition": {
"leaveWithGrappleTeleport": {
"blockPositions": [
[
2,
29
]
]
}
}
},
{
"link": [
3,
1
],
"name": "Grapple Teleport X-Ray Climb",
"entranceCondition": {
"comeInWithGrappleTeleport": {
"blockPositions": [
[
2,
34
]
]
}
},
"requires": [
"canXRayClimb"
],
"bypassesDoorShell": true,
"note": [
"Exit the previous room with Samus in a standing pose (while grappled).",
"After teleporting, press right to release Grapple while staying standing (not being forced into a crouch).",
"Then X-ray climb to get up to the door transition, without needing to open the door."
],
"devNote": [
"This strat is only useful if the room were modified to have a door lock on the left."
]
},
{
"link": [
3,
3
],
"name": "Leave with Runway",
"requires": [],
"exitCondition": {
"leaveWithRunway": {
"length": 3,
"openEnd": 1
}
}
},
{
"link": [
3,
3
],
"name": "Leave with Runway, Tube Not Broken",
"requires": [
{
"not": "f_MaridiaTubeBroken"
},
"canRiskPermanentLossOfAccess"
],
"exitCondition": {
"leaveWithRunway": {
"length": 14,
"openEnd": 0
}
},
"devNote": "FIXME: Needs a way to represent that this runway has an 'air' environment."
},
{
"link": [
3,
4
],
"name": "Tricky Cross Room Jump",
"entranceCondition": {
"comeInJumping": {
"speedBooster": false,
"minTiles": 0.4375
}
},
"requires": [
"f_MaridiaTubeBroken",
"canCrossRoomJumpIntoWater",
"canTrickyJump"
],
"note": [
"Only requires a runway of one tile in the adjacent room.",
"This strat is slightly easier on the right side at low run speeds, but the same otherwise."
]
},
{
"link": [
3,
4
],
"name": "Cross Room Speedy Jump",
"entranceCondition": {
"comeInJumping": {
"speedBooster": true,
"minTiles": 7.4375
}
},
"requires": [
"f_MaridiaTubeBroken",
"canCrossRoomJumpIntoWater"
],
"note": [
"Only requires a runway of 7 tiles in the adjacent room, but an extra tile makes for an easier jump."
]
},
{
"link": [
3,
4
],
"name": "Glass Tunnel Grapple Teleport into Grapple Jump or Tube Intact (Right Entrance)",
"notable": true,
"entranceCondition": {
"comeInWithGrappleTeleport": {
"blockPositions": [
[
5,
3
]
]
}
},
"requires": [
{
"doorUnlockedAtNode": 4
},
{
"or": [
{
"and": [
"canMidairWiggle",
"canTrickyGrappleJump",
"canInsaneJump"
]
},
{
"and": [
{
"not": "f_MaridiaTubeBroken"
},
"canRiskPermanentLossOfAccess"
]
}
]
}
],
"unlocksDoors": [
{
"types": [
"super"
],
"requires": []
},
{
"types": [
"missiles",
"powerbomb"
],
"requires": [
"never"
]
}
],
"reusableRoomwideNotable": "Glass Tunnel Grapple Teleport into Grapple Jump (or Tube Intact)",
"note": [
"Swing to the right, shoot open the door above, and grapple jump through it.",
"The grapple beam will need to be retracted while swinging to the right, to avoid bonking on the small platform."
],
"devNote": [
"FIXME: Add a version of this with an exit condition for grapple jumping through the transition.",
"FIXME: Add a canRiskPermanentLossOfAccess variation coming from Moat, which only works if door is not blue."
]
},
{
"link": [
3,
5
],
"name": "Base",
"requires": []
},
{
"link": [
3,
5
],
"name": "G-Mode Morph Power Bomb",
"entranceCondition": {
"comeInWithGMode": {
"mode": "any",
"morphed": true
}
},
"requires": [
{
"not": "f_MaridiaTubeBroken"
},
"h_canArtificialMorphPowerBomb"
],
"clearsObstacles": [
"A"
],
"note": "The tube will break when exiting G-Mode or when the Power Bomb finishes detonating, whichever is later."
},
{
"link": [
3,
6
],
"name": "Grapple Teleport",
"entranceCondition": {
"comeInWithGrappleTeleport": {
"blockPositions": [
[
5,
3
],
[
2,
7
]
]
}
},
"requires": []
},
{
"link": [
3,
6
],
"name": "Grapple Teleport Inside Wall",
"entranceCondition": {
"comeInWithGrappleTeleport": {
"blockPositions": [
[
3,
12
],
[
3,
13
]
]
}
},
"requires": [],
"note": [
"After teleporting, retract Grapple by pressing up.",
"Then if necessary, wiggle right out of the wall by turning around a few times."
]
},
{
"link": [
3,
7
],
"name": "Stored Moonfall Clip",
"entranceCondition": {
"comeInWithStoredFallSpeed": {
"fallSpeedInTiles": 1
}
},
"requires": [
"canMoonfall"
]
},
{
"link": [
4,
1
],
"name": "Carry G-Mode Through Tube (Top to Left)",
"notable": false,
"entranceCondition": {
"comeInWithGMode": {
"mode": "any",
"morphed": false
},
"comesThroughToilet": "any"
},
"requires": [
"f_MaridiaTubeBroken"
],
"exitCondition": {
"leaveWithGMode": {
"morphed": false
}
}
},
{
"link": [
4,
1
],
"name": "Carry G-Mode Morph Through Tube (Top to Left)",
"notable": false,
"entranceCondition": {
"comeInWithGMode": {
"mode": "any",
"morphed": true
},
"comesThroughToilet": "any"
},
"requires": [
"f_MaridiaTubeBroken"
],
"exitCondition": {
"leaveWithGMode": {
"morphed": true
}
}
},
{
"link": [
4,
3
],
"name": "Carry G-Mode Through Tube (Top to Right)",
"notable": false,
"entranceCondition": {
"comeInWithGMode": {
"mode": "any",
"morphed": false
},
"comesThroughToilet": "any"
},
"requires": [
"f_MaridiaTubeBroken"
],
"exitCondition": {
"leaveWithGMode": {
"morphed": false
}
}
},
{
"link": [
4,
3
],
"name": "Carry G-Mode Morph Through Tube (Top to Right)",
"notable": false,
"entranceCondition": {
"comeInWithGMode": {
"mode": "any",
"morphed": true
},
"comesThroughToilet": "any"
},
"requires": [
"f_MaridiaTubeBroken"
],
"exitCondition": {
"leaveWithGMode": {
"morphed": true
}
}
},
{
"link": [
4,
6
],
"name": "Base",
"requires": []
},
{
"link": [
4,
6
],
"name": "G-Mode Morph Power Bomb",
"entranceCondition": {
"comeInWithGMode": {
"mode": "any",
"morphed": true
},
"comesThroughToilet": "any"
},
"requires": [
{
"not": "f_MaridiaTubeBroken"
},
"h_canArtificialMorphPowerBomb"
],
"clearsObstacles": [
"A"
],
"note": [
"The tube will break when exiting G-Mode or when the Power Bomb finishes detonating, whichever is later.",
"Be sure not to overload PLMs with the camera scroll blocks which are next to the tube.",
"It is possible to exit G-Mode before the Power Bomb goes off to be safe."
]
},
{
"link": [
5,
1
],
"name": "Base",
"requires": []
},
{
"link": [
5,
3
],
"name": "Base",
"requires": []
},
{
"link": [
5,
4
],
"name": "Breaking the Maridia Tube Gravity Jump",
"notable": false,
"requires": [
"f_MaridiaTubeBroken",
{
  "obstaclesCleared": [
    "A"
  ]
},
"canRiskPermanentLossOfAccess",
"canSuitlessMaridia",
"canTrickyJump"
],
"note": [
"Jump as the first action after breaking the tube to gravity jump to the top of the room.",
"Open the door and go through it during the ascent. This can only be attempted once."
],
"devNote": "This strat requires the tube to be broken, while the obstacle being set requires the tube to not yet be broken."
},
{
"link": [
5,
5
],
"name": "Break the Tube with a Power Bomb",
"requires": [
{
"not": "f_MaridiaTubeBroken"
},
"h_canUsePowerBombs"
],
"clearsObstacles": [
"A"
]
},
{
"link": [
5,
6
],
"name": "Base",
"requires": [
"f_MaridiaTubeBroken",
"Gravity"
]
},
{
"link": [
5,
6
],
"name": "Suitless Base",
"requires": [
"f_MaridiaTubeBroken",
"HiJump"
],
"note": "Doesn't require canSuitlessMaridia because there is no risk, nor anything tricky whatsoever."
},
{
"link": [
5,
6
],
"name": "Suitless",
"requires": [
"f_MaridiaTubeBroken",
"canSuitlessMaridia",
"canSpringBallJumpMidAir"
]
},
{
"link": [
5,
7
],
"name": "Base",
"requires": [
"f_MaridiaTubeBroken"
]
},
{
"link": [
6,
4
],
"name": "Base",
"requires": [
"Gravity"
]
},
{
"link": [
6,
4
],
"name": "Suitless Base",
"requires": [
"HiJump"
],
"note": "Doesn't require canSuitlessMaridia because there is no risk, nor anything tricky whatsoever."
},
{
"link": [
6,
4
],
"name": "Suitless",
"requires": [
"canSuitlessMaridia",
"canSpringBallJumpMidAir"
]
},
{
"link": [
6,
4
],
"name": "Tube Intact",
"requires": [
{
"not": "f_MaridiaTubeBroken"
},
"canRiskPermanentLossOfAccess"
],
"note": "Until the tube is broken there is no water in this room."
},
{
"link": [
6,
5
],
"name": "Base",
"requires": [
"f_MaridiaTubeBroken"
]
},
{
"link": [
6,
5
],
"name": "Maridia Tube Unmorph Clip",
"notable": true,
"requires": [
"Morph"
],
"reusableRoomwideNotable": "Glass Tunnel Maridia Tube Clip",
"note": "Unmorph once fully underneath the rightside slope to clip."
},
{
"link": [
6,
5
],
"name": "Maridia Tube Standing Clip",
"notable": true,
"requires": [
"canTunnelCrawl"
],
"reusableRoomwideNotable": "Glass Tunnel Maridia Tube Clip",
"note": [
"Wedge Samus under the right side slope with either a very clean low jump or tunnel crawl movements.",
"Once deep enough, the clip will happen automatically."
]
},
{
"link": [
6,
6
],
"name": "Break the Tube with a Power Bomb",
"requires": [
{
"not": "f_MaridiaTubeBroken"
},
"h_canUsePowerBombs"
],
"clearsObstacles": [
"A"
]
},
{
"link": [
7,
2
],
"name": "Base",
"requires": []
},
{
"link": [
7,
5
],
"name": "Base",
"requires": [
"f_MaridiaTubeBroken"
],
"resetsObstacles": [
"A"
],
"devNote": "The obstacle is reset, as 7 is too low to jump to 4."
},
{
"name": "Base",
"notable": false,
"requires": [
{
  "obstaclesCleared": [
    "A"
  ]
}
],
"link": [
5,
8
],
"clearsObstacles": [
"f_MaridiaTubeBroken"
]
},
{
"link": [
8,
5
],
"name": "Base",
"notable": false,
"requires": []
},
{
"name": "Base",
"notable": false,
"requires": [
{
"obstaclesCleared": [
"A"
]
}
],
"link": [
6,
9
],
"clearsObstacles": [
"f_MaridiaTubeBroken"
]
},
{
"link": [
9,
6
],
"name": "Base",
"notable": false,
"requires": []
},
{
"name": "Base",
"notable": false,
"requires": [
{
  "or": [
    "h_canUsePowerBombs",
    {
      "obstaclesCleared": [
        "A"
      ]
    }
  ]
}
],
"link": [
7,
10
],
"clearsObstacles": [
"f_MaridiaTubeBroken"
]
},
{
"link": [
10,
7
],
"name": "Base",
"notable": false,
"requires": []
},
{
"link": [
1,
4
],
"name": "Tricky Cross Room Jump",
"entranceCondition": {
"comeInJumping": {
"speedBooster": false,
"minTiles": 0.4375
}
},
"requires": [
{
  "obstaclesCleared": [
    "f_MaridiaTubeBroken"
  ]
},
"canCrossRoomJumpIntoWater",
"canTrickyJump"
],
"note": [
"Only requires a runway of 1 tile in the adjacent room.",
"This strat is slightly easier on the right side at low run speeds, but the same otherwise."
]
},
{
"link": [
1,
4
],
"name": "Cross Room Speedy Jump",
"entranceCondition": {
"comeInJumping": {
"speedBooster": true,
"minTiles": 7.4375
}
},
"requires": [
{
  "obstaclesCleared": [
    "f_MaridiaTubeBroken"
  ]
},
"canCrossRoomJumpIntoWater"
],
"note": [
"Only requires a runway of 7 tiles in the adjacent room, but an extra tile makes for an easier jump."
]
},
{
"link": [
2,
1
],
"name": "Carry G-Mode Through Tube (Bottom to Left)",
"notable": false,
"entranceCondition": {
"comeInWithGMode": {
"mode": "any",
"morphed": false
}
},
"requires": [
{
  "obstaclesCleared": [
    "f_MaridiaTubeBroken"
  ]
}
],
"exitCondition": {
"leaveWithGMode": {
"morphed": false
}
}
},
{
"link": [
2,
1
],
"name": "Carry G-Mode Morph Through Tube (Bottom to Left)",
"notable": false,
"entranceCondition": {
"comeInWithGMode": {
"mode": "any",
"morphed": true
}
},
"requires": [
{
  "obstaclesCleared": [
    "f_MaridiaTubeBroken"
  ]
},
{
"or": [
{
"and": [
"Gravity",
"h_canArtificialMorphMovement"
]
},
{
"and": [
"canSuitlessMaridia",
"h_canArtificialMorphSpringBall",
"HiJump"
]
}
]
}
],
"exitCondition": {
"leaveWithGMode": {
"morphed": true
}
}
},
{
"link": [
2,
3
],
"name": "Carry G-Mode Through Tube (Bottom to Right)",
"notable": false,
"entranceCondition": {
"comeInWithGMode": {
"mode": "any",
"morphed": false
}
},
"requires": [
{
  "obstaclesCleared": [
    "f_MaridiaTubeBroken"
  ]
}
],
"exitCondition": {
"leaveWithGMode": {
"morphed": false
}
}
},
{
"link": [
2,
3
],
"name": "Carry G-Mode Morph Through Tube (Bottom to Right)",
"notable": false,
"entranceCondition": {
"comeInWithGMode": {
"mode": "any",
"morphed": true
}
},
"requires": [
{
  "obstaclesCleared": [
    "f_MaridiaTubeBroken"
  ]
},
{
"or": [
{
"and": [
"Gravity",
"h_canArtificialMorphMovement"
]
},
{
"and": [
"canSuitlessMaridia",
"h_canArtificialMorphSpringBall",
"HiJump"
]
}
]
}
],
"exitCondition": {
"leaveWithGMode": {
"morphed": true
}
}
},
{
"link": [
2,
4
],
"name": "Glass Tunnel Cross Room Platform Stuck Wiggle to Top Door",
"notable": true,
"entranceCondition": {
"comeInJumping": {
"speedBooster": true,
"minTiles": 18
}
},
"requires": [
{
  "obstaclesCleared": [
    "f_MaridiaTubeBroken"
  ]
},
"canCrossRoomJumpIntoWater",
"canMomentumConservingTurnaround",
"canTrickyDashJump",
"canInsaneJump"
],
"note": [
"Requires a runway of at least 18 tiles in the adjacent room.",
"Ride up the right wall just above the doorway, then turnaround before and after hitting the platform following the doorway slope.",
"Continue up the rest of the way to reach the door."
],
"unlocksDoors": [
{
"types": [
"super"
],
"requires": []
},
{
"types": [
"missiles",
"powerbomb"
],
"requires": [
"never"
]
}
]
},
{
"link": [
2,
4
],
"name": "Cross Room Jump with Speedbooster",
"entranceCondition": {
"comeInJumping": {
"speedBooster": true,
"minTiles": 21
}
},
"requires": [
{
  "obstaclesCleared": [
    "f_MaridiaTubeBroken"
  ]
},
"canCrossRoomJumpIntoWater",
"canMidairWiggle",
"canTrickyJump"
],
"note": [
"Assumes a runway of at least 21 tiles in the adjacent room.",
"End Samus' momentum where no platforms are over head.",
"Shoot the door while rising to pass through."
],
"unlocksDoors": [
{
"types": [
"super"
],
"requires": []
},
{
"types": [
"missiles",
"powerbomb"
],
"requires": [
"never"
]
}
]
},
{
"link": [
3,
4
],
"name": "Tricky Cross Room Jump",
"entranceCondition": {
"comeInJumping": {
"speedBooster": false,
"minTiles": 0.4375
}
},
"requires": [
{
  "obstaclesCleared": [
    "f_MaridiaTubeBroken"
  ]
},
"canCrossRoomJumpIntoWater",
"canTrickyJump"
],
"note": [
"Only requires a runway of one tile in the adjacent room.",
"This strat is slightly easier on the right side at low run speeds, but the same otherwise."
]
},
{
"link": [
3,
4
],
"name": "Cross Room Speedy Jump",
"entranceCondition": {
"comeInJumping": {
"speedBooster": true,
"minTiles": 7.4375
}
},
"requires": [
{
"obstaclesCleared": [
"f_MaridiaTubeBroken"
]
},
"canCrossRoomJumpIntoWater"
],
"note": [
"Only requires a runway of 7 tiles in the adjacent room, but an extra tile makes for an easier jump."
]
},
{
"link": [
4,
1
],
"name": "Carry G-Mode Through Tube (Top to Left)",
"notable": false,
"entranceCondition": {
"comeInWithGMode": {
"mode": "any",
"morphed": false
},
"comesThroughToilet": "any"
},
"requires": [
{
"obstaclesCleared": [
"f_MaridiaTubeBroken"
]
}
],
"exitCondition": {
"leaveWithGMode": {
"morphed": false
}
}
},
{
"link": [
4,
1
],
"name": "Carry G-Mode Morph Through Tube (Top to Left)",
"notable": false,
"entranceCondition": {
"comeInWithGMode": {
"mode": "any",
"morphed": true
},
"comesThroughToilet": "any"
},
"requires": [
{
"obstaclesCleared": [
"f_MaridiaTubeBroken"
]
}
],
"exitCondition": {
"leaveWithGMode": {
"morphed": true
}
}
},
{
"link": [
4,
3
],
"name": "Carry G-Mode Through Tube (Top to Right)",
"notable": false,
"entranceCondition": {
"comeInWithGMode": {
"mode": "any",
"morphed": false
},
"comesThroughToilet": "any"
},
"requires": [
{
"obstaclesCleared": [
"f_MaridiaTubeBroken"
]
}
],
"exitCondition": {
"leaveWithGMode": {
"morphed": false
}
}
},
{
"link": [
4,
3
],
"name": "Carry G-Mode Morph Through Tube (Top to Right)",
"notable": false,
"entranceCondition": {
"comeInWithGMode": {
"mode": "any",
"morphed": true
},
"comesThroughToilet": "any"
},
"requires": [
{
"obstaclesCleared": [
"f_MaridiaTubeBroken"
]
}
],
"exitCondition": {
"leaveWithGMode": {
"morphed": true
}
}
},
{
"link": [
5,
4
],
"name": "Breaking the Maridia Tube Gravity Jump",
"notable": false,
"requires": [
{
"obstaclesCleared": [
"f_MaridiaTubeBroken"
]
},
{
"obstaclesCleared": [
"A"
]
},
"canRiskPermanentLossOfAccess",
"canSuitlessMaridia",
"canTrickyJump"
],
"note": [
"Jump as the first action after breaking the tube to gravity jump to the top of the room.",
"Open the door and go through it during the ascent. This can only be attempted once."
],
"devNote": "This strat requires the tube to be broken, while the obstacle being set requires the tube to not yet be broken."
},
{
"link": [
5,
6
],
"name": "Base",
"requires": [
{
"obstaclesCleared": [
"f_MaridiaTubeBroken"
]
},
"Gravity"
]
},
{
"link": [
5,
6
],
"name": "Suitless Base",
"requires": [
{
"obstaclesCleared": [
"f_MaridiaTubeBroken"
]
},
"HiJump"
],
"note": "Doesn't require canSuitlessMaridia because there is no risk, nor anything tricky whatsoever."
},
{
"link": [
5,
6
],
"name": "Suitless",
"requires": [
{
"obstaclesCleared": [
"f_MaridiaTubeBroken"
]
},
"canSuitlessMaridia",
"canSpringBallJumpMidAir"
]
},
{
"link": [
5,
7
],
"name": "Base",
"requires": [
{
"obstaclesCleared": [
"f_MaridiaTubeBroken"
]
}
]
},
{
"link": [
6,
5
],
"name": "Base",
"requires": [
{
"obstaclesCleared": [
"f_MaridiaTubeBroken"
]
}
]
},
{
"link": [
7,
5
],
"name": "Base",
"requires": [
{
"obstaclesCleared": [
"f_MaridiaTubeBroken"
]
}
],
"resetsObstacles": [
"A"
],
"devNote": "The obstacle is reset, as 7 is too low to jump to 4."
}
]
}