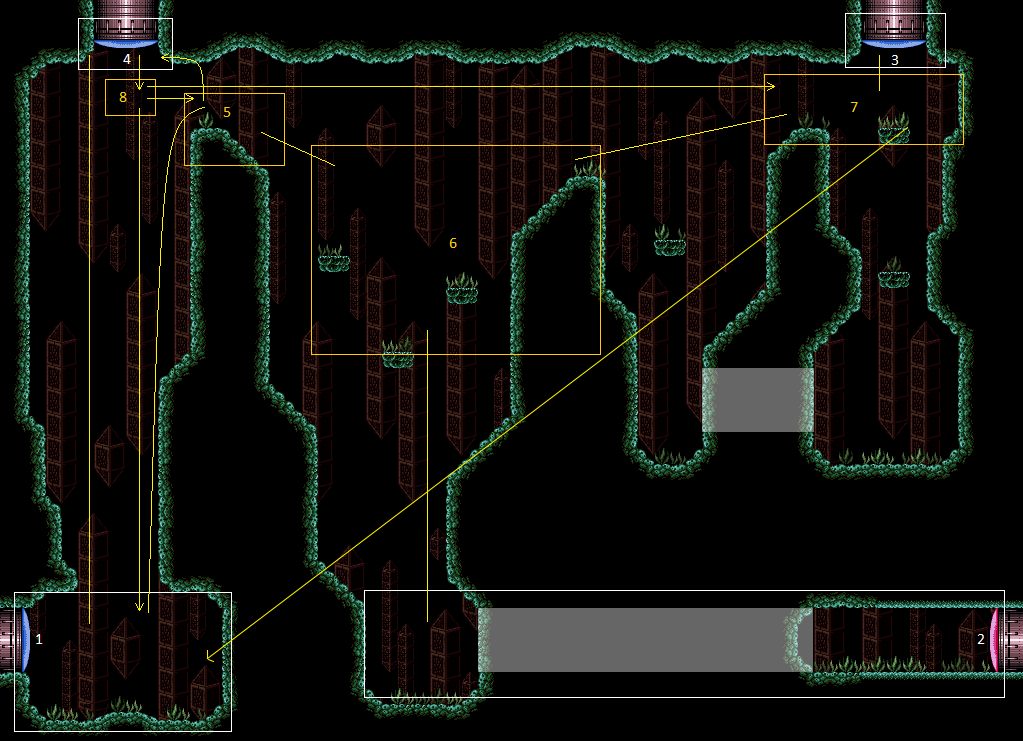
Fish Tank
Room ID: 173
|
Exit condition: {
"leaveWithRunway": {
"length": 1,
"openEnd": 1
}
}
|
|
Requires: "h_canCrystalFlash" |
|
Requires: {
"enemyDamage": {
"enemy": "Skultera",
"type": "contact",
"hits": 1
}
}
|
|
Once high enough, it may be necessary to kill the fish and open the door. Requires: "Gravity" "h_canIBJ" |
|
From: 1
Bottom Left Door
To: 4
Top Left Door
Requires a runway of at least 4 tiles in the adjacent room. Entrance condition: {
"comeInJumping": {
"speedBooster": true,
"minTiles": 4
}
}
Requires: "HiJump" "canCrossRoomJumpIntoWater" "canMomentumConservingTurnaround" |
|
From: 1
Bottom Left Door
To: 4
Top Left Door
Requires a runway of at least 18 tiles in the adjacent room. Entrance condition: {
"comeInJumping": {
"speedBooster": true,
"minTiles": 18
}
}
Requires: "canCrossRoomJumpIntoWater" "canTrickyJump" |
|
From: 1
Bottom Left Door
To: 4
Top Left Door
Requires a runway of at least 22 tiles in the adjacent room. Entrance condition: {
"comeInJumping": {
"speedBooster": true,
"minTiles": 22
}
}
Requires: "canCrossRoomJumpIntoWater" |
|
Requires: "Gravity"
{
"or": [
"canWalljump",
"h_canFly",
{
"and": [
"HiJump",
"SpeedBooster"
]
},
"canSpringBallJumpMidAir",
"canGravityJump"
]
}
|
|
Entrance condition: {
"comeInShinecharged": {
"framesRequired": 30
}
}
Requires: "h_canNavigateUnderwater"
{
"shinespark": {
"frames": 55
}
}
|
|
From: 1
Bottom Left Door
To: 5
Platform Junction Near Top Left Door
Requires: "canSuitlessMaridia" "canTrickyUseFrozenEnemies" "HiJump" "canTrickySpringBallJump" |
|
From: 1
Bottom Left Door
To: 5
Platform Junction Near Top Left Door
Requires: "canSuitlessMaridia" "h_canDoubleSpringBallJumpWithHiJump" |
|
From: 1
Bottom Left Door
To: 5
Platform Junction Near Top Left Door
Requires 3 tiles of run speed (with no open end) to make it past the overhang above the door. Cross Room jump and aim towards the left side where the fish is. Shooting at it from below can deal damage sooner to get a faster freeze. Hug the frozen fish to gain the extra height needed to climb on top. Entrance condition: {
"comeInJumping": {
"speedBooster": true,
"minTiles": 2.4375
}
}
Requires: "HiJump"
"canCrossRoomJumpIntoWater"
"canMomentumConservingTurnaround"
"canTrickyUseFrozenEnemies"
"canInsaneJump"
"canDownGrab"
{
"or": [
"Wave",
"Spazer",
"Plasma"
]
}
|
|
From: 1
Bottom Left Door
To: 5
Platform Junction Near Top Left Door
Requires 3 tiles of run speed (with no open end) to make it past the overhang above the door. Entrance condition: {
"comeInJumping": {
"speedBooster": true,
"minTiles": 2.4375
}
}
Requires: "HiJump" "canCrossRoomJumpIntoWater" "canMomentumConservingTurnaround" "canTrickySpringBallJump" "canInsaneJump" |
|
From: 1
Bottom Left Door
To: 5
Platform Junction Near Top Left Door
Requires a runway of at least 3 tiles in the adjacent room. Entrance condition: {
"comeInJumping": {
"speedBooster": true,
"minTiles": 3
}
}
Requires: "HiJump" "canCrossRoomJumpIntoWater" "canMomentumConservingTurnaround" "canTrickyJump" |
|
From: 1
Bottom Left Door
To: 5
Platform Junction Near Top Left Door
Requires a runway of at least 4 tiles in the adjacent room. Entrance condition: {
"comeInJumping": {
"speedBooster": "any",
"minTiles": 4
}
}
Requires: "HiJump" "canCrossRoomJumpIntoWater" "canMomentumConservingTurnaround" |
|
From: 1
Bottom Left Door
To: 5
Platform Junction Near Top Left Door
Requires running a very precise distance of 7 tiles in the adjacent room, to hit a peak of the speed vs height graph. Entrance condition: {
"comeInJumping": {
"speedBooster": true,
"minTiles": 7
}
}
Requires: "canTrickyDashJump" "canCrossRoomJumpIntoWater" "canMomentumConservingTurnaround" |
|
From: 1
Bottom Left Door
To: 5
Platform Junction Near Top Left Door
Requires a runway of at least 12 tiles (with no open end) in the adjacent room. Entrance condition: {
"comeInJumping": {
"speedBooster": true,
"minTiles": 11.4375
}
}
Requires: "SpeedBooster" "canCrossRoomJumpIntoWater" |
|
From: 1
Bottom Left Door
To: 5
Platform Junction Near Top Left Door
Requires a runway of at least 10 tiles in the adjacent room. Entrance condition: {
"comeInJumping": {
"speedBooster": true,
"minTiles": 10
}
}
Requires: "SpeedBooster" "canCrossRoomJumpIntoWater" "canSpringBallJumpMidAir" "canTrickyJump" |
|
From: 1
Bottom Left Door
To: 5
Platform Junction Near Top Left Door
Kill the first fish with bombs then dodge or kill the second one. Entrance condition: {
"comeInWithGMode": {
"mode": "any",
"morphed": true
}
}
Requires: "h_canArtificialMorphIBJ" "Gravity" |
|
From: 1
Bottom Left Door
To: 5
Platform Junction Near Top Left Door
Entrance condition: {
"comeInWithGrappleTeleport": {
"blockPositions": [
[
12,
12
],
[
12,
13
]
]
}
}
|
|
After teleporting, Grapple will open the door (if it is blue), making it not possible to swing over to the ledge. Entrance condition: {
"comeInWithGrappleTeleport": {
"blockPositions": [
[
7,
2
]
]
}
}
|
|
Entrance condition: {
"comeInWithGrappleTeleport": {
"blockPositions": [
[
2,
34
]
]
}
}
Bypasses door shell: true |
|
Entrance condition: {
"comeInWithGrappleTeleport": {
"blockPositions": [
[
2,
34
]
]
}
}
Exit condition: {
"leaveWithGrappleTeleport": {
"blockPositions": [
[
2,
34
]
]
}
}
Bypasses door shell: true |
|
Exit condition: {
"leaveWithRunway": {
"length": 33,
"openEnd": 1
}
}
|
|
Requires: "h_canCrystalFlash" |
|
From: 2
Bottom Right Door
To: 4
Top Left Door
Notable: true 
Swing to the right, shoot open the door above, and grapple jump through it. Entrance condition: {
"comeInWithGrappleTeleport": {
"blockPositions": [
[
5,
3
]
]
}
}
Requires: {
"doorUnlockedAtNode": 4
}
"canMidairWiggle"
"canTrickyGrappleJump"
"canInsaneJump"
|
|
From: 2
Bottom Right Door
To: 5
Platform Junction Near Top Left Door
Start the dash as close to the door transition as possible in order to have a larger window for storing the shinecharge. Entrance condition: {
"comeInRunning": {
"speedBooster": true,
"minTiles": 0.4375
}
}
Requires: "canWaterShineCharge"
{
"or": [
{
"shinespark": {
"frames": 41,
"excessFrames": 7
}
},
{
"and": [
"canMidairShinespark",
{
"shinespark": {
"frames": 38,
"excessFrames": 7
}
}
]
}
]
}
|
|
From: 2
Bottom Right Door
To: 5
Platform Junction Near Top Left Door
Swing over the right to make it to the ledge. Avoid extending Grapple, to prevent being damaged by the Skulltera. You can wait for the camera to fix itself; continue swinging while waiting, to avoid damage. Entrance condition: {
"comeInWithGrappleTeleport": {
"blockPositions": [
[
5,
3
]
]
}
}
|
|
Requires: "Gravity"
{
"or": [
"HiJump",
"canWalljump",
"h_canFly",
"canCarefulJump",
"canSpringBallJumpMidAir",
"canGravityJump",
{
"enemyDamage": {
"enemy": "Pink Space Pirate (standing)",
"type": "contact",
"hits": 1
}
},
{
"enemyKill": {
"enemies": [
[
"Pink Space Pirate (standing)"
]
],
"explicitWeapons": [
"Plasma",
"ScrewAttack"
]
}
}
]
}
|
|
Requires: "canSuitlessMaridia"
"HiJump"
{
"or": [
"canCarefulJump",
"canSpringBallJumpMidAir",
{
"enemyDamage": {
"enemy": "Pink Space Pirate (standing)",
"type": "contact",
"hits": 1
}
},
{
"enemyKill": {
"enemies": [
[
"Pink Space Pirate (standing)"
]
],
"explicitWeapons": [
"Plasma"
]
}
}
]
}
|
|
From: 2
Bottom Right Door
To: 6
Middle Junction Near Top Left Pirate
The second jump is harder than a normal mid-air springball jump. Use either a stationary lateral mid air morph, to gain enough horizontal momentum, or a SpringFling to reduce Samus' fall speed as soon as it begins to build up. Requires: "canSuitlessMaridia"
"canTrickySpringBallJump"
{
"or": [
"canStationaryLateralMidAirMorph",
"canSpringFling"
]
}
{
"or": [
"canTrickyJump",
{
"enemyDamage": {
"enemy": "Pink Space Pirate (standing)",
"type": "contact",
"hits": 1
}
},
{
"enemyKill": {
"enemies": [
[
"Pink Space Pirate (standing)"
]
],
"explicitWeapons": [
"Plasma"
]
}
}
]
}
|
|
From: 2
Bottom Right Door
To: 6
Middle Junction Near Top Left Pirate
Start the dash as close to the door transition as possible in order to have a larger window for storing the shinecharge. Spark up and fall onto the platform left of the fish. Entrance condition: {
"comeInRunning": {
"speedBooster": true,
"minTiles": 0.4375
}
}
Requires: "canWaterShineCharge"
{
"or": [
{
"shinespark": {
"frames": 43,
"excessFrames": 9
}
},
{
"and": [
"canMidairShinespark",
{
"shinespark": {
"frames": 38,
"excessFrames": 9
}
}
]
}
]
}
|
|
From: 2
Bottom Right Door
To: 6
Middle Junction Near Top Left Pirate
Start the dash as close to the door transition as possible in order to have a larger window for storing the shinecharge. With low energy, shinespark diagonally to the middle ledge on the left. Entrance condition: {
"comeInRunning": {
"speedBooster": true,
"minTiles": 0.4375
}
}
Requires: "canWaterShineCharge"
{
"or": [
{
"shinespark": {
"frames": 43,
"excessFrames": 26
}
},
{
"and": [
"canMidairShinespark",
{
"shinespark": {
"frames": 38,
"excessFrames": 25
}
}
]
}
]
}
{
"or": [
{
"enemyDamage": {
"enemy": "Pink Space Pirate (standing)",
"type": "contact",
"hits": 1
}
},
{
"enemyKill": {
"enemies": [
[
"Pink Space Pirate (standing)"
]
],
"explicitWeapons": [
"Plasma"
]
}
}
]
}
{
"or": [
"h_canCrouchJumpDownGrab",
"canSpringBallJumpMidAir",
{
"and": [
"Ice",
"Plasma"
]
}
]
}
|
|
Entrance condition: {
"comeInShinecharged": {
"framesRequired": 15
},
"comesThroughToilet": "any"
}
Requires: "h_canNavigateUnderwater"
"canHorizontalShinespark"
{
"shinespark": {
"frames": 90
}
}
|
|
|
|
|
|
Requires Samus to enter in a state that can diagonally spark immediately. Entrance condition: {
"comeInShinecharged": {
"framesRequired": 10
},
"comesThroughToilet": "any"
}
Requires: "h_canNavigateUnderwater"
"canPrepareForNextRoom"
"canMidairShinespark"
{
"shinespark": {
"frames": 3,
"excessFrames": 0
}
}
|
|
From: 4
Top Left Door
To: 5
Platform Junction Near Top Left Door
Notable: true 
Enter on the left side of the door while aiming down and freeze the fish immediately. Entrance condition: {
"comeInNormally": {},
"comesThroughToilet": "no"
}
Requires: "h_canNavigateUnderwater"
"canPrepareForNextRoom"
"canTrickyUseFrozenEnemies"
{
"or": [
{
"and": [
"Wave",
"Plasma"
]
},
{
"and": [
"Plasma",
"Charge"
]
},
{
"and": [
"Wave",
"Spazer",
"Charge"
]
}
]
}
|
|
Enter on the left side of the door in order to land on the fish, then Damage Boost to reach the ledge on the right. Entrance condition: {
"comeInNormally": {},
"comesThroughToilet": "no"
}
Requires: "Gravity"
"canHorizontalDamageBoost"
"canPrepareForNextRoom"
{
"enemyDamage": {
"enemy": "Skultera",
"hits": 1,
"type": "contact"
}
}
|
|
From: 4
Top Left Door
To: 5
Platform Junction Near Top Left Door
Notable: true 
Morph and unmorph before reaching the transition, and then drift to the ledge. Enter the room as far right as possible. Entrance condition: {
"comeInNormally": {},
"comesThroughToilet": "no"
}
Requires: "canSuitlessMaridia" "h_canResetFallSpeed" "canPrepareForNextRoom" |
|
From: 4
Top Left Door
To: 5
Platform Junction Near Top Left Door
Notable: true 
Wall jump in the room above, on the right wall of the doorway, immdiately before the door transition. Failure will likely result in a soft lock. To get to the ledge: If the room above has normal physics, hold right in this room. If the room above has water physics, shoot to break spin while holding right in this room. Entrance condition: {
"comeInNormally": {},
"comesThroughToilet": "any"
}
Requires: "canSuitlessMaridia" "canPreciseWalljump" "canPrepareForNextRoom" "canMidairWiggle" "canCarefulJump" |
|
From: 4
Top Left Door
To: 5
Platform Junction Near Top Left Door
Kill or dodge the fish by the top left door. Entrance condition: {
"comeInWithGMode": {
"mode": "any",
"morphed": true
},
"comesThroughToilet": "any"
}
Requires: "h_canArtificialMorphIBJ" "Gravity" |
|
Immediately spark after the door transition into the wall just to the right of the top right door. Entrance condition: {
"comeInShinecharged": {
"framesRequired": 10
},
"comesThroughToilet": "any"
}
Requires: "Gravity"
"canPrepareForNextRoom"
"canMidairShinespark"
{
"shinespark": {
"frames": 70,
"excessFrames": 16
}
}
|
|
From: 4
Top Left Door
To: 7
Spawn At Junction Near Top Right Door
Immediately spark after the door transition into the wall just to the right of the top right door. Entrance condition: {
"comeInShinecharged": {
"framesRequired": 10
},
"comesThroughToilet": "any"
}
Requires: "canSuitlessMaridia"
"canPrepareForNextRoom"
"canMidairShinespark"
{
"shinespark": {
"frames": 88,
"excessFrames": 21
}
}
|
|
|
|
|
|
Requires: "Gravity"
{
"or": [
"canWalljump",
"h_canFly",
"canUseFrozenEnemies",
"canGravityJump"
]
}
|
|
From: 5
Platform Junction Near Top Left Door
To: 4
Top Left Door
Requires: "canSuitlessMaridia"
"canUseFrozenEnemies"
{
"or": [
"HiJump",
"canSpringBallJumpMidAir"
]
}
|
|
Requires: "canSuitlessMaridia" "HiJump" "h_canUseSpringBall" |
|
From: 5
Platform Junction Near Top Left Door
To: 4
Top Left Door
Notable: true 
Build up run speed and jump at the last moment to reach the door. Requires: "Gravity" "canTrickyJump" |
|
From: 5
Platform Junction Near Top Left Door
To: 4
Top Left Door
Notable: true
Jump towards the door with HiJump equipped. A Flatley style jump can position Samus over the edge of the ledge, closer to the door. Turning around while facing down, just before touching the ceiling, is another way to move Samus a few pixels closer to the door. Requires: "canSuitlessMaridia"
"HiJump"
"canTrickyJump"
{
"or": [
"canFlatleyJump",
"canMomentumConservingTurnaround"
]
}
|
|
From: 5
Platform Junction Near Top Left Door
To: 4
Top Left Door
Notable: true
Jump towards the door with a Springball Jump, jumping as late as possible. A Flatley style jump can position Samus over the edge of the ledge, closer to the door, allowing for an earlier Springball jump. The slight fall from a Flatley Jump helps with the Springball jump, but then Samus must unmorph to extend her hitbox to touch the transition. A Stationary Lateral MidAir Morph also helps with this jump. Unmorphing after a missed jump can return Samus to the ledge to try again. Requires: "canSuitlessMaridia"
"canTrickySpringBallJump"
{
"or": [
"canTrickyJump",
"canStationaryLateralMidAirMorph"
]
}
|
|
From: 5
Platform Junction Near Top Left Door
To: 5
Platform Junction Near Top Left Door
Requires: "h_canCrystalFlash" |
|
From: 5
Platform Junction Near Top Left Door
To: 6
Middle Junction Near Top Left Pirate
Requires: "h_canNavigateUnderwater" |
|
|
|
From: 6
Middle Junction Near Top Left Pirate
To: 5
Platform Junction Near Top Left Door
Requires: "Gravity" |
|
From: 6
Middle Junction Near Top Left Pirate
To: 5
Platform Junction Near Top Left Door
Requires: "canSuitlessMaridia"
{
"or": [
"HiJump",
"canSpringBallJumpMidAir"
]
}
|
|
From: 6
Middle Junction Near Top Left Pirate
To: 5
Platform Junction Near Top Left Door
Freeze the fish a bit left of the peak in its swim cycle. Build run speed on top of the fish before jumping to the ledge. The positioning is more lenient if the fish is frozen while moving leftward. Requires: "canSuitlessMaridia" "canTrickyJump" "canTrickyUseFrozenEnemies" |
|
From: 6
Middle Junction Near Top Left Pirate
To: 6
Middle Junction Near Top Left Pirate
Requires: {
"or": [
"Gravity",
"HiJump"
]
}
{
"or": [
"Plasma",
{
"and": [
"ScrewAttack",
"Gravity"
]
}
]
}
{
"resetRoom": {
"nodes": [
2,
3
],
"mustStayPut": false
}
}
{
"refill": [
"Energy",
"Missile"
]
}
|
|
From: 6
Middle Junction Near Top Left Pirate
To: 7
Spawn At Junction Near Top Right Door
Requires: "Gravity"
{
"or": [
"HiJump",
"canWalljump",
"h_canFly",
"canGravityJump",
"canCarefulJump",
"canSpringBallJumpMidAir",
{
"enemyDamage": {
"enemy": "Pink Space Pirate (standing)",
"type": "contact",
"hits": 1
}
},
{
"enemyKill": {
"enemies": [
[
"Pink Space Pirate (standing)"
]
],
"explicitWeapons": [
"Plasma",
"ScrewAttack"
]
}
}
]
}
|
|
From: 6
Middle Junction Near Top Left Pirate
To: 7
Spawn At Junction Near Top Right Door
Requires: "canSuitlessMaridia"
"canCarefulJump"
{
"or": [
"HiJump",
"canSpringBallJumpMidAir"
]
}
|
|
From: 6
Middle Junction Near Top Left Pirate
To: 7
Spawn At Junction Near Top Right Door
Notable: true .png)
.gif)
This is particularly precise, and requires subpixel precision. Requires: "canSuitlessMaridia" "canInsaneJump" |
|
From: 6
Middle Junction Near Top Left Pirate
To: 7
Spawn At Junction Near Top Right Door
Requires: "canSuitlessMaridia" "Plasma" "canUseFrozenEnemies" |
|
Requires: "Gravity" |
|
Requires: "canSuitlessMaridia"
{
"or": [
"HiJump",
"canSpringBallJumpMidAir"
]
}
|
|
From: 7
Spawn At Junction Near Top Right Door
To: 6
Middle Junction Near Top Left Pirate
Requires: "h_canNavigateUnderwater" |
|
From: 7
Spawn At Junction Near Top Right Door
To: 7
Spawn At Junction Near Top Right Door
Requires: "h_canCrystalFlash" |
|
|
{
"$schema": "../../../schema/m3-room.schema.json",
"id": 173,
"name": "Fish Tank",
"area": "Maridia",
"subarea": "Outer",
"playable": true,
"roomAddress": "0x7D017",
"roomEnvironments": [
{
"heated": false
}
],
"nodes": [
{
"id": 1,
"name": "Bottom Left Door",
"nodeType": "door",
"nodeSubType": "blue",
"nodeAddress": "0x001a3d8",
"doorEnvironments": [
{
"physics": "water"
}
]
},
{
"id": 2,
"name": "Bottom Right Door",
"nodeType": "door",
"nodeSubType": "red",
"nodeAddress": "0x001a3e4",
"doorEnvironments": [
{
"physics": "water"
}
],
"locks": [
{
"name": "Fish Tank Red Lock (to Mama Turtle)",
"lockType": "coloredDoor",
"unlockStrats": [
{
"name": "Base",
"notable": false,
"requires": [
"h_canOpenRedDoors"
]
}
]
}
]
},
{
"id": 3,
"name": "Top Right Door",
"nodeType": "door",
"nodeSubType": "blue",
"nodeAddress": "0x001a3fc",
"doorEnvironments": [
{
"physics": "water"
}
]
},
{
"id": 4,
"name": "Top Left Door",
"nodeType": "door",
"nodeSubType": "blue",
"nodeAddress": "0x001a3f0",
"doorEnvironments": [
{
"physics": "water"
}
],
"spawnAt": 8
},
{
"id": 5,
"name": "Platform Junction Near Top Left Door",
"nodeType": "junction",
"nodeSubType": "junction"
},
{
"id": 6,
"name": "Middle Junction Near Top Left Pirate",
"nodeType": "junction",
"nodeSubType": "junction"
},
{
"id": 7,
"name": "Spawn At Junction Near Top Right Door",
"nodeType": "junction",
"nodeSubType": "junction"
},
{
"id": 8,
"name": "Spawn At Junction Near Top Left Door",
"nodeType": "junction",
"nodeSubType": "junction"
}
],
"enemies": [
{
"id": "e1",
"groupName": "Fish Tank Bottom Skultera",
"enemyName": "Skultera",
"quantity": 1,
"homeNodes": [
1
]
},
{
"id": "e2",
"groupName": "Fish Tank Top Left Skultera",
"enemyName": "Skultera",
"quantity": 1,
"homeNodes": [
5
]
},
{
"id": "e3",
"groupName": "Fish Tank Central Skultera",
"enemyName": "Skultera",
"quantity": 1,
"homeNodes": [
6
]
},
{
"id": "e4",
"groupName": "Fish Tank Top Right Skultera",
"enemyName": "Skultera",
"quantity": 1,
"homeNodes": [
7
]
},
{
"id": "e5",
"groupName": "Fish Tank Bottom Pirate",
"enemyName": "Pink Space Pirate (standing)",
"quantity": 1,
"homeNodes": [
2
]
},
{
"id": "e6",
"groupName": "Fish Tank Central Pirate",
"enemyName": "Pink Space Pirate (standing)",
"quantity": 1,
"homeNodes": [
6
]
},
{
"id": "e7",
"groupName": "Fish Tank Top Right Pirate",
"enemyName": "Pink Space Pirate (standing)",
"quantity": 1,
"homeNodes": [
7
]
}
],
"reusableRoomwideNotable": [
{
"name": "Fish Tank Top Left Direct Jump",
"note": [
"Jump into the Top-Left door of the Fish Tank room from the nearby ledge using one of Gravity, HiJump, or SpringBall.",
"This requires a very precise jump from the very edge of the ledge and risks falling into the Bottom-Left pit which may be difficult to climb back from."
]
}
],
"links": [
{
"from": 1,
"to": [
{
"id": 1
},
{
"id": 4,
"note": "Direct link for cross room jump and IBJ, which can't be done from 5 to 4 and must be directly from 1.",
"devNote": "This link also exists because it will become useful as an alternate to walljumping"
},
{
"id": 5
}
]
},
{
"from": 2,
"to": [
{
"id": 1
},
{
"id": 2
},
{
"id": 4
},
{
"id": 5
},
{
"id": 6
}
]
},
{
"from": 3,
"to": [
{
"id": 1
},
{
"id": 7
}
]
},
{
"from": 4,
"to": [
{
"id": 1
},
{
"id": 5
},
{
"id": 7
},
{
"id": 8
}
]
},
{
"from": 5,
"to": [
{
"id": 1
},
{
"id": 4
},
{
"id": 5
},
{
"id": 6
}
]
},
{
"from": 6,
"to": [
{
"id": 2
},
{
"id": 5
},
{
"id": 6
},
{
"id": 7
}
]
},
{
"from": 7,
"to": [
{
"id": 3
},
{
"id": 6
},
{
"id": 7
}
]
},
{
"from": 8,
"to": [
{
"id": 1
},
{
"id": 5
}
]
}
],
"strats": [
{
"link": [
1,
1
],
"name": "Leave with Runway",
"requires": [],
"exitCondition": {
"leaveWithRunway": {
"length": 1,
"openEnd": 1
}
}
},
{
"link": [
1,
1
],
"name": "Crystal Flash",
"requires": [
"h_canCrystalFlash"
]
},
{
"link": [
1,
1
],
"name": "G-Mode Regain Mobility",
"requires": [
{
  "enemyDamage": {
    "enemy": "Skultera",
    "type": "contact",
    "hits": 1
  }
}
],
"gModeRegainMobility": {}
},
{
"link": [
1,
4
],
"name": "IBJ",
"requires": [
"Gravity",
"h_canIBJ"
],
"note": "Once high enough, it may be necessary to kill the fish and open the door."
},
{
"link": [
1,
4
],
"name": "Cross Room Jump with HiJump and Speedbooster",
"entranceCondition": {
"comeInJumping": {
"speedBooster": true,
"minTiles": 4
}
},
"requires": [
"HiJump",
"canCrossRoomJumpIntoWater",
"canMomentumConservingTurnaround"
],
"note": "Requires a runway of at least 4 tiles in the adjacent room.",
"devNote": [
"Using more run speed to avoid the momentumConservingTurnaround requirement will bonk the door, requiring a turnaround to get through",
"This would be a way to bring high vertical speed into the room on the other side of 4."
]
},
{
"link": [
1,
4
],
"name": "Cross Room Jump with Speedbooster",
"entranceCondition": {
"comeInJumping": {
"speedBooster": true,
"minTiles": 18
}
},
"requires": [
"canCrossRoomJumpIntoWater",
"canTrickyJump"
],
"note": "Requires a runway of at least 18 tiles in the adjacent room."
},
{
"link": [
1,
4
],
"name": "Cross Room Jump with Speedbooster (lenient)",
"entranceCondition": {
"comeInJumping": {
"speedBooster": true,
"minTiles": 22
}
},
"requires": [
"canCrossRoomJumpIntoWater"
],
"note": "Requires a runway of at least 22 tiles in the adjacent room."
},
{
"link": [
1,
5
],
"name": "Base",
"requires": [
"Gravity",
{
"or": [
"canWalljump",
"h_canFly",
{
"and": [
"HiJump",
"SpeedBooster"
]
},
"canSpringBallJumpMidAir",
"canGravityJump"
]
}
]
},
{
"link": [
1,
5
],
"name": "Shinespark",
"entranceCondition": {
"comeInShinecharged": {
"framesRequired": 30
}
},
"requires": [
"h_canNavigateUnderwater",
{
"shinespark": {
"frames": 55
}
}
]
},
{
"link": [
1,
5
],
"name": "Springball to the Frozen Fish",
"requires": [
"canSuitlessMaridia",
"canTrickyUseFrozenEnemies",
"HiJump",
"canTrickySpringBallJump"
]
},
{
"link": [
1,
5
],
"name": "Double Springball Jump",
"requires": [
"canSuitlessMaridia",
"h_canDoubleSpringBallJumpWithHiJump"
]
},
{
"link": [
1,
5
],
"name": "Cross Room Jump to the Frozen Fish",
"entranceCondition": {
"comeInJumping": {
"speedBooster": true,
"minTiles": 2.4375
}
},
"requires": [
"HiJump",
"canCrossRoomJumpIntoWater",
"canMomentumConservingTurnaround",
"canTrickyUseFrozenEnemies",
"canInsaneJump",
"canDownGrab",
{
"or": [
"Wave",
"Spazer",
"Plasma"
]
}
],
"note": [
"Requires 3 tiles of run speed (with no open end) to make it past the overhang above the door.",
"Cross Room jump and aim towards the left side where the fish is.",
"Shooting at it from below can deal damage sooner to get a faster freeze.",
"Hug the frozen fish to gain the extra height needed to climb on top."
]
},
{
"link": [
1,
5
],
"name": "Cross Room Jump with HiJump and Springball",
"entranceCondition": {
"comeInJumping": {
"speedBooster": true,
"minTiles": 2.4375
}
},
"requires": [
"HiJump",
"canCrossRoomJumpIntoWater",
"canMomentumConservingTurnaround",
"canTrickySpringBallJump",
"canInsaneJump"
],
"note": "Requires 3 tiles of run speed (with no open end) to make it past the overhang above the door."
},
{
"link": [
1,
5
],
"name": "Cross Room Jump with HiJump and Speedbooster",
"entranceCondition": {
"comeInJumping": {
"speedBooster": true,
"minTiles": 3
}
},
"requires": [
"HiJump",
"canCrossRoomJumpIntoWater",
"canMomentumConservingTurnaround",
"canTrickyJump"
],
"note": "Requires a runway of at least 3 tiles in the adjacent room."
},
{
"link": [
1,
5
],
"name": "Cross Room Jump with HiJump",
"entranceCondition": {
"comeInJumping": {
"speedBooster": "any",
"minTiles": 4
}
},
"requires": [
"HiJump",
"canCrossRoomJumpIntoWater",
"canMomentumConservingTurnaround"
],
"note": "Requires a runway of at least 4 tiles in the adjacent room."
},
{
"link": [
1,
5
],
"name": "Tricky Cross Room Jump with Speedbooster",
"entranceCondition": {
"comeInJumping": {
"speedBooster": true,
"minTiles": 7
}
},
"requires": [
"canTrickyDashJump",
"canCrossRoomJumpIntoWater",
"canMomentumConservingTurnaround"
],
"note": "Requires running a very precise distance of 7 tiles in the adjacent room, to hit a peak of the speed vs height graph."
},
{
"link": [
1,
5
],
"name": "Cross Room Jump with Speedbooster",
"entranceCondition": {
"comeInJumping": {
"speedBooster": true,
"minTiles": 11.4375
}
},
"requires": [
"SpeedBooster",
"canCrossRoomJumpIntoWater"
],
"note": "Requires a runway of at least 12 tiles (with no open end) in the adjacent room."
},
{
"link": [
1,
5
],
"name": "Cross Room Jump with Speedbooster and Springball",
"entranceCondition": {
"comeInJumping": {
"speedBooster": true,
"minTiles": 10
}
},
"requires": [
"SpeedBooster",
"canCrossRoomJumpIntoWater",
"canSpringBallJumpMidAir",
"canTrickyJump"
],
"note": "Requires a runway of at least 10 tiles in the adjacent room."
},
{
"link": [
1,
5
],
"name": "G-Mode Morph IBJ",
"entranceCondition": {
"comeInWithGMode": {
"mode": "any",
"morphed": true
}
},
"requires": [
"h_canArtificialMorphIBJ",
"Gravity"
],
"note": "Kill the first fish with bombs then dodge or kill the second one."
},
{
"link": [
1,
5
],
"name": "Grapple Teleport",
"entranceCondition": {
"comeInWithGrappleTeleport": {
"blockPositions": [
[
12,
12
],
[
12,
13
]
]
}
},
"requires": []
},
{
"link": [
2,
1
],
"name": "Grapple Teleport",
"entranceCondition": {
"comeInWithGrappleTeleport": {
"blockPositions": [
[
7,
2
]
]
}
},
"requires": [],
"note": [
"After teleporting, Grapple will open the door (if it is blue), making it not possible to swing over to the ledge."
],
"devNote": [
"FIXME: Add canRiskPermanentLossOfAccess variations to get onto the ledge if the door is not blue;",
"also to get up through the door with a tricky grapple jump, if the door is pink or green (using a Super to open it)."
]
},
{
"link": [
2,
1
],
"name": "Grapple Teleport",
"entranceCondition": {
"comeInWithGrappleTeleport": {
"blockPositions": [
[
2,
34
]
]
}
},
"requires": [],
"bypassesDoorShell": true
},
{
"link": [
2,
1
],
"name": "Carry Grapple Teleport",
"entranceCondition": {
"comeInWithGrappleTeleport": {
"blockPositions": [
[
2,
34
]
]
}
},
"requires": [],
"bypassesDoorShell": true,
"exitCondition": {
"leaveWithGrappleTeleport": {
"blockPositions": [
[
2,
34
]
]
}
}
},
{
"link": [
2,
2
],
"name": "Leave with Runway",
"requires": [],
"exitCondition": {
"leaveWithRunway": {
"length": 33,
"openEnd": 1
}
}
},
{
"link": [
2,
2
],
"name": "Crystal Flash",
"requires": [
"h_canCrystalFlash"
]
},
{
"link": [
2,
4
],
"name": "Fish Tank Grapple Teleport into Grapple Jump",
"notable": true,
"entranceCondition": {
"comeInWithGrappleTeleport": {
"blockPositions": [
[
5,
3
]
]
}
},
"requires": [
{
"doorUnlockedAtNode": 4
},
"canMidairWiggle",
"canTrickyGrappleJump",
"canInsaneJump"
],
"unlocksDoors": [
{
"types": [
"super"
],
"requires": []
},
{
"types": [
"missiles",
"powerbomb"
],
"requires": [
"never"
]
}
],
"note": [
"Swing to the right, shoot open the door above, and grapple jump through it."
],
"devNote": [
"FIXME: Add a version of this with an exit condition for grapple jumping through the transition."
]
},
{
"link": [
2,
5
],
"name": "Suitless Water Shinecharge",
"entranceCondition": {
"comeInRunning": {
"speedBooster": true,
"minTiles": 0.4375
}
},
"requires": [
"canWaterShineCharge",
{
"or": [
{
"shinespark": {
"frames": 41,
"excessFrames": 7
}
},
{
"and": [
"canMidairShinespark",
{
"shinespark": {
"frames": 38,
"excessFrames": 7
}
}
]
}
]
}
],
"note": "Start the dash as close to the door transition as possible in order to have a larger window for storing the shinecharge."
},
{
"link": [
2,
5
],
"name": "Grapple Teleport",
"entranceCondition": {
"comeInWithGrappleTeleport": {
"blockPositions": [
[
5,
3
]
]
}
},
"requires": [],
"note": [
"Swing over the right to make it to the ledge.",
"Avoid extending Grapple, to prevent being damaged by the Skulltera.",
"You can wait for the camera to fix itself; continue swinging while waiting, to avoid damage."
]
},
{
"link": [
2,
6
],
"name": "Base",
"requires": [
"Gravity",
{
"or": [
"HiJump",
"canWalljump",
"h_canFly",
"canCarefulJump",
"canSpringBallJumpMidAir",
"canGravityJump",
{
"enemyDamage": {
"enemy": "Pink Space Pirate (standing)",
"type": "contact",
"hits": 1
}
},
{
"enemyKill": {
"enemies": [
[
"Pink Space Pirate (standing)"
]
],
"explicitWeapons": [
"Plasma",
"ScrewAttack"
]
}
}
]
}
]
},
{
"link": [
2,
6
],
"name": "Suitless",
"requires": [
"canSuitlessMaridia",
"HiJump",
{
"or": [
"canCarefulJump",
"canSpringBallJumpMidAir",
{
"enemyDamage": {
"enemy": "Pink Space Pirate (standing)",
"type": "contact",
"hits": 1
}
},
{
"enemyKill": {
"enemies": [
[
"Pink Space Pirate (standing)"
]
],
"explicitWeapons": [
"Plasma"
]
}
}
]
}
]
},
{
"link": [
2,
6
],
"name": "SpringBall Escape",
"requires": [
"canSuitlessMaridia",
"canTrickySpringBallJump",
{
"or": [
"canStationaryLateralMidAirMorph",
"canSpringFling"
]
},
{
"or": [
"canTrickyJump",
{
"enemyDamage": {
"enemy": "Pink Space Pirate (standing)",
"type": "contact",
"hits": 1
}
},
{
"enemyKill": {
"enemies": [
[
"Pink Space Pirate (standing)"
]
],
"explicitWeapons": [
"Plasma"
]
}
}
]
}
],
"note": [
"The second jump is harder than a normal mid-air springball jump.",
"Use either a stationary lateral mid air morph, to gain enough horizontal momentum,",
"or a SpringFling to reduce Samus' fall speed as soon as it begins to build up."
]
},
{
"link": [
2,
6
],
"name": "Suitless Water Shinecharge Vertical Spark",
"entranceCondition": {
"comeInRunning": {
"speedBooster": true,
"minTiles": 0.4375
}
},
"requires": [
"canWaterShineCharge",
{
"or": [
{
"shinespark": {
"frames": 43,
"excessFrames": 9
}
},
{
"and": [
"canMidairShinespark",
{
"shinespark": {
"frames": 38,
"excessFrames": 9
}
}
]
}
]
}
],
"note": [
"Start the dash as close to the door transition as possible in order to have a larger window for storing the shinecharge.",
"Spark up and fall onto the platform left of the fish."
]
},
{
"link": [
2,
6
],
"name": "Suitless Water Shinecharge Diagonal Spark",
"entranceCondition": {
"comeInRunning": {
"speedBooster": true,
"minTiles": 0.4375
}
},
"requires": [
"canWaterShineCharge",
{
"or": [
{
"shinespark": {
"frames": 43,
"excessFrames": 26
}
},
{
"and": [
"canMidairShinespark",
{
"shinespark": {
"frames": 38,
"excessFrames": 25
}
}
]
}
]
},
{
"or": [
{
"enemyDamage": {
"enemy": "Pink Space Pirate (standing)",
"type": "contact",
"hits": 1
}
},
{
"enemyKill": {
"enemies": [
[
"Pink Space Pirate (standing)"
]
],
"explicitWeapons": [
"Plasma"
]
}
}
]
},
{
"or": [
"h_canCrouchJumpDownGrab",
"canSpringBallJumpMidAir",
{
"and": [
"Ice",
"Plasma"
]
}
]
}
],
"note": [
"Start the dash as close to the door transition as possible in order to have a larger window for storing the shinecharge.",
"With low energy, shinespark diagonally to the middle ledge on the left."
],
"devNote": "FIXME: It is possible to get over the space pirate, damageless, but it is challenging, especially when keeping the Skulltera alive for other frozen strats."
},
{
"link": [
3,
1
],
"name": "Shinespark",
"entranceCondition": {
"comeInShinecharged": {
"framesRequired": 15
},
"comesThroughToilet": "any"
},
"requires": [
"h_canNavigateUnderwater",
"canHorizontalShinespark",
{
"shinespark": {
"frames": 90
}
}
],
"devNote": [
"Spark through 5 into the wall past 4. Then fall down to 1.",
"Ending the spark a bit early would work but lets work with the expected cost.",
"If you can continue from 5 then it can be reached with another item already."
]
},
{
"link": [
3,
7
],
"name": "Base",
"requires": []
},
{
"link": [
4,
1
],
"name": "Base",
"requires": []
},
{
"link": [
4,
5
],
"name": "Shinespark",
"entranceCondition": {
"comeInShinecharged": {
"framesRequired": 10
},
"comesThroughToilet": "any"
},
"requires": [
"h_canNavigateUnderwater",
"canPrepareForNextRoom",
"canMidairShinespark",
{
"shinespark": {
"frames": 3,
"excessFrames": 0
}
}
],
"note": "Requires Samus to enter in a state that can diagonally spark immediately.",
"devNote": [
"FIXME: The requirement to be in a pose that can spark immediately may not align with the exit condition in the other room.",
"We need a way to make this requirement explicit and take it into account."
]
},
{
"link": [
4,
5
],
"name": "Fish Tank Entry Fall onto Frozen Fish",
"notable": true,
"entranceCondition": {
"comeInNormally": {},
"comesThroughToilet": "no"
},
"requires": [
"h_canNavigateUnderwater",
"canPrepareForNextRoom",
"canTrickyUseFrozenEnemies",
{
"or": [
{
"and": [
"Wave",
"Plasma"
]
},
{
"and": [
"Plasma",
"Charge"
]
},
{
"and": [
"Wave",
"Spazer",
"Charge"
]
}
]
}
],
"note": "Enter on the left side of the door while aiming down and freeze the fish immediately."
},
{
"link": [
4,
5
],
"name": "Damage Boost",
"entranceCondition": {
"comeInNormally": {},
"comesThroughToilet": "no"
},
"requires": [
"Gravity",
"canHorizontalDamageBoost",
"canPrepareForNextRoom",
{
"enemyDamage": {
"enemy": "Skultera",
"hits": 1,
"type": "contact"
}
}
],
"note": "Enter on the left side of the door in order to land on the fish, then Damage Boost to reach the ledge on the right."
},
{
"link": [
4,
5
],
"name": "Fish Tank Entry Reset Fall Speed",
"notable": true,
"entranceCondition": {
"comeInNormally": {},
"comesThroughToilet": "no"
},
"requires": [
"canSuitlessMaridia",
"h_canResetFallSpeed",
"canPrepareForNextRoom"
],
"note": [
"Morph and unmorph before reaching the transition, and then drift to the ledge.",
"Enter the room as far right as possible."
],
"devNote": "FIXME: An enemy can hit Samus where she would unmorph as a way to perform this strat without Morph."
},
{
"link": [
4,
5
],
"name": "Fish Tank Wall Jump Entry",
"notable": true,
"entranceCondition": {
"comeInNormally": {},
"comesThroughToilet": "any"
},
"requires": [
"canSuitlessMaridia",
"canPreciseWalljump",
"canPrepareForNextRoom",
"canMidairWiggle",
"canCarefulJump"
],
"note": [
"Wall jump in the room above, on the right wall of the doorway, immdiately before the door transition. Failure will likely result in a soft lock.",
"To get to the ledge: If the room above has normal physics, hold right in this room. If the room above has water physics, shoot to break spin while holding right in this room."
],
"devNote": [
"Strat starts before entering this transition.",
"FIXME: The midair wiggle is only needed if the room above has water physics. That's not something in the logic for vertical doors currently. Also if the room above is heated, these may require some heat frames to set up."
]
},
{
"link": [
4,
5
],
"name": "G-Mode Morph IBJ",
"entranceCondition": {
"comeInWithGMode": {
"mode": "any",
"morphed": true
},
"comesThroughToilet": "any"
},
"requires": [
"h_canArtificialMorphIBJ",
"Gravity"
],
"note": "Kill or dodge the fish by the top left door."
},
{
"link": [
4,
7
],
"name": "Shinespark",
"entranceCondition": {
"comeInShinecharged": {
"framesRequired": 10
},
"comesThroughToilet": "any"
},
"requires": [
"Gravity",
"canPrepareForNextRoom",
"canMidairShinespark",
{
"shinespark": {
"frames": 70,
"excessFrames": 16
}
}
],
"note": "Immediately spark after the door transition into the wall just to the right of the top right door."
},
{
"link": [
4,
7
],
"name": "Suitless Shinespark",
"entranceCondition": {
"comeInShinecharged": {
"framesRequired": 10
},
"comesThroughToilet": "any"
},
"requires": [
"canSuitlessMaridia",
"canPrepareForNextRoom",
"canMidairShinespark",
{
"shinespark": {
"frames": 88,
"excessFrames": 21
}
}
],
"note": "Immediately spark after the door transition into the wall just to the right of the top right door."
},
{
"link": [
4,
8
],
"name": "Base",
"requires": []
},
{
"link": [
5,
1
],
"name": "Base",
"requires": []
},
{
"link": [
5,
4
],
"name": "Base",
"requires": [
"Gravity",
{
"or": [
"canWalljump",
"h_canFly",
"canUseFrozenEnemies",
"canGravityJump"
]
}
]
},
{
"link": [
5,
4
],
"name": "Suitless Frozen Fish",
"requires": [
"canSuitlessMaridia",
"canUseFrozenEnemies",
{
"or": [
"HiJump",
"canSpringBallJumpMidAir"
]
}
]
},
{
"link": [
5,
4
],
"name": "Rolling Jump",
"requires": [
"canSuitlessMaridia",
"HiJump",
"h_canUseSpringBall"
]
},
{
"link": [
5,
4
],
"name": "Fish Tank Top Left Direct Jump with Gravity",
"notable": true,
"requires": [
"Gravity",
"canTrickyJump"
],
"reusableRoomwideNotable": "Fish Tank Top Left Direct Jump",
"note": "Build up run speed and jump at the last moment to reach the door."
},
{
"link": [
5,
4
],
"name": "Fish Tank Top Left Direct Suitless HiJump",
"notable": true,
"requires": [
"canSuitlessMaridia",
"HiJump",
"canTrickyJump",
{
"or": [
"canFlatleyJump",
"canMomentumConservingTurnaround"
]
}
],
"reusableRoomwideNotable": "Fish Tank Top Left Direct Jump",
"note": [
"Jump towards the door with HiJump equipped.",
"A Flatley style jump can position Samus over the edge of the ledge, closer to the door.",
"Turning around while facing down, just before touching the ceiling, is another way to move Samus a few pixels closer to the door."
]
},
{
"link": [
5,
4
],
"name": "Fish Tank Top Left Direct Suitless Springball Jump",
"notable": true,
"requires": [
"canSuitlessMaridia",
"canTrickySpringBallJump",
{
"or": [
"canTrickyJump",
"canStationaryLateralMidAirMorph"
]
}
],
"reusableRoomwideNotable": "Fish Tank Top Left Direct Jump",
"note": [
"Jump towards the door with a Springball Jump, jumping as late as possible.",
"A Flatley style jump can position Samus over the edge of the ledge, closer to the door, allowing for an earlier Springball jump.",
"The slight fall from a Flatley Jump helps with the Springball jump, but then Samus must unmorph to extend her hitbox to touch the transition.",
"A Stationary Lateral MidAir Morph also helps with this jump.",
"Unmorphing after a missed jump can return Samus to the ledge to try again."
]
},
{
"link": [
5,
5
],
"name": "Crystal Flash",
"requires": [
"h_canCrystalFlash"
]
},
{
"link": [
5,
6
],
"name": "Base",
"requires": [
"h_canNavigateUnderwater"
]
},
{
"link": [
6,
2
],
"name": "Base",
"requires": []
},
{
"link": [
6,
5
],
"name": "Base",
"requires": [
"Gravity"
]
},
{
"link": [
6,
5
],
"name": "Suitless With Jump Assist",
"requires": [
"canSuitlessMaridia",
{
"or": [
"HiJump",
"canSpringBallJumpMidAir"
]
}
]
},
{
"link": [
6,
5
],
"name": "Suitless With Ice",
"requires": [
"canSuitlessMaridia",
"canTrickyJump",
"canTrickyUseFrozenEnemies"
],
"note": [
"Freeze the fish a bit left of the peak in its swim cycle.",
"Build run speed on top of the fish before jumping to the ledge.",
"The positioning is more lenient if the fish is frozen while moving leftward."
]
},
{
"link": [
6,
6
],
"name": "Space Pirate Farm",
"requires": [
{
"or": [
"Gravity",
"HiJump"
]
},
{
"or": [
"Plasma",
{
"and": [
"ScrewAttack",
"Gravity"
]
}
]
},
{
"resetRoom": {
"nodes": [
2,
3
],
"mustStayPut": false
}
},
{
"refill": [
"Energy",
"Missile"
]
}
]
},
{
"link": [
6,
7
],
"name": "Base",
"requires": [
"Gravity",
{
"or": [
"HiJump",
"canWalljump",
"h_canFly",
"canGravityJump",
"canCarefulJump",
"canSpringBallJumpMidAir",
{
"enemyDamage": {
"enemy": "Pink Space Pirate (standing)",
"type": "contact",
"hits": 1
}
},
{
"enemyKill": {
"enemies": [
[
"Pink Space Pirate (standing)"
]
],
"explicitWeapons": [
"Plasma",
"ScrewAttack"
]
}
}
]
}
]
},
{
"link": [
6,
7
],
"name": "Suitless",
"requires": [
"canSuitlessMaridia",
"canCarefulJump",
{
"or": [
"HiJump",
"canSpringBallJumpMidAir"
]
}
]
},
{
"link": [
6,
7
],
"name": "Fish Tank Insane Naked Jump Over Pirate (Left to Right)",
"notable": true,
"requires": [
"canSuitlessMaridia",
"canInsaneJump"
],
"note": "This is particularly precise, and requires subpixel precision."
},
{
"link": [
6,
7
],
"name": "Suitless Frozen Pirate",
"requires": [
"canSuitlessMaridia",
"Plasma",
"canUseFrozenEnemies"
]
},
{
"link": [
7,
3
],
"name": "Base",
"requires": [
"Gravity"
]
},
{
"link": [
7,
3
],
"name": "Suitless",
"requires": [
"canSuitlessMaridia",
{
"or": [
"HiJump",
"canSpringBallJumpMidAir"
]
}
]
},
{
"link": [
7,
6
],
"name": "Base",
"requires": [
"h_canNavigateUnderwater"
]
},
{
"link": [
7,
7
],
"name": "Crystal Flash",
"requires": [
"h_canCrystalFlash"
]
},
{
"link": [
8,
1
],
"name": "Base",
"requires": []
}
]
}