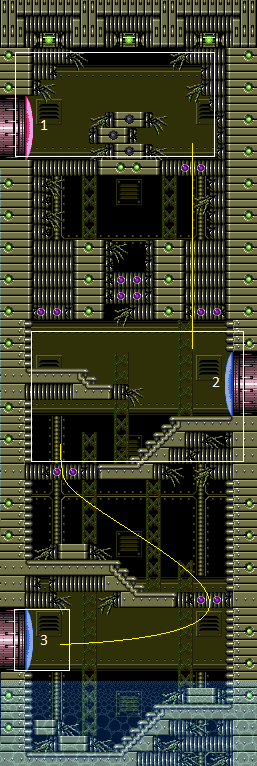
Electric Death Room
Room ID: 166

|
Exit condition: {
"leaveWithRunway": {
"length": 4,
"openEnd": 0
}
}
|
|
|
|
|
|
Exit the previous room with Samus in a standing pose (while grappled). After teleporting, press right to release Grapple while staying standing (not being forced into a crouch). Then X-ray climb to get up to the door transition, without needing to open the door. Entrance condition: {
"comeInWithGrappleTeleport": {
"blockPositions": [
[
2,
18
],
[
2,
19
],
[
2,
29
]
]
}
}
Requires: "canXRayClimb" Bypasses door shell: true |
|
Exit condition: {
"leaveWithRunway": {
"length": 13,
"openEnd": 0,
"steepUpTiles": 3
}
}
|
|
Requires: "h_canCrystalFlash" |
|
Requires: "h_canNavigateUnderwater"
{
"or": [
"Gravity",
"HiJump",
"SpaceJump"
]
}
|
|
Requires: {
"not": "f_DefeatedPhantoon"
}
"canRiskPermanentLossOfAccess"
|
|
Requires: "canSuitlessMaridia" "canDownGrab" |
|
From: 3
Bottom Left Door
To: 1
Top Left Door
Enter with G-mode direct, back up to between 1 and 6 pixels from the door transition, and activate X-ray to get very deep stuck in the door. Climb up 2 screens, and perform a turnaround buffered spin-jump away from the door to trigger the transition, bypassing any lock on the door. Entrance condition: {
"comeInWithGMode": {
"mode": "direct",
"morphed": false
}
}
Requires: "canXRayClimb" Bypasses door shell: true |
|
|
|
Exit condition: {
"leaveWithRunway": {
"length": 1,
"openEnd": 1
}
}
|
{
  "$schema": "../../../schema/m3-room.schema.json",
  "id": 166,
  "name": "Electric Death Room",
  "area": "Wrecked Ship",
  "subarea": "Main",
  "playable": true,
  "roomAddress": "0x7CBD5",
  "roomEnvironments": [
    {
      "heated": false
    }
  ],
  "nodes": [
    {
      "id": 1,
      "name": "Top Left Door",
      "nodeType": "door",
      "nodeSubType": "red",
      "nodeAddress": "0x001a27c",
      "doorEnvironments": [
        {
          "physics": "air"
        }
      ],
      "locks": [
        {
          "name": "Electric Death Room Red Lock (to E-Tank)",
          "lockType": "coloredDoor",
          "lock": [
            "f_DefeatedPhantoon"
          ],
          "unlockStrats": [
            {
              "name": "Base",
              "notable": false,
              "requires": [
                "h_canOpenRedDoors"
              ]
            }
          ],
          "note": "Somehow this door is blue, not red, before Phantoon dies."
        }
      ]
    },
    {
      "id": 2,
      "name": "Right Door",
      "nodeType": "door",
      "nodeSubType": "blue",
      "nodeAddress": "0x001a264",
      "doorEnvironments": [
        {
          "physics": "air"
        }
      ]
    },
    {
      "id": 3,
      "name": "Bottom Left Door",
      "nodeType": "door",
      "nodeSubType": "blue",
      "nodeAddress": "0x001a270",
      "doorEnvironments": [
        {
          "physics": "air"
        }
      ]
    }
  ],
  "enemies": [],
  "links": [
    {
      "from": 1,
      "to": [
        {
          "id": 1
        },
        {
          "id": 2
        }
      ]
    },
    {
      "from": 2,
      "to": [
        {
          "id": 1
        },
        {
          "id": 2
        },
        {
          "id": 3
        }
      ]
    },
    {
      "from": 3,
      "to": [
        {
          "id": 1
        },
        {
          "id": 2
        },
        {
          "id": 3
        }
      ]
    }
  ],
  "strats": [
    {
      "link": [
        1,
        1
      ],
      "name": "Leave with Runway",
      "requires": [],
      "exitCondition": {
        "leaveWithRunway": {
          "length": 4,
          "openEnd": 0
        }
      },
      "devNote": "This runway can be extended almost another half tile, if the ship is off, or with 1 electricity hit."
    },
    {
      "link": [
        1,
        2
      ],
      "name": "Base",
      "requires": []
    },
    {
      "link": [
        2,
        1
      ],
      "name": "Base",
      "requires": []
    },
    {
      "link": [
        2,
        1
      ],
      "name": "Grapple Teleport X-Ray Climb",
      "entranceCondition": {
        "comeInWithGrappleTeleport": {
          "blockPositions": [
            [
              2,
              18
            ],
            [
              2,
              19
            ],
            [
              2,
              29
            ]
          ]
        }
      },
      "requires": [
        "canXRayClimb"
      ],
      "bypassesDoorShell": true,
      "note": [
        "Exit the previous room with Samus in a standing pose (while grappled).",
        "After teleporting, press right to release Grapple while staying standing (not being forced into a crouch).",
        "Then X-ray climb to get up to the door transition, without needing to open the door."
      ]
    },
    {
      "link": [
        2,
        2
      ],
      "name": "Leave with Runway",
      "requires": [],
      "exitCondition": {
        "leaveWithRunway": {
          "length": 13,
          "openEnd": 0,
          "steepUpTiles": 3
        }
      }
    },
    {
      "link": [
        2,
        2
      ],
      "name": "Crystal Flash",
      "requires": [
        "h_canCrystalFlash"
      ]
    },
    {
      "link": [
        2,
        3
      ],
      "name": "Base",
      "requires": [
        "h_canNavigateUnderwater",
        {
          "or": [
            "Gravity",
            "HiJump",
            "SpaceJump"
          ]
        }
      ]
    },
    {
      "link": [
        2,
        3
      ],
      "name": "Unpowered",
      "requires": [
        {
          "not": "f_DefeatedPhantoon"
        },
        "canRiskPermanentLossOfAccess"
      ]
    },
    {
      "link": [
        2,
        3
      ],
      "name": "Down Grab",
      "requires": [
        "canSuitlessMaridia",
        "canDownGrab"
      ]
    },
    {
      "link": [
        3,
        1
      ],
      "name": "Very Deep Stuck X-Ray Climb",
      "entranceCondition": {
        "comeInWithGMode": {
          "mode": "direct",
          "morphed": false
        }
      },
      "requires": [
        "canXRayClimb"
      ],
      "bypassesDoorShell": true,
      "note": [
        "Enter with G-mode direct, back up to between 1 and 6 pixels from the door transition, and activate X-ray to get very deep stuck in the door.",
        "Climb up 2 screens, and perform a turnaround buffered spin-jump away from the door to trigger the transition, bypassing any lock on the door."
      ]
    },
    {
      "link": [
        3,
        2
      ],
      "name": "Base",
      "requires": []
    },
    {
      "link": [
        3,
        3
      ],
      "name": "Leave with Runway",
      "requires": [],
      "exitCondition": {
        "leaveWithRunway": {
          "length": 1,
          "openEnd": 1
        }
      }
    }
  ]
}