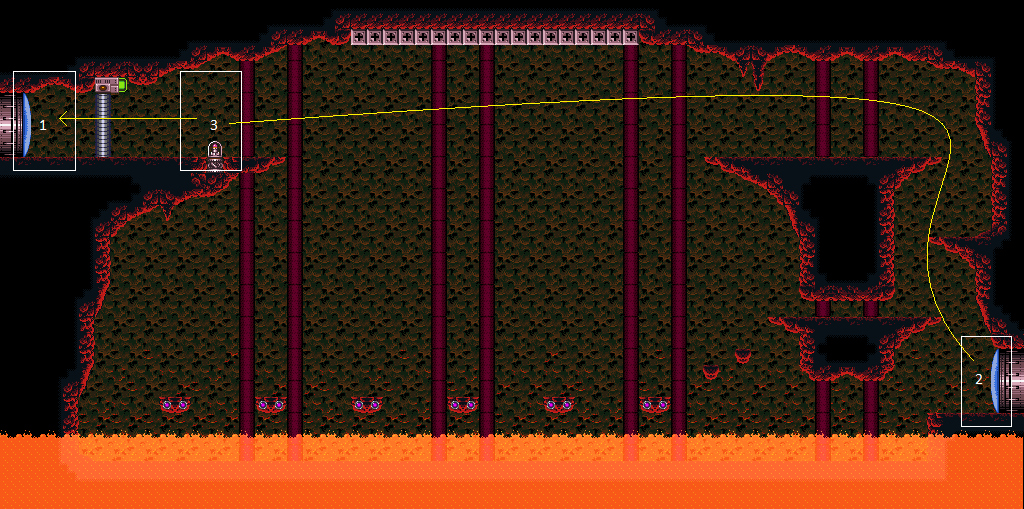
Crocomire Escape
Room ID: 121
|
Exit condition: {
"leaveWithRunway": {
"length": 5,
"openEnd": 0
}
}
|
|
Requires: "h_canHeatedCrystalFlash" |
|
Entrance condition: {
"comeInWithGrappleTeleport": {
"blockPositions": [
[
12,
12
]
]
}
}
|
|
Entrance condition: {
"comeInWithGrappleTeleport": {
"blockPositions": [
[
5,
3
],
[
7,
2
]
]
}
}
Requires: {
"heatFrames": 45
}
|
|
Entrance condition: {
"comeInWithGrappleTeleport": {
"blockPositions": [
[
3,
12
],
[
3,
13
]
]
}
}
Bypasses door shell: true |
|
Entrance condition: {
"comeInWithGrappleTeleport": {
"blockPositions": [
[
3,
12
]
]
}
}
Exit condition: {
"leaveWithGrappleTeleport": {
"blockPositions": [
[
3,
12
]
]
}
}
Bypasses door shell: true |
|
From: 2
Right Door
To: 1
Left Door
Entrance condition: {
"comeInWithGrappleTeleport": {
"blockPositions": [
[
3,
13
]
]
}
}
Exit condition: {
"leaveWithGrappleTeleport": {
"blockPositions": [
[
3,
13
]
]
}
}
Bypasses door shell: true |
|
Exit the previous room with Samus in a standing pose (while grappled). After teleporting, press right to release Grapple while staying standing (not being forced into a crouch). Then X-ray climb to get up to the door transition, without needing to open the door. Samus will not be visible during the climb. Entrance condition: {
"comeInWithGrappleTeleport": {
"blockPositions": [
[
2,
18
],
[
2,
19
],
[
2,
28
],
[
2,
29
]
]
}
}
Requires: "canXRayClimb"
{
"heatFrames": 1600
}
Bypasses door shell: true |
|
Exit condition: {
"leaveWithRunway": {
"length": 5,
"openEnd": 1
}
}
|
|
Requires: "h_heatProof"
{
"canShineCharge": {
"usedTiles": 15,
"openEnd": 2
}
}
Exit condition: {
"leaveShinecharged": {
"framesRemaining": 15
}
}
|
|
From: 2
Right Door
To: 2
Right Door
Notable: true 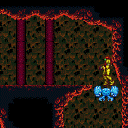

Enter from the right door and spin jump onto the first ledge while barely landing on the ledge in order to prevent getting the Geruta on camera. Walk against the left wall and jump to trigger the Geruta. It should now be moving leftwards. Stand on the next platform against the right wall and shoot the Geruta to get it one shot away from being frozen. After a few swoops, it will come down; either freeze it or tank a hit. Then go up and stand on the corner and freeze it when it is in position. The Geruta will be stuck below and keep swooping, so if Energy permits, Samus will have several attempts. Quickly shinecharge left to right, kill the Geruta and spark out the bottom right door. Entrance condition: {
"comeInNormally": {}
}
Requires: "h_canTrickyFrozenEnemyRunway"
"canCarefulJump"
{
"canShineCharge": {
"usedTiles": 17,
"openEnd": 1
}
}
"canShinechargeMovementTricky"
{
"heatFrames": 1260
}
{
"shinespark": {
"frames": 2,
"excessFrames": 0
}
}
Exit condition: {
"leaveWithSpark": {}
}
|
|
Requires: "h_canHeatedCrystalFlash" |
|
Requires: "Grapple"
{
"heatFrames": 600
}
|
|
Requires: "SpaceJump"
{
"heatFrames": 600
}
|
|
Requires: "HiJump"
"SpeedBooster"
"canWalljump"
{
"heatFrames": 600
}
|
|
Requires: "h_canJumpIntoIBJ"
{
"heatFrames": 1650
}
|
|
Kill the Dragon with bombs, then start the IBJ in the lava. It's an option without canJumpIntoIBJ. Requires: "h_heatProof" "Gravity" "h_canIBJ" |
|
Requires: "HiJump"
"canSpringBallJumpMidAir"
{
"heatFrames": 600
}
|
|
Notable: true 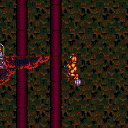
Uses a bomb boost at the end of a mid-air SpringBall jump. Also requires a crouchjump and downgrab to complete the maneuver. Requires: "canSpringBallJumpMidAir"
"canUnmorphBombBoost"
"h_canCrouchJumpDownGrab"
{
"heatFrames": 800
}
|
|
Notable: true 
Do a series of mid-air SpringBall jumps to bring the Geruta over, then freeze it and step on it. Requires: "canTrickyUseFrozenEnemies"
"canSpringBallJumpMidAir"
{
"heatFrames": 1600
}
{
"enemyDamage": {
"enemy": "Geruta",
"type": "contact",
"hits": 1
}
}
|
|
Lure the Geruta left by jumping towards it from below. Freeze it and use it as a platform. Requires: "canUseFrozenEnemies"
"HiJump"
{
"heatFrames": 1150
}
|
|
Notable: true 
Ride the Geruta left to reach the missile location by freezing it repeatedly. Stay on its left side when it touches the ceiling for the enemy to continue moving forward. It may not be possible to climb back up to the Geruta if Samus falls. When it moves towards the ceiling, reset Samus' fall speed using an unmorph or by taking knockback damage, in order to wait for the Geruta to fall low enough to refreeze. Requires: "canTrickyUseFrozenEnemies"
"canCarefulJump"
{
"or": [
"canResetFallSpeed",
{
"and": [
"canNeutralDamageBoost",
{
"enemyDamage": {
"enemy": "Geruta",
"type": "contact",
"hits": 3
}
}
]
}
]
}
{
"heatFrames": 3000
}
|
|
Watch out for the Geruda. Running left before jumping to bring it on camera will make it swoop left. Entrance condition: {
"comeInShinecharged": {
"framesRequired": 110
}
}
Requires: "canHorizontalShinespark"
{
"shinespark": {
"frames": 70,
"excessFrames": 12
}
}
"canShinechargeMovementComplex"
{
"heatFrames": 330
}
|
|
Watch out for the Geruda. Running left before jumping to bring it on camera will make it swoop left. Entrance condition: {
"comeInShinecharging": {
"length": 4,
"openEnd": 0
}
}
Requires: "canHorizontalShinespark"
{
"shinespark": {
"frames": 70,
"excessFrames": 12
}
}
"canShinechargeMovementComplex"
{
"heatFrames": 330
}
|
|
Requires: "canHorizontalShinespark"
{
"canShineCharge": {
"usedTiles": 15,
"openEnd": 2
}
}
{
"shinespark": {
"frames": 50
}
}
{
"heatFrames": 600
}
|
|
From: 2
Right Door
To: 3
Item
Notable: true
Enter from the right door and spin jump onto the first ledge while barely landing on the ledge in order to prevent getting the Geruta on camera. Walk against the left wall and jump to trigger the Geruta. It should now be moving leftwards. Stand on the next platform against the right wall and shoot the Geruta to get it one shot away from being frozen. After a few swoops, it will come down; either freeze it or tank a hit. Then go up and stand on the corner and freeze it when it is in position. The Geruta will be stuck below and keep swooping, so if Energy permits, Samus will have several attempts. With full heat protection, Samus can quickly shinecharge left to right then run and spark midair to the left to save Energy. Entrance condition: {
"comeInNormally": {}
}
Requires: "h_canTrickyFrozenEnemyRunway"
"canCarefulJump"
"canHorizontalShinespark"
{
"canShineCharge": {
"usedTiles": 17,
"openEnd": 1
}
}
{
"heatFrames": 1050
}
{
"or": [
{
"shinespark": {
"frames": 55,
"excessFrames": 15
}
},
{
"and": [
"h_heatProof",
"canMidairShinespark",
{
"shinespark": {
"frames": 32,
"excessFrames": 15
}
}
]
}
]
}
|
|
Requires: {
"ammo": {
"type": "Super",
"count": 1
}
}
{
"heatFrames": 180
}
|
|
Requires: {
"ammo": {
"type": "Super",
"count": 1
}
}
{
"heatFrames": 160
}
Exit condition: {
"leaveWithRunway": {
"length": 17,
"openEnd": 1
}
}
|
|
Requires: "Grapple"
{
"heatFrames": 500
}
|
|
Requires: "SpaceJump"
{
"heatFrames": 500
}
|
|
This can be done from the top right, single tile block. Requires: "HiJump"
"SpeedBooster"
{
"heatFrames": 500
}
|
|
This can be done from the top right, single tile block. Requires: "HiJump"
"canWalljump"
{
"heatFrames": 600
}
|
|
Requires: "Morph"
{
"heatFrames": 400
}
|
|
Requires: {
"heatFrames": 350
}
{
"or": [
{
"lavaFrames": 70
},
{
"and": [
"Gravity",
{
"lavaFrames": 45
}
]
}
]
}
{
"or": [
"canCarefulJump",
{
"enemyDamage": {
"enemy": "Dragon",
"type": "contact",
"hits": 1
}
},
{
"enemyKill": {
"enemies": [
[
"Dragon"
]
],
"explicitWeapons": [
"Super",
"Missile",
"Plasma",
"ScrewAttack"
]
}
}
]
}
|
|
This strat just waits out the Dragon. Requires: "h_heatProof" "Gravity" |
|
Requires: "h_canHeatedCrystalFlash" |
{
"$schema": "../../../schema/m3-room.schema.json",
"id": 121,
"name": "Crocomire Escape",
"area": "Norfair",
"subarea": "Upper",
"subsubarea": "West",
"playable": true,
"roomAddress": "0x7AA0E",
"roomEnvironments": [
{
"heated": true
}
],
"nodes": [
{
"id": 1,
"name": "Left Door",
"nodeType": "door",
"nodeSubType": "blue",
"nodeAddress": "0x0019402",
"doorEnvironments": [
{
"physics": "air"
}
]
},
{
"id": 2,
"name": "Right Door",
"nodeType": "door",
"nodeSubType": "blue",
"nodeAddress": "0x001940e",
"doorEnvironments": [
{
"physics": "air"
}
]
},
{
"id": 3,
"name": "Item",
"nodeType": "item",
"nodeSubType": "visible",
"nodeItem": "Missile",
"nodeAddress": "0x78BC0",
"devNote": "Z3M3: Norfair Croc"
}
],
"enemies": [
{
"id": "e1",
"groupName": "Crocomire Escape Geruta",
"enemyName": "Geruta",
"quantity": 1,
"homeNodes": [
2
],
"dropRequires": [
"h_heatProof"
]
},
{
"id": "e2",
"groupName": "Crocomire Escape Dragons",
"enemyName": "Dragon",
"quantity": 5,
"homeNodes": [
2
],
"dropRequires": [
"h_heatProof",
{
"or": [
"Gravity",
"Grapple"
]
}
]
}
],
"reusableRoomwideNotable": [
{
"name": "Croc Escape Frozen Geruta Shinecharge",
"note": [
"Enter from the right door and spin jump onto the first ledge while barely landing on the ledge in order to prevent getting the Geruta on camera.",
"Walk against the left wall and jump to trigger the Geruta. It should now be moving leftwards.",
"Stand on the next platform against the right wall and shoot the Geruta to get it one shot away from being frozen.",
"After a few swoops, it will come down; either freeze it or tank a hit. Then go up and stand on the corner and freeze it when it is in position.",
"The Geruta will be stuck below and keep swooping, so if Energy permits, Samus will have several attempts."
]
}
],
"links": [
{
"from": 1,
"to": [
{
"id": 1
},
{
"id": 3
}
]
},
{
"from": 2,
"to": [
{
"id": 1
},
{
"id": 2
},
{
"id": 3
}
]
},
{
"from": 3,
"to": [
{
"id": 1
},
{
"id": 2
},
{
"id": 3
}
]
}
],
"strats": [
{
"link": [
1,
1
],
"name": "Leave with Runway",
"requires": [],
"exitCondition": {
"leaveWithRunway": {
"length": 5,
"openEnd": 0
}
}
},
{
"link": [
1,
1
],
"name": "Crystal Flash",
"requires": [
"h_canHeatedCrystalFlash"
]
},
{
"link": [
1,
3
],
"name": "Grapple Teleport",
"entranceCondition": {
"comeInWithGrappleTeleport": {
"blockPositions": [
[
12,
12
]
]
}
},
"requires": []
},
{
"link": [
2,
1
],
"name": "Grapple Teleport",
"entranceCondition": {
"comeInWithGrappleTeleport": {
"blockPositions": [
[
5,
3
],
[
7,
2
]
]
}
},
"requires": [
{
  "heatFrames": 45
}
]
},
{
"link": [
2,
1
],
"name": "Grapple Teleport Door Lock Skip",
"entranceCondition": {
"comeInWithGrappleTeleport": {
"blockPositions": [
[
3,
12
],
[
3,
13
]
]
}
},
"requires": [],
"bypassesDoorShell": true
},
{
"link": [
2,
1
],
"name": "Carry Grapple Teleport (Top Position)",
"entranceCondition": {
"comeInWithGrappleTeleport": {
"blockPositions": [
[
3,
12
]
]
}
},
"requires": [],
"bypassesDoorShell": true,
"exitCondition": {
"leaveWithGrappleTeleport": {
"blockPositions": [
[
3,
12
]
]
}
}
},
{
"link": [
2,
1
],
"name": "Carry Grapple Teleport (Bottom Position)",
"entranceCondition": {
"comeInWithGrappleTeleport": {
"blockPositions": [
[
3,
13
]
]
}
},
"requires": [],
"bypassesDoorShell": true,
"exitCondition": {
"leaveWithGrappleTeleport": {
"blockPositions": [
[
3,
13
]
]
}
}
},
{
"link": [
2,
1
],
"name": "Grapple Teleport X-Ray Climb",
"entranceCondition": {
"comeInWithGrappleTeleport": {
"blockPositions": [
[
2,
18
],
[
2,
19
],
[
2,
28
],
[
2,
29
]
]
}
},
"requires": [
"canXRayClimb",
{
"heatFrames": 1600
}
],
"bypassesDoorShell": true,
"note": [
"Exit the previous room with Samus in a standing pose (while grappled).",
"After teleporting, press right to release Grapple while staying standing (not being forced into a crouch).",
"Then X-ray climb to get up to the door transition, without needing to open the door.",
"Samus will not be visible during the climb."
]
},
{
"link": [
2,
2
],
"name": "Leave with Runway",
"requires": [],
"exitCondition": {
"leaveWithRunway": {
"length": 5,
"openEnd": 1
}
}
},
{
"link": [
2,
2
],
"name": "Short Short Charge Leave Shinecharged",
"requires": [
"h_heatProof",
{
"canShineCharge": {
"usedTiles": 15,
"openEnd": 2
}
}
],
"exitCondition": {
"leaveShinecharged": {
"framesRemaining": 15
}
}
},
{
"link": [
2,
2
],
"name": "Croc Escape Frozen Geruta Shinecharge (Shinespark Out Right)",
"reusableRoomwideNotable": "Croc Escape Frozen Geruta Shinecharge",
"notable": true,
"entranceCondition": {
"comeInNormally": {}
},
"requires": [
"h_canTrickyFrozenEnemyRunway",
"canCarefulJump",
{
"canShineCharge": {
"usedTiles": 17,
"openEnd": 1
}
},
"canShinechargeMovementTricky",
{
"heatFrames": 1260
},
{
"shinespark": {
"frames": 2,
"excessFrames": 0
}
}
],
"exitCondition": {
"leaveWithSpark": {}
},
"unlocksDoors": [
{
"types": [
"ammo"
],
"requires": []
}
],
"note": [
"Enter from the right door and spin jump onto the first ledge while barely landing on the ledge in order to prevent getting the Geruta on camera.",
"Walk against the left wall and jump to trigger the Geruta. It should now be moving leftwards.",
"Stand on the next platform against the right wall and shoot the Geruta to get it one shot away from being frozen.",
"After a few swoops, it will come down; either freeze it or tank a hit. Then go up and stand on the corner and freeze it when it is in position.",
"The Geruta will be stuck below and keep swooping, so if Energy permits, Samus will have several attempts.",
"Quickly shinecharge left to right, kill the Geruta and spark out the bottom right door."
]
},
{
"link": [
2,
2
],
"name": "Crystal Flash",
"requires": [
"h_canHeatedCrystalFlash"
]
},
{
"link": [
2,
3
],
"name": "Grapple",
"requires": [
"Grapple",
{
"heatFrames": 600
}
]
},
{
"link": [
2,
3
],
"name": "Space Jump",
"requires": [
"SpaceJump",
{
"heatFrames": 600
}
]
},
{
"link": [
2,
3
],
"name": "Speedjump",
"requires": [
"HiJump",
"SpeedBooster",
"canWalljump",
{
"heatFrames": 600
}
]
},
{
"link": [
2,
3
],
"name": "Croc Escape Jump IBJ",
"requires": [
"h_canJumpIntoIBJ",
{
"heatFrames": 1650
}
]
},
{
"link": [
2,
3
],
"name": "Croc Escape Lava IBJ",
"requires": [
"h_heatProof",
"Gravity",
"h_canIBJ"
],
"note": "Kill the Dragon with bombs, then start the IBJ in the lava. It's an option without canJumpIntoIBJ."
},
{
"link": [
2,
3
],
"name": "MidAir SpringBall",
"requires": [
"HiJump",
"canSpringBallJumpMidAir",
{
"heatFrames": 600
}
]
},
{
"link": [
2,
3
],
"name": "Croc Escape SpringBall Bomb Boost",
"notable": true,
"requires": [
"canSpringBallJumpMidAir",
"canUnmorphBombBoost",
"h_canCrouchJumpDownGrab",
{
"heatFrames": 800
}
],
"note": [
"Uses a bomb boost at the end of a mid-air SpringBall jump.",
"Also requires a crouchjump and downgrab to complete the maneuver."
]
},
{
"link": [
2,
3
],
"name": "Croc Escape SpringBall Freeze",
"notable": true,
"requires": [
"canTrickyUseFrozenEnemies",
"canSpringBallJumpMidAir",
{
"heatFrames": 1600
},
{
"enemyDamage": {
"enemy": "Geruta",
"type": "contact",
"hits": 1
}
}
],
"note": "Do a series of mid-air SpringBall jumps to bring the Geruta over, then freeze it and step on it."
},
{
"link": [
2,
3
],
"name": "Croc Escape HiJump Freeze",
"requires": [
"canUseFrozenEnemies",
"HiJump",
{
"heatFrames": 1150
}
],
"note": "Lure the Geruta left by jumping towards it from below. Freeze it and use it as a platform."
},
{
"link": [
2,
3
],
"name": "Croc Escape Ice Only Geruta Platforming",
"notable": true,
"requires": [
"canTrickyUseFrozenEnemies",
"canCarefulJump",
{
"or": [
"canResetFallSpeed",
{
"and": [
"canNeutralDamageBoost",
{
"enemyDamage": {
"enemy": "Geruta",
"type": "contact",
"hits": 3
}
}
]
}
]
},
{
"heatFrames": 3000
}
],
"note": [
"Ride the Geruta left to reach the missile location by freezing it repeatedly.",
"Stay on its left side when it touches the ceiling for the enemy to continue moving forward.",
"It may not be possible to climb back up to the Geruta if Samus falls.",
"When it moves towards the ceiling, reset Samus' fall speed using an unmorph or by taking knockback damage, in order to wait for the Geruta to fall low enough to refreeze."
]
},
{
"link": [
2,
3
],
"name": "Enter with Shinespark Stored",
"entranceCondition": {
"comeInShinecharged": {
"framesRequired": 110
}
},
"requires": [
"canHorizontalShinespark",
{
"shinespark": {
"frames": 70,
"excessFrames": 12
}
},
"canShinechargeMovementComplex",
{
"heatFrames": 330
}
],
"note": "Watch out for the Geruda. Running left before jumping to bring it on camera will make it swoop left."
},
{
"link": [
2,
3
],
"name": "Enter Shinecharging",
"entranceCondition": {
"comeInShinecharging": {
"length": 4,
"openEnd": 0
}
},
"requires": [
"canHorizontalShinespark",
{
"shinespark": {
"frames": 70,
"excessFrames": 12
}
},
"canShinechargeMovementComplex",
{
"heatFrames": 330
}
],
"note": "Watch out for the Geruda. Running left before jumping to bring it on camera will make it swoop left."
},
{
"link": [
2,
3
],
"name": "Croc Escape Short Short Charge",
"requires": [
"canHorizontalShinespark",
{
"canShineCharge": {
"usedTiles": 15,
"openEnd": 2
}
},
{
"shinespark": {
"frames": 50
}
},
{
"heatFrames": 600
}
]
},
{
"link": [
2,
3
],
"name": "Croc Escape Frozen Geruta Shinecharge (Shinespark Left)",
"reusableRoomwideNotable": "Croc Escape Frozen Geruta Shinecharge",
"notable": true,
"entranceCondition": {
"comeInNormally": {}
},
"requires": [
"h_canTrickyFrozenEnemyRunway",
"canCarefulJump",
"canHorizontalShinespark",
{
"canShineCharge": {
"usedTiles": 17,
"openEnd": 1
}
},
{
"heatFrames": 1050
},
{
"or": [
{
"shinespark": {
"frames": 55,
"excessFrames": 15
}
},
{
"and": [
"h_heatProof",
"canMidairShinespark",
{
"shinespark": {
"frames": 32,
"excessFrames": 15
}
}
]
}
]
}
],
"note": [
"Enter from the right door and spin jump onto the first ledge while barely landing on the ledge in order to prevent getting the Geruta on camera.",
"Walk against the left wall and jump to trigger the Geruta. It should now be moving leftwards.",
"Stand on the next platform against the right wall and shoot the Geruta to get it one shot away from being frozen.",
"After a few swoops, it will come down; either freeze it or tank a hit. Then go up and stand on the corner and freeze it when it is in position.",
"The Geruta will be stuck below and keep swooping, so if Energy permits, Samus will have several attempts.",
"With full heat protection, Samus can quickly shinecharge left to right then run and spark midair to the left to save Energy."
]
},
{
"link": [
3,
1
],
"name": "Base",
"requires": [
{
"ammo": {
"type": "Super",
"count": 1
}
},
{
"heatFrames": 180
}
]
},
{
"link": [
3,
1
],
"name": "Leave with Runway",
"requires": [
{
"ammo": {
"type": "Super",
"count": 1
}
},
{
"heatFrames": 160
}
],
"exitCondition": {
"leaveWithRunway": {
"length": 17,
"openEnd": 1
}
},
"unlocksDoors": [
{
"types": [
"missiles"
],
"requires": [
{
"heatFrames": 70
}
]
},
{
"types": [
"super"
],
"requires": []
},
{
"types": [
"powerbomb"
],
"requires": [
{
"heatFrames": 120
}
]
}
]
},
{
"link": [
3,
2
],
"name": "Grapple",
"requires": [
"Grapple",
{
"heatFrames": 500
}
]
},
{
"link": [
3,
2
],
"name": "Space Jump",
"requires": [
"SpaceJump",
{
"heatFrames": 500
}
]
},
{
"link": [
3,
2
],
"name": "Speedjump",
"requires": [
"HiJump",
"SpeedBooster",
{
"heatFrames": 500
}
],
"note": "This can be done from the top right, single tile block."
},
{
"link": [
3,
2
],
"name": "HiJump",
"requires": [
"HiJump",
"canWalljump",
{
"heatFrames": 600
}
],
"note": "This can be done from the top right, single tile block."
},
{
"link": [
3,
2
],
"name": "Morph",
"requires": [
"Morph",
{
"heatFrames": 400
}
]
},
{
"link": [
3,
2
],
"name": "Quick Lava Bath",
"requires": [
{
"heatFrames": 350
},
{
"or": [
{
"lavaFrames": 70
},
{
"and": [
"Gravity",
{
"lavaFrames": 45
}
]
}
]
},
{
"or": [
"canCarefulJump",
{
"enemyDamage": {
"enemy": "Dragon",
"type": "contact",
"hits": 1
}
},
{
"enemyKill": {
"enemies": [
[
"Dragon"
]
],
"explicitWeapons": [
"Super",
"Missile",
"Plasma",
"ScrewAttack"
]
}
}
]
}
]
},
{
"link": [
3,
2
],
"name": "Safe Lava Bath",
"requires": [
"h_heatProof",
"Gravity"
],
"note": "This strat just waits out the Dragon."
},
{
"link": [
3,
3
],
"name": "Crystal Flash",
"requires": [
"h_canHeatedCrystalFlash"
]
}
]
}